
THarrison351
-
Posts
1,502 -
Joined
-
Last visited
Content Type
Profiles
Forums
Events
Gallery
Everything posted by THarrison351
-
 Thanks! Thank you! Thanks! Thank you! Yes! I'd like to see one! Thanks! A cut above the wheel arch and lot of setting solution! Thank you!
 -
This is a 1993 release of the seventies cars AMT released of Lennie Pond, Bobby Allison, Donnie Allison, Gordon Johncock, and Benny Parsons. I also picked up the terrible decals that were released at the time for this kit. I'd always planned to do the Lennie Pond car, but the decals were such a disappointment. A decade or so ago I found some bad copies of the original kit decals. The first set sent to me were a bad copy, so the seller sent another set. Not much better. Eventually, I found the Bobby Allison's decals as a compromise. AMT has now rererereleased the kit with ok decals and I planned to get that one. Then Ace decals released a beautiful set of full markings for Lennie's car. They're not perfect, but pretty nice. I started building this in the nineties, the incorrect front facia was used for some reason, and I guess I tossed the other. I made my own front and rear spoiler from thin metal. I used PPE wheels because the included wheels are just odd. The colors are all off from the few pictures I can find. So my use of Rustoleum 2X Gloss Marigold is close, but not quite there. It replaces a model of the original kit I built in the seventies with no paint and lots of glue! Thanks for looking! This is what was in the box. The first set of decals are to the left, Lennie Pond reprints in the middle and the Bobby Allison set on the right. I have plans for the Allison decals.
-
No credible source that really defines which cars were used Racing Reference just says Plymouth, but Petty ran the Superbird on the faster tracks and the Road Runner on the rest of the tracks. The best I can tell is three races, Rockingham, Atlanta, and Dover. There are pictures. The rest of his wins are all short tracks, road courses, or dirt and from everything I've ever read, Petty didn't run a Superbird on these.
-
Finally, finished. Another gift kit from my son. Not my best work, but considering the condition of the kit, I'm okay with it. This so far has been the most poorly molded kit I've ever built. The dies were really offset, leading to some wonky, warped parts. And the really weird thing is, I built this same exact kit when Testors released it when I was a kid and don't remember it being difficult. I also built the Lotus Ford at the same time and have that one to build now as well, and it looks poorly molded too. It was almost fifty years ago, so memory is a bit spotty. I modified the body to look somewhat like Mario Andretti's Sebring winner. The MPC kit would have been a better choice to start with. Tamiya paint, Starfighter, and Indycal decals. Thanks for looking!
-
Danbury Mint 1941 Cadillac Fleetwood Series 61 Special
THarrison351 replied to THarrison351's topic in Diecast Corner
In the first photo is how I received it as I recall. So, all the pieces you see in the photo were already off. By what I've written in the text, I glued the front suspension back to the places where the screws attach. I'm guessing three screws come in from the top. It looks like some more disassembly to remove the screws. The way I've had to repair other Mint diecasts, this involves breaking glue joints as well as screw removal. I wish I had more information to help, but mine had been broken from the screw mounts. -
Gas Ronda's '69 Ford Mustang Funny Car
THarrison351 replied to W-409's topic in WIP: Drag Racing Models
Good luck with this. I finished this kit earlier in the year. I shortened the frame 3/16" once I realize the wheelbase was too long. OK kit otherwise. The decals even did reasonably well considering they're Slixx and so old. -
Why do you model?
THarrison351 replied to Matt Bacon's topic in General Automotive Talk (Trucks and Cars)
I can't afford the cost or the space to build the 1:1s -
How Important is Box Art
THarrison351 replied to Biggu's topic in General Automotive Talk (Trucks and Cars)
I only know if what was on the inside in no way matched what was outside, a lot of purchases would never been made. Every Palmer kit ever made. And later on, RC2 let go a lot of models that did not match what was inside. -
Thanks! Thank you! Thanks! Thank you! Thanks! Thank you! Thanks! Yeah, I started a bunch of models when I was in the Air Force as a flying crew chief and would get deployed. I'd take the partly finished kits and my supplies and finish them. I had accumulated quite the stockpile when I moved from NC to California and circumstances changed. Then I moved again and they all went to storage. Now I have a dedicated building space and I'm knocking them out. On;y a few of those left. Thank you! Thanks! I'm finally seeing a light at the end of the unfinished builds tunnel! Thank you! It's over Mr. Primer Surfacer 1000 grey Thanks! Thank you! Thanks! Thank you! Thanks! Thank you! Thanks! Thank you! I'm gld Hobby Lobby still has Testors Lacquers in stock! Thanks!
-
Freshly finished after hibernating for thirty plus years. I added a few decals from a later kit. Also, I stole the red stripes from leftover Wallace NASCAR MGD decals. Testors icy blue paint, the only big frustration was the chrome bits that AMT created to convert it from the 68 Road Runner to this GTX. The grill is too shallow and the trunk insert is just poorly rendered. I can't even blame old molds because it's the first run. Last picture was how I found it in the box. I'd started it and put it away in the early nineties. Thanks for looking!
-
I received three fresh from their boxes Franklin Mint cars for my birthday this week. The 1915 Stutz Bearcat, 1954 Mercedes-Benz W196R, and 1954 Mercedes-Benz 300 SL Gull-Wing. The Stutz did not appear to have ever been displayed. It still had its factory wrapping taped in place. The W196 came without papers, but those are never that important to me. It's how cheap they are. I already had the Stutz and Gull Wing as rebuilders and still paid less for these than I did for them years ago and these aren't damaged and have boxes! Now if anyone is interested, my other Stutz and Gull Wing are for sale. PM me. They are going for less than I paid, plus shipping. The issues are no wipers and slowly disintegrating tires on the Gull Wing. No cowl lights, or horn bell, bent front axle, and repaired bumper. They still display well in a case.
-
Looks nice! I've just restarted mine. It was first started in 1990 and after all the prep was complete, put away. I just put some Testors Icy Blue paint on the body, and the interior will be parchment.
-
Don Schumacher "Revell's Super Shoe " Vega Funny Car
THarrison351 replied to THarrison351's topic in Drag Racing
Thanks! Thank you! Thanks! Great story! Thank you! Thanks! -
Another one completed! This one was a gift from my wife a couple of decades ago. It's a re-release from the mid nineties. Revell didn't do much to make sure that the molds were in great shape. They were offset with lots of flash, even on the ejector pins. It turned out ok, but to build one is not for beginners. I have two more Revell funny cars from more recent releases. They have different wheels and better tires. I'm hoping the molds are fixed too! Paint is Tamiya and the decals were difficult. Hard to match the color. The only mod I made was the extended spoiler made from plastic sheet. Thanks for looking!
-
About an hour and a half to two hours a day during the week and a bit longer on the weekends depending on other obligations
-
Thanks! Thank You! Thanks! Thank You! Thanks! Thank You! Thanks! Thank You! Thanks! Thank You! Cool conversion! Thanks! Thank You! Thanks! Thank You! Thanks!
-
Here's another one started decades ago and put away. I built a Boss 302 Eliminator many years ago, but it's one of those prepainted ProShop models. I included it in a side by side. These are fairly easy to build kits considering the age and origins. Paint is Tamiya dark green with pearl. I pre drilled the distributor way back when so I added the wires. Thanks for looking!
- 19 replies
-
- 11
-

-
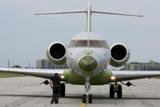
Thanks so much! Many years ago I was at an air show and the Breitling Connie was there. I'd seen plenty of pictures, but to see it fly was something else. Thank you! Thanks! Thank you! Yeah, they started as cargo aircraft, C-121s. Then some were converted to AWACS with the big antennas on the top and bottom. This aircraft and another like it were once like that too, but the antennas were removed for their Vietnam mission.
-
My son got this for me several years ago because he knows the Connie is one my favorite aircraft. Tiniest scale model I've ever built. The least detailed also. Reference material is really lacking. Colors were not what I hoped for, but it is what it is. Relatively easy build, the biggest issue were the gear doors. I added some thin wire to reinforce the attachment. Not a weathering person either. I like factory fresh. I added a few extra decals from a nice Caracal decals set. Paint is all Tamiya. I have four aircraft left in my stash, and the plan is build one a year until they're finished. Thanks for looking! Decal sheet did not include prop ring of death stripes, plus they were terribly out of registration. The insignia was especially affected. The Caracal decals were a good cover. Both were made by Cartograph Weirdly cambered nose wheels, but the axles are not moled that way. I may have overdid it a bit. Props are pitched for reverse Other than flight controls, there are no panel or door lines on the fuse and wings. Gear details were meh First paint, this and the light green were the only colors I was relatively happy with. The olive drab was too light. First prime, going to need a few more spots of putty.
-
Project X! Excellent!
-
Thanks! Thank you! Thanks! Thank you! Thanks! Yeah the hood could close without the hoses. They are too wide. They sit down on the valve covers. The left exhaust manifold hits the crossmember, that's why it sits crooked. Seen someone else's build that has the same problem on Youtube. I'd have to tear it all apart to fix it, so the easiest fix is to remove the hoses for now. Thank you! Yeah, I agree! Thanks! Yeah, it's crooked because the left exhaust manifold hits the crossmember. Seen someone else's build that has the same problem on Youtube. I'd have to tear it all apart to fix it, so the easiest fix is to remove the hoses for now. Thank you! I'd have to tear it all apart to fix it, so the easiest fix is to remove the hoses for now. Thanks! Thank you! Thanks! Thank you!
-
Another one I started decades ago. It was the 1994 issue and I painted it with a lovely shade of gold. Unfortunately it was too hot and went through the primer and wrinkled the plastic. I just put it away and moved on. I pulled it out a few weeks ago and dunked it in the purple soup. The paint came off, but the plastic was ruined. So, I ordered the Jolly Green Gasser kit and used the body, decals, slicks, and green tinted plastic. Everything else was as it came in the old box. I used Testors Metallic green, but it just didn't want to lay down well. If I use it in the future, I'll decant, and airbrush it. The hood won't shut with the air intake hoses. We'll executed AMT! I'm guessing when they added these parts in the seventies, no one tried to see if they'd fit. I've just realized these wheels are not kit originals. I have no idea what I robbed them from, They were in the box and painted. Anyways it's finished. Other than the body parts, from the gasser kit, everything below was how I left it three decades ago. The white and chrome parts are a little beat up. I could have used the gasser chrome, but it's not that great to be new. Here's the body, hood and trunk lid after the purple pond. I'm going to keep it and used the custom parts for a future build. Lots of sanding and smoothing. Hopefully, it won't take three decades to finish!
-
delete
-
Or the Coca-Cola logos that have been missing since the original releases
-
Thanks! I've had some warped bodies and chassis, but so many parts on this were out of shape. Thank you! Thanks! Thank you! Tamiya paints are hard to beat! Thanks! Thank you! I look forward to seeing yours finished!
