hedotwo
-
Posts
1,551 -
Joined
-
Last visited
Content Type
Profiles
Forums
Events
Gallery
Everything posted by hedotwo
-
 To finally be able to put the wraps on my C/10/Winnebago conversions project I found time to finish changing the Greenlight diecast Winnebago trailer to match the colors and striping style on ours. The trailer wasn't identical to our 64 fifteen foot but hey, I was tickled to see something this close available. Rather than the tedious job of masking/painting the red striping I used lacquer thinner (the pic shows ELO but that didn't work) on a rag and gently wiped the original gold striping away and then creating the new striping. I found a package of like 5 different widths of red paper masking tape on Amazon and then created the style of the stripes and "W" we had. Was using tape ideal? Nope but it looks good to me. I also replaced the original wheel/tire combo with silver painted steelies and whitewalls, as we had, and disassembled the trailer to be able to change the colors on the inside as well to those close to what we had. So this project is now in the display case and I'm really happy with it. Thanks for all the nice comments on this build. I'm including one of the only photos of both the truck and trailer that has survived in the past 47 years. I'm sitting with my now 49 year old daughter ?! The other old pic is of my wife and daughter. I'd posted a similar post to this with pics earlier this week in my 69 base C/10 thread but in the interest of not taking up server space by posting the same pics here I've left them off. If you want to see the final of this project you can look there.
 -
1969 Chevy base C/10
hedotwo replied to hedotwo's topic in WIP: Model Trucks: Pickups, Vans, SUVs, Light Commercial
For those interested, I posted my last update on this project in the Under Glass Trucks area. Has the trailer final. -
69 Chevy base C/10
hedotwo replied to hedotwo's topic in Model Trucks: Pickups, Vans, SUVs, Light Commercial
I found time to finish changing the Greenlight diecast Winnebago trailer to match the colors and striping style on ours. The trailer wasn't identical to our 64 fifteen foot but hey, I was tickled to see something this close available. Rather than the tedious job of masking/painting the red striping I used lacquer thinner (the pic shows ELO but that didn't work) on a rag and gently wiped the original gold striping away and then creating the new striping. I found a package of like 5 different widths of red paper masking tape on Amazon and then created the style of the stripes and "W" we had. Was using tape ideal? Nope but it looks good to me. I also replaced the original wheel/tire combo with silver painted steelies and whitewalls, as we had, and disassembled the trailer to be able to change the colors on the inside as well to those close to what we had. So this project is now in the display case and I'm really happy with it. Thanks for all the nice comments on this build. I'm including one of the only photos of both the truck and trailer that has survived in the past 47 years. I'm sitting with my now 49 year old daughter ?! The other old pic is of my wife and daughter.
-
Best way to apply a black wash?
hedotwo replied to Brandon Miller's topic in Tips, Tricks, and Tutorials
I'll add my 2 cents too.... After years of making my own washes including home brewed acrylics, enamels, Tamiya Panel Line color, and even The Detailer. All have been ok to one extent or another but based on the vote for Vallejo Model Wash earlier in this thread I picked up a bottle of it over the weekend and just gave it a number of tries on various scrap grilles and wheel covers. Super impressed! Flowed really easy and required little or no rebrushing to fill low areas, and it dries nice and dark. This will be my go to from now on. Happy camper ? -
Thanks Mark... those are it.
-
Thanks
-
Any help with this one? Looks to be two of each. Thanks!
-
60 Imperial kit taillight question
hedotwo replied to hedotwo's topic in Model Building Questions and Answers
Thanks Bill! -
Can anyone tell me if the AMT 60 Imperial came with chrome taillight bezels to be used with the clear red lenses? Or did the kit just have red lenses? Thanks
-
My 1965 Chevy C10
hedotwo replied to Oldmopars's topic in Model Trucks: Pickups, Vans, SUVs, Light Commercial
Great job Scott! -
1969 Chevy base C/10
hedotwo replied to hedotwo's topic in WIP: Model Trucks: Pickups, Vans, SUVs, Light Commercial
Folk Art Thicket Green craft acrylic. -
A replica build of our 1:1 C/10 we owned in the early 70's to pull our 64 Winnebago trailer. Base color is Folk Art Thicket Green craft acrylic with Tamiya clear. Interior is Folk Art Bark Brown satin craft acrylic. Build progress is in a post in the WIP section. This project is a two step build with the second part trying to replicate the colors on our trailer onto a diecast Greenlight Winnebago that started life with gold trim. Ours had red striping. I'll try and post a short WIP on the trailer as I go along too. I've included a pic of the trailer here after I stripped the gold. Thanks for looking.
-
1969 Chevy base C/10
hedotwo replied to hedotwo's topic in WIP: Model Trucks: Pickups, Vans, SUVs, Light Commercial
Hard finding time to do the remaining work but I was able to lay down the base color onto the Mr. Surfacer gray primer and then final assembly. I'll put a few pics in the Under Glass section. Not much to see here for this last entry... and the order I've posted photos throughout the thread isn't very good either.
-
Good job! Those are some wide whites for sure!
-
1969 Chevy base C/10
hedotwo replied to hedotwo's topic in WIP: Model Trucks: Pickups, Vans, SUVs, Light Commercial
Nice weather = not enough bench time. Even when retired. But, I did make some progress with the interior and resin grille. I started out with the plan to just cobble up a bench seat to replace the buckets and not be overly concerned with factory accuracy. From looking at pix on google it seemed as though the base c/10 had a couple different patterns and neither were very fancy. My old memory says ours may have even had a funky cloth or vinyl seat cover. So, I began with the front bench from a 67 Chevy Impala which I widened and then sanded off as much of the pleating as I had patience to do. I ended up removing probably 80-90 percent of the pleating but I think it looks ok for this build. The door panels and dash were left alone. I just didn't want to look in and see buckets. I got around to doing the resin grille (fits perfectly in the MPC body) by spraying with Molotow and drilling out the headlights and replacing with clear lenses. On the backside of the grille I used Molotow to chrome the surfaces of a strip of 020 that would end up behind the headlights and then attached. I really should try and paint the CHEVROLET lettering black but I know my limits with small painting. For me it's often better to skip accuracy to avoid frustrating redo's ?. Thanks as usual for looking....
-
Not wanting to keep this thread floating, but based on what I've been following here I went ahead and ordered a pack of 001 Chrome online just now. Lately I've been using some of the BMF Matte Aluminum and found that it was similar in adhesive and thickness of the "old" BMF chrome. It'll be great to go back to the original (fingers crossed)....
-
Fuel system and throttle linkage reference.
hedotwo replied to Mike D's topic in Model Building Questions and Answers
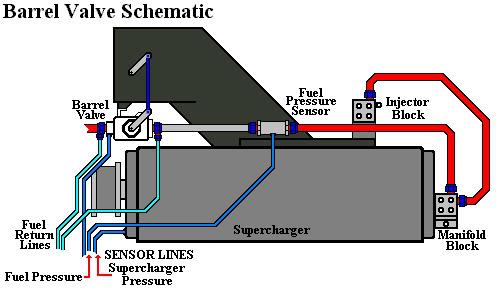
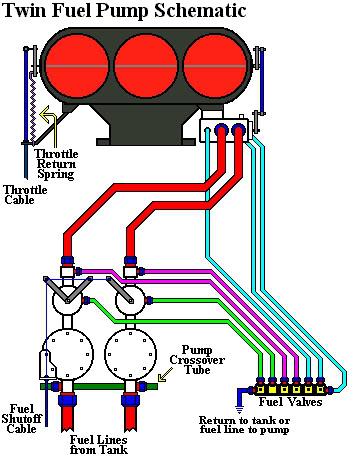
In addition to what Bill posted, these might be of help too? I've had these saved for a long time... back when I used to get into small detailing ?
-
Cool project idea! I'll watch this one for sure once you start ?
- 39,081 replies
-
- 1
-

-
- johan
- glue bombs
- (and 1 more)
-
Has anyone seen these wheels?
hedotwo replied to hedotwo's topic in Model Building Questions and Answers
Thanks! -
Has anyone seen these wheels?
hedotwo replied to hedotwo's topic in Model Building Questions and Answers
If anyone out there has the Maisto Explorer with the rims shown in the pics above could you measure the OD of the tire/rim combo and the OD of just the rim? Just wondering if they'd be too large for the 1/25 Ranger. Also, I just scanned ebay listings for Maisto Explorers (assuming those are the only ones offered with those rims) and found a few listings for complete diecasts. Not sure I want to pay for a complete model to rob the rims so I'm hoping either a junkyard offering comes up or better yet, just the rims. Thanks -
Has anyone seen these wheels?
hedotwo replied to hedotwo's topic in Model Building Questions and Answers
These are the closest I've seen to what I had... now if I could find them "cheap" ? -
Has anyone seen these wheels?
hedotwo replied to hedotwo's topic in Model Building Questions and Answers
I'd have no idea who'd be able to do this for me. I appreciate the offer though. -
Has anyone seen these wheels?
hedotwo replied to hedotwo's topic in Model Building Questions and Answers
Long bed but not an extended cab. Salesman tried to talk me out of that cab and get the extended but I didn't listen. When winter came and I started wearing my heavy coat and misc it became pretty cramped. I remember the seats were really big and comfortable for a small truck. I'll see if I can locate a set of those wheels... thanks a bunch! -
Has anyone seen these wheels?
hedotwo replied to hedotwo's topic in Model Building Questions and Answers
What kit is the pic of Rog? I can't tell ?.. shortbox F150? -
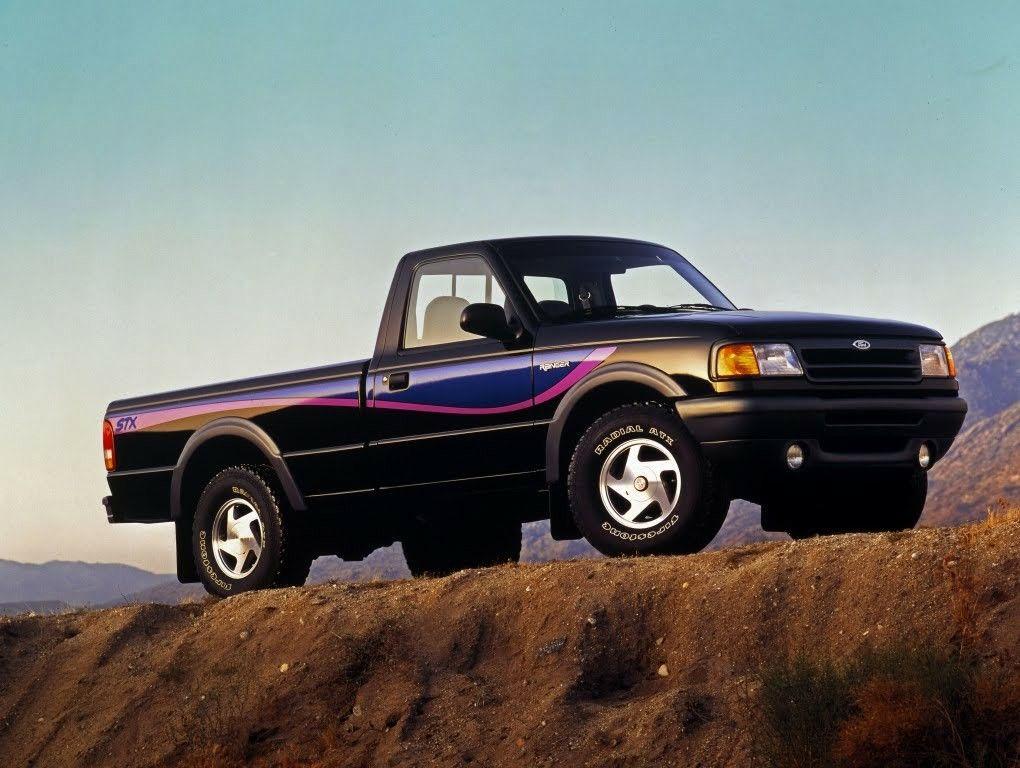
I had a 1:1 '93 STX and am happy there is an AMT kit of it, but the included rims aren't what mine had. The pic shows what I had (actually mine was black just like the pic). I know I'm probably going to end up using the kit rims but thought I'd ask first. Thanks
.JPG.5679e9afcd66bc083217185d866eaed0.JPG)
.JPG.e44a3d49cde58ff9865c034681441cc9.JPG)
.JPG.602a1ffaccab8ab3f72324bef9075552.JPG)
.JPG.8d33100d59ad1d5e0549985811afbaeb.JPG)
.JPG.093e3e9ed461911aad1212787832a567.JPG)
.JPG.8f9d1d1c394be65d6168e46638b427fc.JPG)
.JPG.cd2dad434f6657ae7d91284b2dad2c6e.JPG)
.JPG.679cc8ff798d750c2b560af870e8fc25.JPG)
.JPG.d2940ddcc3d5bce1f6a9e873b905ad86.JPG)

.JPG.9f140235f21e3b11502e023eee23026b.JPG)
.JPG.8c5cb5f85c80eff43202077ebdaf03b2.JPG)
.JPG.8c828c2d7ce3648485b9fdbb8a3635cb.JPG)
.JPG.09be41904299192891043eb99b30abf3.JPG)
.JPG.812c6456c51ae5d079d8eb001dfe061a.JPG)
.JPG.4269c6aad69ae124dde5c2e03dcdbf68.JPG)
.JPG.934c03652baf2e705b53c0a2d76fcfa1.JPG)
.JPG.1e50ee94c7d34f239839fca759d9c38c.JPG)
.JPG.9af1ca436716900c869f6ac1d202be01.JPG)
.JPG.9379a94b4821eeb139c50b253edb8a4c.JPG)
.JPG.a65e7c142d551db3691980804106d9c9.JPG)
.JPG.197897c9ac0536248d080efec01f463b.JPG)
.JPG.c3cf71cd790a116b1f070e44bad79a91.JPG)
.JPG.9500b62867f0d598b570c3a79e3609f3.JPG)
.JPG.5406de1fe6b32d930779e5b3ae88ed68.JPG)
.JPG.272f5f37970c8ba83962ea9f3c591798.JPG)
.JPG.72c62c9aab1310b4002b7d8660df6451.JPG)
.JPG.6da42487132ec954f5d8ddb86052cde7.JPG)
.JPG.923efd96ab26e4266d3370859eedf3ca.JPG)
.JPG.edfa0a4742fa8423ea0efcd8382d7e7c.JPG)
.JPG.17cf4c59ac61404f96994e7cf3202009.JPG)
.JPG.0aecb7c64f517295b2491d04520d1e31.JPG)
.JPG.5733f91940757daaa75a5bf6fe7ef54c.JPG)
.JPG.71cae874589fdebf9eadccde096faf82.JPG)
.JPG.aea7e724f156dd96a345b5276d4fa920.JPG)
.JPG.d42b2933130686976b62dd2103b8b6c9.JPG)