Kenny B
-
Posts
762 -
Joined
-
Last visited
Content Type
Profiles
Forums
Events
Gallery
Everything posted by Kenny B
-
 Pavel, Again another very nice job. Very nice weathering. You would never know it is a snap together. Well done. Ken
 -
Scratchbuilt Timpte Super Hopper
Kenny B replied to KJ790's topic in WIP: Model Trucks: Big Rigs and Heavy Equipment
KJ, Looks like you have your work cut out for sure. Ken. -
Done? looks good. Ken
-
all Peterbilt Conventionals here
Kenny B replied to Ken Gilkeson's topic in Model Trucks: Big Rigs and Heavy Equipment
Ken, Nice looking Pete. Ken. -
1/16 Scale Peterbilt 359 Large Car
Kenny B replied to Kenny B's topic in WIP: Model Trucks: Big Rigs and Heavy Equipment
Anthony, Here is a list of what I used. I used Tamiya Putty Basic for the body work Tamiya surface primer gray from a rattle can Tamiya Red X-7 Acrylic Tamiya Blue X-4 Acrylic (added x amount of drops from an eye dropper) Tamiya Black X-1 Acrylic (added x amount of drops from an eye dropper) Tamiya X20A Acrylic paint thinner All mixed in a new uncontaminated airbrush jar. That was all my base coat. Once the truck was sprayed it sat for almost a month to totally gas out in a dust free cabnet. I lightly wet sanded it with 4000 Micro mesh pad to remove any dust marks and a few spots of orange peel. The colour wasn't exactly as I wanted so I mixed up a top coat. Tamiya Clear Red X-27 Acrylic Tamiya Blue X-4 Acrylic (added x amount of drops from an eye dropper) Tamiya X-20A Acrylic paint thinner Once the truck was sprayed It sat for amost 3-4 weeks to totally gas out. Perfect colour. Lightly wet sanded again with 4000 Micro mesh pads. Final step Tamiya Clear X-22 Acrylic mixed with Tamiya Acrylic X-20A thinner (About a 60/40 mixture.) Sprayed through a new #5 tip and new airbrush bottle only used for clearcoating. Final coat went on very nicely. Once it dryed it turned brown. I still have to clear coat the sleeper. Hopeing that it turns brown as well so everything matches. Then I guess I will spray every thing with Tamiya Clear red X-27 alone to see if it will come back to the dark cherry burgandy. If not , I don't know at this point. Thanks for your input. Ken. -
Aeromax with lowboy 35 t
Kenny B replied to mackd's topic in WIP: Model Trucks: Big Rigs and Heavy Equipment
Alain, looks real to me. Nice job on removing the teeth. Ken. -
Reissued Pete 359 California Hauler
Kenny B replied to truckabilly's topic in WIP: Model Trucks: Big Rigs and Heavy Equipment
Jarda, The mods to the frame looks really good. I really like the smaller windshield that you changed. You are one of the few that does the bracing under the hood. I did the same on my pete, it may not be exact but it looks alot better that leaving it bare. The whole project is looking really good. Keep us posted. Ken. -
1/16 Scale Peterbilt 359 Large Car
Kenny B replied to Kenny B's topic in WIP: Model Trucks: Big Rigs and Heavy Equipment
Jonathan, Now, I don't know why you are apologizing. I didn't take it the wrong way at all. I was simply telling you all the steps that I had done. No need to apologize for the trouble you went through to help me out. I very, very much appreciate your input and had to tell my wife about what you had said. I told her there was someone out there that actually cared enough to help me try to figure this out. Many, many thanks to you my friend. Life is not over, It will be corrected no matter what. As far as California goes, They have wierd laws down there when it comes to driving a truck. Just proud to be a Canadian. Ken. -
1/16 Scale Peterbilt 359 Large Car
Kenny B replied to Kenny B's topic in WIP: Model Trucks: Big Rigs and Heavy Equipment
Jonathan, I really appreciate the input and do understand what your mom is saying. The clear coat is only a couple of months old and is clear as clear can be. I purchsed 6 jars all at the same time.The hobby shop had just brought in more. I had cleaned them out on my visit before. It is very upsetting to have put so much time and money into this truck for something like this to ruin it. I do have my own colour wheel and do understand mixing colours as I have been doing this for many many years. Thanks for the info on the Color Harmony book I will check it out for sure. More input even at my age is always a good thing. Many thanks again to you and your mom. I have also sent off an email to Tamiya to see if they can explain what has happened. I will keep everyone posted as to the outcome. Ken. -
1/16 Scale Peterbilt 359 Large Car
Kenny B replied to Kenny B's topic in WIP: Model Trucks: Big Rigs and Heavy Equipment
Nasty, At that point I will box it up and build something else. Ken. -
1/16 Scale Peterbilt 359 Large Car
Kenny B replied to Kenny B's topic in WIP: Model Trucks: Big Rigs and Heavy Equipment
For all those following my post here is the same formula of paint I used when I painted my Chevelle years ago. I copied the formula exactly to the drop. And you see that it never turned brown. Ken. -
1/16 Scale Peterbilt 359 Large Car
Kenny B replied to Kenny B's topic in WIP: Model Trucks: Big Rigs and Heavy Equipment
Clayton, I mixed up my own colours to make the dark cherry burgandy. I took Tamiya red added x amount of Tamiya blue and x amount of Tamiya black. Once that dried I sparyed Tamiya clear with a few drops of blue mixed in and had a real super nice colour. Between each coat it was left to dry for weeks if not longer and then painted the strips. They were lightly wet sanded between each coat to remove any dust particles.The final coat was only Tamiya clear. Sooo...I'm stumped. Ken. -
1/16 Scale Peterbilt 359 Large Car
Kenny B replied to Kenny B's topic in WIP: Model Trucks: Big Rigs and Heavy Equipment
Rich & Wife, Thanks to both of you for following my build. It has taken me three years to get where I am now. Now that I have had a good night sleep I think what I am going to do is spray the sleeper the same way so it turns brown as well. I'll let the clear cure for about a week or so and I think that I will try to lightly wet sand everything with 4000 grit. The clear went on so nice that there is no orange peel to deal with. I'm going to then try to go over everything with Tamiya clear red and see if that will bring it back. I guess that will be my plan "B". Failing that I don't know what I'll do. It WILL NOT remain brown anyways. I HATE BROWN!!!! Thanks again for you concern. Stay tuned. Ken. -
Brian, Is that ever nice looking. Very nice job. Ken.
-
1/16 Scale Peterbilt 359 Large Car
Kenny B replied to Kenny B's topic in WIP: Model Trucks: Big Rigs and Heavy Equipment
Clayton, Gator. I'm at a loss myself. All the paint including the clear is all Tamiya acrylic products. I even used Tamiya acrylic thinner to thin them down to use in my airbrush. Same method I have always done. I was going to use future floor wax but decided to keep it all the same product. I could see if I had used future and it turned brown then it would be because of the future, one would think. Don't know. Ken. -
1/16 Scale Peterbilt 359 Large Car
Kenny B replied to Kenny B's topic in WIP: Model Trucks: Big Rigs and Heavy Equipment
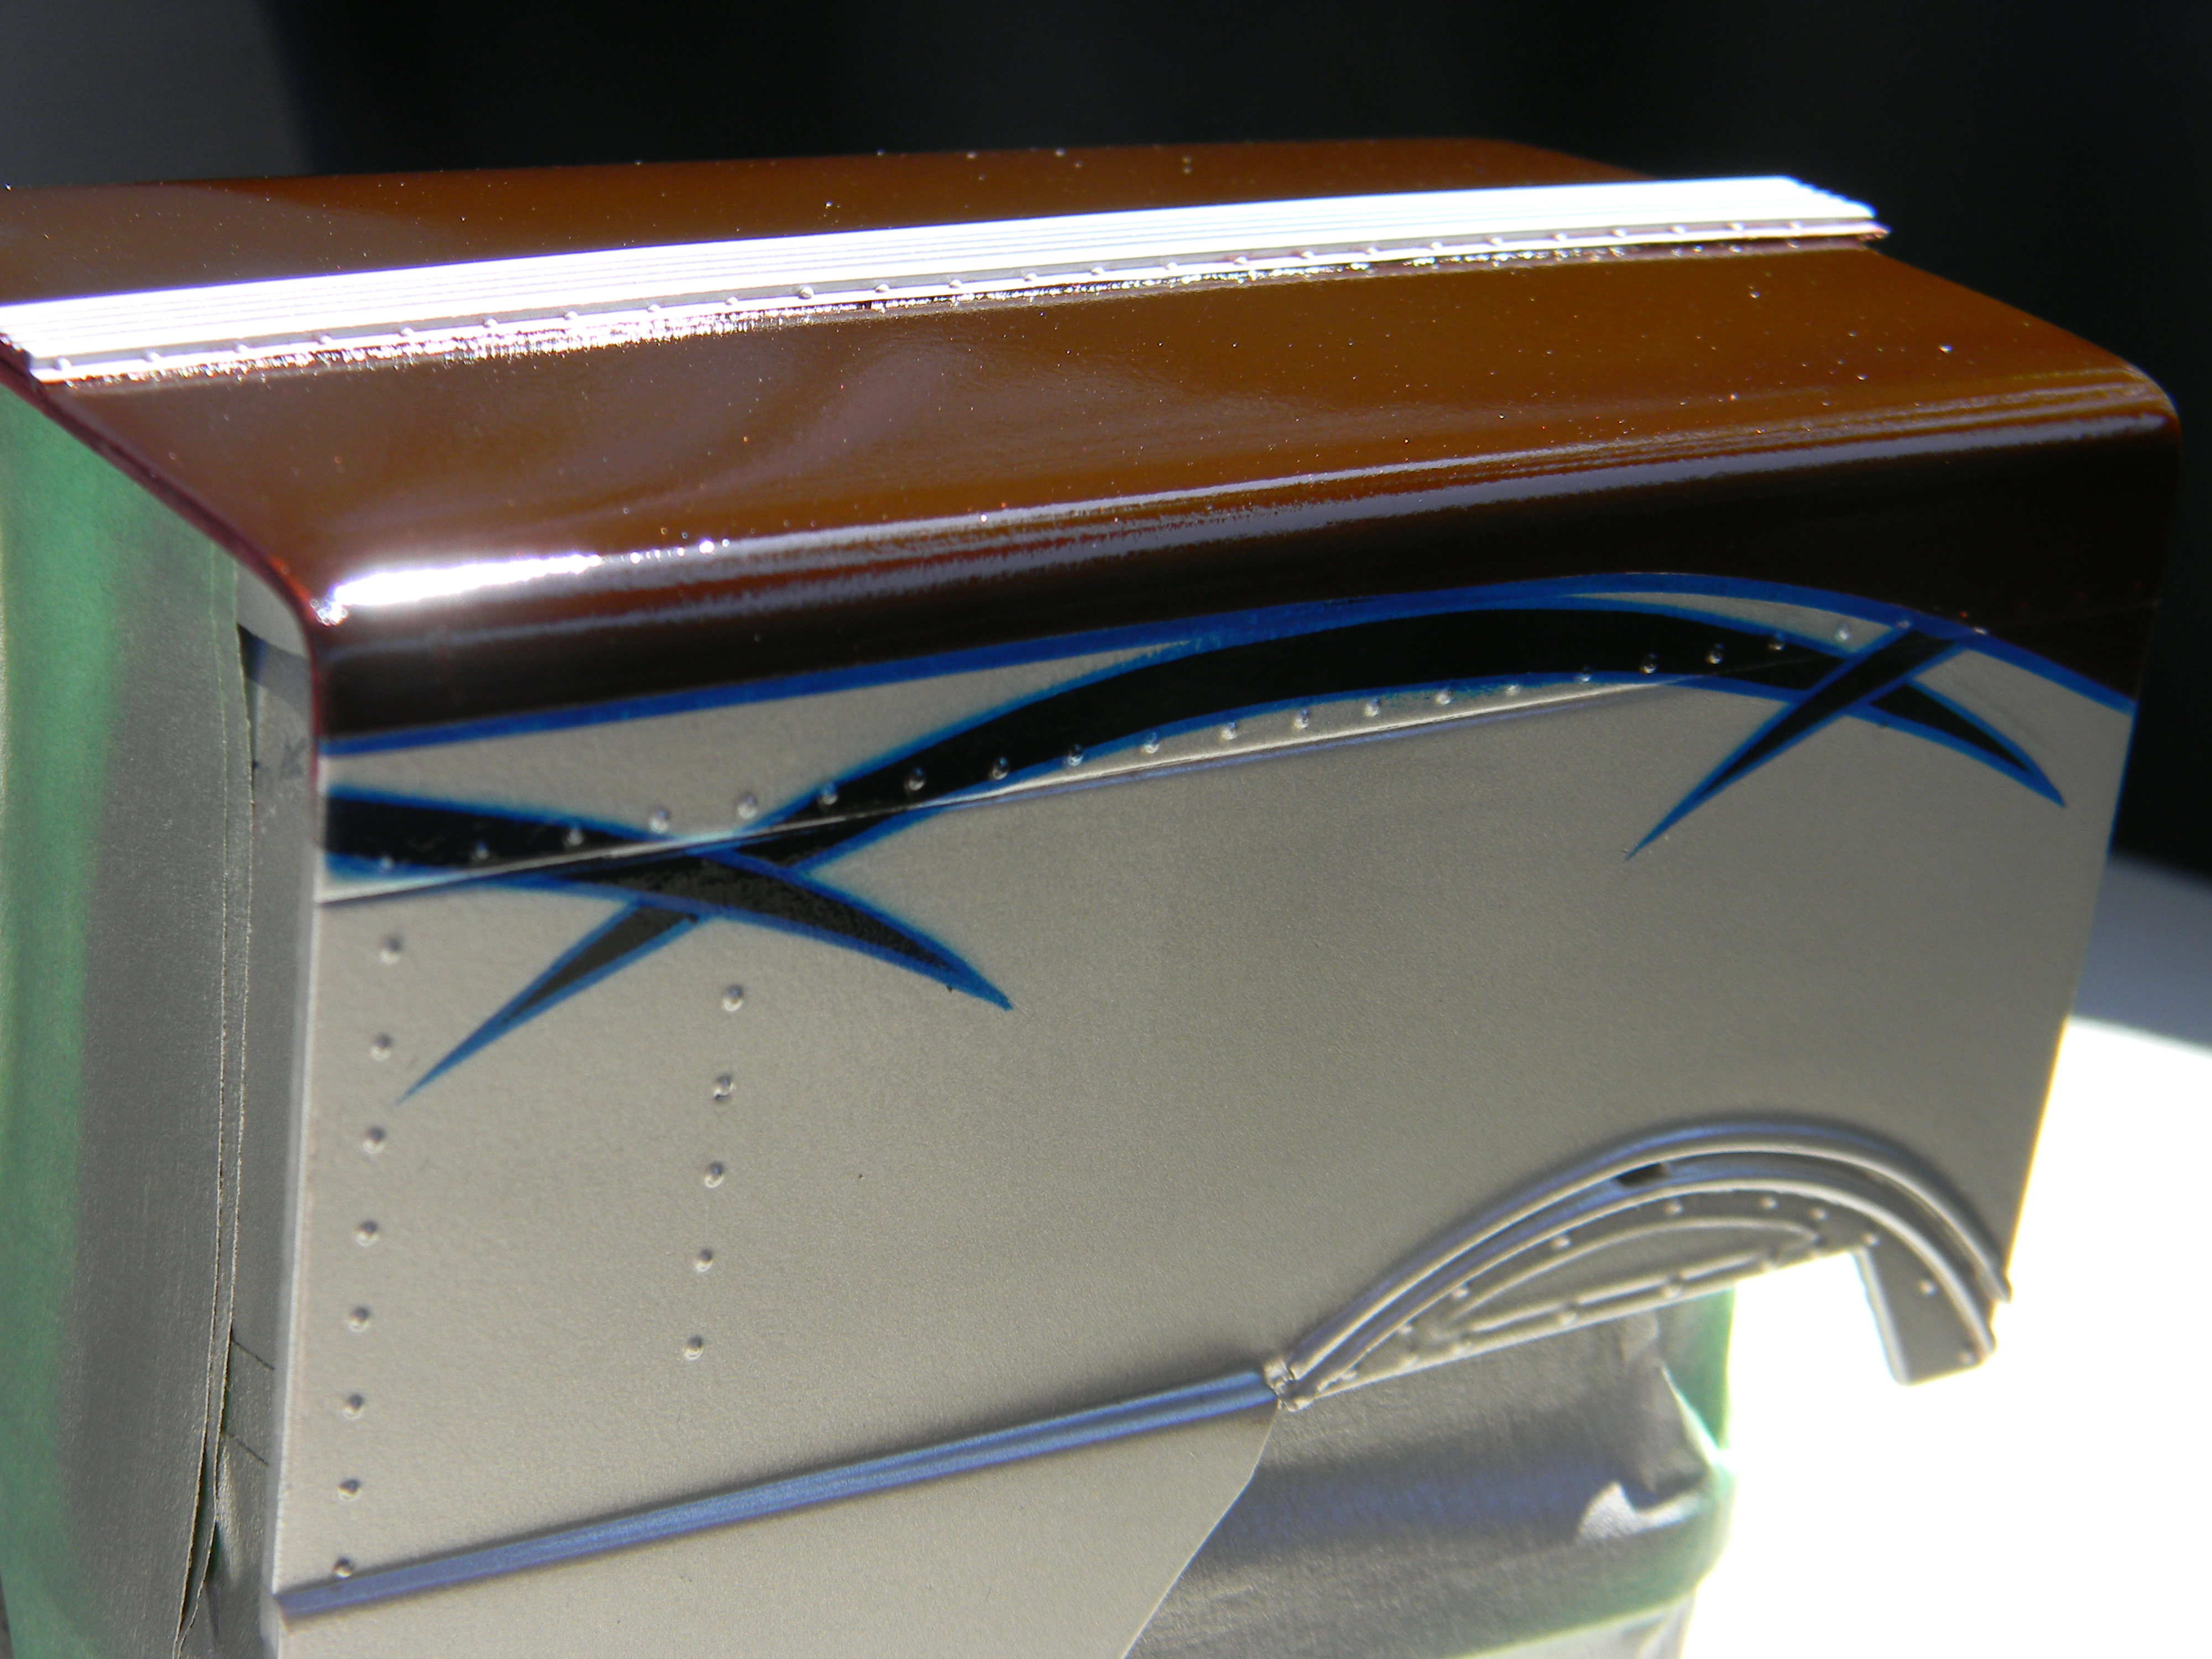
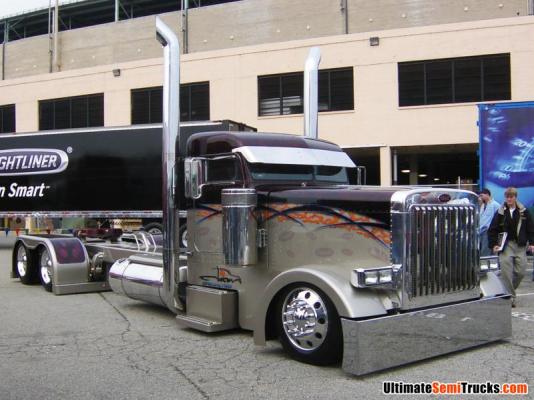
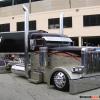
Well, I was so happy with the strips all done and a couple of small touch ups corrected I figured that it was time for the clearcoat. I've got everything all ready to clear and put down a few thin coats over the strips so they won't bleed into the other colours. I let it dry for a few minutes and hit the cab and the hood with a nice good coat of clear. It went on nicely no dust marks, and was really excited and set them both aside in a dust free cabnet to dry. Now you know that this is to good to be true, right!! Well I let them both dry for about an hour or so and pulled them out to take a look. Well let me tell you excitement went down the drain very quickly. Stop the world I want off!!!! For some unknown reason maybe the planets weren't aligned right or something they both changed colours. My beautiful dark cherry burgandy that I was so proud of has changed colour after putting on the clear. Are you ready for this one???? They turned BROWN !!!!!! Well I don't think my eyes are fooling me, and I really didn't have a plan "B". So I took some pictures so everyone can share in the excitement I am enjoying so much right now. The surface dust on them now is after they were dry. Soooo...... Any ideas now??? Ken.
-
1/16 Scale Peterbilt 359 Large Car
Kenny B replied to Kenny B's topic in WIP: Model Trucks: Big Rigs and Heavy Equipment
JT, That's about what I was thinking. I don't have any room for errors so I can't practice cutting it. The mirror side is like metal. Thanks for your input JT. Ken. -
1/16 Scale Peterbilt 359 Large Car
Kenny B replied to Kenny B's topic in WIP: Model Trucks: Big Rigs and Heavy Equipment
Thanks Richard, It doesn't help when your local hobby shop doesn't carry masking tape under 1mm. I had to cut my own tape. Alot of masking and a few nice words now and then. The cab and sleeper are all done now too and will post some pictures very soon. Ken -
1/16 Scale Peterbilt 359 Large Car
Kenny B replied to Kenny B's topic in WIP: Model Trucks: Big Rigs and Heavy Equipment
Could be I've hung onto it for about 30 years or so. (not a junk collector) -
1/16 Scale Peterbilt 359 Large Car
Kenny B replied to Kenny B's topic in WIP: Model Trucks: Big Rigs and Heavy Equipment
Thanks Ken. Ken. -
William, Looking good. Ken.
-
Jon, Very cool, that should look real nice. Ken.
-
Aeromax with lowboy 35 t
Kenny B replied to mackd's topic in WIP: Model Trucks: Big Rigs and Heavy Equipment
Alain, This thing is out of this world. I love all the detail. Ken. -
Jon, Off to a good start. What colour are you thinking of painting it? Ken.
-
White Freightliner daycab
Kenny B replied to SpreadAxle's topic in WIP: Model Trucks: Big Rigs and Heavy Equipment
Ray, Looking good. Ken.