Nacho Z
-
Posts
2,924 -
Joined
-
Last visited
Content Type
Profiles
Forums
Events
Gallery
Everything posted by Nacho Z
-
Thank you, Ray, I appreciate it! Thanks, Roger!
-

Ebbro/Tamiya 1:12 1968 Matra MS11 F1
Nacho Z replied to Nacho Z's topic in WIP: Other Racing: Road Racing, Land Speed Racers
I have a good amount of sub-assemblies completed on this model and it is getting time to get the body pieces under paint so that I can begin to assemble the car. There are a total of 13 pieces that need to be painted body color. Due to the amount of paint needed for this, I used Tamiya TS-10 French Blue right out of the spray can. I applied 3 coats. What you see in the following pictures is the paint after it had cured for 24 hours. Nothing has been polished. -
Thank you, Joe! Yup, Ramchargers are iconic!
-
I thought I would share my 2023 Annual 24 Hour Model Build. Most of you are familiar with the 24 hour build but for those of you who are not it is a FB group build that starts at Noon on a Saturday and runs until Noon on Sunday. It is always held on the weekend of the 24 Hours at Daytona. This year I stopped at about 21 hours into it. I was starting to make mistakes and getting sloppy. After getting some rest I spent about another 5 hours fixing my mistakes, repositioning some parts and polishing the kit glass, (twice!), due to some unfortunate glue placement...lol.
-
Very nice, very nice indeed!
-
Ebbro/Tamiya 1:12 1968 Matra MS11 F1
Nacho Z replied to Nacho Z's topic in WIP: Other Racing: Road Racing, Land Speed Racers
I am definitely pleased with how it turned out. The clay that I used, Sculpey Premo, actually has a date on the package. My assumption is you want the newest, freshest package you can find. I found that the clay was very easily marred so it is easy to put dents and creases in it. -
Ebbro/Tamiya 1:12 1968 Matra MS11 F1
Nacho Z replied to Nacho Z's topic in WIP: Other Racing: Road Racing, Land Speed Racers
I see that September 26th was my last update. I assure you that I have been busy working on this model. I will try to get caught up on my progress. I also realized that I haven't been all that active on MCM. I'm not sure what happened...lol. This update will concentrate on the cockpit. The real car's cockpit was very sparse and the model's cockpit is worse. Because of it was designed to have a driver figure installed in it, Tamiya did not provide much seat detail. I wanted to add what little seat padding the poor driver had. Here is what I came up with. This is the kit part, (in blue), along with what I added for the footwell and pedals, (in white). There is some molded texture but there is no depth to the seat area. I had an idea of trying to make the missing seat padding out of clay. I made an index card template of the textured seat area. My wife was kind enough to let me use one of her rolling pins. A plastic fondant rolling pin with rings to be precise. Actually, the rings are important because they allowed me to roll the clay out in exact, even thickness. I laid the template on the clay and cut it out. After I cut out the seat padding I doubled up the padding for the driver's back, just like the 1:1. I wore nitrile gloves while working with the clay and used the gloves textured fingertips to add texture to the clay. I formed it to the kit seat and then baked the clay per its instructions. Although hard to capture in a photo, the clay's finish really looks the part. Time for full disclosure. My first attempt did not go well. I believe my clay was old and a little dried out. The first attempt at shaping the clay went sideways and then the clay cracked and broke on me. When my second attempt was finished, I realized that I did not add slots for the shoulder belts. I very carefully put them in. There are some exciting, (at least to me), updates just around the corner. I'll see you then! -
This is just an all around great model! It is just soooo cool! Great job.
-
Absolutely gorgeous!!
-
She is a great looking model, Ryan! You are right about it being pretty darn perfect across the board. Paint, stance, interior and engine bay all look great!
-
The Boot Hill Express - Halloween themed group build
Nacho Z replied to Nacho Z's topic in Model Cars
Thank you, Chris! Much appreciated, Ed! -
She is a looker, no doubt about that! That is just an overall great looking model!
-
The Boot Hill Express - Halloween themed group build
Nacho Z replied to Nacho Z's topic in Model Cars
Hi Dave, thanks! Z-Man is Steve Zimmerman. He is known for his tires and wheels. Actually, I think that is all he sells. Anyhow, he is at a lot of the shows I go to and when I saw these outrageously fat tires I just had to buy them. To the best of my knowledge, and somebody please correct me if I am wrong, Z only sells on FB. His stuff is gorgeous! Yes, I believe my particular set of tires and wheels are resin. -
The Boot Hill Express - Halloween themed group build
Nacho Z replied to Nacho Z's topic in Model Cars
Once again let me say thank you to you guys for all of the nice comments! I certainly do appreciate them and they always put a smile on my face! -
Just to add to this, I picked up a 442 this weekend from the same place that James / niteowl7710 did. We were both at the same model contest. I bought mine very early, first thing actually, in the morning whereas James bought his later. My kit was fine. The only explanation that I could come up with is that my kit came from a different case. This vendor definitely had two cases of these kits and was selling these things like hotcakes. Maybe my case sold out and James got his from the other case? But that does not explain why the ones at the store were also bad. Maybe I was just lucky?
-
The Boot Hill Express - Halloween themed group build
Nacho Z replied to Nacho Z's topic in Model Cars
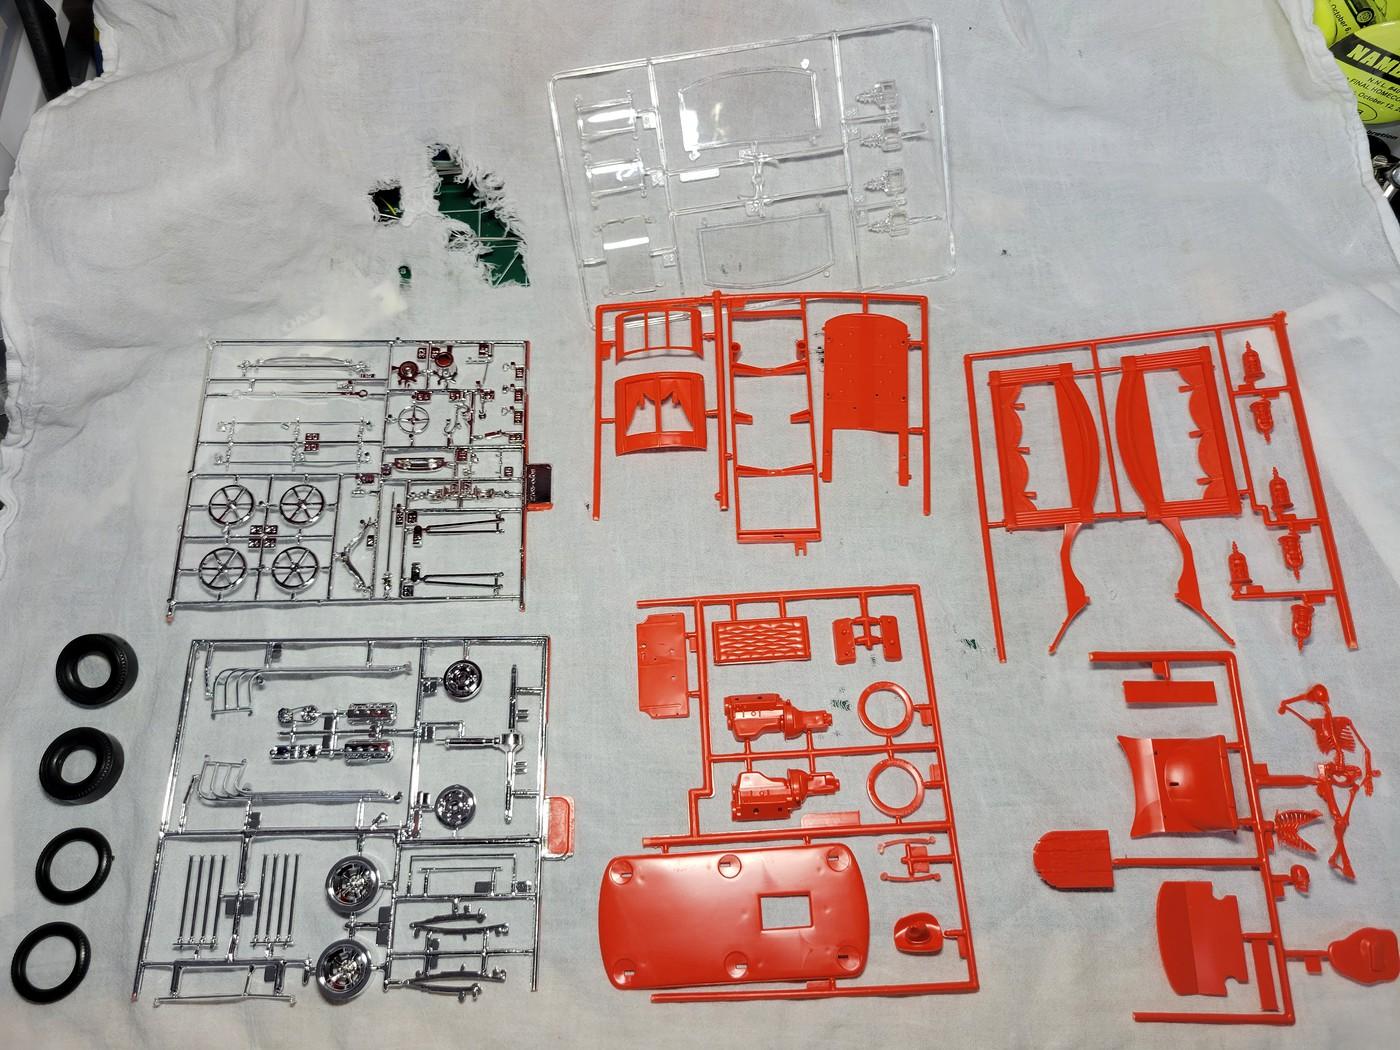
I’ll be darned. I honestly don’t know much about this kit’s history but if it helps, mine is the 1994 issue. On my WIP thread I posted a picture of the kit contents. My wheels were chromed which was not correct. I stripped them and shot them in AK Interactive Xtreme Metal Magnesium, (I believe). Let me try to post that pic again.
-
The Boot Hill Express - Halloween themed group build
Nacho Z replied to Nacho Z's topic in Model Cars
Hi Alan, did you mean to say the rear wheels and tires? The fronts are kit parts but the rears are from Z-Man. I just didn’t like the kit supplied ones. Thank you, Don! -
The Boot Hill Express - Halloween themed group build
Nacho Z replied to Nacho Z's topic in Model Cars
Hi David, thanks! The rear wheels and tires are Z-Man items that I've had stashed away for awhile. I just wanted to say thank you to everyone who popped in and took a look at my attempt at the Boot Hill Express. Another thank you to those who took the time to comment. I really do appreciate it! There are a couple of mistakes and a whole lot of things that could have been done better but I only had one month to build it. When a mini-vacation and beautiful Fall weather are factored in I really didn't have near as much time to work on it as I had planned. -
The Boot Hill Express - Halloween themed group build
Nacho Z replied to Nacho Z's topic in Model Cars
Thank you, Bob, I appreciate it! -
I participated in a FB group Halloween themed build. I had several models in my stash that would fit the bill. I posted 4 choices and let my friends pick which model I would build. The overwhelming choice was the Boot Hill Express. I had one month in which to build it. The rules stated the kit must not be started which mine wasn't. Please take a moment to look at the build thread here: It will answer questions about the stacks and paint choice and color. I'm happy to answer any questions about the build that you may have. Thanks for looking and Happy Halloween!
-
Sorry for not replying or updating this thread as often as I should have. The pace that I worked at to meet the deadline didn't really afford me a whole lot of time to stop and take pictures of what I was doing. I am getting ready to post the finished model in the Under Glass section. Thanks to those who followed along!
-
My wife and I are empty nesters. She has her crafts and TV shows and I have my models. When we get home from work we discuss our day, eat our supper and catch the news. Then it is clean up and take care of this or that. By 8PM I am usually making my way to my hobby room where I will spend a couple of hours each night. I tend to get a few more hours in on the weekends. Like most, I get more bench time in during the Winter months than I do in the Summer.
-
This update will just be on the engine. I will keep pointing out that I only have a month to build this and unfortunately life has a way of getting in the way. It would be great to drop a nice engine in this with all of the appropriate wiring and plumbing but that is not in the cards for me. What I did do was to strip all of the chrome off of the parts, except for the valve covers, and repaint them with AK Interactive Xtreme Metals paint. I did add plug wires. No, they are not in the correct firing order. Here are the kit injector stacks. They are absolutely terrible. I saw no way of salvaging them so I decided to try my hand at making my own. I measured the length of the stacks and then cut them off of the flange. I cut 3/32 aluminum tubing to length. A friend of mine made a tool, a punch really, that would allow me to flare the end of the tubing. I drilled a hole in a block of wood so that just a small portion of the aluminum tubing would stick out. This would hold the tubing and stop it from bending while being flared. This is the tool / punch. Nothing fancy but it does the job. I had to be very careful when tapping the tool with a hammer while flaring the tubing. It is very easy to split the aluminum. Go ahead, ask me how I know! Next was to figure out how to hold the new stacks in place. I drilled small holes in the flange and inserted copper wire. Next I cut small brass tubing to fit over the wire. Finally I placed the newly made aluminum stacks over the brass tubing. This will allow me to bend the stacks to the correct angle once attached to the engine. I am very pleased with the results.
-
Very cool, indeed!
-
Jim, it is one of my favorites also. I forgot to mention in my introductory post that I put a poll up on my FB page and asked my friends which kit I should build for the Halloween themed build. There were four to choose from. This was the overwhelming favorite. I really liked the Pale Brass too. Thanks, Emre, I appreciate it. I'll show the color I went with in a post coming up soon. It was really a tough choice. Thanks, Maxx! I think if you have the time, skills and the right items you can make a killer model out of this. I am very limited by time, (probably skills too...lol). I am making a few modifications to mine but I have to keep myself in check. I'm committed to making the deadline.