Nacho Z
-
Posts
2,924 -
Joined
-
Last visited
Content Type
Profiles
Forums
Events
Gallery
Everything posted by Nacho Z
-

2003 Bentley Speed 8
Nacho Z replied to Chris Smith's topic in WIP: Other Racing: Road Racing, Land Speed Racers
Loving the updates on this, Chris! She is a beauty! -
Ghostbusters car. Elvira's car. The Supernatural Chevy.
-
Mike, there is Grandpa's DRAG-U-LA and the Munsters' Coach. I did the Phantom, or Vantom, van last year. The Grip Reaper motorcycle. Any number of NASCAR kits with original or aftermarket decals.
-
Academy's F4U-1 Corsair
Nacho Z replied to Nacho Z's topic in All The Rest: Motorcycles, Aviation, Military, Sci-Fi, Figures
Thanks so much for the kind words, everyone. I really enjoy trying something a little different every now and then. Airplane guys will find all sorts of things wrong with this one but I am happy to have it sitting on my shelf. I can’t wait to do one with a proper camouflage scheme. -
Ebbro/Tamiya 1:12 1968 Matra MS11 F1
Nacho Z replied to Nacho Z's topic in WIP: Other Racing: Road Racing, Land Speed Racers
Thanks for the kind words, Jonn! The kit does show its age a bit. Fitment is good so far. It just has a lot of sink marks, seam lines, etc. If you have any questions about anything I've done feel free to ask away. Good luck with your build and I hope you share your work with us. -
To quote Monty Python: "And now for something completely different." I'm not an airplane builder, this is only the 3rd one that I have built. I participated in a FB group 1 week challenge build. The idea being to start and complete a model in one week with no stress about adding tons of detail and/or correcting every little flaw. At least that is how I took it. I did not make the one week deadline and actually took two weeks. My first week was blown up by life getting in the way. I chose the Academy 1:72 scale kit due to the low parts count and the fact that I could paint it one solid color, and a glossy one at that. I only used what I had on hand. Unfortunately, I did not have the correct shade of blue for my plane but it was close. I also didn't have the exact color for the interior. I did find a formula to mix a couple of Tamiya XF colors to get close to what I needed. This plane represents the one flown by Capt. Phillip C. DeLong in 1945. One heck of a pilot and one heck of a machine!
-
Fantastic model!
-
Very, very nice! Such a clean build.
-
1/12th Porsche 934 Vaillant
Nacho Z replied to majel's topic in WIP: Other Racing: Road Racing, Land Speed Racers
I’m really enjoying following along on this build. Thanks for all of the photos and explanations of what you are doing. She is looking great! -
Fireball Red Line Tire
Nacho Z replied to TransAmMike's topic in Model Building Questions and Answers
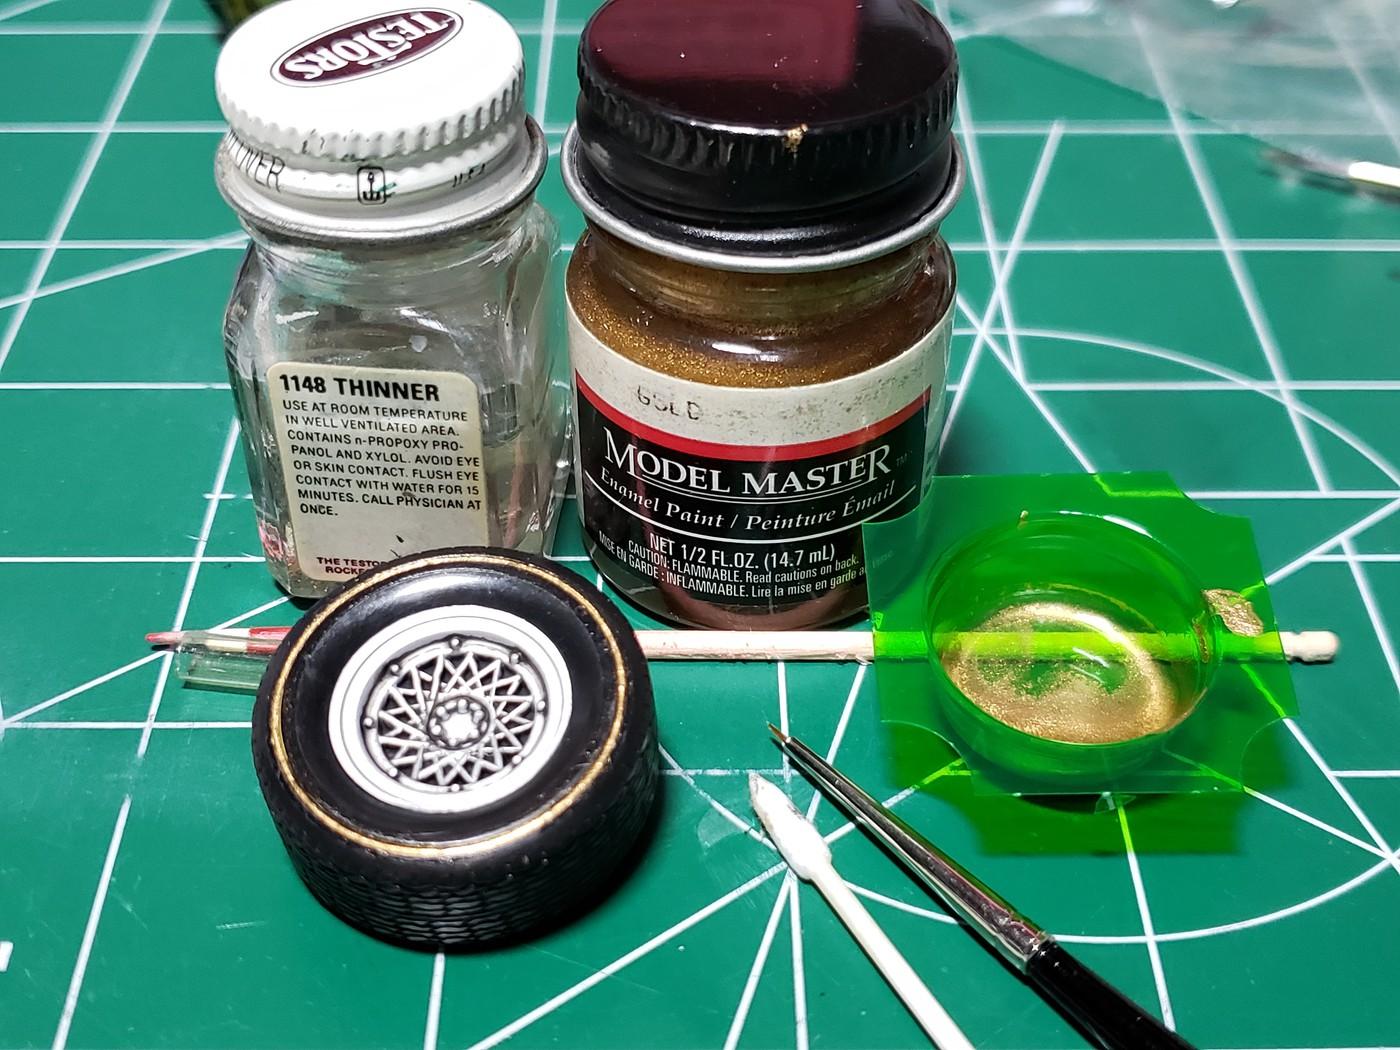
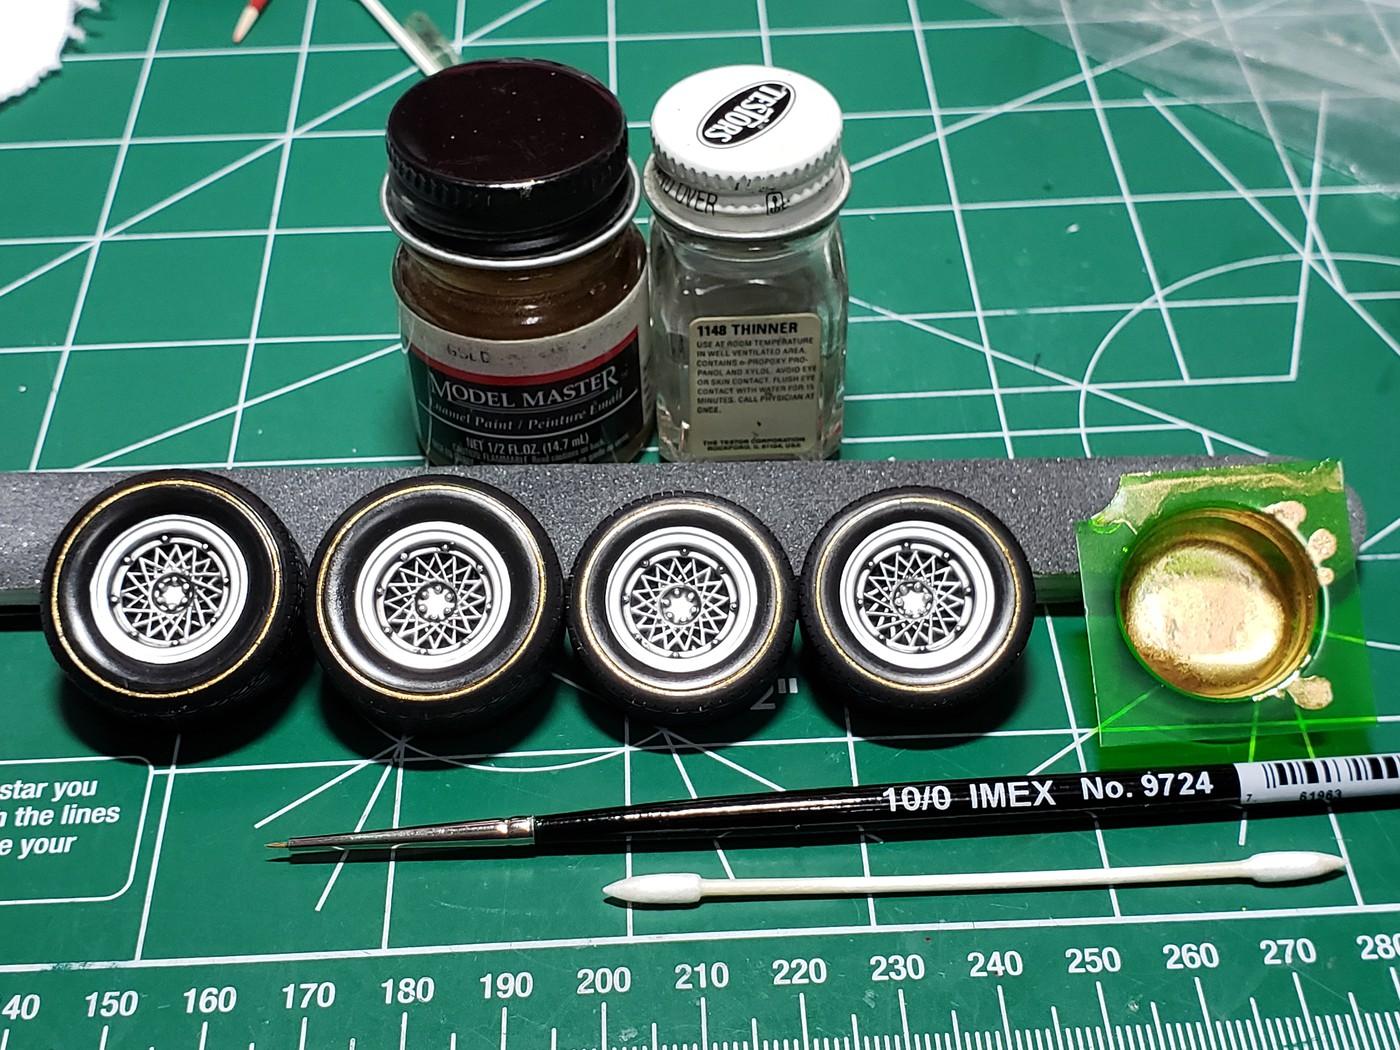
Steve brings up a really good point and I thought, for the sake of others who may read this thread in the future, I should clarify a few things. You really should not use enamel paint on kit vinyl type tires. It just never dries. Stick with acrylic. Now why in the world did I use enamel? The Chaparral 2D was my 2021 Annual 24 Hour Model Build entry. The kit had decals for the gold rings but they failed on me. Time to punt. I had the gold enamel and thinner on hand. Because the paint would be down in a groove and not up on the tire face I felt it was a good and safe "plan B". But yeah, don't use enamel on kit tires. -
Simulated Metal Paint
Nacho Z replied to TransAmMike's topic in Model Building Questions and Answers
Mike, I really like AK Interactive Xtreme Metal colors. They are enamel based. I’ve used them on a number of builds that I’ve posted here. You can see my results with their chrome on my Matra MS11 build thread in the large scale section. I just posted pics this week. You mentioned the price of Alclad. I’m thinking that you will probably have to pay for the higher quality of Alclad, AK and others. I should have mentioned, AK Interactive Xtreme Metals are only for airbrushing. -
Fireball Red Line Tire
Nacho Z replied to TransAmMike's topic in Model Building Questions and Answers
I hope this works, Mike. On my Chaparral build I tried the gold ring decals that came with the kit. Epic fail. The tires had a small groove in them. I thinned some gold paint and kinda loaded the paintbrush. I put the tip of the paintbrush in the groove and capillary action did the rest. Really, it was just like a panel liner. The few spots where I touched the brush to the tire were easily cleaned up once the paint in the groove dried.
-
Ebbro/Tamiya 1:12 1968 Matra MS11 F1
Nacho Z replied to Nacho Z's topic in WIP: Other Racing: Road Racing, Land Speed Racers
Yup, that was what I was shooting for. I didn’t mix up very large batches of the color at any one time so the “brew” is not exact. I added 1 drop of Smoke to only a handful of drops of yellow. I don’t remember the exact ratio because there really wasn’t one. -
Ebbro/Tamiya 1:12 1968 Matra MS11 F1
Nacho Z replied to Nacho Z's topic in WIP: Other Racing: Road Racing, Land Speed Racers
Thank you, Rob! I am very happy with how they turned out. -
Sauber Mercedes C9
Nacho Z replied to 2whl's topic in WIP: Other Racing: Road Racing, Land Speed Racers
Another 1:12 MFH build to follow along with! I love watching these come together. Such a gorgeous car, too. Please post a lot of updates and good luck with your build! -
Ebbro/Tamiya 1:12 1968 Matra MS11 F1
Nacho Z replied to Nacho Z's topic in WIP: Other Racing: Road Racing, Land Speed Racers
If it's Monday night, it's update time! I may miss the next couple of weeks. Building a F4U-1 Corsair for a FB group build. Wheels and tires. They can make or break a model, IMHO, especially on a street car. Not so much on a race car but they can make a difference. This was not simply slide the tire over the wheels. It was a little more involved than that. As I pointed out earlier in this build thread, this is a poorly molded kit and the wheels did not escape that. Here is what I am trying to replicate. The kit wheels are 2mm too wide. I used a razor saw to remove the 2mm. Original wheel size on the left, modified wheel on the right. The spokes on all 4 wheels are poorly molded. I cleaned them up as best as I could. To make them perfect was well beyond what I was willing or able to do. Pictured is a beautifully machined air valve stem from Top Studio. All 8 wheel parts were primed in Gravity Colors, (Spain), dark gray primer and then airbrushed in Tamiya's LP-1 Black. The wheel faces were airbrushed in AK Interactive Xtreme Metal Chrome and the wheel backs were airbrushed in AK Interactive Xtreme Metal Aluminum. I hand painted the middle of each spoke in acrylic black. Two coats. I also painted the lug nuts. The Dunlop letters and logo were hand painted with Tamiya acrylic yellow with Tamiya acrylic smoke added to the yellow. Two coats, both sides of each tire. The real car's wheels had wheel weights. I thought I should add some too. Styrene rod was flattened, cut to various lengths and painted. Final results. -
Ebbro/Tamiya 1:12 1968 Matra MS11 F1
Nacho Z replied to Nacho Z's topic in WIP: Other Racing: Road Racing, Land Speed Racers
Thank you, Bruce! I appreciate that, Håkan! -
Tamiya 1/20 Lotus 79
Nacho Z replied to SpikeSchumacher's topic in Other Racing: Road Racing, Salt Flat Racers
Stunning livery and iconic car. JPS Lotus is among my favorite liveries. You did a fantastic job on this. She is a beauty! -
Very nice, Tom! It is funny, I did not put you from Facebook together with you from MCM…lol. Glad you are in the group! Great job on your Monte!
-
Hi Scott, are you on Facebook? There is a Dan Gurney group. I’m a member of the group. I did a search for your car but didn’t find anything useful for you. If you aren’t a member I would be willing to post a question for you. Not sure if I can post there and not sure if anyone will answer but I’m willing to try. Let me know.
-
2003 Bentley Speed 8
Nacho Z replied to Chris Smith's topic in WIP: Other Racing: Road Racing, Land Speed Racers
Really nice, Chris! Forgive me if you have answered this a hundred times already but do you use any type of magnetic tumbler to clean and/or polish your white metal parts? Thanks! -
Ebbro/Tamiya 1:12 1968 Matra MS11 F1
Nacho Z replied to Nacho Z's topic in WIP: Other Racing: Road Racing, Land Speed Racers
This Monday night update is a smaller one. I have done about all I can do to the drivetrain until I get it installed in the chassis. I added the throttle linkage pieces and a few of my own. I also installed the exhaust brackets and a radiator bracket. -
Decal tips. What am I doing wrong?
Nacho Z replied to Mike C.'s topic in Model Building Questions and Answers
Hey, Dusty, that is very close to what my wife uses for her hobbies. Hers may be a little smaller. Mine looks like a miniature hair dryer. It definitely gets hot. Very hot. I don’t use mine all of the time but is an invaluable tool. -
Decal tips. What am I doing wrong?
Nacho Z replied to Mike C.'s topic in Model Building Questions and Answers
Mike, I really do want to see you succeed with your project. We all share this common passion. Decal solutions soften the decal chemically so that it will conform. Heat softens the decal mechanically so that it conforms. You do not have a continuous breeze blowing across the decal. You just hit the decal for a few seconds with high heat. You can literally watch the decal relax. Yes, if you hold the heat on the decal for too long you will actually melt it. You just want to warm it up enough to soften it. There is no drying out the decal with this method. Not every decal or manufacturer’s decal sheets will need this technique done to them but for very stubborn decals such as yours, it might be just the thing they need. BTW, I still work my decals with a blotter after the heat is applied. I will keep adding solutions and heat until I’m satisfied. I know you don’t know me from Adam but I do know what I’m talking about in regards to laying down decals. Go to my profile and look at the models I’ve posted. Also, check out some of the YouTube videos where guys actually show the process in real time. There may very well be some older threads on this site about the same thing that you are going through. Just don’t write something off because you’ve never done it before. Good luck. -
Decal tips. What am I doing wrong?
Nacho Z replied to Mike C.'s topic in Model Building Questions and Answers
Mike, the use of heat is a well established staple of getting tough decals to settle down. You don’t blast the decal for an extended period of time, you just use it for a brief amount. I’m not one who gets into Internet arguments, I don’t have the time nor the inclination but if you think using heat on decals is “completely doing it the wrong way” then you have not done your homework. You asked for “decal tips” and I gave you several. Good luck with your project. My apologies for trying to help.