
Jeremy Jon
-
Posts
1,127 -
Joined
-
Last visited
Content Type
Profiles
Forums
Events
Gallery
Everything posted by Jeremy Jon
-
More great progress & detailed workmanship, Love it!!
-
Alternate Flocking Technique
Jeremy Jon replied to Jeremy Jon's topic in Tips, Tricks, and Tutorials
Long term adhesion doesn't seem to be a problem, I've never had any issue, even with handling of the cut pieces, bending or folding for installation either -
Alternate Flocking Technique
Jeremy Jon replied to Jeremy Jon's topic in Tips, Tricks, and Tutorials
Absolutely guys, and hope it helps, as it has for me, making the process MUCH easier! For the flocking application itself, there is no need to sift the flocking, I just rub it round on the masking tape sticky side, until it's completely covered, and then I gently brush it to clear away all the loose flocking, you can easily retouch any bare areas, because the tape stays tacky and doesn't dry up right away like glue does, it makes for a great even finish! -
True, there is the HRM kit, Harold Bradford, but even though is technically still in production, is very tricky to get hold of one, and is not cheap, but very extensive full detail kit
-
This is a short tutorial about a method I like to use for application of flocking material, in the construction of automotive scale model carpeting! https://www.facebook.com/media/set/?set=a.541215119305535.1073741852.381978565229192&type=1
-
Thanks Don & Brian! It's been a TON of work!
-
86 Monte Carlo SS box stock sorta
Jeremy Jon replied to Wonderbread Kustomz's topic in WIP: Model Cars
Nice & clean, always like the GNs in silver! -
Great build, I've always loved the Cheetah, it's the not overdone Cobra IMO, and a full detail 1/24 kit would be great to see!
-
Really cool build, and interesting subject! Very nice!
-
Good job, looks great! The fastback 1st gen Mustang is also the best IMO
-
The new Ford Raptor in full detail 1/24 for sure! I'm a big Lamborghini fan, so have a LM002 is already in the build works!
-
Yes, the Compatibility mode selection got thing working again, a few small glitches, like selecting and keeping a font selection, it kicks in & out, but photos can be copy & pasted into posts now I'm not sure, I don't use photobucket, it is a major pain to upload to there, I copy directly from my FB page albums & paste into posts, and even through I've tried to resize the images, for some reason, they always come out on here the same large size, frustrating, so I stopped trying to figure it out
-
Great work, and a second build no less, bravo!! +1 on getting this second body molded, you might even be able to recoup some of your $ that way
-
It's probably not related, but seems like I can only copy/paste in about 5-6 photos, before getting error for to many photos?
-
Drill out the rear bumper side markers, so new clear plastic pieces can be created and installed later Stock kit body shell has deep molding scars at each of rear bumper corners, so must be filled to correct problem With drivers door opening completed, interior panels must be trimmed to correct shapes for realism. Dash board edge created with styrene, for correct look and shapes, for realism, as will be visible in opening upon completion
-
Further scribe work on the body shell, to add realism after being painted, by keeping edges and panel lines crisp Visible edge of front fender, because door will be in open position, is thinned for realism Inner edge of each fender wheel well opening, is thinned by cutting inward at an angle, to create thinned edge Stock kit body shell missing gap between roof A-pillars and front fender, new joint gap created here for proper realism
-
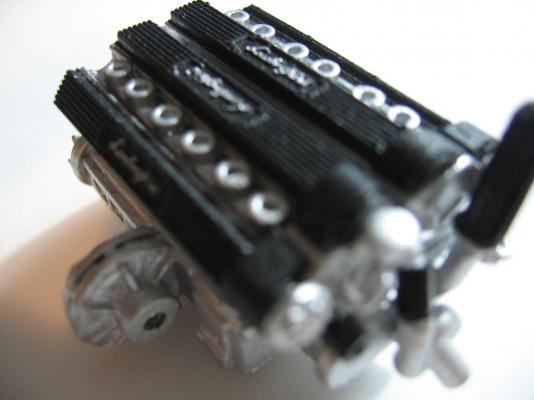
Reference photo shows production throttle body (silver aluminum part) in position (near top of photo) New throttle body created, and built to be placed in proper position, between supercharger and air intake hose/box New fuse box created, with detailed lid and latch. New computer ECU created, with brackets and fasteners in place, ready for painting
-
Stock kit components, upper firewall separate piece from main engine bay piece Beginning of modified engine bay pieces, master brake cylinder separated from upper firewall, all other molded in parts cut out (like battery, computer ECU, inner strut tower bulges, air conditioning dryer) Test fitment of engine and radiator pieces, and start of engine bay inner sheet metal being filled in Windshield shroud separated from body shell, and molded in wipers cut out Windshield shroud modified and test fitted in place, stock kit battery modified for further detail Test fitment of supercharger and intake system, revealed is major mistake by kit, it has NO throttle body molded in the plastic pieces?? WTH
-
Ya, I can post photos again!! More pics of WIP progress During cutting out of driver's door, upper window perimeter seal is reduced in thickness, to much to be reused & look proper New upper window perimeter seal is created, and fitted to contour Upper window perimeter seal fitted with smaller seal tab on inside edge, and formed tabs to each end, for realism of real production part once painted. Lower door seal created, and will be attached to final painted door, and also painted flat black Interior door frame built up to replicate production sheet metal, including forward door hinge pillar. New door sill kick-plate created, with photo-etch part created, Thank you Joseph! for realism of production stainless steel part which sits in the kick-plate
-
Coyote - Hardcastle & McCormick - kit re-build
Jeremy Jon replied to Jeremy Jon's topic in WIP: Model Cars
Hi Dave, I'll have some more updates on this build shortly & Vector kit build, not much work has been done since my injury, and first on my plate is to complete the Shelby GT500 build, but then back on the Coyote and Vector full speed after that! -
Abell82, you are right on the money brother, that fixed the problems, I never even knew that had to be done! It's so easy, anyone with similar issues, try the same, upper right corner of your IE tab is "Tools" icon, click to open, select "Compatibility View Settings", a window will open, click "Add" and then close window, let the tab reset, and then refresh, after that all the problems ceased Thanks again Abell
-
Very strange indeed? Yup, tried Control+V and still doesn't work for me to paste, it gives the prompt to allow access to clipboard, but just nothing shows up no matter how many times I click 'paste' That's what I normally do Casey, is that method, I'm using IE which I like best, FF has issues, and I dumped GC after about a week (hated it) and took me 2 weeks to get it out LOL I have also tried the 'image' icon to post photo, but it simply opens the 'image properties' window, which I can actually paste an URL into, but the 'ok' and 'cancel' buttons don't work, and can't close the window once it's open, so frustrating!? Is it possible some formatting has changed, or forum upgrades/changes, which some functions are not compatible with IE for this forum now?? The change had to have taken place since the last forum WIP posting with pics I did, because since right after that (within a few days), is when I ran into these problems Thanks
-
Anyone else experiencing some (HTML?) problems? I can post a typed reply or type a new topic, but anything I try to paste, be it simply text or photos, the paste function nor attach photo icons do anything when I select them, and when I right mouse click into the body of the post, the cursor sits blinking, but nothing emerges?? I've tested on a couple of other forum & have no problems the same way, just this site? It's getting very frustrating, anyone with suggestions or knowledge, please let me know, Thanks
-
Very nice build Jergen, well done!
-
Thank Gene & S-M! I haven't been able to upload photos, trouble with our internet/cable locally, being fixed, but frustrating, so will update with more once things running normal again!