
Jeremy Jon
-
Posts
1,127 -
Joined
-
Last visited
Content Type
Profiles
Forums
Events
Gallery
Everything posted by Jeremy Jon
-
Thanks Ray! A few more pics, then back to the work bench for a snowy Sunday! Different gauge wires used and formed to create engine bay air conditioning lines and brake line, modified anti-lock brake pump painted and ready to install, scratch built air conditioning dryer made and ready for paint before install Completed engine bay assembly, with all air conditioning hard lines & dryer, wire harnesses, master brake cylinder and booster & semi-transparent reservoir assembly, anti-lock brake pump and brake lines, fuse box and ECU installed, hood pin switch and wiring, and battery tray with hold-down, painted and installed Completed engine assembly, and other surrounding detailed parts (battery, radiator, hoses, front struts, coolant reservoirs, air box, etc.) also completed and ready for later installation Chassis painted, with only basic detailing added - since model will be secured to a base & not be seen, there is no need to go to detailed crazy! Suspensions installed, and inner fenders + gas tank liners painted flat black, painted sway bars and shocks painted ready for later installation
-
Converting the Red Barron to the Black Knight
Jeremy Jon replied to Pete J.'s topic in WIP: Model Cars
Wow! Your metal work is incredible, and that radial engine for Zero is amazing, looking forward to seeing the Black knight completed!! -
Nicely done, I agree the rust weathering is great, not over done, and placed in realistic locations where metal or wear-through of paint would actually occur to form surface rust, Well done!!
-
1957 Dodge - - Finished - - Class of '57 - Entry #2
Jeremy Jon replied to Ramfins59's topic in Model Cars
Great workmanship, the BMF looks fantastic, Nicely done!! -
Thank you guys! James you are right on the money, I believe that for any level of build, it's just as important to make each area of work of equal level to the other, for consistent presentation, it would be a shame to have a highly detailed & finished engine bay, but then a simpler interior (for example), not balanced IMO It does however mean a LOT more work, once you've begun down that path! LOL
-
Beautiful build Eric, bravo!!
-
Revell 1970 Plymouth 'Cuda - Lime Light - Finished Pics
Jeremy Jon replied to RandyB.'s topic in WIP: Model Cars
Always have liked that bright sub-lime as colour for a 'cuda!! Looking forward to seeing more! -
Thanks very much guys for the compliments! Yes, it certainly has been a lot of work involved, but the client will be certainly happily surprised! Pics come out more glossy / shiney than actually is, for some reason? as engine parts only in flat or satin black The fine copper wire is salvaged from old electronics parts, the tiny motors are best source to extract wire that fine, but are other useful components also A few more pics for this evening Front suspension & sub-frame modified, with exacto saw cut 7/8 way through spindle portion, allowing the cut gap to be glued closed, making for steering angle of front wheels as result, and is stronger than if cut through & glued Sub-frame anterior surface gaps filled & sanded smooth, white strip shows new angle of steering spindle, modification done to both sides & steering rack tie rod arms, for equal direction of spindles turn Stock plastic kit steering rack modified, with added pinion housing to rack, and power steering fluid return line added, made from wire stripped on ends, leaving black sheath in middle to simulate hose portion and painted, ready for installation Suspension modified, and wire coil springs fabricated for added realism, when viewed from behind wheels/tires Wire is wrapped around solid rod, and compressed to form coils Axle primed with argent paint, and differential housing painted in chrome, with fastening bolts detailed steel colour Coiled wires spaced evenly, using backside of firm exacto blade Coiled wire cut to length, and ends filed flat so to sit squarely on axle pegs Finished coils are test fit and ready for painting Axle housing painted steel tubes, and black differential housing Completed paint and axle with coil springs assembly
-
More progress photos! With rear W2 bumper complete, chassis rear section completed, and frame rails made to align snug against bumper part Front inner wheel wells needed more space for turning wheels / tires clearance, so before closing up center tunnel portion, front portion of wheel wells expanded forward to back edge of air dam spoiler skirt W2 rear wind built, from styrene stock Test fitment with W2 rear wing in position & stance Nearly there!! Test fit with W2 rear wing in position & stance, Fuel filler post opened and cylinder placed for cap insert part to be crafted
-
Cool build Kenny, that metallic really pops! Very nice!
-
Body filler question
Jeremy Jon replied to keone2013's topic in Model Building Questions and Answers
Ed's exactly right, shrinkage is an issue! Personally, I would fill as much as possible with styrene/plastic first, so then you are only filling a minimal amount as possible, thus avoiding cracks developing, as the filler material, even polyester based bondo will do this, continue to dry and shrink even after being sanded and painted -
Another kit a remember having as a kid LOL The blue would looks great IMO, maybe with some bright white stripes, or even a US flag motif?
-
Comparison of some stock plastic kit parts, to finished modified and painted assembly Power steering fluid housing constructed, of clear plastic tube body, sanded for frosted white semi-transparent appearance, with fluid paint to be added after to hollowed interior for realism & semi-visible through frosted container Lid portion cut off & new part scratch built, using photo etch turn cap, and ultra-fine copper wire as cap leash, to be painted and attached to reservoir after attached to engine front Coolant reservoirs modified, opaque lid sections cut from bottom, and new bottom portions constructed of clear plastic & clear resin filler, until correct shape, and sanded for semi-transparent appearance, with orange fluid paint added after to hollowed interior for realism & semi-visible through frosted container Assembled engine & other ancillary detailed components finished and set in dust free container for later final assembly into chassis
-
More progress pics! Engine supercharger assembly and air box also modified and enhanced, sensors added, and ultra-thin copper wire used to create sensor wire leads, which once painted will integrate into chassis wire harness Engine wiring harness(s) constructed, using thin wires, twisted around each other to hold shape, and provide braches like individual fuel injector plug ends With all individual parts painted, using various semi-gloss and flat paints + clears, to give complexity of surface colourings, are all assembled
-
Coyote - Hardcastle & McCormick - kit re-build
Jeremy Jon replied to Jeremy Jon's topic in WIP: Model Cars
Thanks Erik & Carl! Yes, glad to be doing more work, still have about 50% articulation of my thumb use, but doing physio to help get more mobility, break down the scar tissue and repair the tendon -
Alternate Flocking Technique
Jeremy Jon replied to Jeremy Jon's topic in Tips, Tricks, and Tutorials
Very welcome guys! Glad that is of benefit to some, I'm ALL for making things easier! LOL -
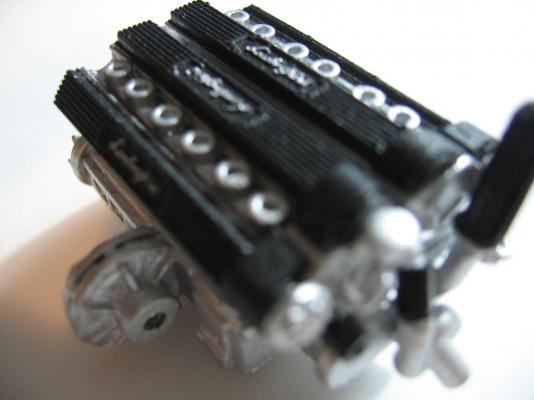
Back to the engine bay, stock plastic parts being modified or enhanced for realism, like the coolant hose assemblies, made of thicker gauge line, and formed to shape, cast splitter housing enhanced with sensors and further detail Test fit of upper coolant hose parts Basic engine being put together and modified for detail, styrene added to front of cylinder heads, so to fill in under valve covers properly, styrene strips scratch built and added over fuel injector ports, to simulate production car Stock plastic accessory belt parts modified, my method is to mark the face with ink, then scrape away the inside surfaces to thin the belt portions, cutting the inside corners alongside pulleys, leaving the backside of the belts slightly thicker for strength, but the face edge as thin possible for realistic appearance Upper coolant hose towers modified on engine block, adding second hose ports, for realism After the first accessory belt part modified, painted and installed, the secondary belt part is also modified, painted and installed, because the lower half of these parts will be fairly hidden down in between the engine & radiator shroud, there isn't as much modification required
-
Underside of hood given some scratch built detailing around edges to simulate bracing, and under hood covering simulated using layers of tape, cut to shapes and until thickness enough for appearance, later will be painted in flat black, and glued to under side position of finished painted hood With all priming and wet sanding done, final coat of fine white primer is sprayed & wet sanded (to 2K grit), then first coat of acrylic lacquer applied After first lacquer coat, each piece wet sanded (starting from 1K grit and up), then washed thoroughly and let to dry
-
More progress pics! Door is going to stay in an open position for display purposes, but the inner door frame & hinges are scratch built using photo etch bars & hard wire rod, to look like the production car, once all is painted, then the door pins allow it to slide down directly into pivots Door hung in test fit, showing proper appearance, and articulation into the front fender Engine hood is modified with photo etch pivot bars also, bent and modified to sit flush, hard wire bent and placed inset of fender underside to connect and articulate hood, and pivot point(s) located as far back as possible, so hood opens up and clear of the cowl, while giving a much smaller volume than the plastic kit hinge arms
-
Coyote - Hardcastle & McCormick - kit re-build
Jeremy Jon replied to Jeremy Jon's topic in WIP: Model Cars
Some more progress now, as I'm healed enough to resume some working again! Continuing on with the bodywork, both sections in hard primer for sanding, second headlamp pod being created to match, additional fine filler work for imperfections Chassis being matched up to front clip at the sill joint(s), and relation to wheels in wells viewed -
Thanks Carl! If I had more time, or was a personal build, I think I might have had the wheels redone by digital design also, but for the time and resources constraints, the tires were the more immediate need
-
Thanks Atin! I'll have more updates on this kit build very shortly! Here's brief vid from the recent Top Gear America show, pity this is all they aired of the Vector on their episode http://www.youtube.com/watch?v=xxwfLkqx2dg&list=PL01DAB8841968B830&feature=player_detailpage
-
Thanks Tom, Carl & Steve More progress pics The stock kit wheels and tires are only fair in quality, but the tire most specifically incorrect size being to large overall diameter, and bald sidewall Originally donor tires from a C5 Corvette kit were considered, but though they had sidewall markings (Goodyear) they were to small in overall diameter Stock kit wheels are de-chromed in oven cleaner Stock kit wheels trimmed of ribs around outer drum surface, and sanded smooth, without distortion of front lip The stock kit wheels have noticeably rounded spokes, and center lug area closed in, so extra material removed to square shoulders of spokes and open center lug dish area To correct the tire issue, entirely new digitally designed tires developed (thank you Joseph), making a production correct Goodyear band tire, correct tread design, and correct dimensions (using the stock kit wheels dimensions I.D.) First 3D print of the digitally designed tires, showing good tread and sidewall markings Final print of the digitally designed tires ready for use, shown compared to stock kit wheel & tire set Painted of final version tire and modified wheels, ready for use For realism, tires painted with flat black in tread blocks and inner wall, and satin black on outer sidewalls (simulates detailed/cleaned tires)
-
Alternate Flocking Technique
Jeremy Jon replied to Jeremy Jon's topic in Tips, Tricks, and Tutorials
If you are wanting to make separate floor mats, or trunk liners, work excellent for that also, as you can cut to an exact shape, I've had no issues to later glue a floor mat piece to the carpet surface, just a blob of glue (centered), even white/elmers type glue does the trick, but CA works just as fine, only be careful not to have glue to near the edge where it might push out from under and become visible -
Leave it sit after that for a time, if fails, try refresh, it sounds a lot like a intermittent connection issue Maybe try the same trick we had to for the posting pictures issue, pen the MCM page, then click on your "tools" icon in upper right corner of browser, select "compatibility view settings", when window opens, click "add", then "close", page should refresh on it's own, then try again to see if problem fixed