Russell C
-
Posts
1,931 -
Joined
-
Last visited
Content Type
Profiles
Forums
Events
Gallery
Everything posted by Russell C
-
Picture test post, why do they get zoomed?
Russell C replied to Harpo's topic in How To Use This Board
Beats me totally. Since the size & resolution I use worked, I've gone with that ever since for the posts here. -
Picture test post, why do they get zoomed?
Russell C replied to Harpo's topic in How To Use This Board
Don't know what PCs have for photo size manipulation, but on my ol' iMac, I open up a photo in the Apple Preview program, adjust its contrast from my overly dark-taking digi camera, and then I size it down to 4.5" inches across at a resolution of 150. Your photo was nearly 14" across at a resolution of 72 when I downloaded it. Looks like this now after all the above alteration:
-
Also applies to NM, my home state. You can tell who's a visiting desert rat back east, they'll be the people gawking at all the arroyos and ravines in South Carolina and Pennsylvania, going "wow, there's water in that one, too!"
-
?? Too hot where I'm at for UFOs to be seen ....
-
Mix 'n match man after my own heart. Particularly like the pickup.
-
Aha, Túlio's blue version in his "Under Glass" post here which I managed to miss but which he pm'd me about today. That would explain why I had the blue image in my mind, from looking at the thread last year.
-
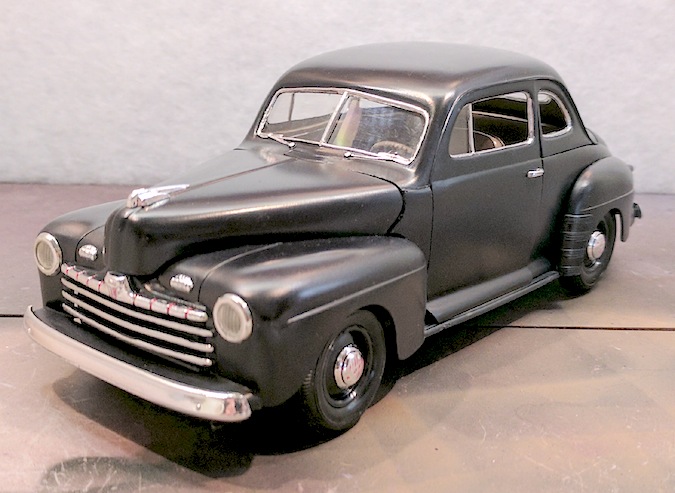
Things like this bug me when they look familiar. Couldn't find it among die casts in a Google image search, and since I like '40 Fords myself, I thought I'd also rummage through an image search of them right here at MCM. Bingo: scroll down to the "outdoor pics" in Túlio "Lovefordgalaxie" Lazzaroni's #1 post here. I didn't go more than 2 pages into Túlio's Flickr photo pile (my obsolete iMac really bogs down in such sites), but if he built a blue version, then somebody has only photo-swirled the Motorcraft sign in the background and his studio tag in the lower left.
-
'51 Ford Bronco Time to toss another virtual project on the pile. After seeing this MCM thread about Marmon-Harrington conversion kits (or the current lack thereof), I tried to see if I could find build threads elsewhere, and surfed across this 1:1 custom Ford "Suburban" page. A little shortening and moving areas here and there, and the somewhat quick & dirty photo alteration results are below. Start with a Monogram '55 panel van , find a '51 Race Motors Replicas (if they are still around) front end resin set if you want that, and go from there, but good luck on the 4x4 conversion until someone creates a resin conversion kit ....
-
Or you can make 'em out of assorted scrap material.
-
You mean the decal place? http://www.jbot.ca/trucks.shtml I've bookmarked it in the past for Movin' On decals, plus I've long had the evil idea of putting the Blue Mule decals on the big Dodge cabover.
-
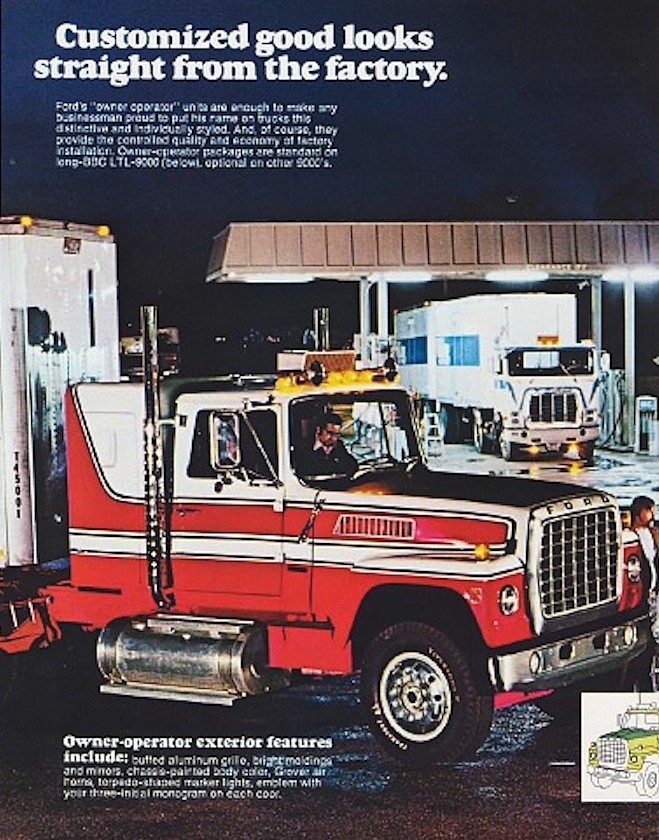
Anybody know if the ones on the LTL-9000s were factory-made or vendor-supplied? They always struck me as being different from the ones commonly seen on Kenworths & Peterbilts, but more rounded that the ones on IHs.
-
Been a while since I looked in there, but what I do is start with this kind of Google search https://www.google.com/search?q=site:shapeways.com+"427+cobra" -- click on the link there to see what the page looks like -- with the words between quote marks, but then I always choose the "Images" option since it's just more fun to look at pics. Other stuff may come up not related to what I want, but that stuff is usually interesting. For those who haven't done image searches that way, you click on the photo you like, and it will give you the option of "Visiting" the page where the image is found.
-
Welcome here, and happy new year!
-
Charger pickup. (<--- from the Dodge Charger forum)
-
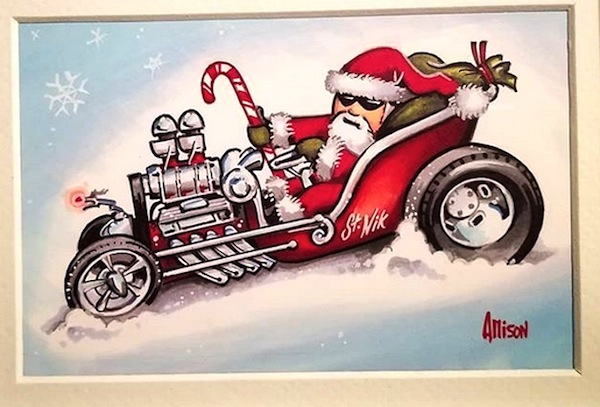
Jeff " @Allison design " is a member here. Tom Daniel's Red Baron, minus the chrome cap, sorta resembles his Lil St Nik sleigh rod.
-
Put in a thumbs up vote on this variant for me, but in my twisted mind, I see it heading in the direction of being a straight axle gasser, but with some kind of front end treatment matching the back, à la Revell's old '53 Chevy panel.
-
Double.
-
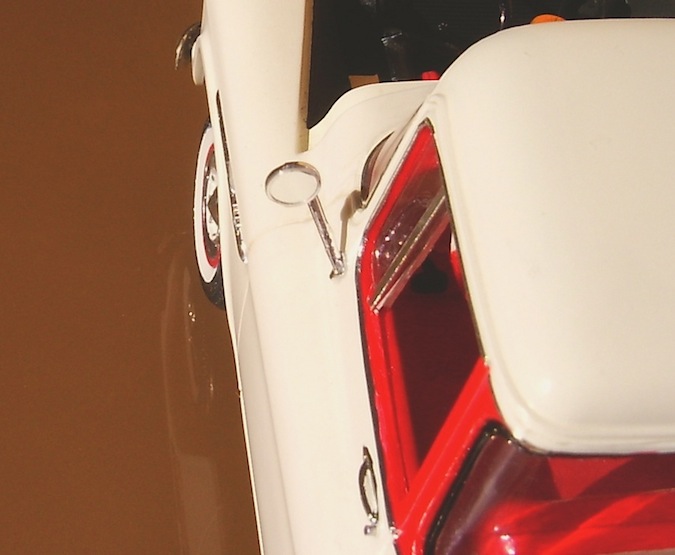
Or adhesive-backed silver mylar material. As seen in the first photo below, I used material that came free in the mail, but it can be bought at hobby shops. When my sister asked me to do some restoration of the AMT '55 Cameo my nephew had built for her years ago, I couldn't let the massive heat sink dimple in the side view mirror go by, so I cut out a rough circle of this sticker material, stuck it to a flat-topped stemmed piece of plastic which I could chuck into my motor tool, and then I 'lathe-turned' it (for lack of a better description) it into the perfect size circle. Since this kind of sticker is rather stiff but with good re-usable adhesive, I just picked it off the plastic and lightly applied it to the mirror, and it laid completely flat across the surface. The next trick was to 'lathe-turn' an outer rim for the mylar - a same diameter ring. Took a few tries to get it right, and then some more careful tries to get it just right on the mylar, but the result looks dynamite. I wish I could have angled the mirror to aim it back into the cab, but it was good enough for jazz to suit this particular restoration.
-
Chev K5 Blazer
Russell C replied to iamsuperdan's topic in WIP: Model Trucks: Pickups, Vans, SUVs, Light Commercial
The MPC '84 GMC pickup already has the fenders done for you, along with the front bumper, and the rounder side mirrors. -
1955 IH RDTC Highbinder
Russell C replied to DRIPTROIT 71's topic in Model Trucks: Big Rigs and Heavy Equipment
With rubber band drive, no less. Always like the models which could pass for 1:1 vehicle shots if a person didn't know better. -
What did you see on the road today?
Russell C replied to Harry P.'s topic in General Automotive Talk (Trucks and Cars)
Leaving from the house across from where my elderly mother lives. It's the time of the year when the snowbirds bring out their classics.
-
What's up with the initial where an avatar would go?
Russell C replied to russosborne's topic in How To Use This Board
Graphic artist that I am, I engineered my avatar to fit into the prior square format. Would be great if an option was available to go back to that instead of us being forced into the circle fad of Facebook / Twitter & whoever else jumped on that bandwagon. -
Unique TV/Movie vehicle
Russell C replied to BobbyHill16's topic in General Automotive Talk (Trucks and Cars)
The Shelby Cobra that Elvis Presley drove in the "Spinout" movie wouldn't be all that unique or unusual, but the Mistral (according to the update at this site) stunt double car he drove into the lake would be different. -
Daytona Spyder engine question
Russell C replied to Darren B's topic in General Automotive Talk (Trucks and Cars)
Same here, but around two decades ago with my project, "Ferrari Daytona blasphemy (Itsa Mustang!)"