
Chas SCR
-
Posts
718 -
Joined
-
Last visited
Content Type
Profiles
Forums
Events
Gallery
Everything posted by Chas SCR
-
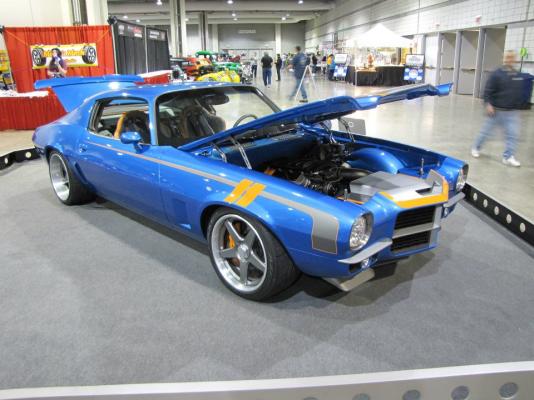
Making the shifting lever, this does have a leather boot on it that fits down in the hole in the center console. The shift nob is sanded down to have 5 flat spots and also has 3 custom holes in the lever its self.put together and ready to be installed. Chassis after having the flat black put on. This is a Du Pont Hot Rod black that does not have to have any clear coat as when it drys it's very hard and not easy to chip away, Polishing out the low parts back to gloss black. With all the high spots done and the full rear of the chassis now complete done in paint. The front roll pan I will show in the next pic.
-
-
-
Will be there for the first time in 3yrs.
-
Center console with ac nobs and center dial put in. Now need to paint them black, You can see the inner fenders as after the clear coat is done this will be done in all flat black and the lower spots in the inner fenders be tape off so it gives a embossing look to it. Chassis with the first of 3 coats of 7900 Du Pont clear, showing off the gloss black with the Toyota 4U3 Sunset Bronze.
-
-
Just put on the first of 4 coats of black to all the parts and body and chassis, This will give the bronz a good base once done and also the chassis will have 3 diffrent colors plus the flat black to the high lights in the rear inner fenders and also parts of the chassis and front roll pan.
-
-
The center console is made and painted top body color and has the AC dials, also you can see in the circle part is where the custom shifter will be. In the dash you can see the gauge plate is now made and is two tone black. This will house 3 gauges and then there is 3 more smaller ones in the center of the dash and have to make the DVD player screan to fit into the bottom part.
-
-
 But the American Challange Seires was a Nascar saction and it ran side by side rules as All Pro did before the 92 merg. A good friend of mine won 3 straight Nascar titles of the ACS in the late 70s to mid 80s.
 -
In scale or model? I made a master of Scrape that RMR Resin makes and that is base on a 1 off body. Also he has a master of a murco 32 ford that needs to be cast and thats a 1 off 32 body. Not sure what your asking?
-
The top pic is showing the front lower roll pan and detail work done to it. The wing covers bolt up to the inner fenders and cover up the wires and stuff as they do to hide things like this for the show car styling. Also you can see the bolt holes to the lower pan that covers the steering rack and front swaybar, this will have .020 bolts in them for detail. The middle pic shows the rear shock tower added to the frame rail. For the last pic is showing the front trailing arm tabs to connect to the lower controal arm..
-
-
you can see the arms coming off the spindle, They are lined up just passed where the rod from the lower controal arm and the swaybar is. The tie rod runs just under the swaybar arm and will be connected to the Sweet steering box.
-
-
Thanks guys, getting the tie rods and steering made today. Then it is really ready to go into paint and doing all the machine parts. Still have to make the mono balls for the upper and lower controal arms.
-
Nascar All Pro was the 3rd tear of Nascar till the trucks took over that spot in 1998 so up untill then if you build a Nascar All Pro or All American Challange car it would still be a nascar sanction.
-
Lower pic showing the nascar style front swaybar coming out to be line up to the center of the frame rail. The upper pic is showing the swaybar arm that has 2 bends in it one down and one over to line up with the tab on the lower strut arm. This will be hooked up with him joints and will be a working part of the car. The tie rod will come from the bottom and run just under the first bend to connect to the spindle.
-
-
scratch built the shock towers and upper A arm bracket. The shock and spring is in place using the lower one with a mono ball.
-
The top pic, Was lining up the rear swaybar to make sure it's straight across. This is the bar it's self. In the middle pic showing with the rear end where the arm is located and will be hooked to the top of the rear end with him joints and aluminum bar. The swaybar arm will also be bolted tight to the swaybar its self and will be albe to move with the rear end. This is a nascar style swaybar hook up in the rear and will also have another one built the same way in the front end.
-
-
Here is the motor, The motor is an LS7 that I had to put into resin and redo a lot of the location of parts, I added a 4spd trans with an all new bell housing. The headers are done in a rap and painted a off metlaic black/sliver base to look like the rapping they used. The three colors on the motor it's self are black with clear coat that has a 3:1 deadner added to make it a semi gloss, The hot rod black also had a deadner added to it to flat'n it out more and then the Bronz was added. Since this pic i have added the AC hose, wire lums and also the fuel lines and the breather lines. The oil cap is made out of aluminum and painted and can be removed for detail look. The front cover had to be complete'ly rebuilt and have the Alt location move down next to the power steering and was all taken apart and casted and then bolted back together. Oil pan was also bolted in place and so was the intake. The air intake inlet also has been made and i'm waiting on my shipment for more resin so I can put the 4 parts of that into the mold and make that and get it painted.
-