Straightliner59
-
Posts
5,800 -
Joined
-
Last visited
Content Type
Profiles
Forums
Events
Gallery
Everything posted by Straightliner59
-
Thank you, Trevor! I appreciate your kind words, my friend! When I was figuring out the hood pins, I was looking at the front, molded-in pins, and there was no place anywhere close to there to anchor them. I figured this would work, even though I'd never seen it, before. It looks kinda cool, too! I'd be honored to have you use it!
-
Thanks, Ian! You've finished up a couple of real beauties, lately! It won Best Engine, at a contest, last weekend. For some reason, they gave the Best Drag Model to a 1/16th scale Blower Bentley that was entered in the Competition Road/Rally class. I was more than a little disappointed--less by the fact that I didn't win that, but by the fact that they gave it to a car that wasn't even a drag racer.
-

Crower 8 port Injector and Scoop
Straightliner59 replied to afxawb2's topic in Model Building Questions and Answers
The AMT Wynn's Charger has a pretty nice hat, but mid-'70s Revell kits (I don't recall which, off the top of my head, maybe one of the Garlits cars) have the better injector. I put this setup together using those parts. The injector is an old dental resin (now available as nail resin) casting done back in the '80s.
-
That Lenco is simply one of the finest models I have ever seen! Fantastic work, Tim!
-
Largest kit box ever?
Straightliner59 replied to OldNYJim's topic in General Automotive Talk (Trucks and Cars)
RevMon used that box for several kits! The Snake dragster/FC combo, in 1/16 comes to mind. -
This is a great subject! I love the different materials you used on the engine. I have a thing for copper! Beautiful work!
-
Thanks, Niko. That's way cool! Now, I remember seeing it, on here. I wish I'd got rid of the exhaust on mine. I convinced myself it was going to be a glorified curbside, and justified not doing it. It was just a couple of weeks later that I regretted not doing it!😅
-
Thank you, Francis! I really am proud of it, and am happy that it satisfied my vision for it. It will be making its public debut, Saturday, at a contest! Thank you, my friend! Frustrating as that stuff can be, I really do enjoy doing it. You're no stranger to it, yourself! Thank you for your kind words, Niko! Do you have a thread for your, on here? I'm a fan of your work! As you stated, it's not a great kit, but it's iconic, and a lot of fun, to build! I'm already working on something to shoot my models against. I'll try to get something posted in the Dioramas Forum, in a few days, although it's not really a diorama, so much as a vignette.
-
Works every time! Even with SAE, back in the olden days!😄
-
Those look very nice! Great idea!
-
Any tin benders here?
Straightliner59 replied to diggerguy's topic in Model Building Questions and Answers
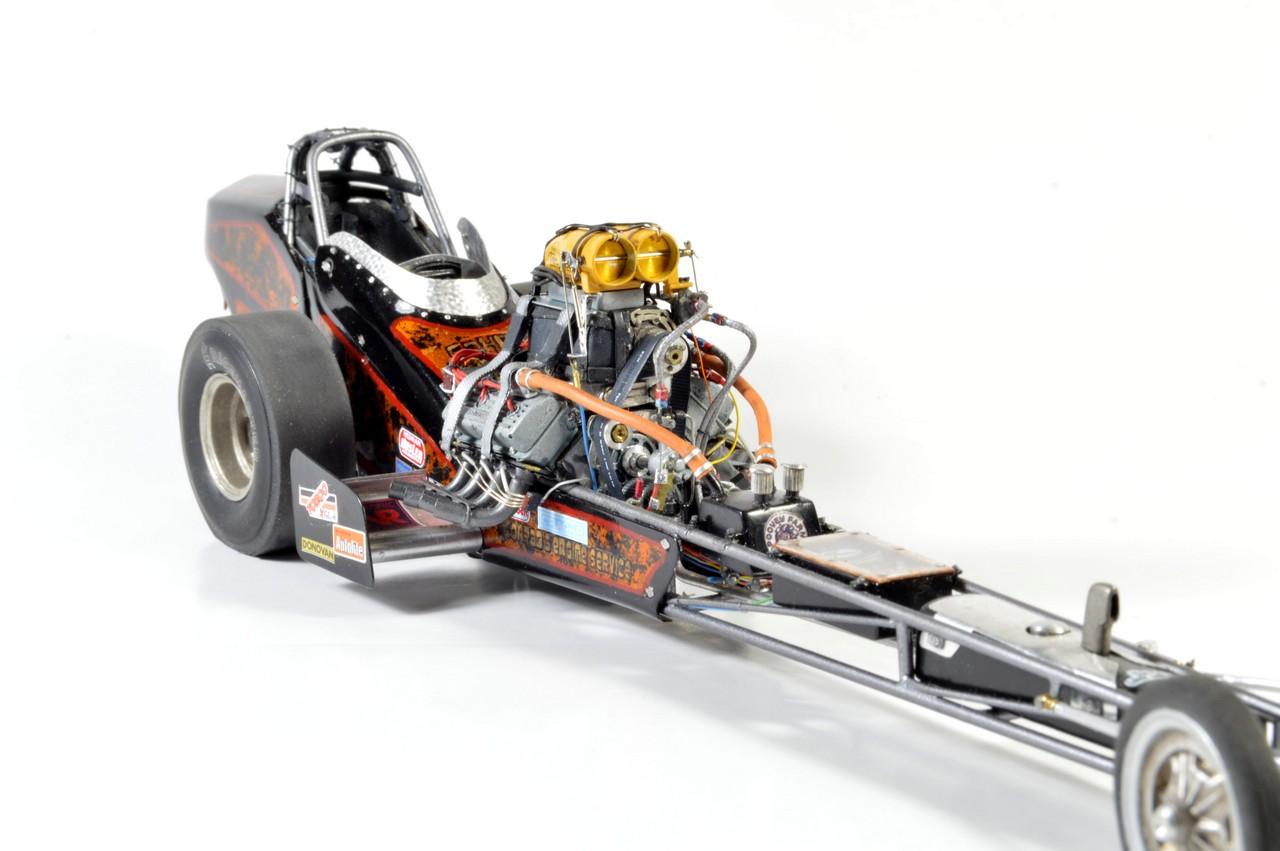
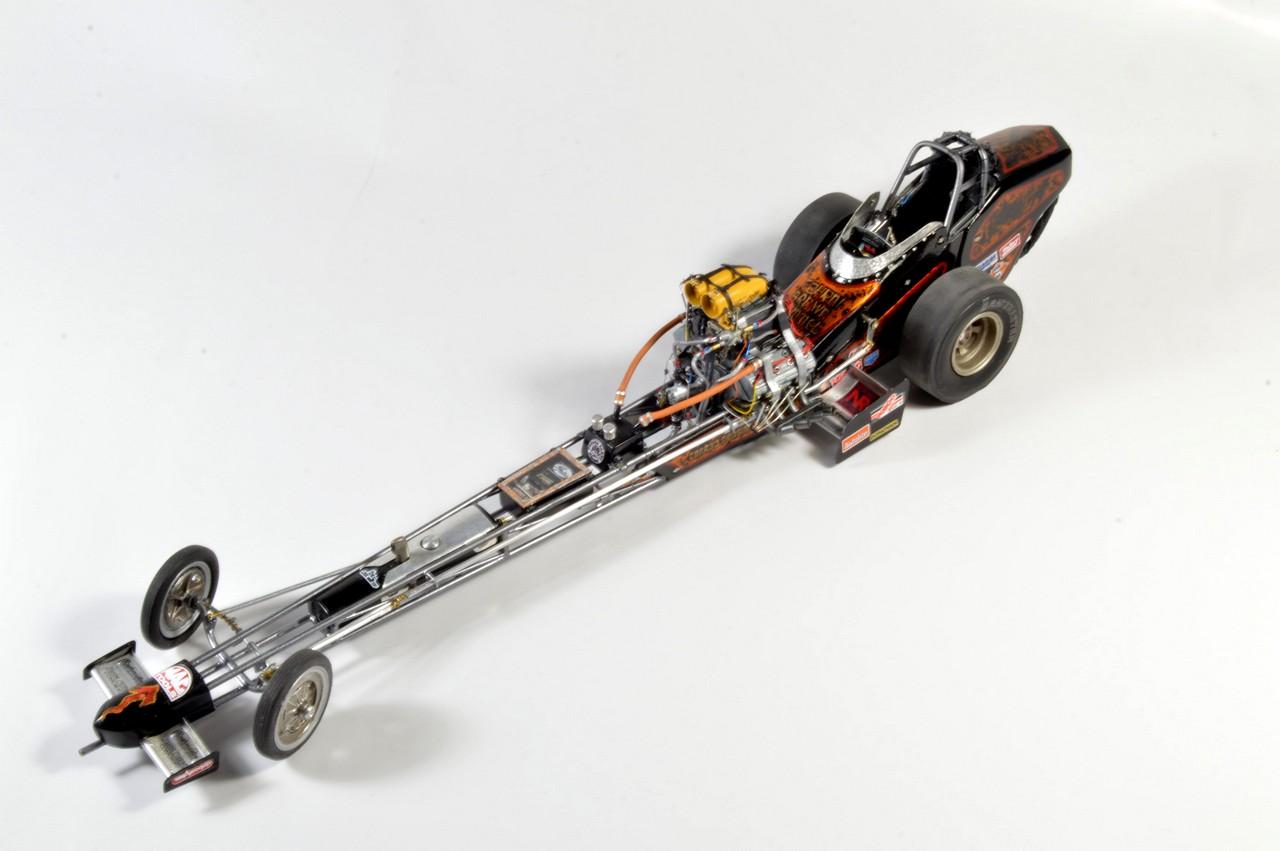
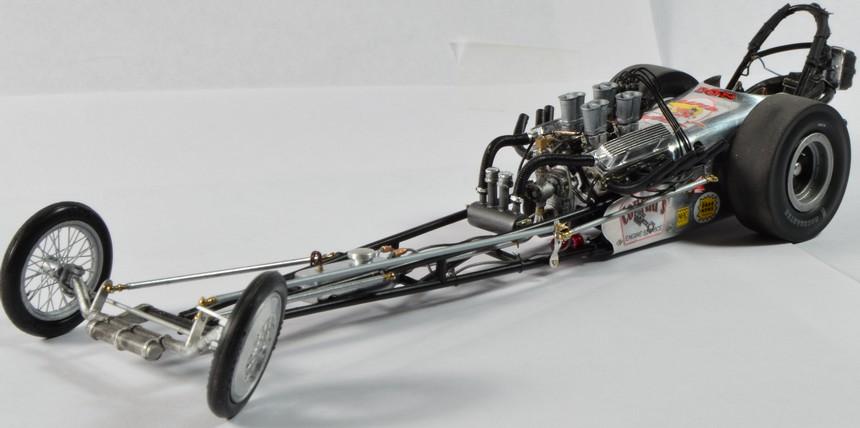
I use a lot of sheet metal. My favorite aluminum sheet is step flashing. I use the 5"X7" sheets. I use it for interior panels, floors, firewalls, fenderwell liners, wheel tubs--you name it! Both these dragsters were built using flashing. The N/TF car has soldered tin nose and tail sections. The front wings and canards are also flashing. The wing on the Supermod is flashing. The three hood sections on the '50s Sprint Car are flashing, with a row of punched louvers.
-
Thank you, Bruce! Sorry for the delay in replying. I wanted to get a few shots of the engine room, since there have been a couple of requests.😃 Thanks, very much, Robert! My next project is in the background, below the engine shots. I'm working on a backdrop, to shoot my models against. It's just going to be a two-sided false-front building on a 10"X10" base. I have some thin pieces of flagstone I'm going to use for the ground/driveway surface. It looks like it may work out, okay.
-
Thanks, Carl! I appreciate it!
-
I appreciate it, Ian! Yes, it did get a little beyond what I thought it was going to be, but, I'm glad it did!
-
I like Krieger's vans! Vanispheres, Caress Of Krieger! More than Krieger, I got Pam over to do heavy lifting!😅
-
This is some fine work, my friend. I know you sweated over this thing, and were dealt more than one setback. It's a beauty, Ian! You can be proud of it, sir!
-
Thanks, Bob!
-
I greatly appreciate your comments, my friend! I'll see if I can get a few more shots of the engine room. I do think it's pretty! Hey, Tony. Thanks! I had to get creative, with the front hood hold-downs, for sure. They worked out, pretty well, and would probably work in 1:1. The wheels are an old spray can of Plasti-Cote Iced Coffee or Topaz, I think. It's one of those two colors, but I don't remember which. I wish they were still being made!
-
I have a couple of thoughts kicking around in my head--there's plenty of room, in there!😄 I'm kind of thinking about a base and backdrop, to shoot models against. Thank you for following along, with this, my friend!
-
I am surprised, the way it started out!🙂 Thanks, my friend!
-
Thanks, Eran! Appreciate that! Hank Borger was one of my early influences. I always enjoyed his work. You should go for another one! There are a lot of interesting things that can be done with it. Thanks, Jim! I appreciate your kind words! You're right about that! Thank you, Larry. Thanks, Brian! For sure happy to see it completed! It really was an enjoyable project.
-
Thanks, Mike! Thank you, my friend! It's interesting you mentioned the smiley faces. When I decided to use them, it was with the idea that it was 1975, and those things were everywhere. Last night, as I was looking over the finished model, I thought exactly that--it's smiling, as it chases down its next "victim"!.
-
Often!
-
Thank you, David! I'm kinda thrilled about it! I think my next project might be a base, with an interchangeable backwall, and/or backdrops, to shoot on/in front of. There's a link to the completed phots, at the bottom of this post. Thanks for following along with this! You're so correct, Pierre--it's always bittersweet to reach the end of something you've become so--there's no more apt way to put it than "intimate with". Perhaps i can find something fairly quickly to keep us both interested!😄 I always appreciate your kind words, my friend. Thank you! On the street, this thing would be a cop magnet, anywhere!😂 I've cleaned the bench off. I'm sure it won't be long before the detritus piles begin to build, again! Thank you kindly, John Michael! Here's the link to the Under Glass post: The End!
-
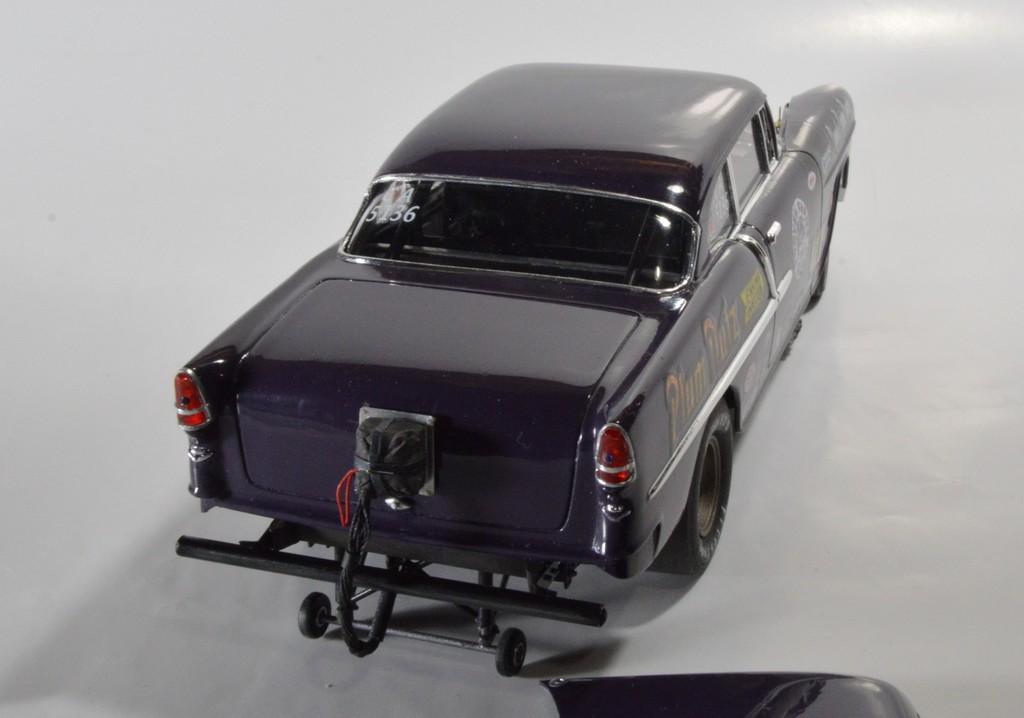
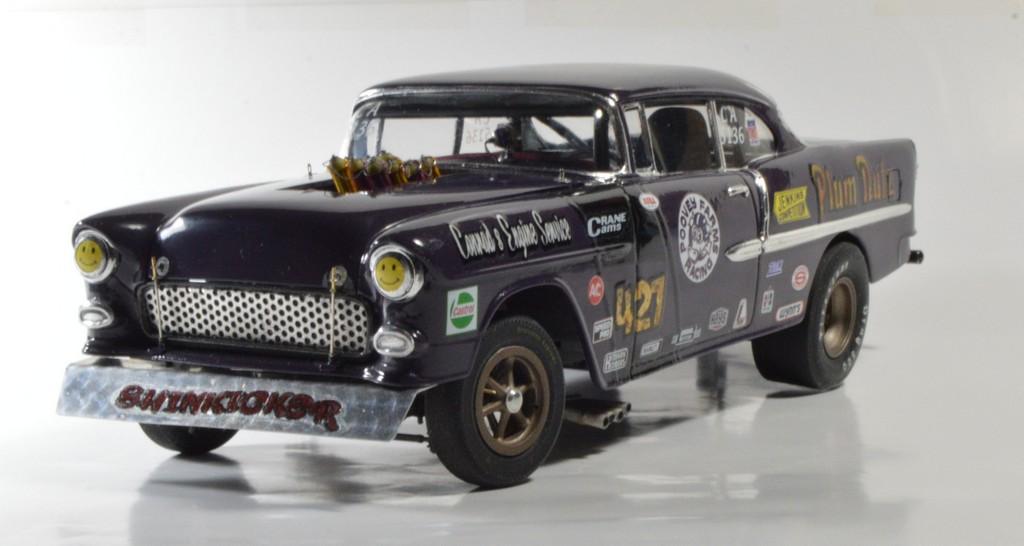
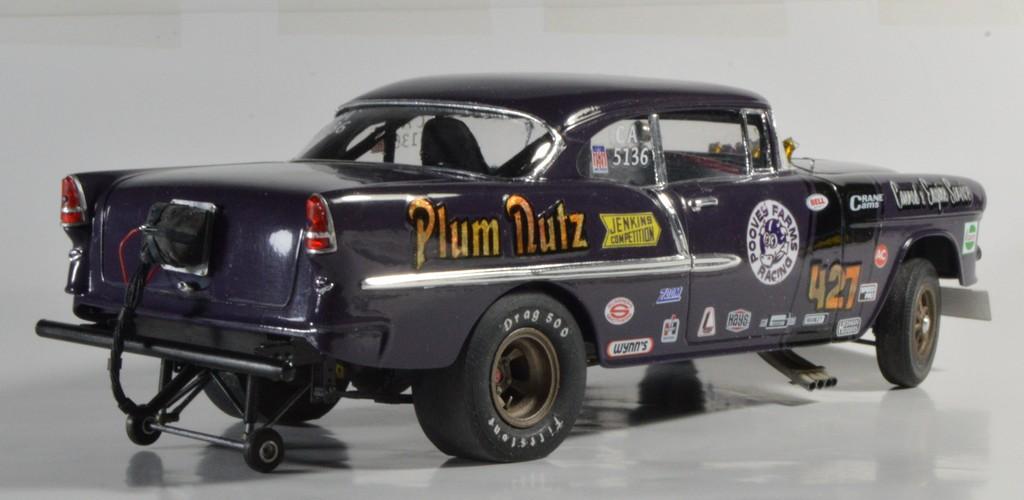
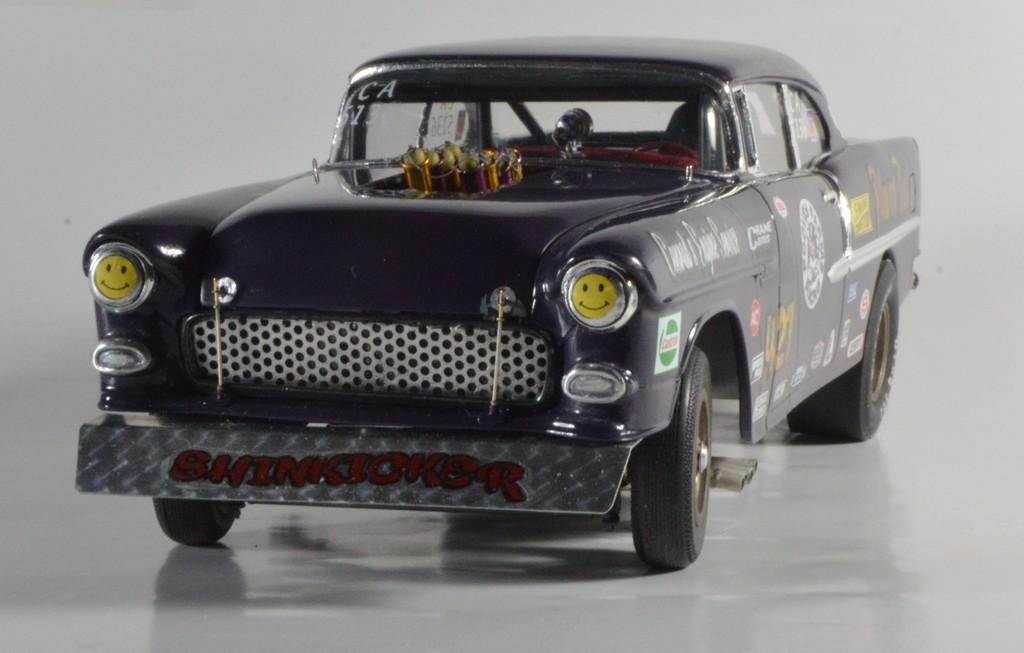
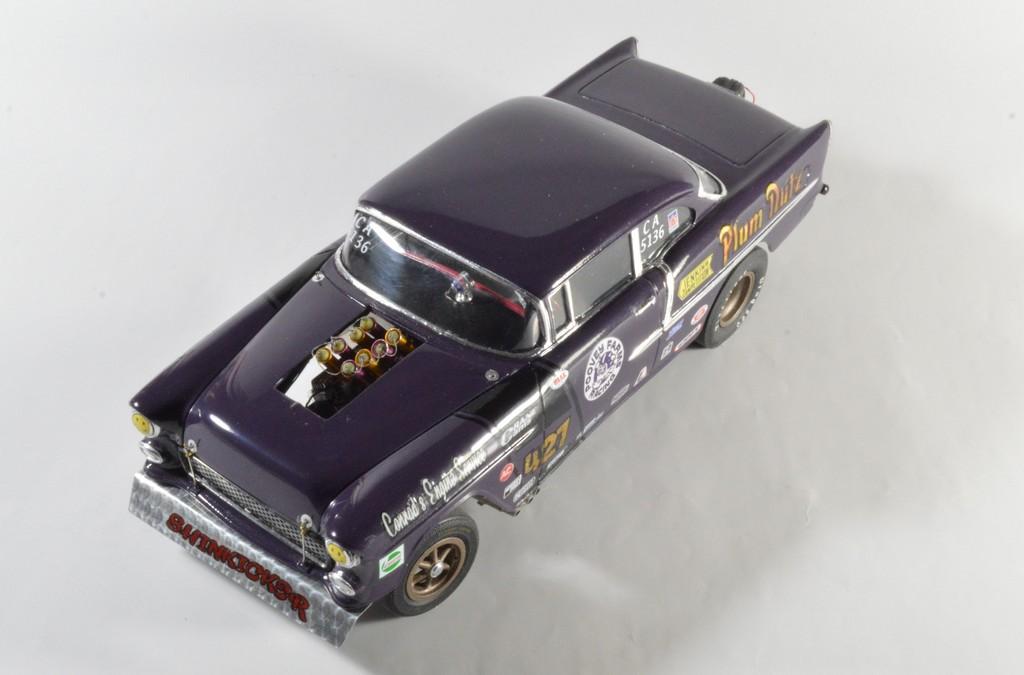
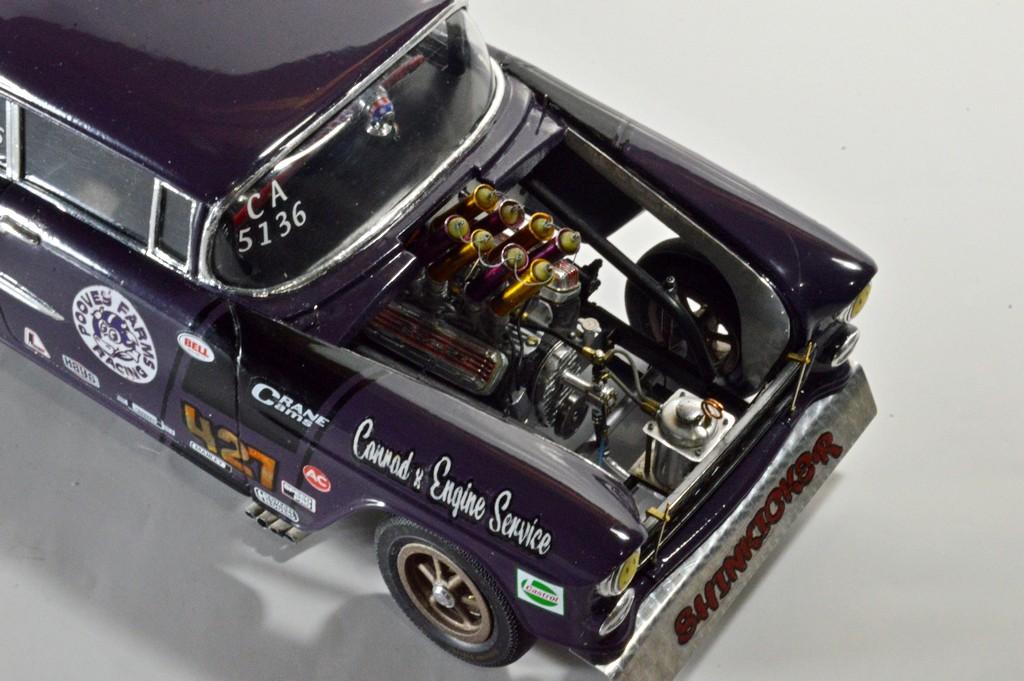
A little over 50 years ago, I built Monogram's iconic Badman kit. While it's not known for its high level of accuracy, it more than makes up for that, in "cool"! I still run across parts from that old build, from time-to-time. Its monofilament fishing line plug wires (I never appreciated the look of thread, although I think I tried it, once), and its ironic carpet-thread attempt at a braided fuel line, reminders, each time I did run into them over the last forty-odd years that I wanted to give that old hoss another spin. I honestly believe that anyone who calls themselves a drag race modeler should build this kit, at least once. For me, given the love I've developed for old Monogram kits over the decades, now seemed like as good a time as any, to do it! When I originally got the vision for this car, about eight years ago, there were two things I felt essential to maintaining the Badman bloodline, so to speak: First, it had to have the distinctive fender slashes, and those had to reflect the proper engine/displacement combination. Second, I always liked the spoiler on the Badman, so I was going to keep that. There were a couple of other things I also decided, early-on that were inspirational in getting this going, as well: The car was going to be purple, and called "Plum Nutz". I wanted to experiment with some techniques for making decals, one involving gold leaf, one, paint. Lastly, I've long wanted to do something like Bruce Larson's bent-stack Chevelle-That worked out, perfectly, here, because straight stacks wouldn't have cleared the cowl. Some highlights include: Aluminum interior panels, heat-formed windshield and backlight, engine-turned spoiler, aluminum stacks, anodized purple and gold, machined timing cover, fuel pump, fuel tank, breather cap, harmonic balancer, and the dash-mounted tachometer. The dash and roll cage are scratchbuilt, as well, as are the Hurst vertical-gate shifter, pedals, steering box and column. There's much more than I can describe, here, but, it's probably all covered in the WIP thread, here: As it ended, it pretty much became what I'd envisioned. I am very happy with it! Your comments, questions and critiques are always welcomed. Thanks for looking!
- 44 replies
-
- 18
-