Straightliner59
-
Posts
5,804 -
Joined
-
Last visited
Content Type
Profiles
Forums
Events
Gallery
Everything posted by Straightliner59
-
Thanks, Mike! Thank you, my friend! It's interesting you mentioned the smiley faces. When I decided to use them, it was with the idea that it was 1975, and those things were everywhere. Last night, as I was looking over the finished model, I thought exactly that--it's smiling, as it chases down its next "victim"!.
-
Often!
-
Thank you, David! I'm kinda thrilled about it! I think my next project might be a base, with an interchangeable backwall, and/or backdrops, to shoot on/in front of. There's a link to the completed phots, at the bottom of this post. Thanks for following along with this! You're so correct, Pierre--it's always bittersweet to reach the end of something you've become so--there's no more apt way to put it than "intimate with". Perhaps i can find something fairly quickly to keep us both interested!😄 I always appreciate your kind words, my friend. Thank you! On the street, this thing would be a cop magnet, anywhere!😂 I've cleaned the bench off. I'm sure it won't be long before the detritus piles begin to build, again! Thank you kindly, John Michael! Here's the link to the Under Glass post: The End!

-
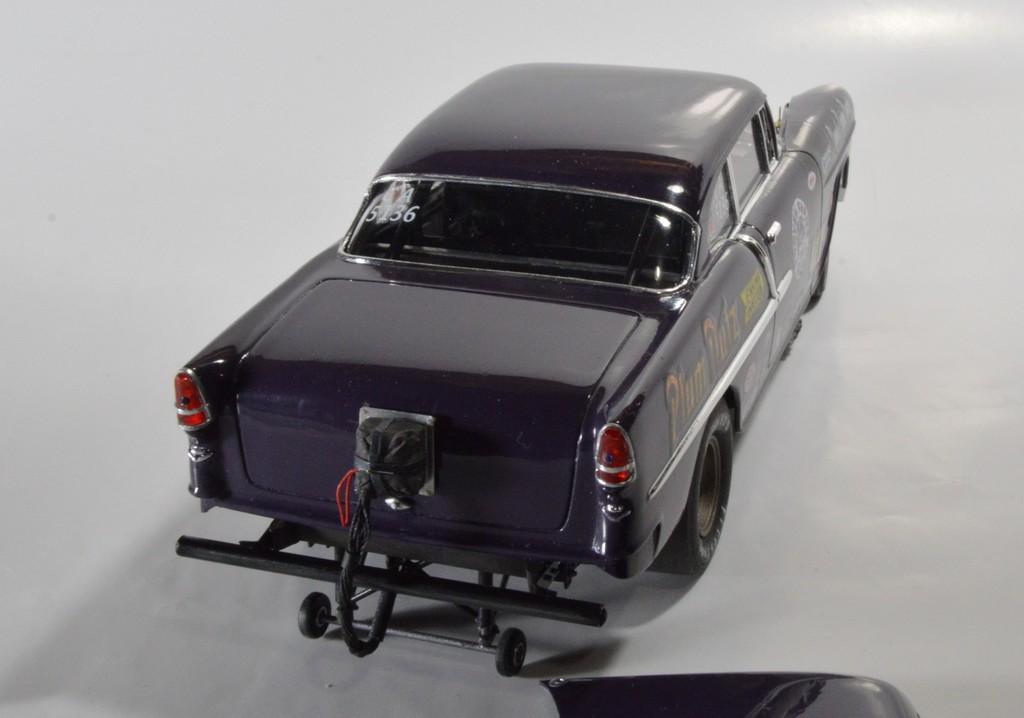
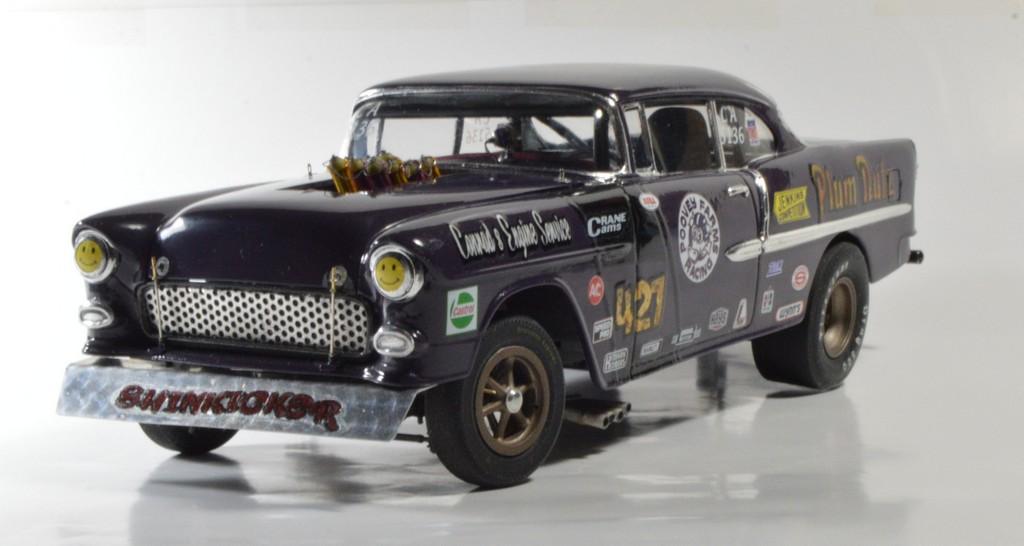
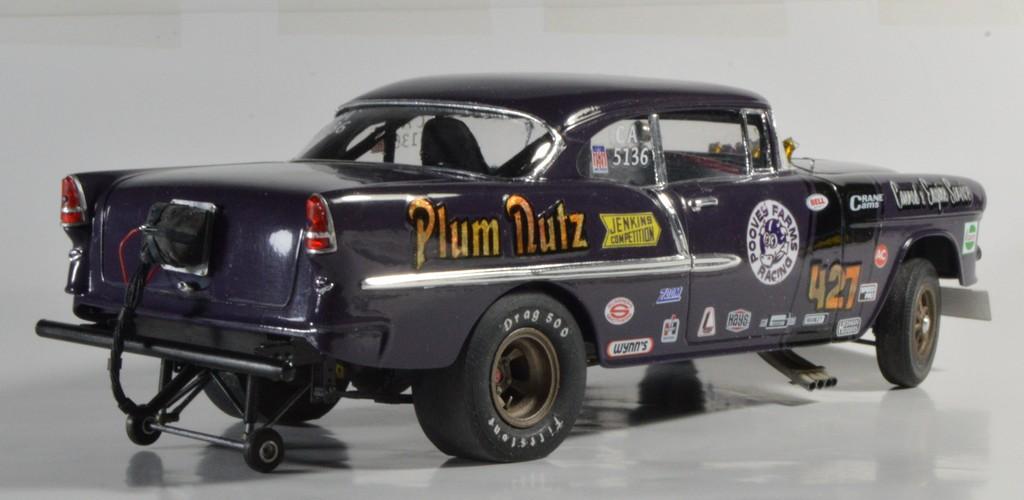
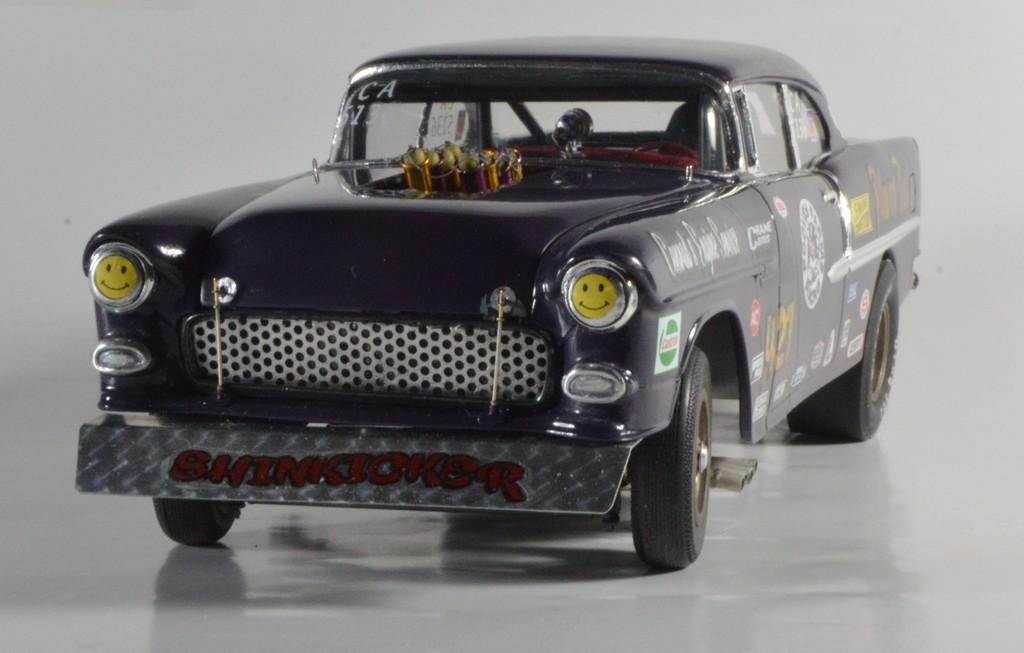
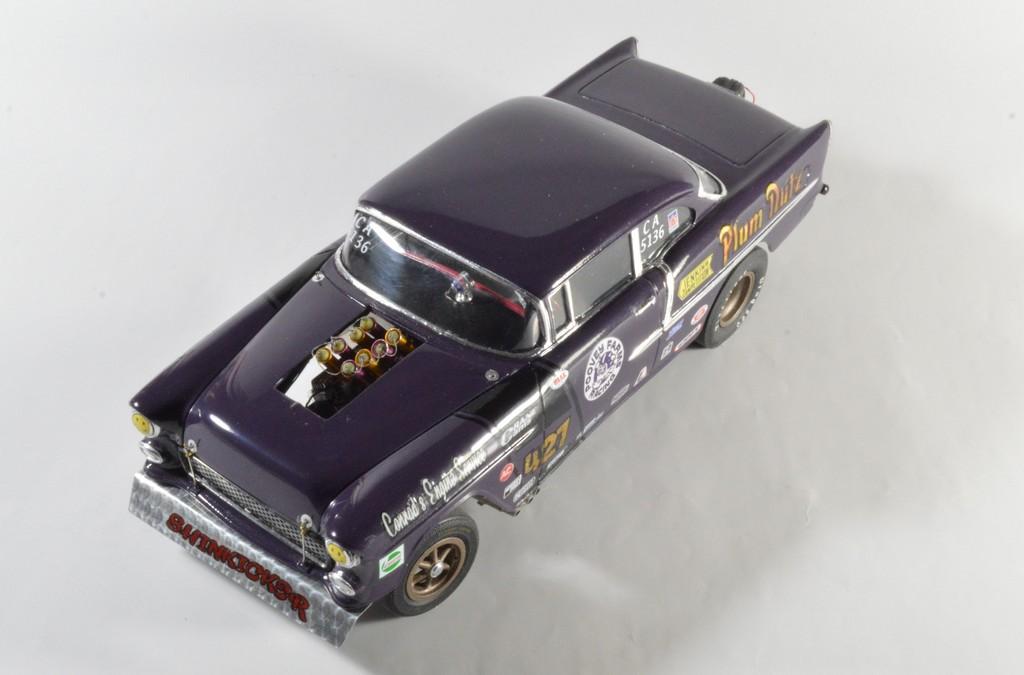
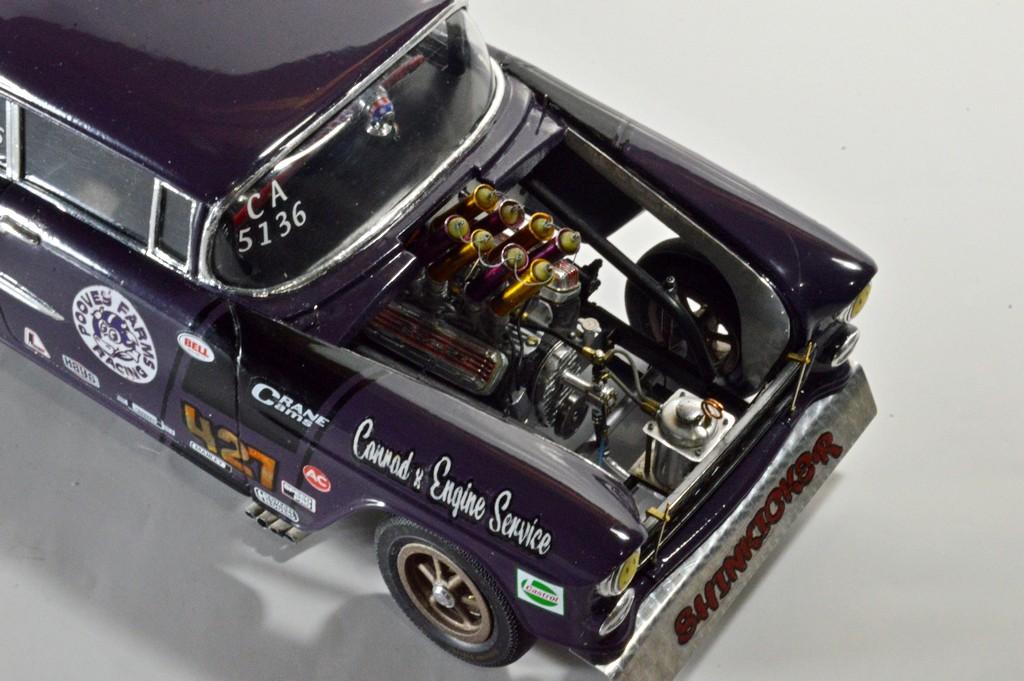
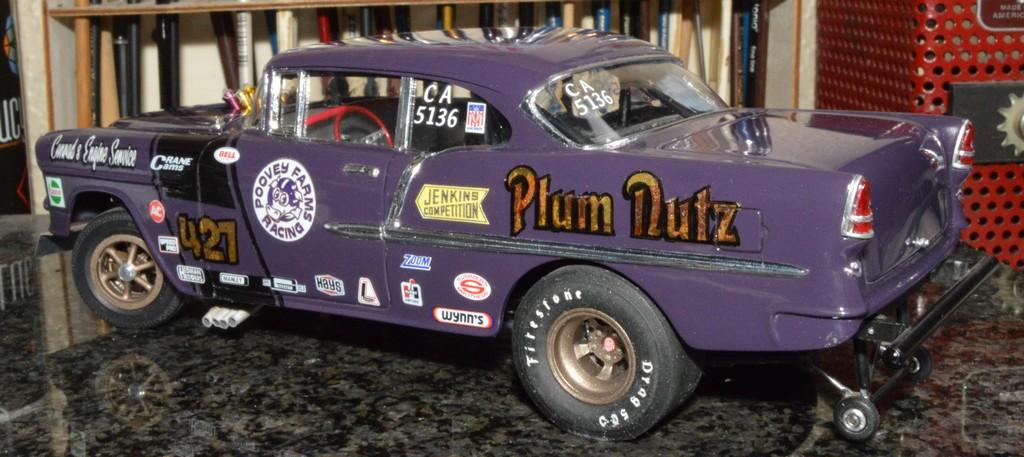
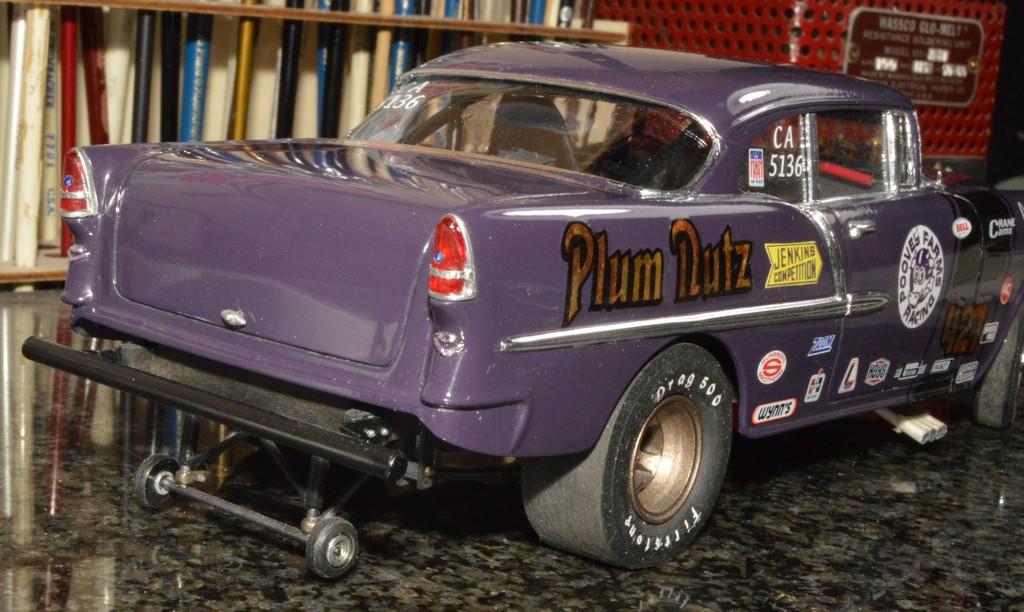
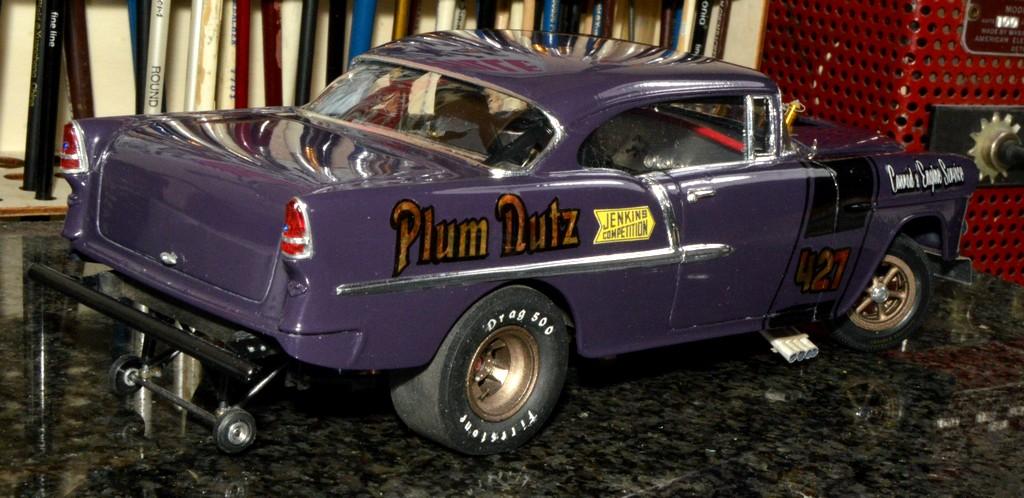
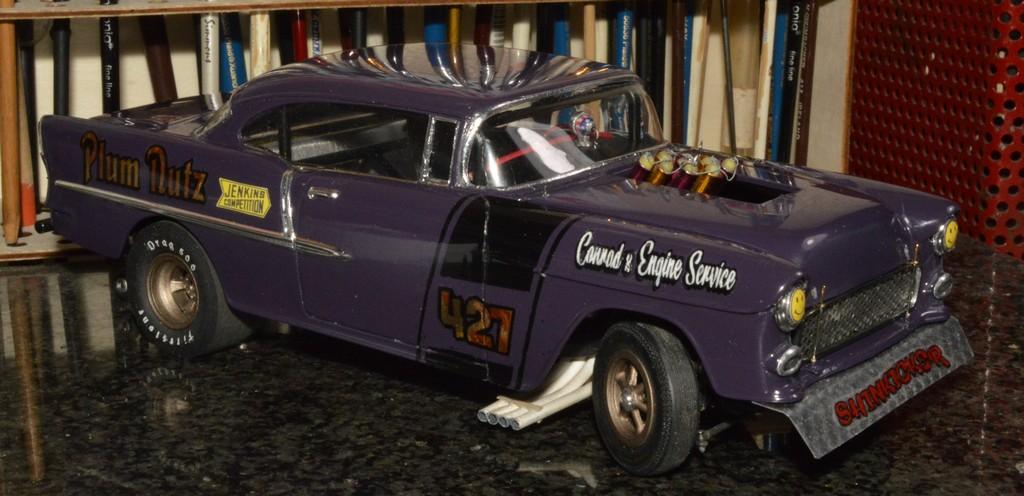
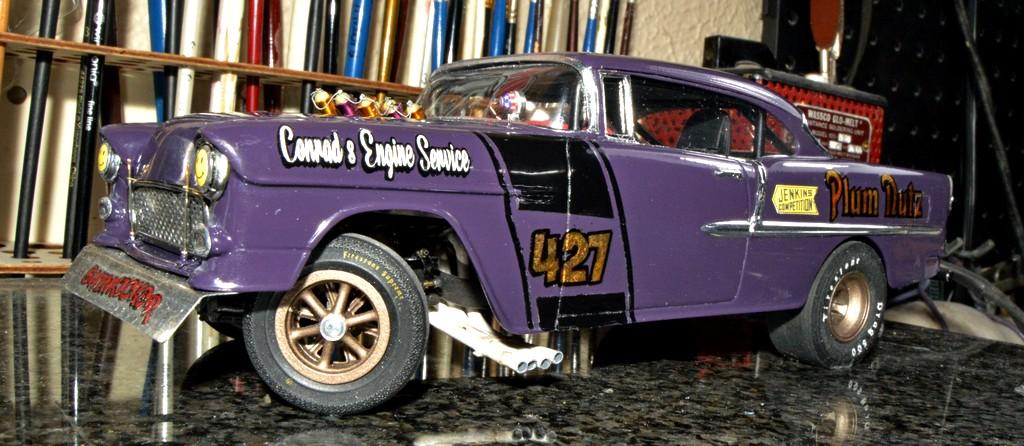
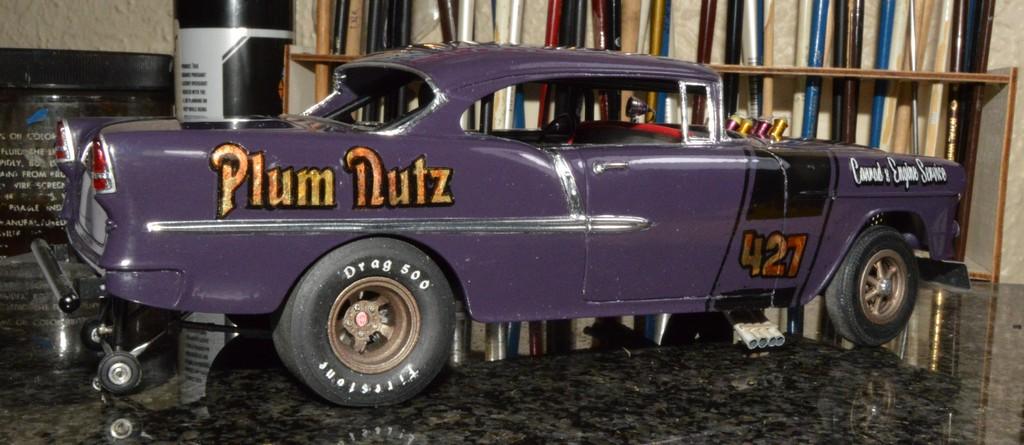
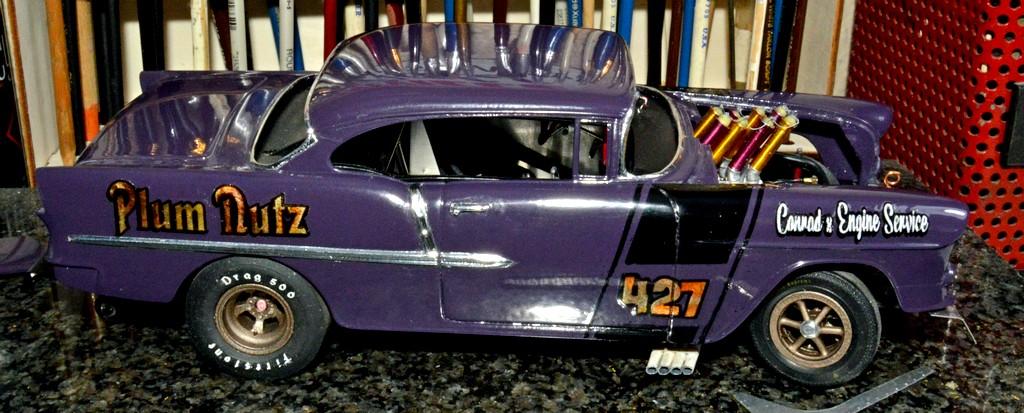
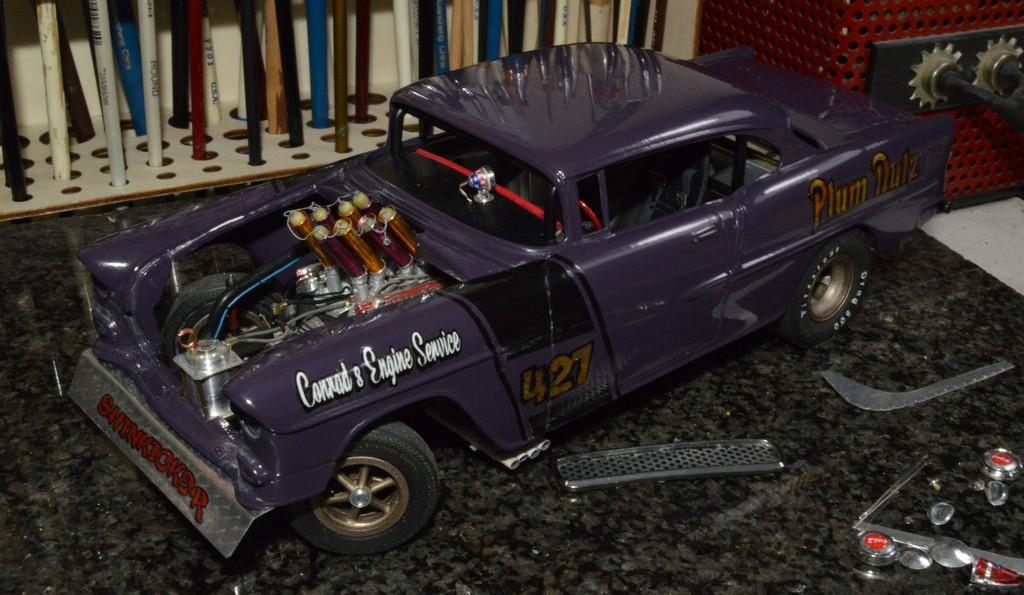
A little over 50 years ago, I built Monogram's iconic Badman kit. While it's not known for its high level of accuracy, it more than makes up for that, in "cool"! I still run across parts from that old build, from time-to-time. Its monofilament fishing line plug wires (I never appreciated the look of thread, although I think I tried it, once), and its ironic carpet-thread attempt at a braided fuel line, reminders, each time I did run into them over the last forty-odd years that I wanted to give that old hoss another spin. I honestly believe that anyone who calls themselves a drag race modeler should build this kit, at least once. For me, given the love I've developed for old Monogram kits over the decades, now seemed like as good a time as any, to do it! When I originally got the vision for this car, about eight years ago, there were two things I felt essential to maintaining the Badman bloodline, so to speak: First, it had to have the distinctive fender slashes, and those had to reflect the proper engine/displacement combination. Second, I always liked the spoiler on the Badman, so I was going to keep that. There were a couple of other things I also decided, early-on that were inspirational in getting this going, as well: The car was going to be purple, and called "Plum Nutz". I wanted to experiment with some techniques for making decals, one involving gold leaf, one, paint. Lastly, I've long wanted to do something like Bruce Larson's bent-stack Chevelle-That worked out, perfectly, here, because straight stacks wouldn't have cleared the cowl. Some highlights include: Aluminum interior panels, heat-formed windshield and backlight, engine-turned spoiler, aluminum stacks, anodized purple and gold, machined timing cover, fuel pump, fuel tank, breather cap, harmonic balancer, and the dash-mounted tachometer. The dash and roll cage are scratchbuilt, as well, as are the Hurst vertical-gate shifter, pedals, steering box and column. There's much more than I can describe, here, but, it's probably all covered in the WIP thread, here: As it ended, it pretty much became what I'd envisioned. I am very happy with it! Your comments, questions and critiques are always welcomed. Thanks for looking!
- 44 replies
-
- 18
-

-

knife blades
Straightliner59 replied to rattle can man's topic in Model Building Questions and Answers
I have been using scalpel and their #11 blades, much more frequently, the last few years. You cam pick up a hundred blades and a handle for about $10. -
I appreciate your kind words, David. I was pretty happy I was able to fix that paint! Here's where it is, now...All that's left is the 'chute, which I am working on, now, then some cleanup and touchup, and it's off to the display case. My next photos will be glamour shots! It looks like a race car, now!
-
I think Steve Guthmiller does it, that way. My current project, I cut them off and replaced them with aluminum sheet.
-
First, sorry to hear about the shoulder. Ouch! Second, the Lenco is tits!
-
I shoot clear, right after I print the decals. I like to use Sign Painter's One-Shot for the paint, if I have the color, I need. It flows out, beautifully and i's very opaque, so it can be thinned, allowing for a physically thinner coat of paint.
-
Just a few things to finish up, Pierre. It's very close! Thank you, my friend!
-
-
A bit more done. I made a trunk latch handle from a couple of pieces of aluminum armature wire. Added a couple of Jenkins Competition decals, and got the front and rear glass formed. I was finally able to get a new printer cartridge, so I printed some new possibilities for the headlight covers. Most recently, I painted the inside of the body. I'll install the glass, later on. At that point, I think I can mount the body...Thanks for looking!
-
So good to see the old Harley back!
-
Any Tutorials On Making Inkjet Decals?
Straightliner59 replied to oldcarfan's topic in Tips, Tricks, and Tutorials
Thank you, Gary! I've had a ton of fun, with them! -
That shouldn't be too long! I'll get something done with it, tonight, and a bit more, tomorrow. I want to add a coat of paint to the hood, because when I polished it, I must have burned almost through, in a spot, because there appears to be a line, across the nose. Not a big deal. I also want to add one of those "T"-handle latches to the trunk lid, along with the other items I still need to do.
-
Thanks, Dennis! I'll be happy to have it done. Indeed, it's Bare-Metal. It really does make for a well-finished model. It sure is a pain, though!😄 Thank you, my friend! I was so impressed by the work you've recently done to the Demon, that I forgot to comment on your thread. Please accept my accolades, here!
-
Any Tutorials On Making Inkjet Decals?
Straightliner59 replied to oldcarfan's topic in Tips, Tricks, and Tutorials
I've been using both Koala and Blinggasm inkjet decal papers the last few years. I like the Blinggasm for white, and Koala for the clear sheet. I usually shoot some Krylon clear over them. I've been thinking about doing something on how I've done them, but, it'll take some time, before I find the time to do it!😄 I've been making most of the markings for my models for the last eight years, or so. I think it's really helped me to complete more projects, because it's given me more control over them. Here are a few examples. This is my current project. I created these using three layers; two of decals, and one of either paint, or gold leaf. They're thicker than I'd prefer, but, they look cool! These were pretty basic. I "built the Texaco logo using vectored shapes in a photo program. I did the lettering in the same program. I really like the way these came out. These were made with graphics I found online, and assembled. They were printed on white film, and trimmed, closely. I "assembled" the Conrad's logo. That, you'll notice is a recurring theme, with my models. It's a tribute to my Dad. The photo program I use is called PhotoImpact Pro 13 (it's old, now), but it works well, and I am very familiar with it. Here are a couple more examples. Also, I have recently started using an online converter to convert graphics to .svg format. I'll see if I can put something more specific together, that's more informative.
-
I'm not calling this done, because it's not, but it's what I envisioned, and the vision is complete! I wasn't planning to post anything, but, I got excited.😃 Obviously, I still need to do the glass. I still have the driver's-side wing window to foil, as well as the emblems beneath the taillights--I have an idea I think will work well, for them. I have a few scratches that'll need to be polished out, before I mount the body, too. Your questions, comments and critiques are always welcomed. Thanks for looking!
-
Thank you, my friend. Yes, it is almost there! Because I knew these decals were going to be pretty thick (two layers of decal film, and either paint, or leaf, between them) I used Krylon Crystal Clear Glaze. I figured it would build, easily, and provide enough body to protect the decals. It's heavier than I like, and, often I don't use clear, because...race cars!😂 It worked out pretty nicely, I think! I have one vent window left to foil, then that will be finished. I need to install the hood pins, the glass and the "headlights", and mount the body--which drops right on! Soon, Pierre, soon!🙂
-
Thank you, Charlie. I am sure your paint will be excellent. Your work is always exemplary and inspirational.
-
Great looking engine compartment! Beautiful work!
-
Pony Express 70s BB/FC ex M/T Pinto
Straightliner59 replied to Ian McLaren's topic in WIP: Drag Racing Models
Awesome work, Ian! This looks beautiful! Glad to see it completed! -
Most of the foil is done. Still a few little items to do, but those pesky windshield and backlight surrounds are done! I'm excited to see it completed, and satisfied with it. Thanks for looking!
-
Thank you, Francis! I am calling it good, now! On to...ugh...foil!😄 It's getting very close!
-
Thank you, Bruce. I appreciate that! I should get the left side of the car done, later, after work. I said "right" earlier, but, I meant the other "right"!😁 Thanks, Brian! I'm hoping to get it finished sometime, tomorrow. Of course, you know how that goes!