Straightliner59
-
Posts
5,803 -
Joined
-
Last visited
Content Type
Profiles
Forums
Events
Gallery
Everything posted by Straightliner59
-
I thank you, my friend! I think you just might know a thing or two about determination, yourself!
-
 Testors 1146 has never been out of the line.
 -
Mercedes Benz SSK
Straightliner59 replied to Pierre Rivard's topic in WIP: Other Racing: Road Racing, Land Speed Racers
Those wheels look much better! I have some parts from a Johan kit lying around here, someplace. -
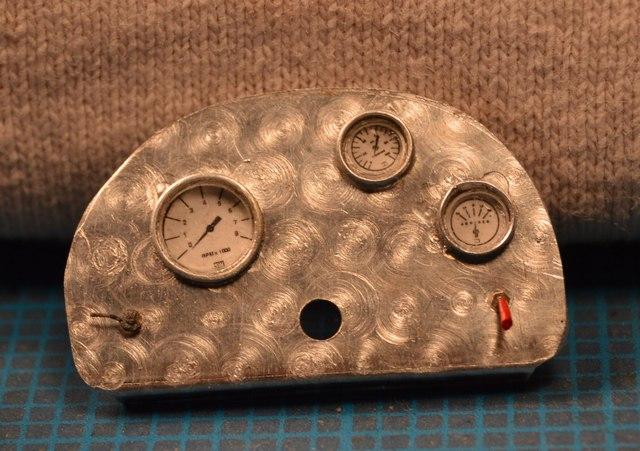
I have punches in many sizes. I just find the right size, and make some clear plastic discs to fit. That said, I most frequently just build my gauges, so I am able to use/make stuff that fits together (proper sized "glass" for the opening).

-
Body Holder for Painting
Straightliner59 replied to bill-e-boy's topic in Tips, Tricks, and Tutorials
I think I probably bent my first one up in the mid-'70s, or so. It's been around for longer than I, I suspect. -
That's what I strive for. Most of the guys in modeling I have "hung out" with (some are online friends) espouse that philosophy. The guy who first got me interested in this stuff told me that, too. He probably hasn't touched a model in 50 years, but his advice stuck with me. Without scratchbuilding, I think I would be bored with modeling. I mostly started scratchbuilding, because I simply found it more enjoyable than scraping and sanding mold lines, etc. Your kind words are always appreciated, my friend! I am very happy with the way this mag turned out!
-
Pony Express 70s BB/FC ex M/T Pinto
Straightliner59 replied to Ian McLaren's topic in WIP: Drag Racing Models
Coming along, nicely, Ian! Body is looking great! -
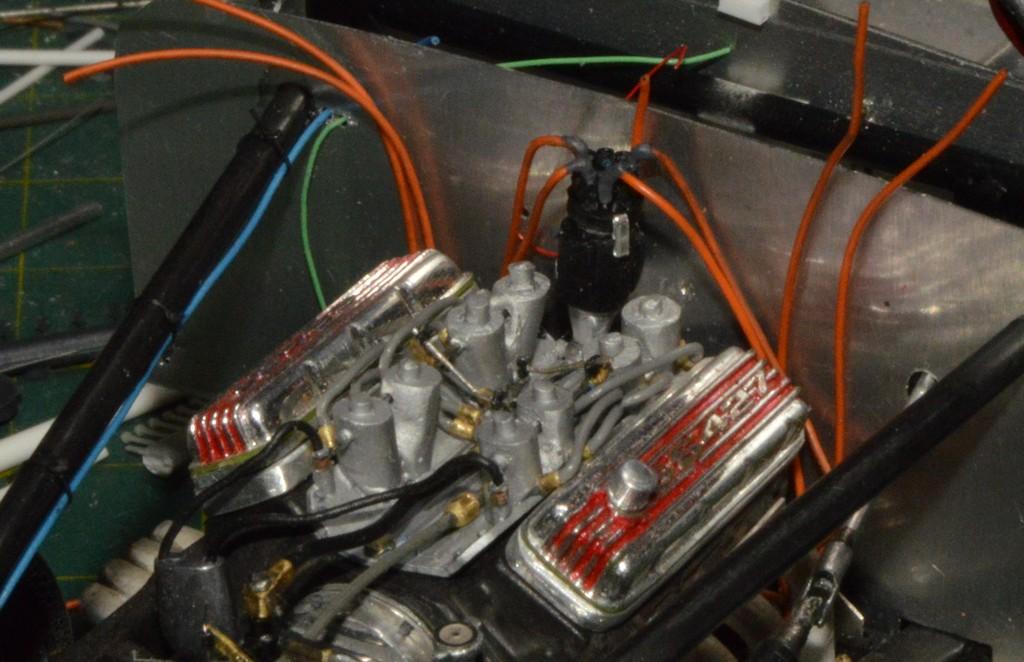
I had hoped to get a little farther along with this, but, we had some arguments, along the way. I have four cylinders hooked up. Once these are finished (I see a bit of touchup I need to do, on the cap), I am pretty sure I can install the stacks! I got the tennis balls inserted into the stacks. I used Alene's tacky glue, for easy cleanup, in case. I'm about to doze off, so I'll try to remember to elaborate on the boots, after work. Thanks for looking!
-
From where we were, this morning, we've come to this! It's easily the most detailed mag I've ever built. The cast-appearing body and the sorta shiny cap were both shot from the same can of paint--Krylon Satin Black. It's a nice contrast of textures, I think. I made the Cirello tags a few years ago, for my Junior Fueler. I already had them applied to aluminum duct tape, so all I had to do was cut one out, and stick it in place. The cap hold downs are just folded tooling aluminum. It's not cemented into place yet, but will be, as soon as I figure out where I want to mount the ground wire. The red wire will exit through the firewall. I couldn't find a schematic that showed specific colors for the wiring, so I went standard red/black. The coil wire isn't cemented in, yet, either, as it will be easier to wire the plugs, first. Next will be making 90-degree wire boots. They're labor-intensive and can often be frustrating. They're worth it!😃 Actually, those will probably be second on the list. First, since I've already dirtied my balls, I will probably install them. Yes, there will be pictures!😂 As always, questions, critiques, and comments (even smart-alecky ones) are always welcomed. Thanks for looking!
-
Body Holder for Painting
Straightliner59 replied to bill-e-boy's topic in Tips, Tricks, and Tutorials
I've used one that's very similar, that I put together years ago, however--that silicone tubing is pure genius! Next time I see some...thanks for the tip! -
Thanks, Brian! I just love making this stuff! I'll start doing something, and forget to eat for hours. I might be a little nuts, but, it's fun!😅 Thank you, kindly, Pierre! Hey! I gotta' keep up with that Mercedes!😃
-
Here are the castings, and, finally, I think, better photos of the mag.
-
The completed '57 Chrysler 300, This is the "Build" of it!
Straightliner59 replied to 426-Hemi's topic in WIP: Model Cars
The turbos look awesome, and this is a great reference for building some. I agree with Greg--hope the guy's okay. -
Stopped in at the best shop in town, last evening and picked up a few unexciting items: The latest contest issue from the remains of the other magazine, a package of 1/16", and one of 3/32" K&S aluminum rod, and a smaller bottle of Mr. Color Levelling Thinner, because I've heard good things about it. I may try it in the One-Shot purple I mixed for the Badman project I'm working on.
- 39,065 replies
-
- 3
-

-
- johan
- glue bombs
- (and 1 more)
-
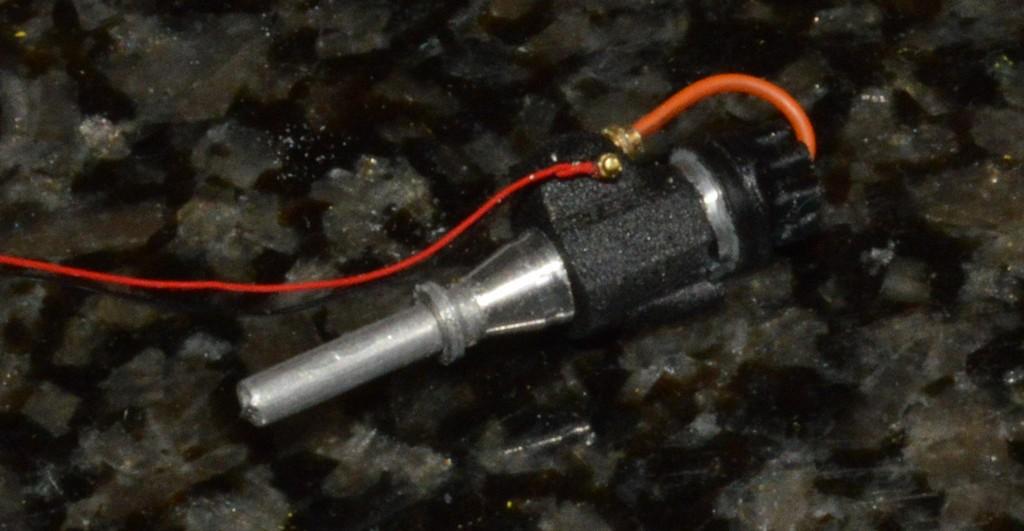
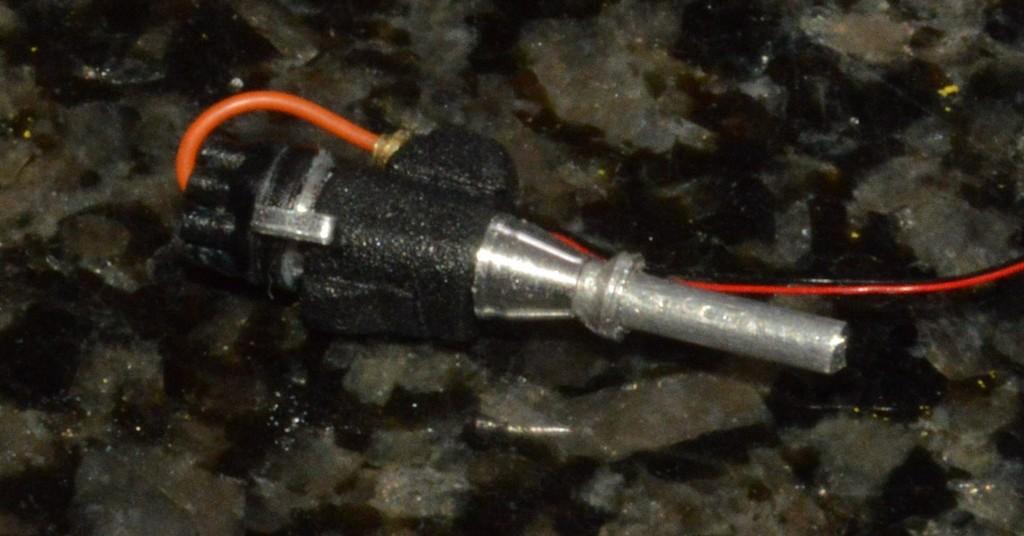
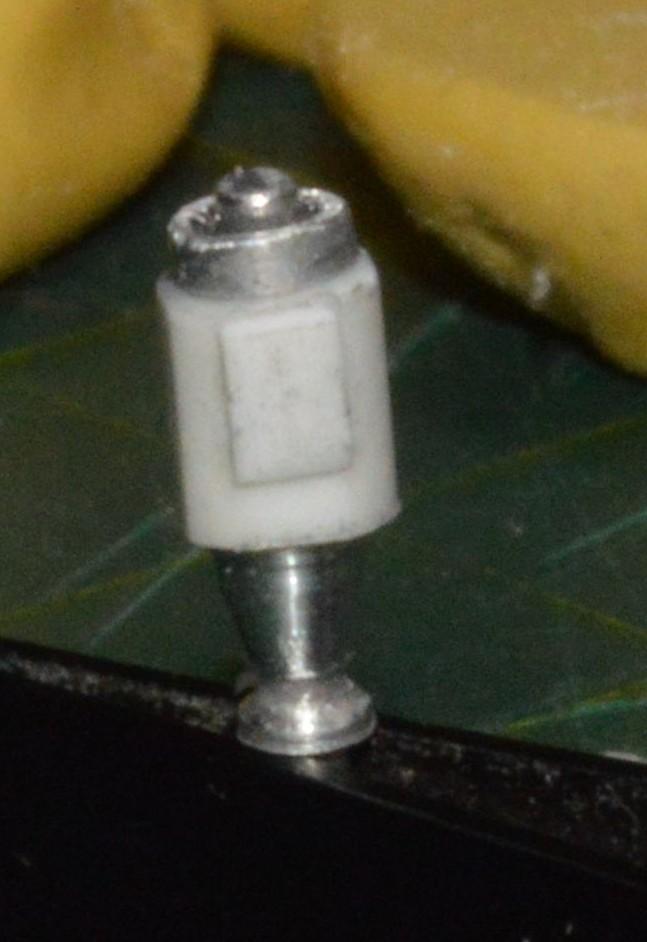
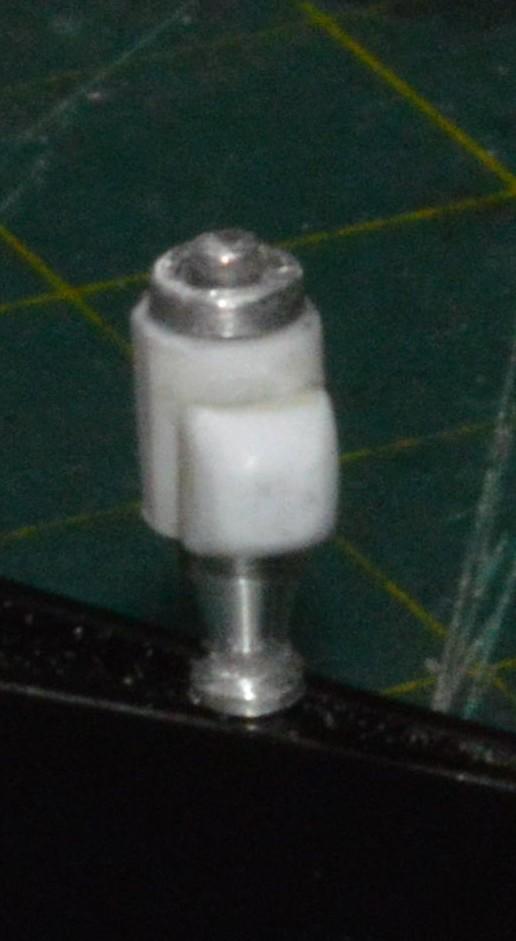
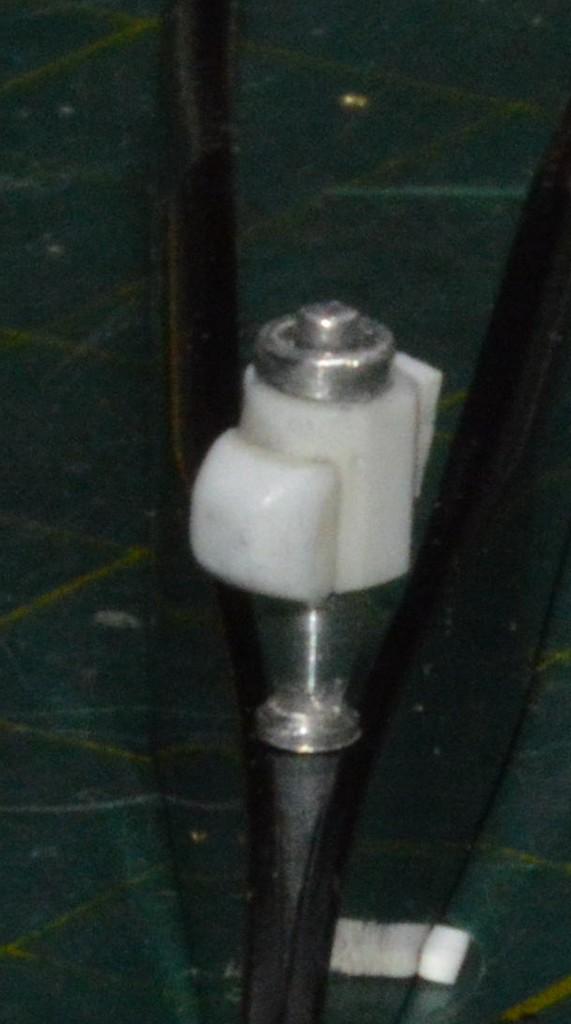
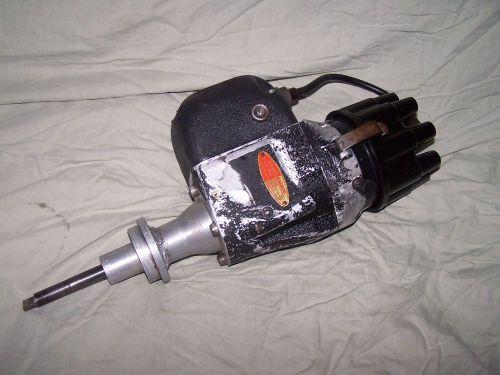
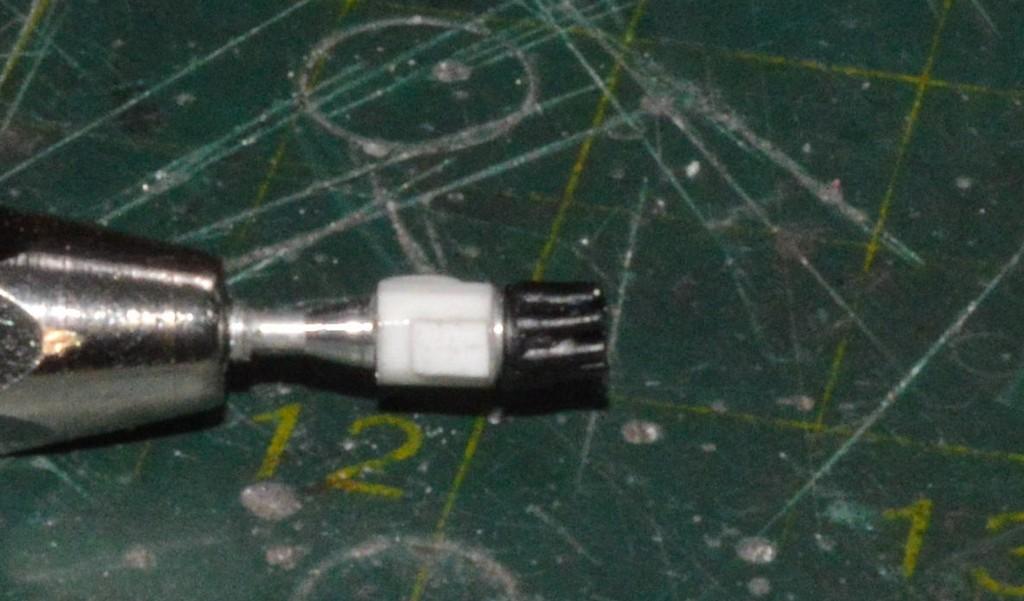
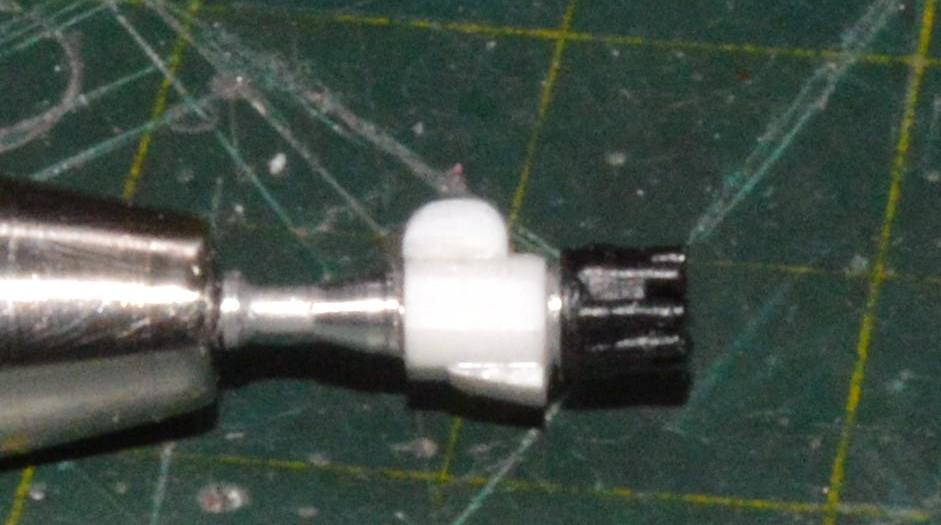
Thank you, sir! I'm in the process of making new mag caps--well, I'm to the point of cleaning them up. They're cast from nail resin, with lugs/teats of old Bell phone wire insulation. Here's a link to a tutorial I did on making them. It's cheap and easier than drilling holes in a 1/25 mag/distributor cap! Here are a couple of photos of what I have going on, now. One thing I will say for these--they're durable! I've never had one of the bits of insulation come free, even with rough handling. I was hoping for better photos of the mag, as well. Also, I've included a photo of what I'm going for a reasonable facsimile of. Anyhoo...Thanks for looking!
-
Steering gear gaiters?
Straightliner59 replied to YellowHound's topic in Model Building Questions and Answers
You could also stack plastic discs (or rubber). Then drill through for the rack. That would be a drawback for the rubber. Maybe tiny O-rings, stacked? -
Old glue bomb kit, what went wrong?
Straightliner59 replied to kymdlr's topic in Model Building Questions and Answers
AMT was using some pretty funky plastic, around that time. It was almost rubbery. It was difficult to keep mods and sanded-off details from reappearing after primer. -
49 Ford High and Mighty inspired
Straightliner59 replied to Ferbz's topic in WIP: Drag Racing Models
I've had good results with contact cement. Lately, I have been using GS Hypo cement, and it seems to be working, so far. Flashing is very easy to use, for flat panels--especially where rigidity is needed. For compound curves, it has to be annealed, first. The body for my Nostalgia Top Fuel dragster is flashing, except for the nose and tail sections, which are tin. If you have any questions, feel free to ask. I have a fair amount of experience!🙂 -
49 Ford High and Mighty inspired
Straightliner59 replied to Ferbz's topic in WIP: Drag Racing Models
Also, for aluminum, I like Maid-O-Metal tooling aluminum and aluminum flashing from the hardware store. I use a lot of aluminum! -
I've started working on the Cirello mag. I will make a new, lower-profile cap. Still a detail or two, to add, and some shaping.
-
Those are awesome! I could use some of those, myself!
- 39,065 replies
-
- 1
-
-
- johan
- glue bombs
- (and 1 more)
-
49 Ford High and Mighty inspired
Straightliner59 replied to Ferbz's topic in WIP: Drag Racing Models
That aluminum duct tape looks like the perfect solution, in this case! Good thinking! I love working with aluminum in many forms. -
I appreciate that, David! I never messed around much with large scale, because...well, I know me! It would likely get pretty nuts!😂 First off, thank you, very kindly, Pierre! As D.W. said, many of them didn't have any kind of cooling system. Especially in the Altered, Dragster and Funny Car classes. Mostly, they'd fill the water jacket, and give the water a place to expand to, as it heated (the canteen, here.). I recall seeing quite a few of them with draincocks, just above the oil pan rail, one on each side of the engine. Generally, they're not running for more than about a minute at any given time. In this instance, I simply mounted the filler neck to the hole where the water pump would attach to the front of the block. The other water port is simply blocked off by the bracket that mounts the canteen. The two lines that feed the canteen are the expansion lines that drain from the ports where the water crossover, and upper radiator hose and t-stat would be, on a stock-type system. Modern "big show" fuel cars run (I'm pretty sure) 32 injectors! Eight each to the hat, and manifold, and two down nozzles per cylinder, in the heads. It's insane! Modern Nostalgia Top Fuel cars run 16. Eight each to the hat and manifold. Down nozzles are not allowed in N/TF.
-
Well, that's done! I like the water filler neck. I stretched some bendable plastic rod, then bent it, after it cooled. I think it's a good shape, and it fits where it's supposed to! It would probably be better, mounted in a higher position on the engine, but, it has to be somewhere the water jacket penetrates the block, so, this'll do! Thanks to Muncie, for pointing out an error, to me! It's much appreciated. The manifold's installed, as well. On to the mag! Thanks for looking!
-
Out-of-production DeTomaso Pantera kits
Straightliner59 replied to jeffs396's topic in Car Kit News & Reviews
Well, that brings back some memories! What a cool place that was!