Straightliner59
-
Posts
5,803 -
Joined
-
Last visited
Content Type
Profiles
Forums
Events
Gallery
Everything posted by Straightliner59
-

Kit purchasing questions.
Straightliner59 replied to CA Whitecloud's topic in Model Building Questions and Answers
Pretty much from the beginning, meaning when they were called FX or Factory Experimental. At first, they were allowed a 2% alteration in wheelbase--they were allowed to move the axles forward 2% of the wheelbase. It quickly changed when the wheelbase alterations became more and more radical, and people started saying they looked "funny". It stuck! -
I've been enlightened to an error!🙂 A bit more "figgerin'" is in order!
-
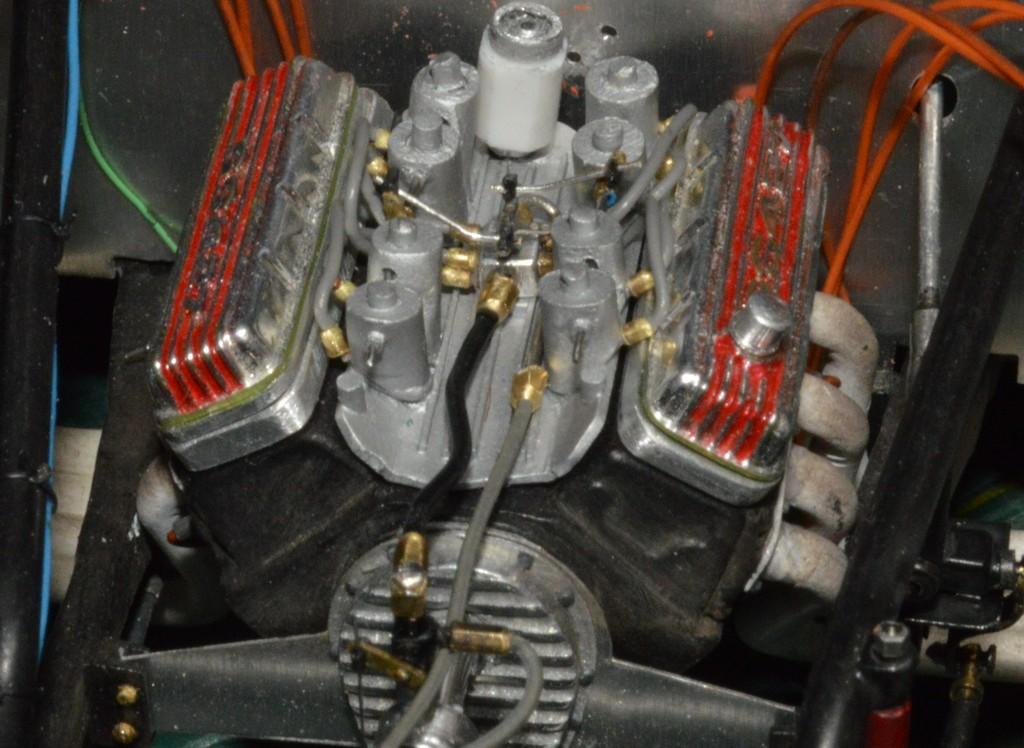
I've been fiddling around with the cooling system--what there is, of it. It consists of a place to add water (the brass-colored hex cap at the front of the manifold), and a place for it to exit, and to collect, as it expands. i cleaned up the canteen from an AMT Wynn's Charger, and drilled it and added a brass hex-shaped cap, and an eye (made like those for the tennis balls) for something to attach a tether, of some sort, to. I still need to make the mounting bracket. That will mount to the holes that mount the water pump, and will double as a block-off for the water pump holes. It should look pretty cool, I'm thinking! I'm getting pretty close to building the mag, and getting the plug wires (with their 90-degree boots) done. Those will be fun! As is always the case, your questions, comments and corrections are welcomed. Thanks for looking!

-
Who was building in the 60s?
Straightliner59 replied to OldNYJim's topic in Model Building Questions and Answers
I know a lot of guys used corduroy fabric for seat coverings and interior door panels. I didn't start building until '72-'73. I used thread for spark plug wires, once, and hated the look, so, I started using monofilament fishing line, and had to make anchors of bread tie wire, to hold them down! I drilled into the engine, and glued them in (I left one end like a pin, the other was an elongated loop, to enclose the "wires"). I would pick up phone wire, around the base of any pole I found it. As far as tools, pretty soon after I started building, I found a Globemaster vise in one of those cheap tool bins in an auto parts store. I still use it, today. Even then, if I thought it might be handy, at some point, I'd get it. I remember using washers for brake rotors. I'm sure there'll be a ton of more interesting stories, than mine! -
Brush Painting
Straightliner59 replied to TransAmMike's topic in Model Building Questions and Answers
I was going to suggest that Pierre might have a thing, or a thousand, to share on this subject! I see he's chimed in, now. When it comes to brush painting, I'd consider his word the gospel. -
Mercedes Benz SSK
Straightliner59 replied to Pierre Rivard's topic in WIP: Other Racing: Road Racing, Land Speed Racers
You're making great progress, Pierre! Plug wire boots are excellent. Love watching fine scratchbuilding--and this is a sure place to find it! -
WIP Cannonball 2025 group build Maverick
Straightliner59 replied to bobthehobbyguy's topic in WIP: Model Cars
This has some major cool potential! -
Mercedes Benz SSK
Straightliner59 replied to Pierre Rivard's topic in WIP: Other Racing: Road Racing, Land Speed Racers
I know the situation, well! It took me decades to learn to move on. I only really have, the last five years, or so--interestingly, my most productive years! Still, it's always a joy to watch you work, my friend! -
Thanks, David! There are a couple of things I think could be better, but, I'm still trying to figure out how to accomplish them. I've been trying, for years to come up with a better way to make connectors for the linkage rods to linkage connection. I've been using fine wire for the rods, and insulation for the connectors. It works, and looks okay, but, I still think there has to be a better way! I have an idea I want to try, but, it'll wait until next time, or until one of those times comes that, "I just have to try that, now!" 😂
-
Thanks so much, my friend! My friend, Don Fahrni used to say, when people would ask him if his details like that worked. He always said, they work, but they don't move! What he meant was that he assembled it, so that it would work, then cemented it rigidly, to eliminate problems, down the road. I've always kind of followed that philosophy, as well--except, I am lazy, where components will never be seen--like this car, between the dash and firewall. I really can't see any reason to put all those details, under/back there. Leaves more time for details, where we can see them!😃 Thanks for visiting!
-
Mercedes Benz SSK
Straightliner59 replied to Pierre Rivard's topic in WIP: Other Racing: Road Racing, Land Speed Racers
It is always pleasing and inspiring, to watch beautiful scratchbuilding! The steering is fabulous, Pierre! -
’72 Dodge Demon Drag Racer 1/25 scale
Straightliner59 replied to AmericanMuscleFan's topic in WIP: Drag Racing Models
I think we've found a nice collection of friends, here, wouldn't you say? -
Welcome to 2025! Man, that whole Y2K thing was a quarter of a century ago, already! The fuel system is pretty much done. I'll still have to cement the main and the return to the fuel block, but, there's nothing left to do with those, but the cement. I still have a couple of things left to add to the manifold, before I can stick it down, for good. I'm fairly pleased, with it. Your questions, comments and critiques are always welcomed. Thanks for looking!
-
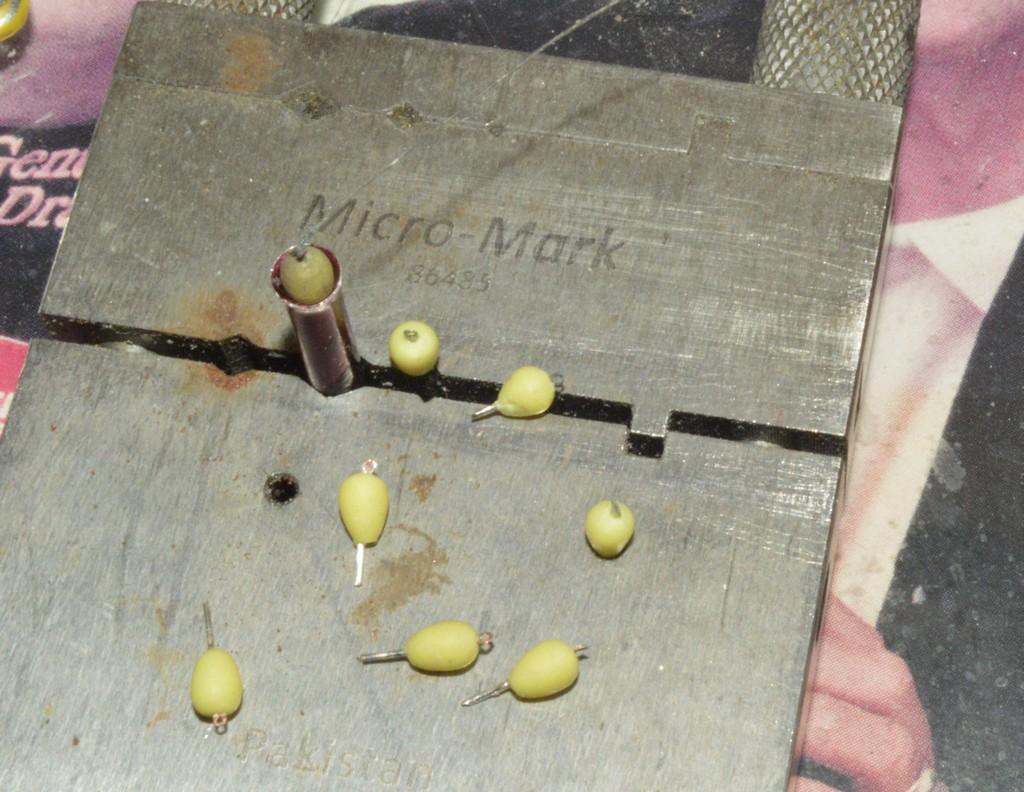
I cheated, a little with those. I just hand-turned 1/32" K&S brass tubing against a sanding board, to taper one end, then cut them off in a little Micro Mark miter box. I'd never tried them, before, but it worked out, well! Previously, I just used wire insulation. Thanks, Brian!
-
Revell 1/25 Porsche 356 Speedster - Oh my!
Straightliner59 replied to Duddly01's topic in WIP: Model Cars
What an excellent job of fixing this thing Love the steering components you built! -
Mercedes Benz SSK
Straightliner59 replied to Pierre Rivard's topic in WIP: Other Racing: Road Racing, Land Speed Racers
I just wanted to say that I love this comment! -
One of these days, I'm going to build myself an English wheel.
-
That'll definitely save you work, later!
-
I've gathered all kinds of stuff to form sheet. There are different shaped horns for jewelry-making that fit into square holes in anvils for making different radii bends in sheet. I have three different anvils. I filed the tang on the smallest one to shape an aluminum scoop for one of my projects. When I did the tail and nose sections of my Nostalgia Top Fuel car, I carved wood bucks, and shaped tin, over them. Randy Ditton has a Birdcage Maserati that is unbelievable, so, if he sees this, he might have some good insight, as well. I told him that my dragster body is a downspout, compared to that! Like Bill mentioned, I have a couple of cheap body dollies from Harbor Freight that work well for shaping sheet. I bought a chasing hammer, too. I made a "hammer" for shaping dragster cowls, that's nothing more than a piece of steel rod that's about 10" long. One thing I've learned is that the metal will kind of "talk" to you, as you gain experience. That, I can't really explain, other than, at some point, you start to get a feel for it. I've had a lot of fun with it, over the years!
-
1961 Impala Outlaw Twin Turbo
Straightliner59 replied to streetmachine11's topic in WIP: Drag Racing Models
That's some killer fabrication. Excellent work! -
Finished up the tennis balls, and shot some of the armature wire with Zinsser BIN primer, then rubbed some earth-tone pastel powder, into that. I tied the first ball onto the tether. I got the injector lines installed, along with the throttle rods, and the linkages on those. I have a few more pieces to add, and some detail painting to do, before I give it a wash, and move along to the mag. This thing's getting there! Thanks for looking!
-
Thanks, Brian! I'm kind of excited by the prospects! I have one side of the injector lines run. Once I finish up the manifold, and get it installed, I will build and install, and wire the mag. Then, I can finally install the stacks! That'll be a pretty big day!
-
Mercedes Benz SSK
Straightliner59 replied to Pierre Rivard's topic in WIP: Other Racing: Road Racing, Land Speed Racers
Indeed, the first step is the biggest! That's one of the coolest things about modeling--by the time we're done with something, we do have a better understanding of those components, no? Of course, in the end, it only has to look right! You're on your way, now, my friend! Your scratchbuilding, as always, brings joy! -
I think patience trumps skill, in this instance--I have made at least seven attempts, so far, and four have been successful. Now, I'm trying to figure out what wire I was using. I thought it was nichrome, but that is behaving differently, so I suspect that I picked up a piece of single-strand conductor off the benchtop--I always end up with a big pile of little bits of stuff, right in the middle of the bench, because I think I might be able to use it, later. Add that to the little containers I've saved, of stuff, for the same reason, and it's no wonder I can never find anything!😂 Thank you, David! You're too kind! Thank you, Pierre! I appreciate that. I agree about those little details--I have always loved them, since I was a child, looking at a model railroad, in a hobby shop. That's why I build the way I do--because I want to see what that looks like! It's those little details that make models interesting, to me--I believe that we're kindred, that way. A well-built out-of-the-box model, is typically just that--well-built, but uninteresting--unless the builder's done something exceptional with paint, like highlighting and shading interior and engine and chassis parts. Thank you for your comments, my friend!
-
It's been a while since I wandered over here. I was impressed, way back in the beginning. Even more so, now. The controls in the cab look fantastic! Nice start on the boom.