StevenGuthmiller
-
Posts
15,088 -
Joined
-
Last visited
Content Type
Profiles
Forums
Events
Gallery
Everything posted by StevenGuthmiller
-
 Fair enough Richard. That's why we're here. To offer opinions and discuss them, as well as talk all things model cars. Only time will tell where this subject might go. Steve
 -
Granted Richard, I said that there will always be some interest in these cars, but 3 shows over the past few years does not a "movement" make. You have to remember that there are still a lot of people who own these cars. They are only a couple of decades old and there are still a fair number of them on the roads. But as time passes and these cars begin to deteriorate, is there going to be a large number of people interested enough to spend tens of thousands of dollars to restore the run of the mill family cars from this era? Of course there will always be interest in the Porsches, Corvettes, Camaros, etc, regardless of their vintage, but the vast majority of the cars sold are run of the mill GM, Ford, etc, family vehicles. Think of it in this respect. The shows that you cited above featured a few hundred cars and a few thousand people attending over a 3 year period, and who knows how many of those people and cars have traveled to attend all three events. The "Back to the 50s" event that I referred to was just one event of probably thousands that occur every year with likely millions of spectators world wide. If these cars from the 80s and 90s are going to garner the same kind of attention and following in the years to come, there is a vast amount of real estate that will have to be covered. Forgive me, but I just don't see it happening. Understand, I don't have the slightest animosity towards these cars or any other. I'm just stating my opinion that I have very large doubts that these type of cars are ever going to rise to the popularity of the stuff from a much earlier time. Steve
-
Do Lacquer Fumes Kill Caronavirus?
StevenGuthmiller replied to jchrisf's topic in Model Building Questions and Answers
That's a question for someone else. I've never used them. Although I will say that their website leaves a little to be desired. They do have photos of the paint jars, but all makes of cars and colors are mixed together randomly so it appears to me that it would be difficult to find a specific color. Steve -
Do Lacquer Fumes Kill Caronavirus?
StevenGuthmiller replied to jchrisf's topic in Model Building Questions and Answers
Just be cognoscente Chris, that these are all lacquer paints and require the same preparation as any lacquer would when sprayed on plastic. You will still require a good primer barrier to insure that there is no damage to the plastic. It's just the nature of the beast when dealing with lacquer. Steve -
Do Lacquer Fumes Kill Caronavirus?
StevenGuthmiller replied to jchrisf's topic in Model Building Questions and Answers
Absolutely. To each his own. I just question the validity of going through the work of decanting when you can buy the paint all ready to spray. Just seems very unnecessary to me. But, we all have our own ideas on how things should be done. Steve -
That's all I'm saying. You also have to take into consideration what has happened to the "car culture" in the past 30 years. It's nothing like it used to be. Cars have increasingly become recyclable, utilitarian appliances to the population. There's just not nearly the interest in cars today as there was when we were young. People in this discussion are alluding to the fact that interest in '50s and '60s vehicles is waning due to our generation getting older and disappearing, which is true. But I don't see the next generation holding much interest in cars at all. I remember growing up in a time when much of your identity as a young man centered on what you were driving. Today, it's just a way to get from one point to the next for most. I remember noticing this difference in attitude towards cars when my son began driving. I thought that as a young 16 year old man, he would be interested in cars naturally as I was as a teenager. I was absolutely wrong. I tried to get him interested, and even bought him a 1998 Honda Prelude, but he really didn't care much. As long as it had 4 wheels and got him to where he wanted to go, that was all that mattered. He was fairly popular in high school and had a lot of friends and none of them gave a rat's behind about what they were driving. We just have to admit that there has been a rather large paradigm shift in attitudes towards automobiles in the past couple of decades, and this is not going to translate into vast parking lots full of 80s and 90s cars with hundreds of spectators ogling them. Granted, there is always going to be some interest in these cars, but it will never be to the scale that we see with older cars presently. In my state of Minnesota, every June, a car show is put on at the Minnesota state fair grounds called "Back to the '50s". Each year it draws in the neighborhood of 12,000 cars from the '20s to 1964 on display, and up to 100,000 visitors every year. Does anybody really seriously think that there will ever be a "Back to the '80s" show someday that will draw this kind of interest? Like it or not, we just have to be realistic about where our car culture, and our hobby for that matter, are headed. Steve
-
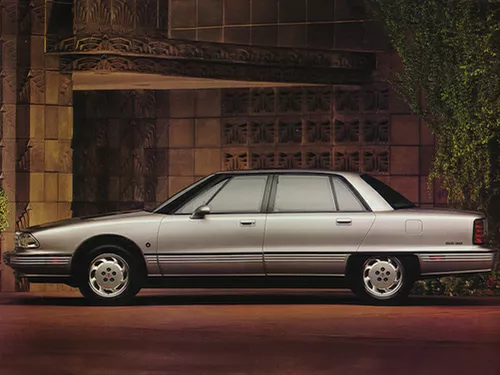
To each his own, but I still maintain that you are never going to see cars from the 80s and 90s restored and maintained in the numbers that you see cars from the 50s and 60s. Cars from that era just had a style and flair that later cars did not. They were also made of steel with few plastic parts and no electronics to speak of to try to restore. Can you imagine trying to find a the plastic bumper cover for the Olds pictured above in another 20 years, let alone right now? You can basically build a '57 Chevy from scratch with all of the after market parts available today. I doubt highly that you will see that kind of aftermarket support for the later cars. So you see, it's not only about the desire to restore these later cars, but it's going to be just as much about whether or not you will have the ability to do so. I have a 1:1 1969 Pontiac Grand Prix, and after over 50 years of waiting, there are still very few after market parts being produced, and old salvageable parts are extremely difficult to find. It will be that much more difficult when half of the parts that you are seeking are plastic. Steve
-
That's one. I'm not saying that there aren't going to be a few Camaros or Corvettes, etc, from that period restored, But I feel pretty safe in saying that it will never be to the scale of the cars from the '30s to the '70s. You are now beginning to see a lot more 4 door hard tops and sedans, station wagons etc, from that period in history being rescued. I doubt very much that you're going to see many of these restored. Steve

-
Do Lacquer Fumes Kill Caronavirus?
StevenGuthmiller replied to jchrisf's topic in Model Building Questions and Answers
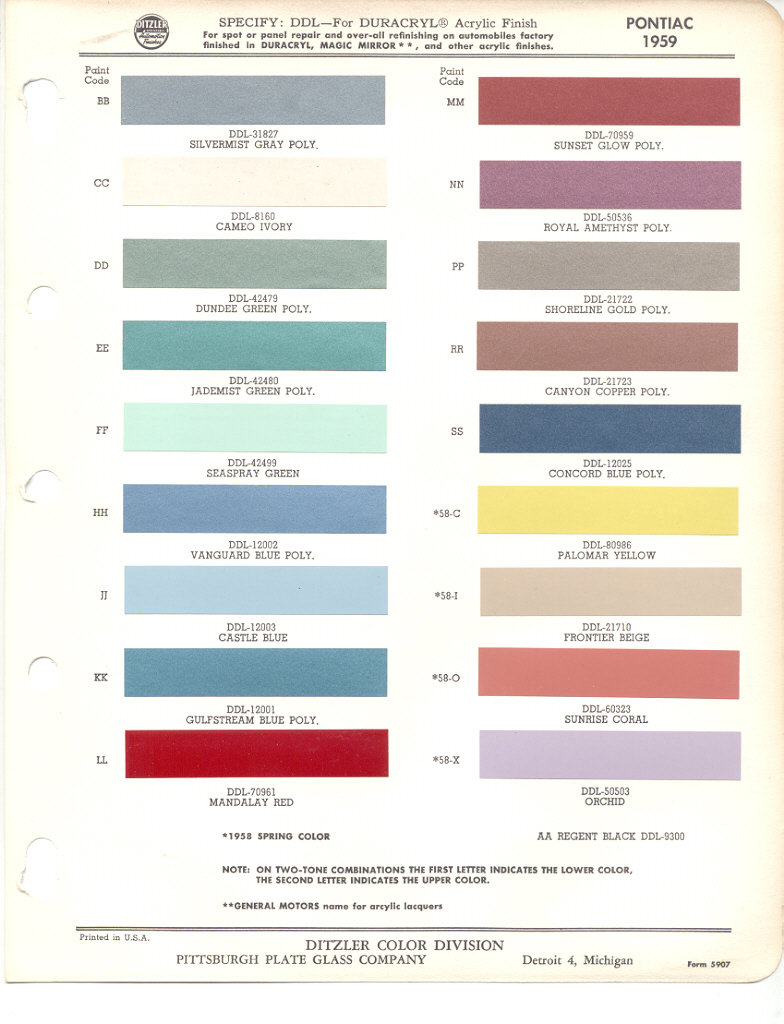
I know enough to know that their numbers are dwarfed by what's available from either MCW or Scale Finishes and the colors offered are exact factory matches, not "close enough" facsimiles. Just for giggles, I went onto the Scale Finishes website and counted the number of colors available just for Pontiac between 1955 and 1959 as an example. There were 94. Multiply that times 41 different makes from 1950 to present. That's a lot of colors!! MCW goes all the way from the 30s to the 70s. They have approximately 375 colors listed for General Motors alone! Both offer engine colors, interior colors, custom and racing colors, etc. There is no comparison. I'm not trying to "dis" anybody, but there's a great big world of alternatives out there. Why not utilize them? Steve -
I wouldn't worry about it too much. Anything built before 1995 is now considered an "antique" or "collectable", yet you're not going to go to a car show and see rows of 1991 Oldsmobiles or 1987 Dodges at any point in the future. These cars will never be collectable, they just become junk.........and then the next generation of "boremobiles". Steve
-
Do Lacquer Fumes Kill Caronavirus?
StevenGuthmiller replied to jchrisf's topic in Model Building Questions and Answers
I have to agree. First of all decanting and mixing paint is totally unnecessary. Why mess with all of that when all you have to do is open a jar and start painting. Second, adjusting air pressure isn't rocket science and it's part of the "control" equation. I spray everything at approximately 40 PSI and adjusting that pressure is as simple as twisting a knob. Third, as Peter stated, cleaning an airbrush, even if you're breaking it down, takes literally 5 minutes or less. That time spent is well worth the effort, if for no other reason than I don't have to limit myself to what Tamiya thinks is a good color to paint my model. I guess If your satisfied with a couple of dozen color choices, versus literally thousands, who am I to suggest otherwise. Steve -
It's hard to afford a "brass era" car when you're living in your mom's basement trying to figure out how to cash in on your anthropology degree! You would never know that interest in '50s cars is waning by looking at the prices that a restored '55 Belair will bring today. Steve
-
I have one of the original "flat box" kits with the stock Polara trim, molded in white! I really need to get on that soon! Steve
-
Do Lacquer Fumes Kill Caronavirus?
StevenGuthmiller replied to jchrisf's topic in Model Building Questions and Answers
If you're looking for easy and terrific pre-thinned airbrush lacquers, you absolutely cannot go wrong with MCW and Scale Finishes paints! Both are a dream to work with. I don't see the advantage to messing around with decanting paint when you are limited to what the manufacturer feels it wants to offer as far as color when you can choose virtually any color you can think of already pre-mixed and ready to spray. One of the biggest epiphanies to me in all my years of building was discovering that I didn't have to be confined to whatever color testors or Tamiya decided to put into a spray can. One of my biggest joys now at the beginning of a project is to be able to look at color chip sheets for a particular make and year and to know that I will be able to get any color on that chart that I choose from one of these 2 providers. Steve -
Actually Rich, the color you used is not as close to "Orchid" as it is to "Royal Amethyst" which was also a factory correct color for the '59 Pontiac. I used the Buick version, called "Lido Lavender" on a '59 Buick Invicta build some time back. There were some very cool colors available on the GM cars in 1959. The Royal Amethyst and Sunset Glow were 2 of my favorites! Steve
-
Coronavirus (Tom Hanks and Rita Wilson tested positive)
StevenGuthmiller replied to NYLIBUD's topic in The Off-Topic Lounge
That's the best advice I've heard in this entire thread!! But personally, I would prefer one of these. Steve
-
How to be competitive at contests.
StevenGuthmiller replied to Jantrix's topic in Tips, Tricks, and Tutorials
It didn't actually happen to me Peter. It was just a joke. I kind of look at it from the perspective of a Harley rider. Don't you dare touch my bike!! Actually, I've never been entered in a show where the model needed to be picked up. Steve -
How to be competitive at contests.
StevenGuthmiller replied to Jantrix's topic in Tips, Tricks, and Tutorials
Just what I need. Some goof picking up the model I sweated over for 6 months and dropping the hood on the floor, chipping a flawless paint job!! Steve -
Very nice Tim! I thought that you might like it brought to your attention that there is some sort of contaminant on the lens of whatever device you used to shoot your photos. At first I thought it was something in the paint, but it moved from the tulip panel, to the roof, to the hood, to floating above the windshield. Steve
-
That would look cool as hell left as it is with the white part painted body color! Steve
-
How to be competitive at contests.
StevenGuthmiller replied to Jantrix's topic in Tips, Tricks, and Tutorials
That's pretty neat! And well done I might add! Steve -
Resin 1962 Buick Skylark??
StevenGuthmiller replied to 2zwudz's topic in Model Building Questions and Answers
Long Gone. Steve -
Coronavirus (Tom Hanks and Rita Wilson tested positive)
StevenGuthmiller replied to NYLIBUD's topic in The Off-Topic Lounge
I watched at least 2 separate news casts this evening. Locally, I would say that at least a third of the program involved the virus. I would be surprised if at least 3/4 of the national news didn't pertain to the corona virus. The networks and cable news are not happy unless they are reporting death and dismemberment constantly. I find myself increasingly turning off the national news broadcasts within 5 minutes of them starting. Steve -
Coronavirus (Tom Hanks and Rita Wilson tested positive)
StevenGuthmiller replied to NYLIBUD's topic in The Off-Topic Lounge
The real problem is that even though the vast majority of us are continuing to try to live our lives normally, but just trying to be more conscientious, the powers that be, (including the media) are dragging down the economy and putting us all in great financial risk irrespective of the risk of catching the virus. I'm much more worried about what can happen on the economy front than the illness itself. Just as an example of what I feel is overreaction, my wife is a nursing professor at a university in a state that has yet to record a single case of the virus, yet she just sent me a text stating that the college will not hold any more "in person" classes until April 6th, effective after tomorrow! Seriously? Are we going to close down the entire world until further notice? Does anybody seriously think that those students are going to just stay home for the next 3 weeks? No, they will obviously crowd into the malls, restaurants and bars. Human interaction will not end because you close a school. The swine flu epidemic of 2009 and 2010 saw up to 21% of the worlds population (between 700 million and 1.4 billion) infected with that virus, and somewhere between 150,000 and 500,000 deaths associated with it. Correct me if I'm wrong, but I don't remember a single car show cancellation or basketball game with empty stands during that period! Steve -
Coronavirus (Tom Hanks and Rita Wilson tested positive)
StevenGuthmiller replied to NYLIBUD's topic in The Off-Topic Lounge
Let's just face it. We can only do what we can to help stem the spread of this virus. But with 7.8 billion people on the planet, it's going to get around. I just don't understand all of the over reaction and fear. My guess is that there are already millions of people infected with this virus. The vast majority of infected people have either very mild symptoms, or are symptom free altogether. So while they like to tell us that this virus is 10 times more deadly than the flu, how do they know that when there is no way of calculating how many of us have the virus and don't even know it. To date, a little over 4.000 deaths have been reported worldwide in conjunction with this virus, 25 in the US. In a world of nearly 8 billion people and a country of nearly 330 million, it seems like a bit of over kill to shut down the commerce and movement of entire world. Steve