StevenGuthmiller
-
Posts
15,071 -
Joined
-
Last visited
Content Type
Profiles
Forums
Events
Gallery
Everything posted by StevenGuthmiller
-

Need Primer Help
StevenGuthmiller replied to Horrorshow's topic in Model Building Questions and Answers
Back to Duplicolor primer. The top for this '64 Bonneville is nothing more than straight Duplicolor "sandable black" primer. I shot it from a distance to add a little "grain", but if shot as normal, it dries very smooth, as do all of the Duplicolor primers. Body was primed with Duplicolor "primer sealer". No primer sanding, but the clear coats were cut and polished. Steve -
Need Primer Help
StevenGuthmiller replied to Horrorshow's topic in Model Building Questions and Answers
I use Duplicolor primers all of the time. As a matter of fact, that’s pretty much all that I use. Never been impressed with Tamiya, and I can’t see spending a bunch of money on primer, so even though Duplicolor is really no longer cheap either, it’s what I’ve become used to, and it’s designed to be used with automotive lacquers, which is my paint of choice, so I see no reason to change. Granted, they can be a little hotter than hobby primers, depending on the plastic, but as long as you know that going in and adjust for it, it’s not a problem. I, like “JollySipper” recommend a different Duplicolor primer, but not quite the same one. I prefer Duplicolor “Primer Sealer”, but I use plenty of the sandable primers as well. As a matter of fact, their black sandable primer is pretty much all I use for anything I’m painting flat black. Steve -
Very nice!! Steve
-
1958 Ford promo or kit?
StevenGuthmiller replied to fordf-100's topic in Model Building Questions and Answers
The hubcaps are the original stock caps from the kit. Steve -
1958 Ford promo or kit?
StevenGuthmiller replied to fordf-100's topic in Model Building Questions and Answers
Aside from the obligatory warpage and heat swaged interior and glass that are the standard giveaways for a promo, as Phillip stated, "sound" and "feel" is a good indication of whether or not you have a promo, or a kit. If you flick the body with a finger nail and get a sort of dull thud, versus a sharp click, it's likely acetate, and therefore a promo. The acetate promo bodies are generally heavier and have an almost "oily" feel in comparison to a styrene body, and acetate is generally more flexible, with a kind of rubbery feel, versus styrene which is stiffer and more brittle. My opinion is that it is indeed a kit, just from the look of the photos. The interiors are very shallow and devoid of detail in these early kits, but they can still build into a pretty impressive model with some love and attention. Steve -
Sorry that I didn’t respond to your question in the other thread. I was out of town all weekend attending a grandson’s baptism, so I wasn’t paying any attention to model stuff. Steve
-
1959 Desoto Fireflite Convertible
StevenGuthmiller replied to StevenGuthmiller's topic in WIP: Model Cars
Unfortunately, the Moebius ‘55 and ‘56, as well as the AMT ‘57, all have Hemi engines. The Hemi was no longer available in ‘59, so another Mopar big block will have to fill the Bill. While the wheel base looks about right from the Möbius kits, the frame looks a little different, and the ‘57 looks to be a little more accurate for a ‘59. Steve -
1959 Desoto Fireflite Convertible
StevenGuthmiller replied to StevenGuthmiller's topic in WIP: Model Cars
I'm investigating the possibility that at least the upper dash pad might be a good starting point. The width of the instrument panel section, and the defroster vent portion look to be close. Imperial. Desoto. Steve -
1959 Desoto Fireflite Convertible
StevenGuthmiller replied to StevenGuthmiller's topic in WIP: Model Cars
I'm not certain what trim level the red Desoto depicts, but it appears as if the Chrysler 300's door panels are pretty close to the '59 Fireflite's. '57 Chrysler 300. '59 Desoto Fireflite. Steve -
1959 Desoto Fireflite Convertible
StevenGuthmiller replied to StevenGuthmiller's topic in WIP: Model Cars
I would absolutely consider an Adventurer, but unfortunately, as is the usual case, nobody makes PE scripts for cars like this, so it seems like a better game plan to stick with the Fireflite. Steve -
1959 Desoto Fireflite Convertible
StevenGuthmiller replied to StevenGuthmiller's topic in WIP: Model Cars
My plan is to shave the handles from the '57 Chrysler's doors and use them. Steve -
Time to move on to another project. This time I'm probably going to just get myself into trouble, but after a number of mid to late 60s builds, I wanted to get back to the 50s and try to do something a little nuts. I'm starting with this X-El 1959 Desoto Fireflite 4 door hard top, and converting it into a full detail convertible. I'll be utilizing as much of the AMT 1957 Chrysler 300 kit for the guts as I can, but the real test is going to be putting together an interior. The promo has no interior, so one will basically need to be scratch built from the ground up. I'll hopefully be able to modify some of the interior parts from the 300, and with any luck, I'll be able to find at least a starting point for the dash board. In any case, the first task was to fill the unwanted door seams, and begin the transformation from a 4 door to a 2 door. I began this work many years ago, but decided to start over again. Rather than fill the panel lines with filler, (I hate putty) I filled them by gluing pieces of thinly stretch sprue into the gaps and then sanding and going over it with a very thin glaze of putty. Shot a guide coat of primer over the mods to see how it's going. Looks okay so far, although a little more light work might be required. Steve
-
By your definition, a “model kit” is a scratch made item. It is made from raw materials, and with tools. This describes basically every man made item since the beginning of human kind. Steve
-
Who has an aversion to using 3-D printed parts? I don’t remember hearing anybody saying that throughout this whole discussion. The topic was whether or not we felt that 3-D printing was scratch building or not. Not how we felt about the technology in general. I think you’re right. The thread has probably run it’s course, but in my opinion, it’s because a lot of people want to make the topic about something that it was never intended to be about. It started out as a pretty simple opinion, “yes or no” question and then, as is often the case, quickly morphed into all sorts of contortions that have little to do with the original question. Steve
-
Off black paint for scale effect.
StevenGuthmiller replied to D.Pack's topic in Model Building Questions and Answers
Way too far into the weeds for me too. Steve -
Off black paint for scale effect.
StevenGuthmiller replied to D.Pack's topic in Model Building Questions and Answers
Just plain old Duplicolor "Universal Black" has always done well for me. Steve -
Off black paint for scale effect.
StevenGuthmiller replied to D.Pack's topic in Model Building Questions and Answers
Yeah, I don't know what "scale effect" means. A black car is a black car, and a dark gray one is a dark gray one, no matter what scale it is. Sure, there may be different blacks with a little bit different tints or what have you, but that's just a matter of personal taste. I understand the sentiment with varying finishes when you're talking about interiors or chassis and such, but as far as gloss black on bodies go, if you're trying to replicate black with something other than black, well, then it's not black. Steve -
Bare metal foil small writing
StevenGuthmiller replied to Ctmodeler's topic in Model Building Questions and Answers
That one was a PITA! Steve -
Bare metal foil small writing
StevenGuthmiller replied to Ctmodeler's topic in Model Building Questions and Answers
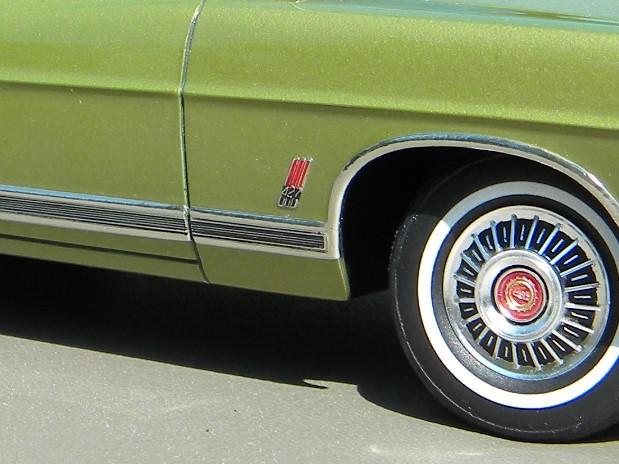
In most cases, the colors used in the recesses of badges are as a rule, basic colors such as black, white, red, blue, etc. As I use mostly lacquers for base colors and clear, I will then use lacquer for the badge colors as well. In most cases, I will just either dab a fine brush in a little of the desired color of lacquer if it's airbrush paint, or if it's lacquer paint in a spray can, I'll spray a little into a cup and then use the brush to paint the recessed areas, clean as you would a script, and then clear over the entire body with clear lacquer. In a nutshell, as I'm using lacquers, if I'm detailing a badge to be cleared over with lacquer, I use lacquer for the detail paint as well. On another note, if the badge is large enough to be foiled and detailed after all of the paint and clear has been I applied, I will do it that way. In the case of this '63 Ford truck, the badge was foiled after paint and clear, and the background was done using flat red acrylic craft paint. The rest of these were done with lacquer prior to clear coats. Some pretty dramatic affects can be achieved using this method. The badges and scripts on this '64 Pontiac Grand Prix and '61 Buick Invicta were EXTREMELY faint! Yet, they can be detailed quite nicely if planned well and executed carefully. Steve -
Bare metal foil small writing
StevenGuthmiller replied to Ctmodeler's topic in Model Building Questions and Answers
One has to be remember that every car can be different as far as the techniques employed with things like badges. For that matter, more than one system might be used on the same car. As an example, some of the lettering on my 1:1 ‘69 Pontiac Grand Prix is chromed pot metal with painted background, but the badge on the hood is done in exactly the same configuration as the center caps on the wheels. A chrome bezel with a chrome and paint insert with a clear plastic cover. My recommendation is to find a system that works well for all of them and stick with that rather than trying to use different techniques to try to be in exact accordance with the items on the 1:1. Sometimes it’s in your best interest to pick the best hill to die on. ? Steve -
How to put BMF trim on a vinyl top?
StevenGuthmiller replied to Kit Basher's topic in Model Building Questions and Answers
The roof was the last thing. The body was completely painted and polished first. Then the foil, followed by the vinyl top. I will confess that I masked off some of the window trim prior to painting the top and foiling and then foiled it afterwards, but much of it, such as the drip rails, were foiled prior to paint and cleaned off afterwards. Sometimes there are no set rules. You just have to assess the situation and use whatever technique appears to have the best chance of success for a particular situation. I’ll use every tool that is at my disposal to achieve the best results possible. Steve -
Bare metal foil small writing
StevenGuthmiller replied to Ctmodeler's topic in Model Building Questions and Answers
In either case fellas, it has no bearing on badges on a 1/25th scale model. If anyone can tell what “sheen” the paint on badges of this size is, well, more power to them, but yeah.......not. Even if you think you can tell in a close up photo, you can forget about it with the naked eye. Not possible. Steve -
Bare metal foil small writing
StevenGuthmiller replied to Ctmodeler's topic in Model Building Questions and Answers
Not only does it work, but in my view, it’s the absolute best way to detail badges! Steve
-
How to put BMF trim on a vinyl top?
StevenGuthmiller replied to Kit Basher's topic in Model Building Questions and Answers
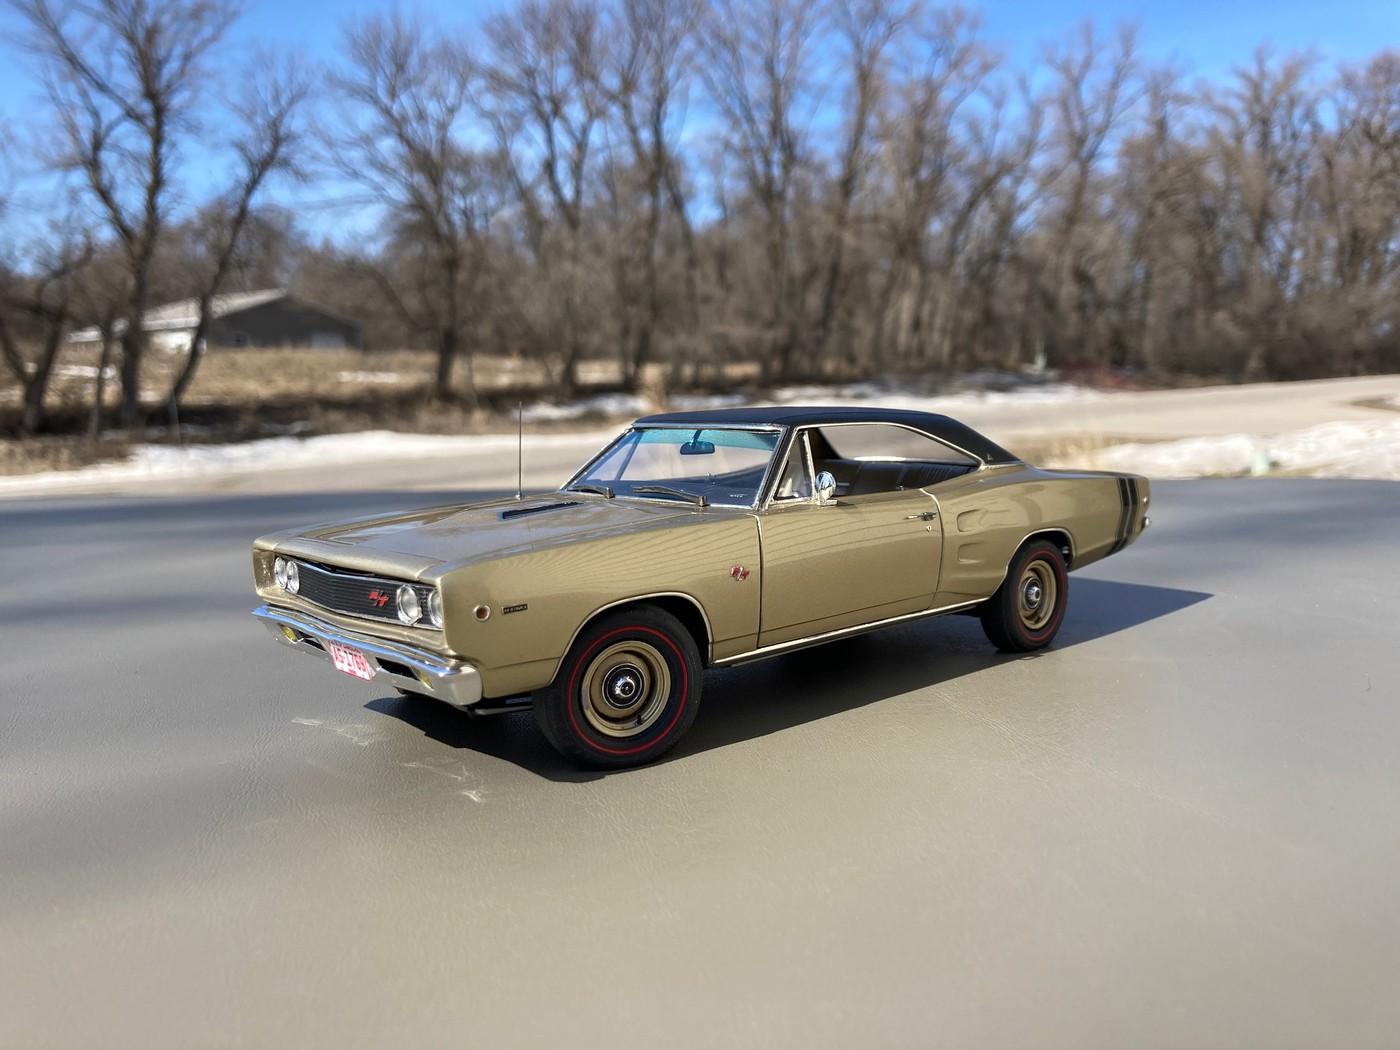
That’s the technique I used on my ‘68 Dodge. Steve
-
Bare metal foil small writing
StevenGuthmiller replied to Ctmodeler's topic in Model Building Questions and Answers
To the contrary. It looks very good! Steve