StevenGuthmiller
-
Posts
15,071 -
Joined
-
Last visited
Content Type
Profiles
Forums
Events
Gallery
Everything posted by StevenGuthmiller
-
 I think I'm headed in the right direction, BUT........ I'm thinking that the engine from the '66 GTO kit might be a better starting point. It appears to be closer to the '64 in appearance. The valve covers from the '61 kits are wrong, and with the '61 having a generator instead of an alternator, the pulley configuration is incorrect as well, and thanks to a couple of members who sent me engine parts from the GTO kit a few years ago, I have plenty of parts for that engine to start with. Anyway, after opening the manifold up, and digging out one of my coveted Carter AFB carbs from Fireball, I think I'm on the right track. Steve
 -
Thanks for all of the input guys! It appears at this point that options are very limited. Most of the old annual kit pieces appear to be so poorly defined that I'm pretty sure they're out. It's looking like the best option will be the manifold from the '68 Firebird, but I think I'm going to investigate modifying it a little. I'm thinking that I'm going to try to open the voids that should be present in the manifold itself, and add a valley pan underneath. Wish me luck! Steve
-
You should be able to use any of the Testors clear lacquers over it. I know for a fact that it will not damage the plastic, but as I use almost no decals of any kind, I can't tell you with certainty that it is safe to use over your decals. Steve
-
Does anybody happen to have any information of where I might find a Pontiac 4 barrel intake manifold? I'm considering going with a single 4bbl on my '64 Bonneville, but they don't seem to be very prolific. Everything has tri-power intakes. Already looked at the intake from the '68 Firebird, but it doesn't look right, and it's too wide. Thanks! Steve
-
Full Sized Air Filter
StevenGuthmiller replied to StevenGuthmiller's topic in Tips, Tricks, and Tutorials
Thanks guys. Yes. That's why I said "it will need some refining". I'll probably thin it a little more around the inside, and depending on clearances when I get all of the carb/intake/air cleaner/hood dimensions all figured out, it might need to be thinned more for height as well. Once I have that all dialed in, I can add seals with some thin sheet plastic. Steve -
For those of us who are "Do-It-Your-Selfers", who like to find uses for everyday items, or even better, things that you would normally pitch in the trash, here's a little tidbit that I stumbled across for anyone that might have the desire to make a filter to go into that full sized air cleaner. I've probably thrown out thousands of these lip balm tubes in my life time, but I just happened to look at one the other day, and something just clicked. I thought to myself, If that's the right size, with a little work, it just might make a convincing air cleaner element. Well, it's pretty close, so off to the shop I went. It is still going to get a little more refining, but once finished and painted, it should look pretty good. Steve
-
Dashboards
StevenGuthmiller replied to Sidney Schwartz's topic in Model Building Questions and Answers
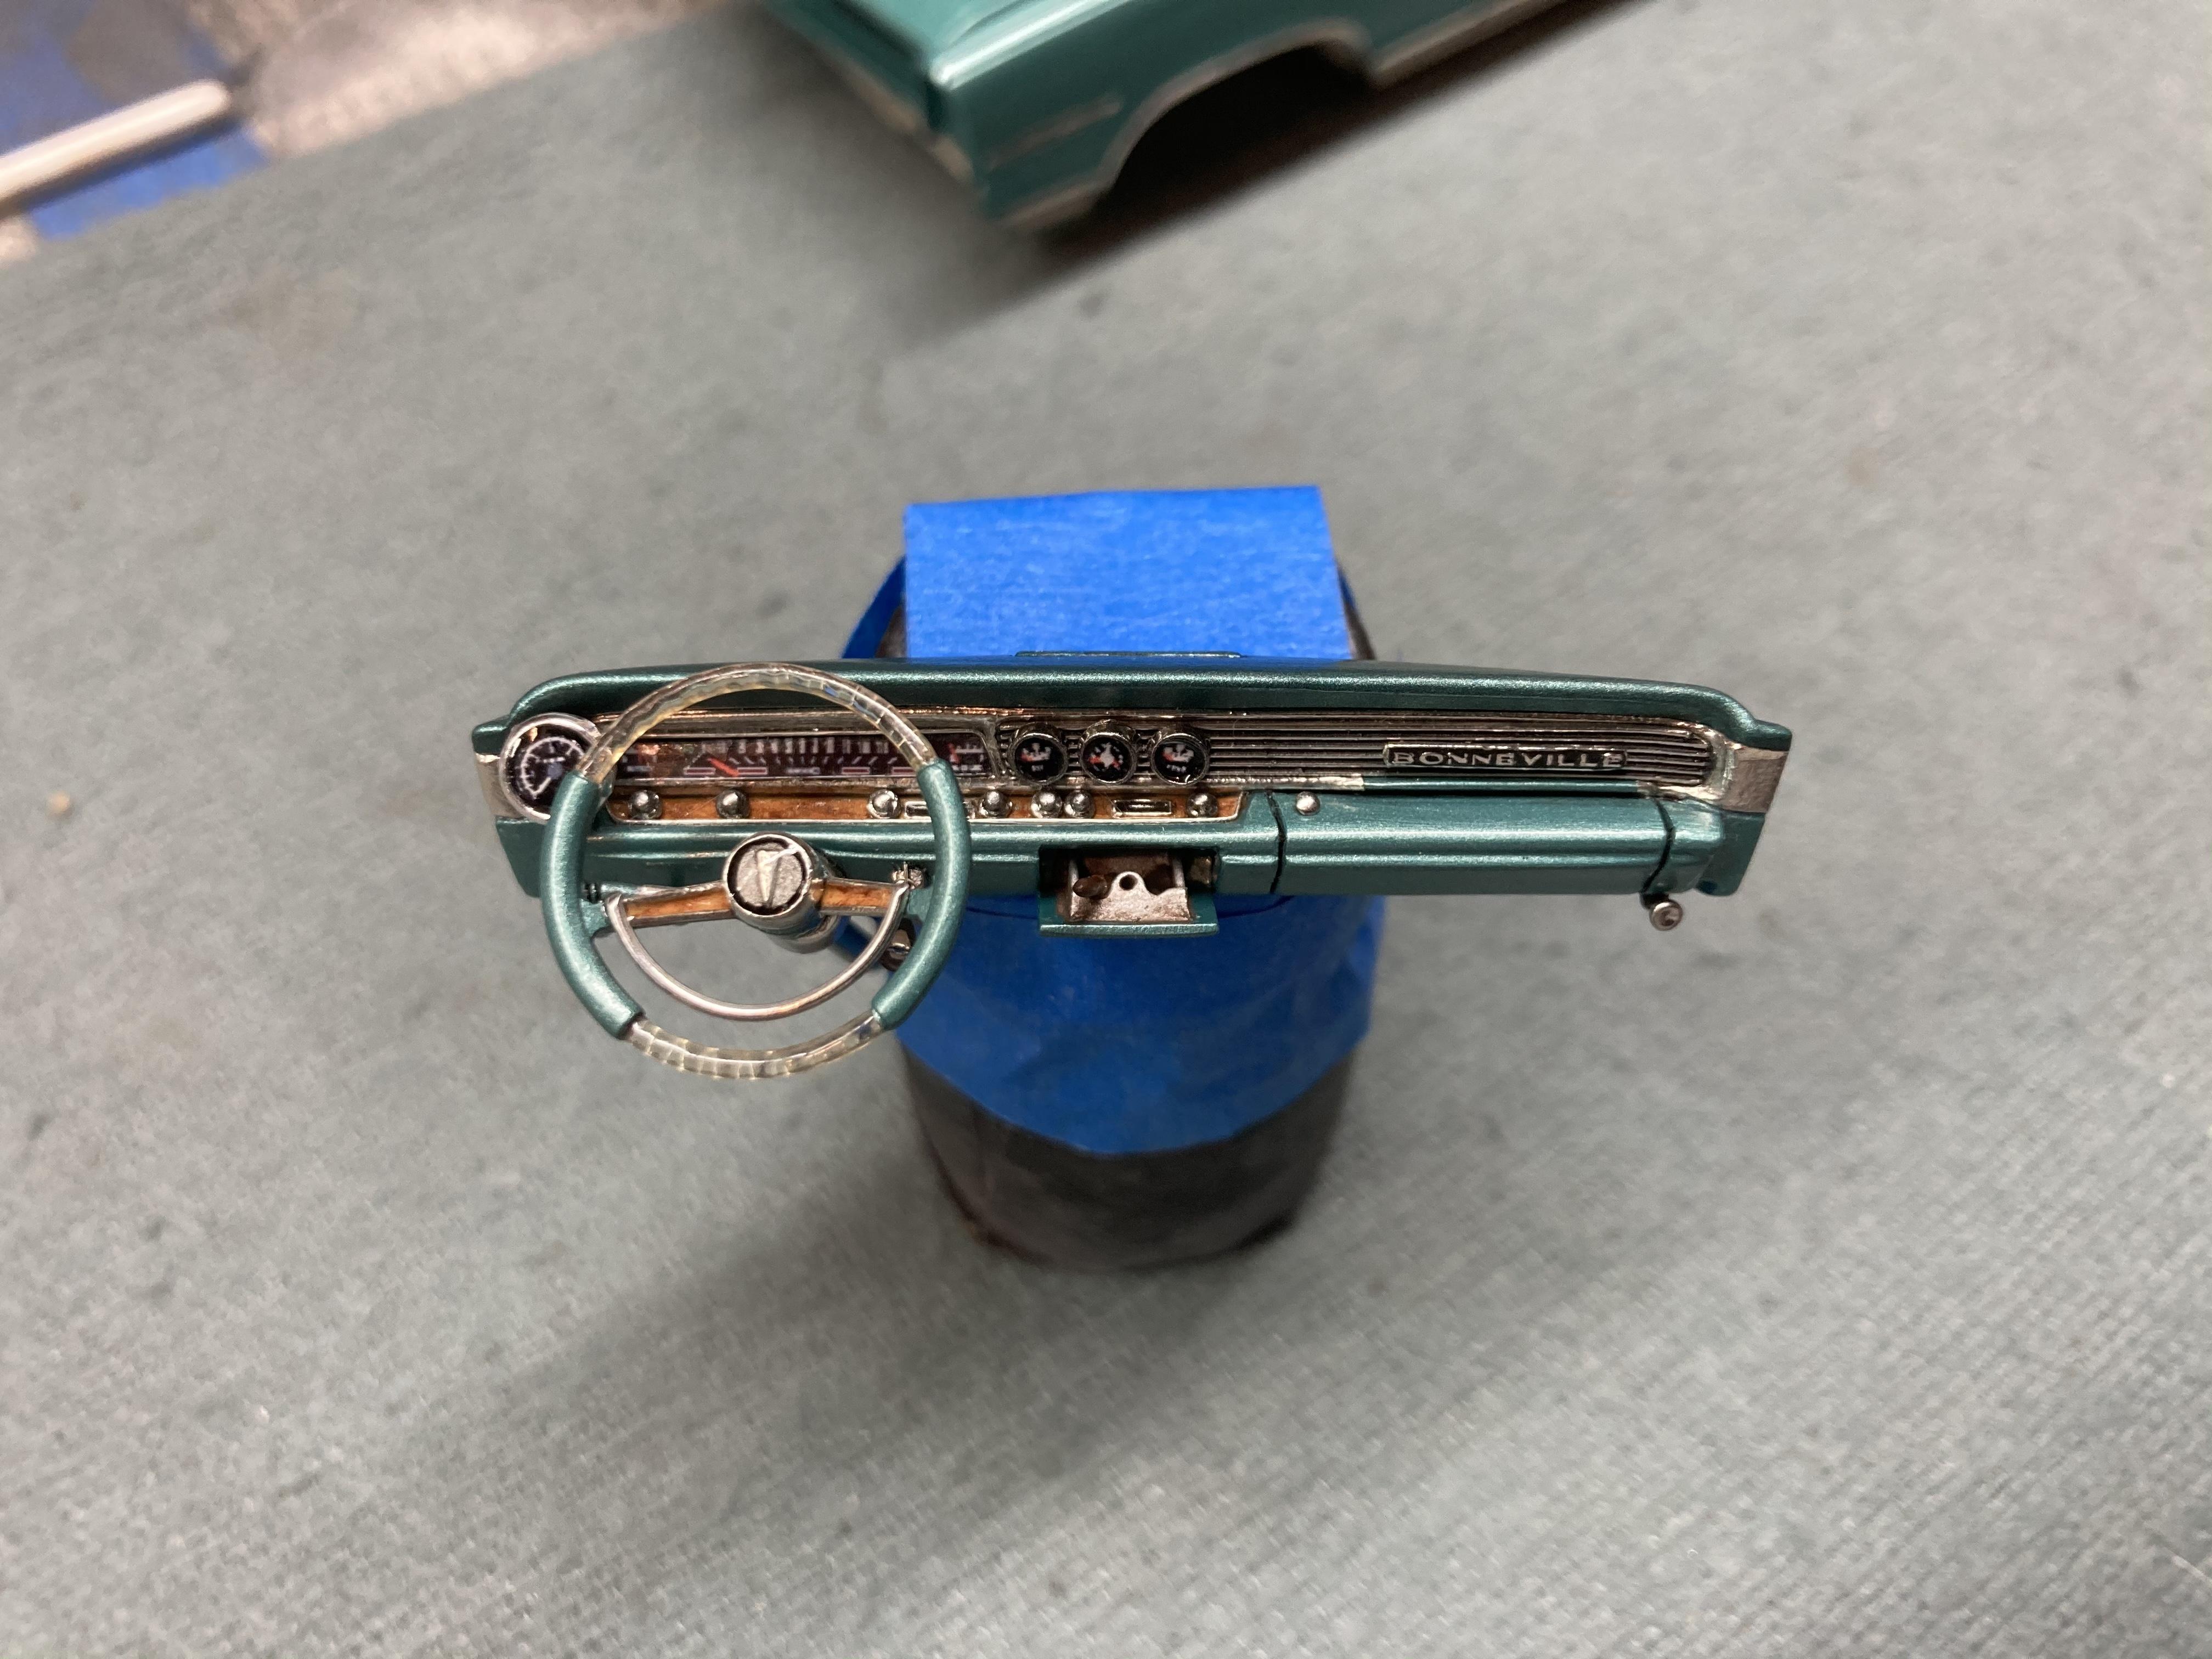
No. Very little brush painting went into this dash. Almost everything that was painted, (the dash itself, gauge pods and knobs) were separate pieces and were sprayed. Nearly everything else was foiled, a decal or silver wire. The only things that were brush painted were the wood on the dash and steering wheel, and the fine background detailing on the ribbed trim, Bonneville script, etc. Steve -
Dashboards
StevenGuthmiller replied to Sidney Schwartz's topic in Model Building Questions and Answers
I don't normally get this carried away with a dashboard, but in this case, I'm building a '64 Bonneville convertible and wanted to upgrade the interior tub. As I was going through the trouble of completely rebuilding the door panels, and other aspects of the interior, I wanted the dashboard to exhibit the same level of detail, so I dove in pretty deep. Some parts swapping, scratch building and a fair amount of detailing went into this dashboard, as well as some gauge face decals. "Best Model Car Parts" provided the gauge decals. Otherwise, it was a lot of scratch made and repurposed parts, with plenty of foil and Alclad chrome paint. Steve -
Nothing special or interesting for me. I use scraps of any kind of soft cotton material that I have around. There are always cotton T-shirts or flannel of some sort that's heading for the trash, so rather than pitch it, I cut it up and use it for polishing. I use a Micro-Mesh polishing kit for my sanding purposes, usually starting at about 3600 or 4000, and working my way down to 12000. Then, with the scrap cloths, I use a little Novus #2 "Light Scratch Remover" followed by Turtle Wax "Scratch and Swirl Remover". Probably not the most perfect finish in the world, but I seem to get plenty of compliments, so I figure I must be doing okay. By the way, I use Duplicolor, Perfect Match, "Protective Clear Coat Finish" straight out of the spray can, (usually about 5 coats) for my clear. Steve
-
Making Windshields and Windows Clearer
StevenGuthmiller replied to Miatatom's topic in Model Building Questions and Answers
You can get as thin as .010 through Evergreen. However, for windshields and such, I prefer a thinner product. I use a "Clear Lay Film", manufactured by "Grafix" that I purchased at Hobby Lobby many years ago. It is .007 thick, so therefore more flexible for curved glass. I have grown to really dislike kit glass in general. Far too thick in most cases, so you get all of that weird refraction, especially around the edges, that grossly detracts from the realism of a model. The lay film that I mentioned above is not as clear, or as glossy as clear styrene, but to my eye, it still looks far more realistic than glass that's way too thick. I'm sure that with some extra polishing or maybe a coat of Future, the shine level could be improved, but I usually just use it straight from the package and find it satisfactory. Steve -
Making Windshields and Windows Clearer
StevenGuthmiller replied to Miatatom's topic in Model Building Questions and Answers
Get rid of as many of them as you can and replace them with thin, more in scale, clear plastic sheet. Steve -
BMF under or over clear coat?
StevenGuthmiller replied to Sidney Schwartz's topic in Model Building Questions and Answers
That’s why it works so great for aging transparent steering wheels. ? Steve
-
BMF under or over clear coat?
StevenGuthmiller replied to Sidney Schwartz's topic in Model Building Questions and Answers
Both are just curbside builds with no engines. and slab chassis. Pretty much box stock in both instances, with a few added enhancements like better tires, wheels, mirrors, etc. Steve -
Johan catalogs
StevenGuthmiller replied to Maindrian Pace's topic in General Automotive Talk (Trucks and Cars)
Just cruising through the adds quickly, I think there are at least a couple that never made it to production. Personally, I've never seen a Johan '71 Torino, or '70 and '72 Delta 88. I'm sure that there are plenty of us that would have loved to have seen the Oldsmobiles! Steve -
BMF under or over clear coat?
StevenGuthmiller replied to Sidney Schwartz's topic in Model Building Questions and Answers
Just as a comparison, this '58 Buick was clear coated after foil. The '59 Dodge was clear coated first, and then foiled after. Just my opinion, but I feel like the foil retains more of it's reflectivity if it's exposed, and not covered with clear. Steve -
BMF under or over clear coat?
StevenGuthmiller replied to Sidney Schwartz's topic in Model Building Questions and Answers
I’ve done it both ways. Personally, I have had better results applying “most” of the foil after clear. Steve -
No. The hood hinges are separate pieces that are held in place with magnets so that the model has the option of being displayed with the hood in the open or closed position, as well as removing it completely. Steve
-
The Steering wheel came from the Moebius ‘61 Ventura/Catalina kit. I modified it by thinning and slightly tapering the spokes, grinding down the center, and then adding my own scratch made spoke detail and center hub. The acrylic wheel itself was easily “discolored” slightly by spraying a coat of Testors clear enamel over it. I knew I’d find a practical use for that stuff someday. ? Steve
-
Finished up the dashboard for my '64 Bonneville today. Steve
-
No Witty Name Revell 32 Roadster (update 11/9)
StevenGuthmiller replied to Mr. Metallic's topic in WIP: Model Cars
Thank you for not giving it a “witty name”. ? Steve -
1964 Pontiac Bonneville Convertible.
StevenGuthmiller replied to StevenGuthmiller's topic in WIP: Model Cars
Thanks Keith! I estimated somewhere in the neighborhood of 30 parts or so in the dashboard. I believe that the dash is finally finished, short of some very small touch-up here and there. I added the gauge pods and decals, the tach, ash tray, (and cigar) vent knobs and parking brake release, attached the steering wheel to the column, and added a set of keys. Yeah, it's a Chevy key chain, but we'll just say his other car is a Chevy. Steve -
Oh well. I still somehow manage to get the job done. Steve
-
I know where all of mine are too. Buried under a pile of junk somewhere on my bench! Steve
-
1964 Pontiac Bonneville Convertible.
StevenGuthmiller replied to StevenGuthmiller's topic in WIP: Model Cars
Appreciate it fellas! A little more done on some interior stuff today. Got the tach decal in place with a dab of clear epoxy for a lens. Added the speedo decal, along with a piece of clear sheet for the cover, and then trimmed it with another piece of fine wire. Never being one to let opportunity go to waste, I made the horn ring for the steering wheel with a shaped and polished wire Christmas ornament hanger. Edit: Just looking at the steering wheel photos that I posted, the first pic appears as if the end of the wire is just a straight, raw cut, but it must just be a weird reflection. I actually cut the piece with a wire cutter and then ground the ends to a slight taper and polished them to avoid just what that photo seems to portray. Steve -
Thanks fellas! Steve