StevenGuthmiller
-
Posts
15,071 -
Joined
-
Last visited
Content Type
Profiles
Forums
Events
Gallery
Everything posted by StevenGuthmiller
-
The cost is irrelevant, but if you're using good paint, which is either designed for the hobbyist, or there is adequate information, feedback and instructions available to you to know how to use it, these sort of things won't happen. A paint doesn't necessarily need to be plastic compatible, as long as you know what your getting going in. With these bargain paints, it's going to be the user's job to figure out what's in the can, as many of them state no real information on the can, other than, as in this case, "Clear Acrylic", which is basically meaningless unless you analyze the ingredients. With virtually all of the mainstream paints used within the model car building hobby, there's a plethora of information available to the modeler of how to deal with each one of them. With a paint such as this, you're either relying on the off chance that there's information out there from someone who may have used it once, or else you're going to have to spend the money and hope. I belong to a multitude of Facebook groups, and several modeling forums, and in all honesty, paint issues are by far the most common problem that I see out there, and in the vast majority of circumstances, it's because the person is going to Walmart, Home Depot, Menards, etc, and buying something in a spray can that they have zero idea of what it is their getting. Next thing you know, they're asking for advice on how to fix a disastrous paint job that they got from using some furniture paint that they got at the corner hardware store. My only contention is that if you use products that are tried and true for our hobby, you're much less likely to be spending your time asking the next inevitable question, "What do I use to strip this paint?" Steve
-

Deteriorating Chrome
StevenGuthmiller replied to bluestringer's topic in Model Building Questions and Answers
Might have been some sort of chemical that had gotten on the parts before the kit was built and there's some kind of delayed reaction happening? At this point, who knows. Chalk it up as a mystery. Did you happen to have cleaned the parts with anything before assembly that might have been the culprit? Steve -
I understand that most modelers take the word acrylic to mean a water based, plastic safe paint, and I often take it as such myself, but people need to understand that that doesn’t necessarily translate when it comes to buying a product, especially when you’re dealing with this sort of bargain store stuff. There’s no way of knowing how these cheapo paints are going to perform without some testimonials from other hobbyists who have had some experience with it. Steve
-
I guess my first question would have been, why was it necessary to spray clear paint over a clear part in the first place? If the part was scratched or damaged in any way, it might have been a better approach to polish it. If you feel that it is necessary to spray clear coat over it, you could try Testors clear lacquer. I’ve sprayed it over virtually everything with no adverse affects, and while I don’t recall ever feeling the need to spray it over clear parts, (although at some point I may have) I have used Testors lacquer window tint on kit glass before and it worked well. I assume they are one in the same as far as formulation goes. Just be sure to test it on a spare part, (as should always be your practice when working with unfamiliar products) Steve
-
Acrylic can be one of those terms that doesn’t explain a whole lot. They run the entire gammit from a water based acrylic craft paint, all of the way to an acrylic lacquer, which is essentially automotive paint. It appears that you have something here that’s closer to the latter. Plastics are not a one size fits all affair either. Styrene plastic is an entirely different animal than some other plastics. Might be safe to use on your lawn furniture, but not necessarily your kit parts. Steve
-
I don't want this to sound like a personal attack Michael, but I have not been the only one to warn people again and again about buying these cheap paints. I get the fact that they may be more inexpensive or convenient, but in the end, you might have been better off to just flush the money down the toilet and save yourself the aggravation. It's been said before, but here it is again. "You get what you pay for". Or more to the point, "you get a can full of rubbish for a few dollars less". Steve
-
Deteriorating Chrome
StevenGuthmiller replied to bluestringer's topic in Model Building Questions and Answers
My feeling is that if you have a high moisture level in your shed, that might also affect the chrome. Dealing with a lot of vintage kits, I can tell you that I’ve seen a lot of chrome that’s all but completely gone from kits that appear to have been stored in very humid conditions for long periods of time. The optimum solution would be to get your finished builds out of the shed and into a more climate controlled area, preferably inside of a clear acrylic case. Steve -
I use mostly Duplicolor "Primer Sealer", with other occasional Duplicolor primers, and some Testors lacquer primer. Steve
-
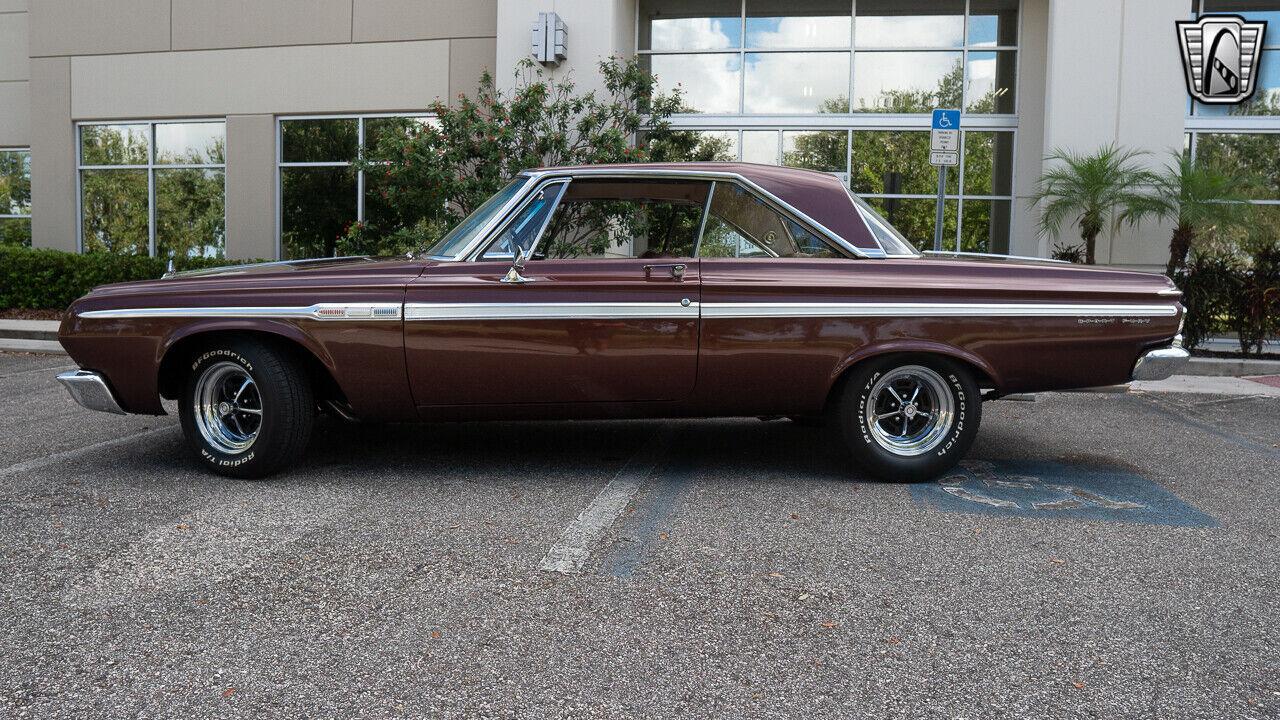
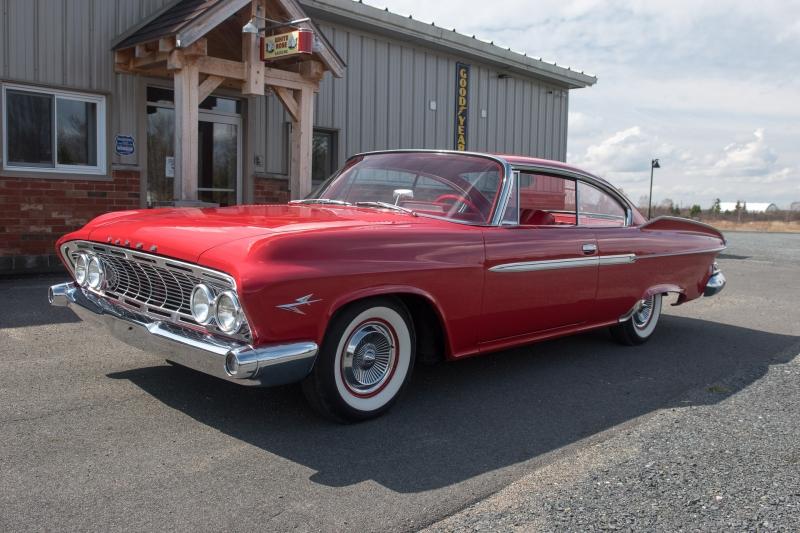
The plan at this point for my '64 Fury was going to be either "Sandalwood" or "Chestnut, or a combination thereof. The '61 Dart is going to be a full detail, all red, D-500 version with the 383 "Long Ram" engine. Steve

-
Deteriorating Chrome
StevenGuthmiller replied to bluestringer's topic in Model Building Questions and Answers
It looks a lot to me like the model got misted with some sort of chemical solution that is removing the chrome. This is exactly how kit chrome would look if you shot a very small mist of one of the lye based solutions that a lot of us to remove chrome. One of the degreasing cleaners, like Super Clean, Simple Green, or Easy Off oven cleaner would probably give you the same affect. Even something as benign as Wesley's "Bleche White", or ammonia will take chrome right off of plastic. If you look at the pinned "removing chrome plating" thread in the Tips and Tricks section, you'll see that there are a thousand different ways to ruin your chrome. I would say that it's extremely likely that the Odo-Ban that you're spraying has something in it that's creating the problem. Active ingredients appear to be "Alkyl" and "Dimethyl Benzyl Ammonium Chloride". I don't like the sound of the ammonium chloride thing. Every kit is different as far as the chrome goes. Some are much thinner than others, which could explain why this one was affected, and others were not. Steve -
Hi Tony, and welcome. While cars are a slightly different game, judging by the skills that you obviously already possess, it shouldn't be a huge leap for you making that transition. Good luck! Steve
-
I have several of these that I'd like to do someday as well. Time will tell, but I have a '63 Fury hardtop that I got a start on a long time ago, as well as a '62 Fury convertible and hard top, and '63 Polara and '62 Dart convertibles. I've got an original flat box '64 Fury, and '64 Polara that will probably take precedence over any of them though. Next one on my bench after my '64 Bonneville is very likely going to be a '61 Dodge Dart. Cool stuff!
-
All looking fantastic! Love to see all of the extra "love" going into them. Are these all originals, or are some of them resin? Steve
-
Or if you use lacquers. Steve
-
Trunk louvers ?
StevenGuthmiller replied to Jon Haigwood's topic in Model Building Questions and Answers
There you go. I imagine the smaller, the better. Steve -
Trunk louvers ?
StevenGuthmiller replied to Jon Haigwood's topic in Model Building Questions and Answers
Thanks! That’s pretty much what I had pictured in my minds eye. Just trying to think through the best way to get there. ? Steve -
Trunk louvers ?
StevenGuthmiller replied to Jon Haigwood's topic in Model Building Questions and Answers
I just went to the website, and went through the entire ordering process up until the final “place order” tab. (PayPal) Up until that point, everything worked fine. I wasn’t going to hit that final tab because I don’t want the product. Steve -
Trunk louvers ?
StevenGuthmiller replied to Jon Haigwood's topic in Model Building Questions and Answers
Might be pretty labor intensive, but if I was going to try it, I might start with a length of half round, and either split it down the center, or sand it down half way to make it a quarter round. Then lay out and mark where each louver is going, cut precise lengths of the quarter round and glue them to each mark. Once dry, I would round over the outside edges with sand paper. Of course this would probably work best with plastic on plastic where you could use a MEK type plastic cement for gluing, but I suppose that it could be possible with super glue. Just an option that might be worth trying if all else fails. But you’ll have to be ready to commit. That’s going to be a lot of individual louvers to recreate. Steve -
Of course. But coverage also suffers the thinner it gets. The best advice that I can give if someone is having issues with enamels drying too slowly, is forget about the gloss enamels and use flat. It dries much faster and you can clear over it to achieve whatever finish you desire. I probably only own about a half dozen jars of Testors gloss enamel, and that is generally used for air brushing, so it gets thinned with lacquer thinner. Everything else that I have is flat. Otherwise, you might want to consider switching to one of the many acrylic options available, especially for brush painting. Lacquers are pretty much all that I'll use for bodies, and the only thing that gets brush painted as a rule on my projects are small details. Any small parts that are large enough to get sprayed, get sprayed. I've gotten to the point in my hobby career where there's no way I'm going to wait for days or weeks for enamel paint to dry when there are other options, and in most cases, much better ones. Steve
-
I understand that, but mineral spirits will not help it dry more quickly. Not only that, but I've had Testors enamels curdle on me occasionally when thinned with mineral spirits. Steve
-
Not particularly, no. However, if I have a Testors enamel that has dried up somewhat and become very thick, I have thinned it back down with lacquer thinner. But in that case, it then needs to be sealed very well, or it will dry up quickly. Steve
-
Molotow Pens not Shiny
StevenGuthmiller replied to Olderisbetter's topic in General Automotive Talk (Trucks and Cars)
This is just one of the reasons, (but one of the biggest) why I don’t use Molotow, and why I continue to try to warn people about it’s shortcomings. Personally, I can’t quite figure out how I could ever get the body and window trim chromed with Molotow with almost all of the final assembly finished. The way it is, I generally foil the trim WAY before I ever even get close to installing windows, interior, engine, chassis, etc. I would not only have the trim all smudged and dulled by the time I was finished, but I’d probably have half of it worn completely off! Steve -
If you’re planning on airbrushing it, just use lacquer thinner for thinning. Speeds up drying time exponentially! Steve
-
Is it just me or are Verizon phone rates way too high?
StevenGuthmiller replied to Monty's topic in The Off-Topic Lounge
I agree. I get a little perturbed every time the bill comes due, but all that I have to do is envision employees and patients at my place of work and I feel better. Almost invariably, people that don't have Verizon have to step out the front of the building just to get a signal. I see it umpteen times every day. I'm not good with that. It's worth the extra money to me not to have to stand outside when it's 30 degrees below zero in the winter just to make a phone call. Steve -
FAKE AMAZON PHISHING E-MAILS
StevenGuthmiller replied to Ace-Garageguy's topic in The Off-Topic Lounge
I got an e-mail from "Amazon" a couple of weeks ago claiming that there had been "suspicious activity" on my account. Claimed that someone had ordered an item for several hundred dollars. Also a scam. They're hoping that you'll call the number provided to "verify your account information". U-huh. Steve