StevenGuthmiller
-
Posts
15,071 -
Joined
-
Last visited
Content Type
Profiles
Forums
Events
Gallery
Everything posted by StevenGuthmiller
-

Top 3 All Time Favorite Songs
StevenGuthmiller replied to StevenGuthmiller's topic in The Off-Topic Lounge
I’m pretty sure we all do, but that’s the assignment. ? Steve -
Top 3 All Time Favorite Songs
StevenGuthmiller replied to StevenGuthmiller's topic in The Off-Topic Lounge
Uh, the task was to name your 3 all time favorite "songs", not your 3 favorite bands. If we were talking about favorite bands, the 3 songs that I listed at the start of this thread wouldn't even rank in my top 20! Steve -
Source for Number 11 Blades
StevenGuthmiller replied to Tom Geiger's topic in Model Building Questions and Answers
Amazon still carries these "American Line" blades. Steve -
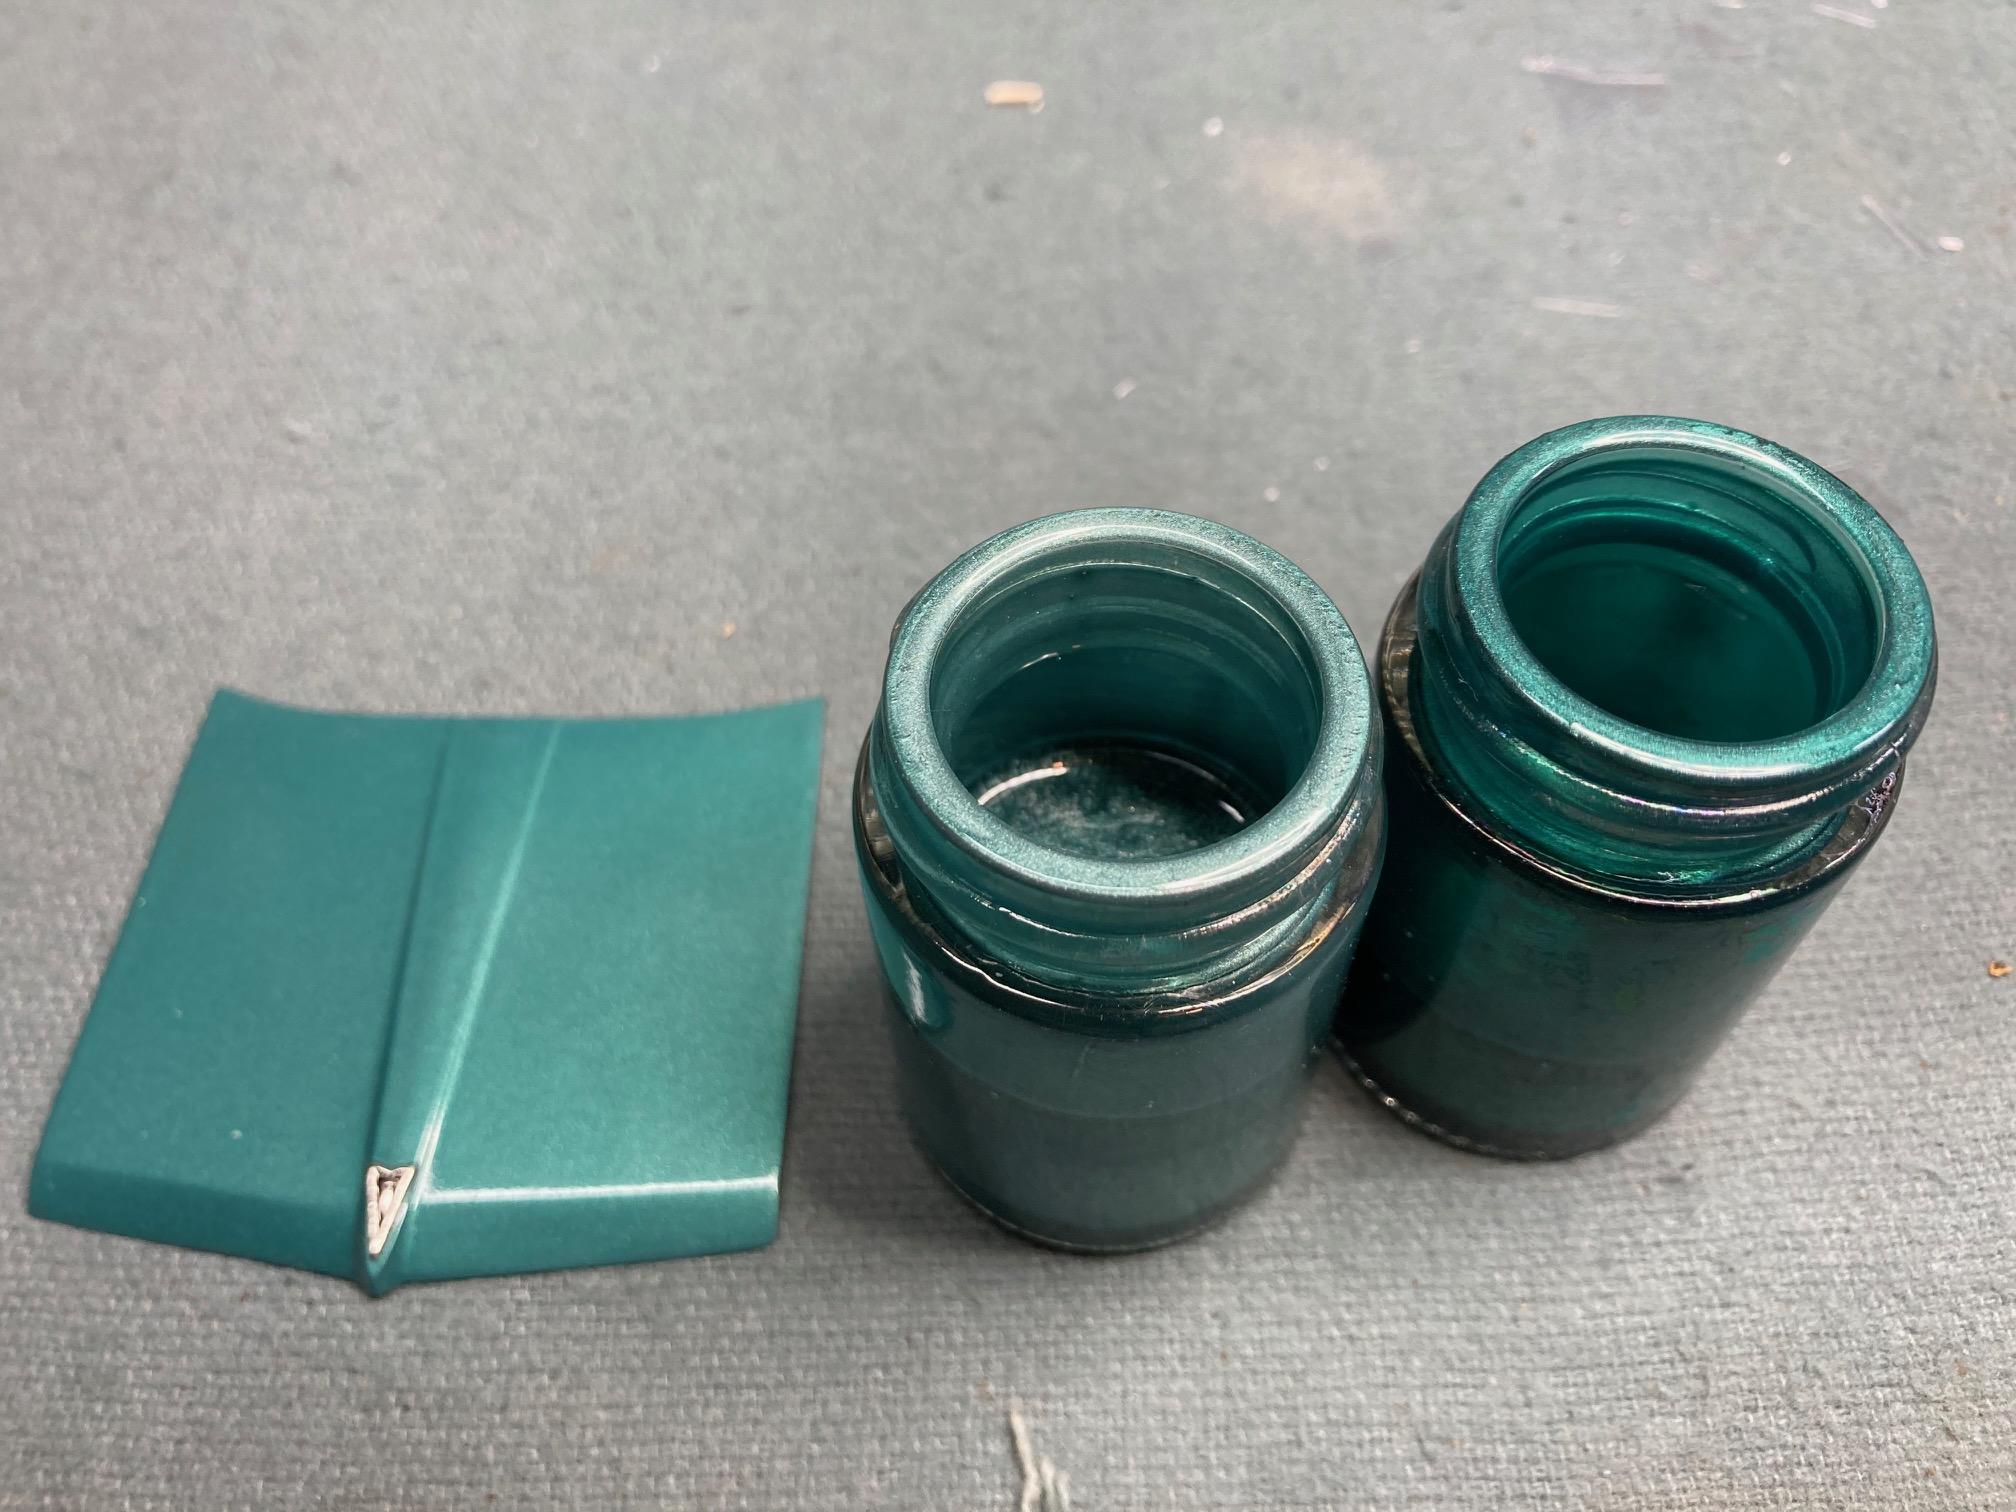
1964 Pontiac Bonneville Convertible.
StevenGuthmiller replied to StevenGuthmiller's topic in WIP: Model Cars
Getting the interior colors custom mixed. Steve
-
Source for Number 11 Blades
StevenGuthmiller replied to Tom Geiger's topic in Model Building Questions and Answers
For this kind of price, the cheapo blades would definitely be worth checking out! On Amazon. 200 for $11.99. 300 for $15.99. Steve -
Wow! That's nice! But I can't see myself spending that much time on a box. I usually use an upside down display case with some foam in the front and rear to help hold the model stationary, and wrap any loose parts in paper towels and either place them under the model, or along side. I also often pack a separate small box with cotton cloths and layer my loose parts within. This wouldn't be a good way to ship a model, but it works very well for transporting a couple hundred miles to a show by car. I have yet to experience any broken parts or damaged paint. Steve
-
Paint sticker shock
StevenGuthmiller replied to junkyardjeff's topic in General Automotive Talk (Trucks and Cars)
If you need a larger tip for the metallics, wouldn’t that mean that the particles are too large to fit through a standard sized tip, ie. out of scale metallic particles? I might be alone on this, but that’s my absolute biggest killer when it comes to metallic paints. Steve -
Paint sticker shock
StevenGuthmiller replied to junkyardjeff's topic in General Automotive Talk (Trucks and Cars)
I believe that they’re some type of lacquer, but I’m not certain. I don’t use them myself. Steve -
My personal opinion? You’re better off just getting into the habit of priming everything. Not only that, but you’re going to get much more satisfactory results by spray painting everything that you possibly can. I brush paint almost nothing, with the exception of very small details. Not much else says “amateur” more than brush marks all over your finished model. Steve
-
Spray Painting in Winter
StevenGuthmiller replied to Horrorshow's topic in Tips, Tricks, and Tutorials
Do you know anybody who has a little bit of heated space that you could borrow occasionally? Someone with an unfinished basement, or a mechanic’s or auto body shop, or the like, that would let you use it for a few minutes after hours once in a while? Otherwise, you might be stuck. Steve -
Top 3 All Time Favorite Songs
StevenGuthmiller replied to StevenGuthmiller's topic in The Off-Topic Lounge
I listened to the Hair of the Dog album constantly when I was kid cruising main. I’m certain that I know every lyric to every song on that album! ? Steve -
Molotow Pens not Shiny
StevenGuthmiller replied to Olderisbetter's topic in General Automotive Talk (Trucks and Cars)
Shelf life. Apparently Molotow has one. I have 2 pens. Neither of them lasted more than a year before they degraded. Personally, I'll stick with the "better" alternatives.......for several reasons. Steve -
You know, everybody loves their brand new car right off the bat. That’s universal. I’m sure you have all seen those television commercials from the auto makers boasting about their “JD Powers” awards for “initial quality”. Those awards are based a lot on consumer’s initial thoughts about the vehicle that they just bought within the past 3 months and are most likely largely based more on emotion than actual hard evaluation. I’ve never given much weight to an award based on surveys of people within the heart of the honeymoon period, right after spending $40,000.00 on a new car, when nobody wants to admit to themselves, or anyone else, that they bought a piece of junk. The real test will come down the road when that honeymoon period is over with, and the the true gravity of the consumer’s decision becomes apparent after getting some real miles on the vehicle. Steve
-
Paint sticker shock
StevenGuthmiller replied to junkyardjeff's topic in General Automotive Talk (Trucks and Cars)
Couldn't agree more! Why "settle" for something that you "sort of" like, when there are so many options available to us today. Is it really worth getting worked up about a buck or two here and there? I've said it before, but people sure don't seem to have a problem spending fist fulls of cash on their other hobbies. How much does a fishing boat, a new shot gun, or green fees cost? Seriously, just about every other hobby known to man costs more than building models. Steve -
What do I need to do
StevenGuthmiller replied to JerseeJerry55's topic in Model Building Questions and Answers
Mock up the main engine parts, (glue it together temporarily with a glue that will let you easily disassemble it) and then see how it fits. Some times you just gotta jump in. Steve -
If I didn't have to pay a small fortune to send it to Poland, I'd give it to you. I doubt that I'll ever build it. Steve
-
Paint sticker shock
StevenGuthmiller replied to junkyardjeff's topic in General Automotive Talk (Trucks and Cars)
Shouldn't surprise anyone that paint prices have gone up, just like everything else. I look at it this way. With the price of gas at 4 or 5 bucks a gallon, I can afford to not make trips to Hobby Lobby or the auto parts store and order my paint online from MCW or Scale Finishes. As a matter of fact, I'm almost definitely saving money, not only on gas, but all of the other stuff that I don't need that I would probably buy on a trip to the hobby shop! I guess I never fretted too much about paint prices, especially in the last few years, since I've been taking a lot more time to build one model. Maybe this would be a good time for all of us to focus a little less on quantity, and spend more time detailing each project. Get your modeling fix without spending gobs of money. Steve -
I’m with Brian. If it’s not a rare kit, it shouldn’t be to hard to source a new body. I wouldn’t waste my time on it. Steve
-
Sure. I figured it was part of the history of the kit. Now if I had done it in the past couple of years, it would have gotten a chassis swap. Steve
-
For some reason, it was also included in the AMT '62 Ford kit. At least that was what was in mine. Steve
-
1964 Pontiac Bonneville Convertible.
StevenGuthmiller replied to StevenGuthmiller's topic in WIP: Model Cars
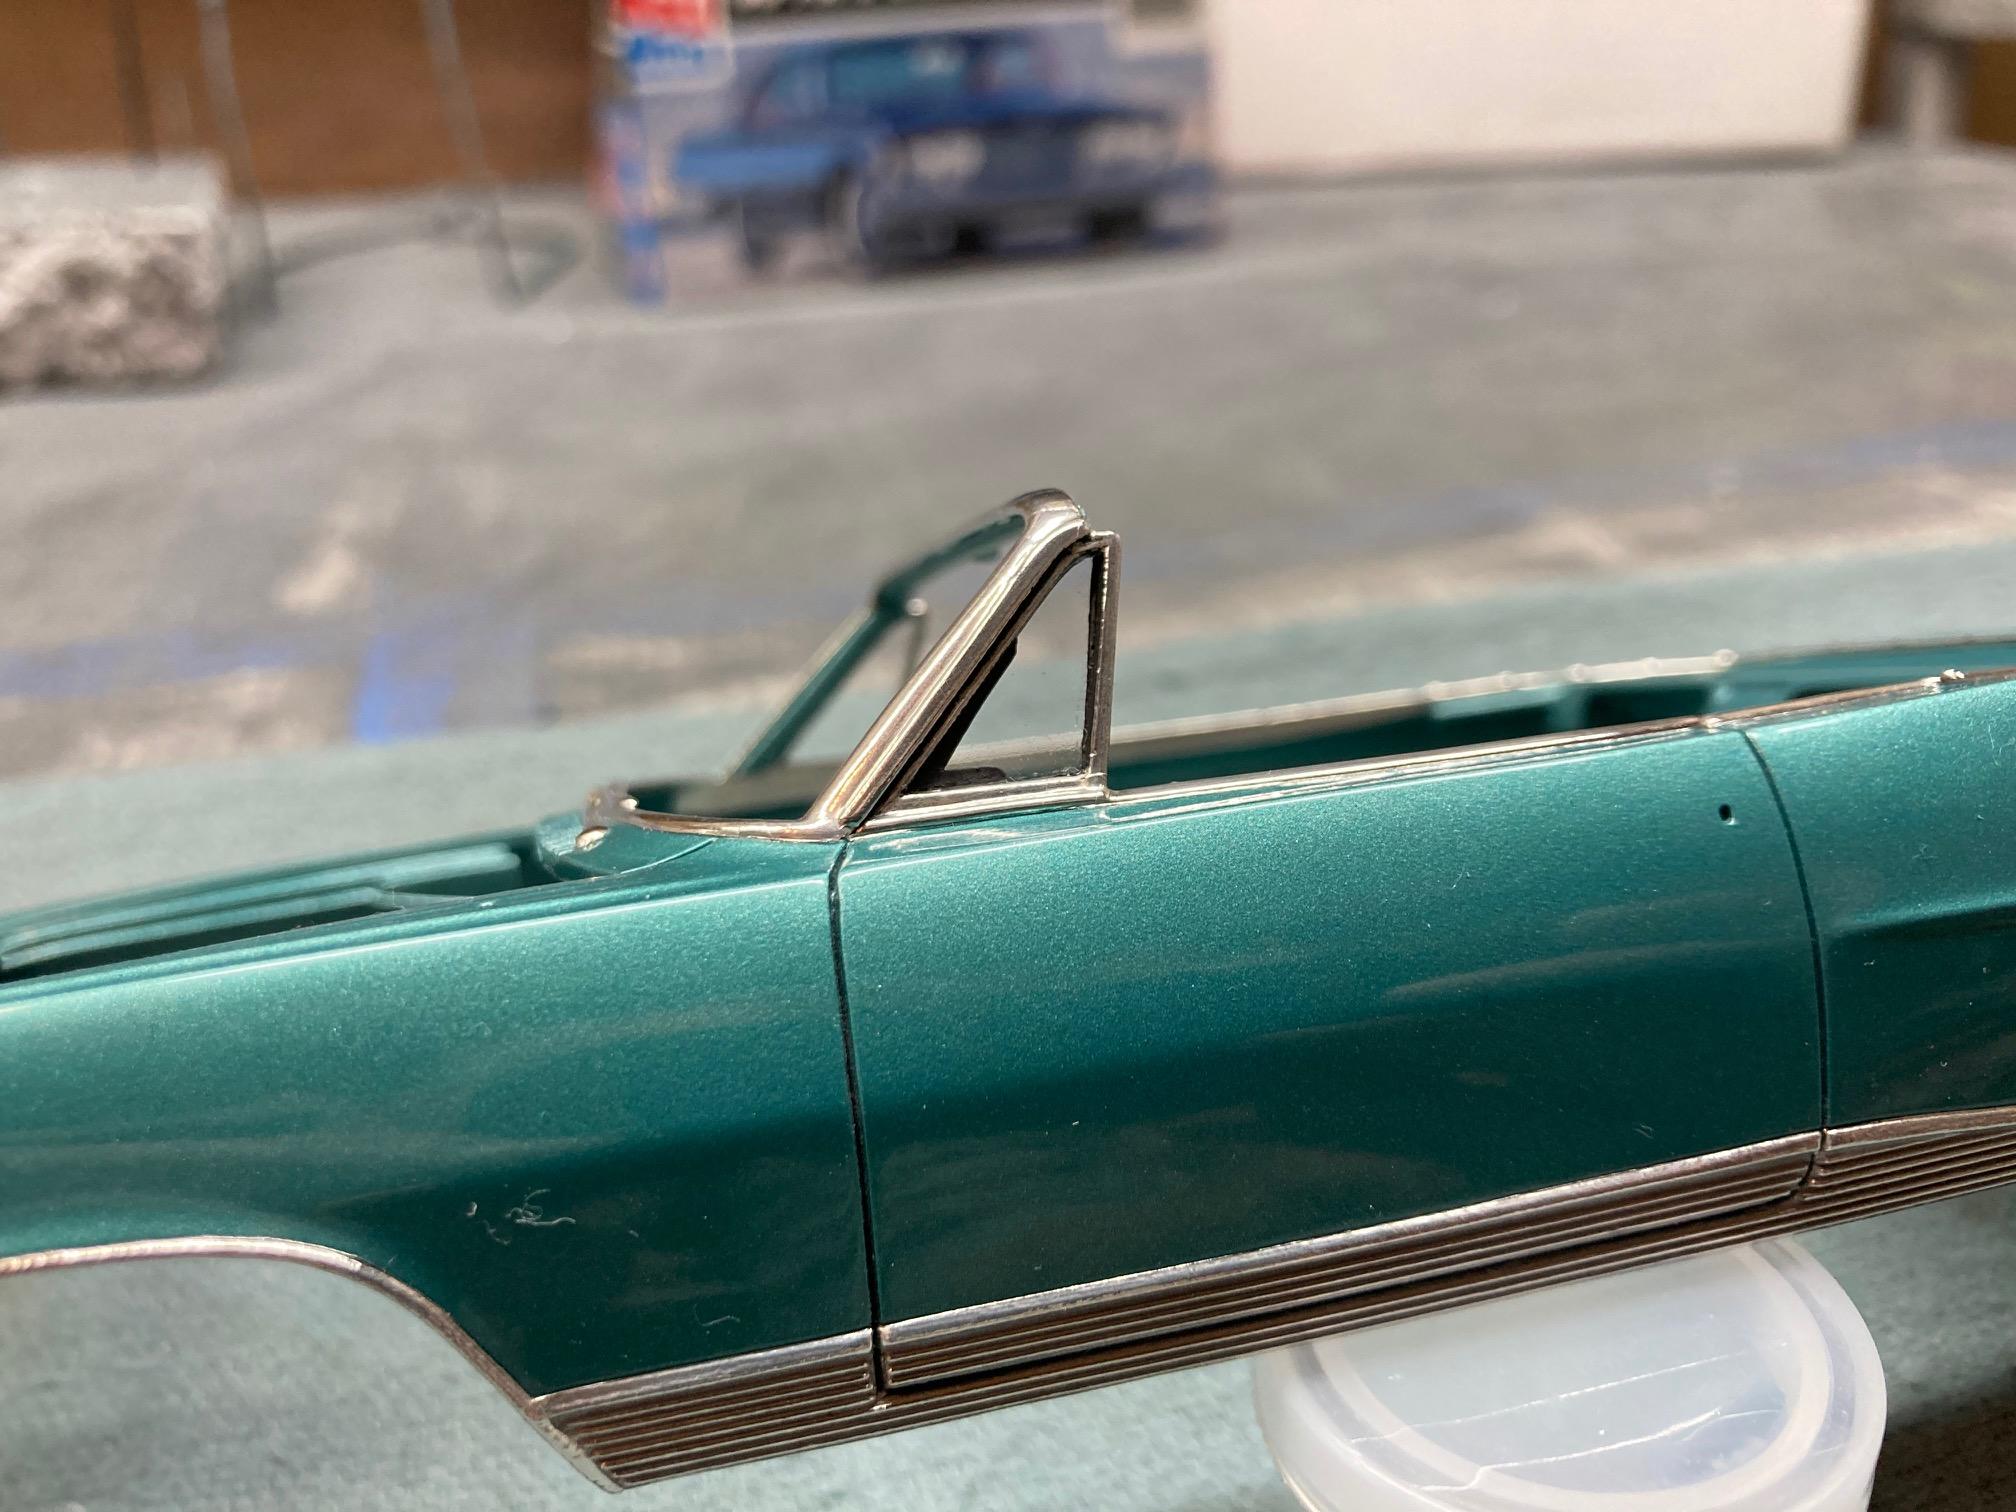
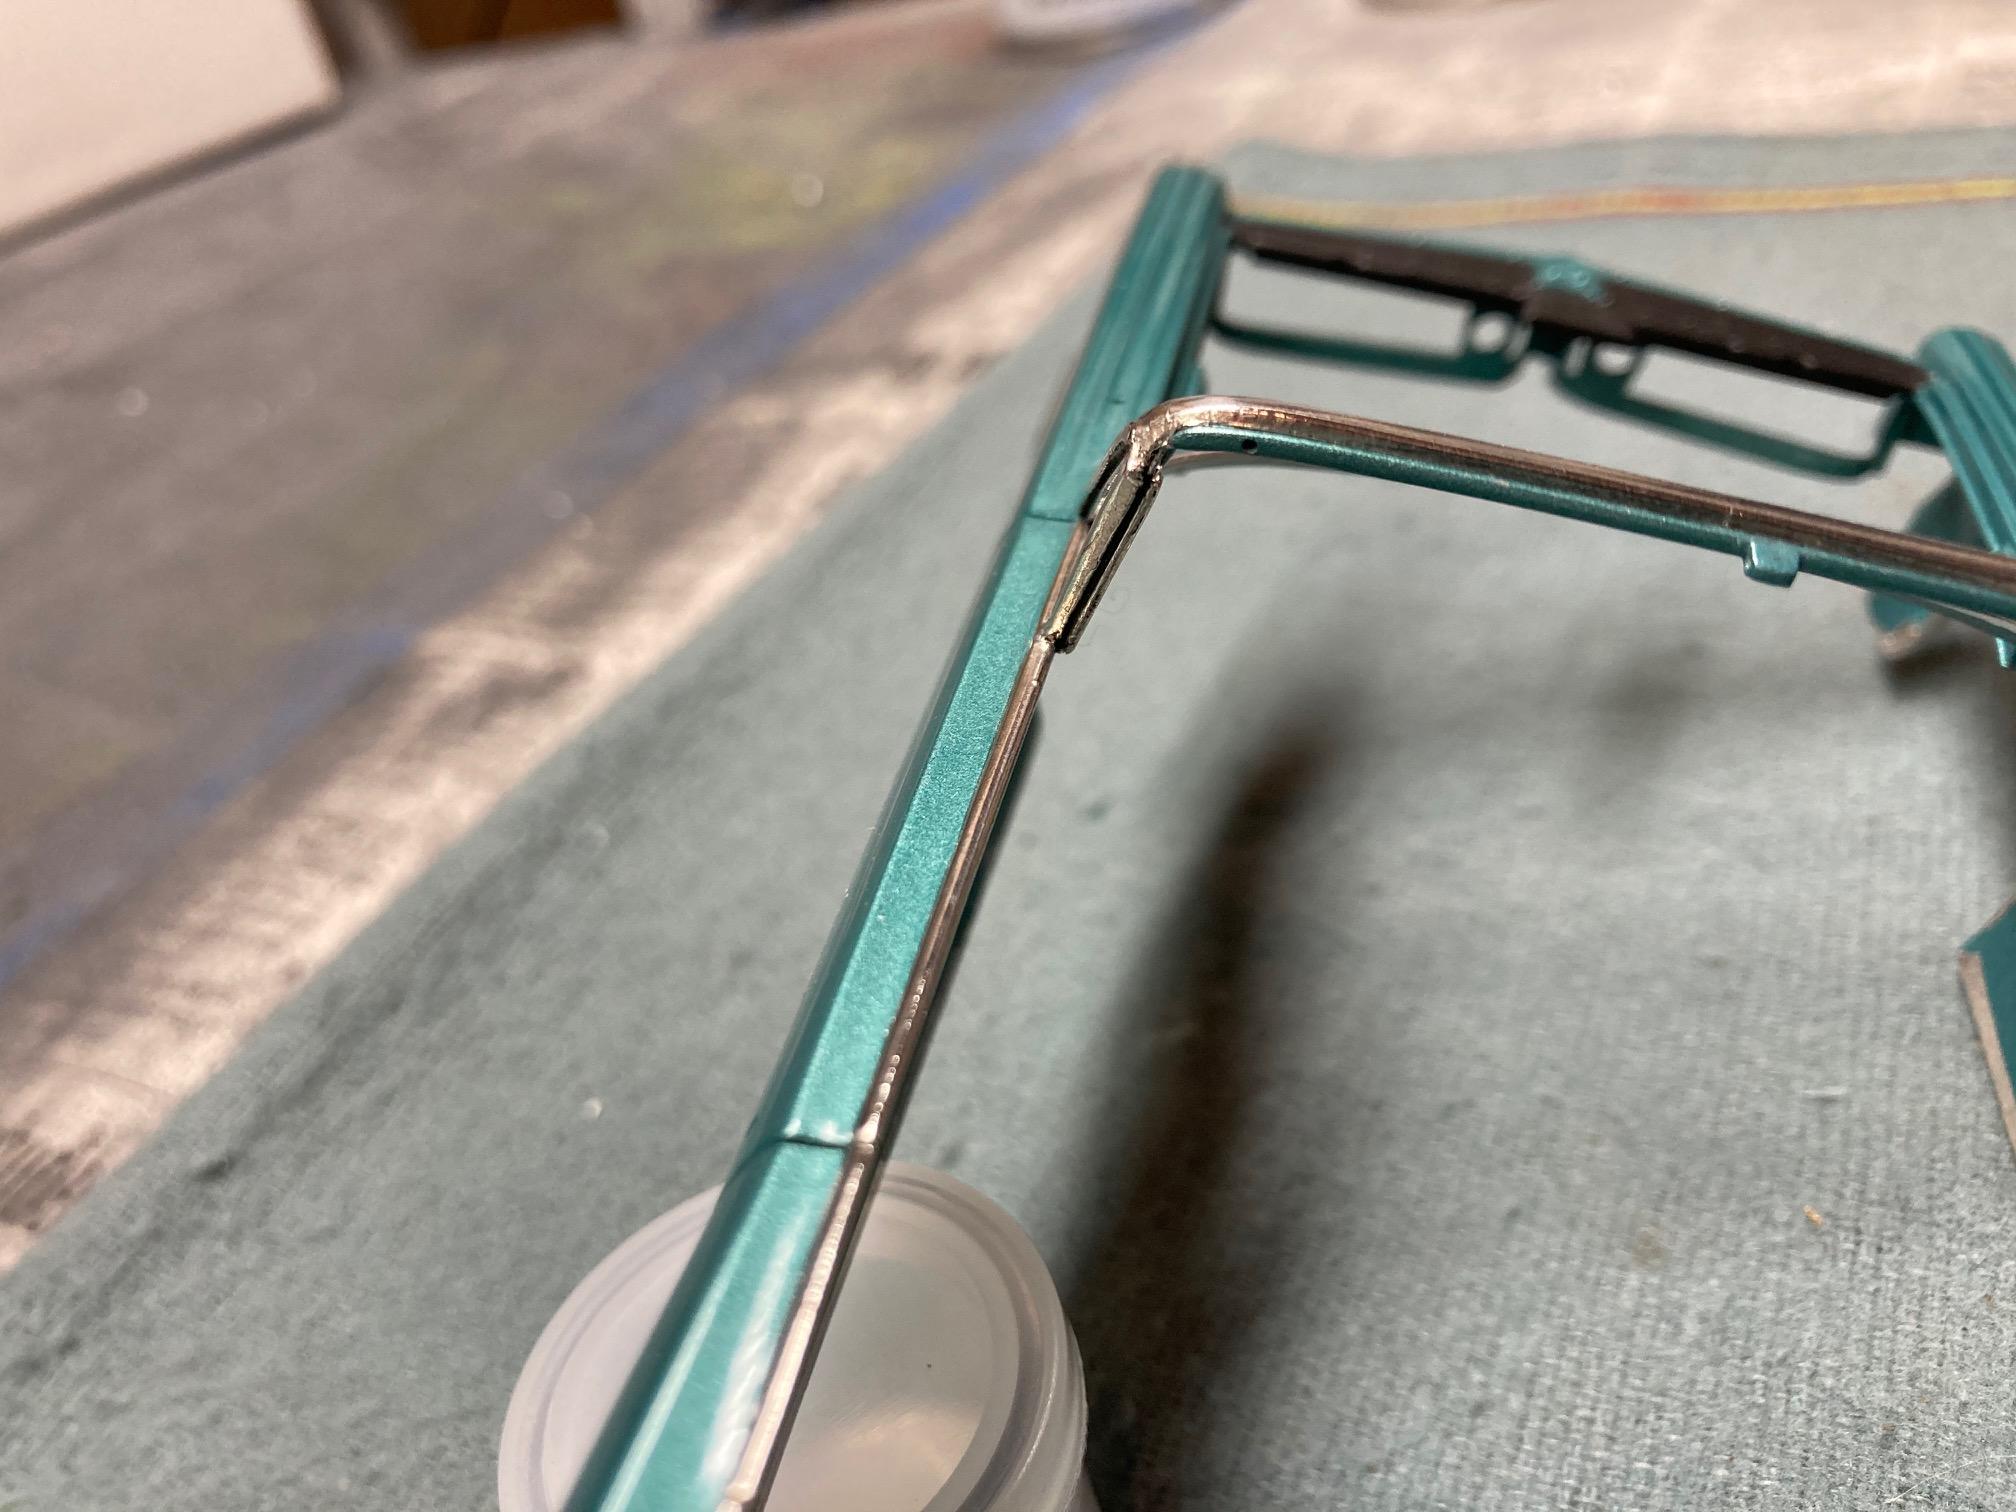
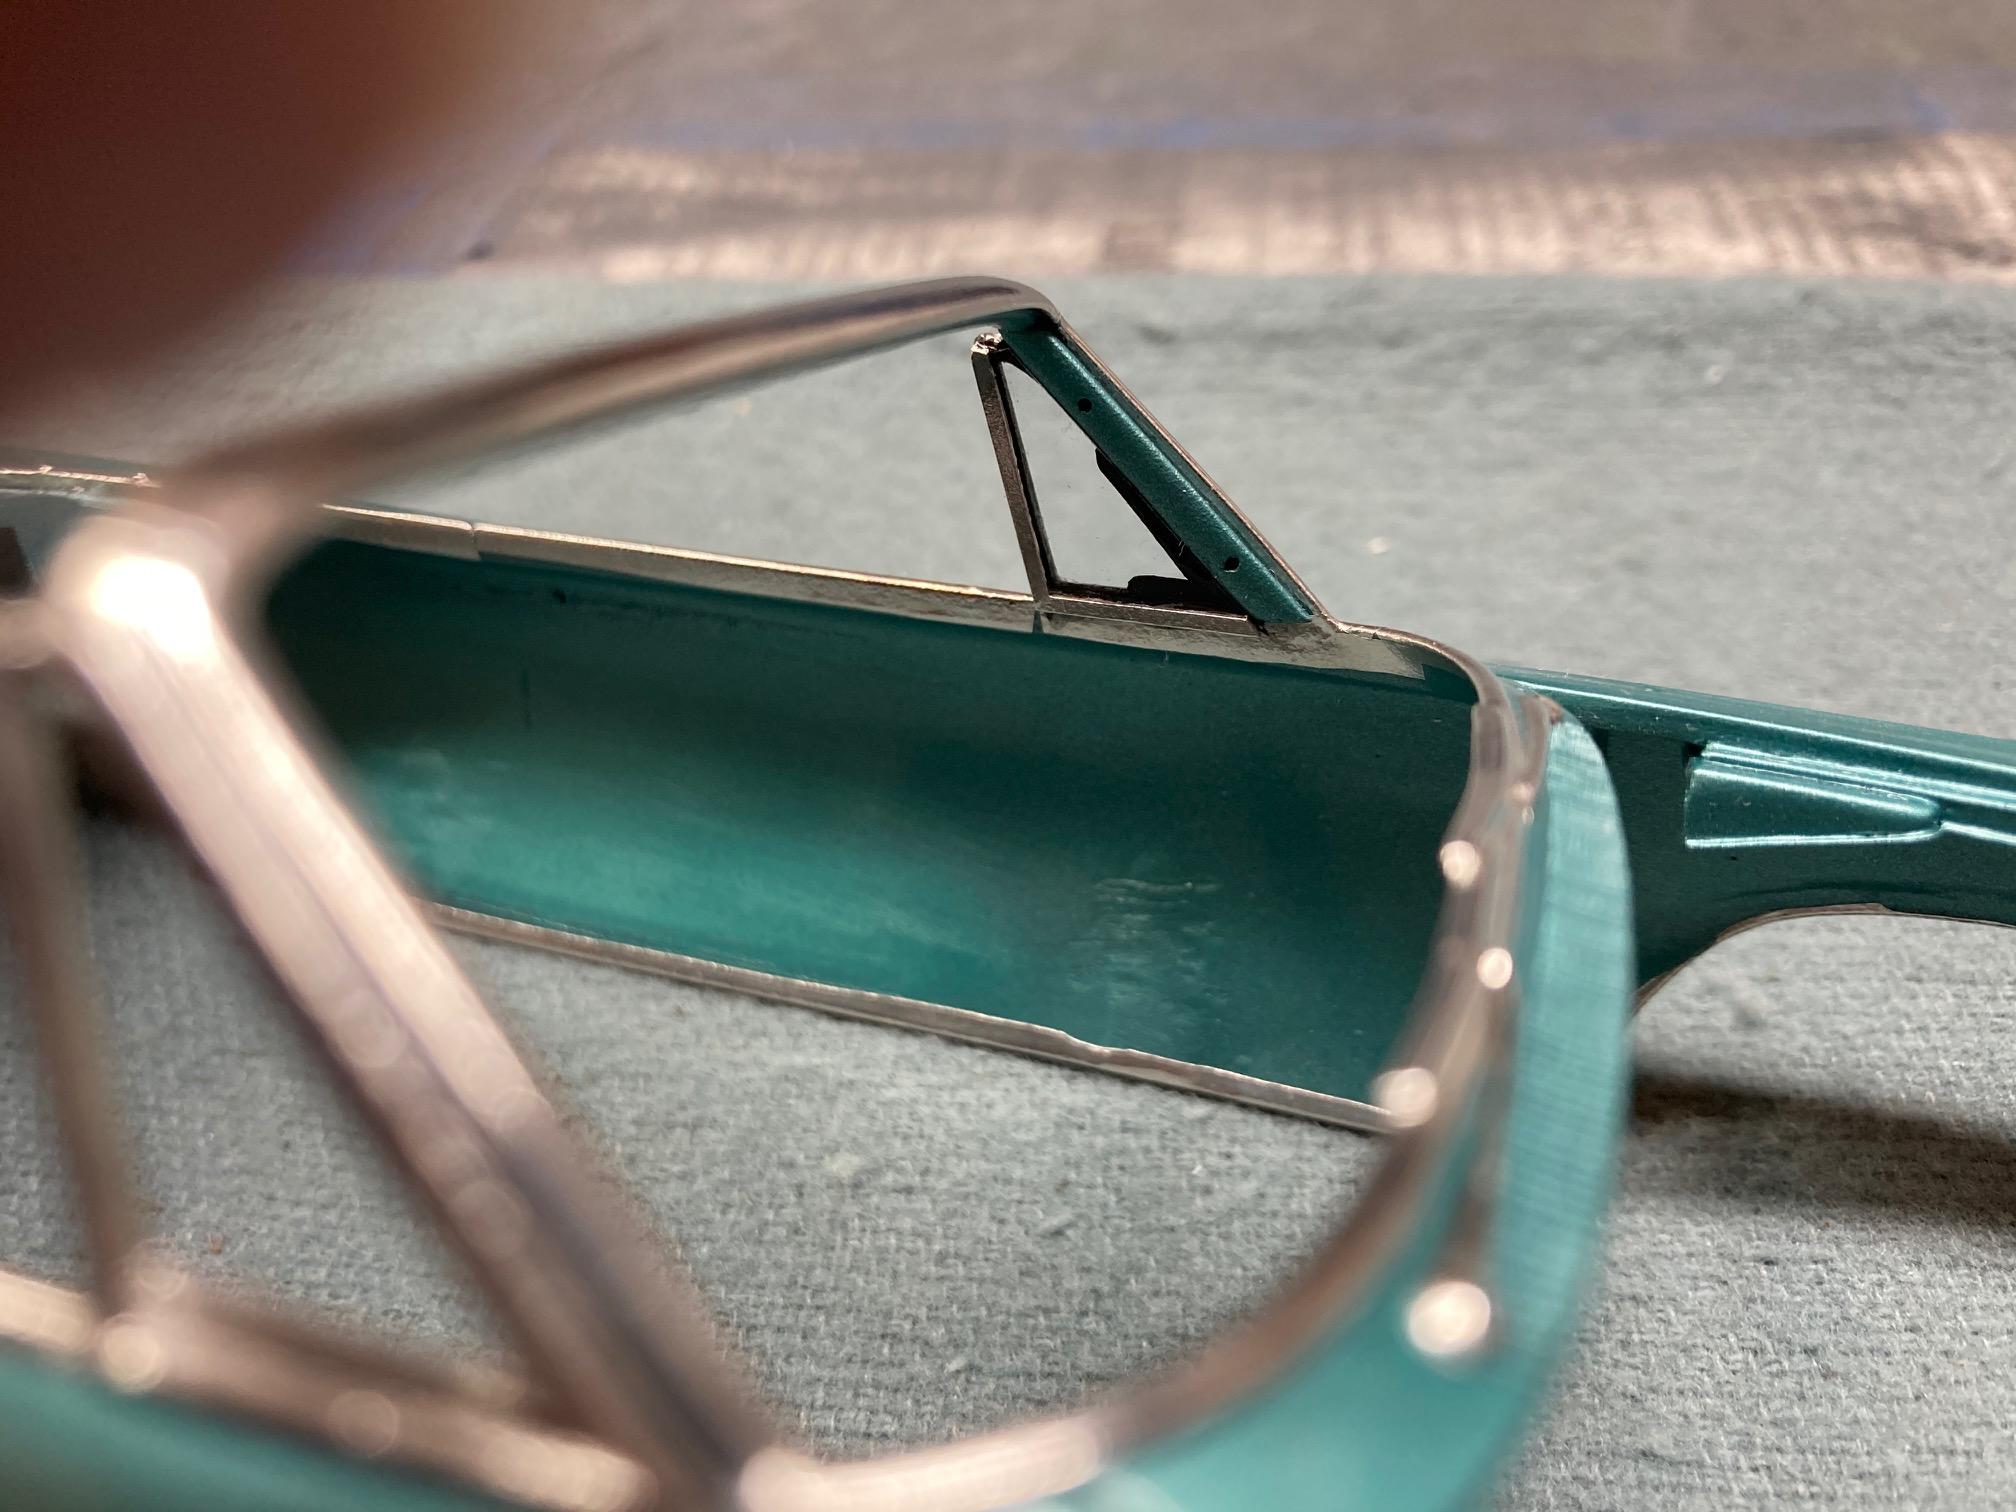
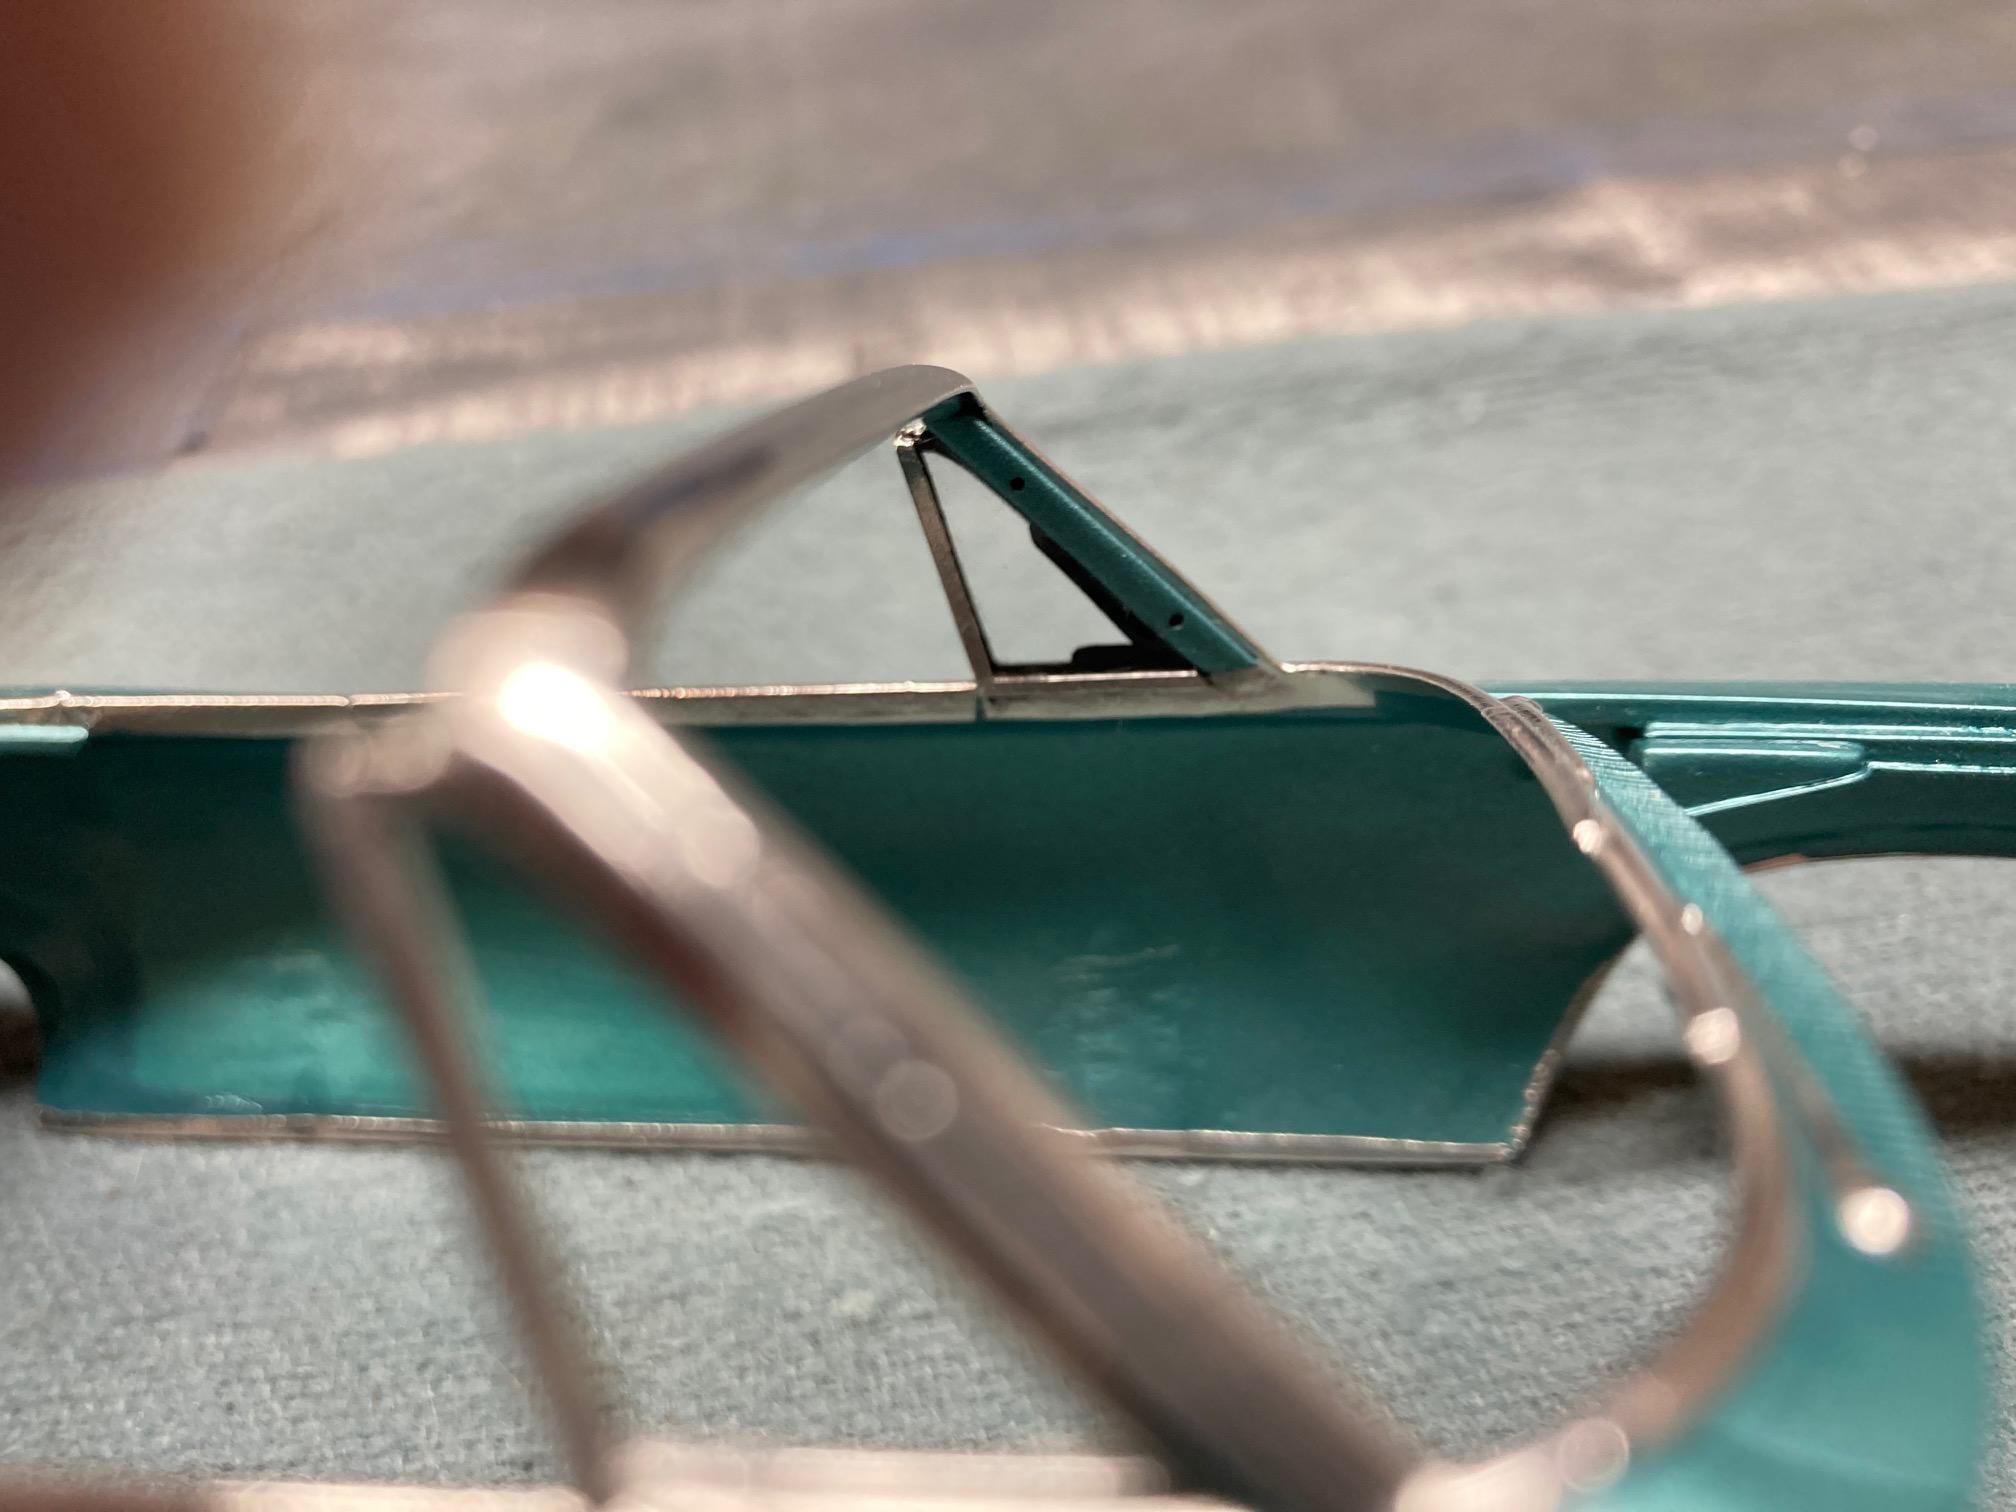
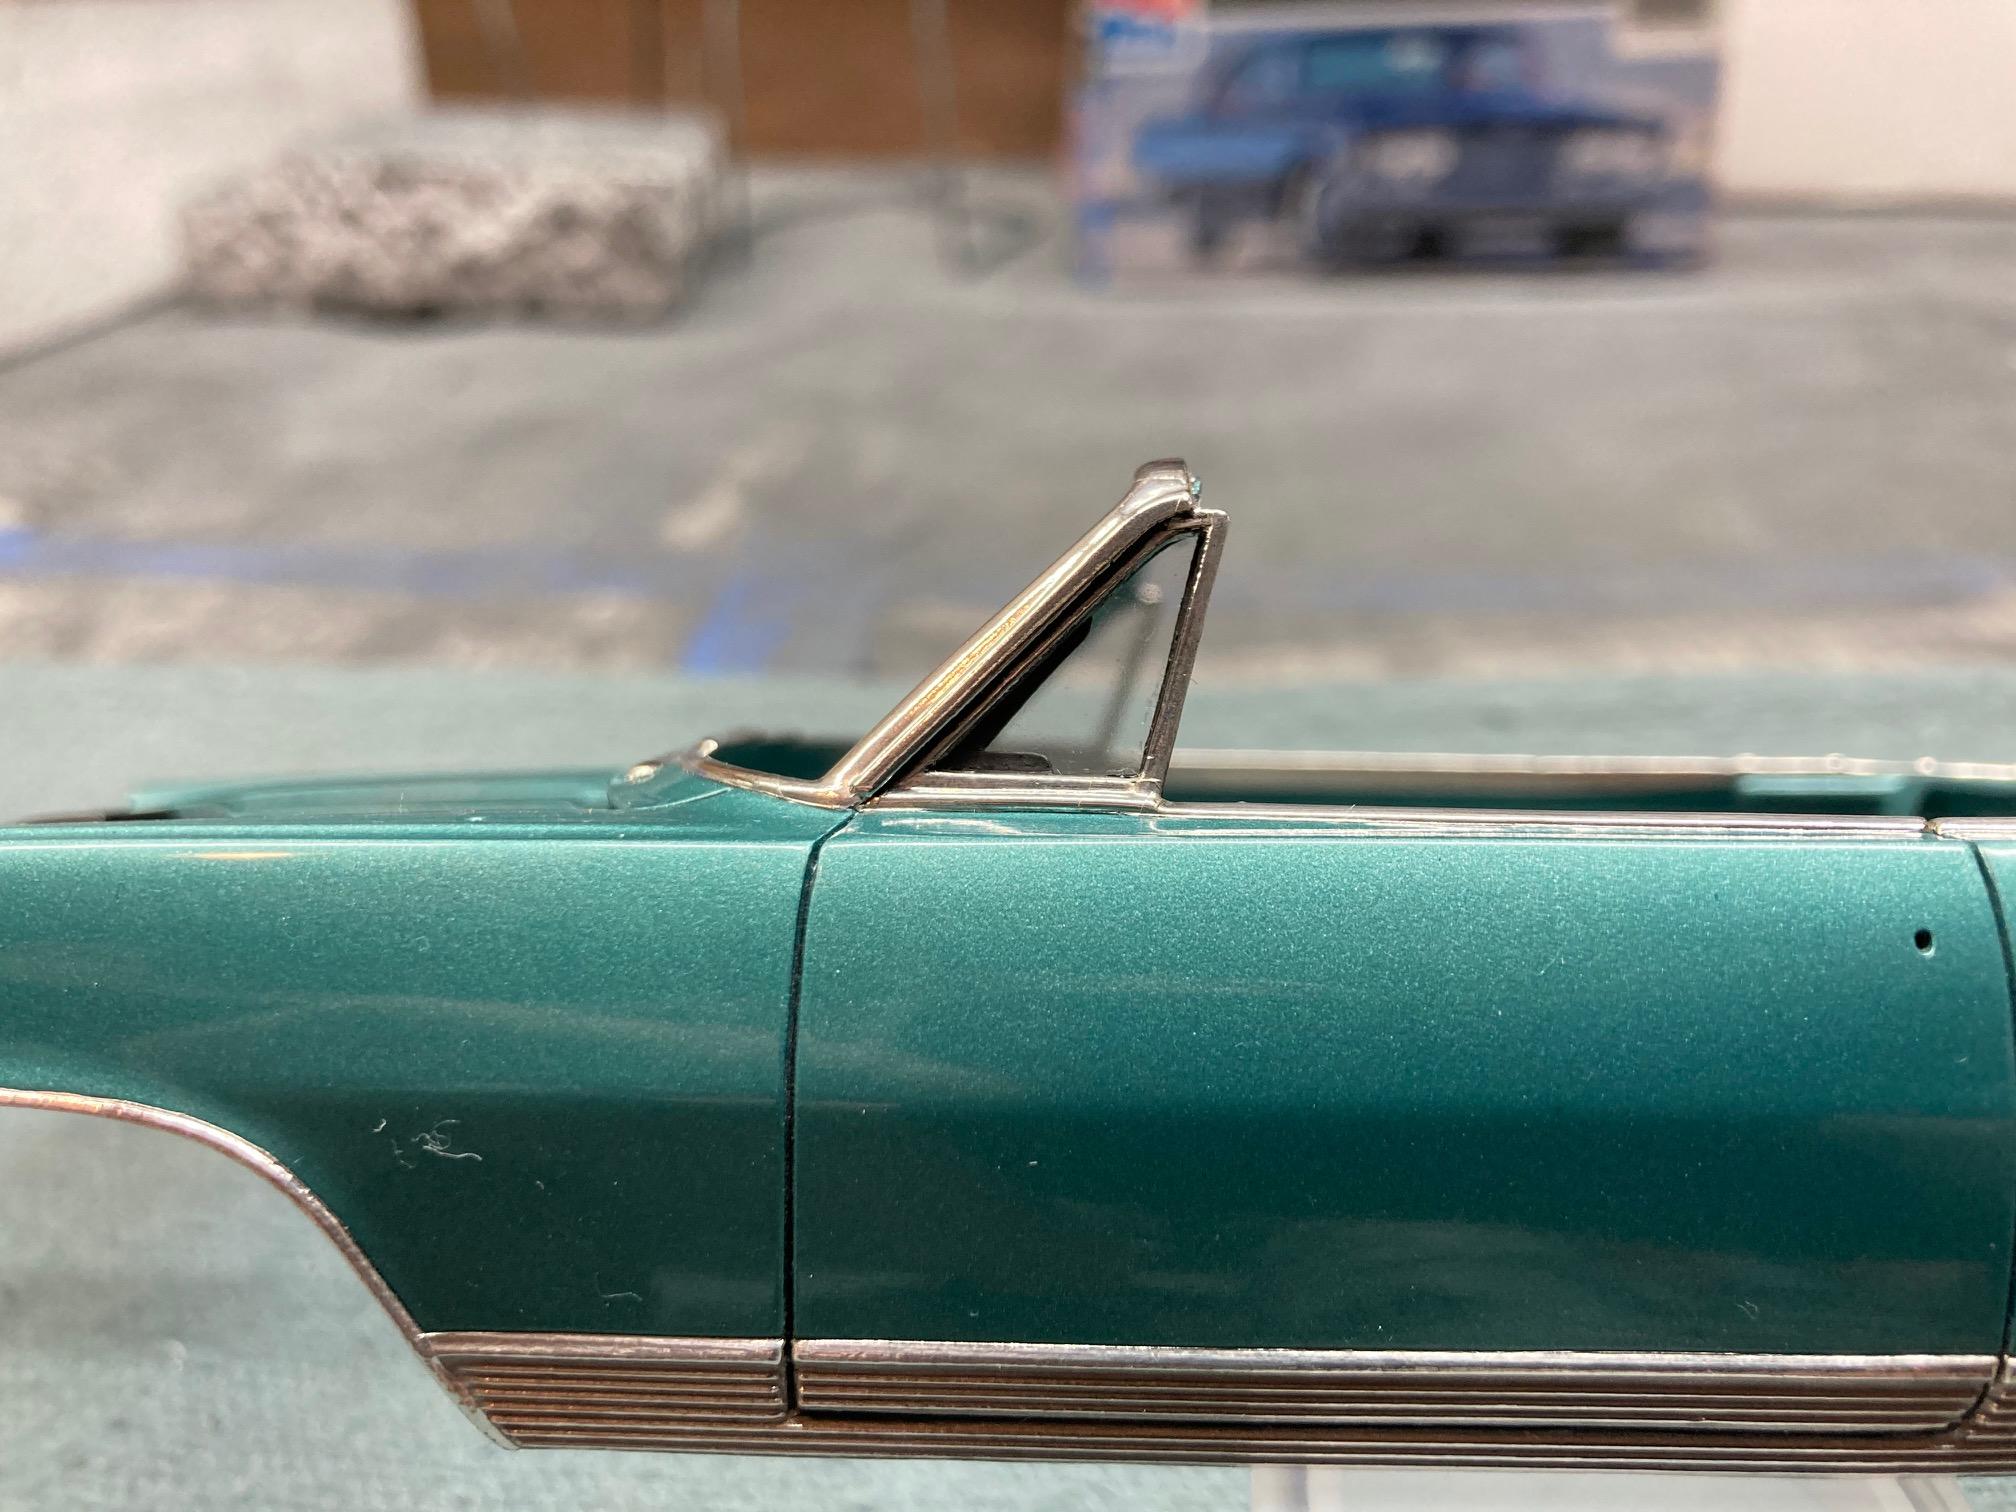
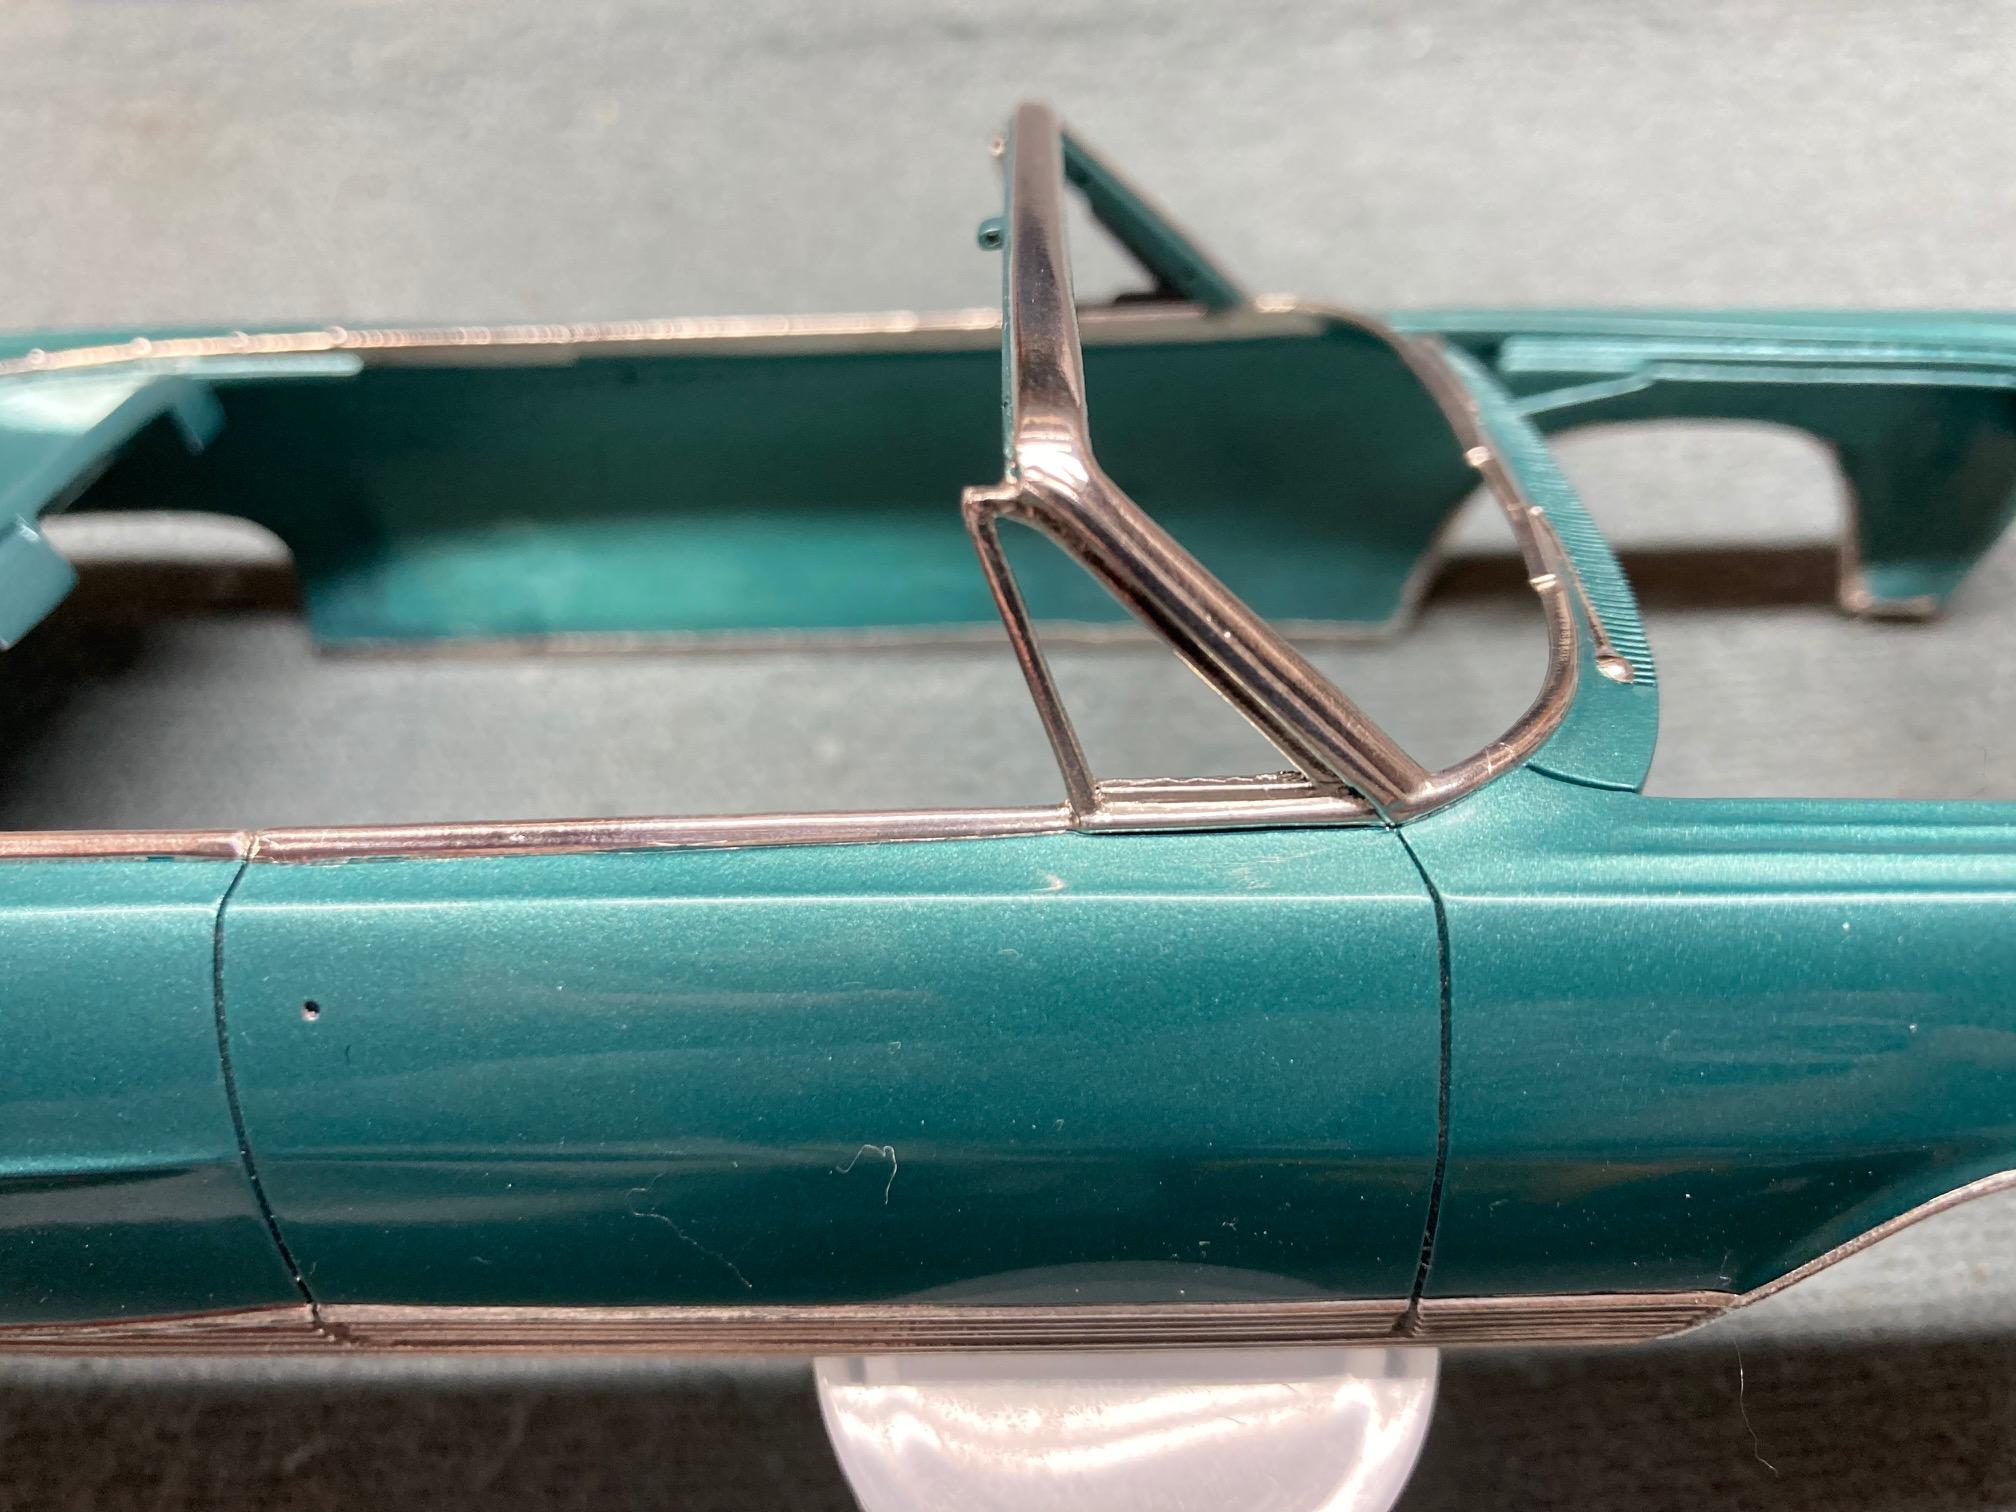
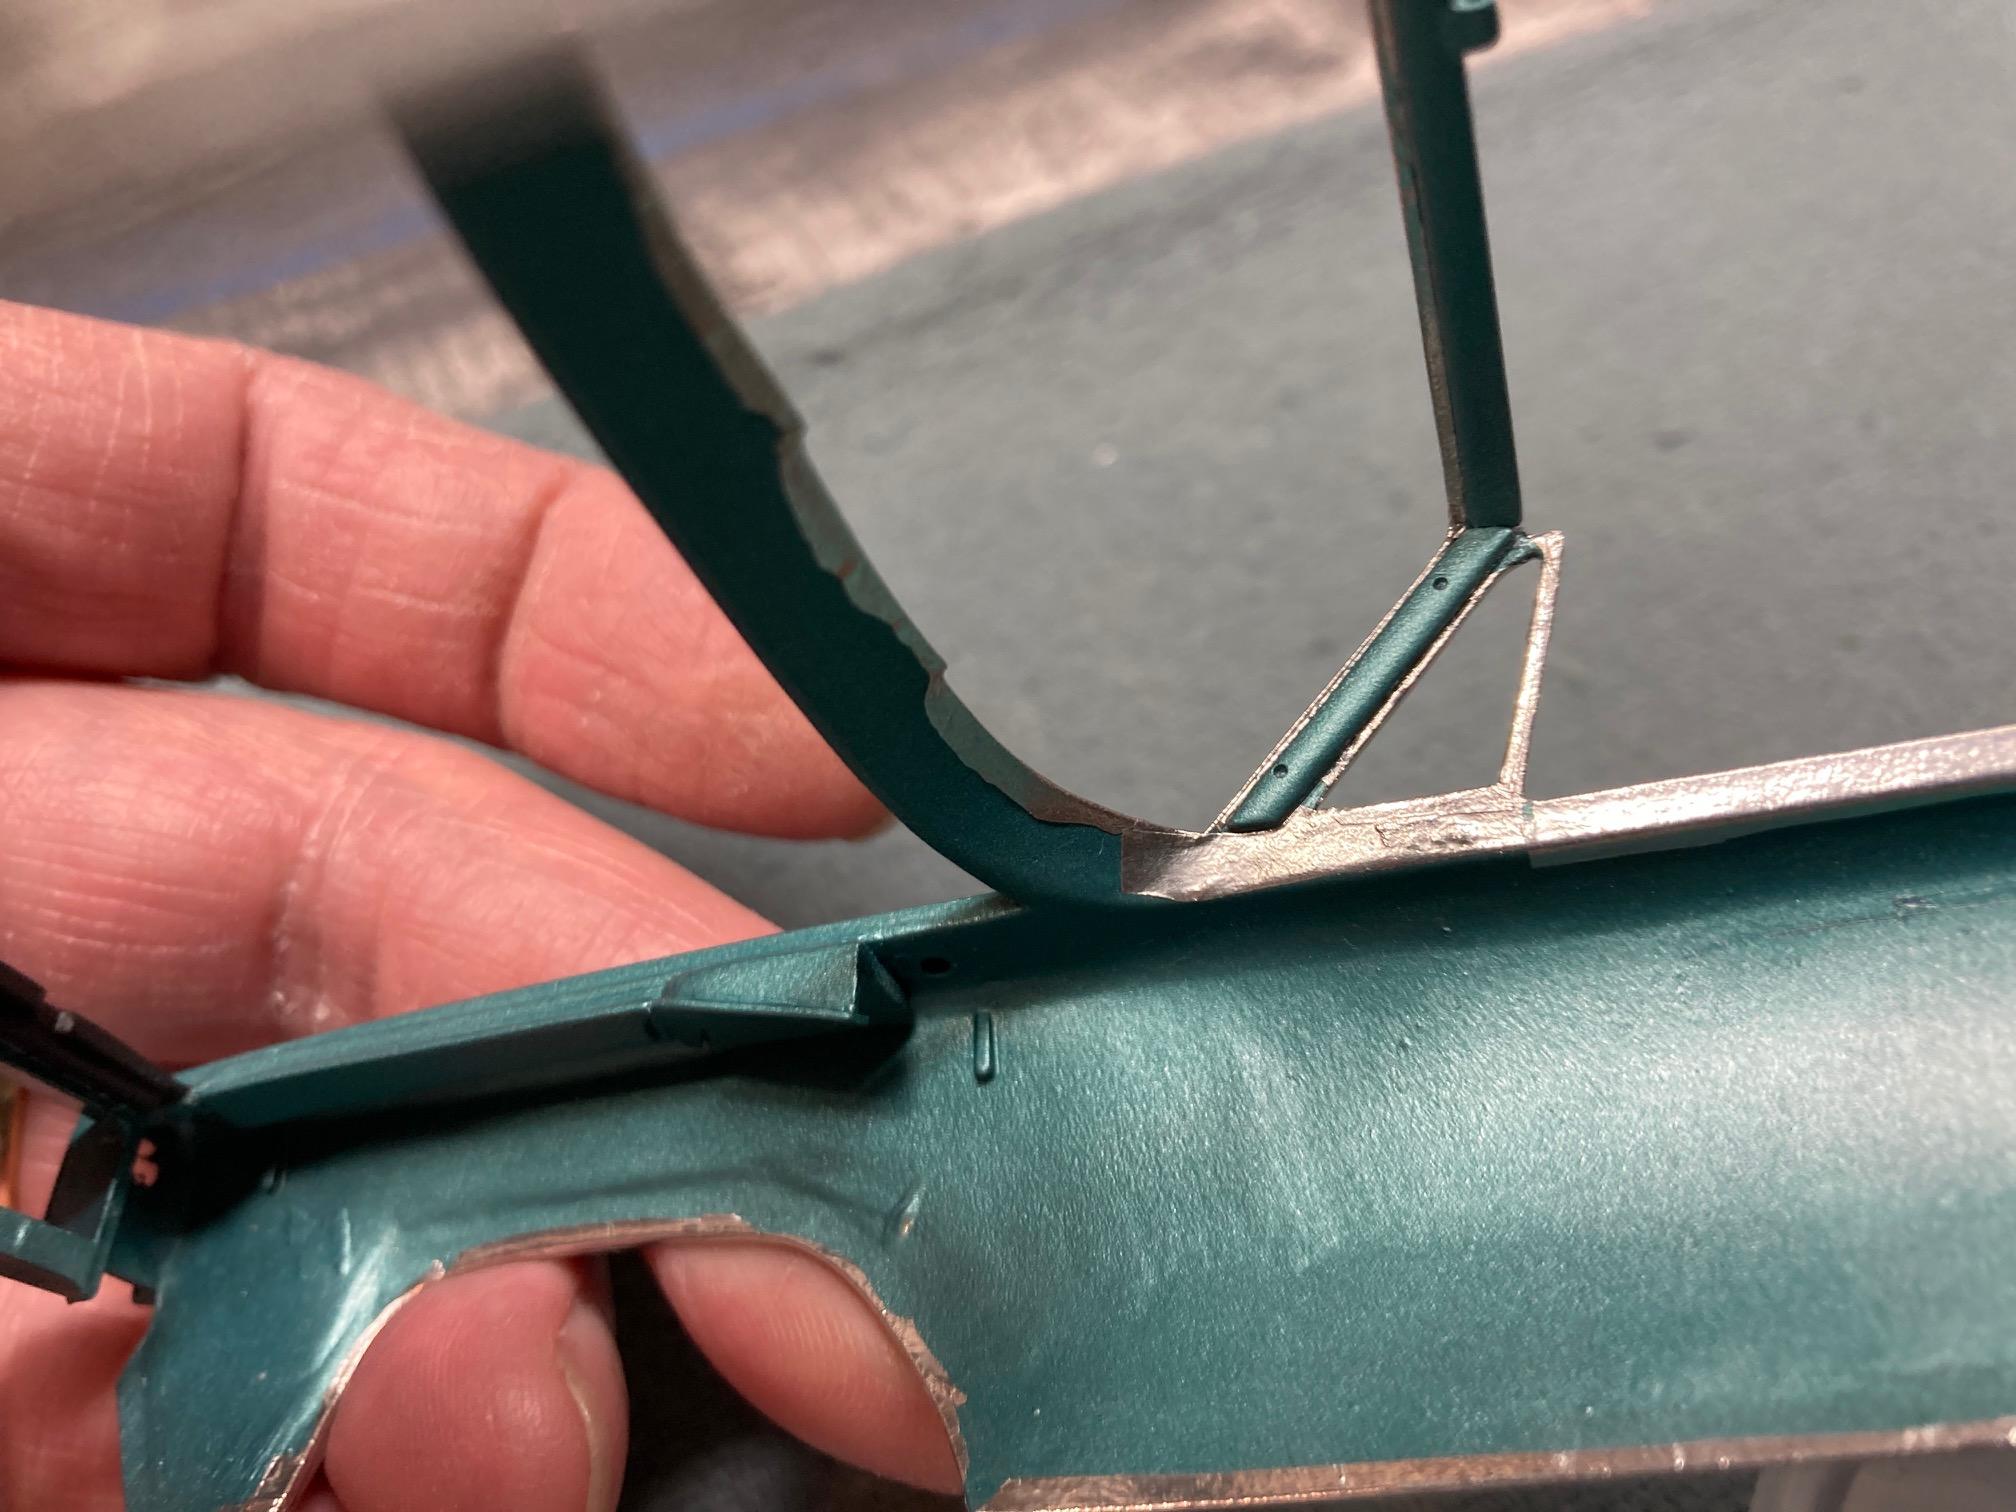
I've finished up the foiling on the body, and now I've moved on the a few remaining body details that I wanted to address. Being as this is a convertible, and the inside of the window areas will be readily visible, I decided to see what I could do about adding a little more realism to the inside of the vent windows. There's nothing that says "model" or "toy" more than thick kit glass just glued to the inside of the body. So first I used a similar technique as in recent past builds, and added inside A-Pillar covers, as well as windshield header trim. The glass is made of .007 "Clear Lay Film", and the windshield will be a "friction fit" configuration. The trim covers were added before paint, so now I could begin adding the rubber seals, glass and interior trim pieces in a sandwich fashion. First the seals, then glass, then trim. Rubber seals were made from the same clear film as the glass, and the chrome trim is just foiled lengths of .010 x .030 styrene strip. This also helped add the affect of side window channels in the back of the vent window. Everything seems to have turned out pretty well, so I can now finish the other side. Just a couple of comparison shots of the unmodified side. (with the added A-pillar cover of course) Steve
-
1964 Pontiac Bonneville Convertible.
StevenGuthmiller replied to StevenGuthmiller's topic in WIP: Model Cars
The graininess is due to the adhesive, but I'm hoping that they'll be able to dial that in a little more too. The sheet that I have from prior to the "pandemic" is as smooth as silk, and still adheres well, so it can be done, and has been in the past. Steve -
1964 Pontiac Bonneville Convertible.
StevenGuthmiller replied to StevenGuthmiller's topic in WIP: Model Cars
It is BMF, but most of the foil around the windows is from an older sheet. The newer sheets that I have have a little more texture to them. Steve -
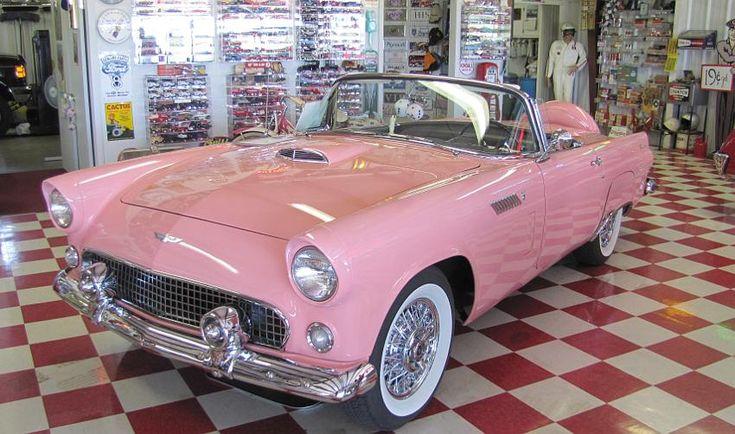
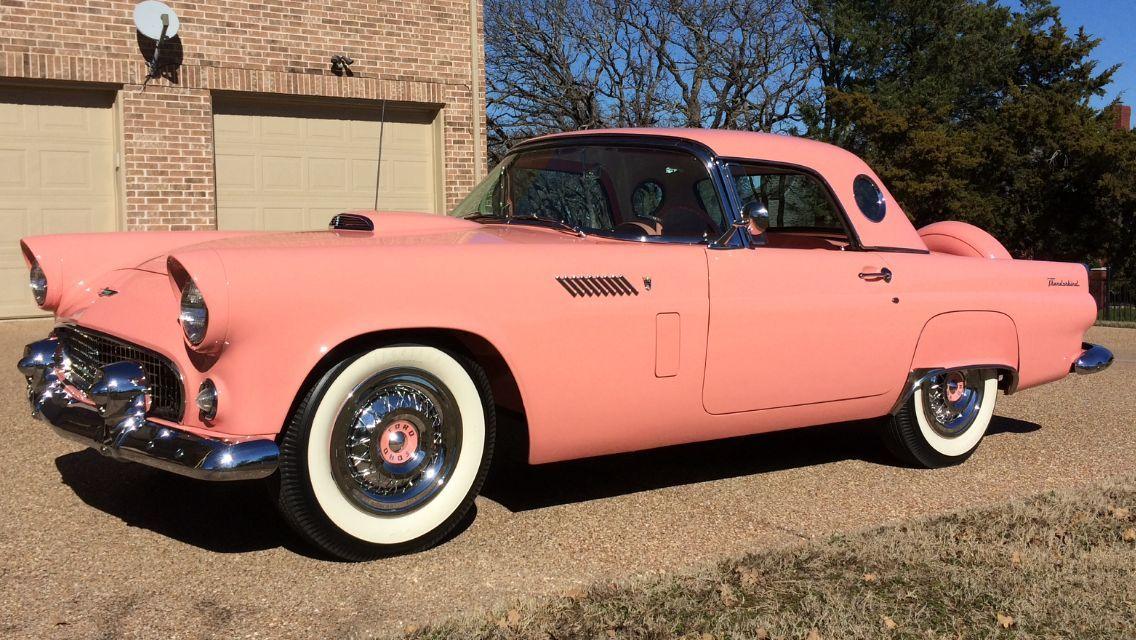
Matching Ford Sunset Coral
StevenGuthmiller replied to Redisetta's topic in Model Building Questions and Answers
I think that I have to agree that the example that the OP posted appears to lean much more towards the orange side than most examples that you see. Normally the color seems to be much closer to a standard pastel pink. Although the orange seems to often come out a little more in the sun. Steve
-
Top 3 All Time Favorite Songs
StevenGuthmiller replied to StevenGuthmiller's topic in The Off-Topic Lounge
I know that I said 3, but being as this is my thread, I'm adding a 4th. Another song that I really love! Steve