
RancheroSteve
-
Posts
1,701 -
Joined
-
Last visited
Content Type
Profiles
Forums
Events
Gallery
Everything posted by RancheroSteve
-
Very nice - can't have too many Cheetahs!
-
Nicely done as always, Mark. I really wish Tamiya had done a 1/24 version of this car.
-
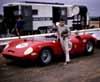
Yes, it's a very basic kit, but the proportions are decent. 1. I made new wheels by casting the wheels from the LS Chaparral 2C. The Monogram kit wheels are too shallow, especially the rears. 2. I added the scoop and oil cooler on the right side. This was a crude, last minute addition to the car when it raced at Daytona, which is the version the kit represents. 3. I added the top portion of an SBC and made some stacks from aluminum tubing. 4. I opened up all the molded in screened areas and replaced the plastic with metal screen. I replaced the exhaust pipes with aluminum tubing. 5. I replaced the goggled driver's head with an un-goggled head from a Fujimi driver's set and painted him to look like Jo Bonnier. There might be a couple of other minor things, but that's all I can remember right now.
-
The old Monogram curbside kit with a few upgrades. Comments & questions welcome - thanks for looking.
-
 Wow, great thread! I'm going to try that. BTW, beautiful models and paint jobs, Marcos.
 -
Just got an email back from Norm - he says, "Did you mean Lotus Elan type wheels, like those in the Gunze Sangyo Elan kit? If those are the ones you mean, then I have not done those." So I'm still mystified - maybe they're from another caster?
-
Custom made photo etch?
RancheroSteve replied to Austin T's topic in General Automotive Talk (Trucks and Cars)
I don't know if there's anyone who does this kind of work on a custom basis. You might want to read through this topic and consider doing it yourself: http://www.modelcars...topic=52974&hl= It's bit daunting at first, but it opens up a whole world of possibilities. -
I like this a lot - just the right amount of "ratty! Nice clean build & excellent photography.
-
I heartily approve - beautiful work, nicely photographed - a great save! Only because you asked though, there is only one very small thing I'd change (if you want the car to be more "correct") - the rear window surround is actually a black rubber gasket, not chrome.
-
Hey, Brian - any chance you'd have a part number for those wheels? I'm not seeing them in the catalog I have (not that the R & M catalog is the easiest thing to navigate).
-
Thanks for the tip! I'm going to order a set.
-
I've got one of those kits and that's always been my plan. The show came on when I was about 12 and I was instantly hooked.
-
Cab Over Glory
RancheroSteve replied to Dr. Cranky's topic in General Automotive Talk (Trucks and Cars)
I've got this far: body cleaned up (I'm thinking it would look good in red) and I've got some heavy duty wheels for it. Still unsure of how to build it. Stake bed, tow truck, beer wagon . . . ? -
MicroMarks photo etch kit
RancheroSteve replied to moparmagiclives's topic in Model Building Questions and Answers
I'm not sure that it's possible to over-clean the metal. The MicroMark kit has a 3200 grit pad and it's also important to not get any grease from your fingers on the metal. I try to handle the peeled photo-resist as little as possible once peeled and get it laminated onto the metal as quickly as I can, but even then a few dust spots are probably unavoidable. In most cases they won't affect your finished product. I've been exposing in the noon (or near noon) day sun and generally letting the laminate expose longer than suggested. Also, when developing, it's easy to over-develop and remove all the laminate if you're not carefull - 30 seconds per side is usually plenty long enough, but better to err on the side of under-developing at first. Finally, given that this is a "home version" of a fairly meticulous industrial process, perfection is certainly something to shoot for, but you won't get 100% of your parts turning out - even GSL winner Randy Derr has told me as much. -
I've got a few: http://public.fotki.com/Roullier/model_cars-1/shelbys_cars/
-
Cab Over Glory
RancheroSteve replied to Dr. Cranky's topic in General Automotive Talk (Trucks and Cars)
I've got a Mill City (?) resin '40 Ford cabover that I started years ago. Kind of a stalled project at this point -I should get back to it. -
Very nicely done and great job on all the added detail! I see you made the rear section removeable in the prototypically correct way. I built this kit a few years back as the Royal Oak version using the Slixx decals.
-
Cool - I see you got the Trek mountain bike! I built a couple of those.
-
Very likely!
-
Yes, I should have mentioned it, but that it what I used for my build. It had almost all of the parts needed, plus great instructions on how to build the various versions (as the car changed over the years). I chose to build the "early Roth version" with the single headlights.
-
I was at my LHS today and they had the new Tweedy. I noticed that they changed the box top a little to represent the tires and wheels that are in the kit. Here's a shot of the original: They also eliminated the "floating heads" on the side of the box, which for me as a kid were always a somewhat strange but iconic part of the Revell boxes of that period. Now that I look at that side panel, I have all of those kits and have built all but two of them!
-
Yes, that's pretty much the story. The car was originally built with a flat head by Bob Johnston in the mid-fifties. Most people believe that Roth put the SBC in, but I've also seen that story called into question. A pretty detailed history here: http://www.kustomrama.com/index.php?title=Tweedy_Pie
-
Right, and while I like keeping a case full of finished builds and try to take satisfaction in what I've accomplished, on the other hand once I'm done with a build it's "on to the next one". For me, the process is maybe 90% of why I build models. Otherwise, we'd all just be buying finished diecasts, right? I hope that doesn't come off too arty or cerebral - it's just the way I look at it.
-
Thanks! Wish I could remember better what the paint is (one of these days I'll learn to take notes), but from what I can recall I used some metallic purple Testors enamel that looked close, but may have modified it a little with a few drops of another color. I was just shooting for something that looked "about right" based on photos I've seen.
-
Great to see this kit restored to its original configuration after all this time - especially the box art, which is one of my favorites. I went to the trouble of building a Tweedy Pie a few years ago, which entailed suplementing the version available at the time with the trans kit from R&M and having to send parts out to be plated, finding the right wheels and tires, etc. All in all, a pretty expensive proposition, but worth it all the same. I love that little hot rod!