
landman
-
Posts
7,921 -
Joined
-
Last visited
Content Type
Profiles
Forums
Events
Gallery
Everything posted by landman
-
I guess I have to redo mine now. :)Nice work, sleek machine.
-
It won't let me quote again. Ray, what clear did you use?
-
-

Hit songs that are actually covers (that nobody knows are covers)
landman replied to Harry P.'s topic in The Off-Topic Lounge
R.I.P. Riley B. King. You were the greatest. -
More Plastruct & tubing, drill bits, paints & washes and another Mustang.
-
Hit songs that are actually covers (that nobody knows are covers)
landman replied to Harry P.'s topic in The Off-Topic Lounge
Oops!Should have read the whole thread. -
Hit songs that are actually covers (that nobody knows are covers)
landman replied to Harry P.'s topic in The Off-Topic Lounge
And Janis' Ball &Chain was Big Mama Thornton's too. -
Scratch/bashing a 702
landman replied to landman's topic in WIP: Model Trucks: Big Rigs and Heavy Equipment
Now why didn't I think of that. -
Scratch/bashing a 702
landman replied to landman's topic in WIP: Model Trucks: Big Rigs and Heavy Equipment
Rummaging through the junk engine parts to find stuff suitable for the font cover, water pump, fuel pump etc..
-
Thank you Jim. Sometimes you just have to.
-
Peterbilt 352 cabover
landman replied to Ken Gilkeson's topic in WIP: Model Trucks: Big Rigs and Heavy Equipment
Good looking stuff Ken. Those hinges are likely a lot easier to use than the PE ones that you have to fold etc. What size are they? I think I might want to stock up on those. -
Decided to go with Eric's idea of twin spares. Drilled a pilot hole in the gas tank apron. Enlarged it to take a 1/8 rod. Attached a 1/8 ID sleeve to the spares and beveled to fit. That will slide over the rod. Should look pretty slick.
-
Started on the roadster conversion tonight. I'm planning to use the roof and windshield of the Metal Master Packard I have. Tried it on for size. It is way too narrow and doesn't conform well to the area behind the doors. Looked at filling in the cabriolet roof well. that would make it look even taller. So, instead, I cut down the upper door molding. Looks better this way. Also cut out the rest of the old windshield base which had broken off. Split the roof parts in three and I will add about 1/8" to each side.
-
Eric, I was working on the 702 for a while. I hope to get back at it tonight. I'm looking at turning it into a roadster as you suggested.
-
Scratch/bashing a 702
landman replied to landman's topic in WIP: Model Trucks: Big Rigs and Heavy Equipment
The carbs were Strombergs WW, anyone know if they are reproduced? Anything similar?
-
Harry, are toy going to do the wood in the actual species or balsa?
-
Scratch/bashing a 702
landman replied to landman's topic in WIP: Model Trucks: Big Rigs and Heavy Equipment
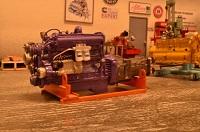
Here's a recap. Redid the exhaust manifolds using smaller material. They are better but not as slim as the 1:1s.But they'll do for now. After all, it IS a prototype. Prototypes get modified. Spent most of the weekend trying to make flanges on the intake manifolds. Here are the results. Posed it next to the CAT 1106 for size reference. I still think it looks too wide at the top compared to the actual engine which appears narrower and taller. Maybe once the pan is installed... Someone suggested I cast this. I feel it isn't an accurate enough replica for that, however, we'll see. But then, I may select the best of something and cast the others off it for consistency. Hope you guys are enjoying this as much as I am. I will take a short break and go back to the Caddy for a bit.
-
Scratch/bashing a 702
landman replied to landman's topic in WIP: Model Trucks: Big Rigs and Heavy Equipment
Remembered the stash of short tubings I got the other day. Cut some of that up and made what I think are more realistic frost plugs. Also cut off all the ports off the exhaust manifolds and reconfigured them so the entire port is above the collector.
-
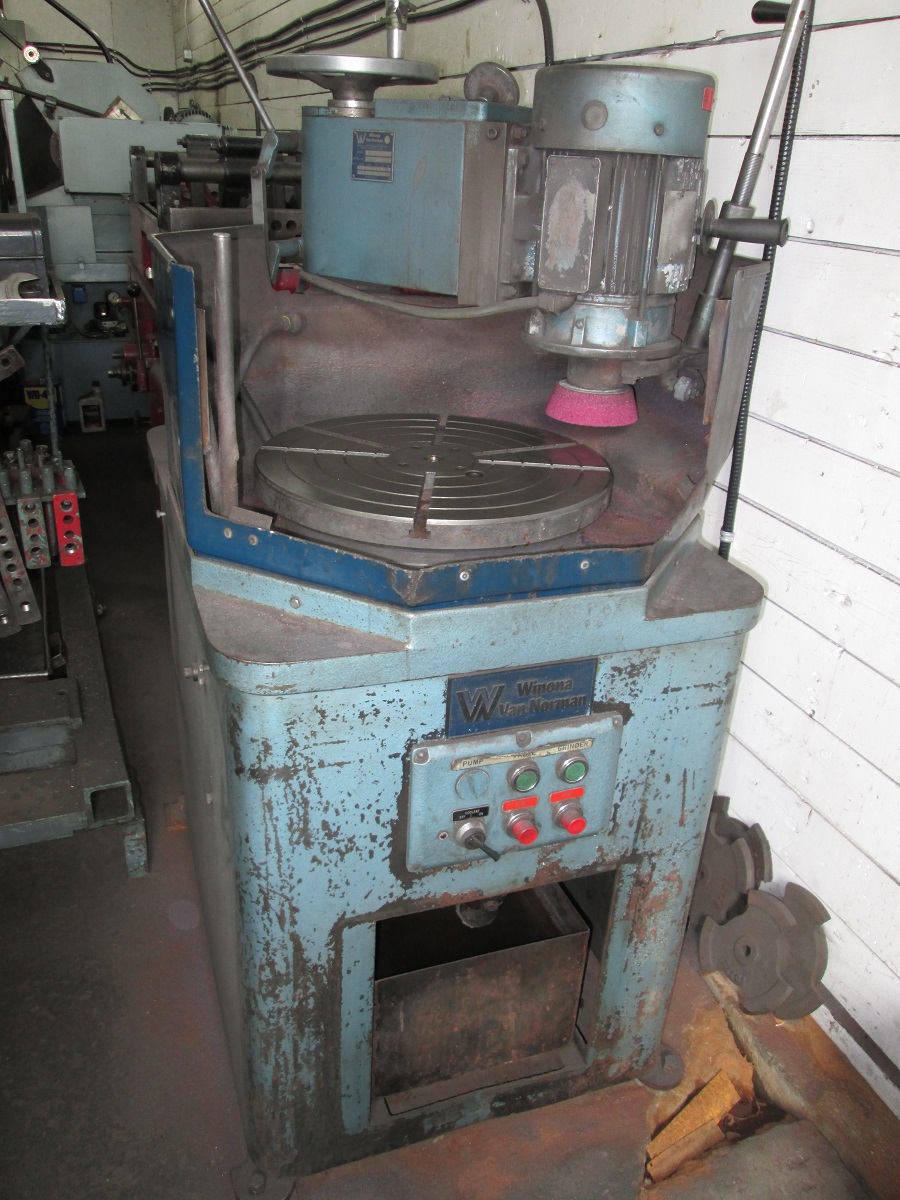
Well, it seems that while this is fine for a photo backdrop, the actual engine shop calls to be built. So today, I visited the shop who rebuilt my '34 Chevy's engine and asked them if I could take photos, sketches and measurements of their equipment. No sweat, he says. I'm going to try scratchbuilding them. I may need to beg Sir Richard Gelens for pointers & assistance. Here's a few of the machines: Now I don't want anyone holding their breath, as they may turn blue waiting. This is for later as I have a few other projects in the works.
-
Scratch/bashing a 702
landman replied to landman's topic in WIP: Model Trucks: Big Rigs and Heavy Equipment
Part of the "chunky" problem is visible in post 324. The runners don't rise high enough above the collector. Back to the drawing board. -
Scratch/bashing a 702
landman replied to landman's topic in WIP: Model Trucks: Big Rigs and Heavy Equipment
While adding pieces to the manifolds, I narrowed the valve covers by one saw kerf. Hardly noticeable but it does slim them down. Then I filled the ribs to get a smooth surface. Remade the heads to obtain the taller profile of the originals. The I;1 has 5 frost plugs on each side of the block. Made some using 4mm rings. 3, or even 2 mm would have been better, but this is the smallest I could find short of cutting some very small tubing.
-
Painted the firewall.
-
Painted the fenders. That gray isn't as dark as the one in the photo.
-
Scratch/bashing a 702
landman replied to landman's topic in WIP: Model Trucks: Big Rigs and Heavy Equipment
Made another one with smaller stock. It still looks "chunky" compared to the real thing. I've been using 1/8 square rod, perhaps 3/32 maight be more like it. The other three are well on the way.
-
Some seriously narrow pinstripe tape.
.JPG.0a00e1445fc8aa6122cb6abc5872fcc0.JPG)
.JPG.0364160302343fe6b05c86efaa3db40a.JPG)
.JPG.b75c07a88c1060925793856d0c1669a1.JPG)
.JPG.ee1ee4a9f555973c743a4865f86915ac.JPG)
.JPG.51170cb4edf3684a9667f02fdfeb1806.JPG)
.JPG.a8d8a545509294c282fb3390fe54ec09.JPG)
.JPG.bde775d6bd633a02e4216c0236d946b0.JPG)
.JPG.86108bee887687690d89618238e5dc86.JPG)
.JPG.9a6a8f86fdeeb10615d95e9da28cf13c.JPG)
.JPG.2e0d3d07d7778174995eaec359884211.JPG)


.JPG.1c91f2c28fca48b066912893820f9fa4.JPG)
.JPG.4ba2af0335449aec348fd91dfd10f11c.JPG)
.JPG.fa7f2c757af5b48ebd0e8c75f789e9a2.JPG)
.JPG.ca289df409f0b8e223009592ff91feaf.JPG)
.JPG.06f29ede9008da2b339701125a1ce49b.JPG)
.JPG.8348816b9c20099e7347a04b349a3ade.JPG)
.JPG.8c2fb9e4972c7eda515c9b255b594fc2.JPG)
.JPG.ae7a2cd87de3f63822e33fd6ec1e7681.JPG)
.JPG.e1338fbc6fd89a36e4f0293bfa358970.JPG)
.JPG.d1b464c9ff5cff53b76521a99933608c.JPG)
.JPG.f54ced0376723572b346fa8507cddcb3.JPG)
.JPG.c79d1295622a4347f4258fc173174ca0.JPG)

.JPG.a5fc0220f3a50198045fe5abb7d55ebb.JPG)
.JPG.effbba31592609338fbf30b8234d1f33.JPG)
.JPG.bac9ba7f3d21776bba6c7da9021941ad.JPG)
.JPG.2597ed18fa687540ab81d5f43929d523.JPG)

.JPG.0a71ef4cada96566fb14433f590f8cc6.JPG)