taaron76
-
Posts
806 -
Joined
-
Last visited
Content Type
Profiles
Forums
Events
Gallery
Everything posted by taaron76
-

Monogram 1970 Challenger T/A Rebuild-Under Glass 03-13
taaron76 replied to mustang1989's topic in WIP: Model Cars
I put a drop of thinner (usually Tamiya thinner) on a Q-tip and clean out the grooves and surfaces where the BMF will be placed, in order to make sure it sticks. It's not enough thinner to remove the paint, but just enough to remove any polish or wax that might be lingering. Tim -
Painting ... Yeah Painting
taaron76 replied to Hollywood's topic in Model Building Questions and Answers
I prime just about everything, too. Although, I didn't prime my 1962 Corvette Roadster for whatever reason and it came out great. I used Tamiya Red and didn't have any coverage issues, but I did sand the body prior to painting it. If I paint two-tone or stripes, I always prime first just to make sure it covers and sticks. I'm with Steve, I don't primer super small parts either. I used Tamiya lacquer primers now and I loved the results. Test a few different primers to find out which one you like best. In my opinion, the difference will be subtle, so it will come down to personal preference. I always make sure and scribe the panel lines when I do primer. One coat of primer and few coats of base, followed by a few coats of clear can fill those lines quickly. Tim Here is the '62 without primer. I had no issues... -
That's awesome, Tom. I look forward to seeing your builds. Thanks for the compliments!!! Tim
-
Nice work! Tim
-
Thanks, Carl! Tim
-
55/57 Cameo build W.I.P.
taaron76 replied to Revstew's topic in WIP: Model Trucks: Pickups, Vans, SUVs, Light Commercial
A-mazing work! Tim -
67 Corvette Convertible Finished! Posted in Under Glass
taaron76 replied to microwheel's topic in WIP: Model Cars
You are an inspiration, Jim. OUTSTANDING work, my friend!!! Keep 'em coming! Tim -
Thank you, Jim! That means a lot to me, coming from you. Thanks again!!! Tim
-
I applied just a tad of Novus #2, then followed by #1. Not much will be needed on this one and I'm very happy with the paint. I have one small spot on the hood to fix, but I will do that this weekend with a coat or two of clear orange. I also forgot to paint the two small body moulding on the sides. A couple of mockup shots... I am VERY pleased with the stance and look. It's exactly what I was going for. There is still loads to do though. I have to finish all of the wiring in the engine bay and sure the internet for reference pics. Nothing but time, right? Tim
-
Nothing special with the interior, just black and a little titanium to break up the black a little.
-
More updates today... I got some more of the engine completed, put a light wash on it as well as the graphite technique on the chassis with a light wash as well. I have to install the distributor and wires and get more of the engine completed over the next week or so. I completed the interior as well. I mocked the car up to see how it was looking, as so far, so good. Lots to do yet. Thanks for looking! Tim The white space will be painted and the aftermarket distort will be mounted there. A very subtle change with the graphite thats hard to tell, but it did make a difference. It's hard to tell in these pics though.
-
Thanks, Joe! I was originally going to strip the chrome off and paint them aluminum, but I found so many different variations out there that I decided I liked the look of these valve covers the best. I love chrome/polished aluminum on an engine, and I wasn't trying to be original with this one, obviously, so I kinda went with what I thought looked best. The oil pan and carb were chromed, but those are soaking in Simple Green now. If you can't tell that I like "shiny" in an engine bay, here's some of my real world work. lol
-
Hi Steve, I want to start working with Alclad II as well, so I appreciate the write-up. I hate how much flashing and casting lines are in the chrome from the box kits. One of the things I read about Alclad II is that it says to prime, then gloss black, then Alclad II (3-4 coats at 15 PSI), followed up with Alclad clear gloss. Is this any different from the technique and methods you've tried in the past? I've seen some good results with Alclad II, but before I run out and spend $40.00 on all of the Alclad II materials, I wanted to make sure I did my due diligence. Thanks! Tim
-
Not a whole bunch of updates on the '66 Shelby, but I got a little bit done. I'm stripping the chrome off of a few parts and then will get them painted. Finished up some of the rear suspension and started on the engine. I still have a lot to do, but I'm trying the graphite technique on the chassis to see how it comes out. Hopefully more updates tomorrow. Slow steps on this one... busy as can be as of late. Tim
-
Amazing! Tim
-
Thanks, Mike! I'm sure you will adapt to shoot acrylics, just like I did. Thanks again! Tim
-
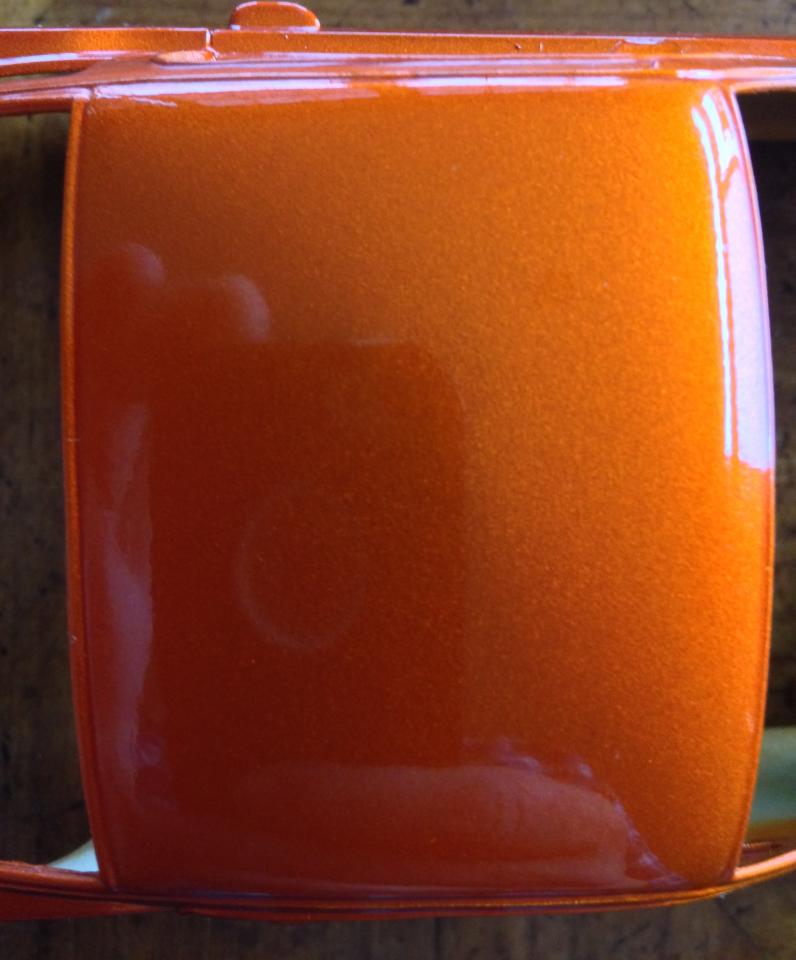
I guess it depends on what your interpretation of "shiny" is. It's one thing to be shiny, but the be glass shiny without any orange peel, is another. I'll let you decide what category this one falls into. Keep in mind I spent about five minutes wet sanding and polishing the roof. Prep and technique has always been the key to a nice paint job, in my opinion. Tim

-
Not sure I'm following you... I'd use clear acrylic, but I'll show you pics of Tamiya X-clear that will change your mind. Tim
-
I've only put clear orange over it as of now. Not sure if I will use normal clear as it might not need it. Tim
-
Bravo, Mike! Great build!!! Tim
-
Thanks, Bruce! This is exactly what I was looking for. I always enjoy reading everyone's tips, so keep them coming if you have any. Thanks! Tim
-
Hi guys, I was wondering what sort of wash (color) are you using to add detail to a black semi-gloss or even flat black, chassis? I've seen colored chassis get a light wash of black or grey, but I've never seen a black chassis get washed with a particular color. Any tips? Thanks! Tim
-
Monogram 1970 Challenger T/A Rebuild-Under Glass 03-13
taaron76 replied to mustang1989's topic in WIP: Model Cars
+1 Tim -
I used to use the Tamiya acrylic thinner, but this was my first paint job using denatured alcohol and I like it better. It seemed to flow a little better and didn't dry as fast... or so it seemed. Tim
-
Very, very nice!