Sledsel
-
Posts
3,974 -
Joined
-
Last visited
Content Type
Profiles
Forums
Events
Gallery
Everything posted by Sledsel
-
Looking good. The flathead looks sharp! I really like what you did with the dash.
-
I think it is very cool.
-
 I have been on a few FB pages for builders and have deleted just about all of them. People ask advise and get smart a** comments, new or novice builders get their builds nit picked apart, disrespect towards fellow builders for using the wrong paint or new builders that may not have honed in their skills yet, ect ect. There was very little encouragement. I have never seen anything like that on this forum, seems everyone is encouraged and given accolades for what they have accomplished. It seems on this forum we are all builders doing our best and trying to get better. That being said, I have seen it here and done it myself. When something is wrong, installed incorrect or can be done different or easier, it is pointed out as an FYI for everyone to learn from, not as an insult to a build. Sometimes you do not know, the instructions are not clear or trying something for the first time. Been there myself. To all the respectful members of this page, thank you. Andy
- 25 replies
-
- 22
-

-
Start with the Revell Street machine truck and get 2 beds from the AMT '84 GMC truck and lengthen the bed.
-
Lookin good. I have pieces of one of these in my stash. No clue if I'll ever use them. Hint, when it comes to filler, less is better. Fill, sand repeat. Put on to much at once and in time it will shrink. How do I know this? Over-coated sanded excess. A year later it was worse than what I started with. Keep on building!!!
-
I stopped at an out of the way Walmart and they had kits, and a decent selection with fresh box art. Well, it was actually a bad move wallet-wise, came home with 4 kits.
-
Ford Econoline Conversion Van
Sledsel replied to Andria H's topic in Model Trucks: Pickups, Vans, SUVs, Light Commercial
Cool -
Looks really good. I do not get it, I have never had an issue with this kit
-
Nice job!
-
Looks good! Paint is sweet.
-
I am in for the Monza, '65 Dodge and maybe another '63 F100. I sure would like the see the Monza's cousin released..... The Python II. I think it was a 1 time release.
-
Cool '57. One of my favorite cars.
-
I too have purchased from them and their items are pretty nice.
-
Paint Cracking Maybe My Mistake Can Help You
Sledsel replied to oldcarfan's topic in Model Building Questions and Answers
I had this happen once and I "think" the base was not gassed out enough before the clear went on. -
I agree... She's lookin' good
-
My favorite Bigfoot!!! This will be cool. Be sure to open up the windshield at the top. AMT messed this up. Here is a reference pic.
-
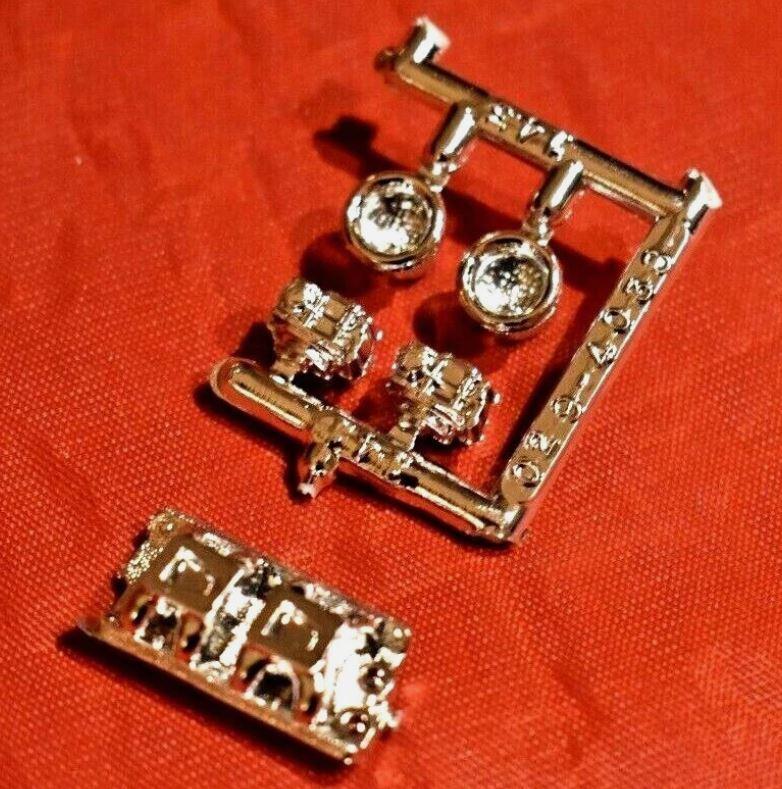
Just the manifold, no carbs or air cleaners I want 2 but gotta start somewhere. LOL
-
Part Identification Please
Sledsel replied to Sledsel's topic in Model Building Questions and Answers
Let me know the fit, I wanted it for an AMT '63 Cobra. I know the Cobra is an old tool, but I can use a 67 Mustang engine if need be. -
Looking for 2 dual quad intakes from the '88 Mustang GT. Do not need carbs or air cleaners. Thanks
-
Does anyone know what this SBF intake is from? Supposedly it is AMT. Thanks in advance.

-
Super looking Victoria
-
55 Chevy
Sledsel replied to Horrorshow's topic in WIP: Stock Cars (NASCAR, Super Stock, Late Model, etc.)
This is gonna bee cool. I enjoy seeing and building the Saturday night stockers -
Round2 Walmart kits with unique box art.
Sledsel replied to Carmak's topic in Car Kit News & Reviews
My '60 ford truck is in that size box with the trailer. My box is the same but the truck is red and white. The '57 Chevy has me wondering if it is the stock only or has the custom parts? Out of those, the van and '34 Ford would be in my cart. -
Well this is an old junkyard, second generation and I go there a lot and know the owner. Yes, an 82 Landau Thunderbird (project) and a 96 Mark VIII.