Sledsel
-
Posts
3,921 -
Joined
-
Last visited
Content Type
Profiles
Forums
Events
Gallery
Everything posted by Sledsel
-

Quick Overview: Revell Starsky & Hutch Torino
Sledsel replied to Chuck Kourouklis's topic in Car Kit News & Reviews
The headlight bezels look better and more of the correct shape than originally thought. This is good. Been looking at the pics in black and white figuring ways to tweak the body into shape. Right now the frame and floor are what I am wondering about. How tight is the fit at the rocker panel area? A -
I might, I just might.
-
I am thinking of the box art build also.... Pearl white base, red interior maybe not all the decals. I'd put the roof decal on the hood.
-
Quick Overview: Revell Starsky & Hutch Torino
Sledsel replied to Chuck Kourouklis's topic in Car Kit News & Reviews
The Johan Torino stocker has an excellent stock chassis, but you need the floor. If they do a Thunderbird, I would hope it is better than this. Yes, it resembles a Torino, but needs a bunch of work still. Personally, rather disappointed. If I build this, I will document the build and corrections. -
How to Remove "Ghost Trim"
Sledsel replied to diymirage's topic in Model Building Questions and Answers
Cool... I'll give it a shot. Don't have much luck with the search box usually -
What to do with instructions?
Sledsel replied to Sledsel's topic in General Automotive Talk (Trucks and Cars)
Great idea TooOld... Take me awhile to inventory them.... -
What to do with instructions?
Sledsel replied to Sledsel's topic in General Automotive Talk (Trucks and Cars)
Ohhh my... that's a lot of scanning! HAHAHAHA -
What to do with instructions?
Sledsel replied to Sledsel's topic in General Automotive Talk (Trucks and Cars)
I keep thinking of tossing, bet there are ones back to the 60's in the box -
NEW PLACE TO GET PARTS CHROME PLATED!
Sledsel replied to Ben's topic in Car Aftermarket / Resin / 3D Printed
Ever since I saw the video, I been prepping parts. Had some bumpers I wanted to remove guards from and such. I am going to give them a shot. $10 seems high for shipping tho, but if service is good and fast, I'm good with it -
I have 2 kit boxes stuffed with instructions. Keep thinking of pitching them, but then don't. What does everyone do with theirs?
-
How to Remove "Ghost Trim"
Sledsel replied to diymirage's topic in Model Building Questions and Answers
What is the best way to avoid ghosting? I just looked at a painted kit that needs to be finished and I see where I filled 2 holes and where the hood cut out should be. Little disgusted since it is foiled and ready for assembly -
Very cool. Pretty darn nice for a 1/32! I'd like to have more Mercs in 1/25 scale too!
-
if I knew that then, I'd have forked over a few bucks on the more pricey kits. I know when the Kings Comet and Falcons came out, I bought a load of them both!
-
Quick Overview: Revell Starsky & Hutch Torino
Sledsel replied to Chuck Kourouklis's topic in Car Kit News & Reviews
Ford Torino Engine Specifications1974 engines[edit]EngineHorsepowerTorqueCarburetorCompression RatioBore & StrokeVIN Code302-2V Windsor V8140 hp (100 kW) @ 3800 rpm230 lb·ft (312 N·m) @ 2600 rpm2-barrel8.00:14.00" x 3.00"F351-2V Windsor V8163 hp (122 kW) @ 4200 rpm278 lb·ft (377 N·m) @ 2000 rpm2-barrel8.20:14.00" x 3.50"H351-2V Cleveland V8162 hp (121 kW) @ 4000 rpm278 lb·ft (377 N·m) @ 2000 rpm2-barrel8.00:14.00" x 3.50"H351CJ*-4V Cleveland V8255 hp (190 kW) @ 5600 rpm290 lb·ft (393 N·m) @ 3400 rpm4-barrel7.90:14.00" x 3.50"Q400-2V 335 series V8170 hp (130 kW) @ 3400 rpm330 lb·ft (447 N·m) @ 2000 rpm2-barrel8.00:14.00" x 4.00"S460-4V 385 Series V8220 hp (160 kW) @ 4000 rpm355 lb·ft (481 N·m) @ 2600 rpm4-barrel8.00:14.36" x 3.85"A460-4V** 385 Series V8260 hp (190 kW) @ 4400 rpm380 lb·ft (515 N·m) @ 2700 rpm4-barrel8.80:14.36" x 3.85"C 1975 engines[edit]EngineHorsepowerTorqueCarburetorCompression RatioBore & StrokeVIN Code351-2V Windsor V8143 hp (107 kW) @ 3600 rpm255 lb·ft (346 N·m) @ 2200 rpm2-barrel8.20:14.00" x 3.50"H351-2V Modified V8148 hp (110 kW) @ 3800 rpm243 lb·ft (329 N·m) @ 2400 rpm2-barrel8.00:14.00" x 3.50"H400-2V 335 series V8158 hp (118 kW) @ 3800 rpm276 lb·ft (374 N·m) @ 2000 rpm2-barrel8.00:14.00" x 4.00"S460-4V 385 Series V8216 hp (161 kW) @ 4000 rpm366 lb·ft (496 N·m) @ 2600 rpm4-barrel8.00:14.36" x 3.85"A460-4V* 385 Series V8226 hp (169 kW) @ 4000 rpm374 lb·ft (507 N·m) @ 2600 rpm4-barrel8.00:14.36" x 3.85"C 1976 engines[edit]EngineHorsepowerTorqueCarburetorCompression RatioBore & StrokeVIN Code351-2V Windsor V8154 hp (115 kW) @ 3400 rpm286 lb·ft (388 N·m) @ 1800 rpm2-barrel8.00:14.00" x 3.50"H351-2V Modified V8152 hp (113 kW) @ 3800 rpm274 lb·ft (371 N·m) @ 1600 rpm2-barrel8.00:14.00" x 3.50"H400-2V 335 series V8180 hp (130 kW) @ 3800 rpm338 lb·ft (458 N·m) @ 1800 rpm2-barrel8.00:14.00" x 4.00"S460-4V 385 Series V8202 hp (151 kW) @ 3800 rpm352 lb·ft (477 N·m) @ 1600 rpm4-barrel8.00:14.36" x 3.85"A460-4V* 385 Series V8226 hp (169 kW) @ 3800 rpm371 lb·ft (503 N·m) @ 1600 rpm4-barrel8.00:14.36" x 3.85"C -
Quick Overview: Revell Starsky & Hutch Torino
Sledsel replied to Chuck Kourouklis's topic in Car Kit News & Reviews
74 the Cleveland was common. 75 and 76 windsors were more common. My 1:1 S&H had a Windsor from the factory. Tried to send you a PM Charlie. Says I cant send to you -
Quick Overview: Revell Starsky & Hutch Torino
Sledsel replied to Chuck Kourouklis's topic in Car Kit News & Reviews
Well, factory built cars could have a 302, 351w, 351c (74 only) 351m or a 460. The 2004 movie cars had stroked windsors. The kit engine looks to be a windsor. I could not see the pics of the block/heads well enough to tell though. The valve covers are definitely windsor. -
My best uneducated guess....

-
Most accurate kit(s) ever (1/24-25)?
Sledsel replied to Harry P.'s topic in General Automotive Talk (Trucks and Cars)
I will only go on kits I have. Johan 60 Desoto, Comet and Maverick, AMT 49 Merc, AMT 64 and 65 Galaxies, Lindberg 53 Fords and 64 Dodges. Revell 40 Ford. -
Quick Overview: Revell Starsky & Hutch Torino
Sledsel replied to Chuck Kourouklis's topic in Car Kit News & Reviews
Thank you for the excellent pics Chuck. As much as I love the subject, it is going on the "Maybe if I find it on clearance" list. If found cheap, I may try to fix it, but in my opinion it is a tough fix. Not going to go into why because I do not need to be called a rivet counter or anything. -
Quick Overview: Revell Starsky & Hutch Torino
Sledsel replied to Chuck Kourouklis's topic in Car Kit News & Reviews
Chuck, I hate to ask, can we get a straight on shot of the front? I want to see the headlight bezel shape and fender angle. Thanks! -
Ohhhh... that is sad! Hey Chris, what about independent Henley Gray? He ran a Thunderbird in 71. As for those calling it a 70's barge, with the similarities to the 70-71 Cyclone, alot can be done with this kit.
-
Quick Overview: Revell Starsky & Hutch Torino
Sledsel replied to Chuck Kourouklis's topic in Car Kit News & Reviews
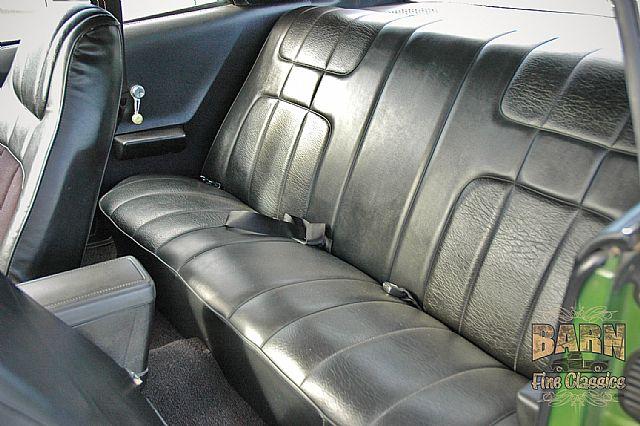
Overall it looks pretty good, but pics of it built will show a lot more. The dash looks good for a 72, as does the rest of the interior. For the 72 Sport, the side panels will be incorrect, but could be cut out of the tub and changed with some plastic. To be more correct the dash needs some work since the pad does not extend to the windshield. Overall dash layout and shape is good. Be sure the 1/4 windows do not align with the door, they actually install ahead of the door and at a little angle. That could have been a part of the "looking too small" in the test shots. It definitely looks as if this was started in the 80's or so and now comes to completion It has enough of detail for me, just want it to look "right" when built. I have attached pics just as an FYI for the side glass, dash comments and 72 Sport interior comments. The interior rear panels would be easy to replicate.
-
JoHan Maverick Pro Stock Grabber
Sledsel replied to FordRodnKustom's topic in Car Kit News & Reviews
These were really nice kits.... yea, engine compartments and chassis lacked, but the looked right. Love all the engine detail. Steve, you can build it as an SOHC, but the block and heads are incorrect. Those are about the nicest SOHC covers out there too. AMT 67 Mustang donates a nice chassis to this kit -
Love this kit. I have several of the MK versions, now I will need more. This thing builds up sweet. Wish it had an accurate 429 though. Ehhh.... I'll put a cammer in one with a supercharger poking out of the hood.
-
Quick Overview: Revell Starsky & Hutch Torino
Sledsel replied to Chuck Kourouklis's topic in Car Kit News & Reviews
Holy smokes!!! Look at those hinges!
.jpg.f4a3f694d190e84a8c904f18b36ba08a.jpg)