DoctorLarry
-
Posts
1,135 -
Joined
-
Last visited
Content Type
Profiles
Forums
Events
Gallery
Everything posted by DoctorLarry
-
Where's the Grand Am?
-
My last efforts

-
Thanks- for some reason I have ventured off the trail into Buicks so we will see how this one turns out. The other three I did came out pretty good.
-
I agree that this was an attractive car. My usual routine is to collect as many pictures as I can and measure and scale things out as well as get the shapes right. The bumpers are always a challenge to me. I am starting with the Monogram GS bumpers and cutting and pasting using them as starters. It will certainly take awhile.
-
I knew about the rear window and had not gotten to the quarter window opening. I also saw the front wheel well issue and have that pretty much fixed. Lots of compound curves and body lines on Pontiacs and Buicks. Very hard to model accurately!
-
Dale Earnhardt's Lumina
DoctorLarry replied to gatorfan69's topic in WIP: Stock Cars (NASCAR, Super Stock, Late Model, etc.)
Looks good. Great detail here. -
Dale Earnhardt's Lumina
DoctorLarry replied to gatorfan69's topic in WIP: Stock Cars (NASCAR, Super Stock, Late Model, etc.)
Yep. -
Another idea I use for plug wire boots is heat shrink tubing. Cut it to the same length, put it on the plug wires and shrink it. It won't fall off after that and looks like an actual plug wire.
-
Last post duplicated for some reason. This will be a master for a resin kit. Body, hood, bumpers, tub, seats, dash and console. It takes awhile.
-
Thanks! LOTS of very unique body lines on this one and bumpers are always my biggest fight for some reason-lots of compound curves.
-
You can drill out the distributor center like you did and anchor the wires with a drop of super glue. I spritz it with ZipKicker to set them in before they can move.
-
You can also go to Hobby Lobby and look in the beading section. There are lots of different sizes and colors of beading wire. I use that for anodized hard lines and braided lines like oil lines.
-
Thanks! LOTS of very unique body lines on this one and bumpers are always my biggest fight for some reason-lots of compound curves.
-
I did the same as DragonHawk. You can look for computer wire or small gauge wire. It makes very scale-looking plug wires.
-
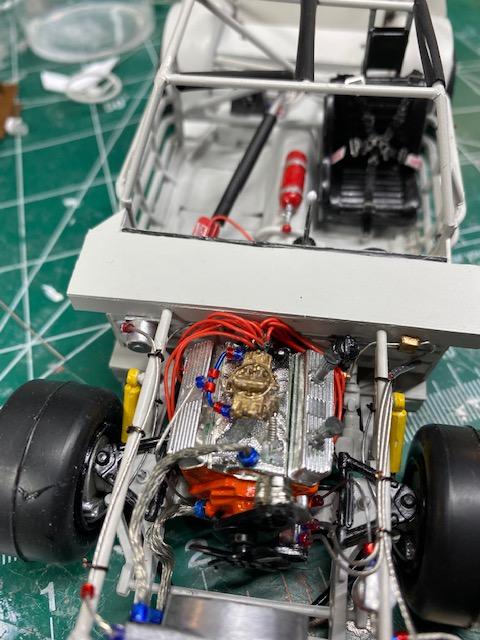
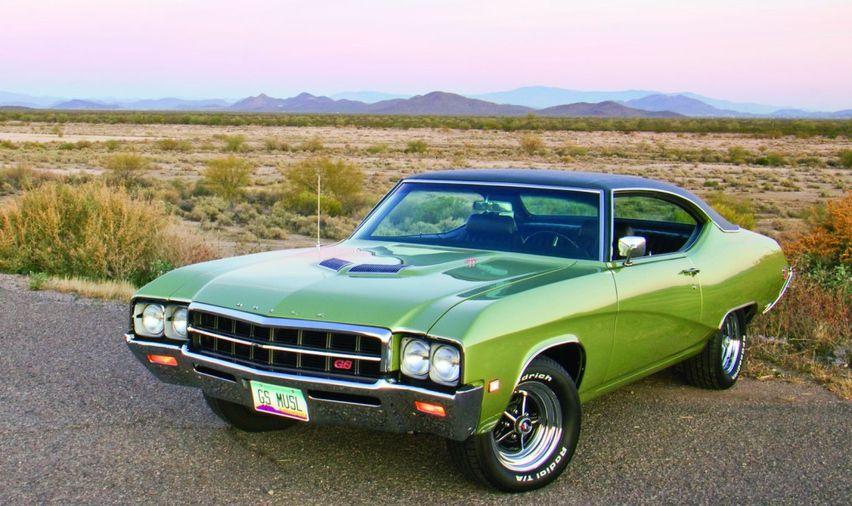
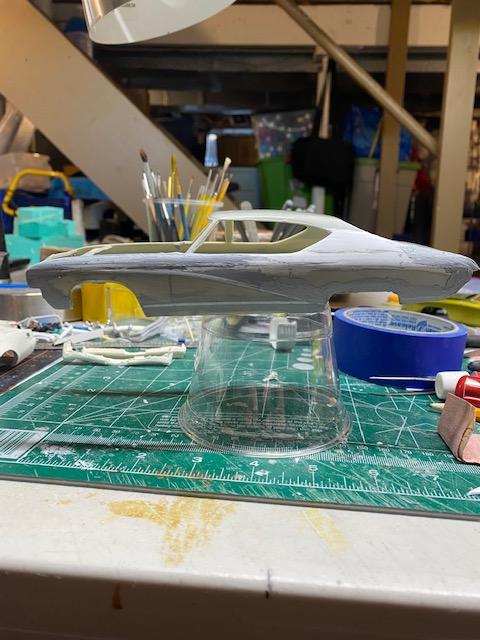
Lately I have been straying outside of my normal G3 (1973-77) Pontiac builds. I moved over to a 73 Buick Century GS and 75 and 76 Buick Indy Pace Cars (still G3's, though). I am in the middle of doing a 74 GTO hatchback and a NASCAR 77 Buick Century side project but decided to add another ground up scratchbuilt, a 69 Buick Skylark. I always had a strange affinity for the side swoop and Buicks and Pontiacs have some of the most unusual (and very hard to re-create) body lines. So this will be based on a 68 Chevelle body but the rest will have to be built from scratch. There were a couple of resin kits of this (Perry's and J&J, I think) in a 68 version but they are long gone. I also love the lime green and olive green cars of the era and this one was particularly attractive in both hues. Keep in mind this is a rough-in shot so the body lines are not fully in place or the final shapes. It should be a challenge to get them all right.
-
That's what I saw when I researched a little more. I was looking for a 68 Buick Skylark and he did a pretty good one that I believe someone else mastered for him. But his reputation was pretty bad. When they pop up on EBAY they get great money for them.
-
Dale Earnhardt's Lumina
DoctorLarry replied to gatorfan69's topic in WIP: Stock Cars (NASCAR, Super Stock, Late Model, etc.)
Looks great! One thing I don't like about these kits is the absolutely lame carburetors they put in. The don't look anything like a real one. I guess it doesn't matter with the air cleaner on, though. -
Looks really good. My brother's Duster had a GREEN interior. I mean leaf green. I think he got an "ugly car nobody wants" deal at the dealership.
-
Tamiya Insignia White, which is from their aircraft paints, gives exactly the right shade of gray in a matte finish. Might save you some time and $$ if you only spray once. If you prime it first, a moot point.
-
Paul Jett Torino
DoctorLarry replied to yellowsportwagon's topic in Stock Cars (NASCAR, Super Stock, Late Model, etc.)
I noticed that last night. The kit tires are shorter and wider than the Monograms. Current size, as far as I can find, is a 28 10 /15. I haven't scaled that out. but probably a little over an inch in 1/25. -
Paul Jett Torino
DoctorLarry replied to yellowsportwagon's topic in Stock Cars (NASCAR, Super Stock, Late Model, etc.)
What do you use for tires? When I compare the scale kit tires to pictures, they always look way too small relative to the real cars. I use the Monogram 1/24 tres whenever possible because they are larger but other kit tires seem too small. Am I missing something? -
Pledge Future Use
DoctorLarry replied to DoctorLarry's topic in Model Building Questions and Answers
Did you go over the decals with it afterwards, Bill? -
I bet putting headers on that car would be a study in maintaining dignity and composure...
-
My brother bought a brand new Duster in 73 or 74. It was this same baby food yellow with a green bench seat interior (Don't know what he was thinking). 340 four barrel. It had rally wheels and white letter tires and actually was a rather fun car to drive. Then he made the mistake of trying to put headers on it. Typical Chrysler snake pit around the steering, etc. What a nightmare. Sounded good when he finally got it done, though.
-
1973 Mercury Montego GT
DoctorLarry replied to gks1964's topic in WIP: Stock Cars (NASCAR, Super Stock, Late Model, etc.)
Beautiful ride, Tim!