Spex84
-
Posts
1,719 -
Joined
-
Last visited
Content Type
Profiles
Forums
Events
Gallery
Everything posted by Spex84
-
This has been very inspiring, thanks! I went down to my stash and pulled out my single Edsel kit, mocked up some custom parts to try out some ideas, and.....nothin'. I just can't get past the headlights, the vertical central grille, the unique taillights, the narrowness of the body. Every idea I try, even some fairly extreme changes, it just fizzles out. Like the '53 Studebaker, I can never decide if the stock '58 Edsel is an incredibly slick design or unbearably awkward. It flip-flops on me like an MC Escher drawing. So I'm extremely interested in seeing where you go with this build!
-

DUESY: A 34 Duesenberg RWD V12 LOOOOOW MODERN MONOCOQUE STREET ROD
Spex84 replied to Claude Thibodeau's topic in Model Cars
This is crazy, I love it! The detailing is above and beyond what I'd expect from a Duesenberg gluebomb with an engine stuffed in the back. It actually looks plausible! -
That's a good-lookin' Vicky! I like the visible welds on the headers, that's a cool detail that I'm not used to seeing.
-
Cool Stude! I like the patterned fabric on the seats. And those wheels look like AMT '49 Mercury to me.
-
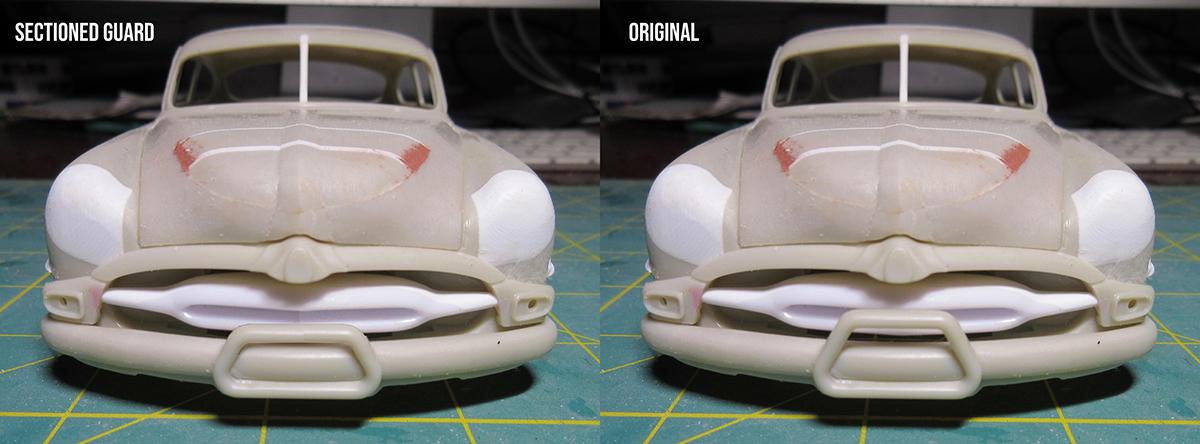
Have you considered chopping the bumper guard? Just a thought. I'm not sure if it helps, or just looks like a chubby license plate holder XD

-
My XJ is beginning to succumb to rust, which is really sad (winter salt and brine on the roads is a killer). It is creeping into "winter beater" territory. I envy those of you with rust-free Jeeps. On the other hand, I'll have an excuse to learn how to weld, haha.
-
Cool tip, thanks!
-
The Official 3D Printing Discussion Thread
Spex84 replied to iamsuperdan's topic in General Automotive Talk (Trucks and Cars)
Cool! That's looking good! As for pulling faces, you can go into Edit mode (Tab), select some vertices, and drag them with the Move tool (or hit G (grab) to move them). OR, to extrude some faces, which creates new geometry, you can select some faces (you need to be in Face Select mode for this, vs Vertex select) and hit E to extrude them. -
The Official 3D Printing Discussion Thread
Spex84 replied to iamsuperdan's topic in General Automotive Talk (Trucks and Cars)
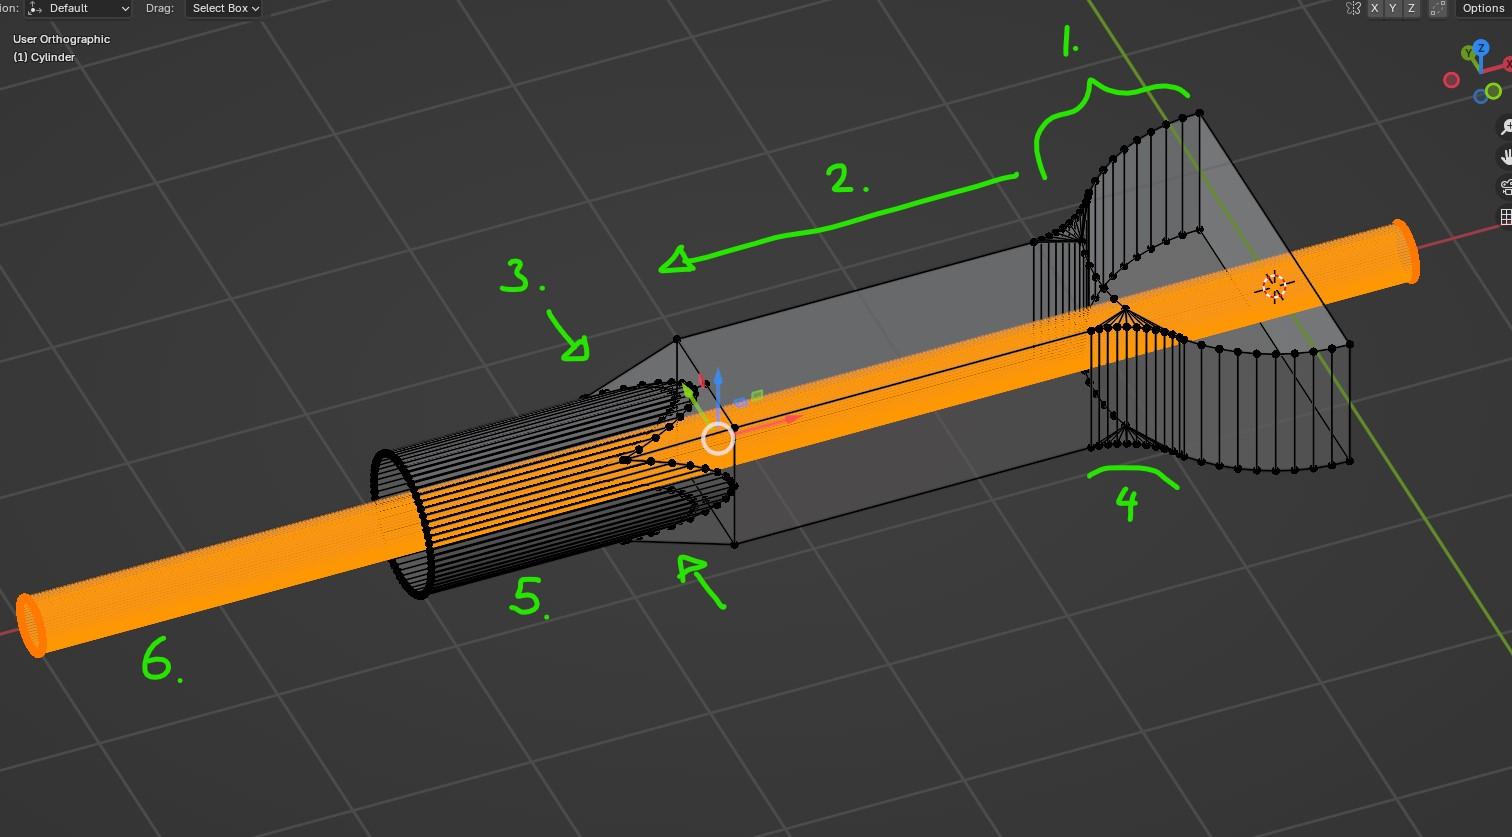
Looks like you're learning the best way...through experience! I didn't completely understand the steps you undertook to build the model, but I think maybe learning a bit more about editing on the mesh level (Mesh Edit Mode) could really help you avoid having to use a lot of Booleans. It's not necessarily a better way-- it just means fewer booleans equals fewer chances for something to go squirrely. Maybe you already know this and I'm just over-explaining, but no harm done, right? I started noodling around just to try and feel it out, here's what I came up with: 1.Made a large vertical cylinder and cut it in half at the centerline (so I can mirror it later). 2.Selected some faces on the edge of the cylinder and extruded them to create the box-section axle. 3.Extruded the end faces once more and then scaled them down to create a tapered end to the box section. 4.Beveled the transition from the cylinder to the box section. 5.Added a cylinder and boolean Union'd it to the box section. *Added a mirror modifier to make the model symmetrical across the centerline* 6.Create a long skinny cylinder to boolean the axle shaft hole through everything.
-
The Official 3D Printing Discussion Thread
Spex84 replied to iamsuperdan's topic in General Automotive Talk (Trucks and Cars)
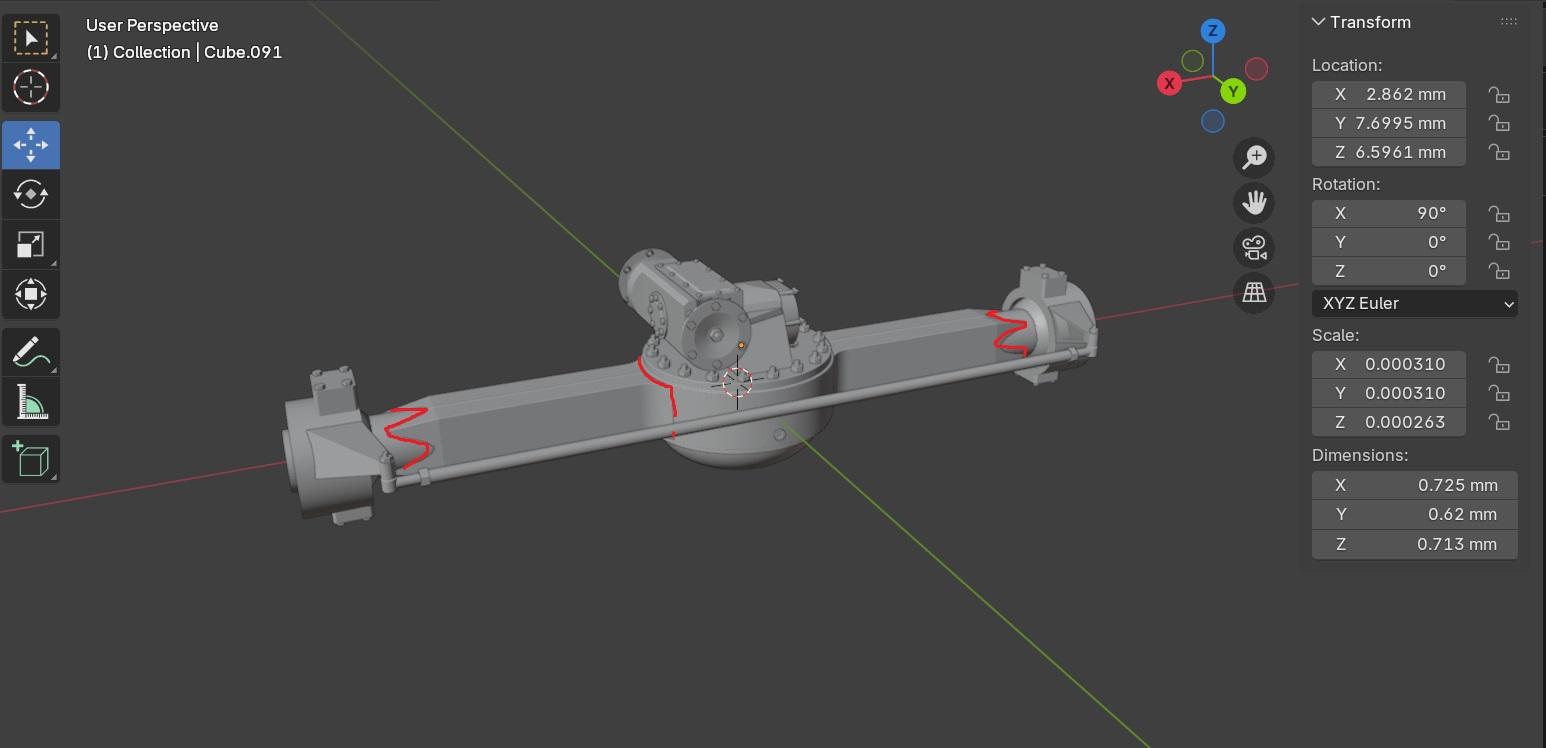
Those are cool! You can use way more triangles for a model that will be 3D printed though. As for your model that has a hole that gets sealed off: have you used Alt+Z in Blender (x-ray mode) to see if you have overlapping/interpenetrating meshes that might be blocking the hole? Next, try going to the Overlays button (top right of the viewport) and check the box for Face Orientation. I have mine set up so outward-facing triangles are blue, and inward are red. Red is bad! If you have holes in the mesh and use the "repair object" or "repair mesh" options in the slicer, it might be "fixing" the problem by capping the open holes against your wishes. With Booleans, sometimes I make a copy of my object (and all its attendant Boolean modifiers) and convert it to mesh, then hit Tab to go into Edit mode and see what carnage the booleans have wrought on the mesh. Sometimes there are vertices that didn't get joined correctly, or co-incident/overlapping triangles that need to be deleted and re-built with manual editing. Once it's cleaned up, I export it as STL. I find Booleans can be so brutal and messy that I often just try to build my model without them, and only use them for situations where I know I'll need to go back and change the size/location of that element (ie, make a hole larger in diameter, or move it). Looking at your axle mesh, I see something that might be suspicious where the rectangular box section tapers to meet the cylindrical tube(the red lines in the attached image). I'm wondering if those are two separate objects? To put a hole clean through, they'd all have to be booleaned together first. "Join" makes the two meshes into one object, but it doesn't give them a single contiguous surface the way Boolean Union does.
-
Very cool project. When you announced it, my first thought was "how long until this absolute madman disassembles his real car so he can measure everything?" 😄😁 Looks like it's happening!! It's great that you have drawings and some good photo reference to work from, rather than needing to take the entire car apart, haha.
-
I'm not a big truck guy at all...but that Mack is cool! Very photogenic trucks.
-
Neat idea with the trim mod! The zig-zag negative space it sets up with the grille/indicator light surround is pretty cool. Takes an otherwise heavy area and makes it dynamic!
-
I really like the blended 1-piece cowl/hood/nose on the roadster. Super cool.
-
Thanks for the photos! Having never attended a show of this scale, I'm always awed by the quality and number of builds on display.
-
Definitely looks like it needs 2-3 inches more lift. I daresay lift blocks would be easy to fabricate...maybe a little tweaking to the driveshafts and pitman arm, and boom, you've got a proper hi-rolling truck. I'd want to change the tires out. Or at least weather them to bring out the detail as much as possible, add some sidewall decals, etc.
-
Well that's a cool idea! Nice work bringing the theme to every part of the car. I like the antique-looking dashboard pinstriping. Did those decals come from a specific kit?
-
Thanks for sharing your techniques and progress! These builds are both very cool. I'm impressed that you've gone for chrome on a 3D printed body, haha! The crackle-finish mud looks perfect. The Vallejo filler/alcohol trick for filling layer lines is fascinating. I'd love to give that a try.
-
I like that mailbox scoop/injectors/blower stacked up on the 409. Just has a really tough and beefy look about it.
-
Whoa! I'm impressed that you're making such organic forms in Sketchup, Pico!!
-
Holy moly, that's incredible work. Great ideas and immaculate execution. Thanks for showing us how you did it!! I have an Olds I want to chop someday in almost exactly this style (based on the reference I've collected) and this will help. I might still be too lazy though. What a ton of work... I think the Predicta quads mimicking the stock headlights, with the mirrored custom grille and Pontiac center bar is absolutely inspired. It's extremely custom without looking too labored about it.
-
The layer lines are caused by several factors: 1. Slice thickness: more slices means a longer printing time, so some people will print thicker layers for the sake of speed, which can cause more obvious layer lines that are more difficult to sand out/fill in. 2. Print orientation: some will print items oriented flat to the build plate rather than tilted, which means less height, fewer layers, and a faster print time...at the expense of having concentric rings of layer lines (ie on tire sidewalls). 3. No anti-aliasing: some free slicing software doesn't offer good anti-aliasing, a feature that can smooth out the stepping created by slicing a 3D file into thin layers by blurring the boundary of each layer slightly. The absolute best prints will be sliced and printed with thin layers (minimal layer height), with parts oriented to minimize stepping, and enough anti-aliasing to fix any remaining issues (ideally without reducing detail). When I print something that has some layer lines I'm unhappy with, my process is: *edit* 0. re-print it better, haha. OR 1. Sand 2.Fill with Mr Surfacer and sand again OR 3.Spot putty if it's really bad 4. More sanding! 5. Filler primer 6. You guessed it...more sanding. So in the case of a tire sidewall with fine lettering, if the letters are raised, you're pretty much out of luck if the layer lines are very pronounced. Recessed lettering is easy to sand over without destroying the lettering. Just be very aware of what you're buying, and insist on clear photos. Many photos don't show layer lines, but they'll be clearly visible to the naked eye and especially under magnification/in a close-up photo. 3D printed parts aren't necessarily easy and headache-free. They can take clean-up work, just like traditionally cast resin parts, or old AMT and MPC kit parts. It's all part of the hobby IMHO. And what's with the striations thing? A 3-dimensional imperfection in a surface caused by imperfect deposition of material layers IS a striation, just like in a sedimentary rock. No??
-
Looking good! Those Chrysler taillights look like they were meant to be there.
-
Ditto Ace's comment--the car is looking mean and clean. I like how you've tightened up the design and let the coolest parts of the original design remain.
-
Love it. That paintjob is looking absolutely killer!