dshue76
-
Posts
285 -
Joined
-
Last visited
Content Type
Profiles
Forums
Events
Gallery
Everything posted by dshue76
-
 Excellent build! I had this kit as a teenager and didn't do it any justice what so ever.
 -
Turbocharged Flattie.
dshue76 replied to landman's topic in General Automotive Talk (Trucks and Cars)
Throttle linkage on the right or passenger side, choke coil and secondary diaphram on left or drivers side. -
Turbocharged Flattie.
dshue76 replied to landman's topic in General Automotive Talk (Trucks and Cars)
Carb orientation is interesting. -
The best $50 I have ever spent
dshue76 replied to 426 pack's topic in General Automotive Talk (Trucks and Cars)
Exactly. Too many people think Holley engineers are idiots and proceed to tune it with drill bits, or they bought one at a swap meet already tuned by Back and Decker. My weekend toy has a Holley carb and will cold start any month of the year in Pennsylvania(100* F to -20* F) and never fails to fire within 10 seconds. Hit the gas once to set the choke, turn the key and vrooooom. In the heat of summer, it fires with just a bump of the key. I would restore that Sattelite with its current paint scheme. That paint scheme fits the car to a T. -
Nice build! Which kit is this built from?
-
I don't mind the scale difference too much, it's as easy to ignore when looking at a display as it is to ignore the immense lack of 4 door cars and subcompacts. I'm the polar opposite of the OP. Growing up in the 80's and loving all things racing I prefer 1/24 since Monogram was always a favorite of mine, their subject matter was great. From the sprint cars and modifieds to Winston Cup, NHRA to street machines, prostreet, hotrods, Indy cars and IMCA, they covered the bases. And I must add that during my formative building years ANY Monogram kit was 1000% higher quality than AMT/ERTL. Monogram moulds were cleaner and crisper. All of these were factors in making me a Monogram fan and by association, a 1/24th scale fan
-
Spray paint is easier and works better in my opinion as an alternative to this kit. That style bottle is a huge pain to clean and as others have said the pressure changes with use. I used every version of cheap Testors airbrush, external mix and internal mix, aerosol propellant, and Testors compressor, and none work as well as a true airbrush. They really suck at spraying water-based paints especially Model Master Acryl, those paints tend to dry as they exit the tip of the cap. In fact, I so loathed painting with them that I only used them for bodies with enamels then I switched to Duplicolor Lacquer spray cans. Now I have a Paasche Talon 3F dual action gravity brush and a Paasche H single action external mix siphon brush and now I love airbrushing. With a good airbrush, it's no problem to go to the bench and get some painting done even if I only have 15 minutes to spend doing it. Whereas with that style bottle I can assure you that you need to clean that tube and the tiny hole in the tip before storing, the red stopper cap alone will not stop lacquer or water-based paints from drying in it or enamels from thickening up in it. A good airbrush only requires 30 seconds of spraying thinner through it and a couple wipes on the tip with a thinner soaked Q-tip and you're done. I do periodically tear my Talon apart for thorough cleaning and lubrication but not after every use. To add, after watching the video I can paint that same nitrous bottle with my Talon and be done with cleaning 5 minutes before he's done cleaning that spray cap and tube, especially with red, if not completely cleaned out and rinsed with clean thinner that red will show itself if the next paint used is a light color. Same with silver. I assure you any teeny tiny bit of trash or color residue left over after using his method to clean WILL cause you grief in the future. I have zero qualms about spraying a single part with either airbrush, to use his example of the nitrous bottle, it would take me 5 minutes from the time I decide to paint it to the time I hang my airbrush up after cleaning. That includes jigging the part for holding and thinning the paint. I use mostly water based paints and will often spray a coat on a body then switch colors and do small parts then switch back to body color for a second coat 10-15 minutes later, I may spray 2 or 3 different colors in that 10-15 minutes between body sprays. And last of all I RARELY adjust air pressure, but If I do it's super simple and the regulator is within easy reach. I have found that consistent paint consistency will allow you to leave air pressure the same from one color or use to another.
-
Since I saw no reply to your question I'll chime in. The reason for the large bumper is because this truck has a PTO that is driven from the front of the engine crankshaft. This PTO mounts in front of the radiator, between the frame rails.
-
For me it was the ERTL International Payhauler. I bought and built 2 of them about 5 years before AMT announced their re-release. Same with the AMT D8H, I bought and built one long before any announced re-release. Then I bought and built 2 of the AMT John Deere 310 backhoes and 1 ERTL John Deere 4430 tractor. I don't collect kits, I buy what I like to build and every kit I buy is bought with the intention of building.
-
Harry's beautiful Mack.......
dshue76 replied to Badluck 13's topic in Model Trucks: Big Rigs and Heavy Equipment
Does anyone happen to have links to Harry's original post on this truck? Did he do a WIP on it? -
Frog tape is terrible, new fresh rolls have some stick to them but the older the roll gets the less stick it has. I've had it pull off of a wall while rolling paint over it..... I use 3m blue painters tape for general use and I love the Tamiya for fine line and color separation. Just be sure to handle the Tamiya rolls with care if you beat up the edges it won't be any better than the 3m, in a pinch if you cut the 3m with a sharp blade then that fresh edge works as well as Tamiya. Another tape I avoid is the Blue Hawk tape from Lowes, if left on too long it leaves residue and can be hard to remove and paint sticks to the edge causing lifting issues.
-
Show pics of your dm600's
dshue76 replied to JUNK-MAN's topic in Model Trucks: Big Rigs and Heavy Equipment
They shortened the hood and moved the cab forward in order to create a shorter "city" truck. This meant that the doghouse intruded more into the footwells. The engineers simply offset the cab to the left and restored the drivers footwell space. The U and DM were built as both straight trucks, IE mixer, dump, flatbed, garbage packer, log body, box etc as well as daycab tractors which were very prevalent. Interestingly when I was turning wrenches in a truck shop that was mostly Mack oriented we had far more R and RD model straight trucks than DM or U models, I attribute this to living in a less populated part of the state. When we worked on trucks from Pittsburgh the mixers and dumps were usually DM's. -
Rubber Duck Mack Update 8/16/18
dshue76 replied to Warren D's topic in WIP: Model Trucks: Big Rigs and Heavy Equipment
I'm looking forward to watching this build come together, It's a subject I always had an interest in but never attempted. Those are copies of the GMC General/Chevy Bison tanks. -
Dodge L700 with dump body
dshue76 replied to dshue76's topic in WIP: Model Trucks: Big Rigs and Heavy Equipment
Then I finally made it to my local hobby shop and picked up the rest of the Evergreen styrene I needed for the bed. Now I can make some progress on it. The most tedious part was the tailgate hinges/latches. I've got the top one done. The hinge pins are .050" steel rod with 3/32" od styrene tube to simulate the cap on the end, the clevis is .017" brass and the hitch pins are .025" steel wire. Next up is to make the lower hinge/gate release then I'll start the bed hoist, hydraulic tank and bed hinges. I'm not sure yet if I want to build a transmission mount pto, a frame mount pto or an electric pump for the hydraulics or just omit the pto all together. -
Dodge L700 with dump body
dshue76 replied to dshue76's topic in WIP: Model Trucks: Big Rigs and Heavy Equipment
I've been working on this pretty steady but with not much perceivable progress. I've done some chassis plumbing and wiring and made a passable representation of a signal stat turn signal switch. I've also made a parking brake lever but haven't mounted it yet. -
Dodge L700 with dump body
dshue76 replied to dshue76's topic in WIP: Model Trucks: Big Rigs and Heavy Equipment
I have only made a little progress in the last couple days. I painted the badges on the cab with Model Master silver chrome enamel. They will be cleared with Model Master gloss clear acryl so I want them to dry for a few days before the clear. I also painted the window surrounds black to help simulate weather stripping. Then I detailed the dash, adding a CB radio and an AM radio. The grills got a wash of dark granite color. These pics were taken with my Sony Handycam, I think it does a better job on close ups than my old Kodak. -
Dodge L700 with dump body
dshue76 replied to dshue76's topic in WIP: Model Trucks: Big Rigs and Heavy Equipment
The rear of the frame got a bumper plate mentioned earlier for a pintle hook and lights. I have a home built triaxle beaver tail equipment trailer that will look good behind this with either the JD 310 backhoe or the diecast Bobcat V518 Versahandler. -
Dodge L700 with dump body
dshue76 replied to dshue76's topic in WIP: Model Trucks: Big Rigs and Heavy Equipment
Some interior shots. There will be weathering add later to the entire build. The only weathering I've done so far has been the engine and wheels/hubs. -
Dodge L700 with dump body
dshue76 replied to dshue76's topic in WIP: Model Trucks: Big Rigs and Heavy Equipment
Next was the body. I'm terrible at picking colors. Too many of my builds are monotone and I'm trying to change that. My original plan was white cab and red bed.... After sleeping on the idea a few nights and attending a local car show while keeping an eye out for inspiring colors I decided a tan color cab with brown fenders and step would look perfect on this truck. The bed will be painted to match once it's finished. The bed will have the flat panels painted tan and the tube framing painted brown. Now with the decals and some Model Master gloss clear acryl. It will get cleared again once the silver work is done on the badges and such. I'm doing the silver work in Model Master silver chrome enamel and mistakes are easier to clean off of clear than off of raw paint. -
Dodge L700 with dump body
dshue76 replied to dshue76's topic in WIP: Model Trucks: Big Rigs and Heavy Equipment
Sprueslayer, For the front spindles you can make 2 more pieces to capture it on the bottom like what the kit supplies for the top. I don't know why the kit omits them. Or just glue them fast, that's my method. The tiny pins on the axle are too weak to hold up and if you want to be able to pose the front wheels for years to come then I suggest steel or brass rod be used to replace the pins on the front axle. The original pins will either fatigue or become brittle with age. Also when you lower the rear ride height on this kit and you use it with a trailer you need to shim up the fifth wheel and or add a shim between the trailer and kingpin plate. Warren D, Like nearly every kit I build or modify it's done my way, rarely do I ever try to go down the rabbit hole of building an exact replica of a real vehicle or try to build a truck as a replica fleet vehicle. I have a lot of respect for the guys that do that type of build but it's too much work and pressure for me! This build is just a representation of what a landscaper might put together as a vintage truck to showcase their business, or just to represent what may have been available back in the late 60's. The only pic I could find of an L700 with a dump bed was a Model. Speaking of research, these trucks are hard to come by in real life and only a little easier to find on google. But in my searches, I have yet to see a stock truck with the same degree of rake as this kit presents. The only picture I can find showing excessive rake is the dealer brochure. I know the flatbed trailer in these kits needs the kingpin plate shimmed to use with other tractors so this leads me to believe the rear ride height is a result of the design of the trailer. -
Dodge L700 with dump body
dshue76 replied to dshue76's topic in WIP: Model Trucks: Big Rigs and Heavy Equipment
Then came the chassis. I moved the rear axle back as far on the frame as it would go. I wish I would have taken pictures along the way as I modified the rear suspension to lower the rear. I'll try to explain. I also the blocks out that separate the upper load springs from the main lower springs then I cut the tops off of the main spring shackles, this was done so that the tops of the load spring shackles are flush with the top of the frame and the tops of the main shackles are slightly below the top of the frame. While I'm no expert on this style truck. I know the 1;1 did not have this severe of a rake when empty. In fact, they had very little rake. I added a crossmember over the rear of the trans for the hoist cylinder and added a rear bumper plate for lights and a pintle hook. -
This is my current project. It's my second attempt at the Lindberg Dodge L700. The last I built as a tractor, this time I'm building it for a 10' dump bed. I'm not going to go crazy with detailing, I'll add just enough in my opinion to show detail without trying to build an exact miniature. It will be lightly weathered to represent a working truck that is well taken care of. I really like this kit. I hear it mentioned that the doors don't fit or go together well but I've had no problem with either kit. Both kits have been surprisingly clean with very little flash. For the most part I'm using craft type acrylic paints, some items will be painted with Testors/Model Master/Rustoleum enamels. I'm scratch building the bed from Evergreen sheet styrene, tubing and balsa sheet for side boards. starting with the engine I added ignition wires made from 30# braided fishing line, I made an ignition coil, added starter wiring, added an alternator mount so it doesn't have to float in the air and wired it and then I built a fuel pump and ran a fuel line to the carb.
-
I believe the bumper is close to correct. Most images show the modern museum car. Also 76 & 77 used the same rear bumper. If I squint just right the kit bumper could be from Bakers 77 Chevrolet cup entry. Remember he ran Olds, Buick & Chevrolet that season.
-
Technical question about pulleys
dshue76 replied to robdebie's topic in General Automotive Talk (Trucks and Cars)
Actually, it's to install the belt. This is used when there is no tension adjustment. That notch allows just enough reduction of tension and also grabs the belt to roll it on. -
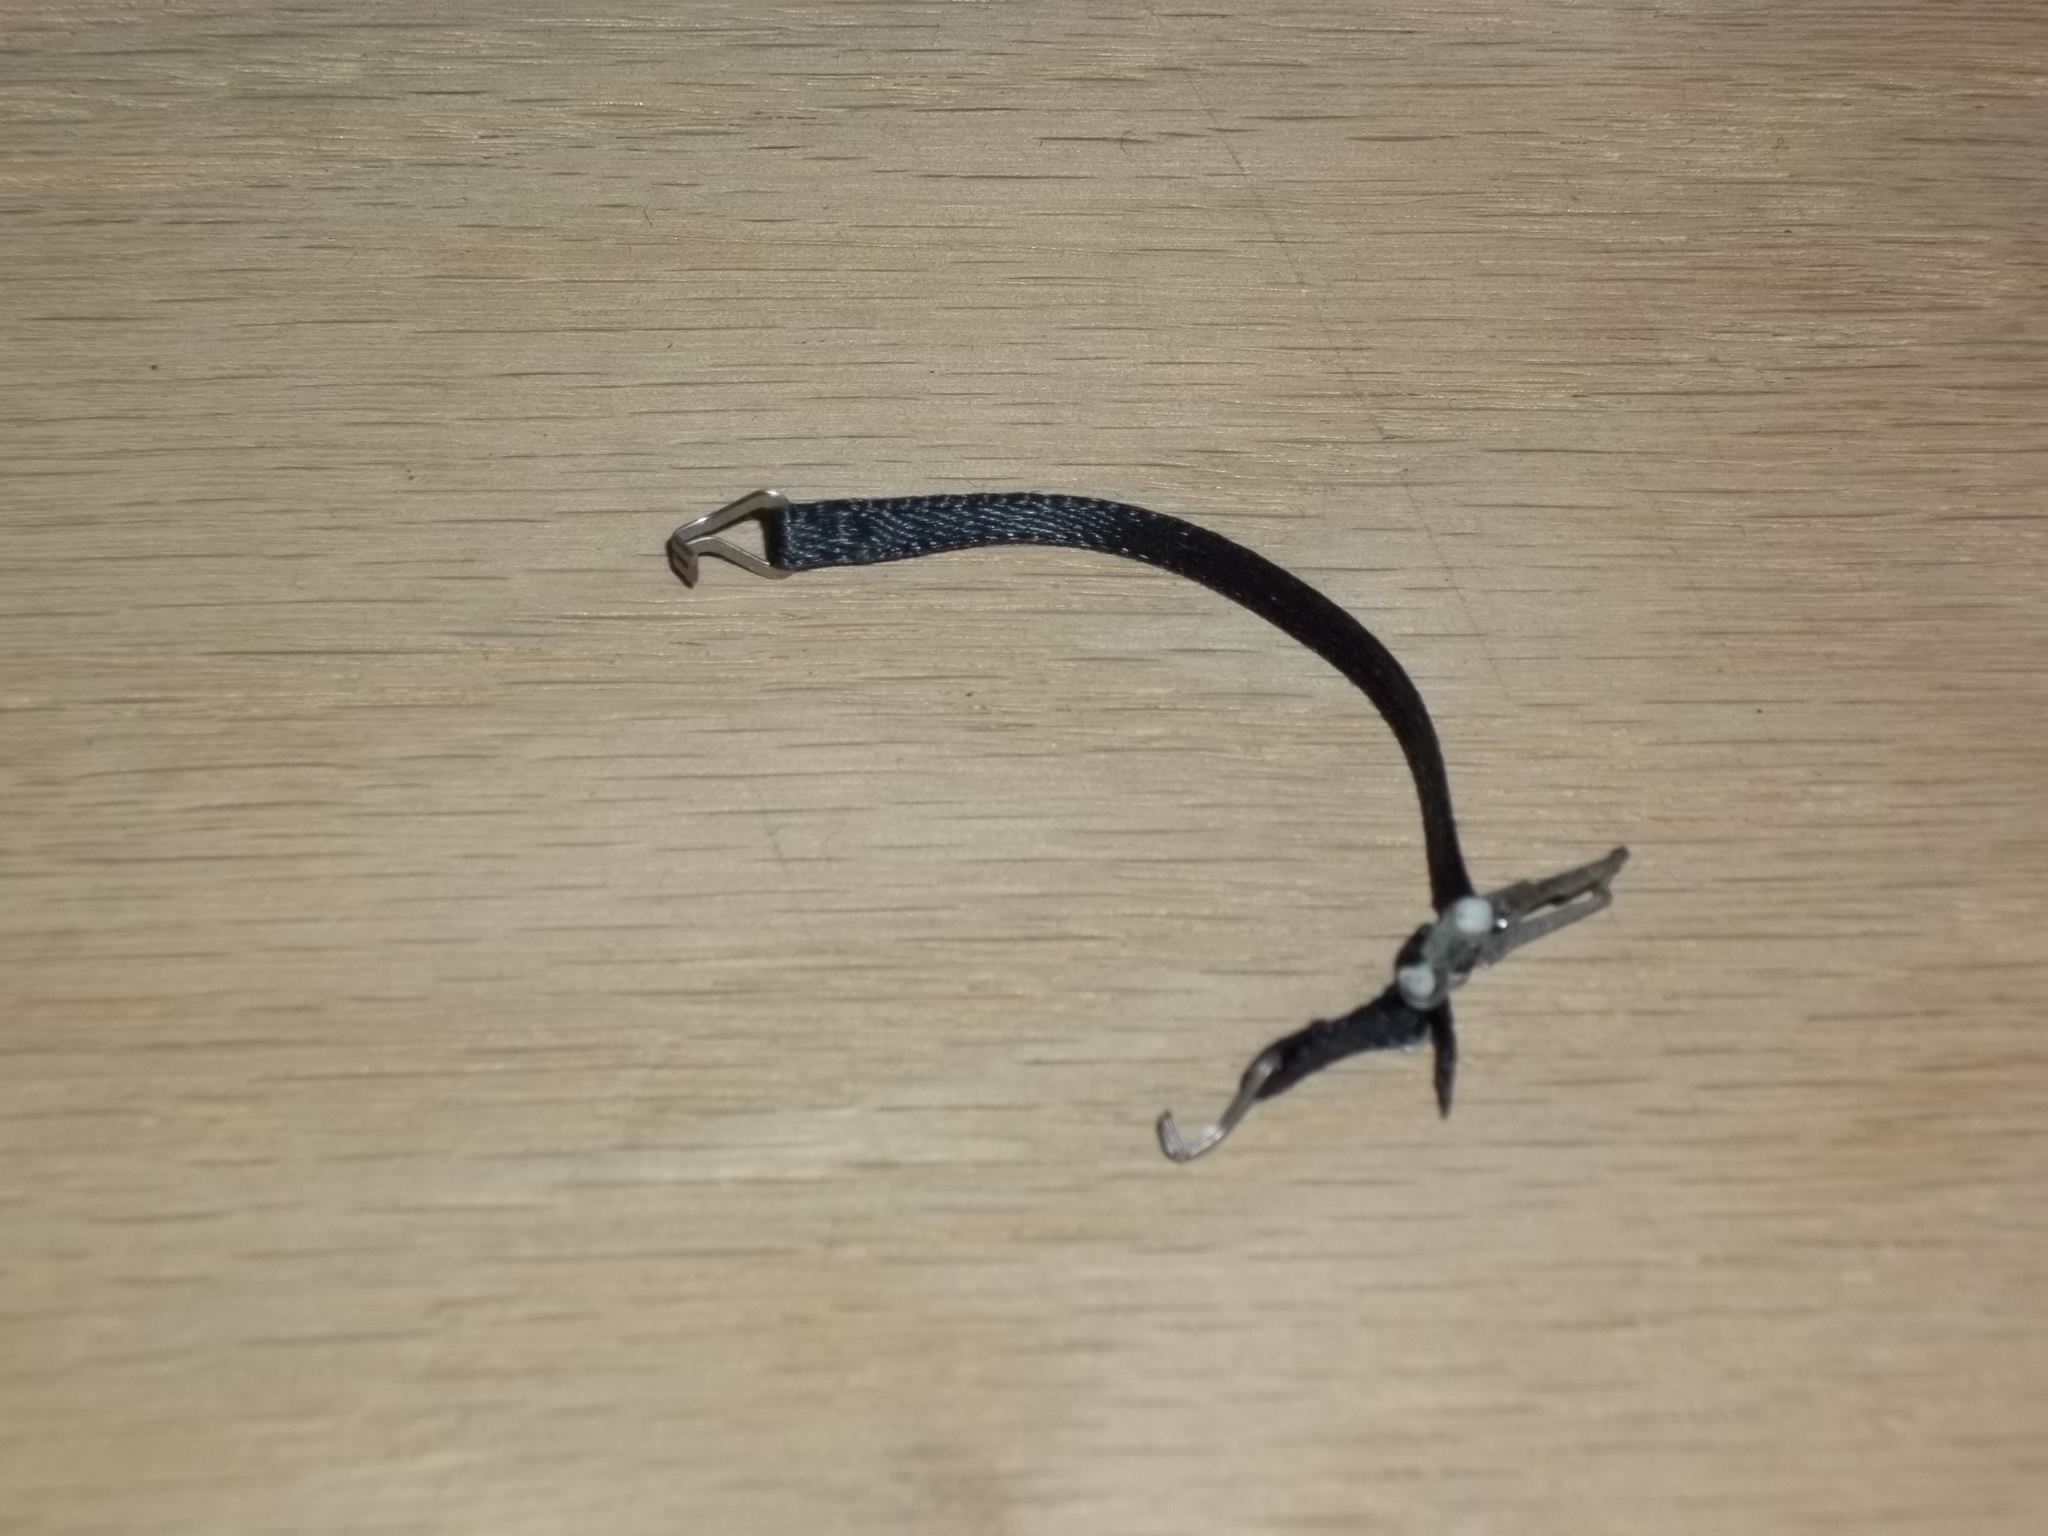
has anyone built the kit form services ratching...
dshue76 replied to oldr-n-drt's topic in Tips, Tricks, and Tutorials
I built some many years ago. In fact they were the first photo etch item I ever assembled. Needless to say they didn't turn out perfect but the kit is excellent. The only tip I have is patience. The metal parts bend beautifully, the strap material is really nice and folds easily, getting the strap material folded and glued straight square and even is the tedious part.