Hoffman
-
Posts
422 -
Joined
-
Last visited
Content Type
Profiles
Forums
Events
Gallery
Everything posted by Hoffman
-
Very nice, Mr. Gluebomber! ? Thank you for posting the pic's. Seeing yours so nicely finished convinced me to buy one just now.
-
 Helmut, that turned out great!! Wonderful transformation. Bravo!
 -
Ferraris that won 24 Hours of Le Mans
Hoffman replied to Gramps46's topic in Other Racing: Road Racing, Salt Flat Racers
Amazing body of work, Gary! Most impressive. Thank you for sharing. -
Helmut, and Gary~ Thank you, Guys!! You made my day. ?
-
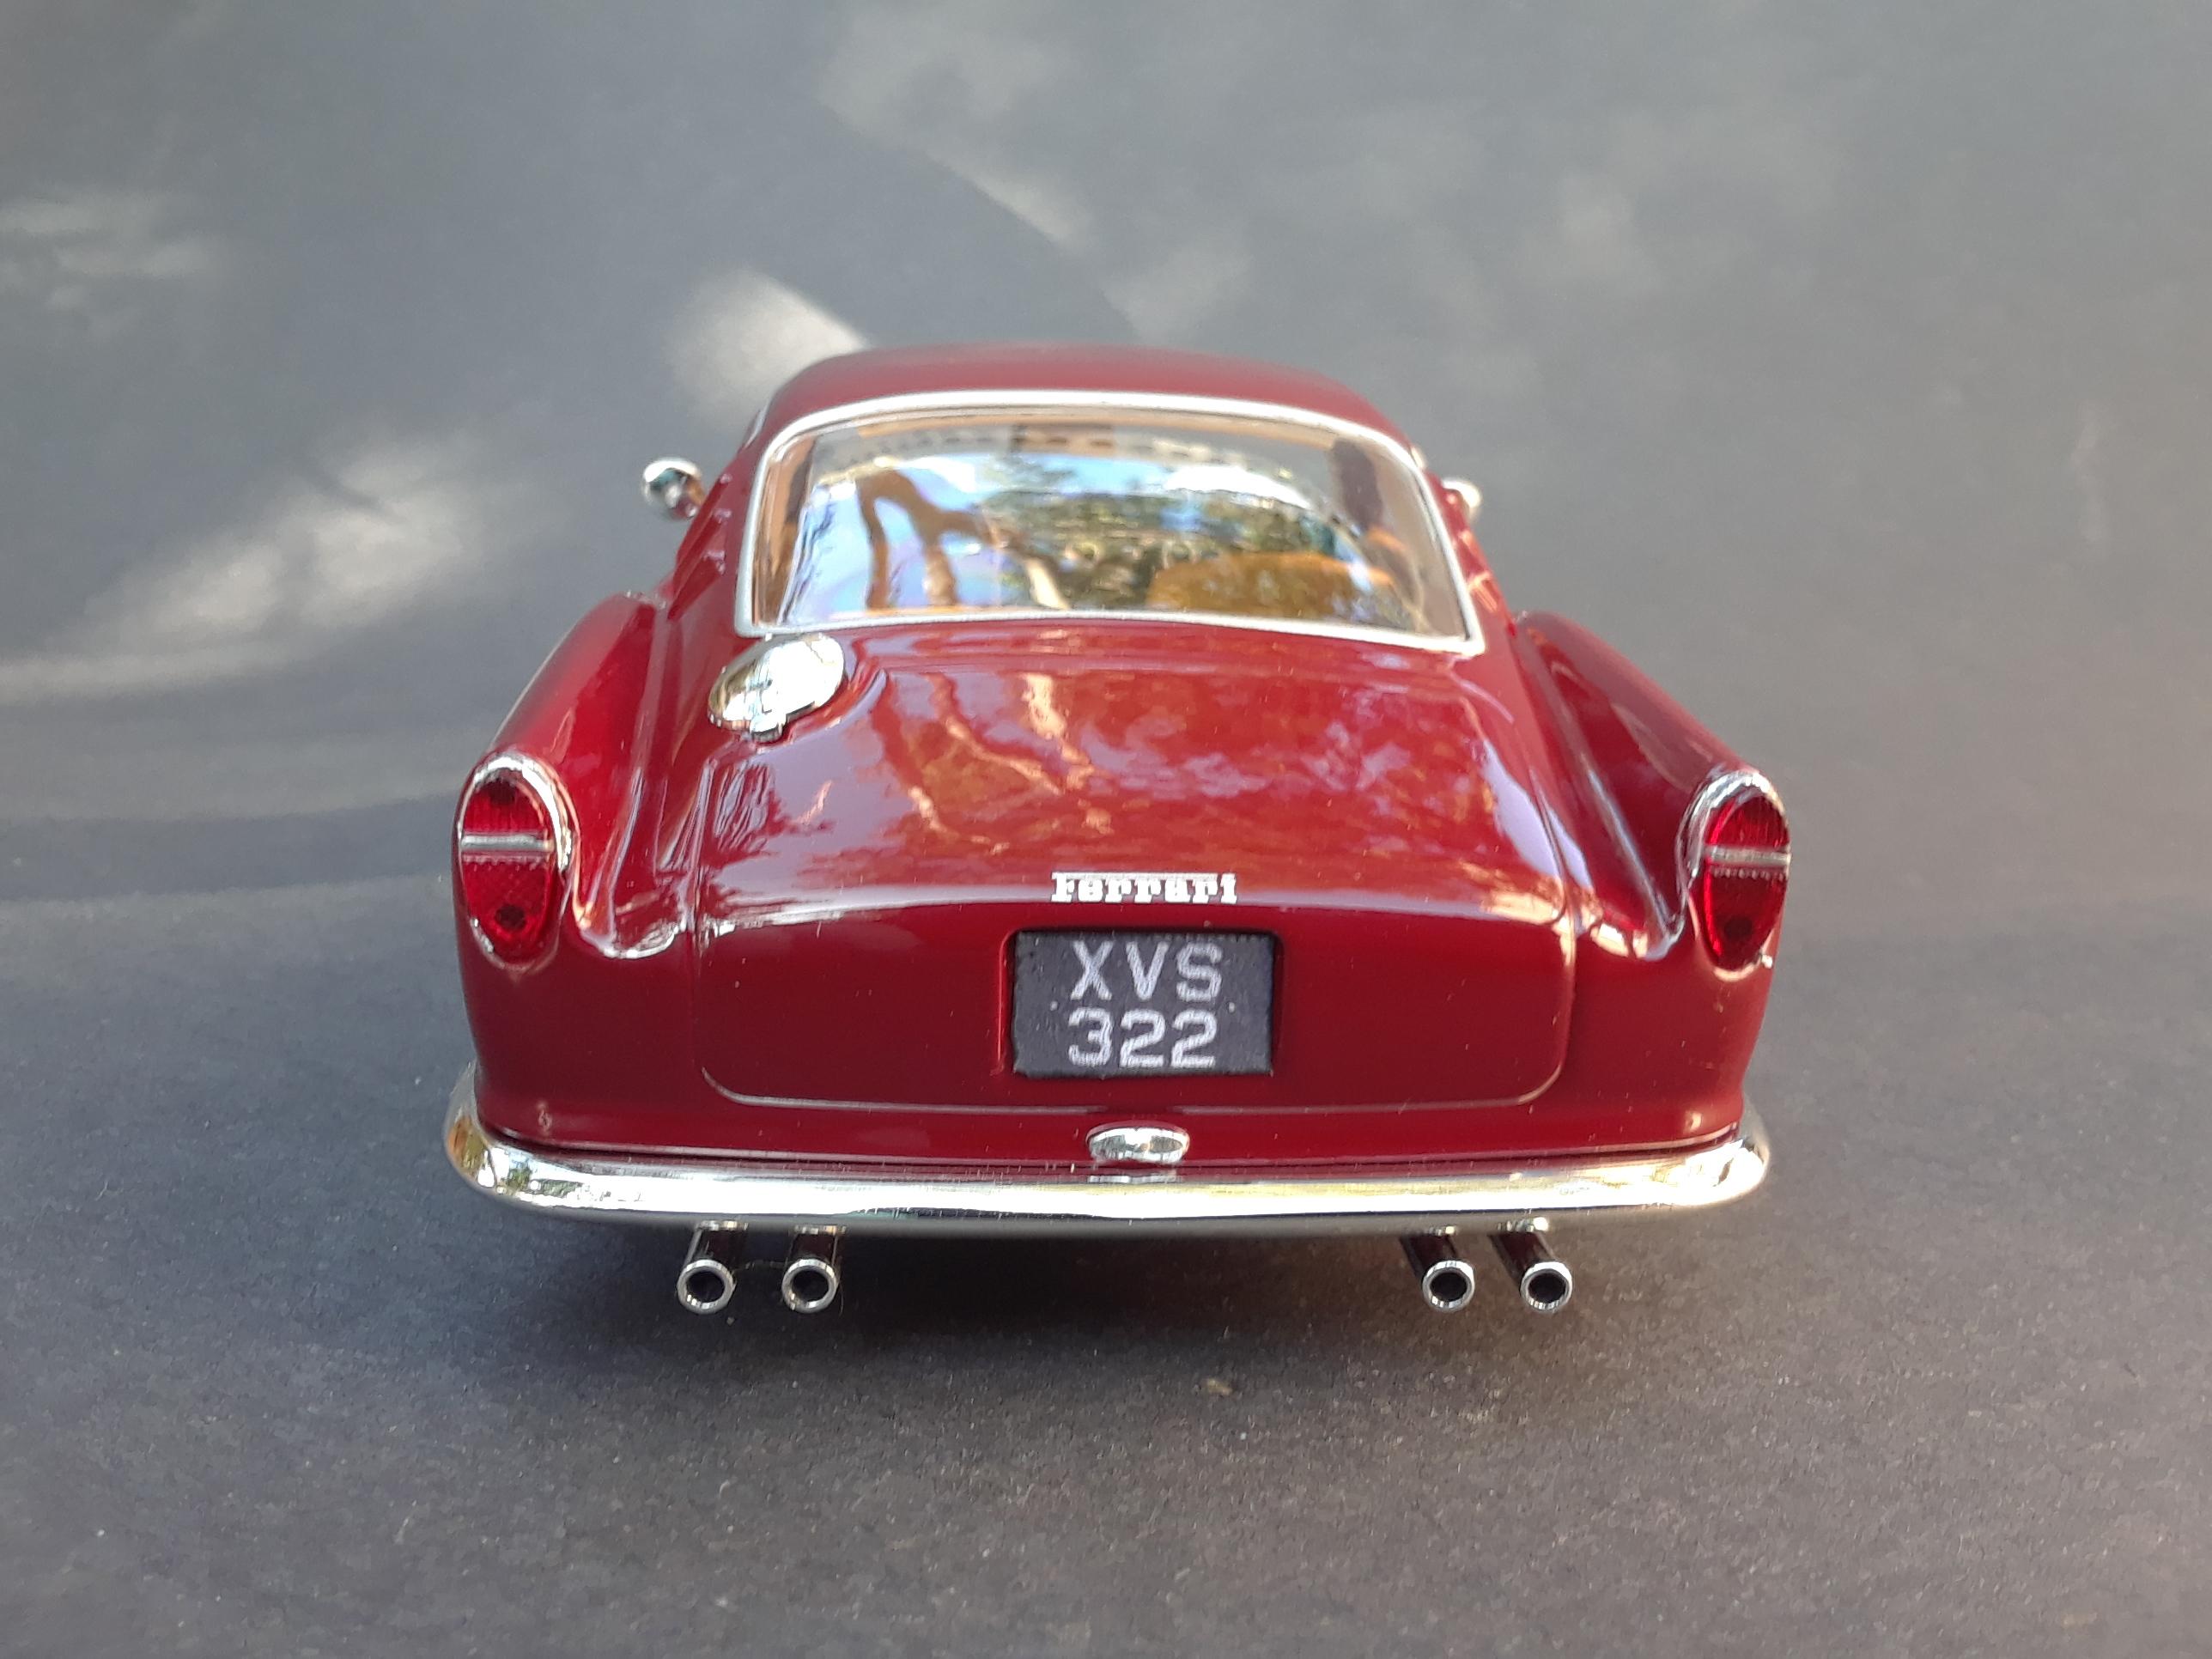
Basic Model: Ferrari 250 GT Berlinetta Tour De France De Agostini Le Grandi Ferrari Collection #52 https://diecast1-24.blogspot.com/2017/04/le-grandi-ferrari-124-29-250-gt.html Interior: Repainted with artist acrylics and oils Wheels: Danbury Mint ’58 250 TR rims, Herb Deeks PE spokes Tires: Danbury Mint ’58 250 TR I really, really wanted a model of the fabulous Ferrari Tour De France, and thanks to my good friend Helmut, I was finally able to get one. (Thank you!!!) This diecast is made by Burago and marketed as the 'De Agostini Le Grandi' Ferrari Collection. Some of them are readily available in the USA. Others, not so much, outside of Europe. I love the color so didn’t need to repaint the body. The interior was a good color too, but shiny plastic. I painted the headliner with some off-white artists acrylic from Deco Art. Everything else was painted with ‘Americana Honey Brown’ first, then I went over the seats and door panels with ‘Yellow Ochre’ oil paint from Artist’s Loft. That gave a nice contrast between what is carpet versus leather. For the body, I added chrome bezels to the tail lights with a combination of BMF and Molotow. The driving lights and front turn signals were painted white then some silver over that. Added black in the hood scoop, brown for the leather straps on the hood and minor chrome details here and there. The chassis is a simple curbside rendition with no engine. The wheels and tires were nice, but I felt there was room for improvement. I decided to go with Danbury Mint 250 Testa Rossa rims and tires, but with Herb Deeks photo etched spokes. Modifying them was time consuming, removing the heavy Danbury Mint spokes and replacing them with the photo etch. The hubs are shoe eyelets from Michael’s craft store. The brake drums are aluminum discs I cut from some thin sheet. I made the axles with brass tubing. This model is fairly close in configuration to a TDF I found online, so I copied that cars license plate. And, that's about it. Thanks for looking, enjoy! ?
-
David, that looks fantastic! Are those 1/24 wheels and tires from Monogram? Nice upgrade.
-
Danbury Mint 1941 Cadillac Fleetwood Series 61 Special
Hoffman replied to THarrison351's topic in Diecast Corner
Great work, Tim! This is something I love doing too, fixing, saving, improving die-casts. Well done. -
Helmut, that looks Great!! ?
-
Very Cool!!
-
Thanks! Yeah, I know the background is real. What I was getting at is that you set up your base at just the right distance away so it looks to be in scale with your model. I'm sure having it elevated helps a lot too. Well done! ?
-
Beautiful! Be careful driving in the rain on the porch though......no wipers! ?
-
Great photography. Your blend from the base to the full size background, and the scale of the buildings and shrubs in the background ~ awesome! Looks very convincing.
-
Really nice foil work! ?
-
Thank you, Helmut! Hope you're doing well. Yeah, the DM wheels and hub caps are nice, but I didn't like the wide-white tires, not for this particular car anyway. I adapted the Revell rat-rod '29 pickup tires. They look a lot like vintage Dunlops. I used the medium white-wall inserts from a Monogram XK120, which are a good fit and actually have 'Dunlop' lettering ~ a natural!
-
Earl Marischal, XYHARRY, Rattlecan Dan, Hard_2_Handle_454, Ace-Garageguy, 70 Sting, H.A.K., and Can-Con……. Gentlemen, thank you so much for your kind words and compliments! Glad you like it. I'm grateful we have this forum to share our projects and finished work with one another. I really enjoy seeing all the cool cars you guys build. THANKS!!
-
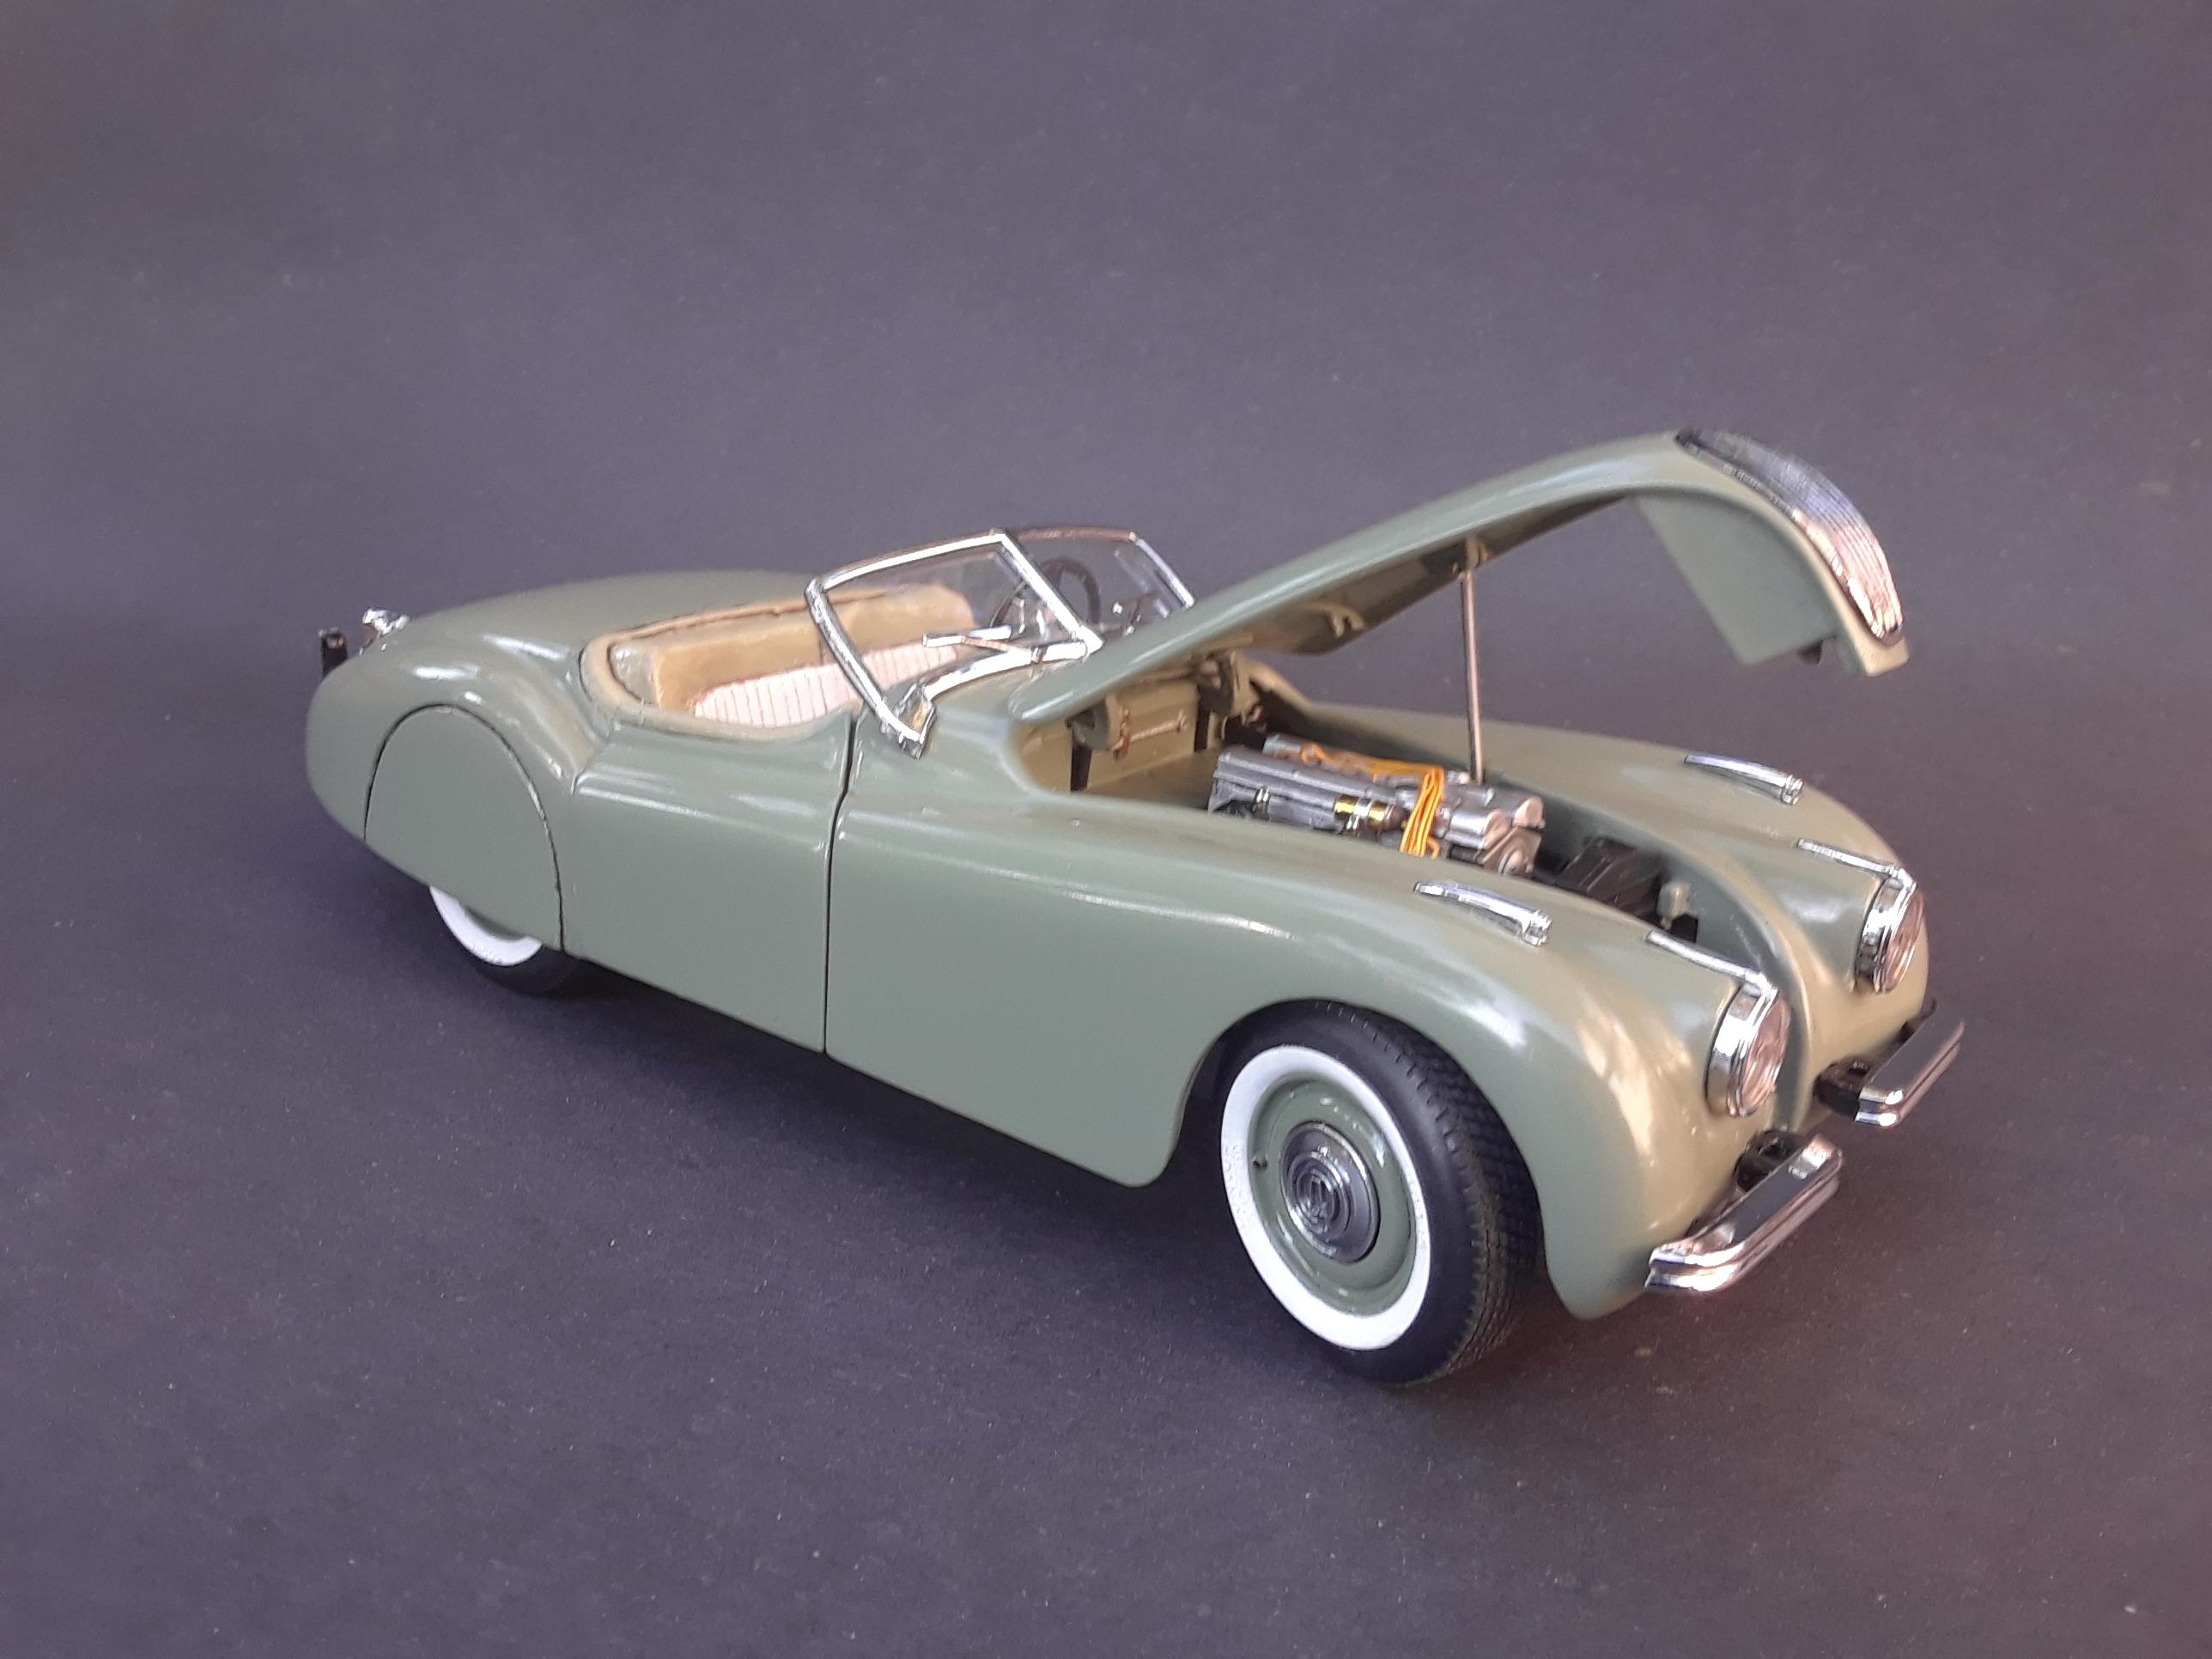
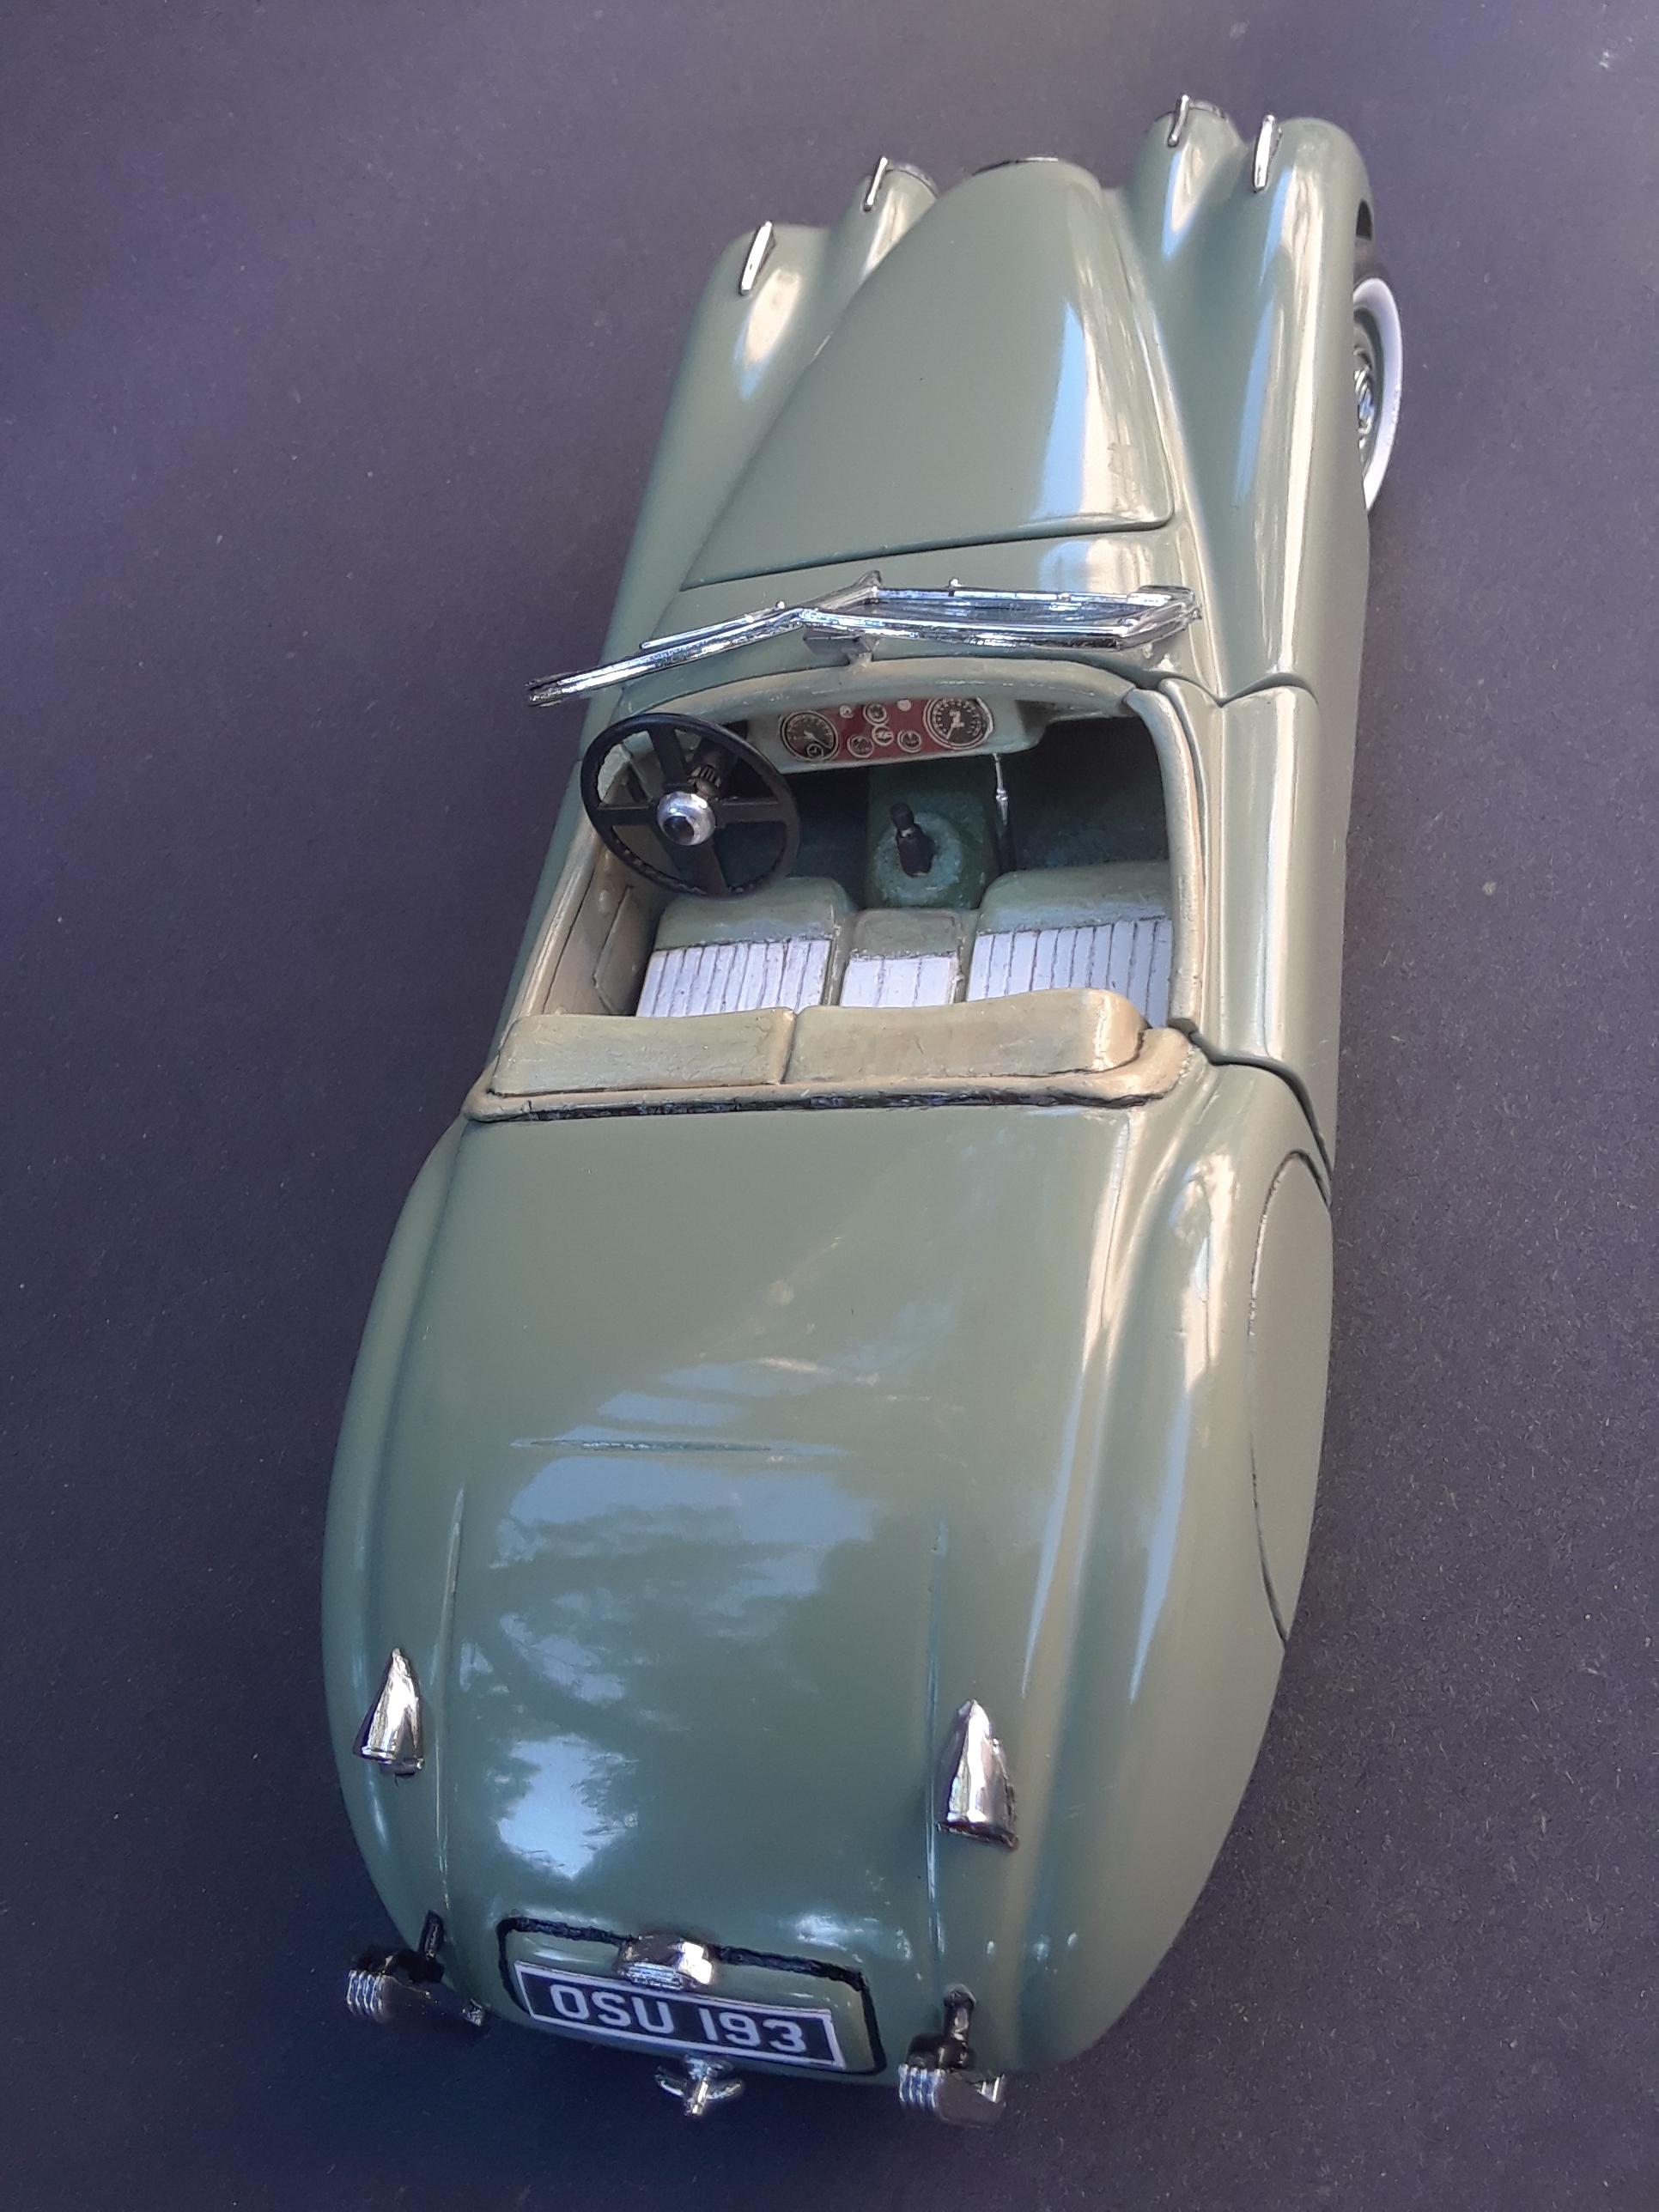
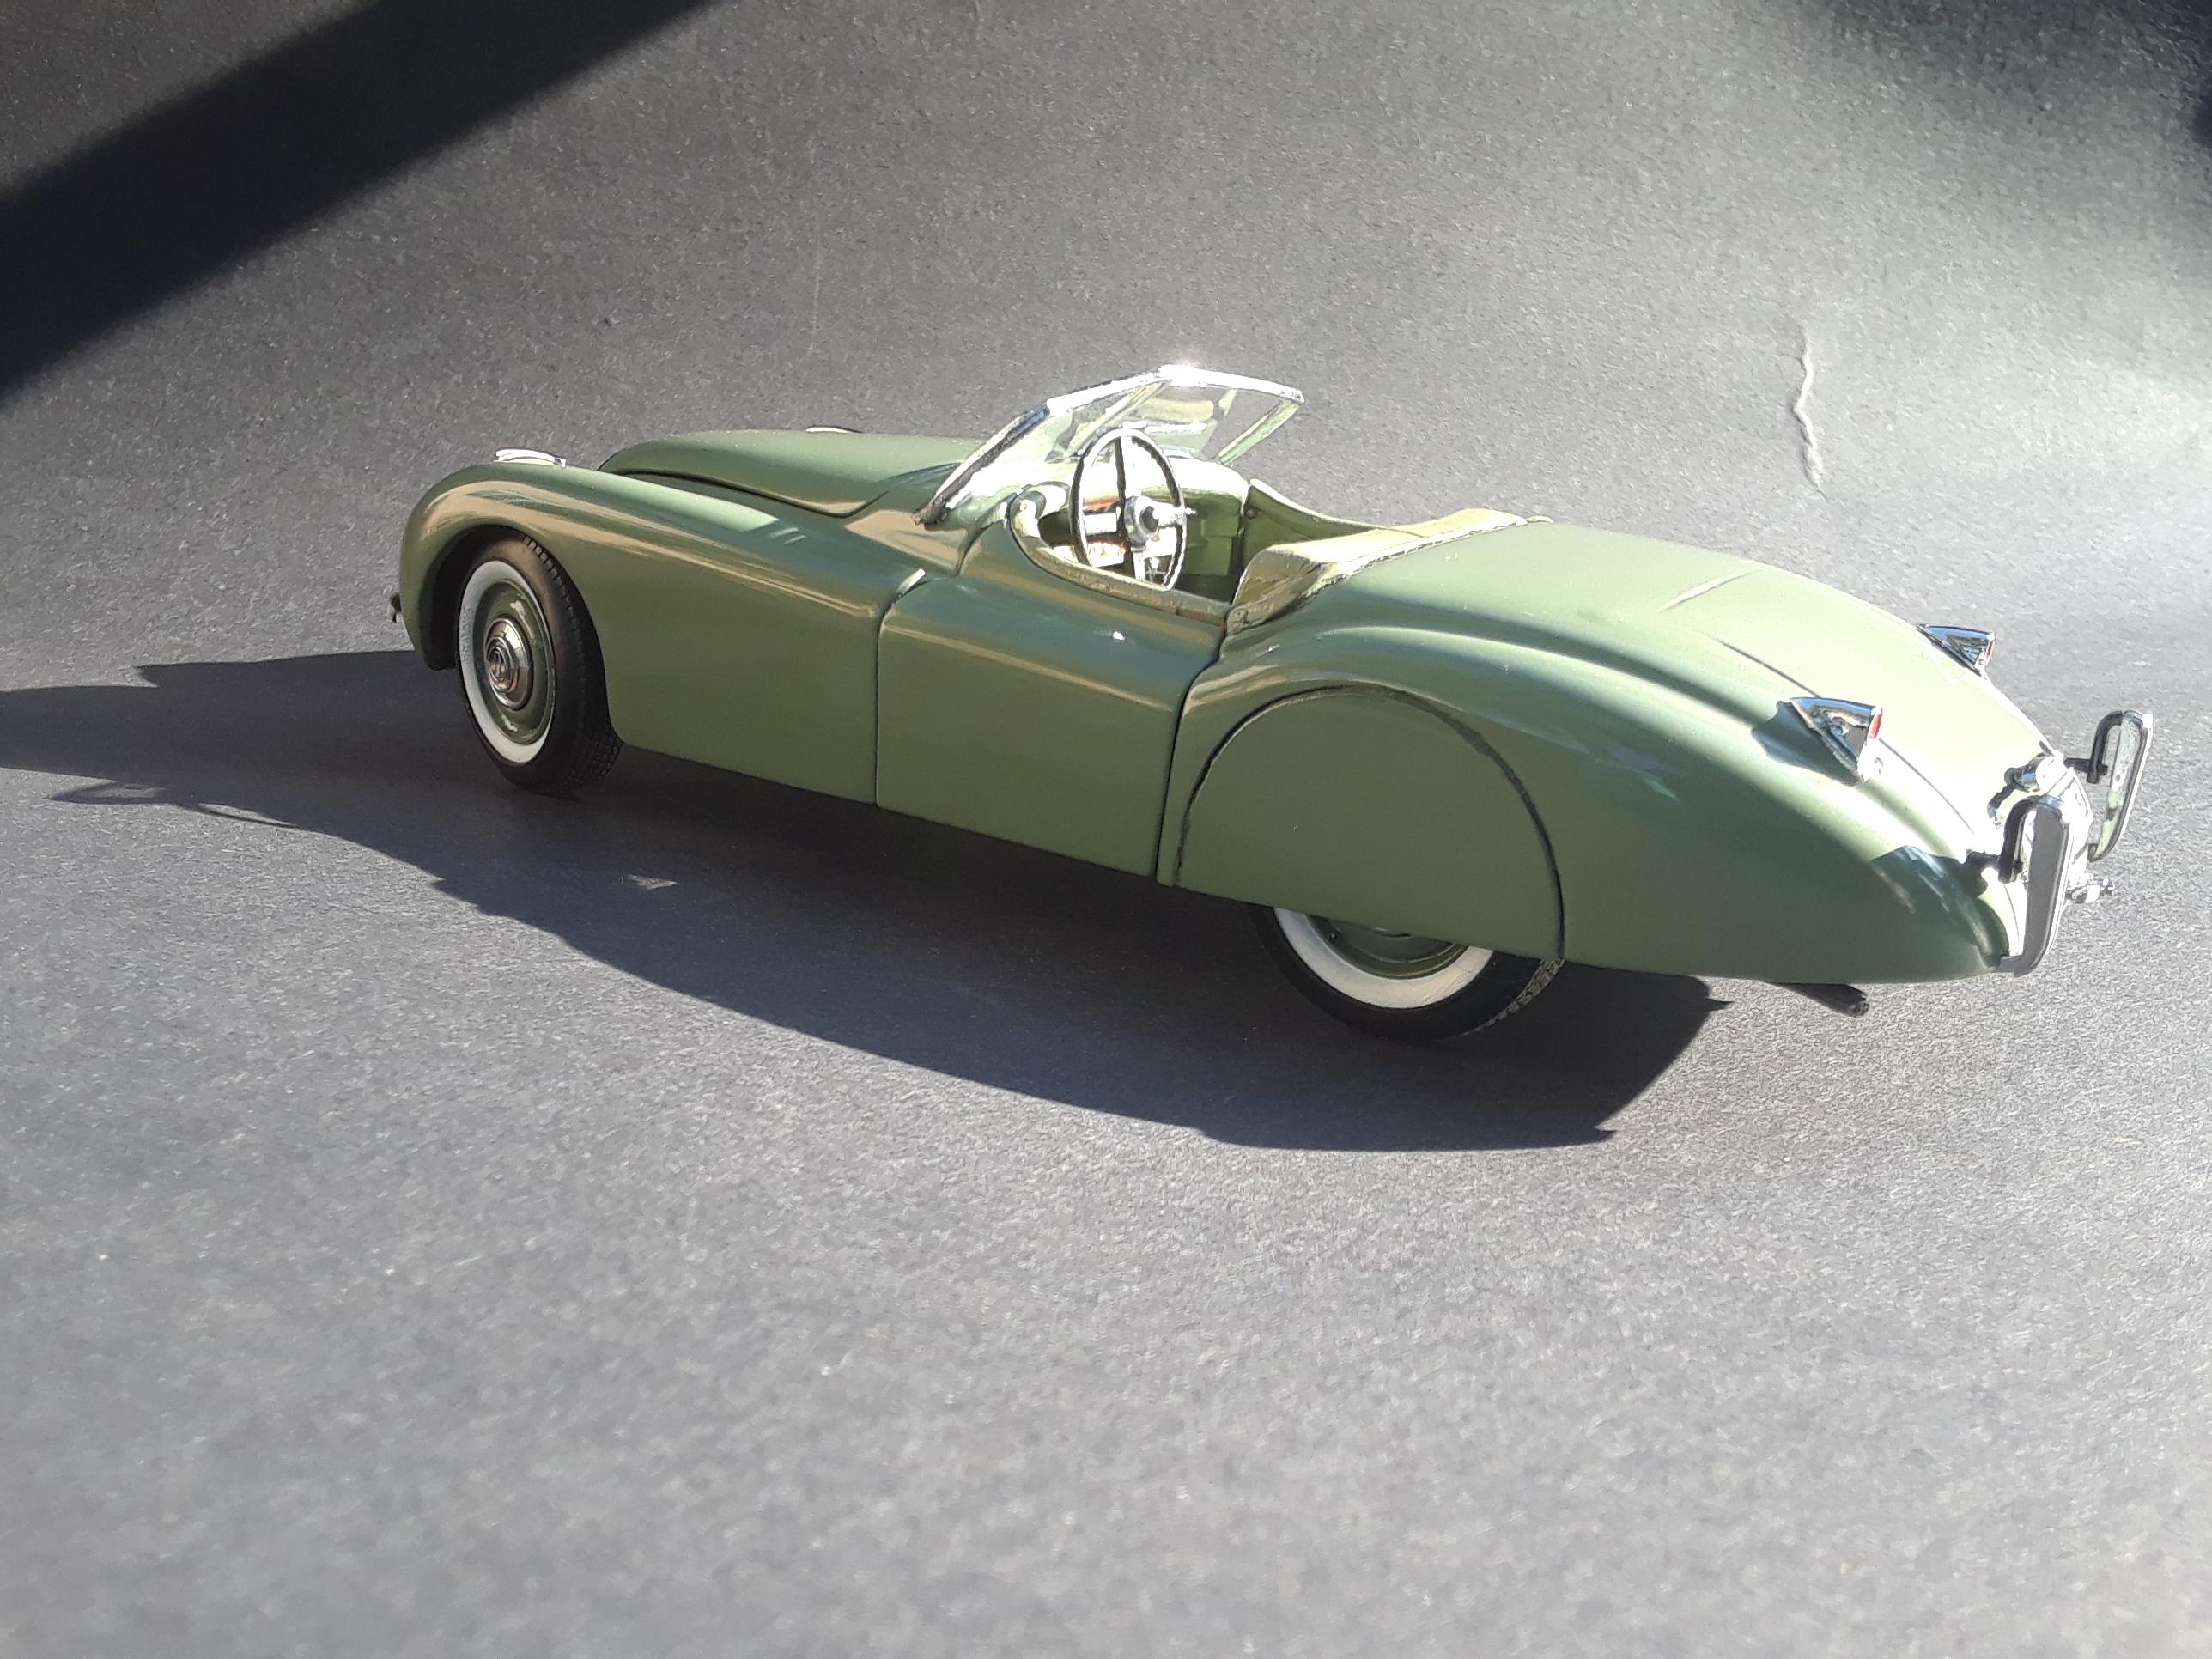
Basic Model: Danbury Mint, fender skirts from evergreen sheet Paint: Sage Green, Rust Oleum ‘Painter’s Touch’ Interior: Tamiya XF21 'Sky' green and white Wheels: Danbury Mint XK120 Tires: Revell ’29 Ford Pickup, ‘Rat Rod’, 4) Rears Engine: Scratch built distributor, coil, added plug wires This car was originally purchased just for parts, $20 on ebay. The more I looked at it, I thought, it’s actually pretty nice, but it really needs fender skirts, a color change, and better tires. So that’s what I did. The inspiration for the model was a semi ratty looking XK120 I found online in a Jaguar color I liked, ‘Fern Green’. That car, license number OSU193 is by no means a show car. Look closely and you’ll see worn upholstery, color mismatch between panels, etc; just a decent driver. While building this model, everything was going well with the repaint until I tried a coat of Testors ‘Extreme Lacquer’ for a nice, glossy finish. I was extremely pissed with the results! Lots of wrinkles. I’ve had great luck with it in the past, but I should have known better. Sometimes lacquer over enamel just really, really does not work out. My original idea was to get enough clear over the base color that I could easily cut and buff it without burning through the paint. I did try sanding off the clear lacquer, touching up the green base coat, and then a different clear. Still no-go. The lacquer had soaked into the enamel enough that more clear, even though it was enamel, started the reaction again. I could have just stripped it down completely and started over, but I kept wanting to save it. Eventually I was able to clean it up with more paint, then sand it smooth and polish it. The funny part is, because of these mishaps, the model ended up looking more like the full size car. It’s very smooth but not super shiny; a driver. I had similar issues with the interior. Danbury mint molded the seats and door panels in red, urethane-like plastic. Painting over the red molded parts in white and green was a challenge. After many coats, the red was still bleeding through slightly. To fix the white pleats, I laid down some Teflon tape. That hid the bleed through better than another coat of paint. On the green, it's not as bad. It looks sort of like worn leather, which is OK. Eventually I just decided I can live with it. I went ahead and gave the model a license plate matching the full size XK120 and called it done. The model is not an exact match, but it's pretty close. Thanks for looking, enjoy!
-
Phil, that turned out GREAT! Very tastefully done. ?
-
Very nice, '49 Buick! ?
-
Joe, I remember seeing your beautiful model about a year ago. Stumbled on it again today while searching for SSK photos. You really did an exceptional job on this one. Love it! Great photos too. Thanks for sharing.
-
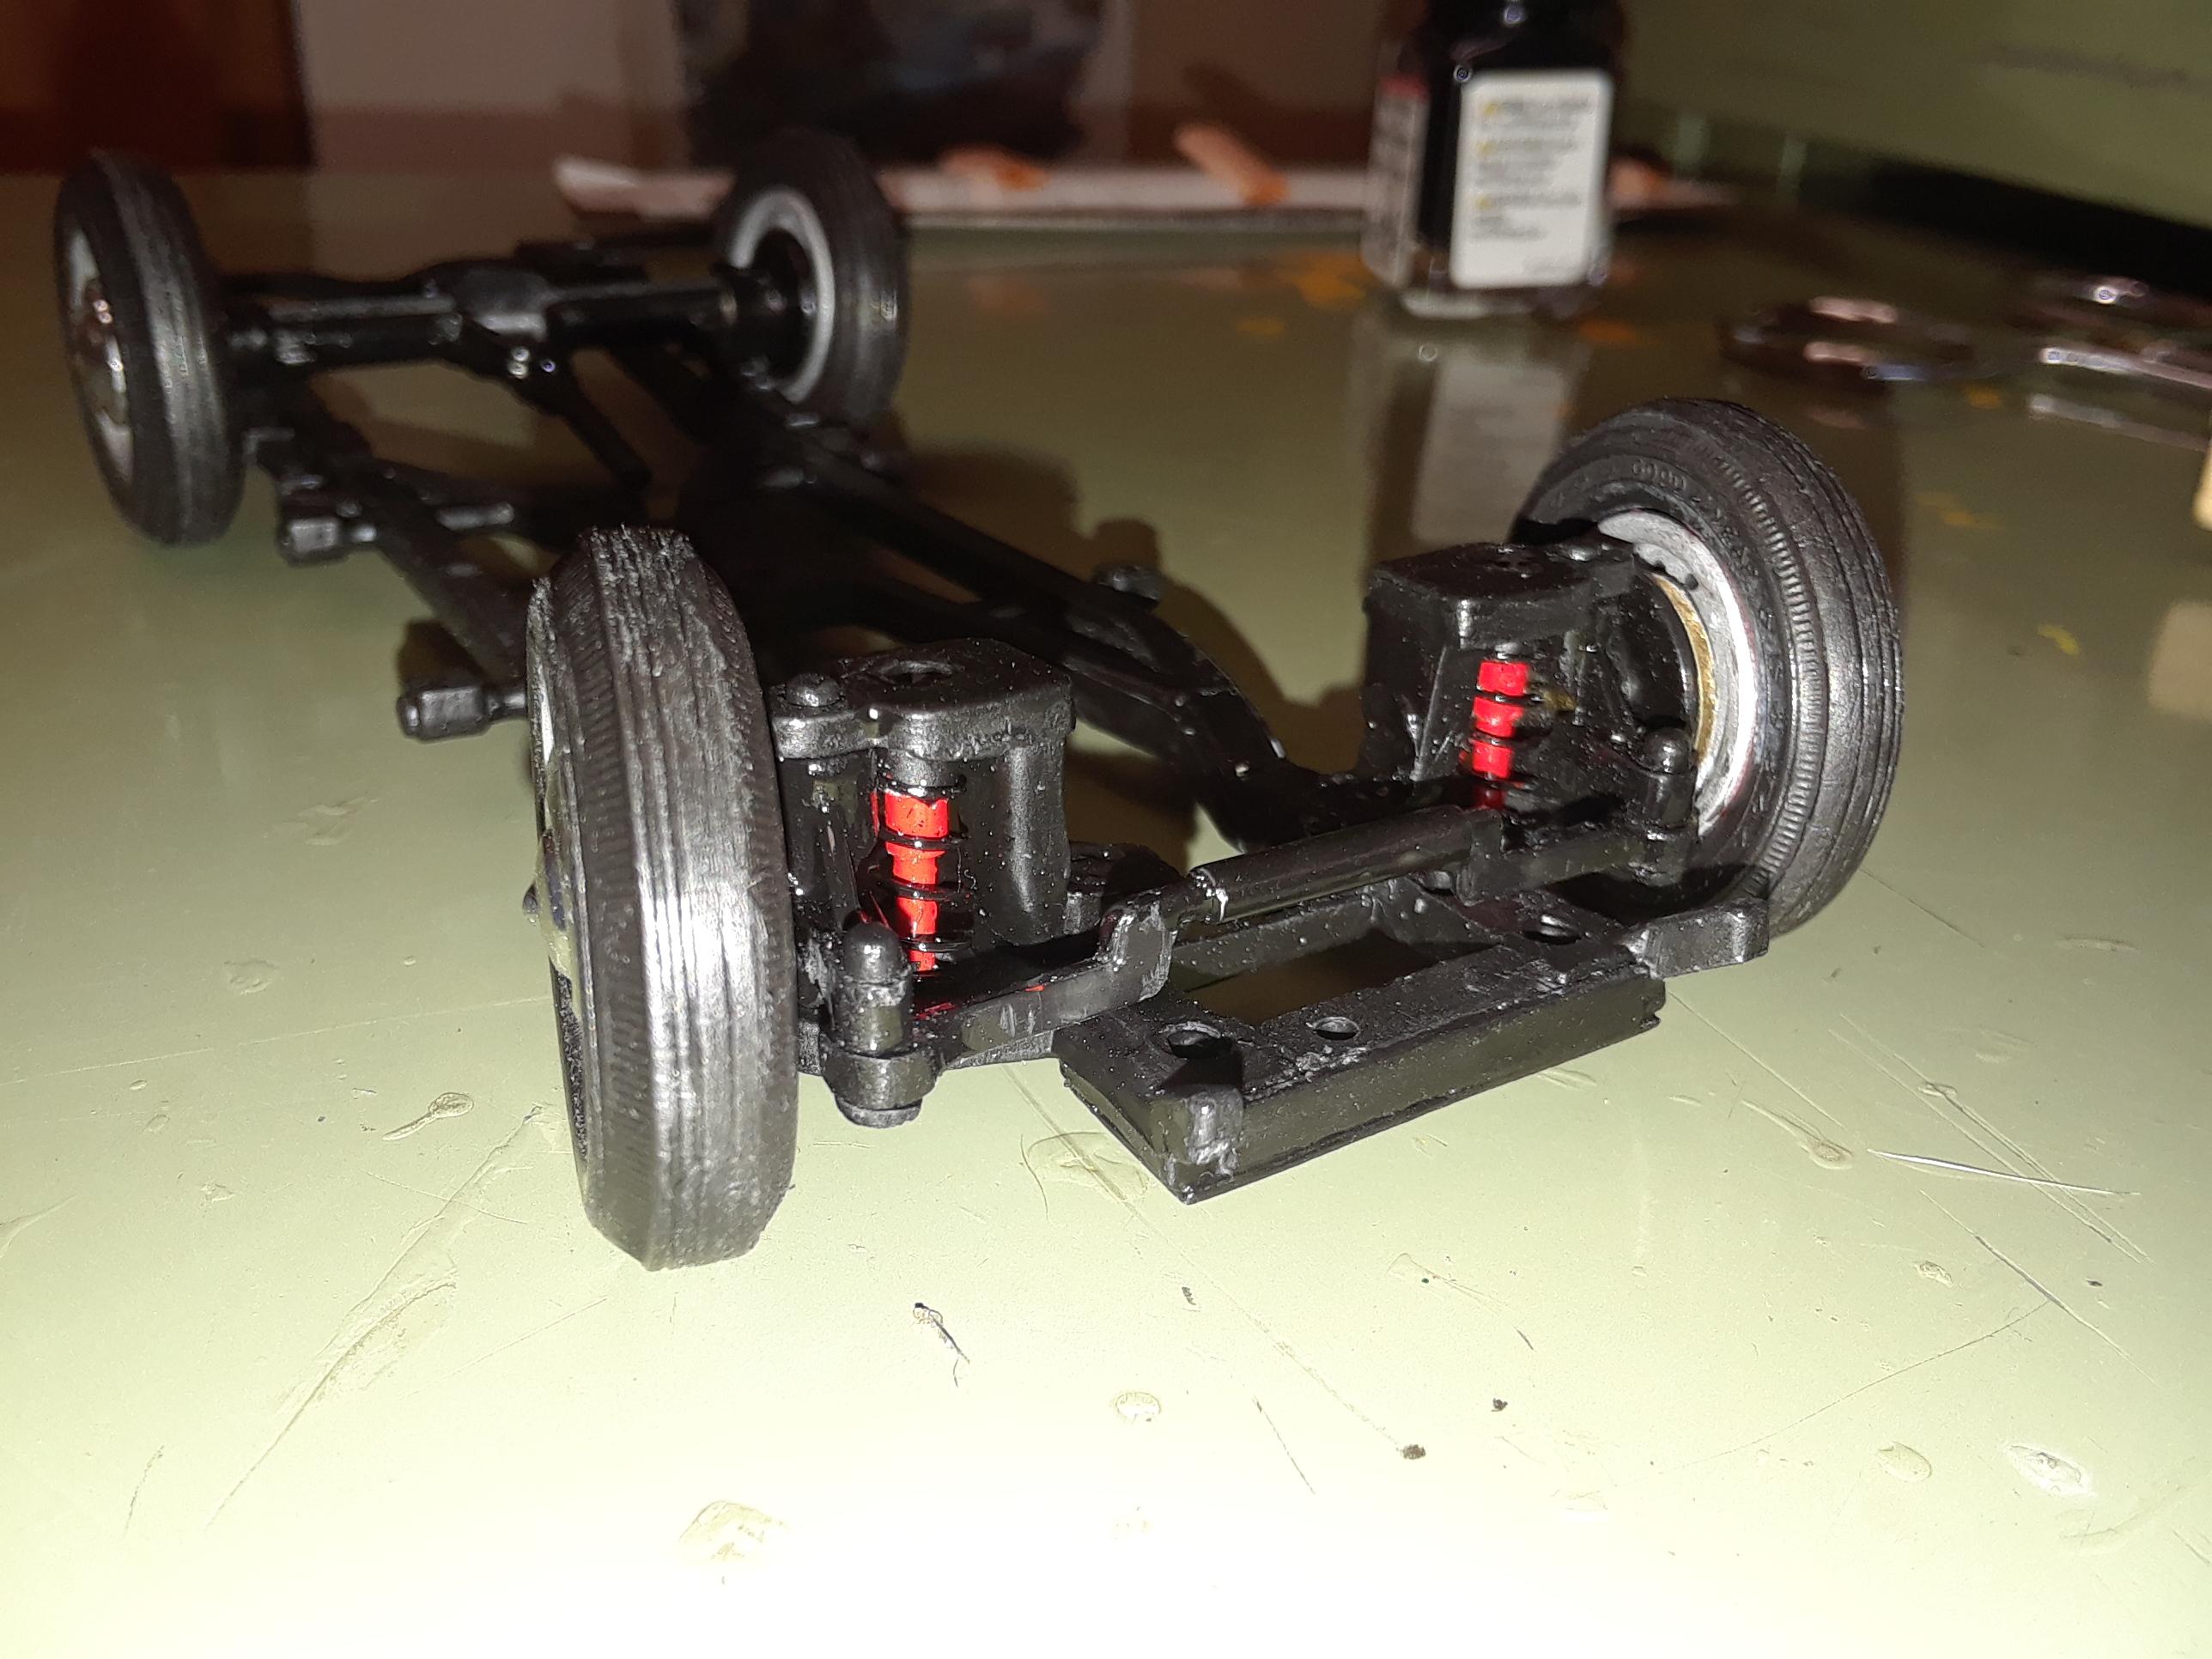
Thank you, Helmut! I've got 5 more TR3's to build. Each will use Saico chassis. Two with Gunze Sangyo bodies; one small mouth and one wide mouth 3A. Three will use Entex bodies. They're a closer fit to the Saico chassis, with slight wheelbase changes. For the Gunze replicas I've had to shorten the length of the floor pans, widen the floor slightly, narrow the track and reduce the wheelbase. They'll all have complete drive trains and poseable steering though. Big improvements to the interior of the Entex versions too. Attached photo is the small mouth Gunze, sitting on a Saico chassis. Work in progress..... The wheels are Gunze TR2 centers mated to 1973 vintage Revell H1374 '55 Chevy wheel backs and bias ply tires. The shock absorbers are brass tubing with ink pen coil springs. For this one I actually narrowed the front of the chassis as well. The hood is not cut open yet on this one but will be. I've done that for my other Gunze 3A and one of my Entex 3A's. It was slow, tedious work but turned out fine. The Saico firewall fits these bodies with minimal massaging.

-
Thank you, Tony! My first car was a TR4 I bought from my Dad while I was in high school. Still have it.
-
Thank you, Gary!! You're the best, my friend. ?