Anglia105E
-
Posts
3,487 -
Joined
-
Last visited
Content Type
Profiles
Forums
Events
Gallery
Everything posted by Anglia105E
-

'Forest Find' - Third and final upgrade...hopefully!!!!
Anglia105E replied to tiking's topic in Dioramas
Your dioramas take realism to another level Charles . . . This is by far the best work of yours that I have seen so far . . . There are several photos that you have posted where you would not know this was a scale model diorama . . . Wonderful to see. David -
Okay, I see . . . I presumed (wrongly) that you had moved your model building space out to the heated building from your basement corner. David
-
That is precisely the sort of outdoor building I would like to have as a model car building workshop, and yours looks great . . . Having built the 1:1 scale version of the workshop, I am sure that you can replicate this structure in 1:64 scale . . . David
-
1:32 Scale Hooper & Co. Coachbuilders ( 1930's )
Anglia105E replied to Anglia105E's topic in WIP: Dioramas
Thanks David G. . . . The composition is now in need of further imaginative thinking on my part ! David W. -
1:32 Scale Hooper & Co. Coachbuilders ( 1930's )
Anglia105E replied to Anglia105E's topic in WIP: Dioramas
Yes, I would agree Paul . . . and the fourth shot by comparison shows that the additional lighting from the passenger side of the car is unecessary from a realism point of view. Thanks for the comment, and I shall continue to explore the possibilties with this composition . . . David -
1:32 Scale Hooper & Co. Coachbuilders ( 1930's )
Anglia105E replied to Anglia105E's topic in WIP: Dioramas
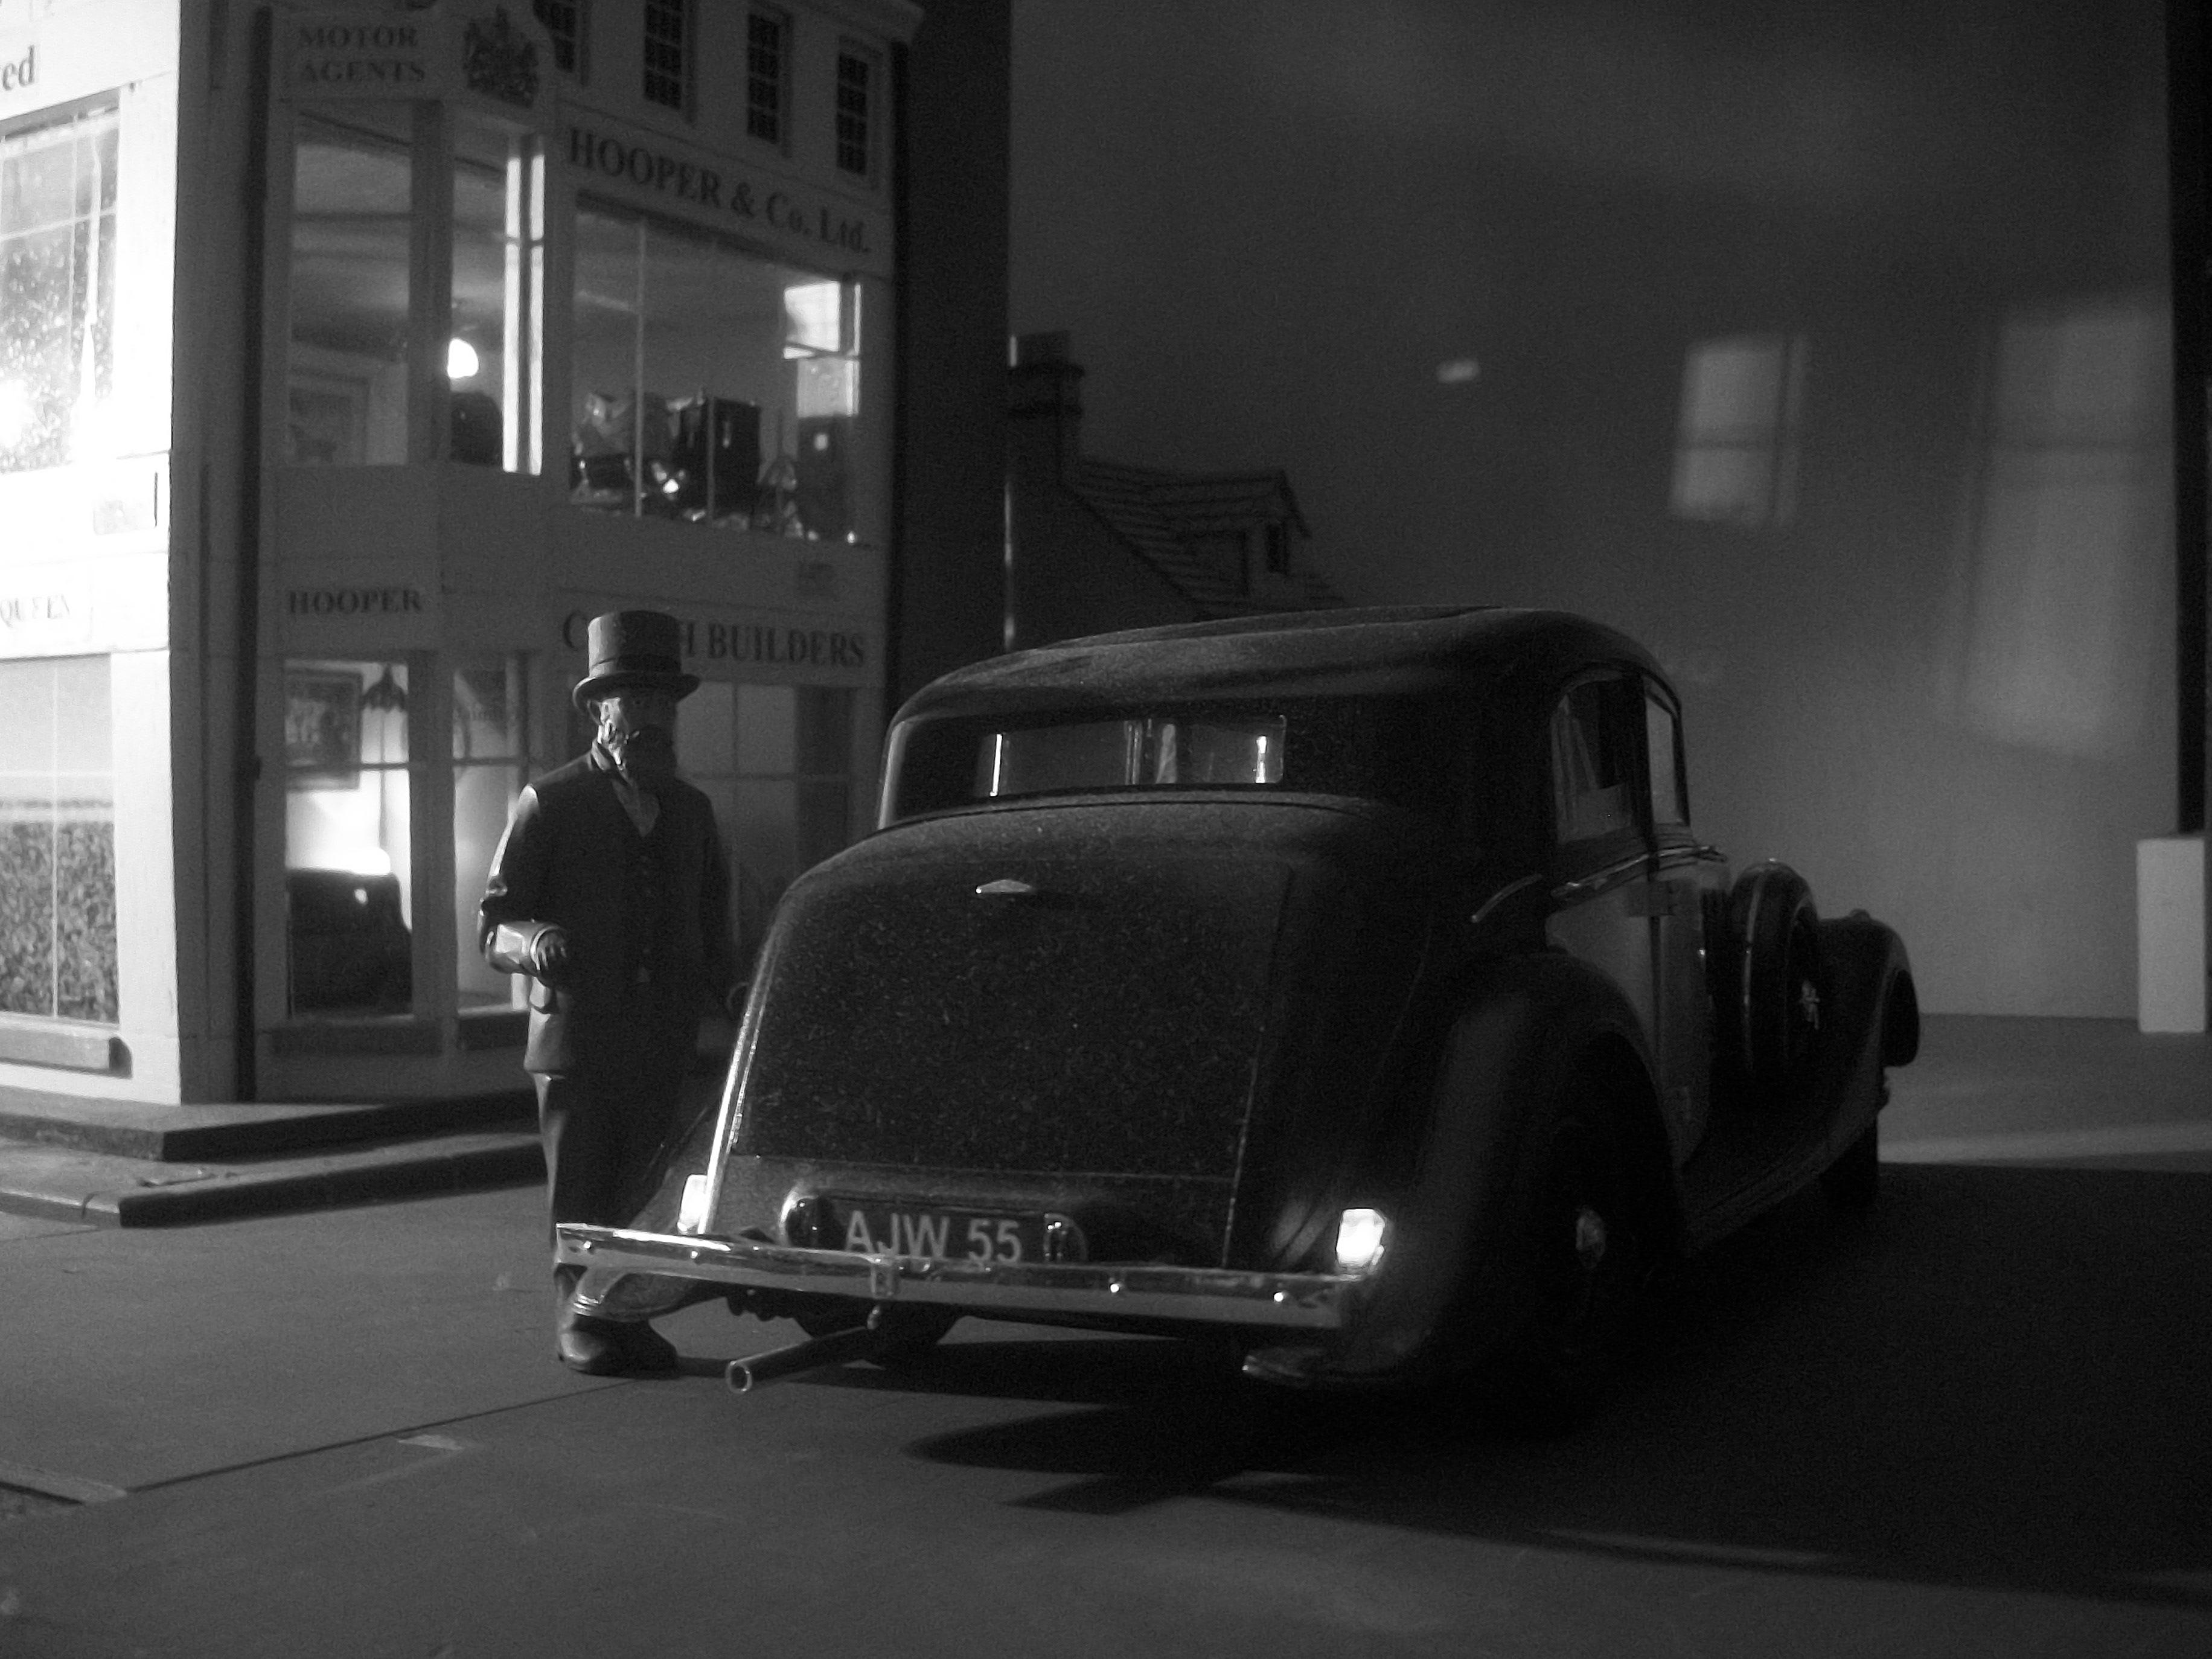
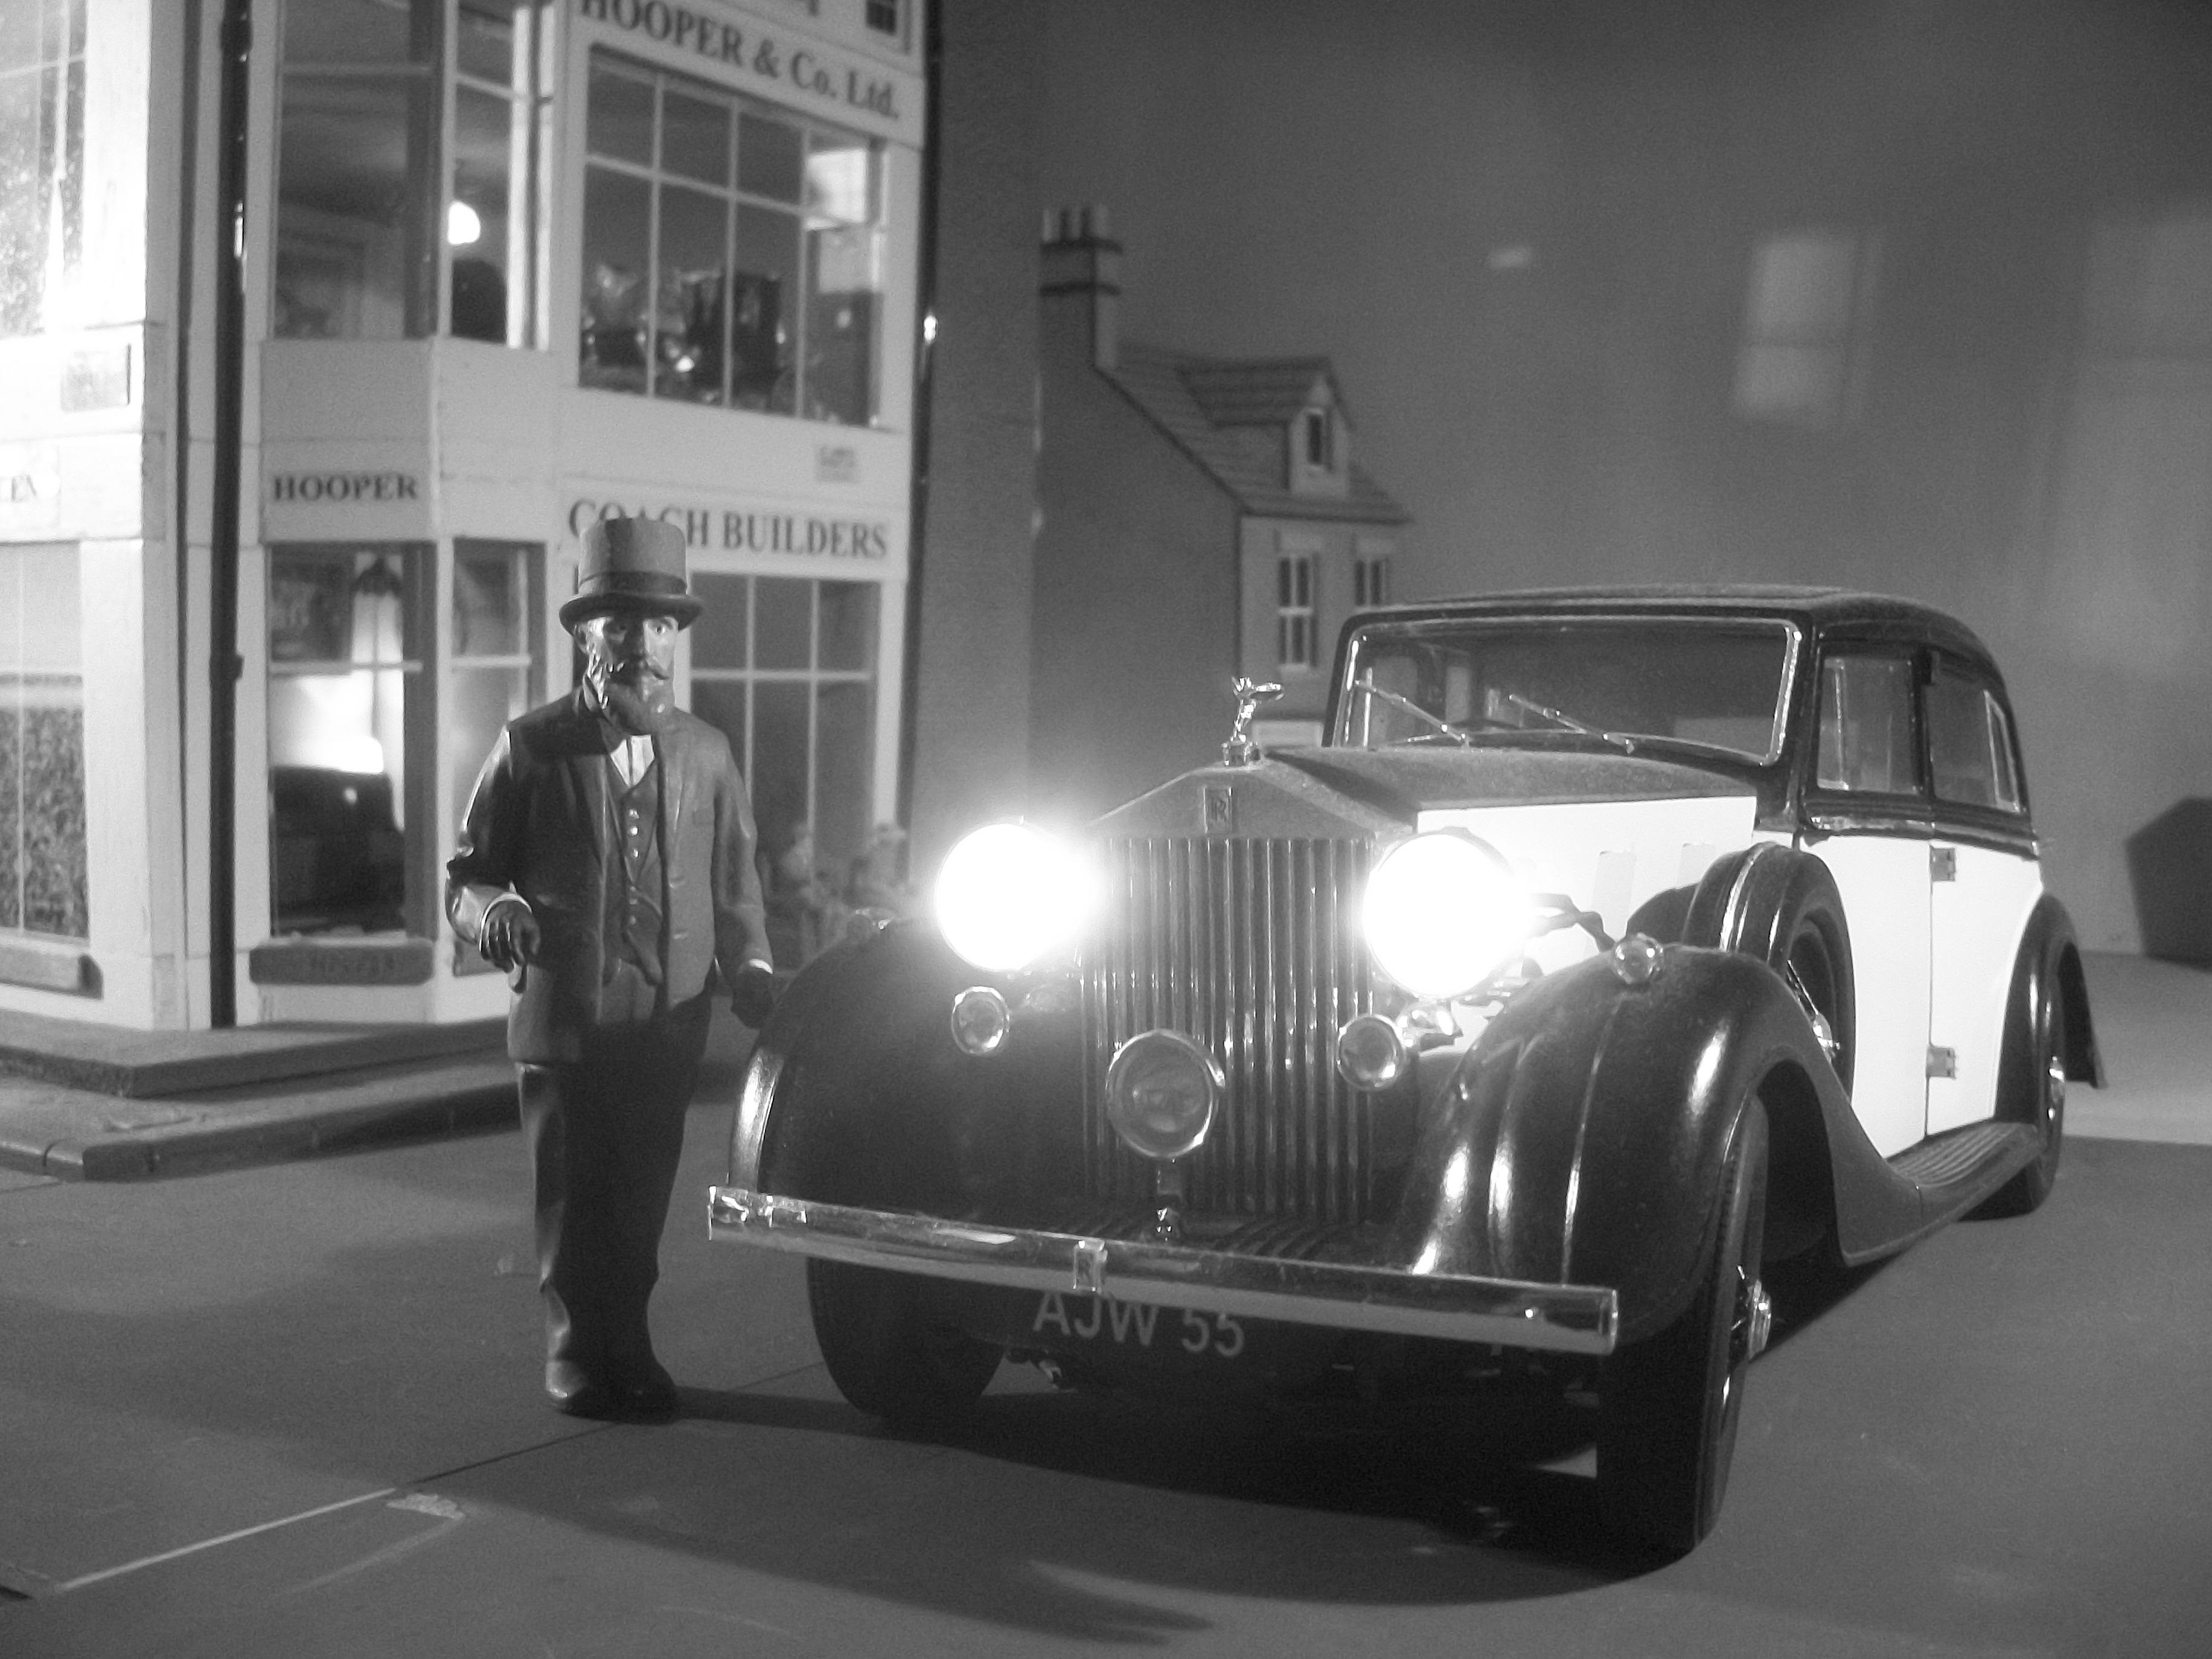
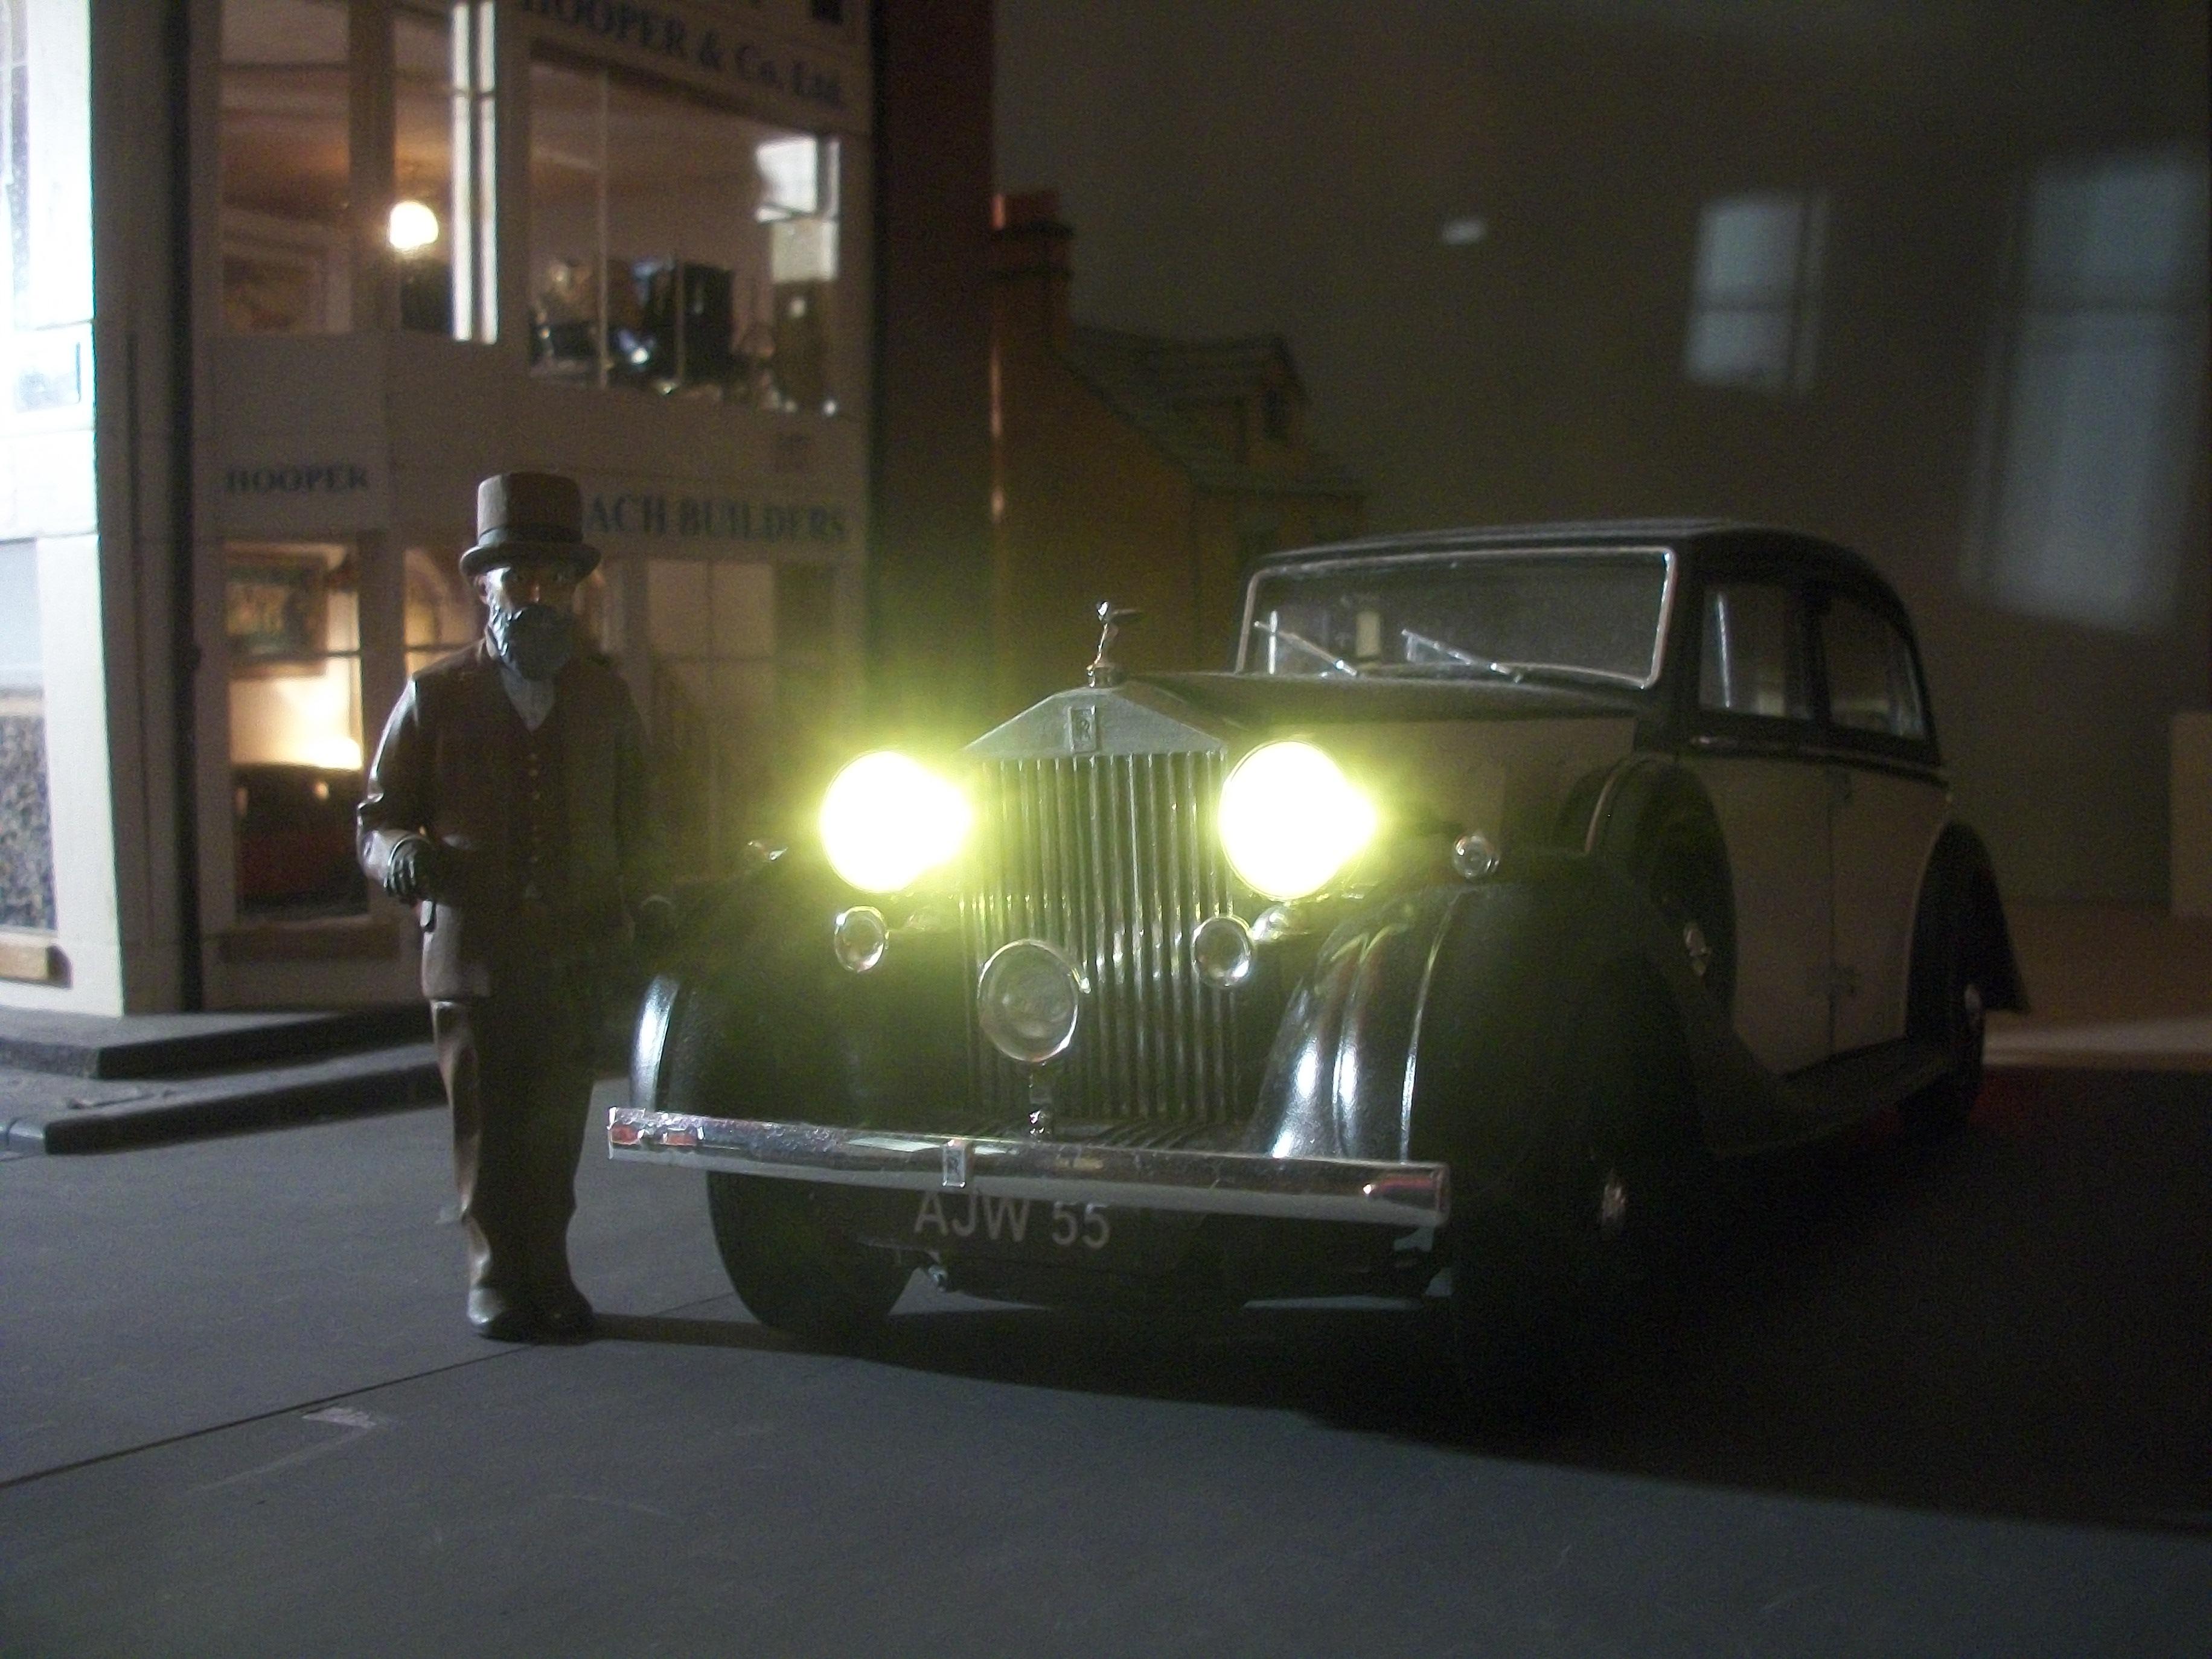
Due to a recent spell of bad weather here in UK lasting five consecutive days, which prevented me from flying the drone, I found time to clear some space on my workbench . . . This enabled me to experiment further with the 1:32 scale Hooper & Co. diorama. I have moved the lighting source behind the position of the building so that the camera is shooting towards the light. The 1:16 scale Phantom III model car is in the foreground, along with the Arthur J. Webb figure . . . There are lights on inside the Hooper showrooms, as well as having the Phantom III headlights switched on. Here are four B&W photos and two colour photos, showing the changes made to the lighting setup . . . David
-
1:32 Scale Hooper & Co. Coachbuilders ( 1930's )
Anglia105E replied to Anglia105E's topic in WIP: Dioramas
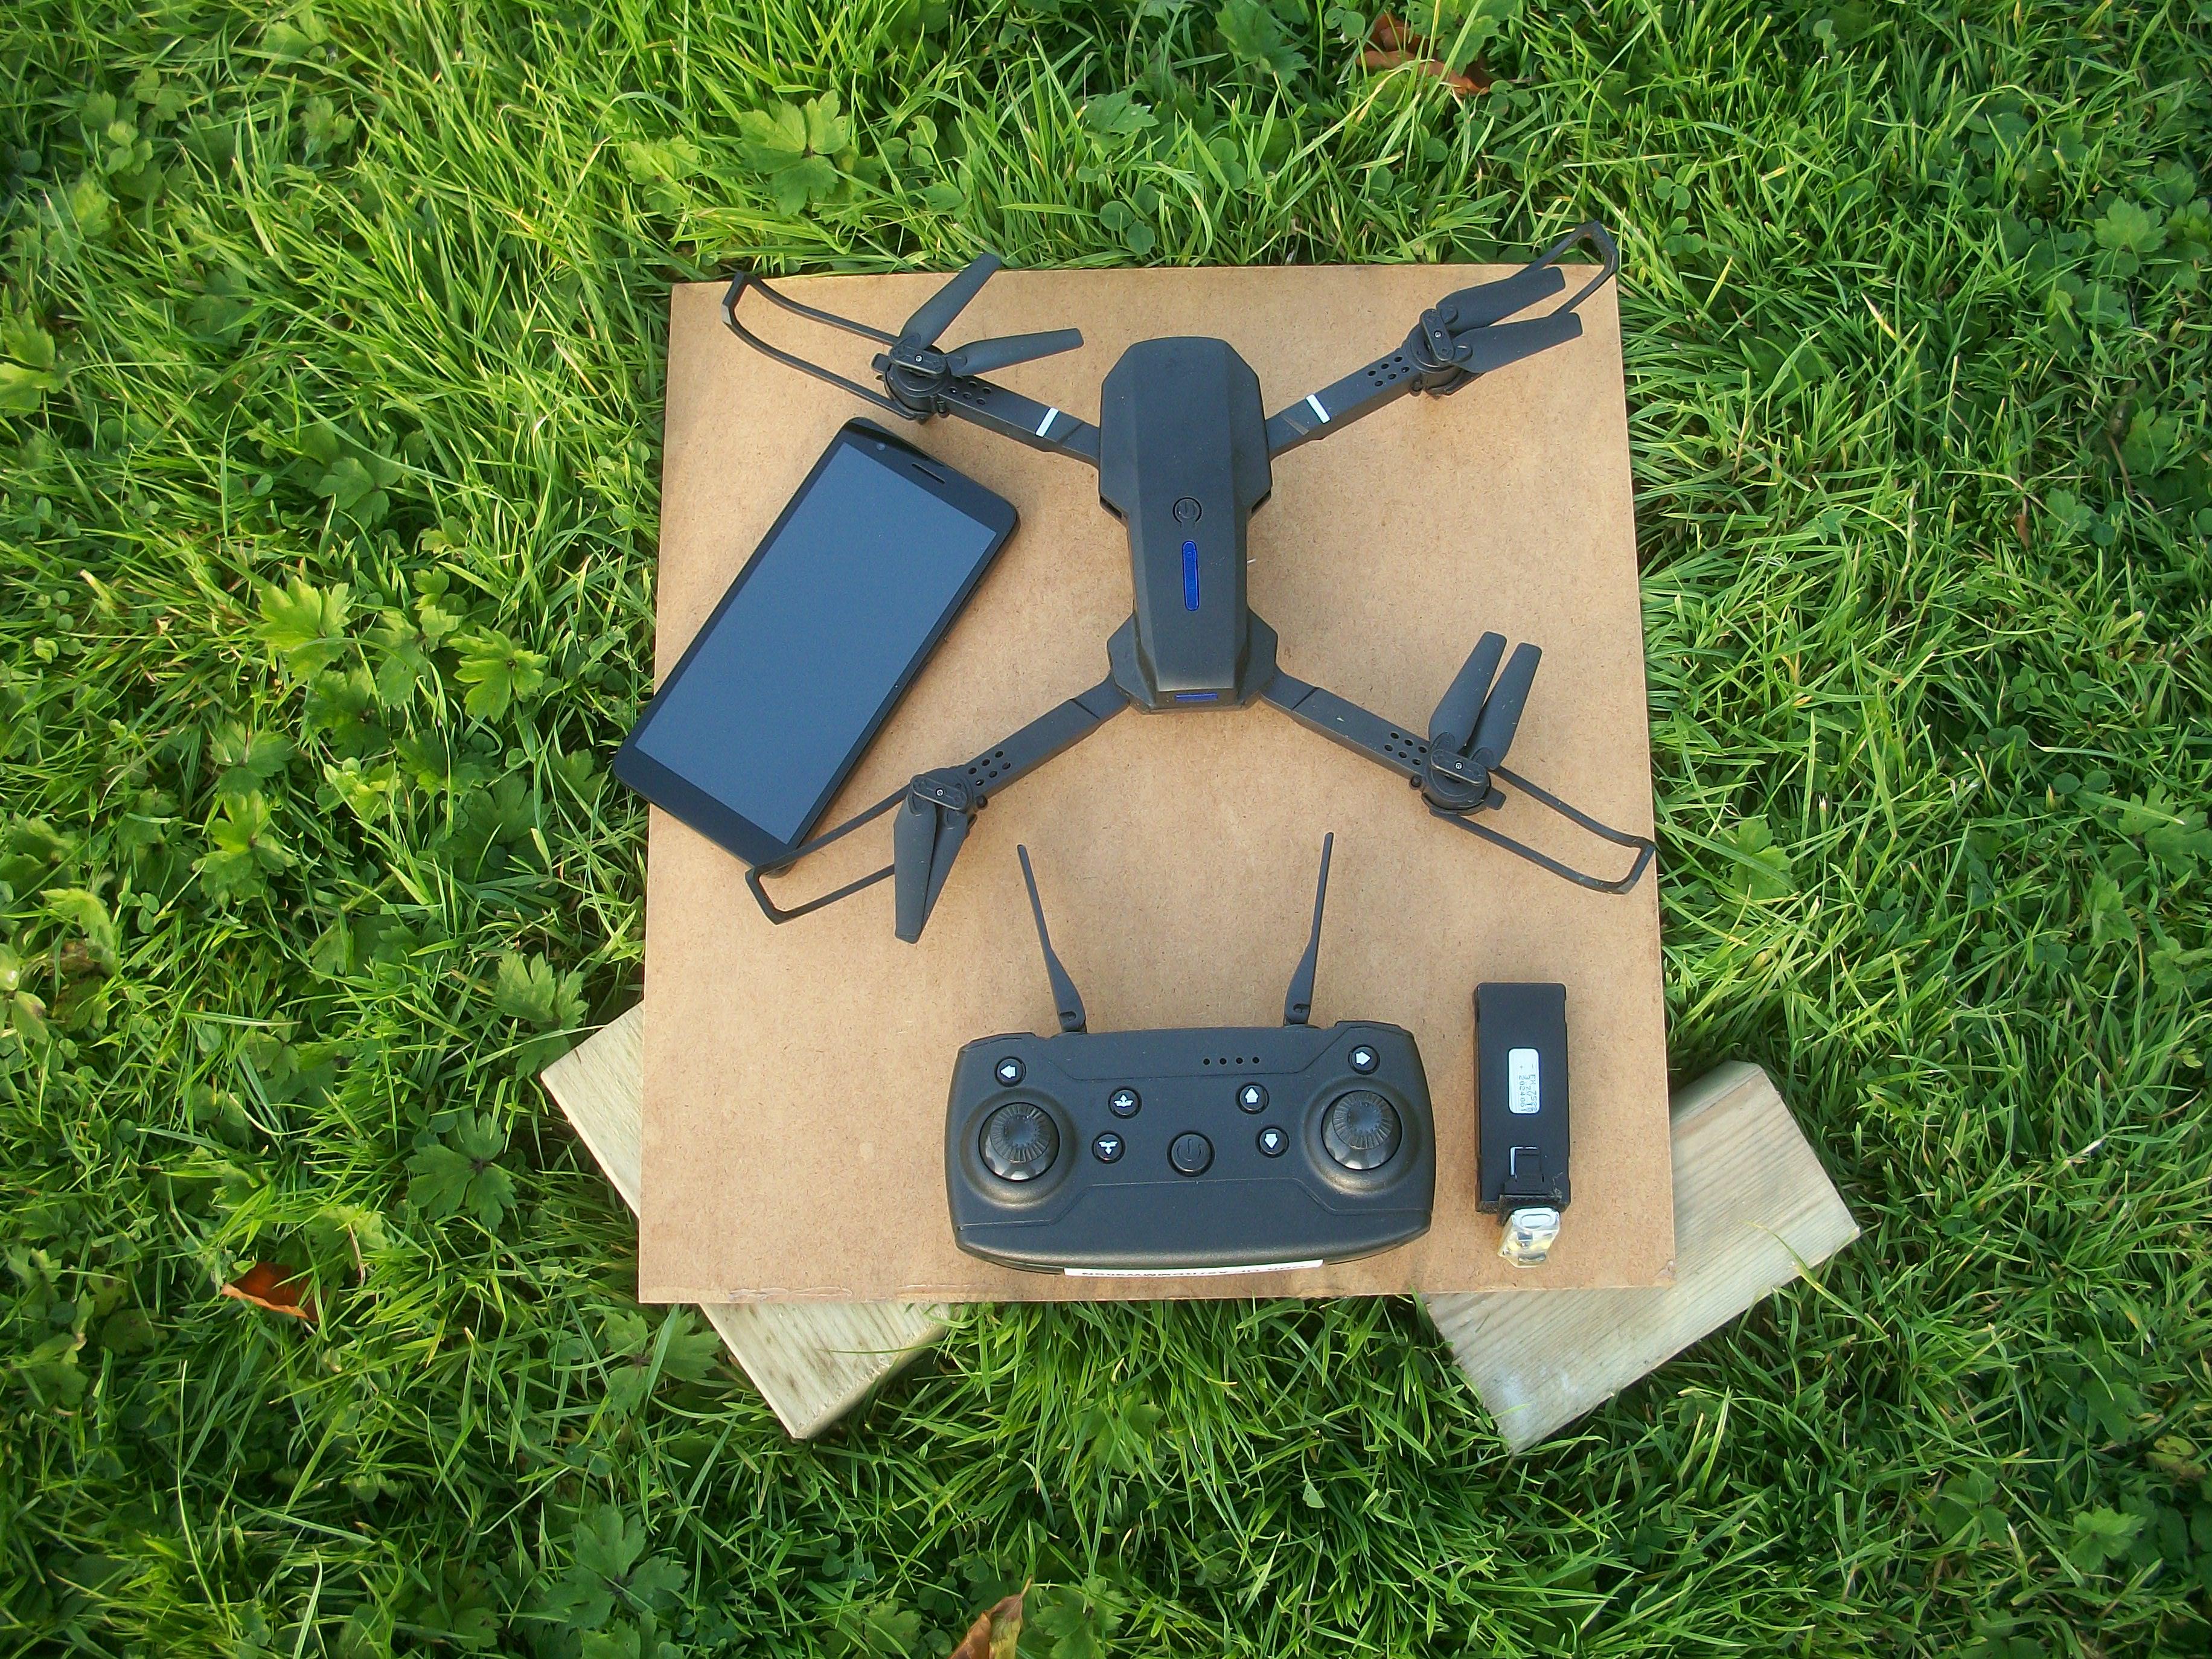
Yes, I can understand why there are as many folks who don't like drones as there are who do like them . . . You have the seriously bad use of drones, such as in the Ukraine - Russian war, and then you have such good uses as finding lost people or locating criminals. My drone cost me £14.75 on Ebay, which is only US$ 19.49 and free delivery too. I cannot afford to pay £359.00 for a real DJI drone ( US$ 474 ) David W. -
1:32 Scale Hooper & Co. Coachbuilders ( 1930's )
Anglia105E replied to Anglia105E's topic in WIP: Dioramas
Well David, like you I am hovering between two or three different projects at the moment . . . Your Aoshima FX-4 build is very interesting, and some time ago I attempted to convert an FX-4 London Taxi Cab into an ealier FX-3 taxi cab. This was using a 1:24 scale Tamiya Toyoda kit, which is surprisingly similar to the FX-3 taxi cab, here is the link https://www.tamiya.com/english/products/24339/index.html . . . That particular build fought me all the way for too long, and I gave up on it, eventually abandoning the whole idea . . . I find your Black Widow build interesting also, because alongside my model cars and dioramas projects I am playing around with a drone project. This is a cheap and smaller copy of a DJI Mavic drone, and I am curious about the technology, so learning to fly the aircraft as well as understanding how it all works . . . Using a local sports field that is only five minutes walk from my home, I have managed to enjoy some good flights, and during the process I have lost the drone three times now. Each time I was lucky to recover the drone, thanks to flashing white LED lights on the front, and a flashing red strobe light on the rear . . . See photo below. David W.
-
1:32 Scale Hooper & Co. Coachbuilders ( 1930's )
Anglia105E replied to Anglia105E's topic in WIP: Dioramas
Thanks David G., and I agree that for 1938 it is a good idea to go with B&W photos . . . May I ask what are you working on yourself at the moment ? David W. -
1:32 Scale Hooper & Co. Coachbuilders ( 1930's )
Anglia105E replied to Anglia105E's topic in WIP: Dioramas
Returning to the workbench, I spent some time moving things around and taking a fresh look at the composition from a photographic point of view. The first of the two following photos is the colour version and the second one has a B&W filter applied . . . My feeling is to go with black & white. Thanks for stopping by guys . . . David
-
1/24 1955 Mille Miglia 300SLR, 300 SL and 180 D
Anglia105E replied to smartdriver's topic in WIP: Dioramas
Here is a link for you Harald . . . I thought you would like to see this short piece of film, at Monza in 1955. https://www.youtube.com/watch?v=hRgkiYdqJ2U David -
1:32 Scale Hooper & Co. Coachbuilders ( 1930's )
Anglia105E replied to Anglia105E's topic in WIP: Dioramas
Sorry guys, but due to recent illness this project has unfortunately stalled . . . Pending ongoing recovery, I shall try to get back to this diorama . . . David -
1:32 Scale Hooper & Co. Coachbuilders ( 1930's )
Anglia105E replied to Anglia105E's topic in WIP: Dioramas
Many thanks David, and nice to hear from you again . . . I shall certainly try that technique, by reducing the zoom and backing off with the camera. At the beginning of this topic I did mention that the year of this diorama will be around 1935 or 1936, but of course the Phantom III in the foreground wasn't produced until 1937 . . . Keeping that in mind, this diorama depicts the year 1938. David W. -
1:32 Scale Hooper & Co. Coachbuilders ( 1930's )
Anglia105E replied to Anglia105E's topic in WIP: Dioramas
You are absolutely right there Paul . . . The depth of field is indeed the main issue, and forced perspective cannot work unless the depth of field is set up so that both foreground and background are in focus. I am able to use manual settings with the Nikon DSLR camera, or I can use the ' Auto ' setting, as shown in the above photos . . . The Kodak camera cannot do fancy manual settings, so that one is more or less point and shoot . . . David -
1:32 Scale Hooper & Co. Coachbuilders ( 1930's )
Anglia105E replied to Anglia105E's topic in WIP: Dioramas
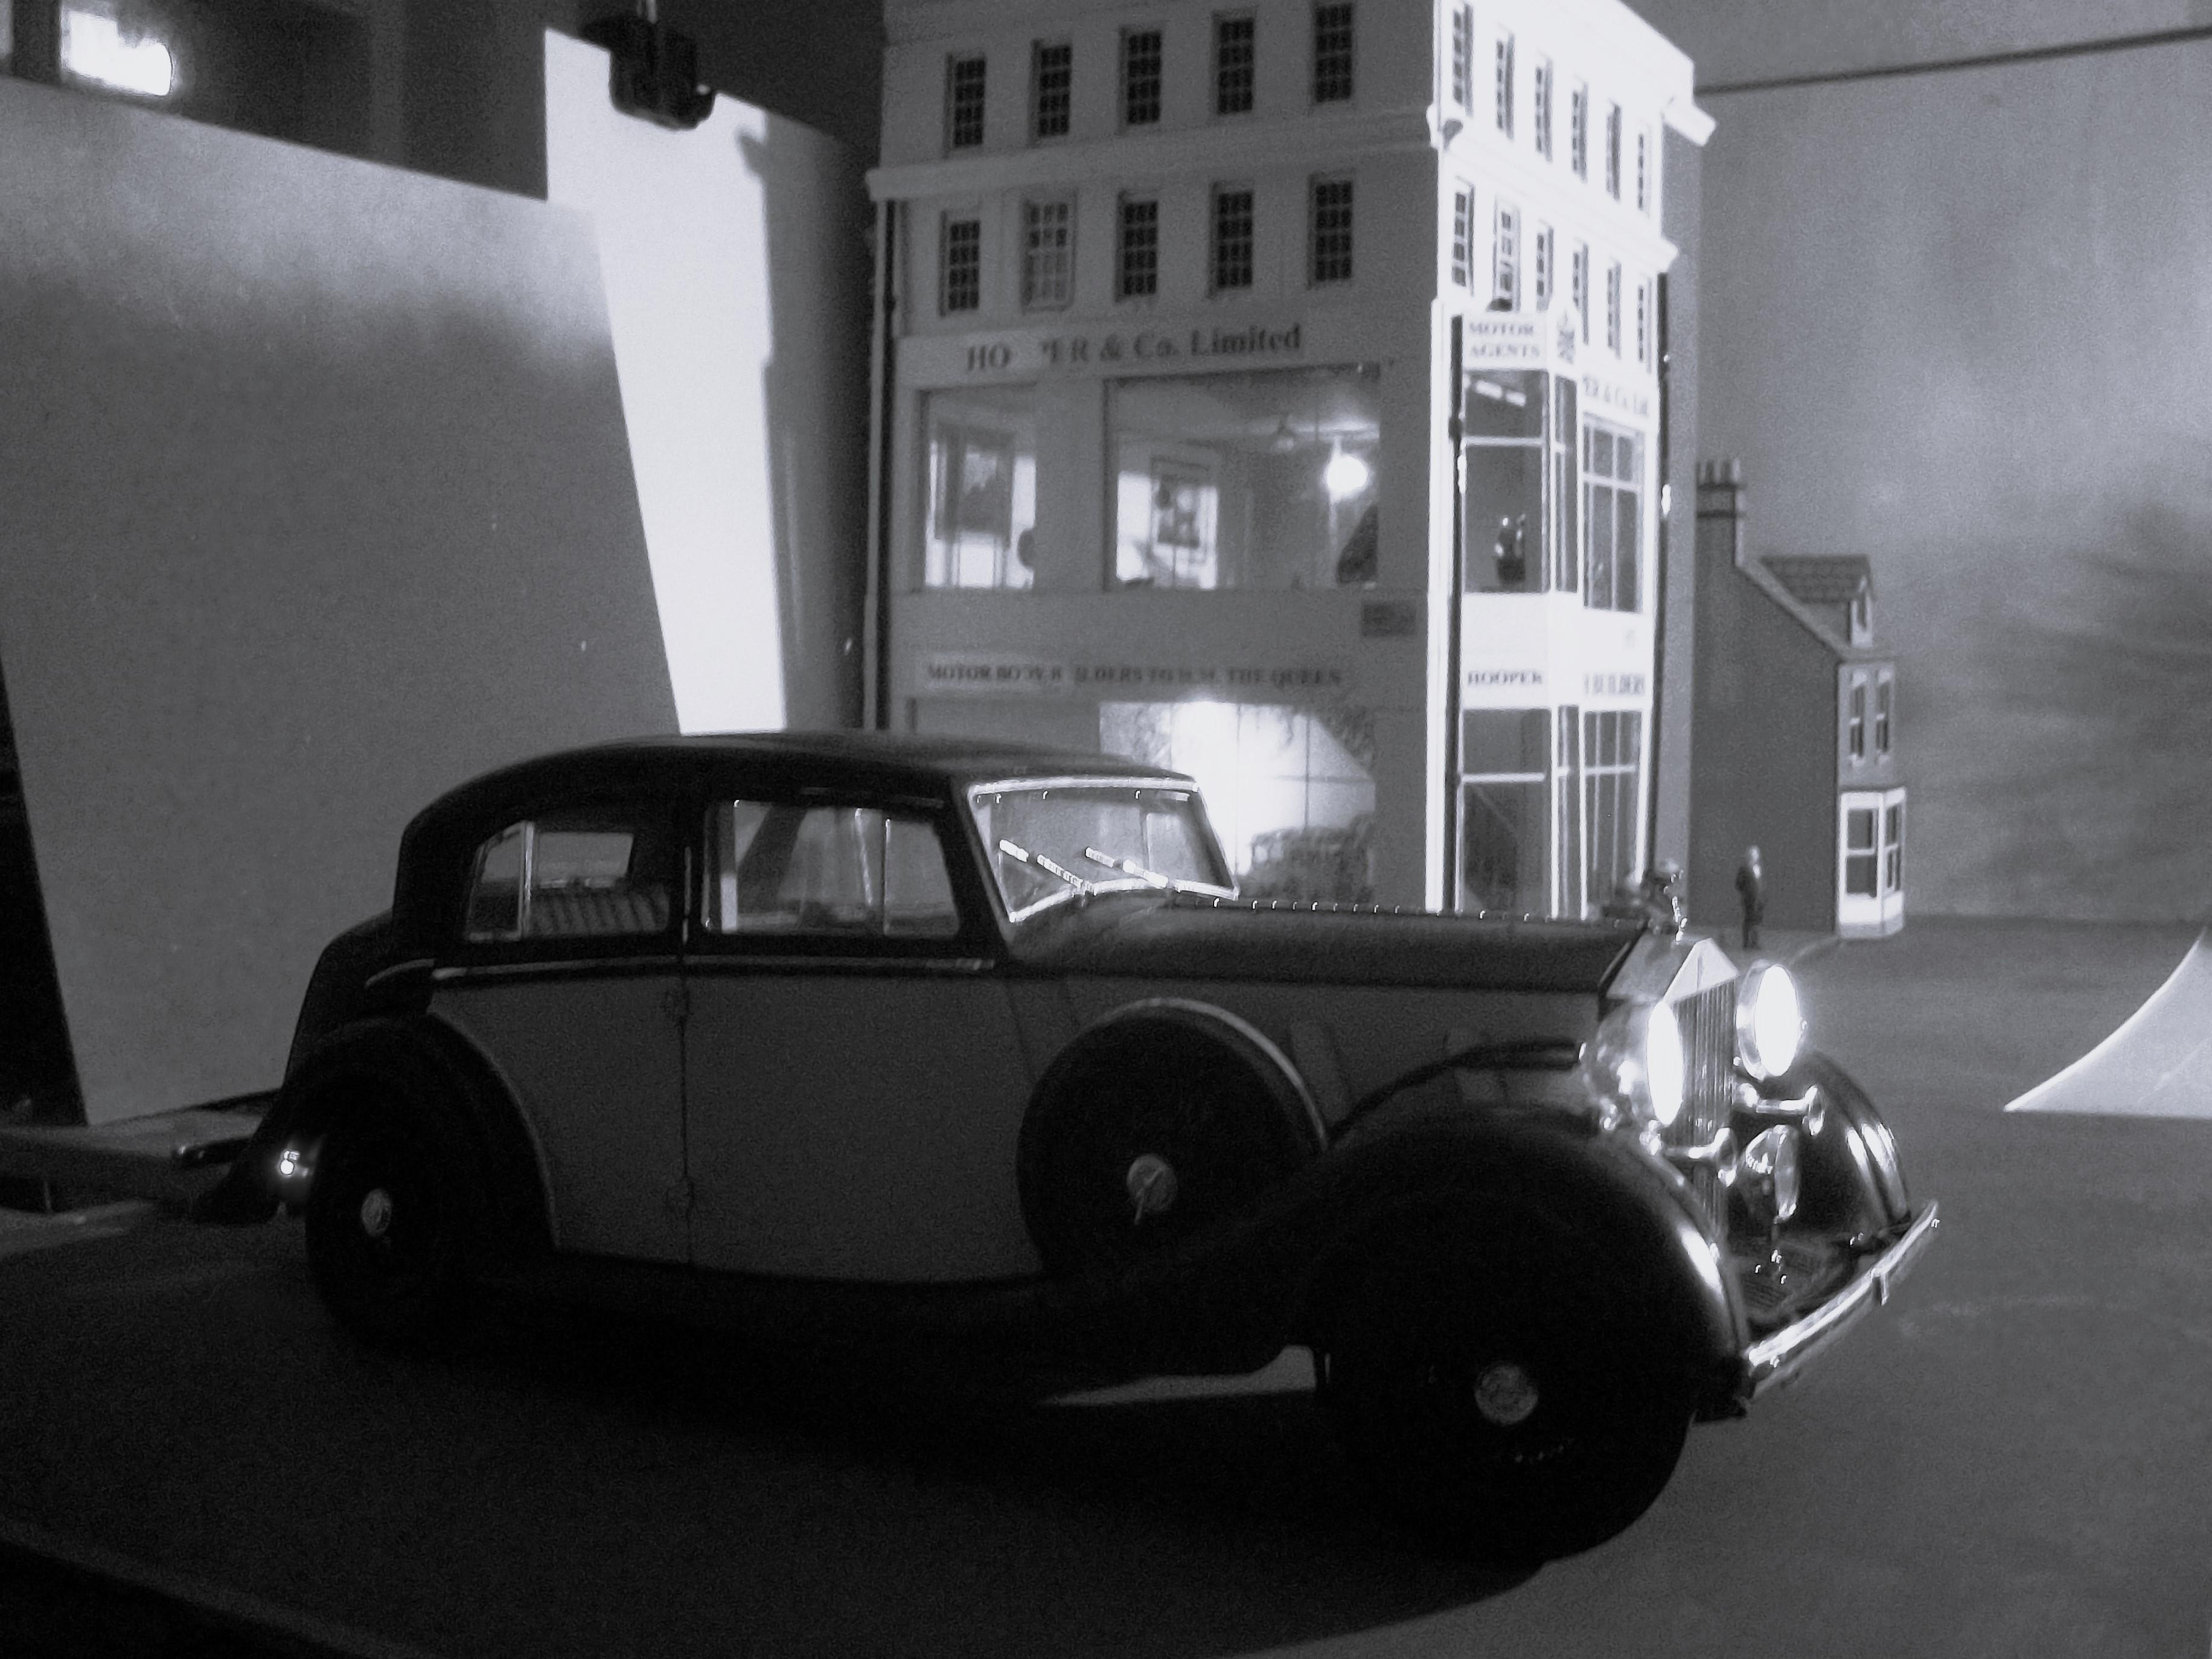
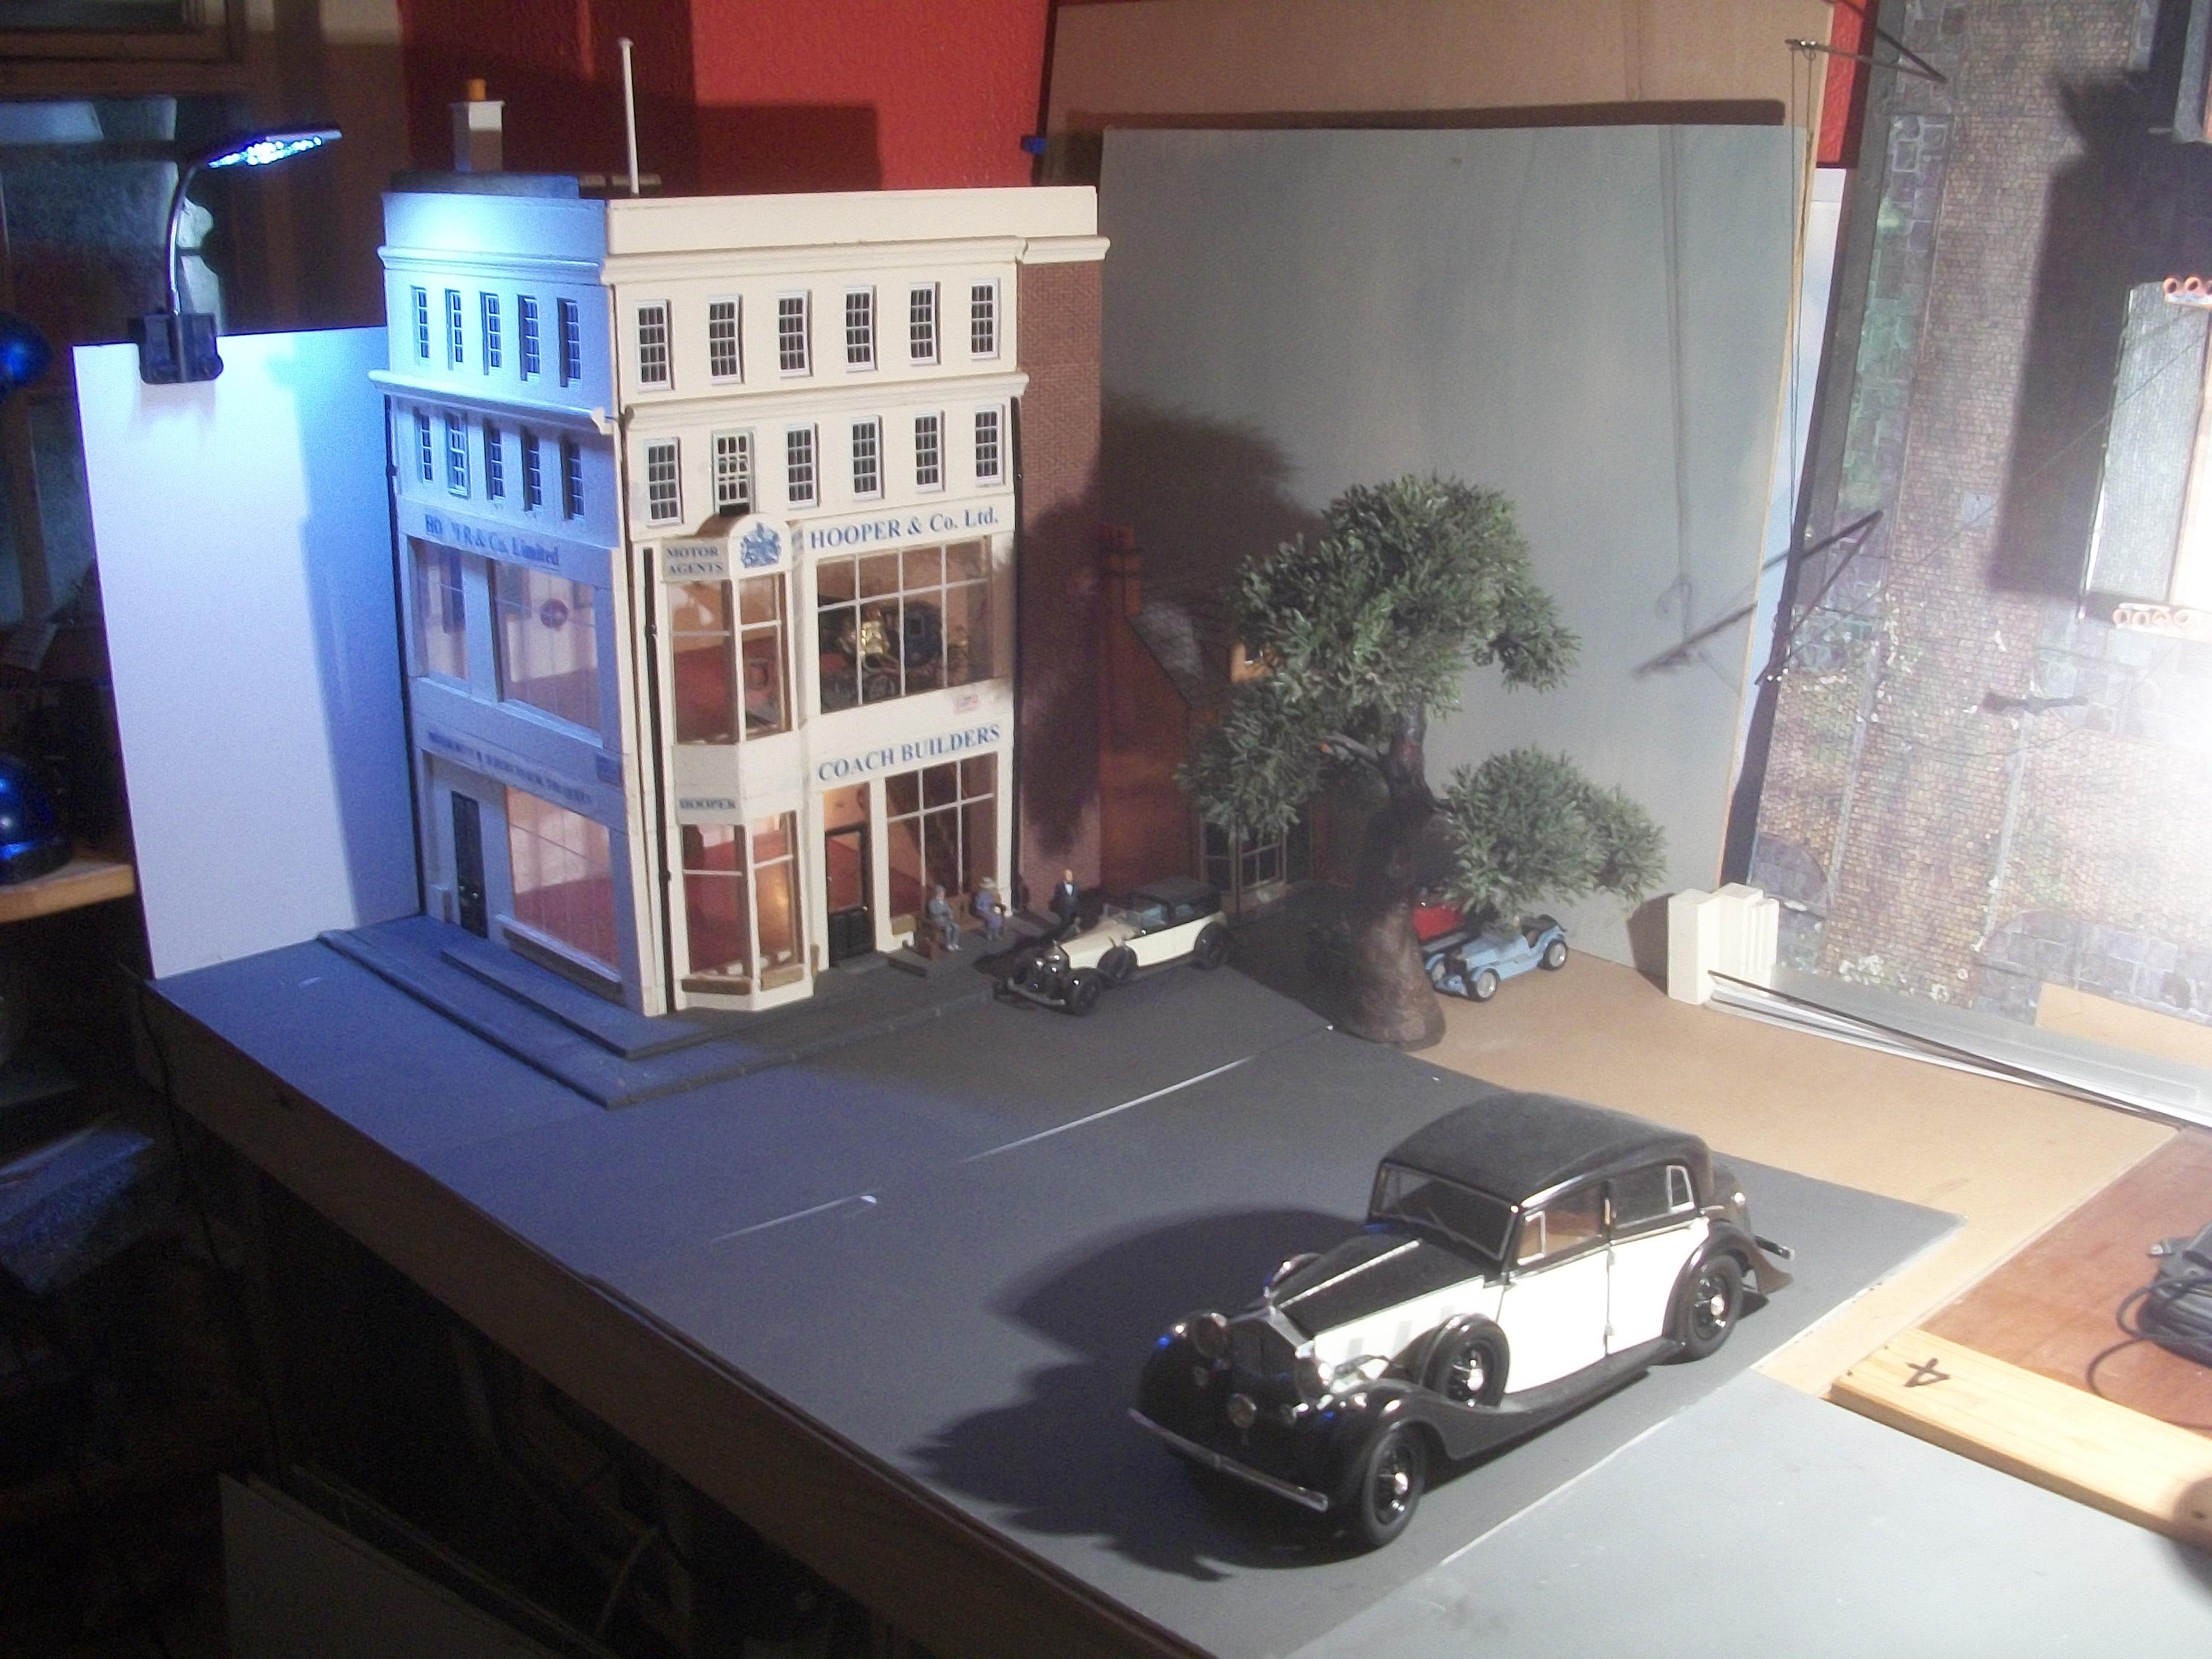
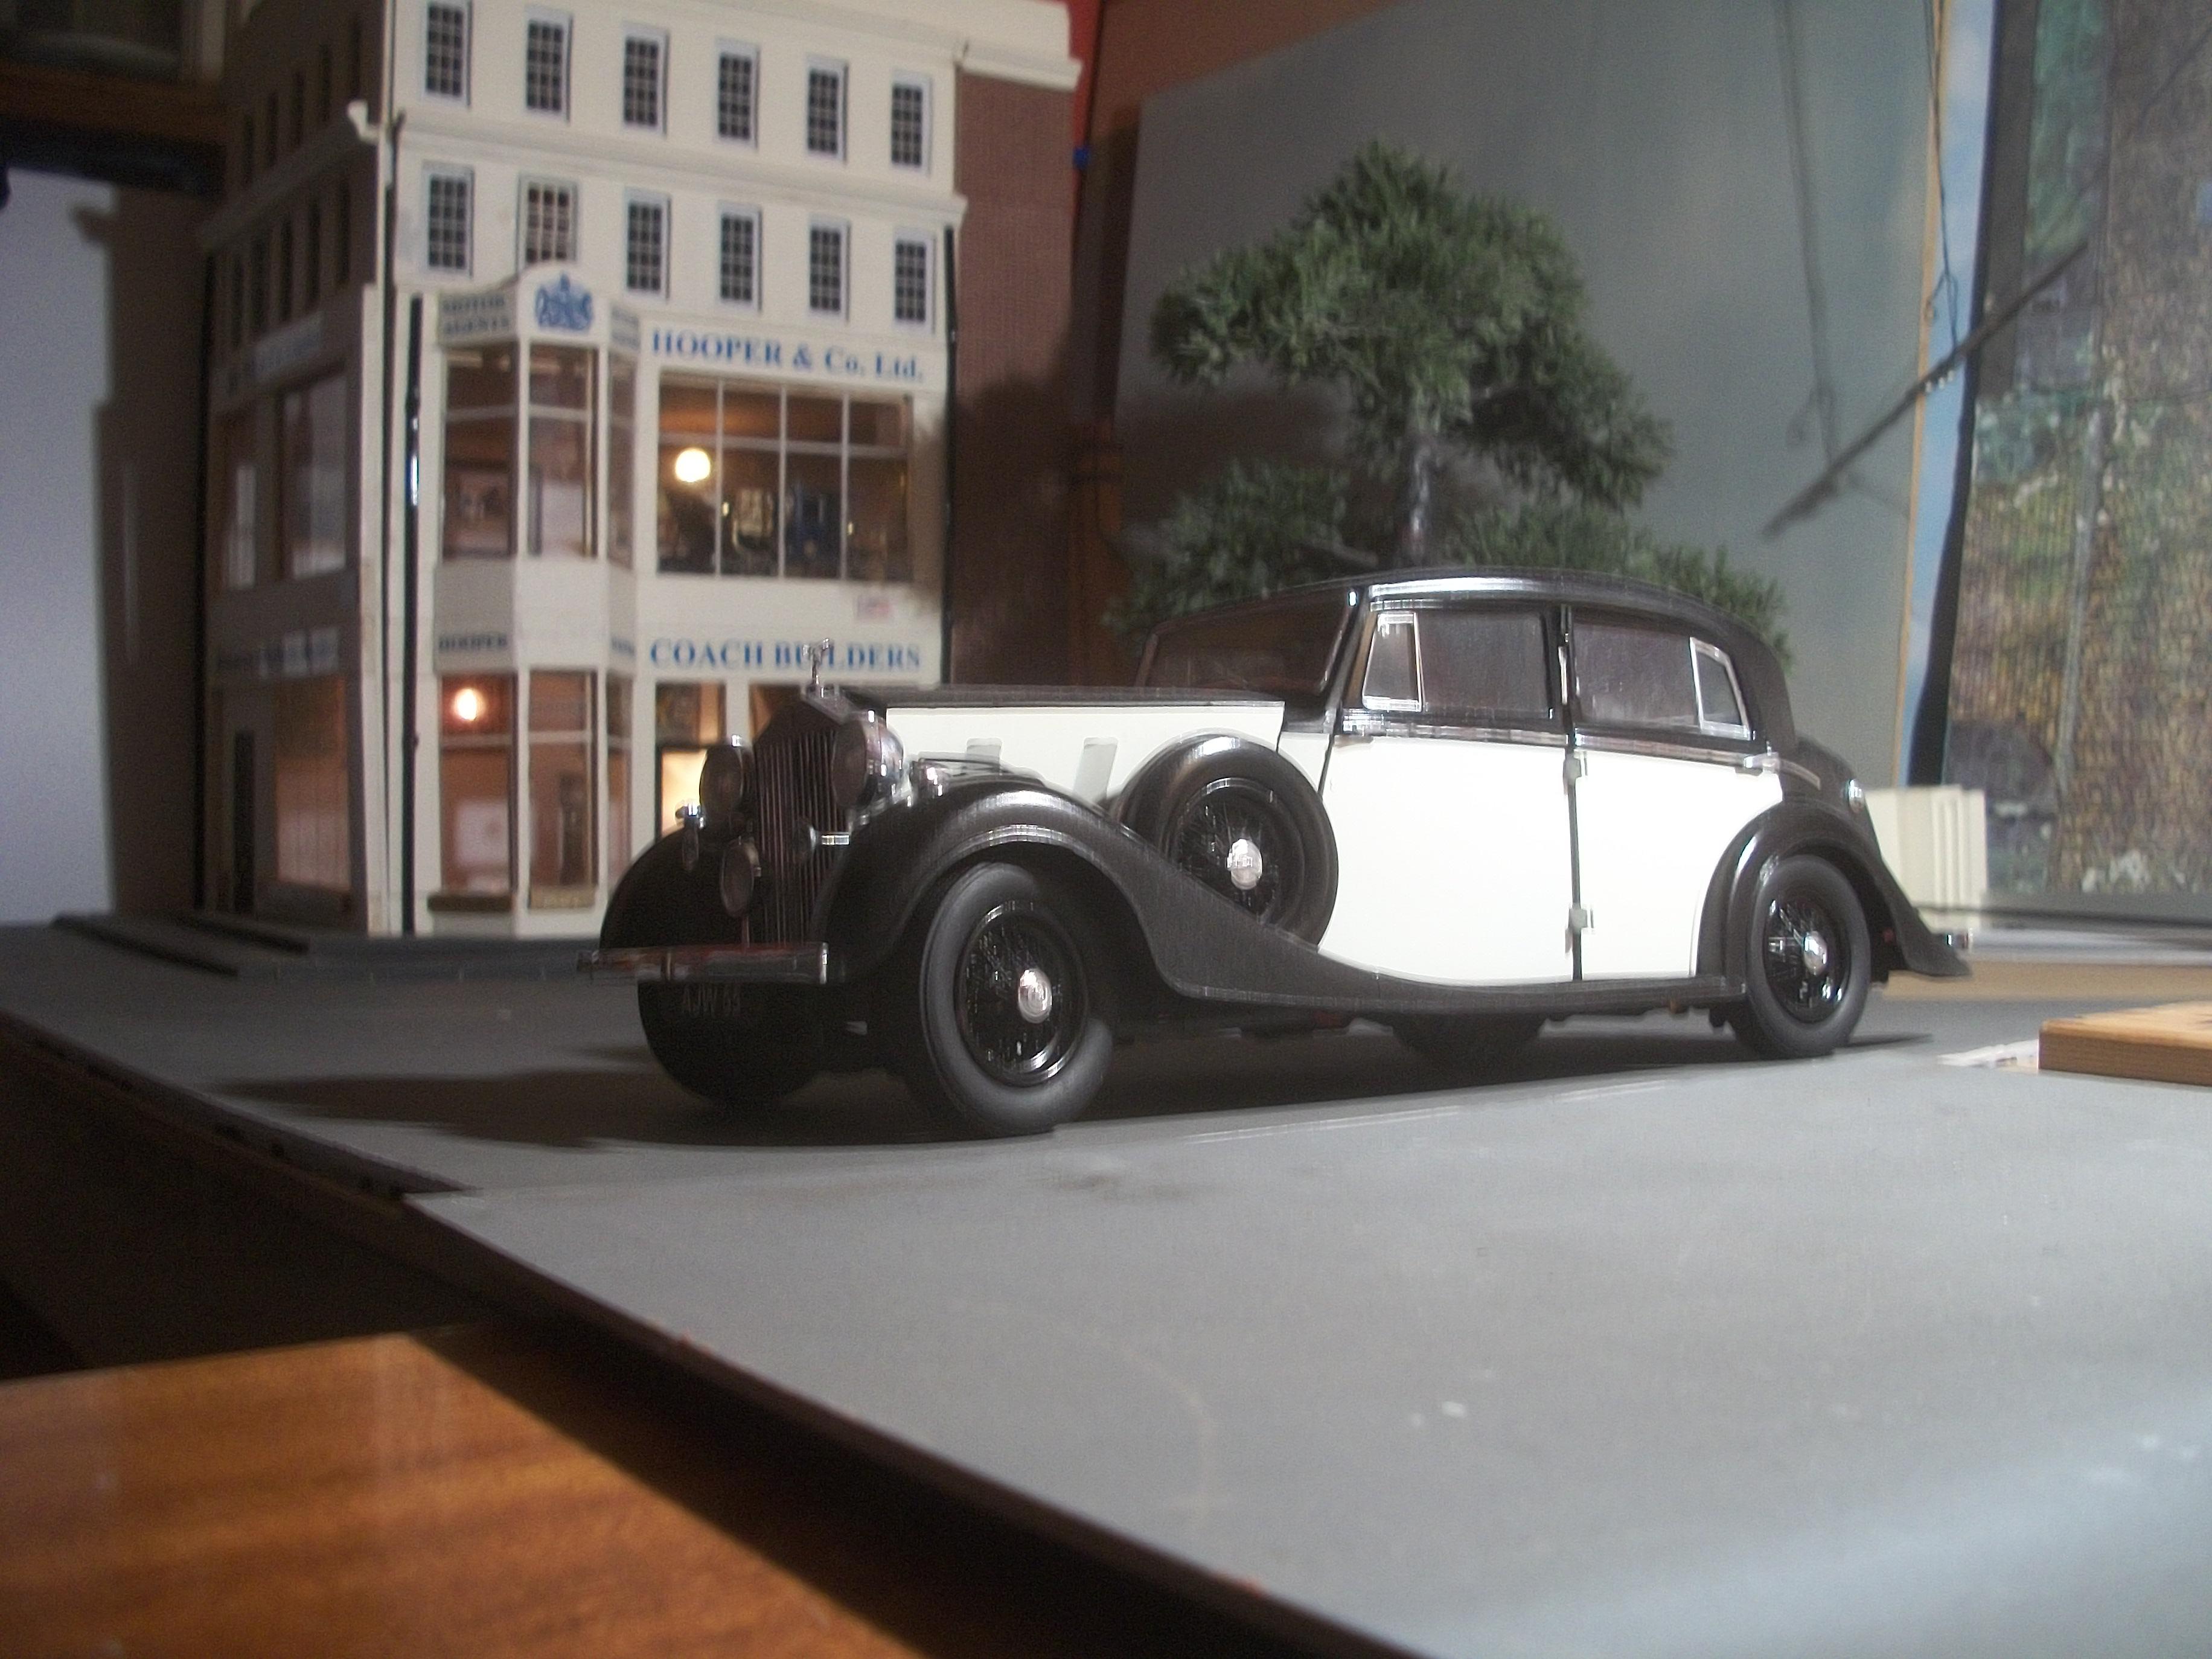
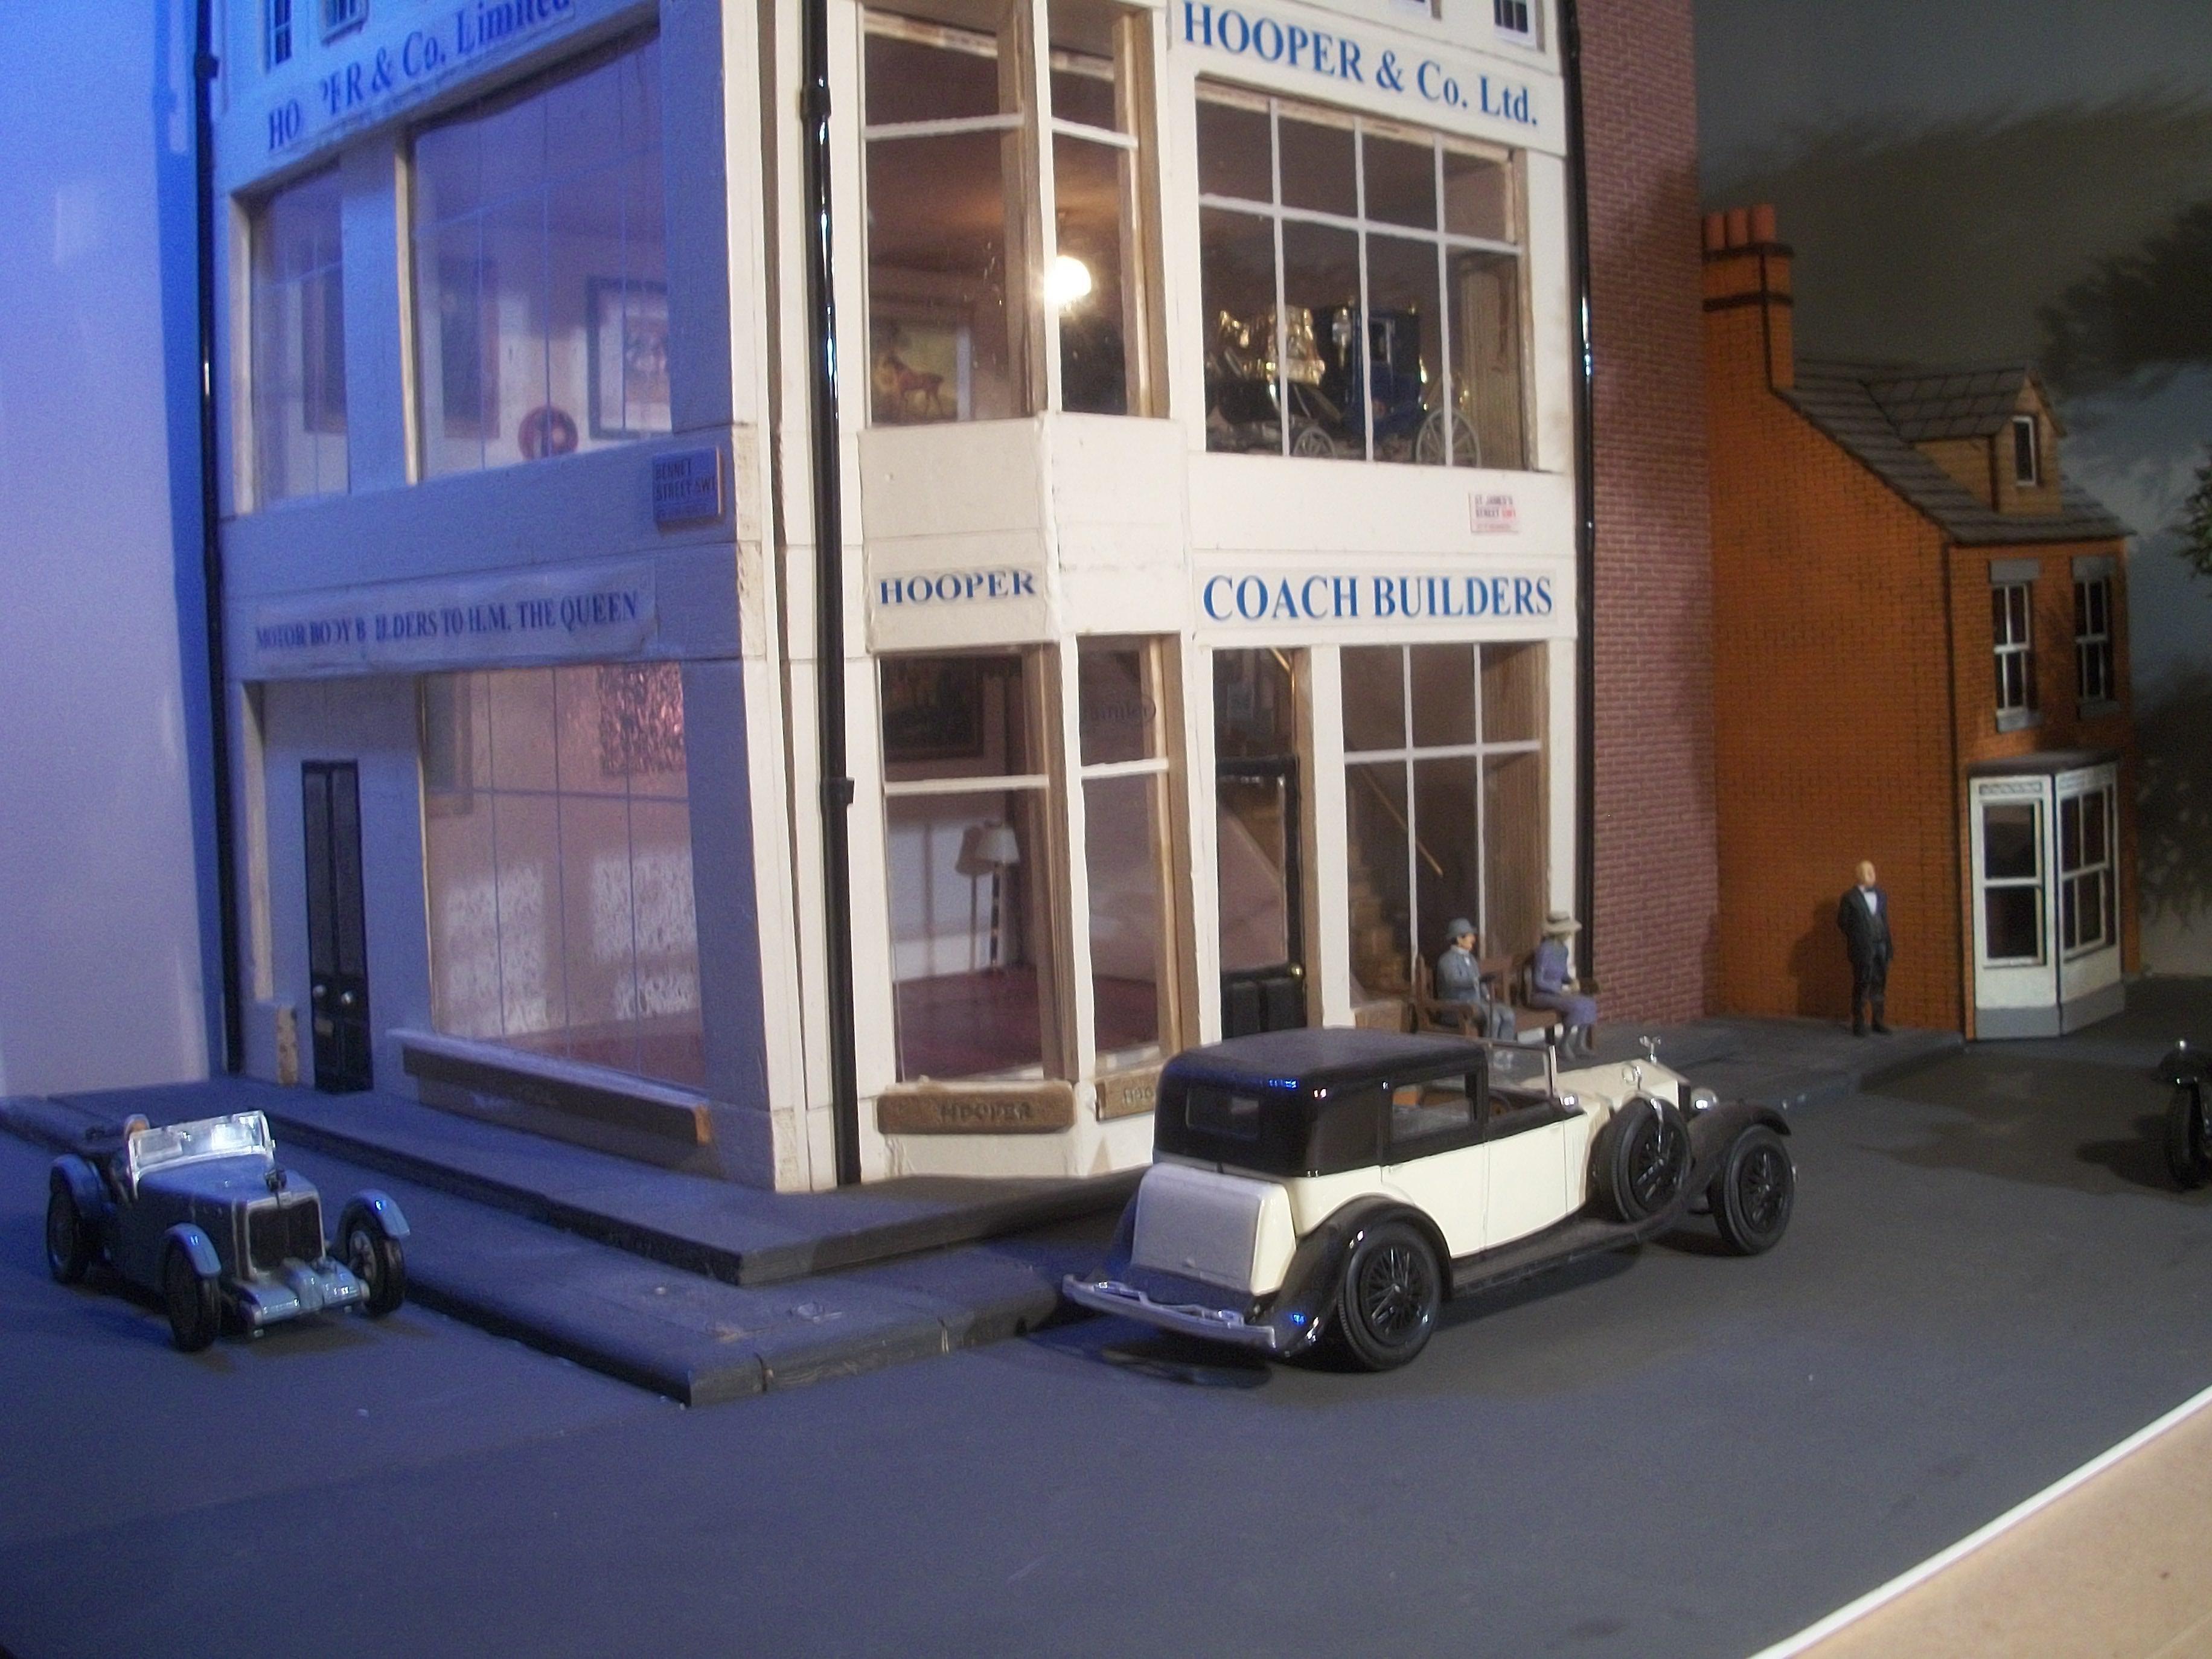
I am now working on a slightly different idea, and thinking along the lines of using two scales within one diorama . . . Some time ago I played around with 1:24 scale models in the foreground, then 1:32 scale models in the middle ground, and then 1:43 scale models in the background . . . This should appear correct to the naked eye, when the photography is set up carefully . . . So what we have here, is the 1:16 scale Rolls-Royce Phantom III model in the foreground, and the 1:32 scale Hooper & Co. building in the background. Providing the camera is low down to the ground level, and as long as any figures and cars that are close to the building are 1:32 scale, the larger 1:16 scale car in the foreground will not appear out of place from the photographs . . . Here are a few photos at the preparation stage . . . The first two photos were taken with the NIKON camera, and the remaining three photos were taken with the KODAK camera . . . David
-
1:32 Scale Hooper & Co. Coachbuilders ( 1930's )
Anglia105E replied to Anglia105E's topic in WIP: Dioramas
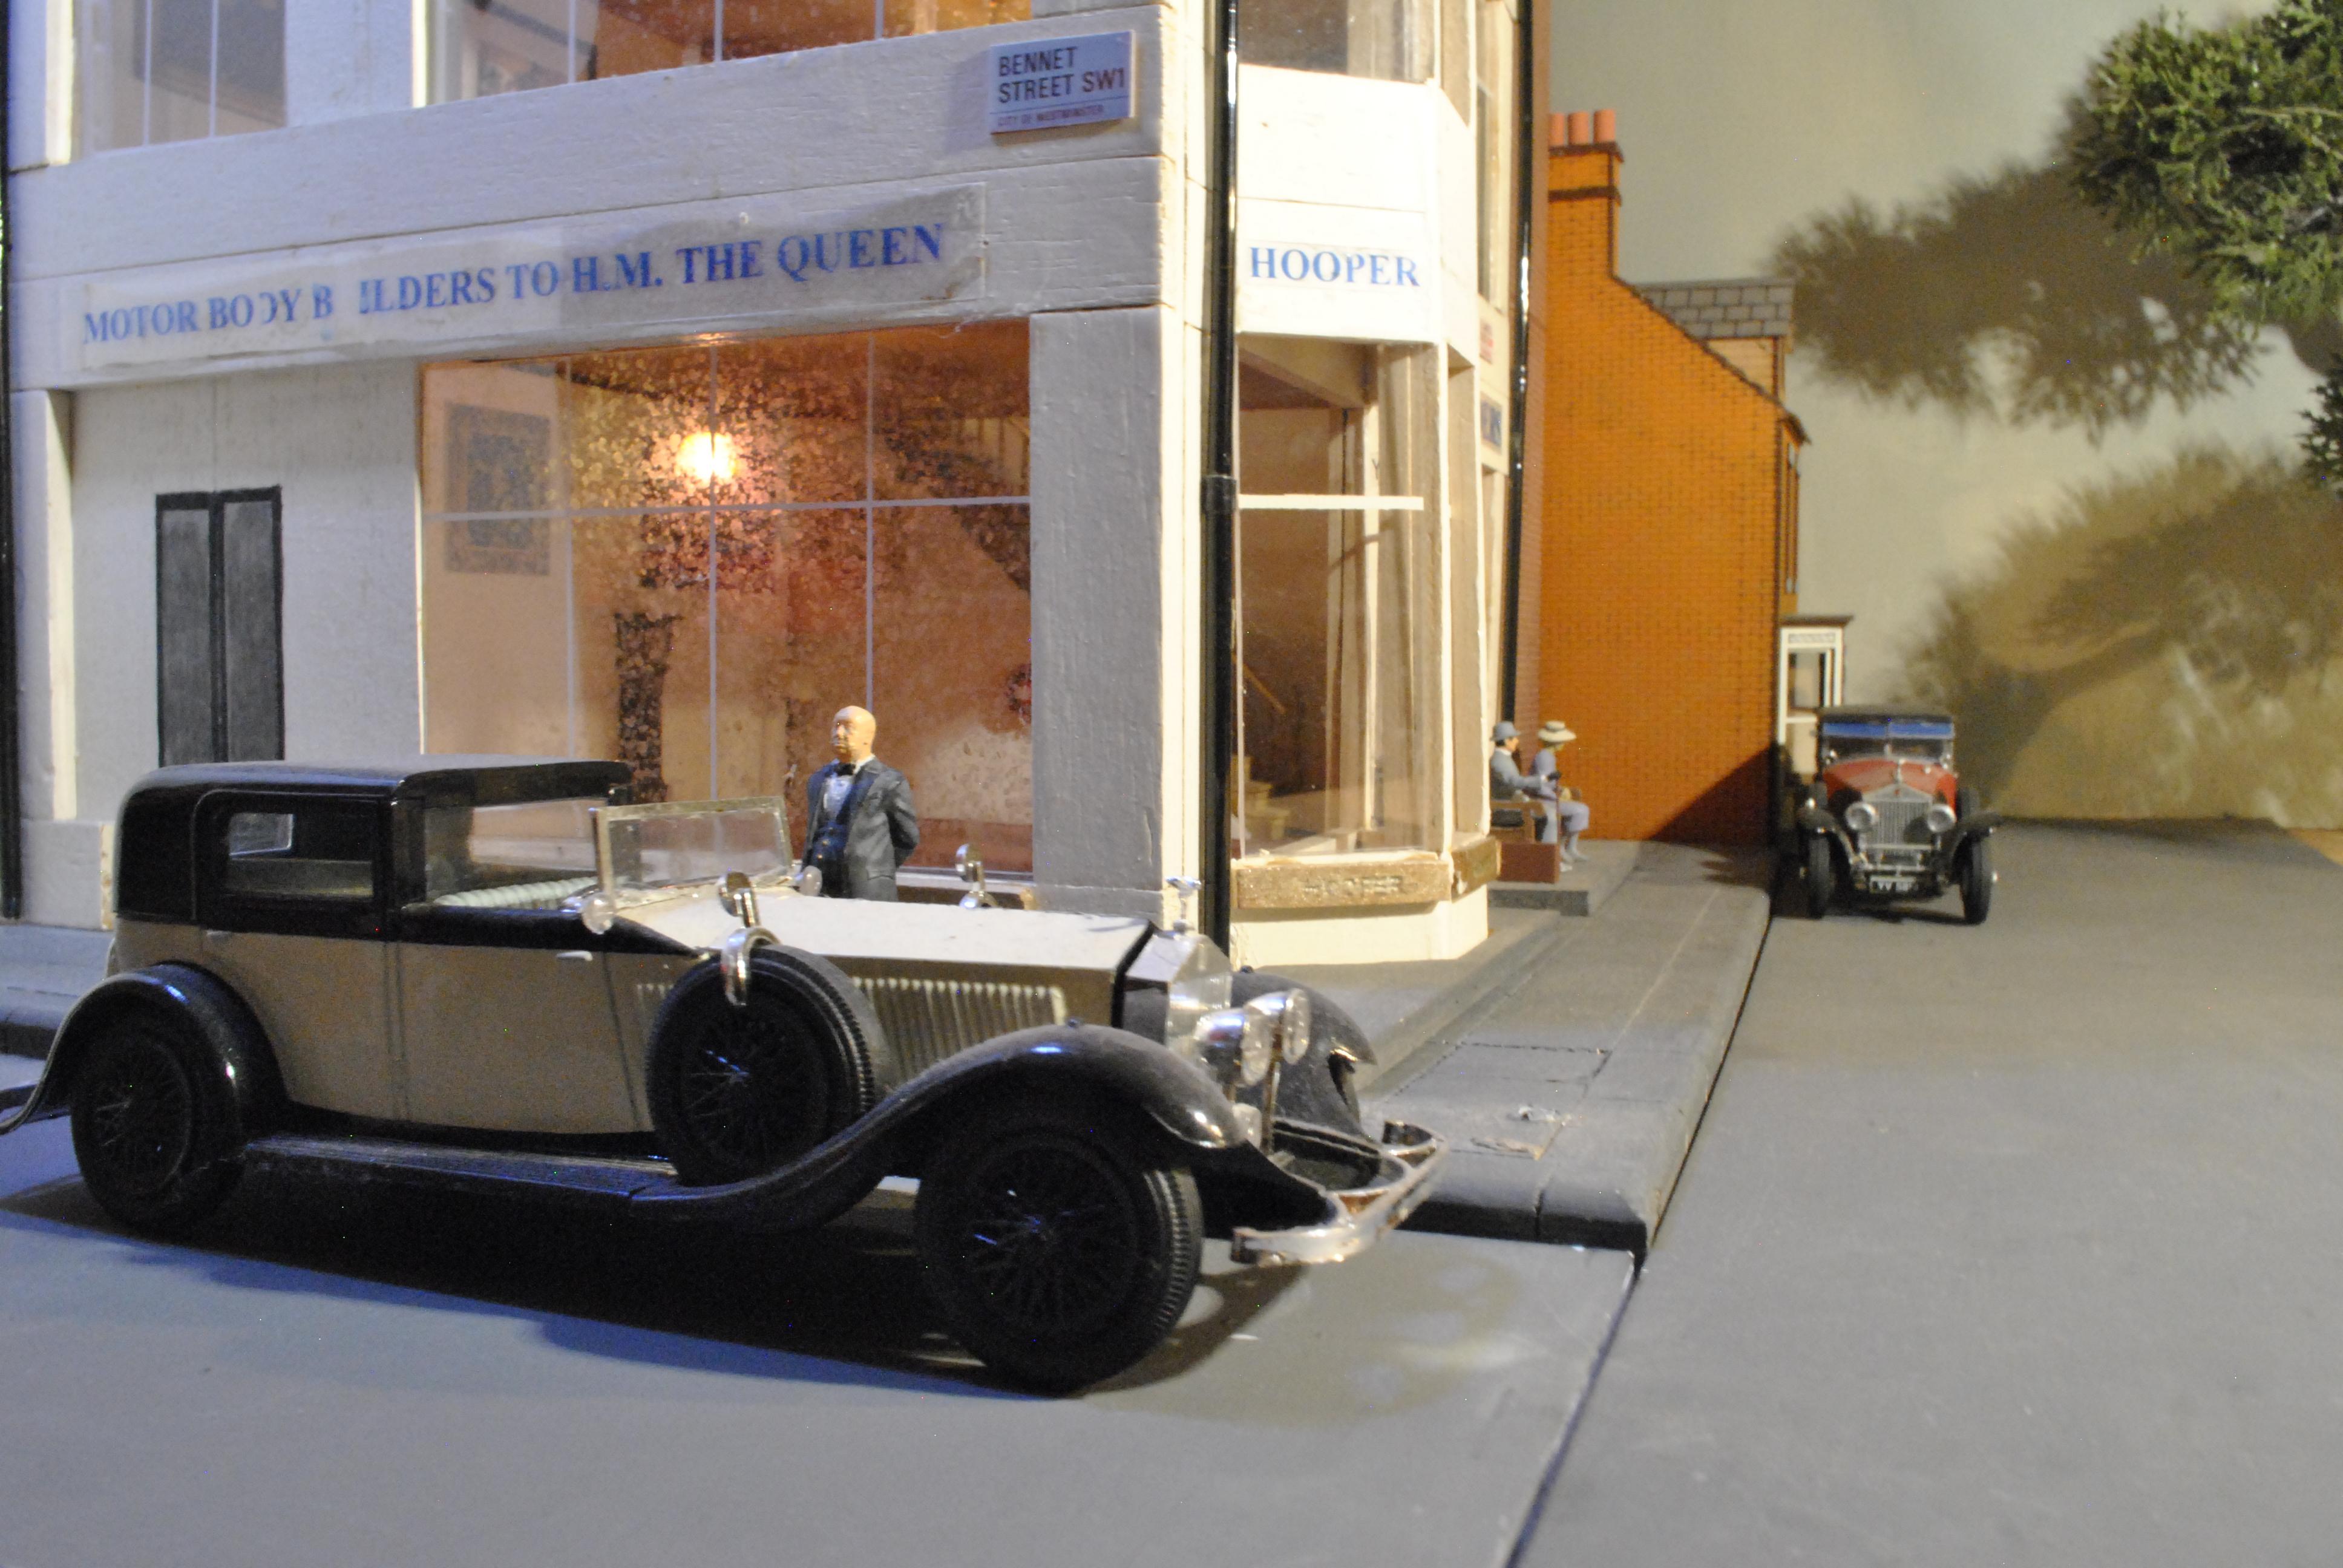
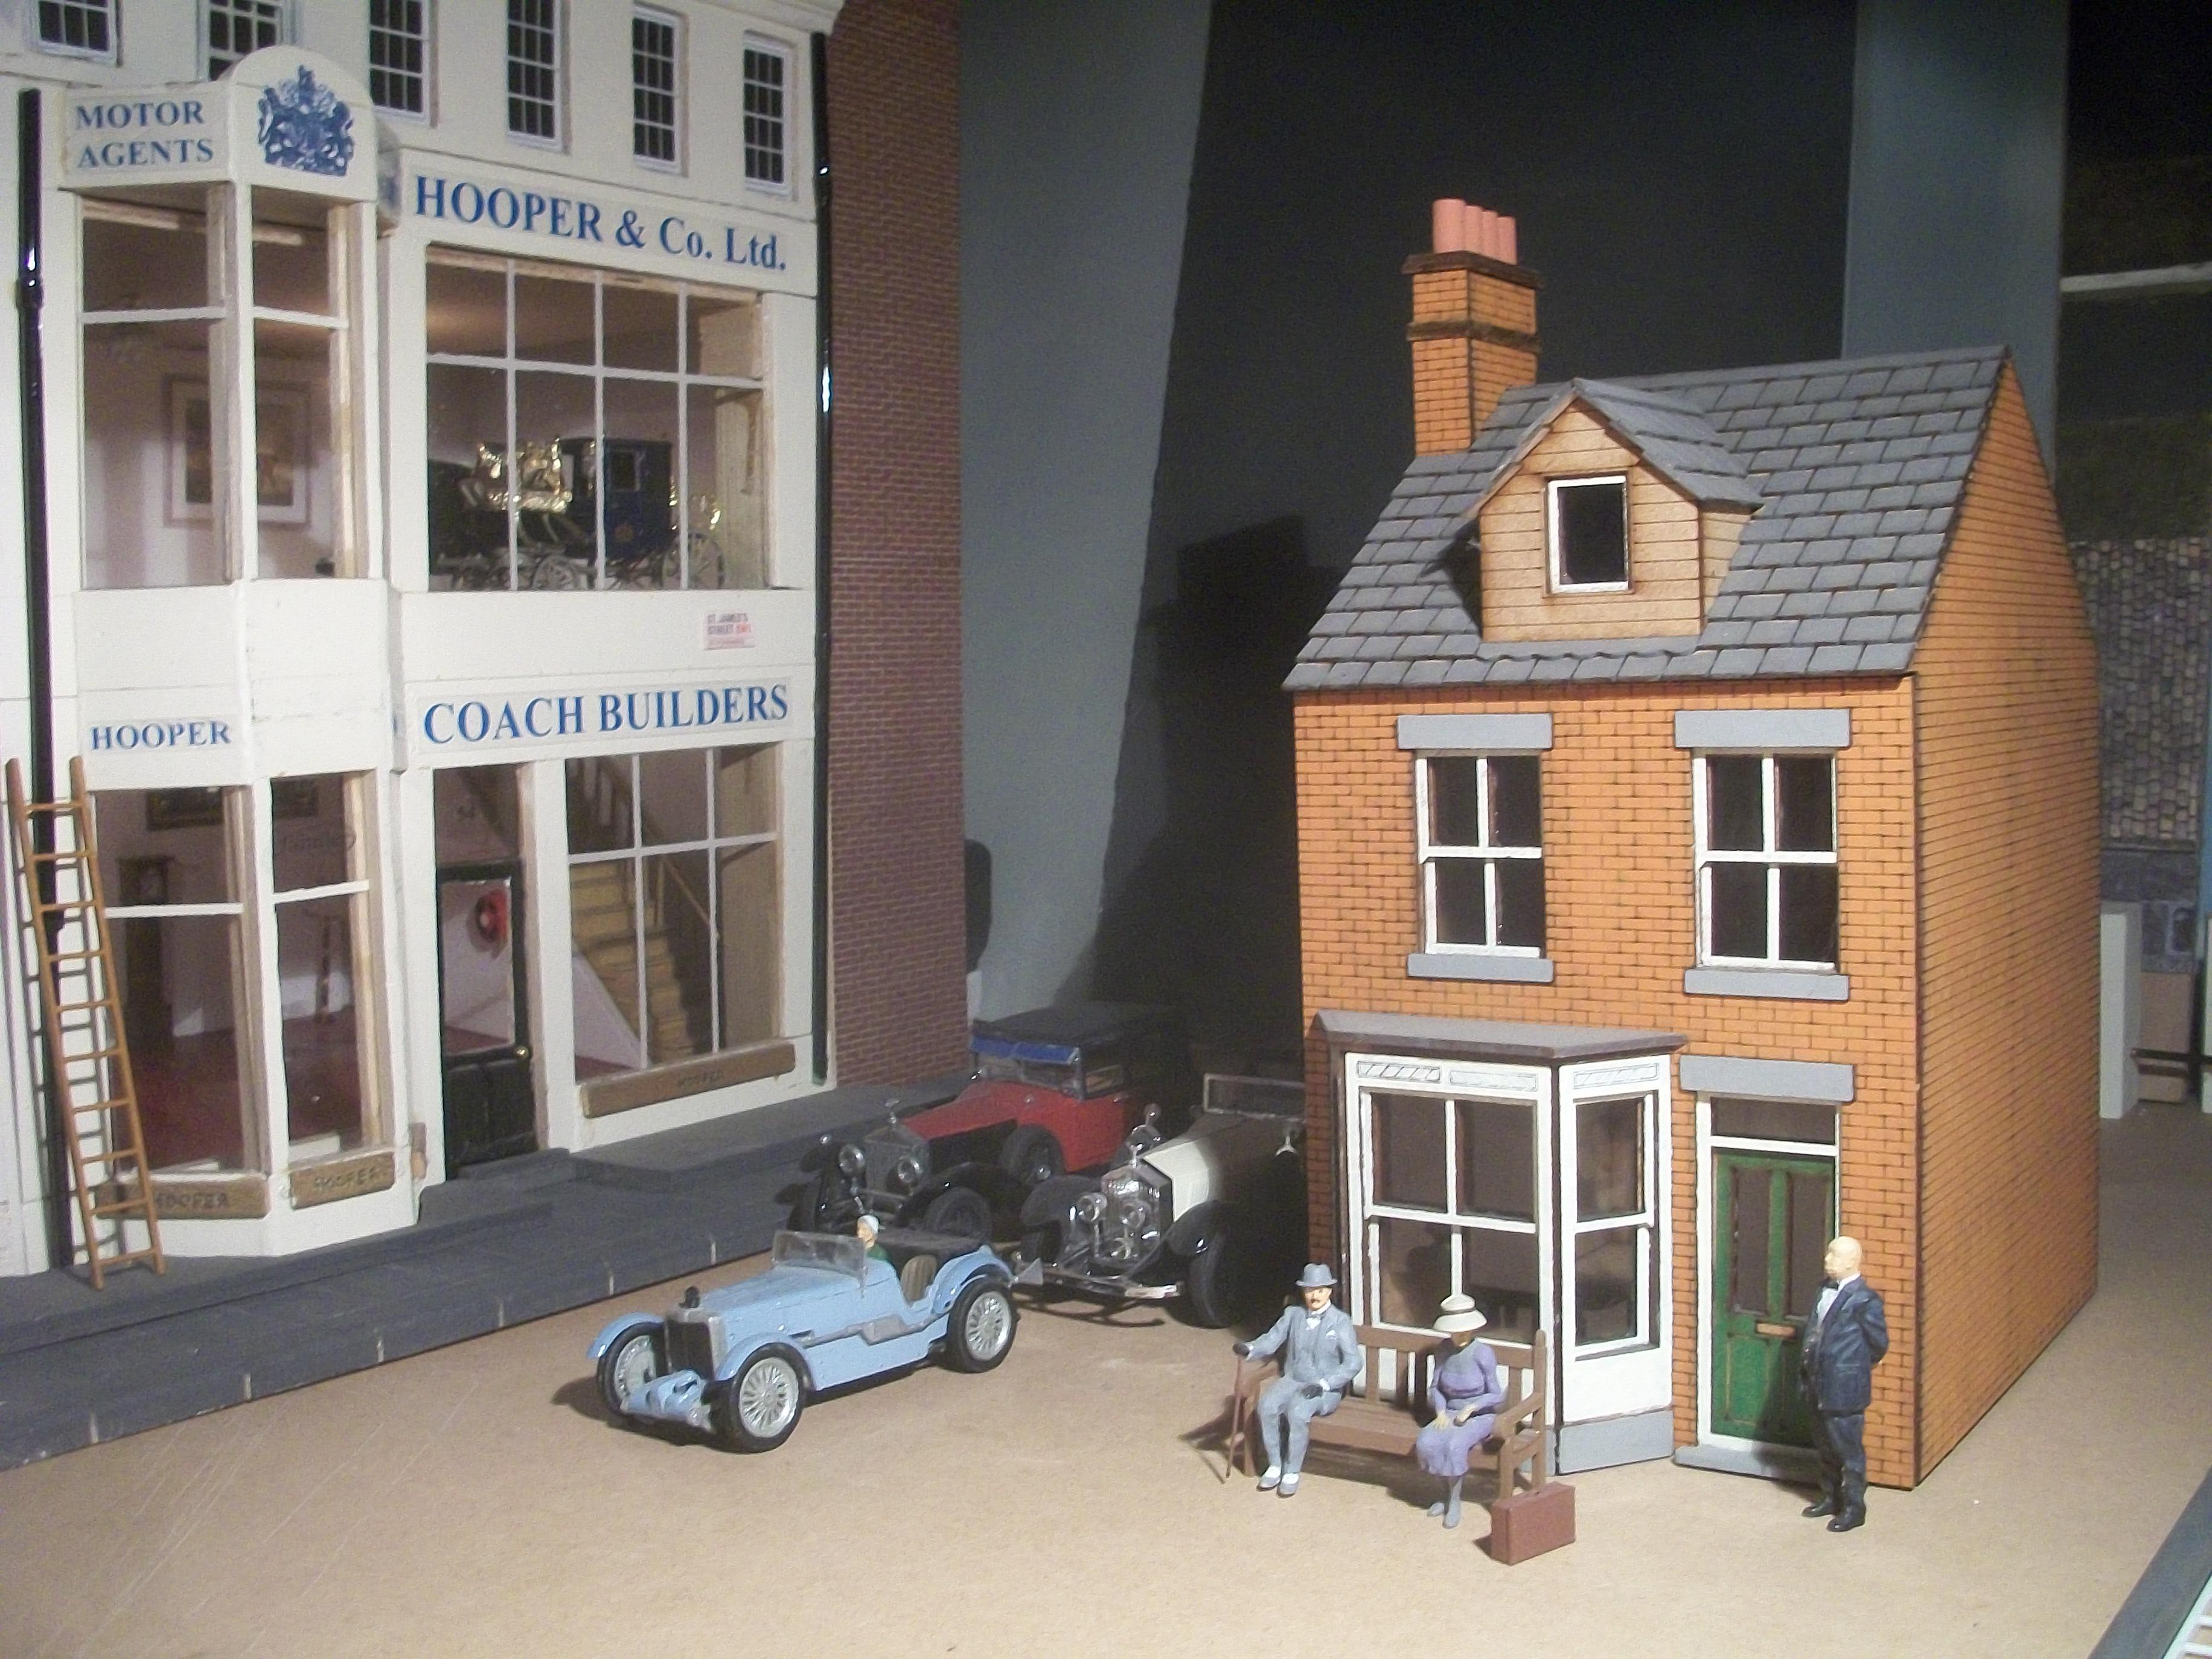
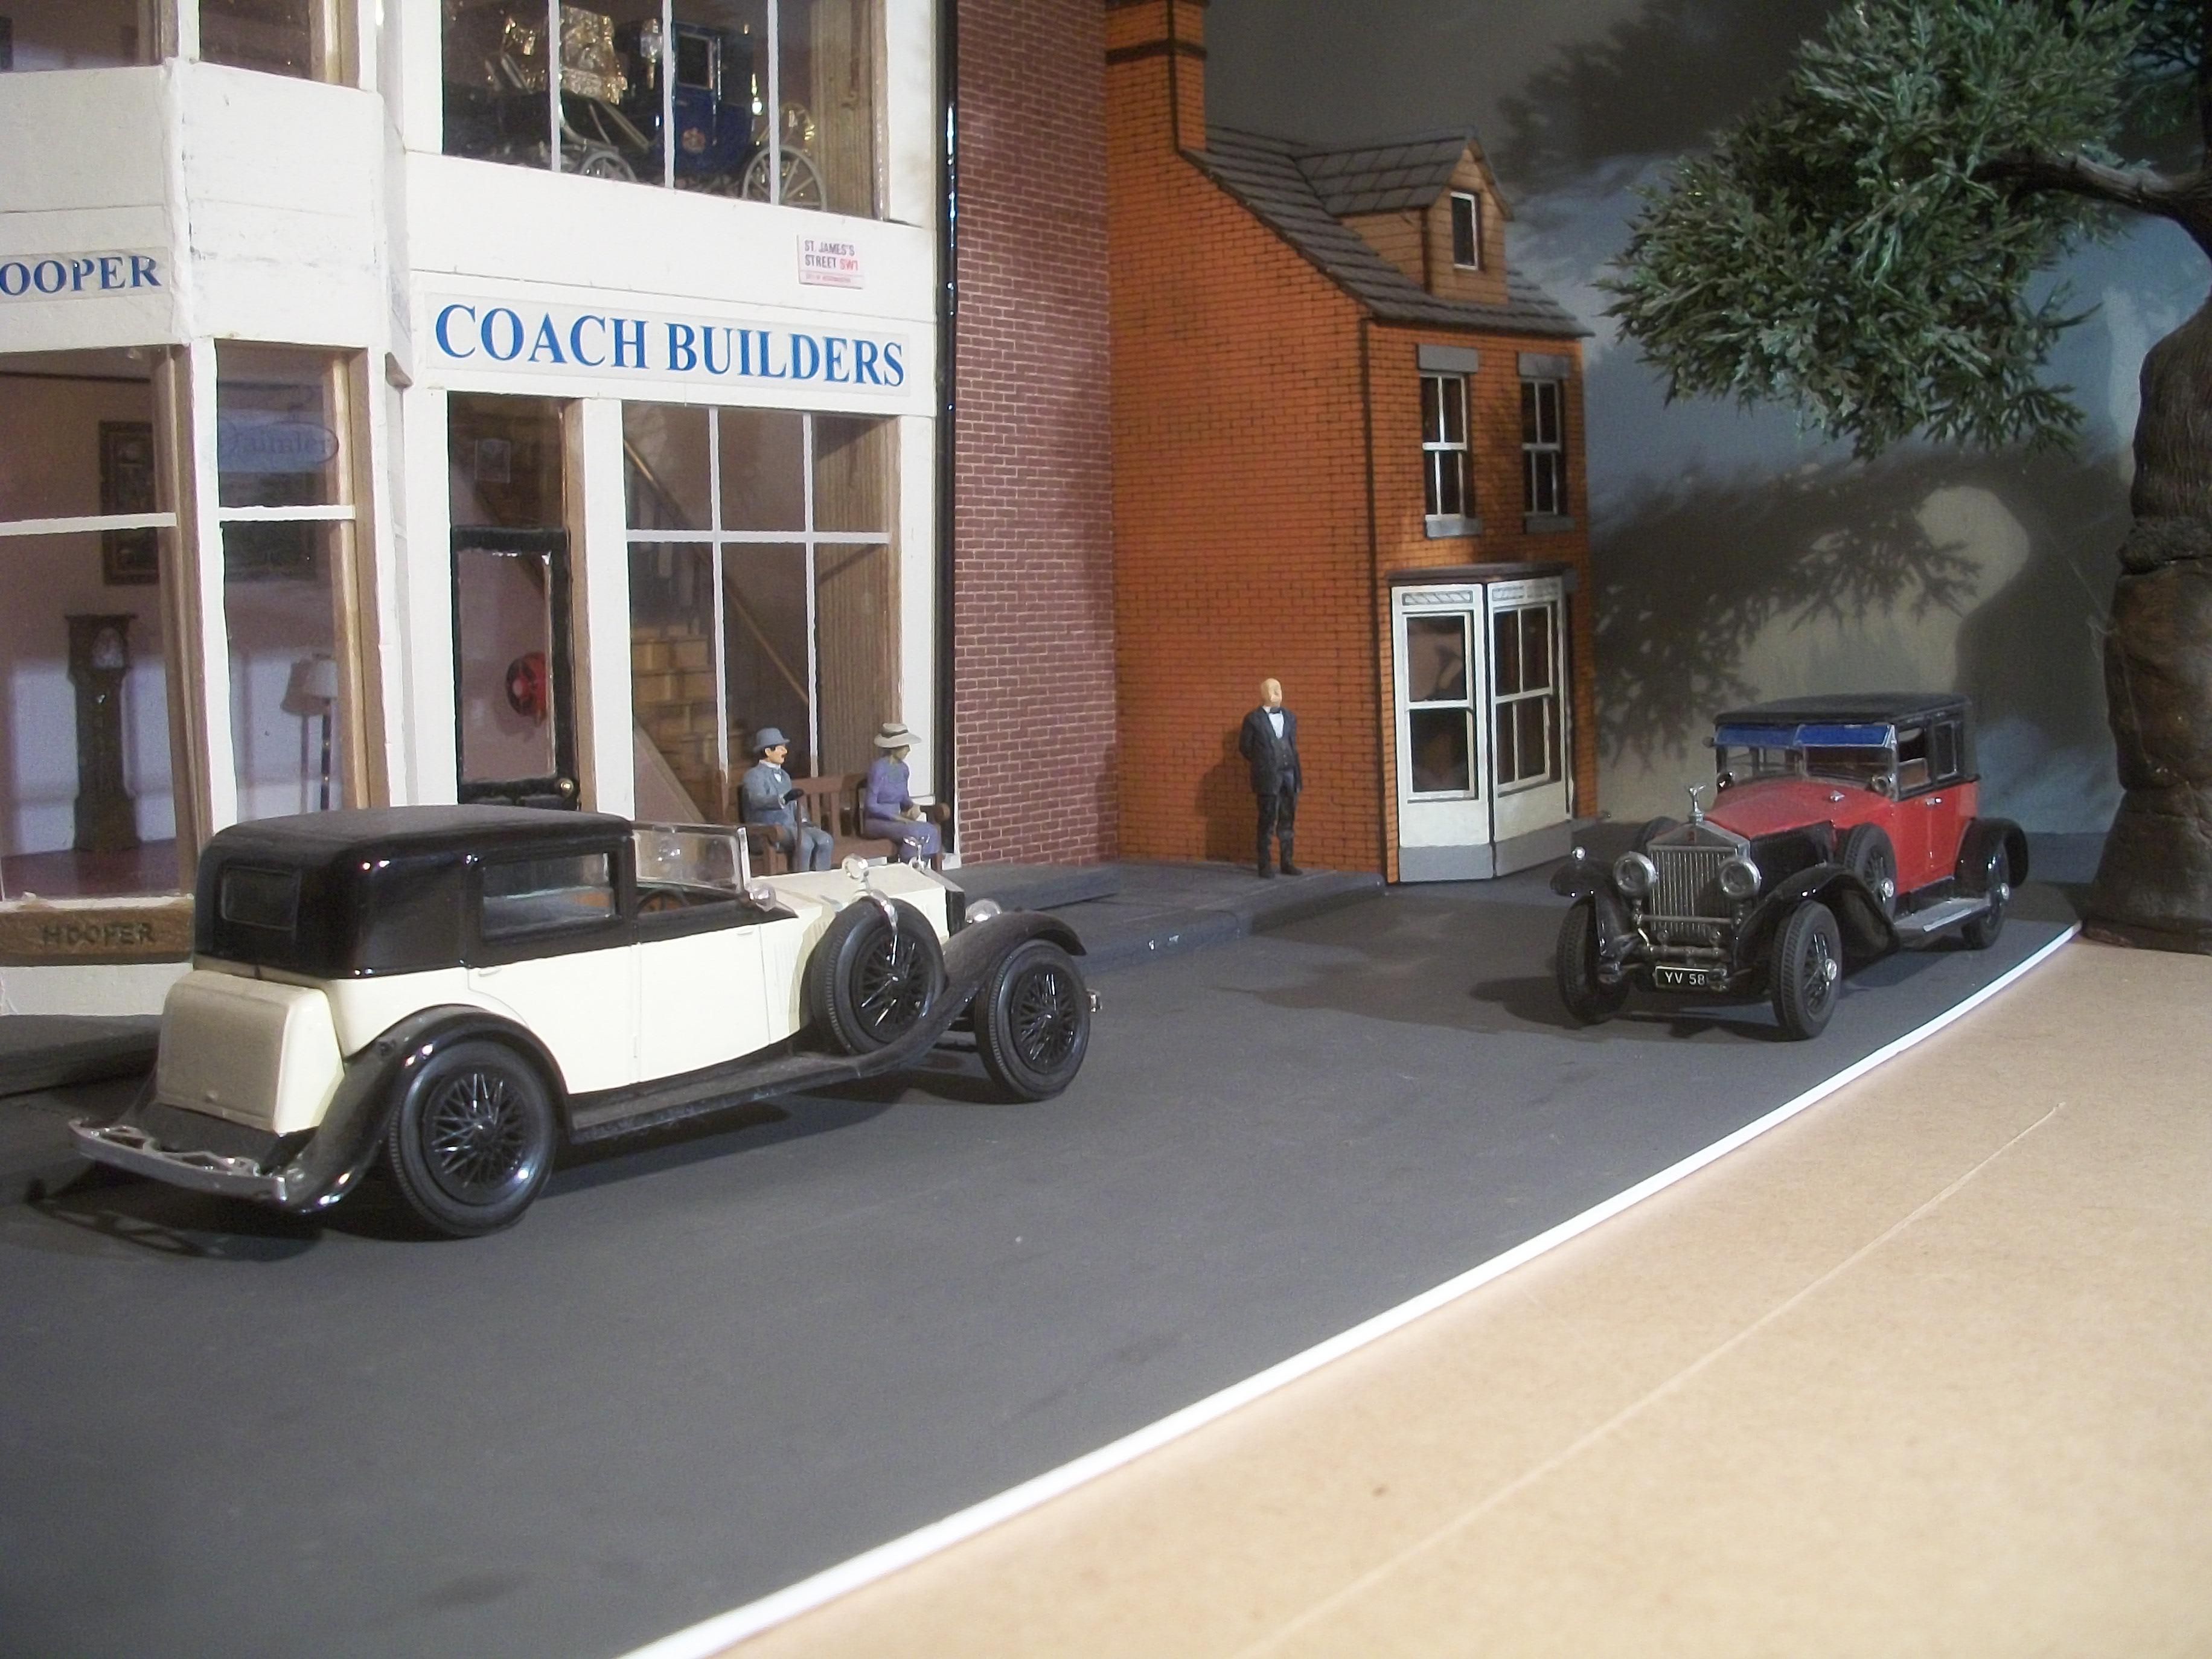
Thanks a lot Paul, and Mr Hitchcock is probably looking pleased because he is about to climb into his 1933 Rolls-Royce Phantom II Sedanca de Ville . . . The other Rolls-Royce is a Phantom I from 1928, that was owned by the diamond dealer Otto Oppenheimer . . . The MG K3 Magna was owned and driven in competition by Kitty Brunell, and this is also a 1933 motor car . . . Alfred Hitchcock was born in 1899, so he would have been 34 years of age when the Phantom II was produced. David -
1:32 Scale Hooper & Co. Coachbuilders ( 1930's )
Anglia105E replied to Anglia105E's topic in WIP: Dioramas
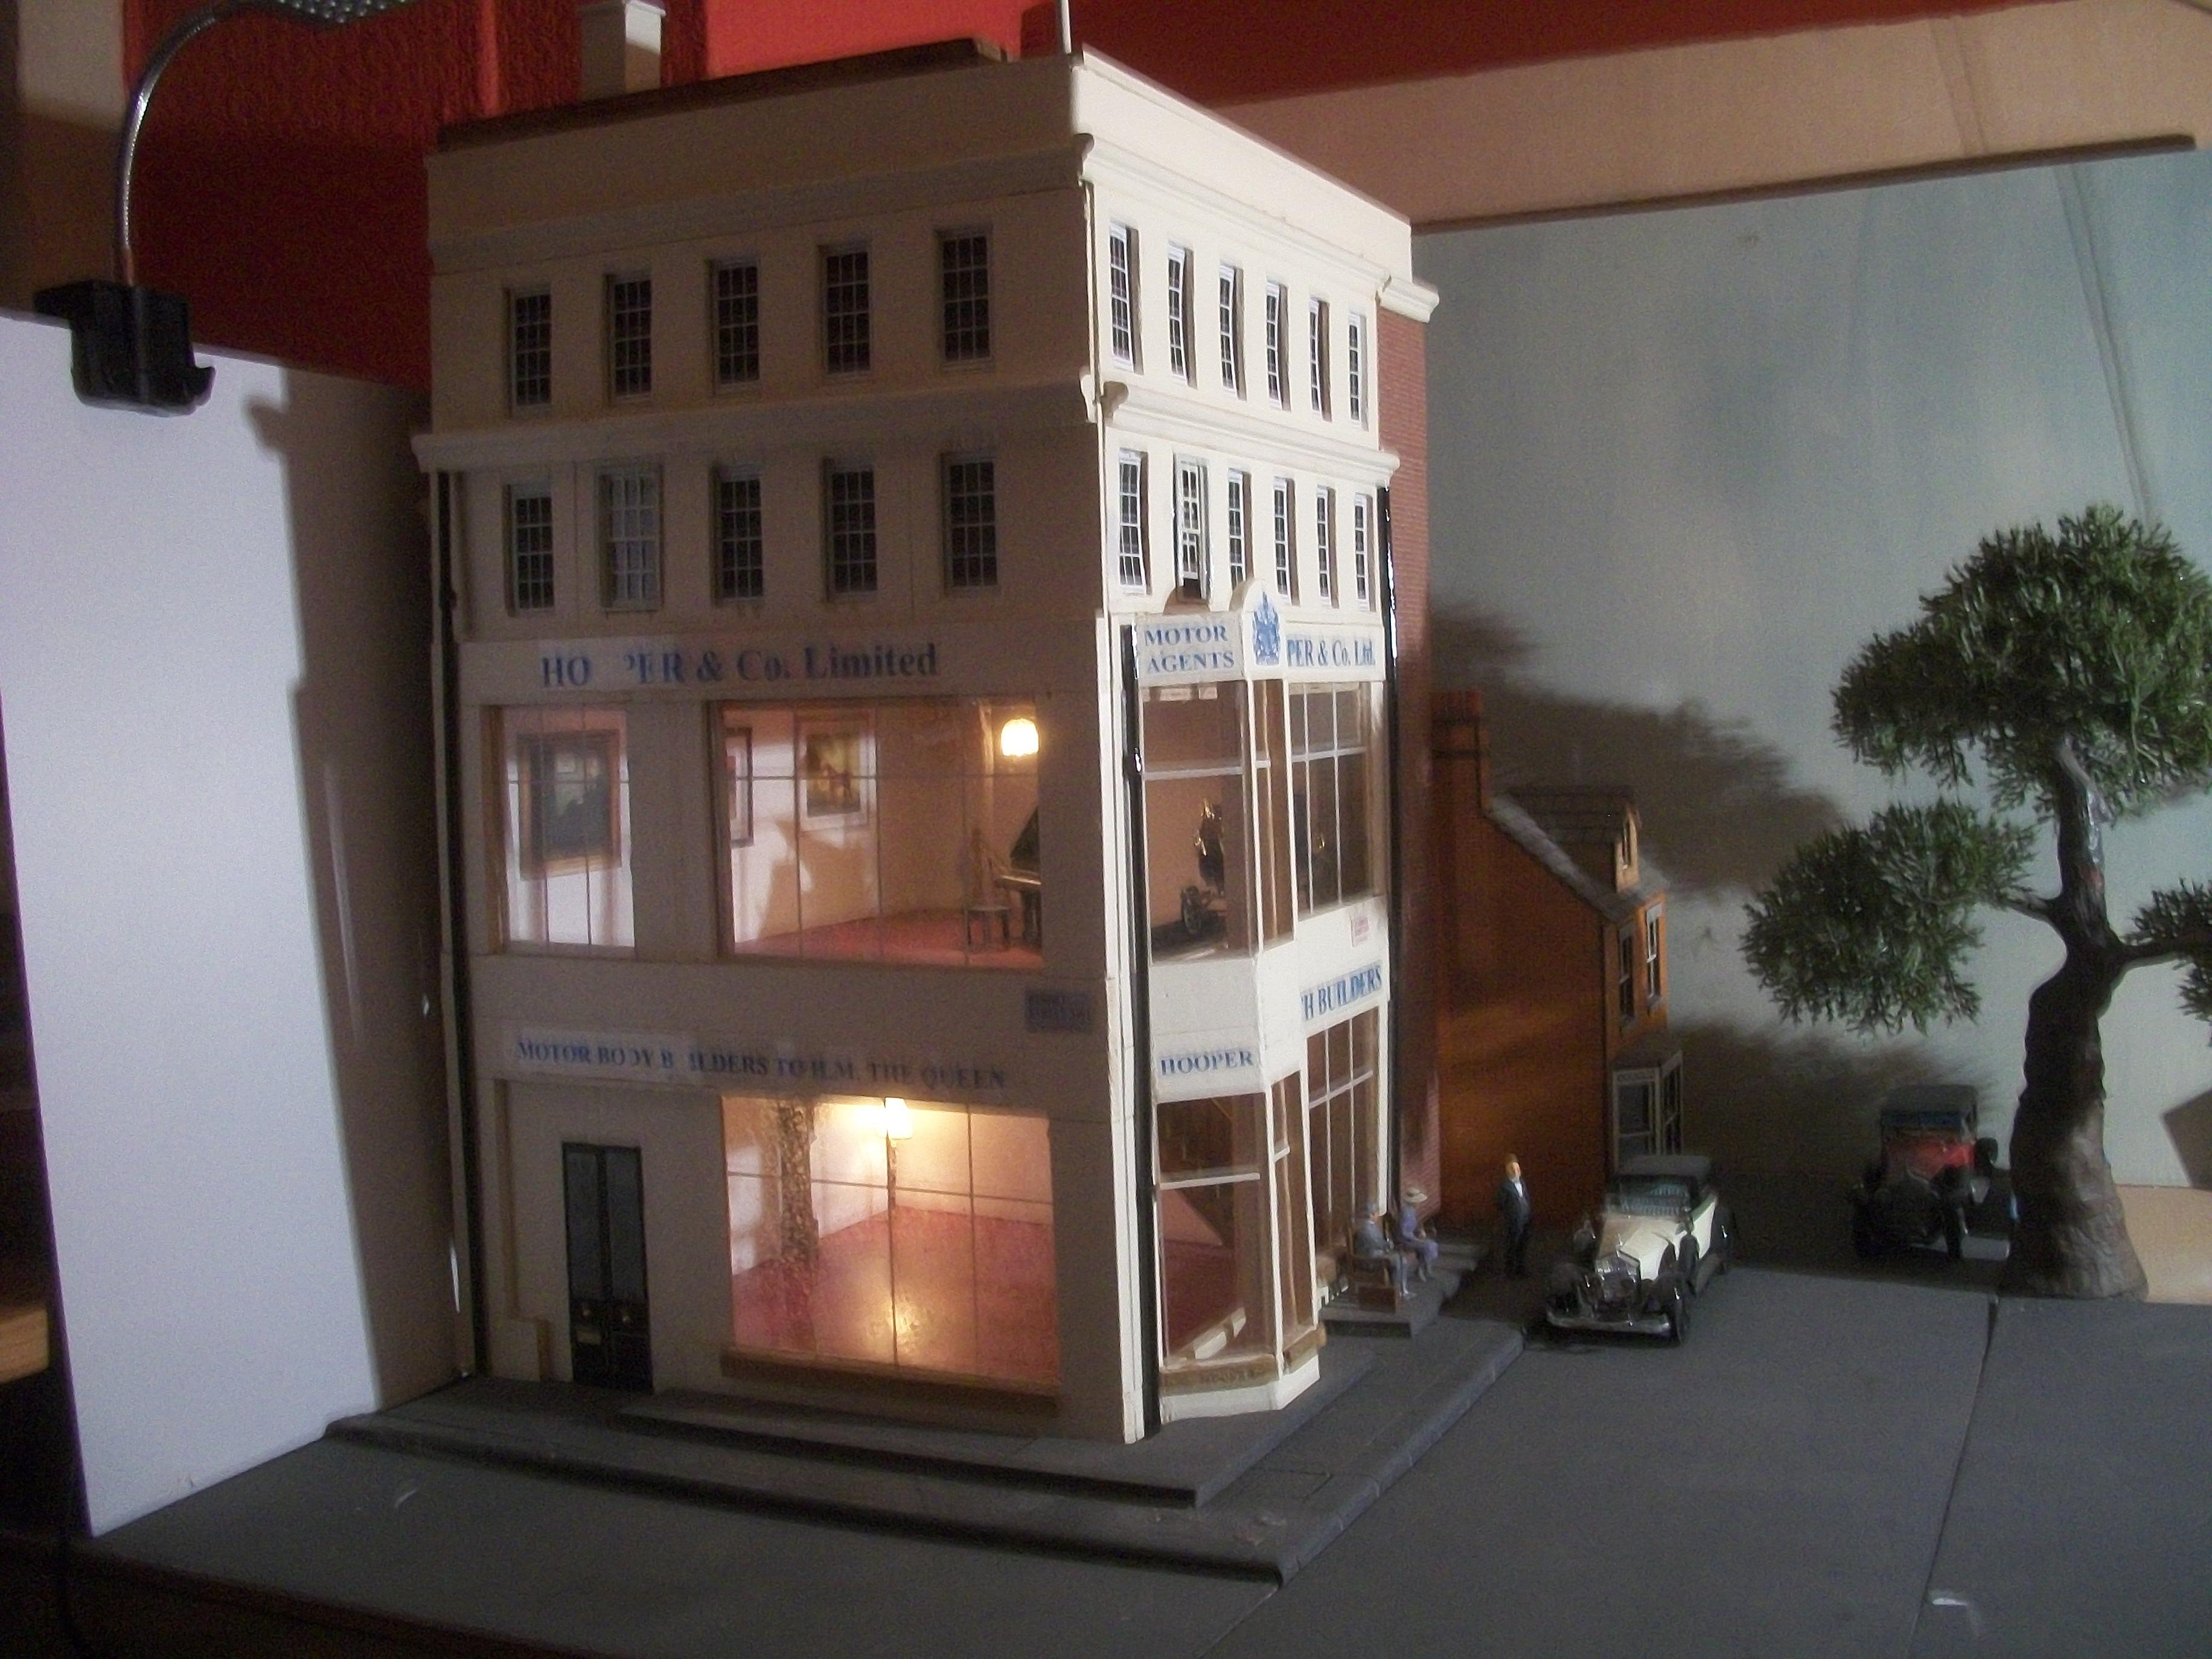
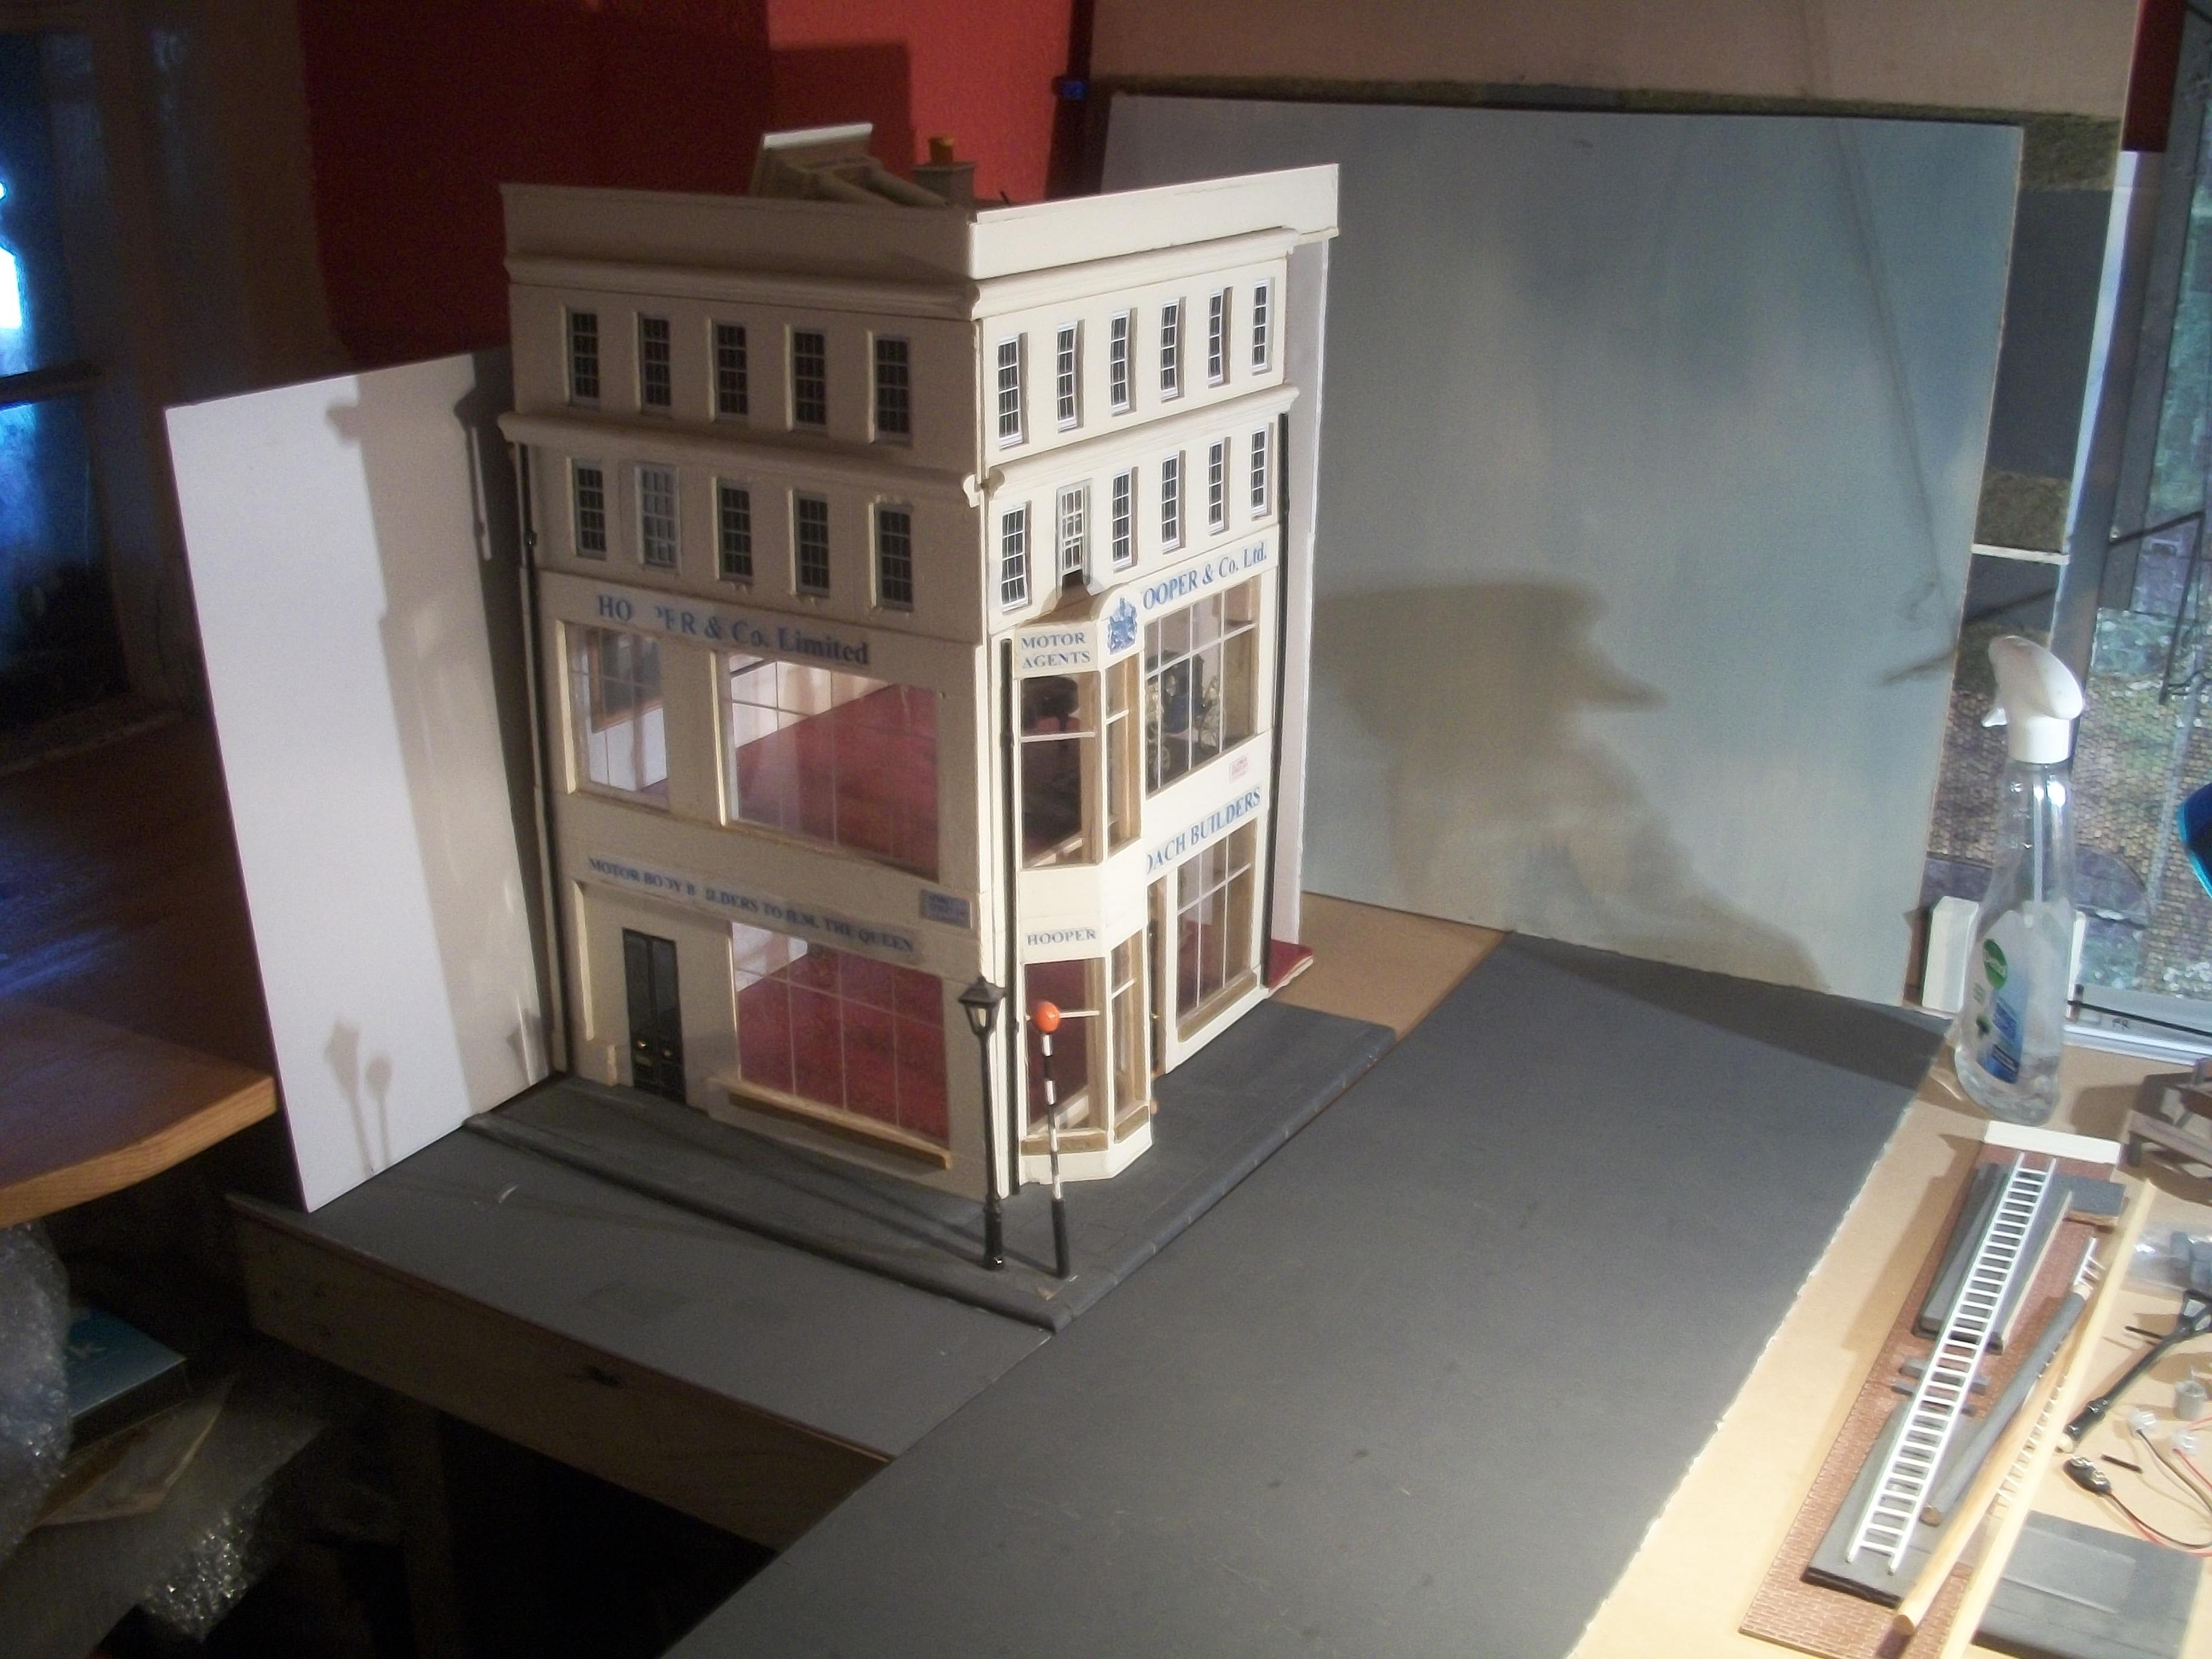
I am beginning to play around with a few different compositions, and also try out alternative light sources . . . The following photos have been taken using the NIKON DSLR camera. The blue lettering on the left side of the building needs some attention, as some of the letters are no longer visible. The lower signboard shows ' HM The Queen ' which was correct for the previous 1958 diorama, but this needs to show ' HM The King ' for this 1935 diorama . . . Two further issues iinclude the grand piano inside the first floor showroom, which is 1:24 scale, and the state carriage near to the window which is 1:43 scale. Both of these models must be 1:32 scale of course . . . David
-
Previously, I had mistakenly assumed that my scratch built Hooper & Co. building was 1:24 scale . . . However, and following some careful re-calculation, this building is actually 1:32 scale . . . The Hooper & Co. Coachbuilders showroom premises was located at 54 St James's Street in London, England and from 1805 until 1959 Hooper's displayed fine examples of horse-drawn carriages, Rolls-Royce motor cars, and also Daimler motor cars. The managing director and chief draughtsman was Osmond Rivers. In order to create this 1:32 scale diorama, there are various aspects of the building that need to be reduced in size from 1:24 scale. This will include the width of the two roads, namely St James's Street and Bennet Street, also the height of the Belisha Beacon for the pedestrian crossing, and the height of the pavement kerbs Several model cars in my collection will be suitable for this resized diorama, such as the Rolls-Royce Phantom I, the Rolls-Royce Phantom II and the MG K3 Magna. The figures shown in the following photos include Alfred Hitchcock, Miss Marples, Hercule Poirot, and Kitty Brunell is seated at the wheel of the MG sports car. Alongside the Hooper & Co. building there is the detached red brick house, which is also 1:32 scale . . . The year of the diorama is around 1935 - 1936. David
-
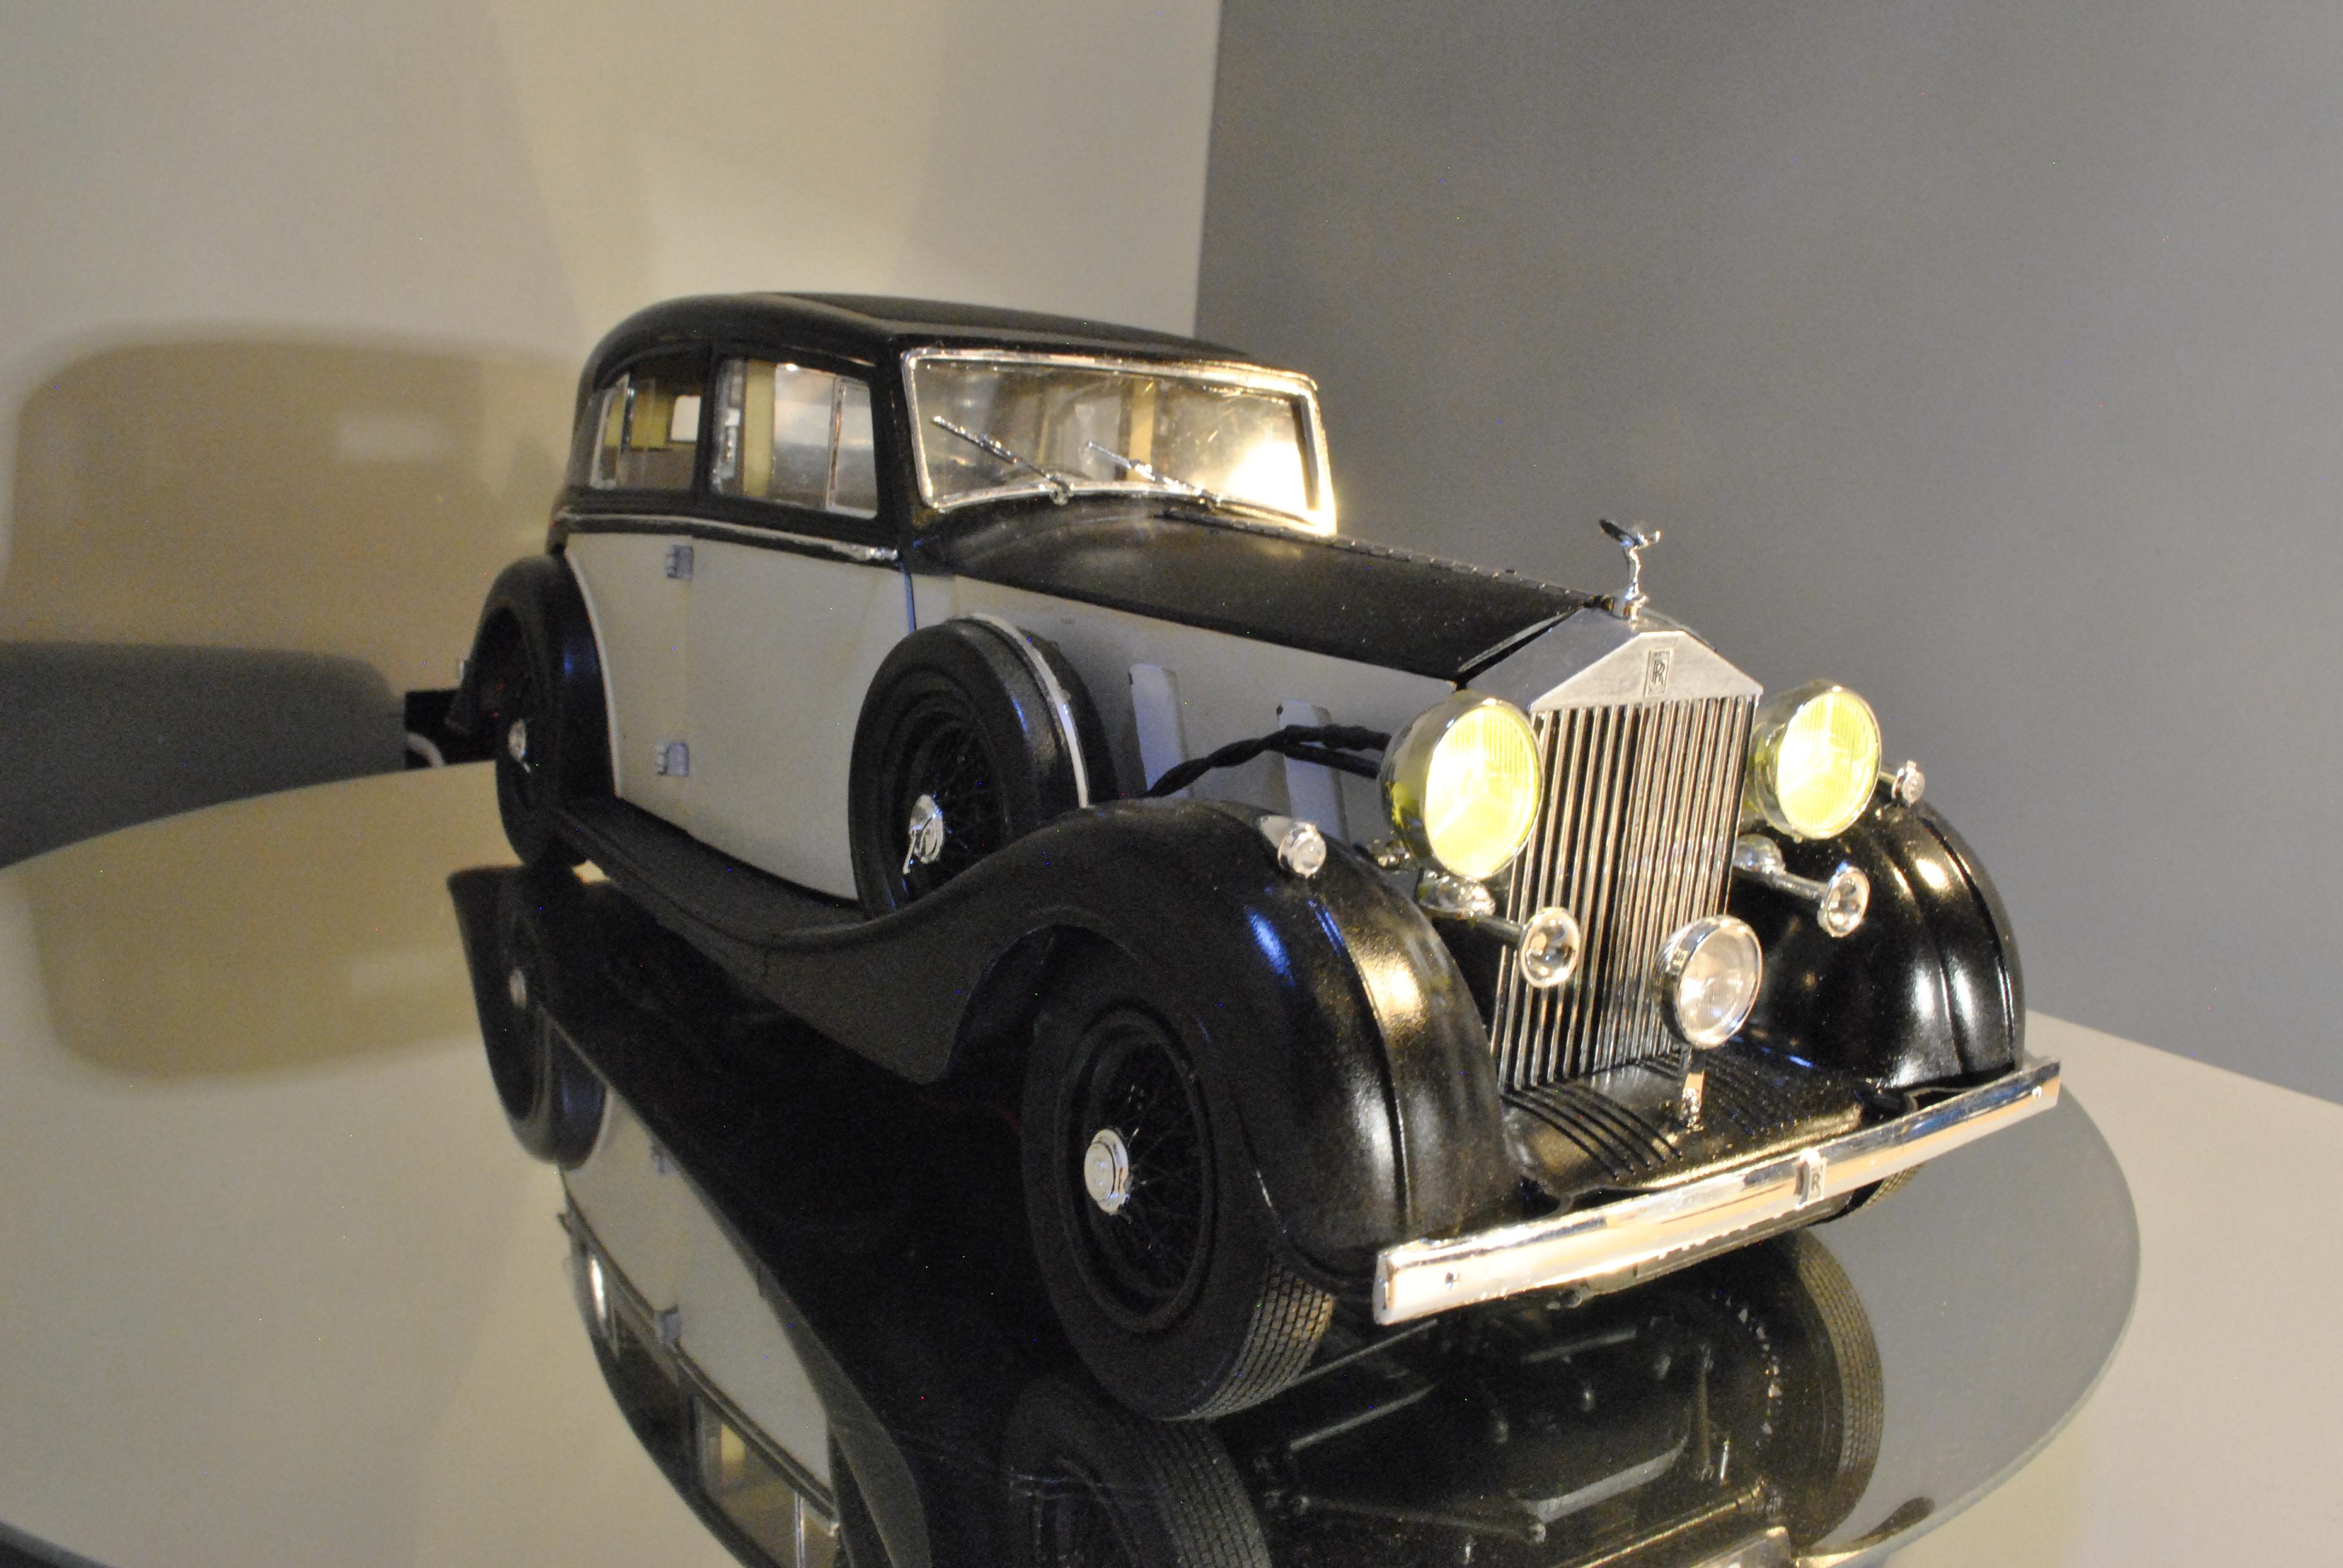
The following photos of ' AJW 55 ' show the car standing on the mirrored turntable, which has been placed upon a glass TV stand, with the lighting provided by a vintage table lamp and also a 100 watt daylight bulb . . . David
-
Thank you Donato . . . I like the word ' Awesome ', especially when used to describe one of my builds ! Few more photos to follow . . . David
-
Thanks a lot Carl . . . Few more photos to follow . . . David
-
These following photos of the Phantom III were taken in the video filming ' box ', with the model standing on the mirrored turntable . . . Several lamps are in place, and the camera used is a NIKON D3000 DSLR, on the Auto setting . . . David
-
Many thanks Larry . . . This build has taken just over 6 months to complete, and there were quite a few challenging moments during the process. Glad you like it ! David
-
Thank you David M., and I was pleasantly surprised at how well the working lights turned out, as this was my first attempt with that feature . . . You also mentioned the two suitcases inside the luggage compartment, which I made from thin card and then added those identification tags as an afterthought. Your comments are much appreciated ! David W.
-
1:16 Gunze Sangyo 1937 Rolls-Royce Phantom III Sports Saloon
Anglia105E replied to Anglia105E's topic in WIP: Model Cars
Thanks for taking a look at the sections of this topic that you may have missed David, and I hope you had an enjoyable holiday . . . There is a YouTube video link in my new topic ' Under Glass ' for this car, and I am working on some final photos also . . . David W.