Anglia105E
-
Posts
3,487 -
Joined
-
Last visited
Content Type
Profiles
Forums
Events
Gallery
Everything posted by Anglia105E
-

1:16 Gunze Sangyo 1937 Rolls-Royce Phantom III Sports Saloon
Anglia105E replied to Anglia105E's topic in WIP: Model Cars
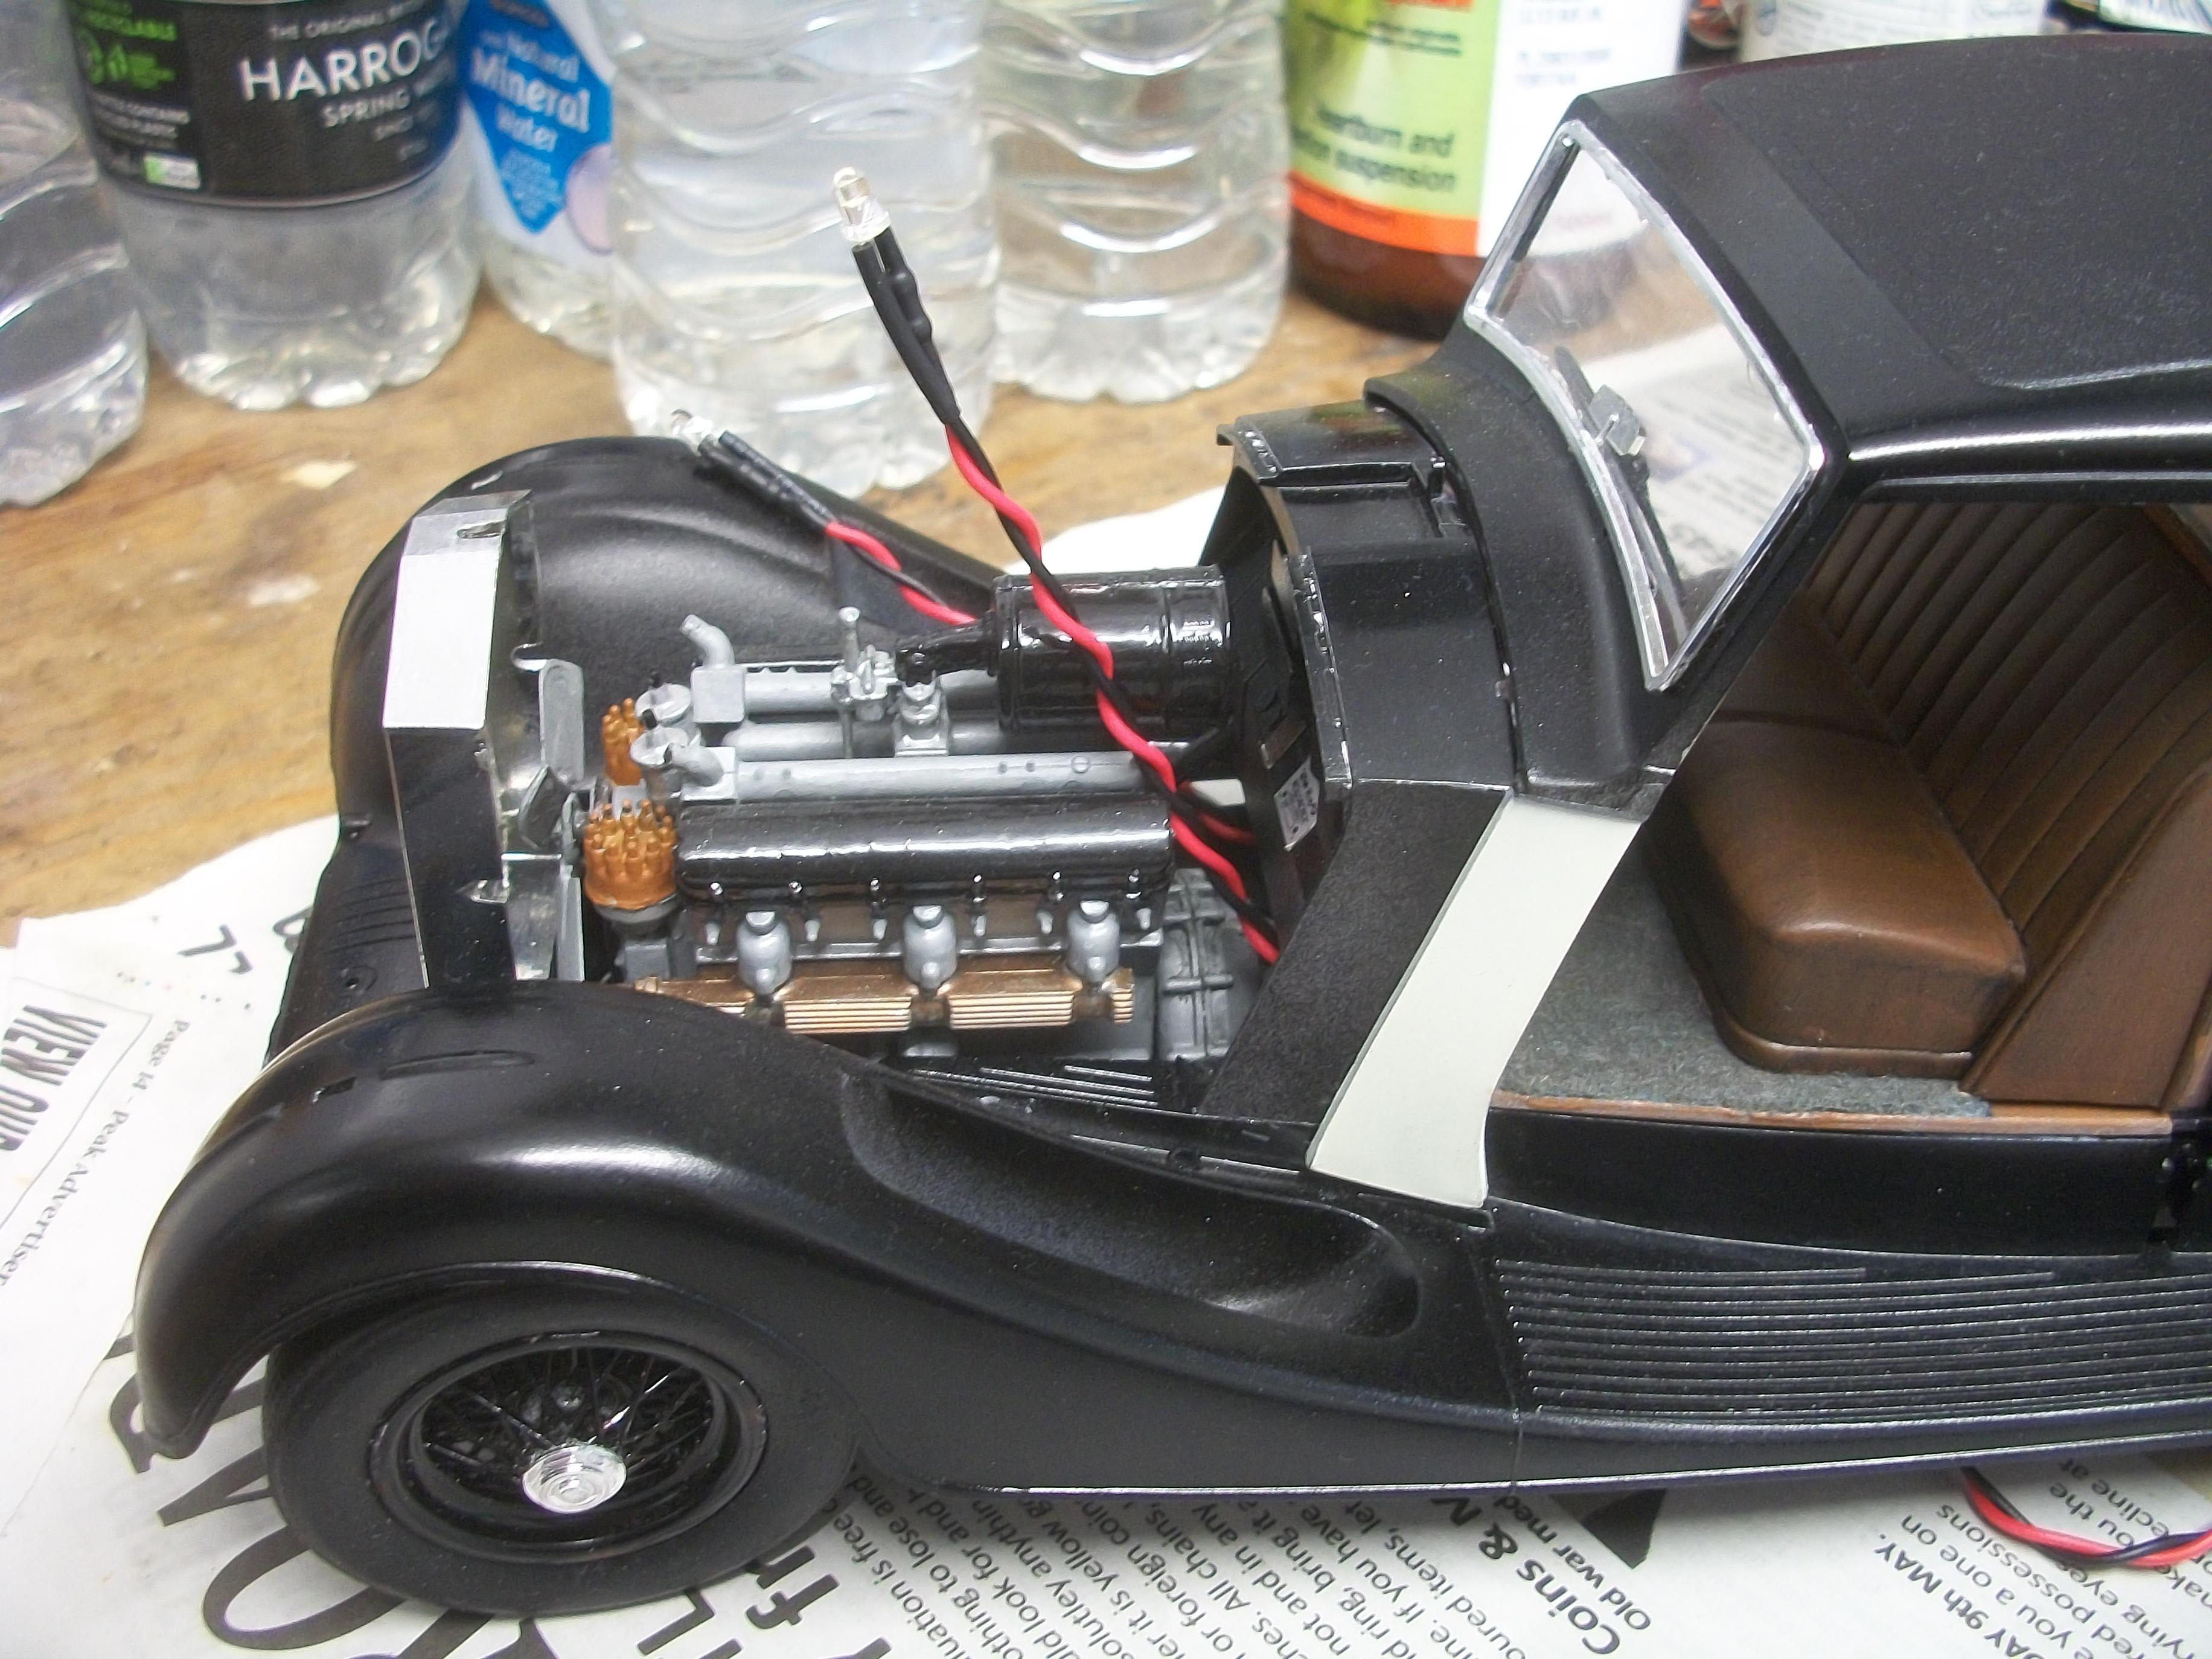
Yes, and this was why I didn't choose the pure white alternative . . . It won't be necessary to paint the inside of the lenses, which are now glued in place. Also, the idea to locate the battery holders inside the the suitcase, and inside the luggage compartment was abandoned, in favour of a more accessible location under the running boards . . . There will be a second battery holder and switch under the passenger side running board, which will supply power to the central fog lamp at the front. One lighting kit provides two warm white LED's. snd two red LED's, so the second kit is required to supply the fog lamp. David -
1:16 Gunze Sangyo 1937 Rolls-Royce Phantom III Sports Saloon
Anglia105E replied to Anglia105E's topic in WIP: Model Cars
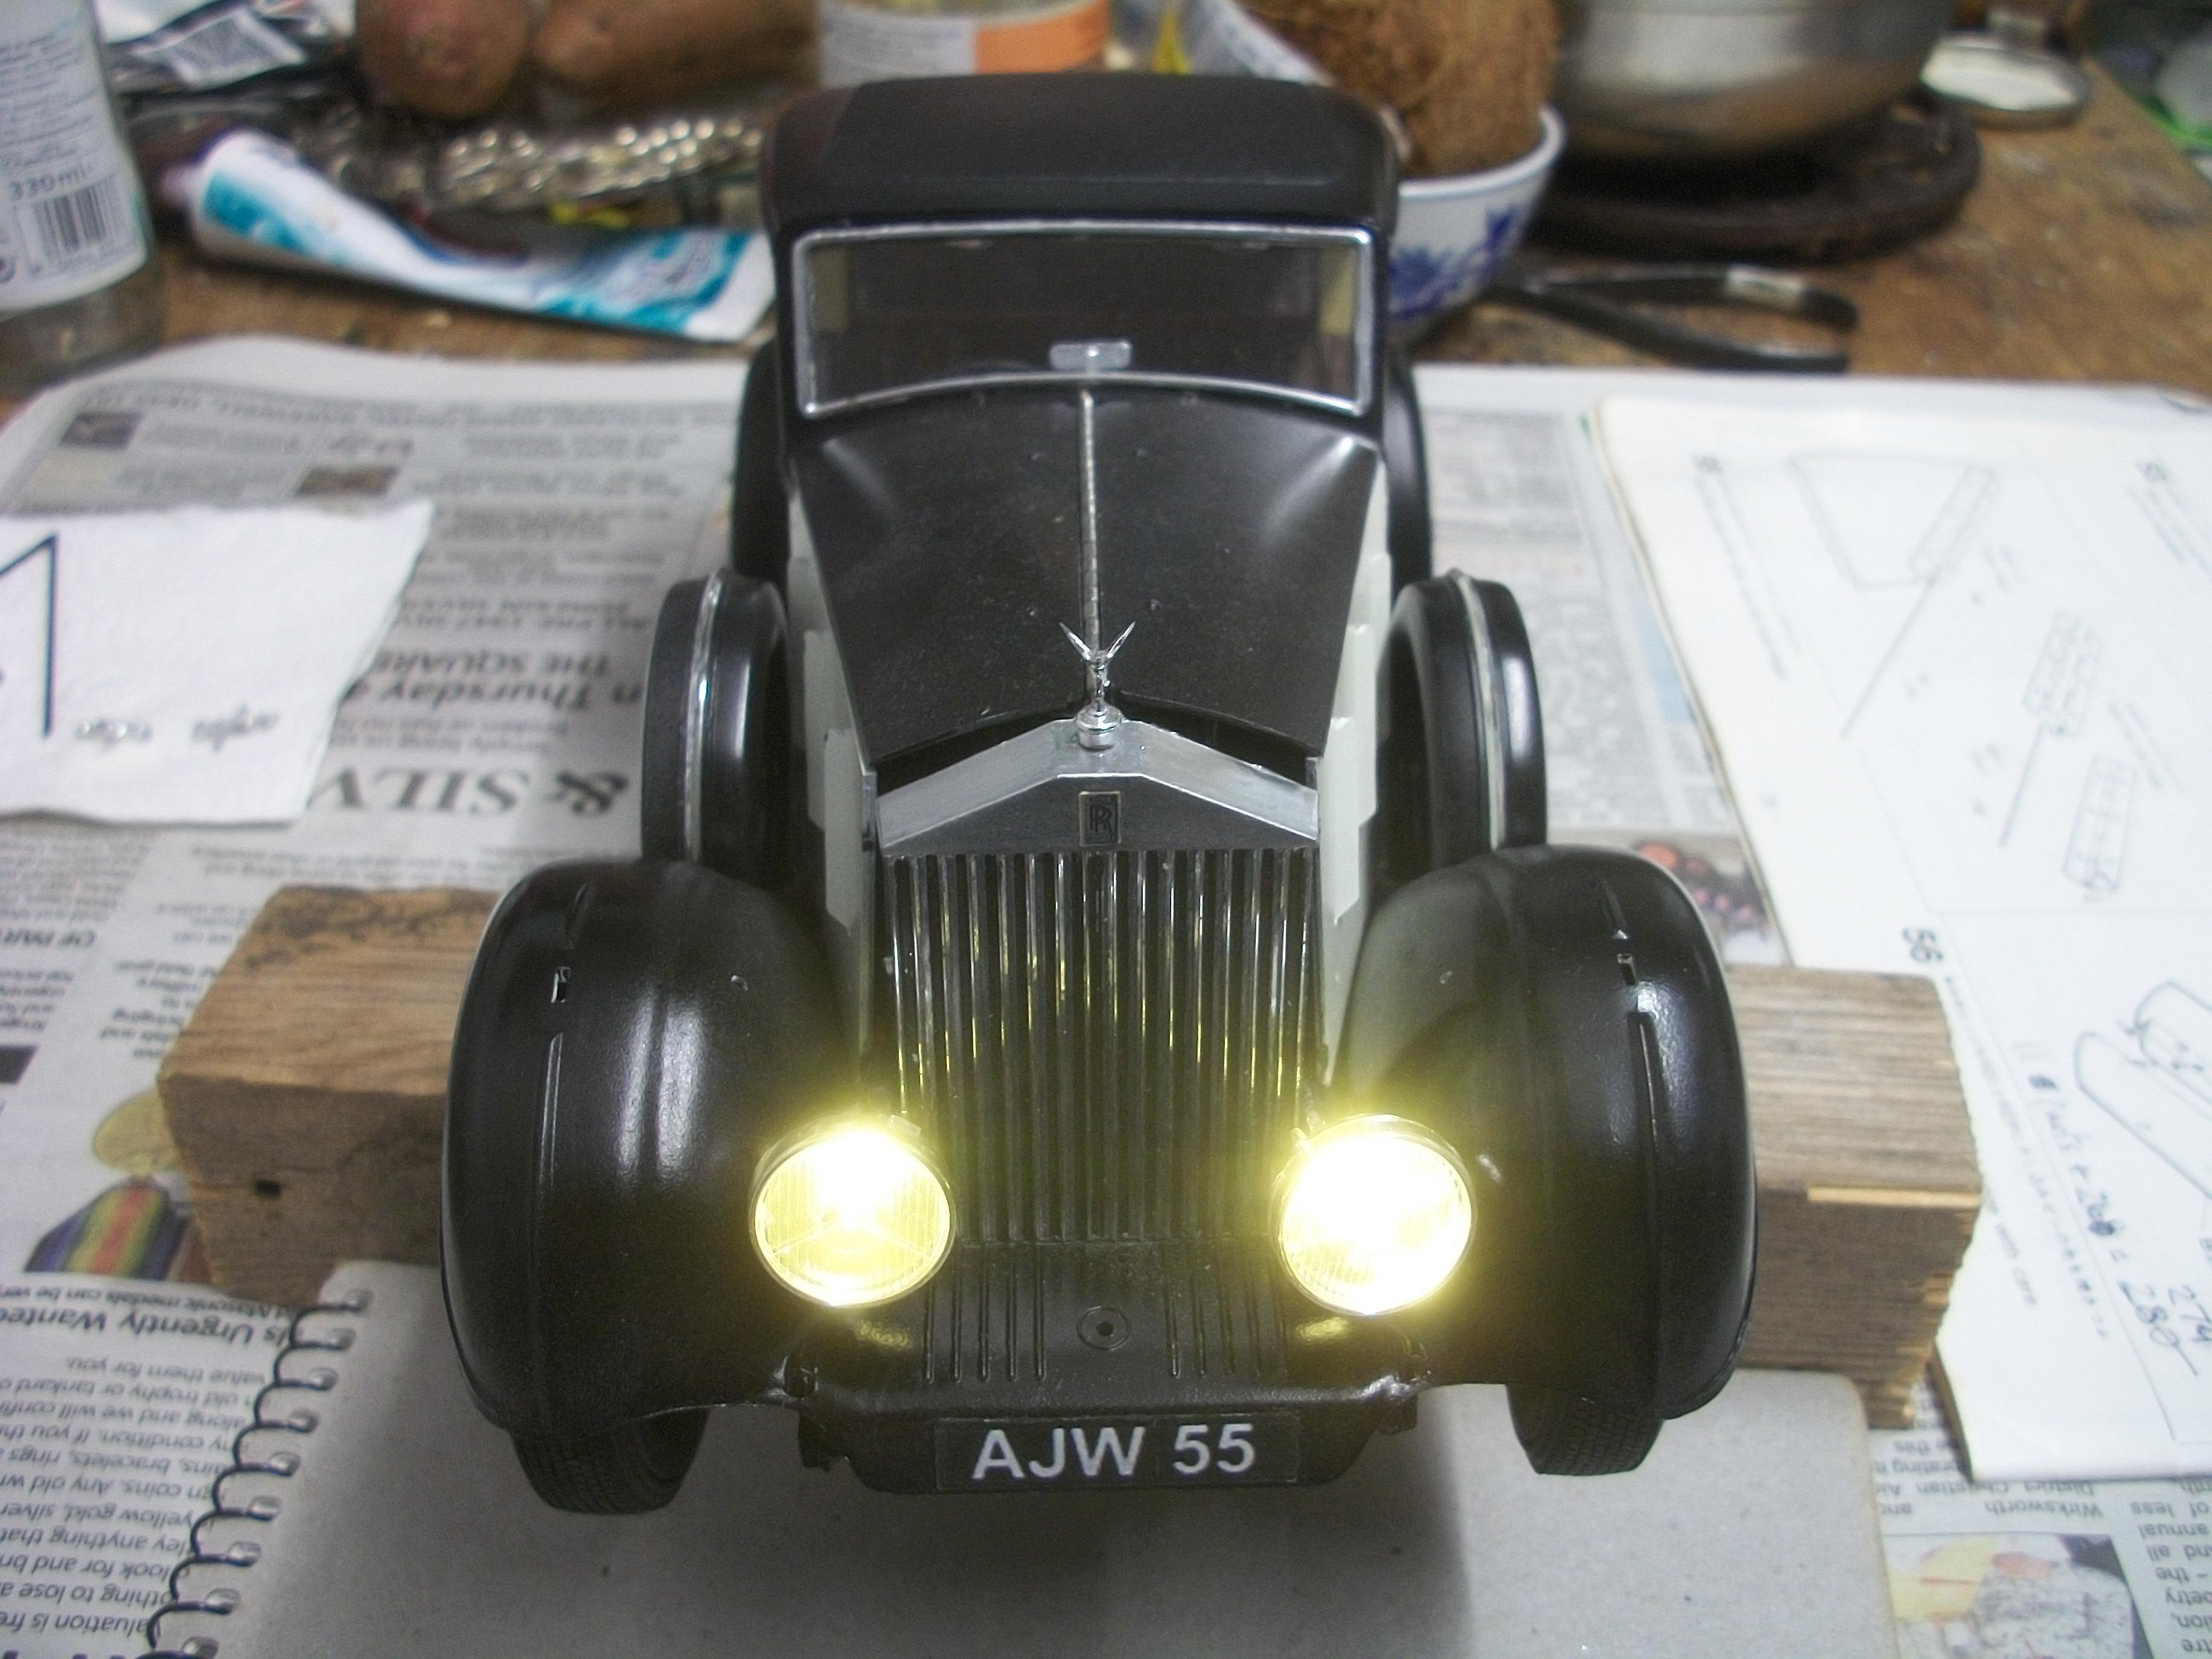
These following photos show the progress made with the working lights on the Phantom III, specifically the large Lucas P100 headlamps . . . I began by drilling 2.3 mm holes in the centre of both headlamp bowls, and the holes were gradually enlarged using an Italeri diamond round file, until the LED bulbs were a snug fit . . . These bulbs are 3 mm in diameter and no glue is necessary to hold them in place. The battery holder, which has an on / off switch, fits perfectly under the driver's side running board of the car, and the part could almost have been made to fit this model . . . Testing the headlamps, with them positioned roughly where they will be mounted later, produced a very satisfyling glow. The pale yellow beams are just what I was hoping to achieve . . . While the model was on the table, I test fitted the radiator grille and also the headlamp mounting bars. I think the process of concealing the wiring as far as possible will be somewhat difficult, but I am hoping to to do a reasonable job of hiding most of it. Thanks for looking guys ! David
-
One year of commitment and lots of hard work has resulted in a truly wonderful model motor car François . . . You should be very proud of your model engineering skills Sir ! David
-
1:16 Gunze Sangyo 1937 Rolls-Royce Phantom III Sports Saloon
Anglia105E replied to Anglia105E's topic in WIP: Model Cars
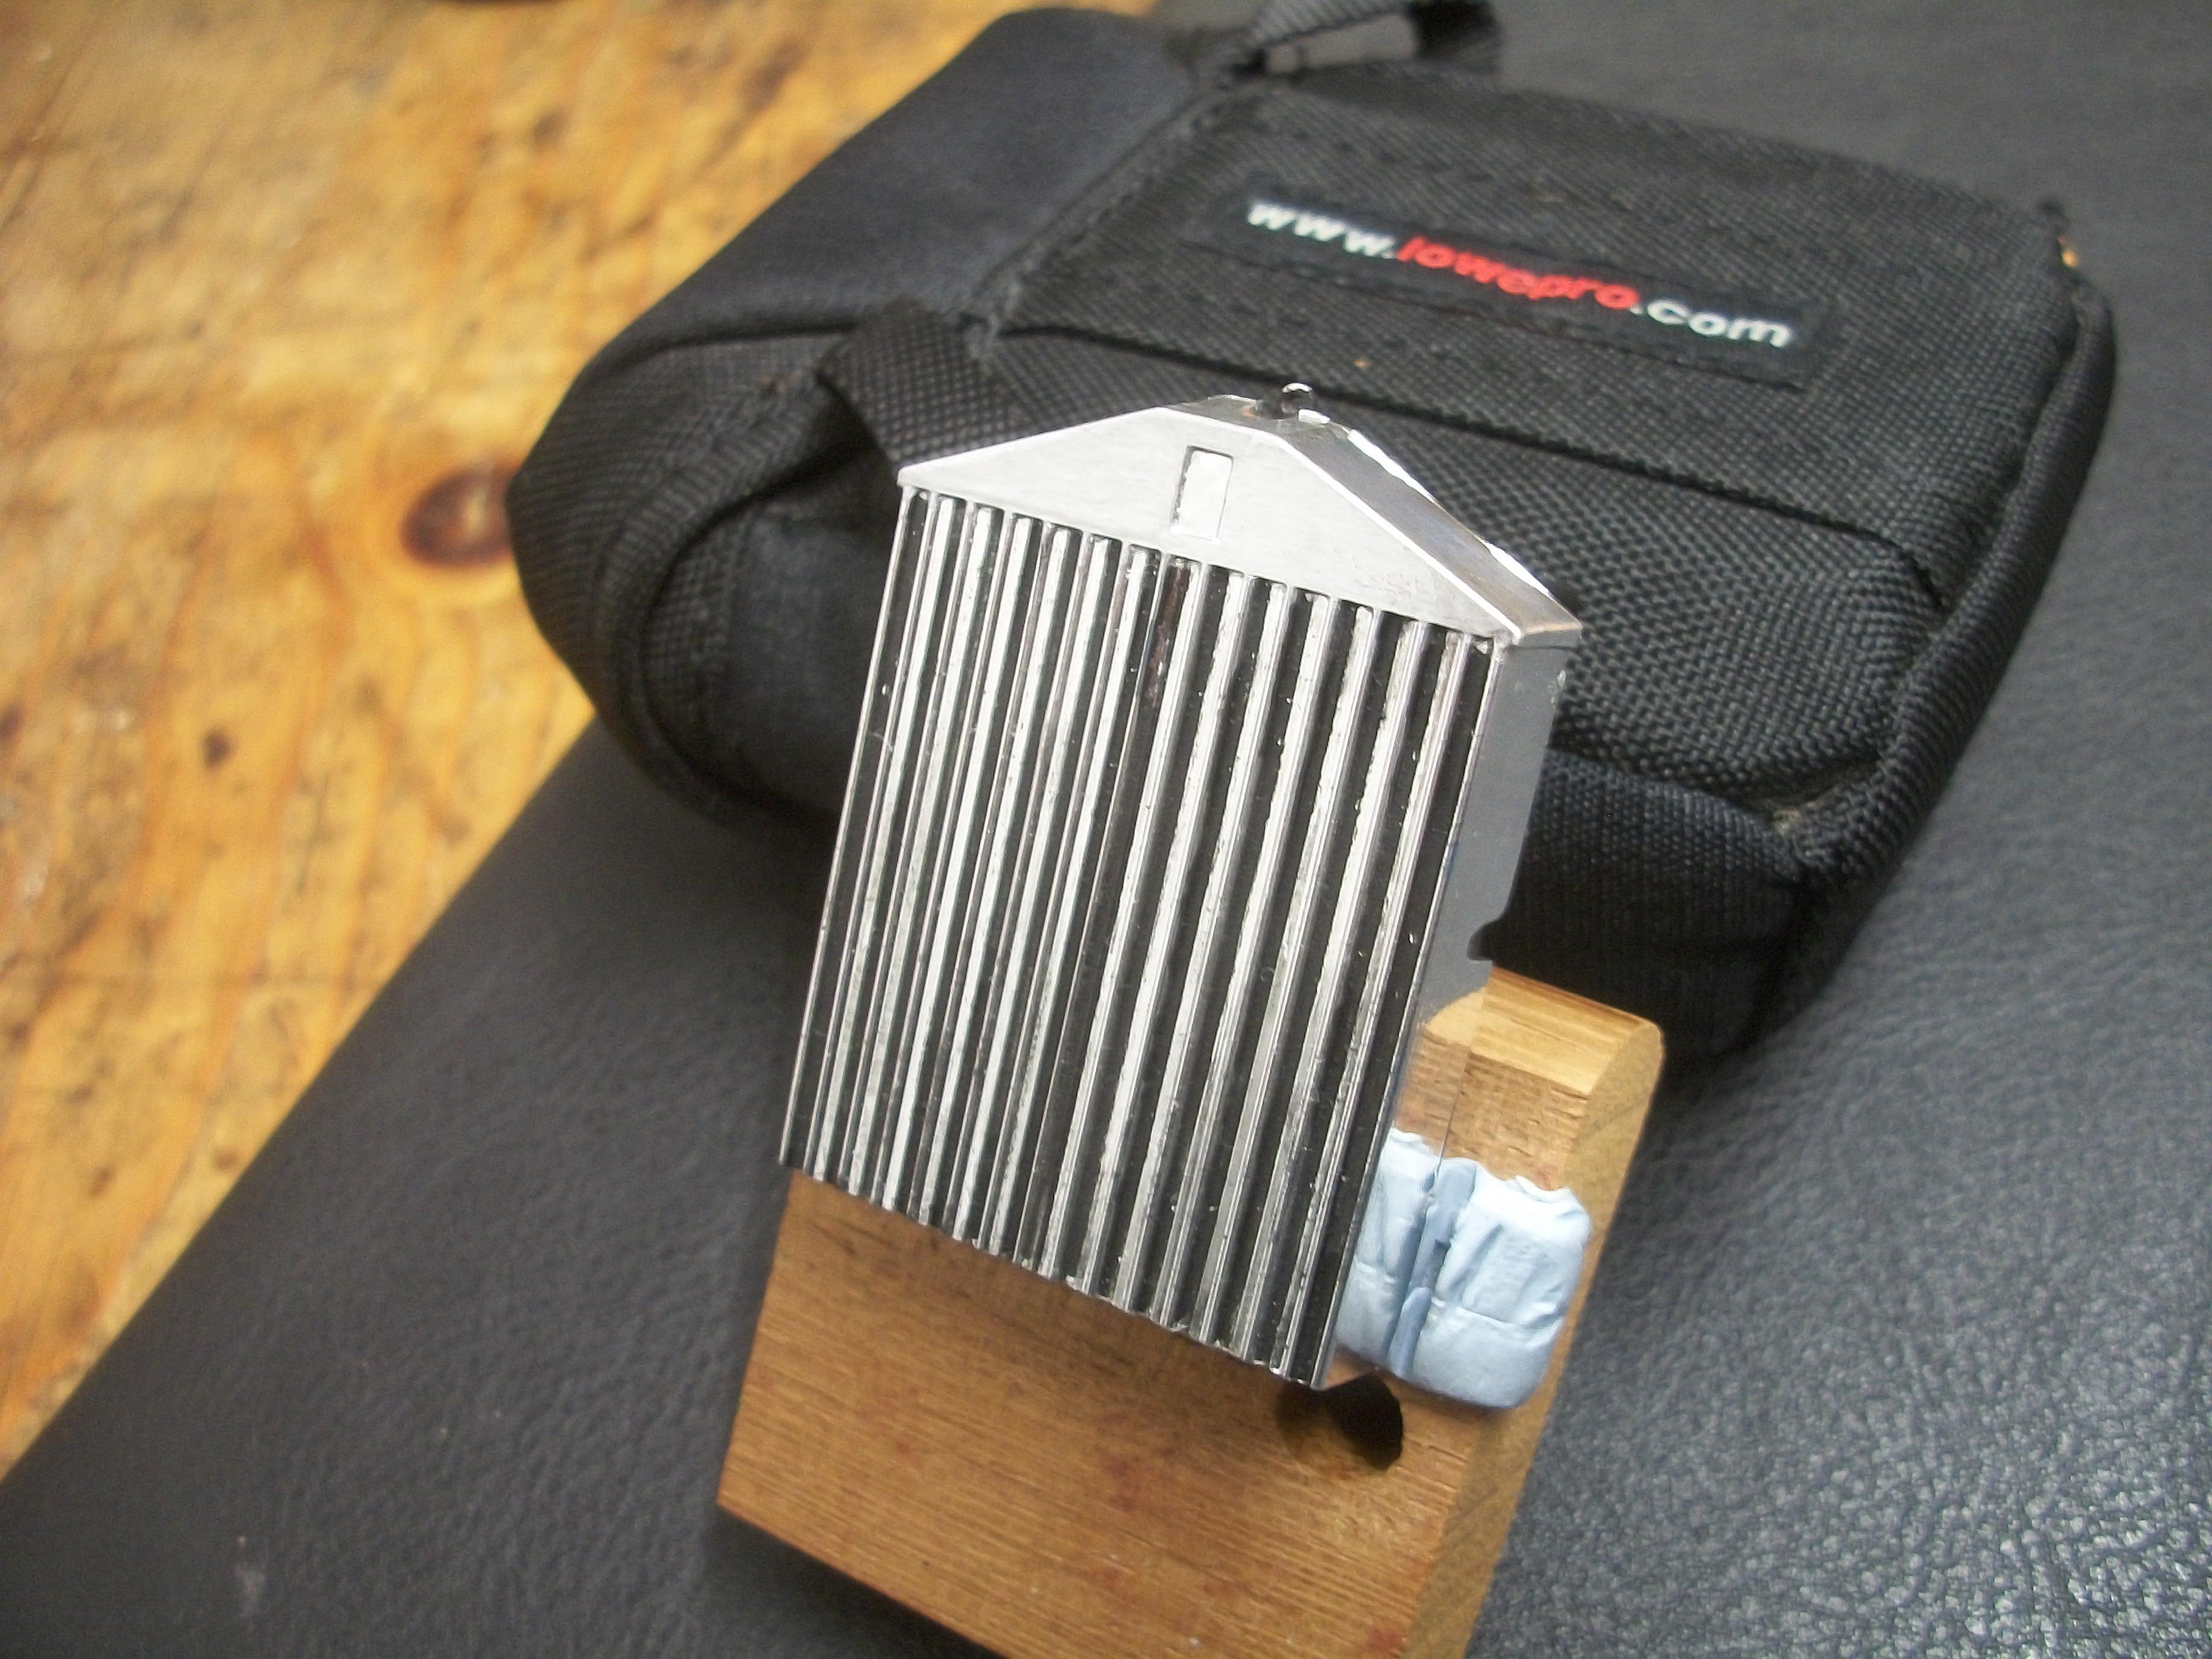
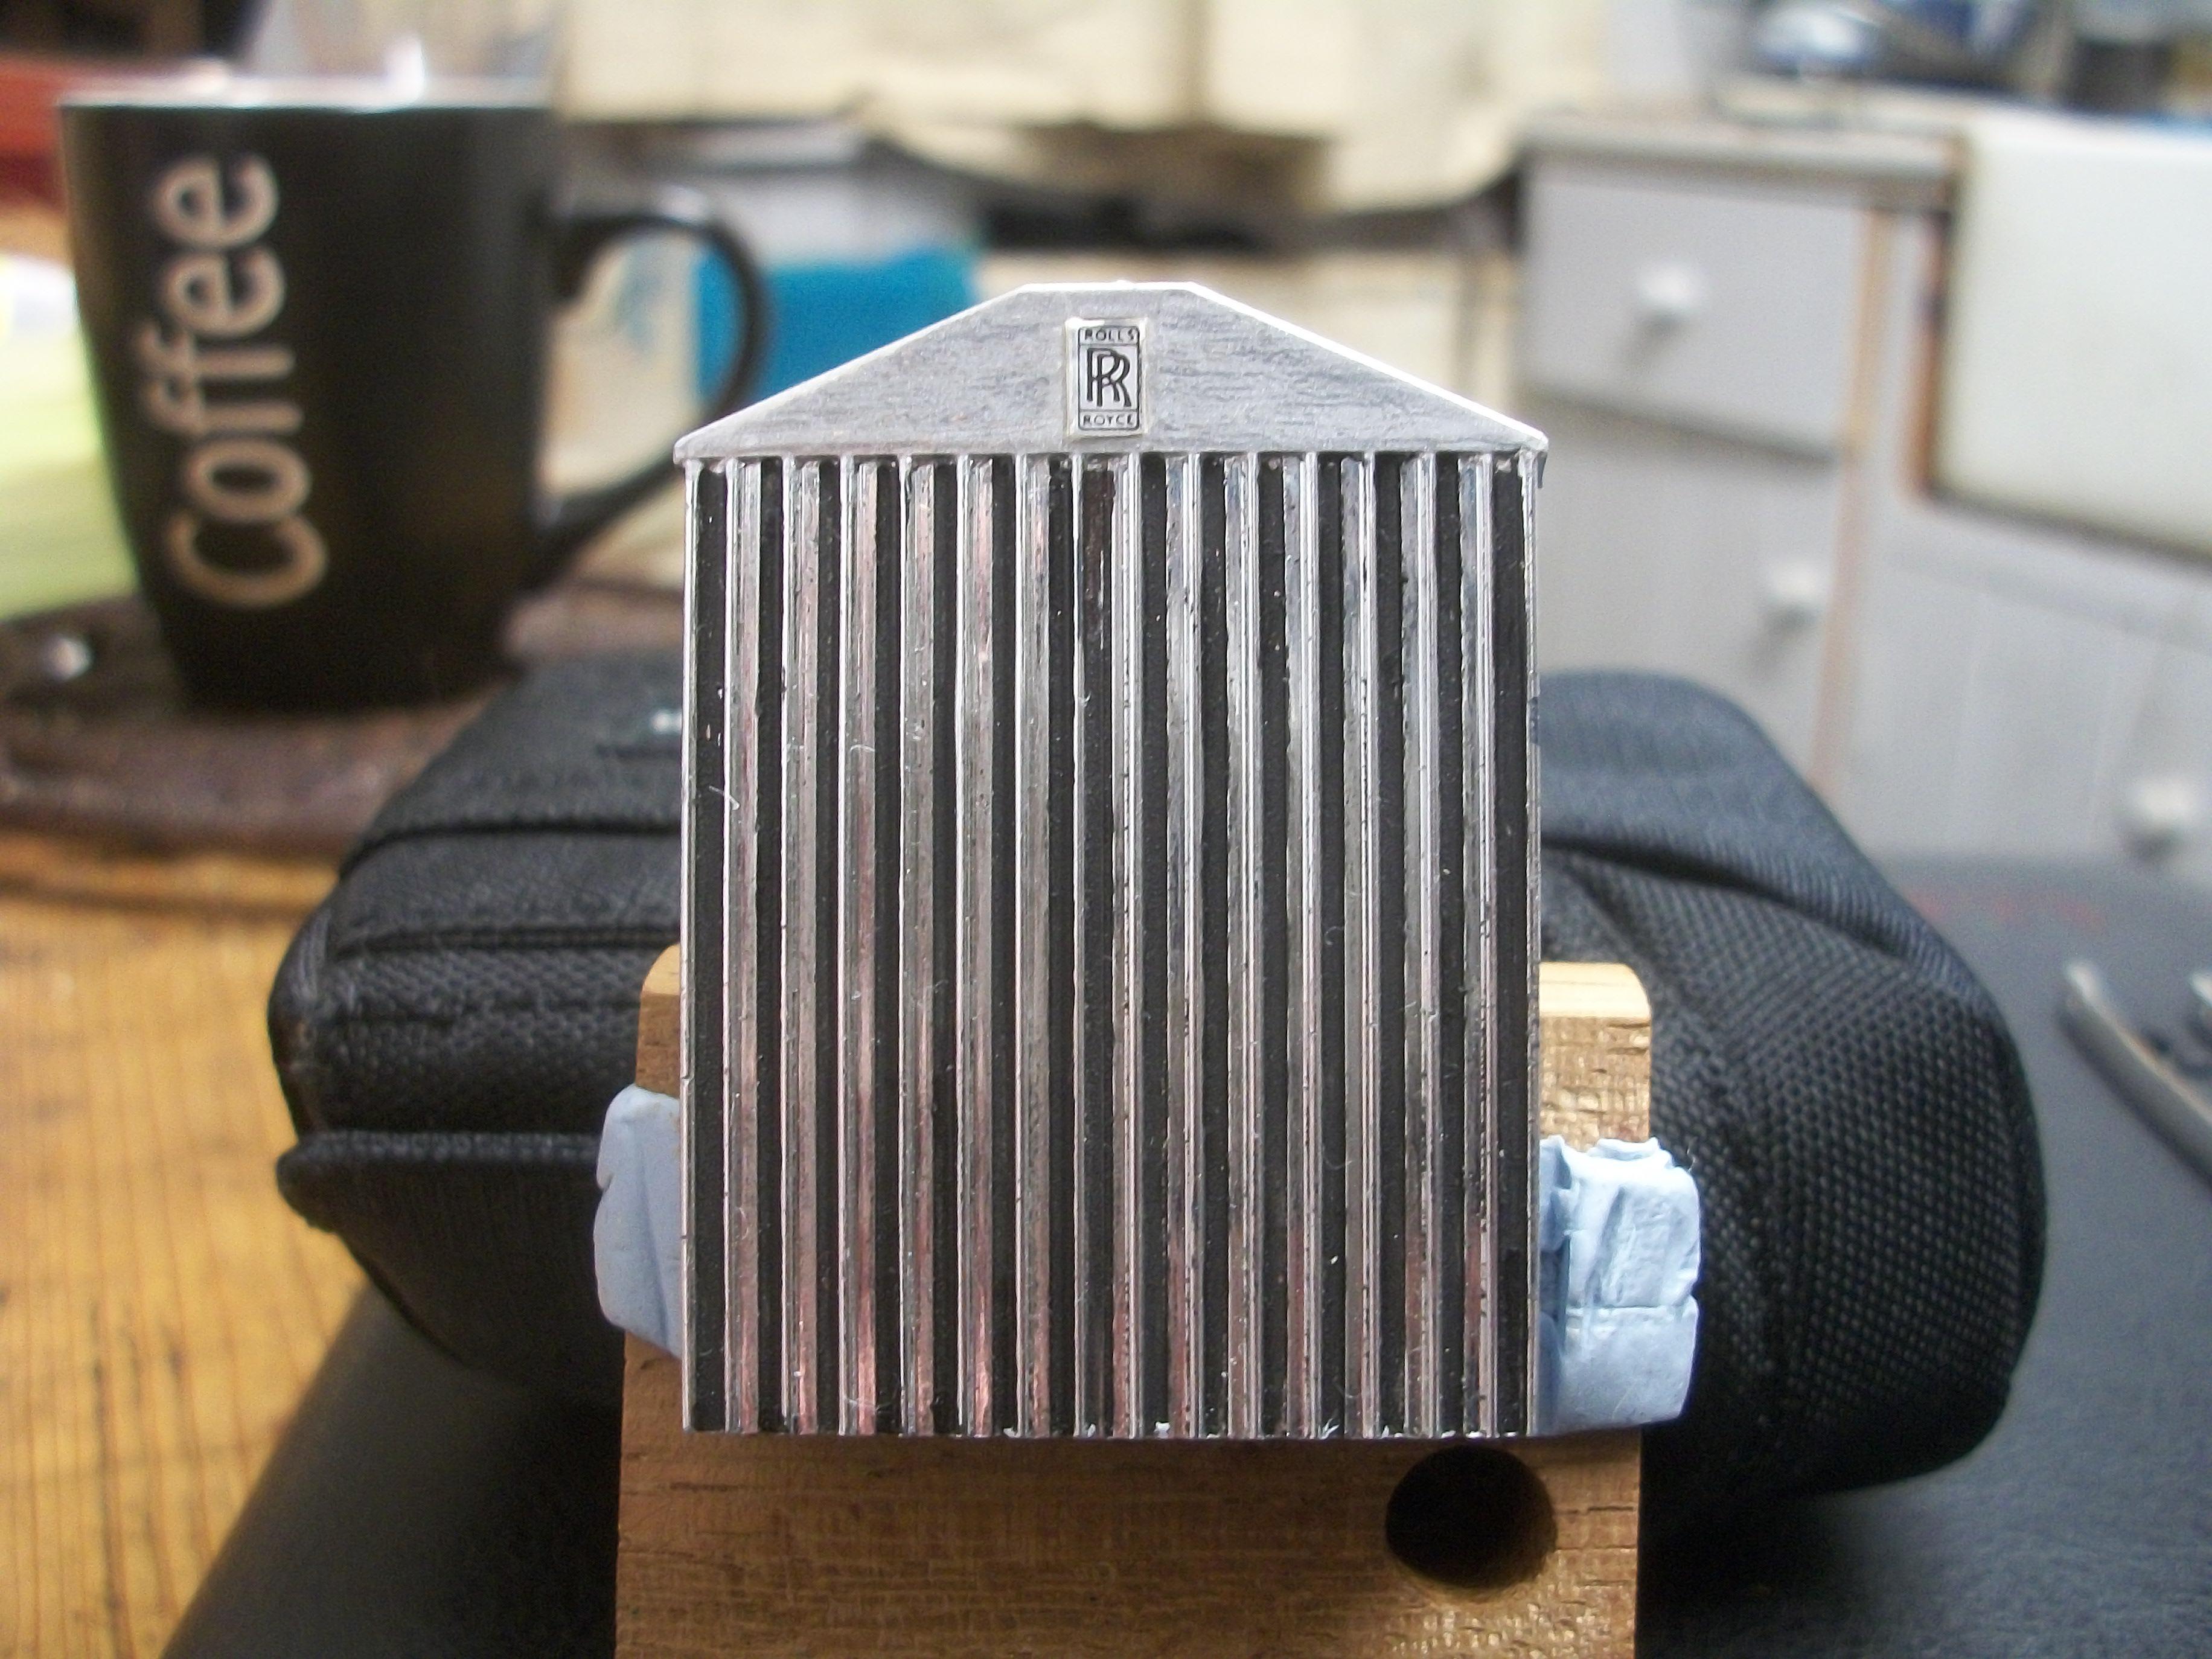
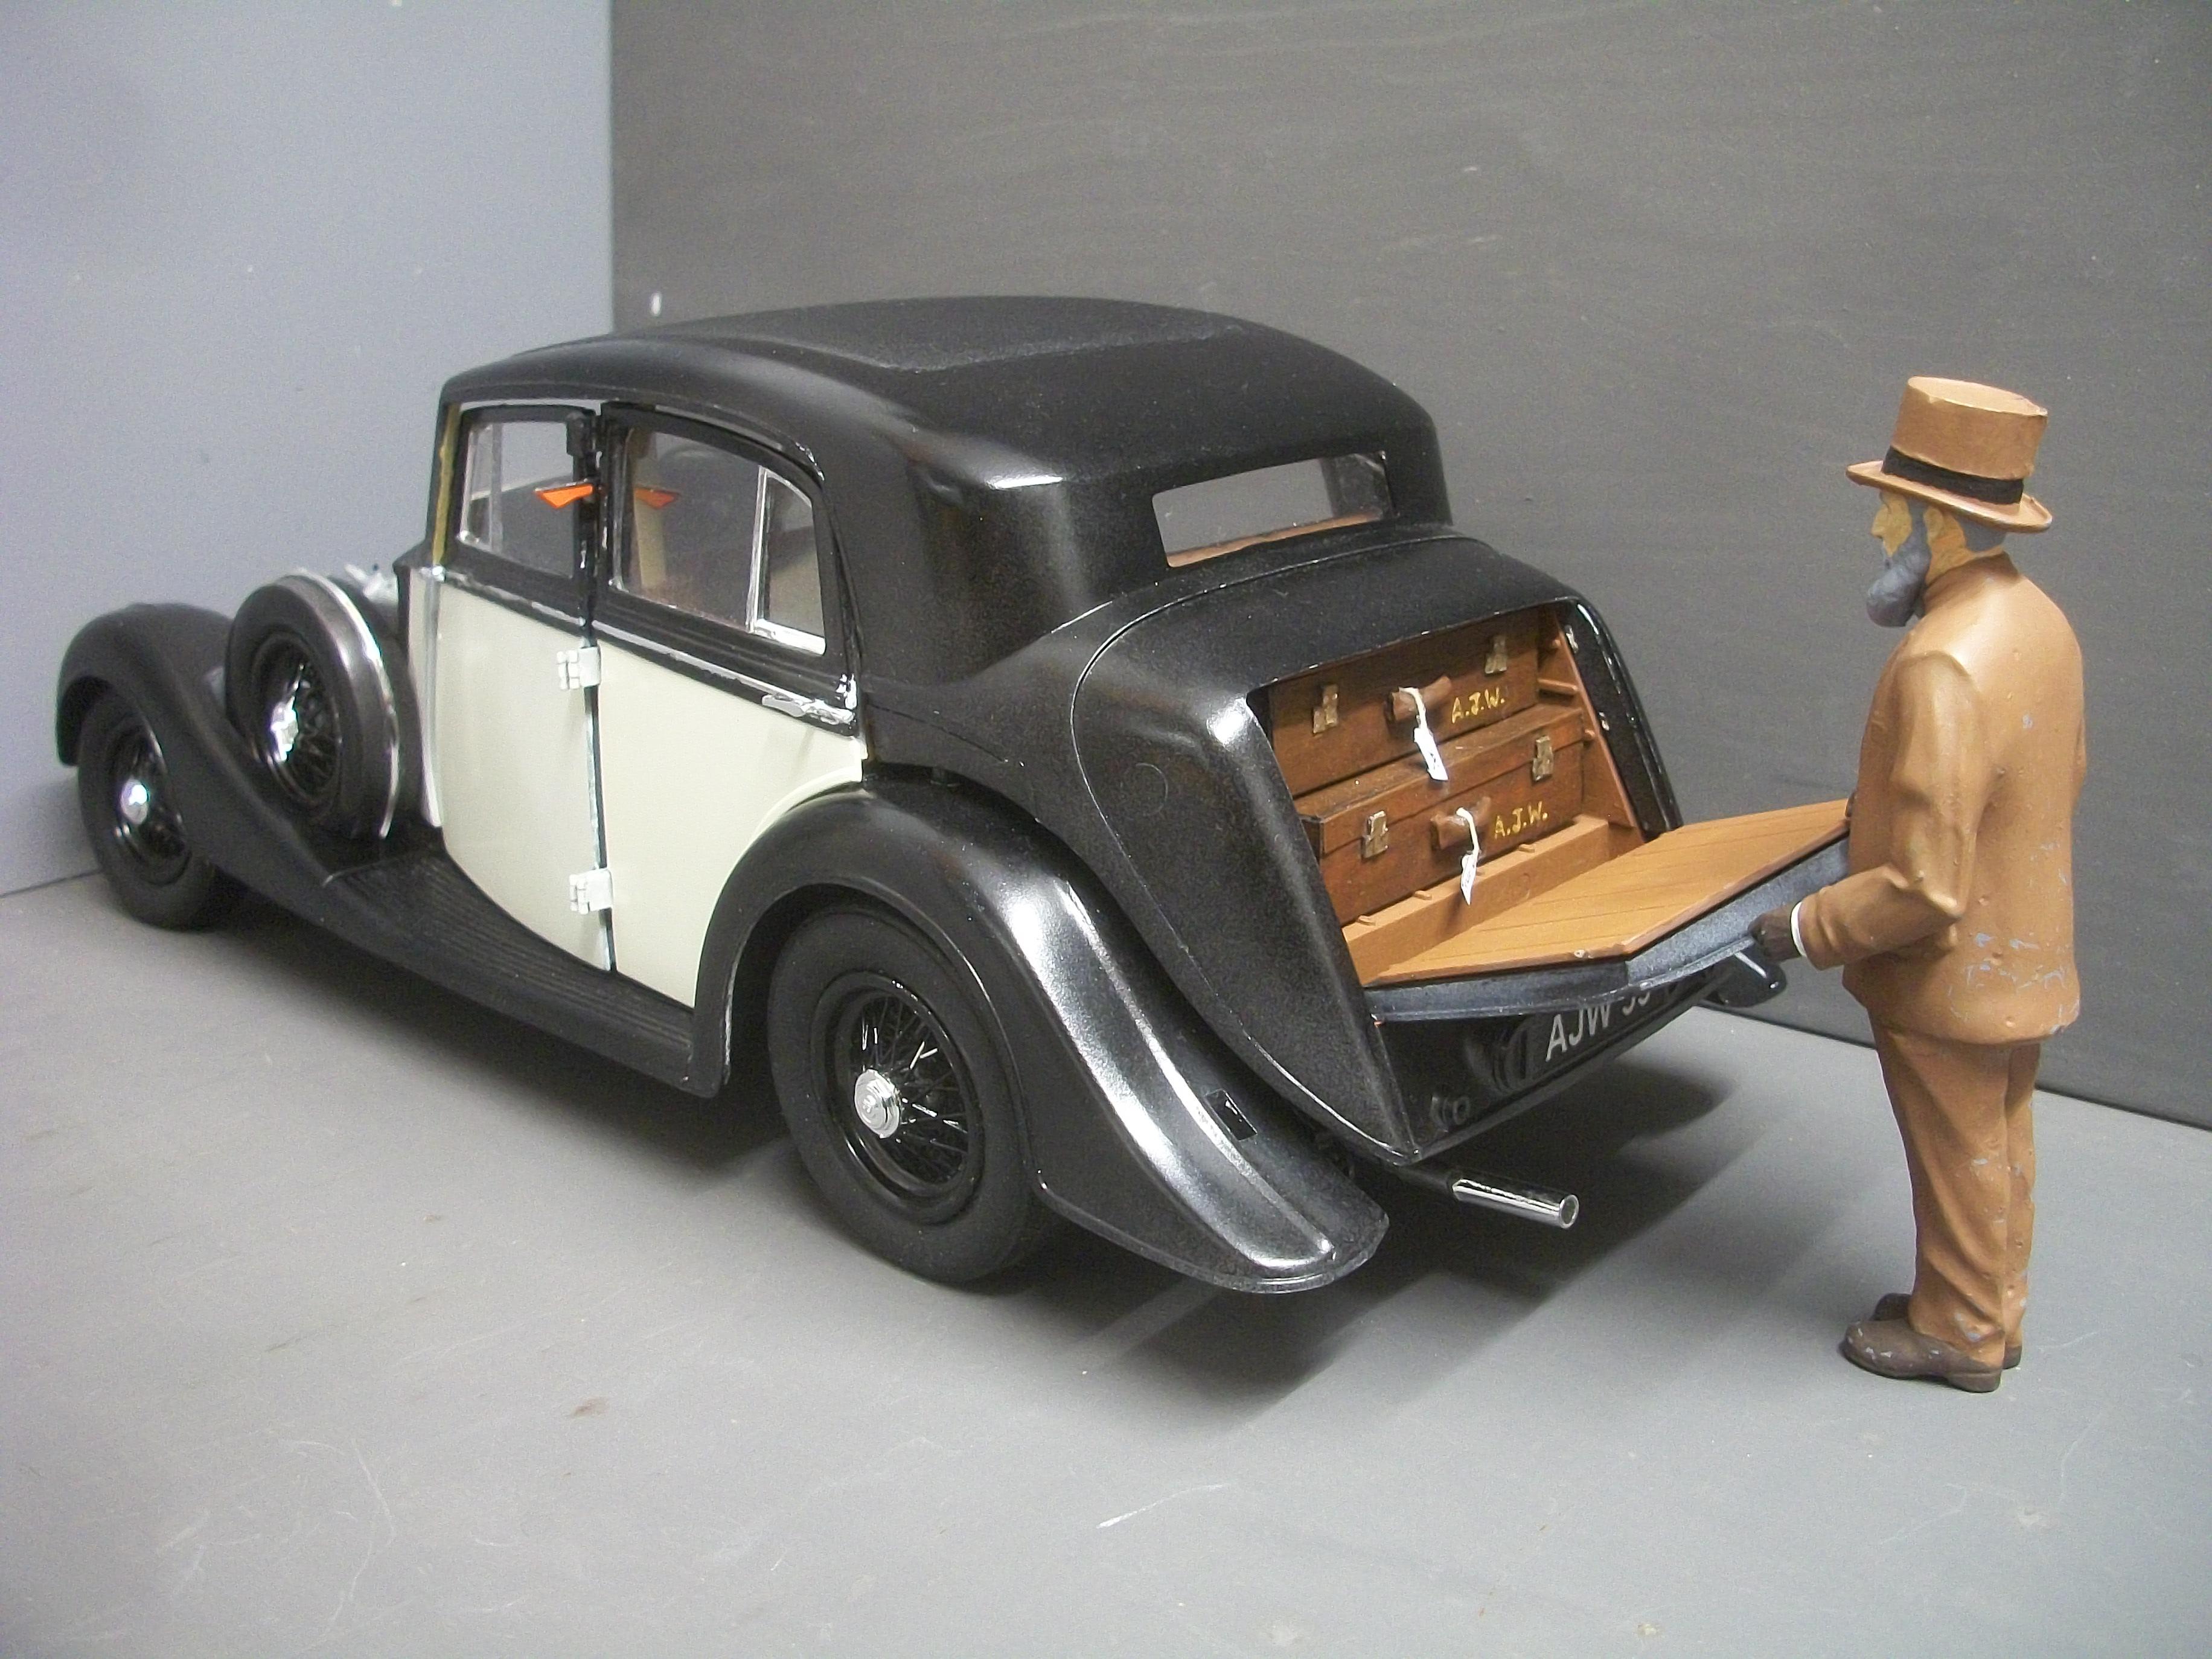
Thanks again David G., and anyone who is following this topic . . . The Phantom III was wheeled out into the sunshine yesterday, and A. J. Webb had the opportuntiy to cast his expert eye over the car. He noticed that the radiator grille has turned out better than expected, and the resulting finish is more realistic than the standard kit chrome . . . The large headlamp bowls are being prepared, along with the headlamp mounting bars, the Spirit of Ecstasy mascot and the twin horns. The mounting bars are quite complex parts, and these fit between the radiator grille shell, and the inner front wing . . . The radiator, with it's two cooling hoses, has been glued inside the radiator grille shell, after carefully inserting the ' Flying Lady ' mascot into the space provided . . . The horns are in two parts, and these have been glued together. Before the radiator grille and headlamps can be assembled, there needs to be holes drilled into the bowls in order to accommodate the warm white LED bulbs . . . If the bulbs are found to be too bright, I may paint the insides of the lenses with matt white enamel (thinned). David
-
I might seriously consider buying a 1:1 full size Fiat 500, Carlo . . . It would have to be one of the more modern ones, so I don't know if they are any good, as compared to the older ones ? I am located in England, U.K. Nice build you have there, and the 1:12 scale Italeri kits are usually very good . . . David
-
1:16 Gunze Sangyo 1937 Rolls-Royce Phantom III Sports Saloon
Anglia105E replied to Anglia105E's topic in WIP: Model Cars
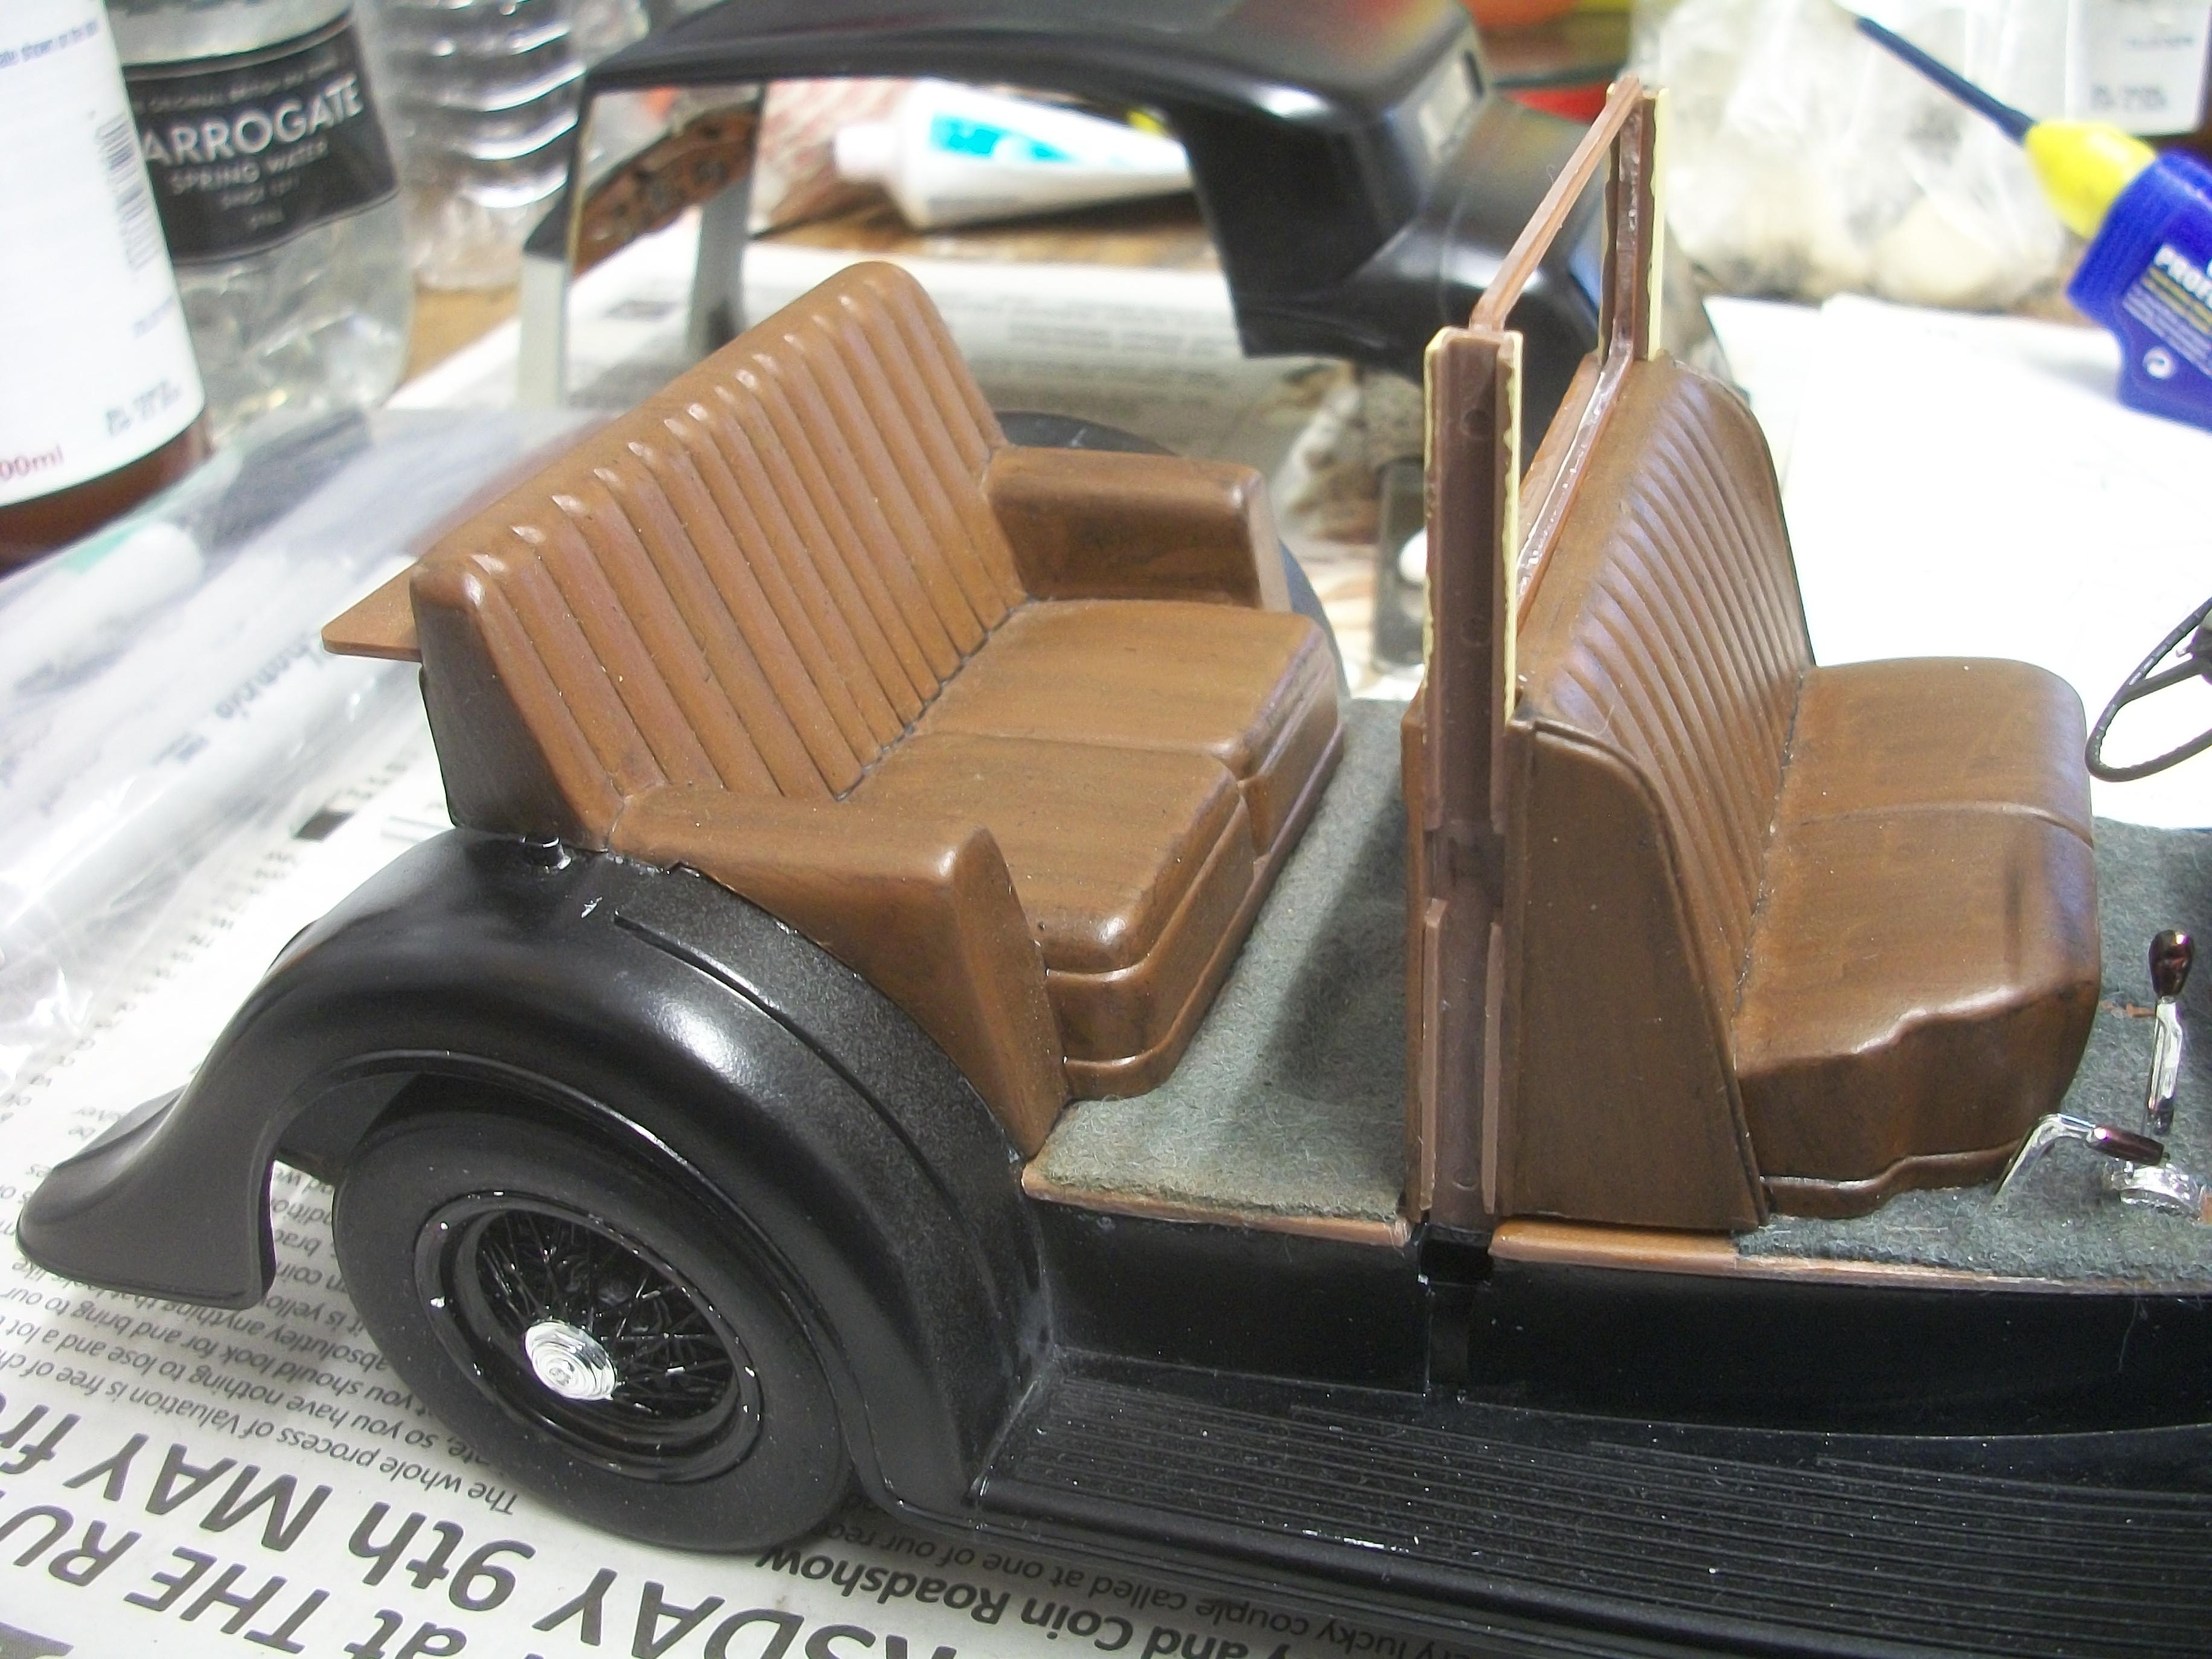
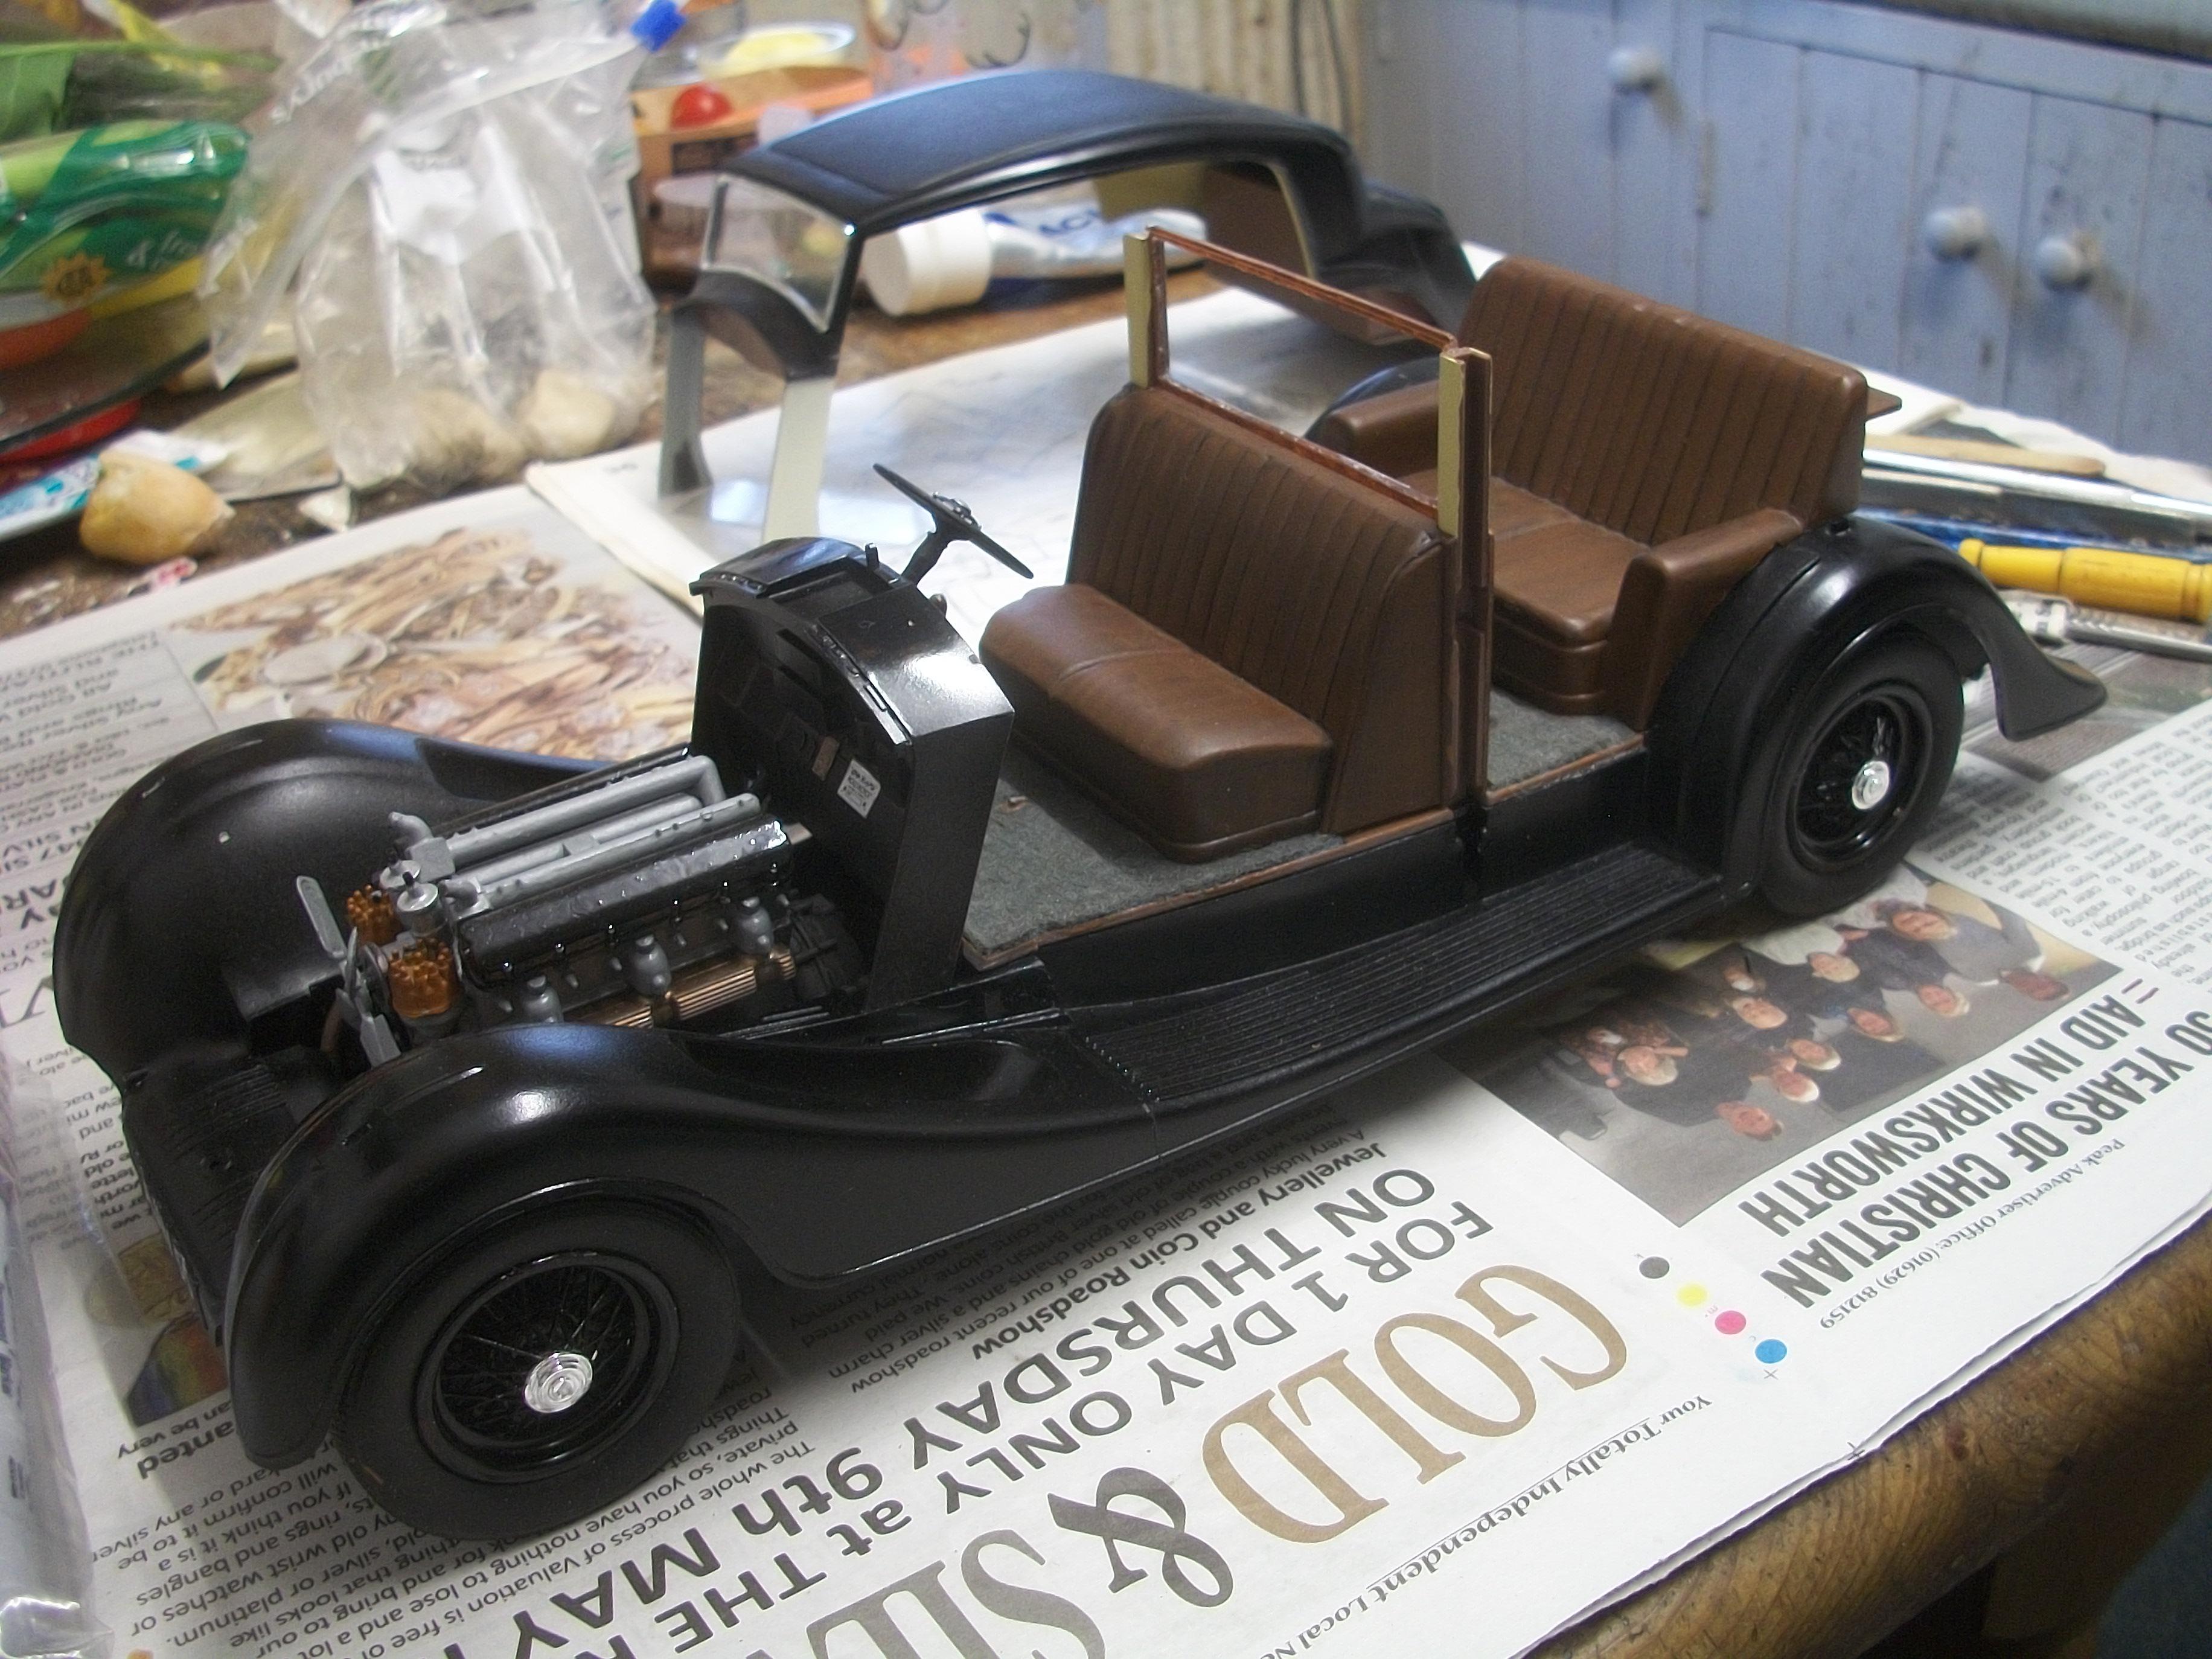
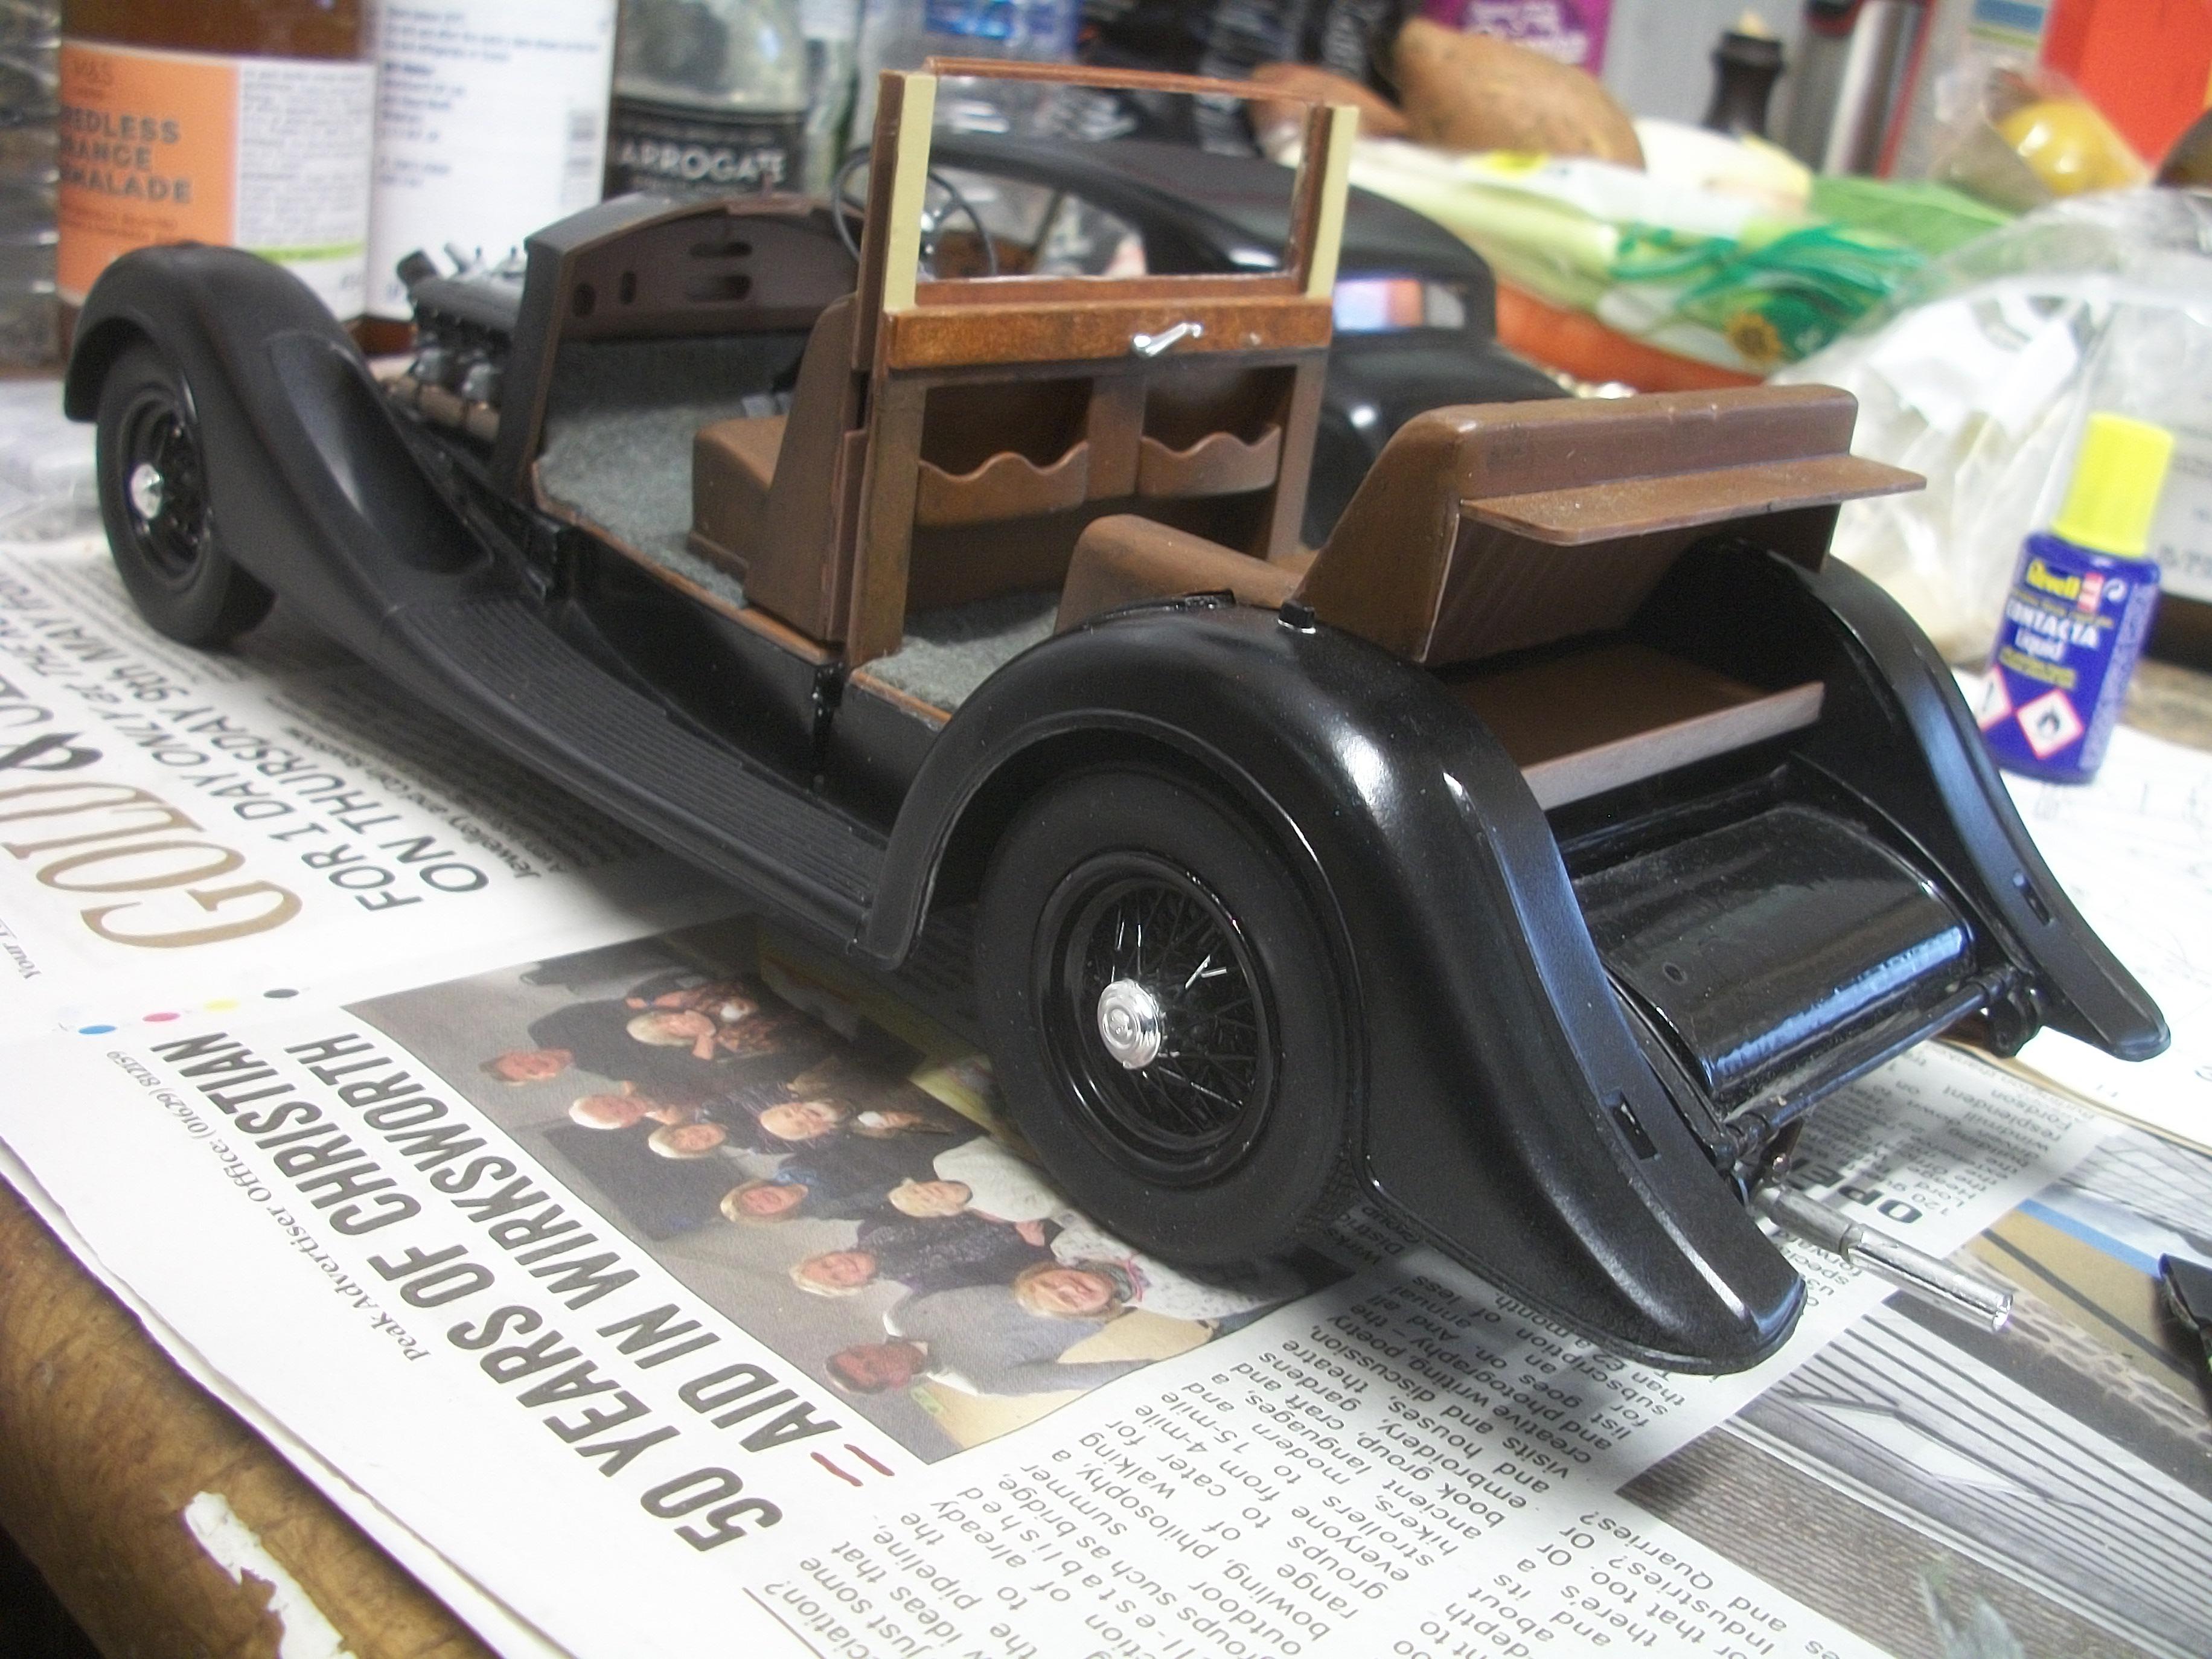
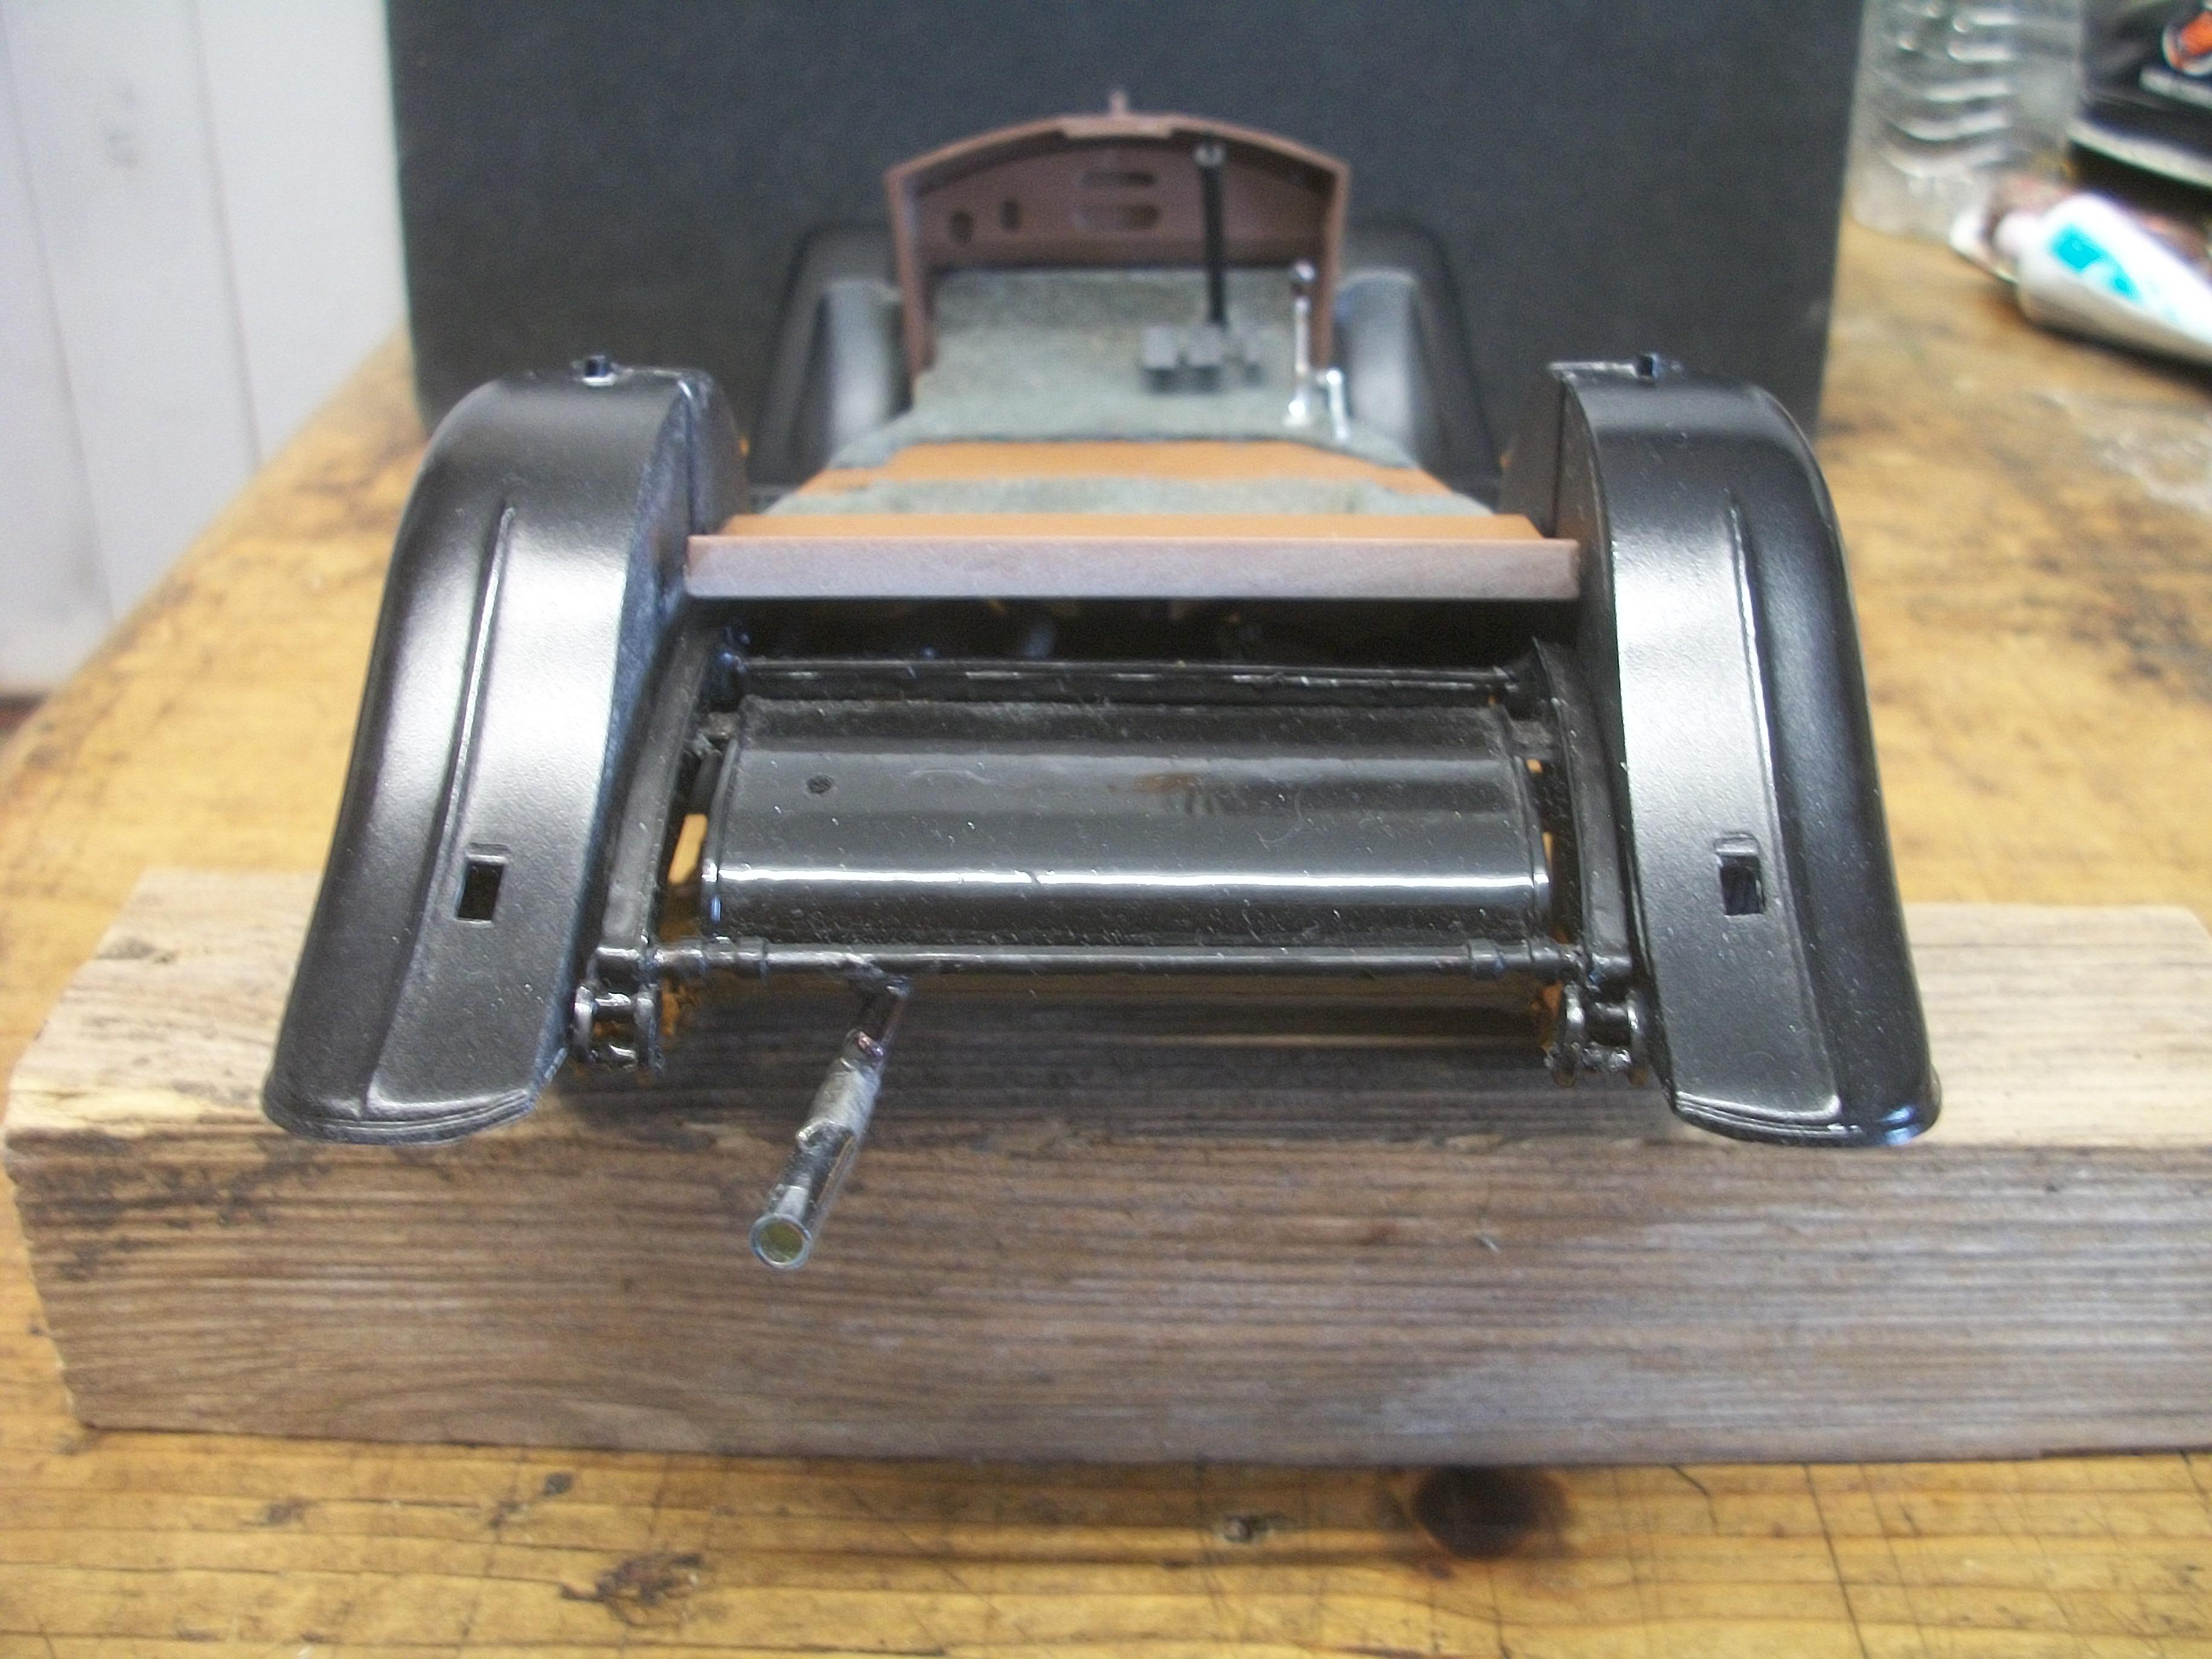
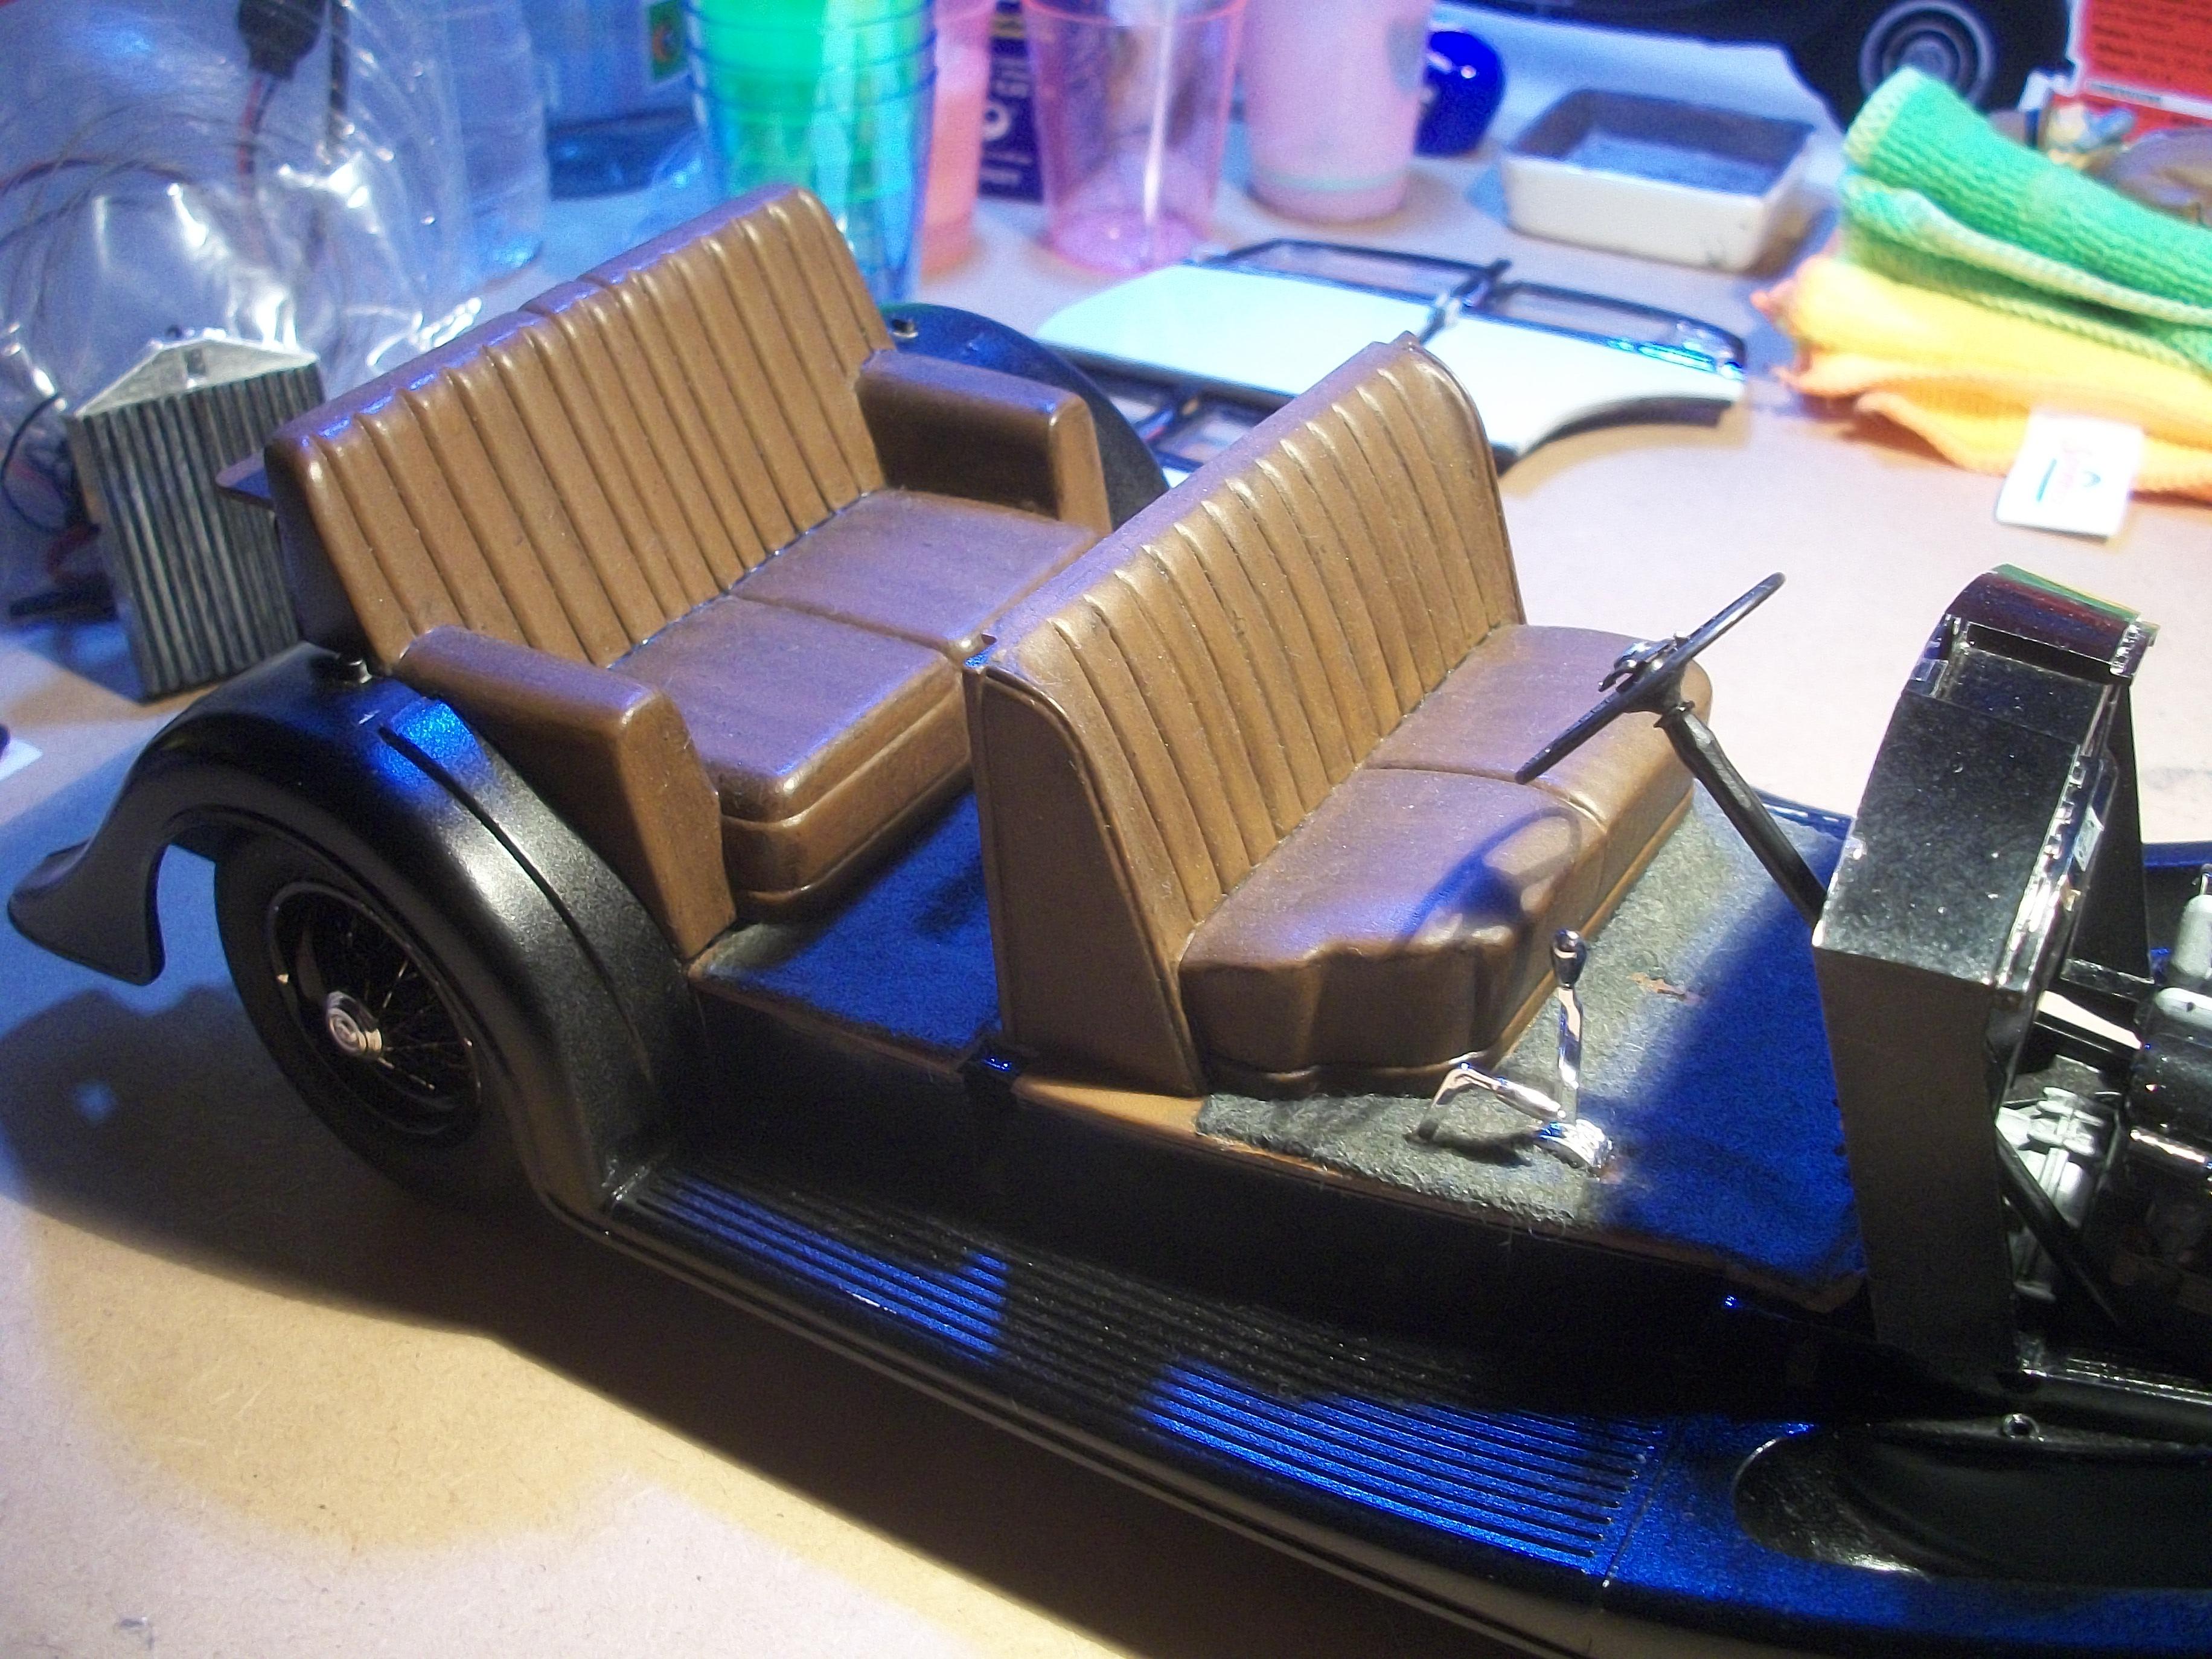
Having glued the division glass back in place and allowing 12 hours to set, it was time to bring together the upper body and the lower body . . . This was more difficult than I had expected, but once the dashboard was carefully eased behind the steering wheel, and once the luggage compartment was prised gently behind the rear seat parcel shelf, the roof section was lowered into position . . . Some further difficulty was encountered as the top edge of the division glass frame was persuaded to slot into the channel on the undersdide of the roof. Everything seemed to click into place at some point, but this is a very precise operation . . . As you can see from the following photos, there is a slight gap between the upper body rear arches and the top surface of the rear wings. I managed to test fit the doors and outer pillar assembly on the passenger side, but the driver's side was reluctant to fit, mainly because the outer door pillar on this side is bent outwards . . . Several photos show the trafficator in the raised position, on the passenger side of the car . . . Two lighting kits have been delivered today, and each kit contains 2 x warm white LED's, 2 x red LED's, 2 x battery holders for 2 x CR2032 coin cell batteries in each holder. The pre-wired LED's and battery holders with on / off switches have a good length of wiring, using two plastic wiring blocks to each kit . . . My plan is to wire up the two large headlamps plus the two tail lamps using one kit, and the front central foglamp will use the second kit. These battery holders will fit nicely into one of the two suitcases inside the rear luggage compartment. Of course, I am fully expecting this wiring setup to be very challenging, but I really would like to provide working lights for this model . . . The four wiring blocks, along with the wiring will need to be covered with black electrical insulation tape on the underside of the chassis. This is quite a large car, but I do wonder if I might have taken the build to rather an advanced stage before tackling the wiring of the lights. Certainly, the drilling of access holes would have been easier before bringing the lower body and chassis together . . . Although the two components are not glued together, the fact that the steering column and steering box is glued to the chassis, and passes through the floorboard and lower body means they cannot be separated now. David
-
Monogram's 1955 Lincoln Futura Concept Car: WIP
Anglia105E replied to David G.'s topic in WIP: Model Cars
If there was one manufacturer that could produce a newly tooled kit for this car, that would be Moebius for sure . . . David W. -
Monogram's 1955 Lincoln Futura Concept Car: WIP
Anglia105E replied to David G.'s topic in WIP: Model Cars
It's okay Peter, I understood that you were simply explaining how the original paint finish on the real car might have been produced using ground up sea shells or fish scales, and I wouldn't expect anyone to attempt such a thing with a model car !!! . . . I do like the idea of a paint finish appearing to be either white, pale blue or pale green, depending upon how the light catches the surface of the bodywork . . . Similar to how they create a paint finish on modern cars that shifts from blue to purple to red, or green even . . . David -
1:16 Gunze Sangyo 1937 Rolls-Royce Phantom III Sports Saloon
Anglia105E replied to Anglia105E's topic in WIP: Model Cars
Absolutely spot on David . . . the inner door pillars would have no positional awareness on their own, so they could have been slightly too far forward or backward, or slightly too far to the left or right. The division partition was precisely located in two holes on the floorboard, so this part cannot be out of position. Later, I shall post an update regarding the working lights for this car . . . David W. -
1:16 Gunze Sangyo 1937 Rolls-Royce Phantom III Sports Saloon
Anglia105E replied to Anglia105E's topic in WIP: Model Cars
Thanks for your comment Bob, and I do agree with you regarding kit instructions . . . These days, I tend to follow the instuction sheet up to a point, and then my years of model building experience takes over, and I always examine the method as instructed by the kit manufacturer / designer, before proceeding with my own chosen sequence of operations . . . Thanks for looking in on my topic Bob, and I understand this is not your type of build ! David -
Monogram's 1955 Lincoln Futura Concept Car: WIP
Anglia105E replied to David G.'s topic in WIP: Model Cars
David G. . . . I agree with Jim, that '50's motor cars generally look good in two-tone paint . . . David W. -
1:16 Gunze Sangyo 1937 Rolls-Royce Phantom III Sports Saloon
Anglia105E replied to Anglia105E's topic in WIP: Model Cars
I realised that with absolute certainty, the division for this Phantom III must be fitted FIRST, that is to say before the inner door posts. The Gunze Sangyo instruction sheet clearly shows the posts being glued to the chassis, before the division is added afterwards . . . The more I have thought about this, the more convinced I have become about the correct order of assembly . . . The division is actually right at the very centre of this car, and everything else around the division is supported by the part, as each further part is fitted. This turned out to be one of those very productive days, when model building becomes a sheer delight . . . Once the division was firmly set in place, and the two door posts were upright and square, the front seat was positioned in front of the division, and glued to the door posts at the inner corners. The rear seat was also glued in place, and I moved on to the division glass and frame . . . This was rather tricky, but I managed to glue the division glass frame into the right place, although the glass itself popped out of the frame. The glass is only held in place by Crystal Clear glue, which is not particularly strong, but I can replace the glass at some point . . . Some brown Sharpie was applied to the gear lever knob and also the handbrake lever knob, which looks better than plain black. While I was on a roll, so to speak, I glued the steering wheel onto the top of the steering column, and also the central hub controls . . . When the upper body is mated with the lower body, during the next day or so, it remains to be seen whether or not the sockets on the underside of the roof interior are going to line up with the top edges of the door posts, and consequently, will the front and rear parts of the upper body sit squarely onto the lower body? . . . My plan is to place the upper body on it's roof on a soft cloth, and hopefully I shall be able to see the sockets aligning with the door post tops ( or not ) . . . !!! David
-
1:16 Gunze Sangyo 1937 Rolls-Royce Phantom III Sports Saloon
Anglia105E replied to Anglia105E's topic in WIP: Model Cars
Yes, I can appreciate the ' fixed wheel ' approach now that I think it through properly ! Productive update will be posted later today . . . David W. -
1:16 Gunze Sangyo 1937 Rolls-Royce Phantom III Sports Saloon
Anglia105E replied to Anglia105E's topic in WIP: Model Cars
Cheers, Noel ! David -
1:16 Gunze Sangyo 1937 Rolls-Royce Phantom III Sports Saloon
Anglia105E replied to Anglia105E's topic in WIP: Model Cars
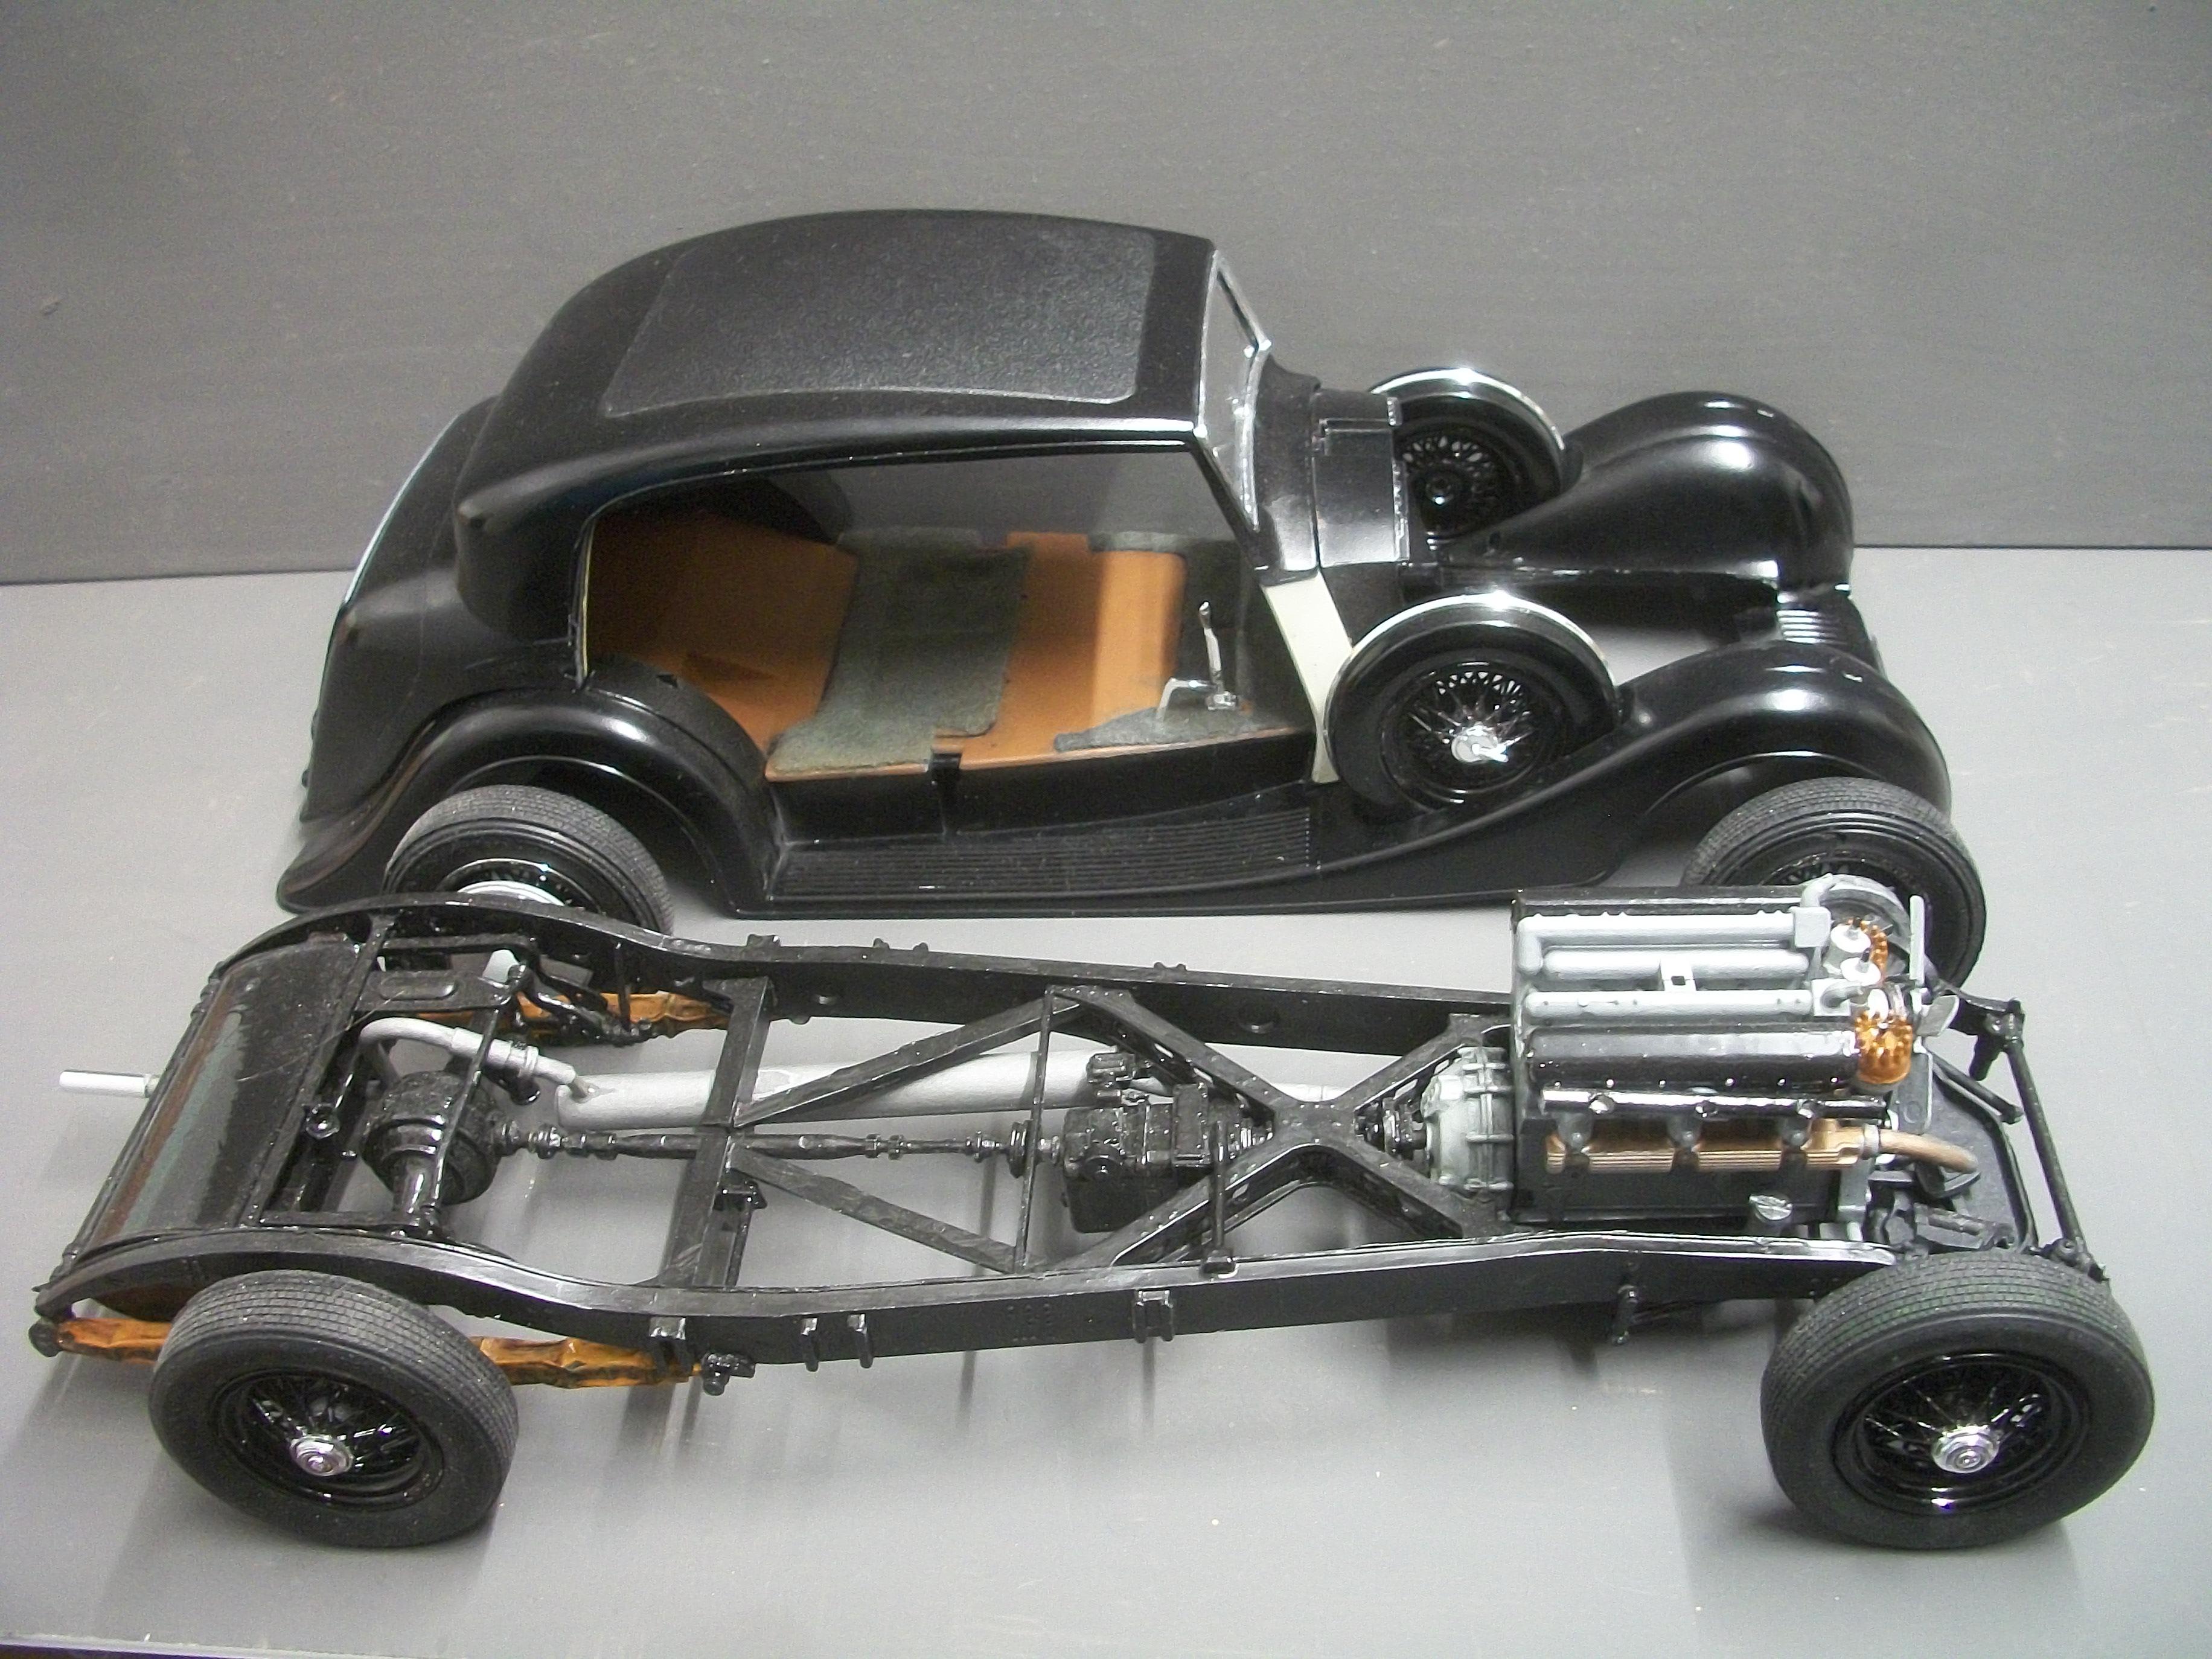
Having embarked on a process of pressing, twisting, sqeezing, forcing and persuading the components of the chassis to conform to some semblance of what it should be, I have arrived at a better place . . . The floorboard and chassis seem to be in a state of tension, whereby they are pushing against one another, and neither of them wants to give ! Anyway, the end result is good enough to proceed with the assembly of the body parts. During the physical struggle between model builder and model, the passenger side rear wheel has dropped off the stub axle, and I cannot find a way of attaching the wheel so that it rotates, as do the other three wheels . . . Now I think about this, maybe if one wheel is glued in a fixed position then the model car cannot roll off a not quite level surface, and plunge to it's death ! The wheel is glued on, and setting overnight . . . David
-
Monogram's 1955 Lincoln Futura Concept Car: WIP
Anglia105E replied to David G.'s topic in WIP: Model Cars
I think Peter is probably right about the ground up fish scales, but your choice of Tamiya TS-60 Pearl Green is far less complicated, and an excellent choice. It does sound like a very interesting paint scheme, and actually a very interesting car . . . You know how to pick 'em David ! David W. -
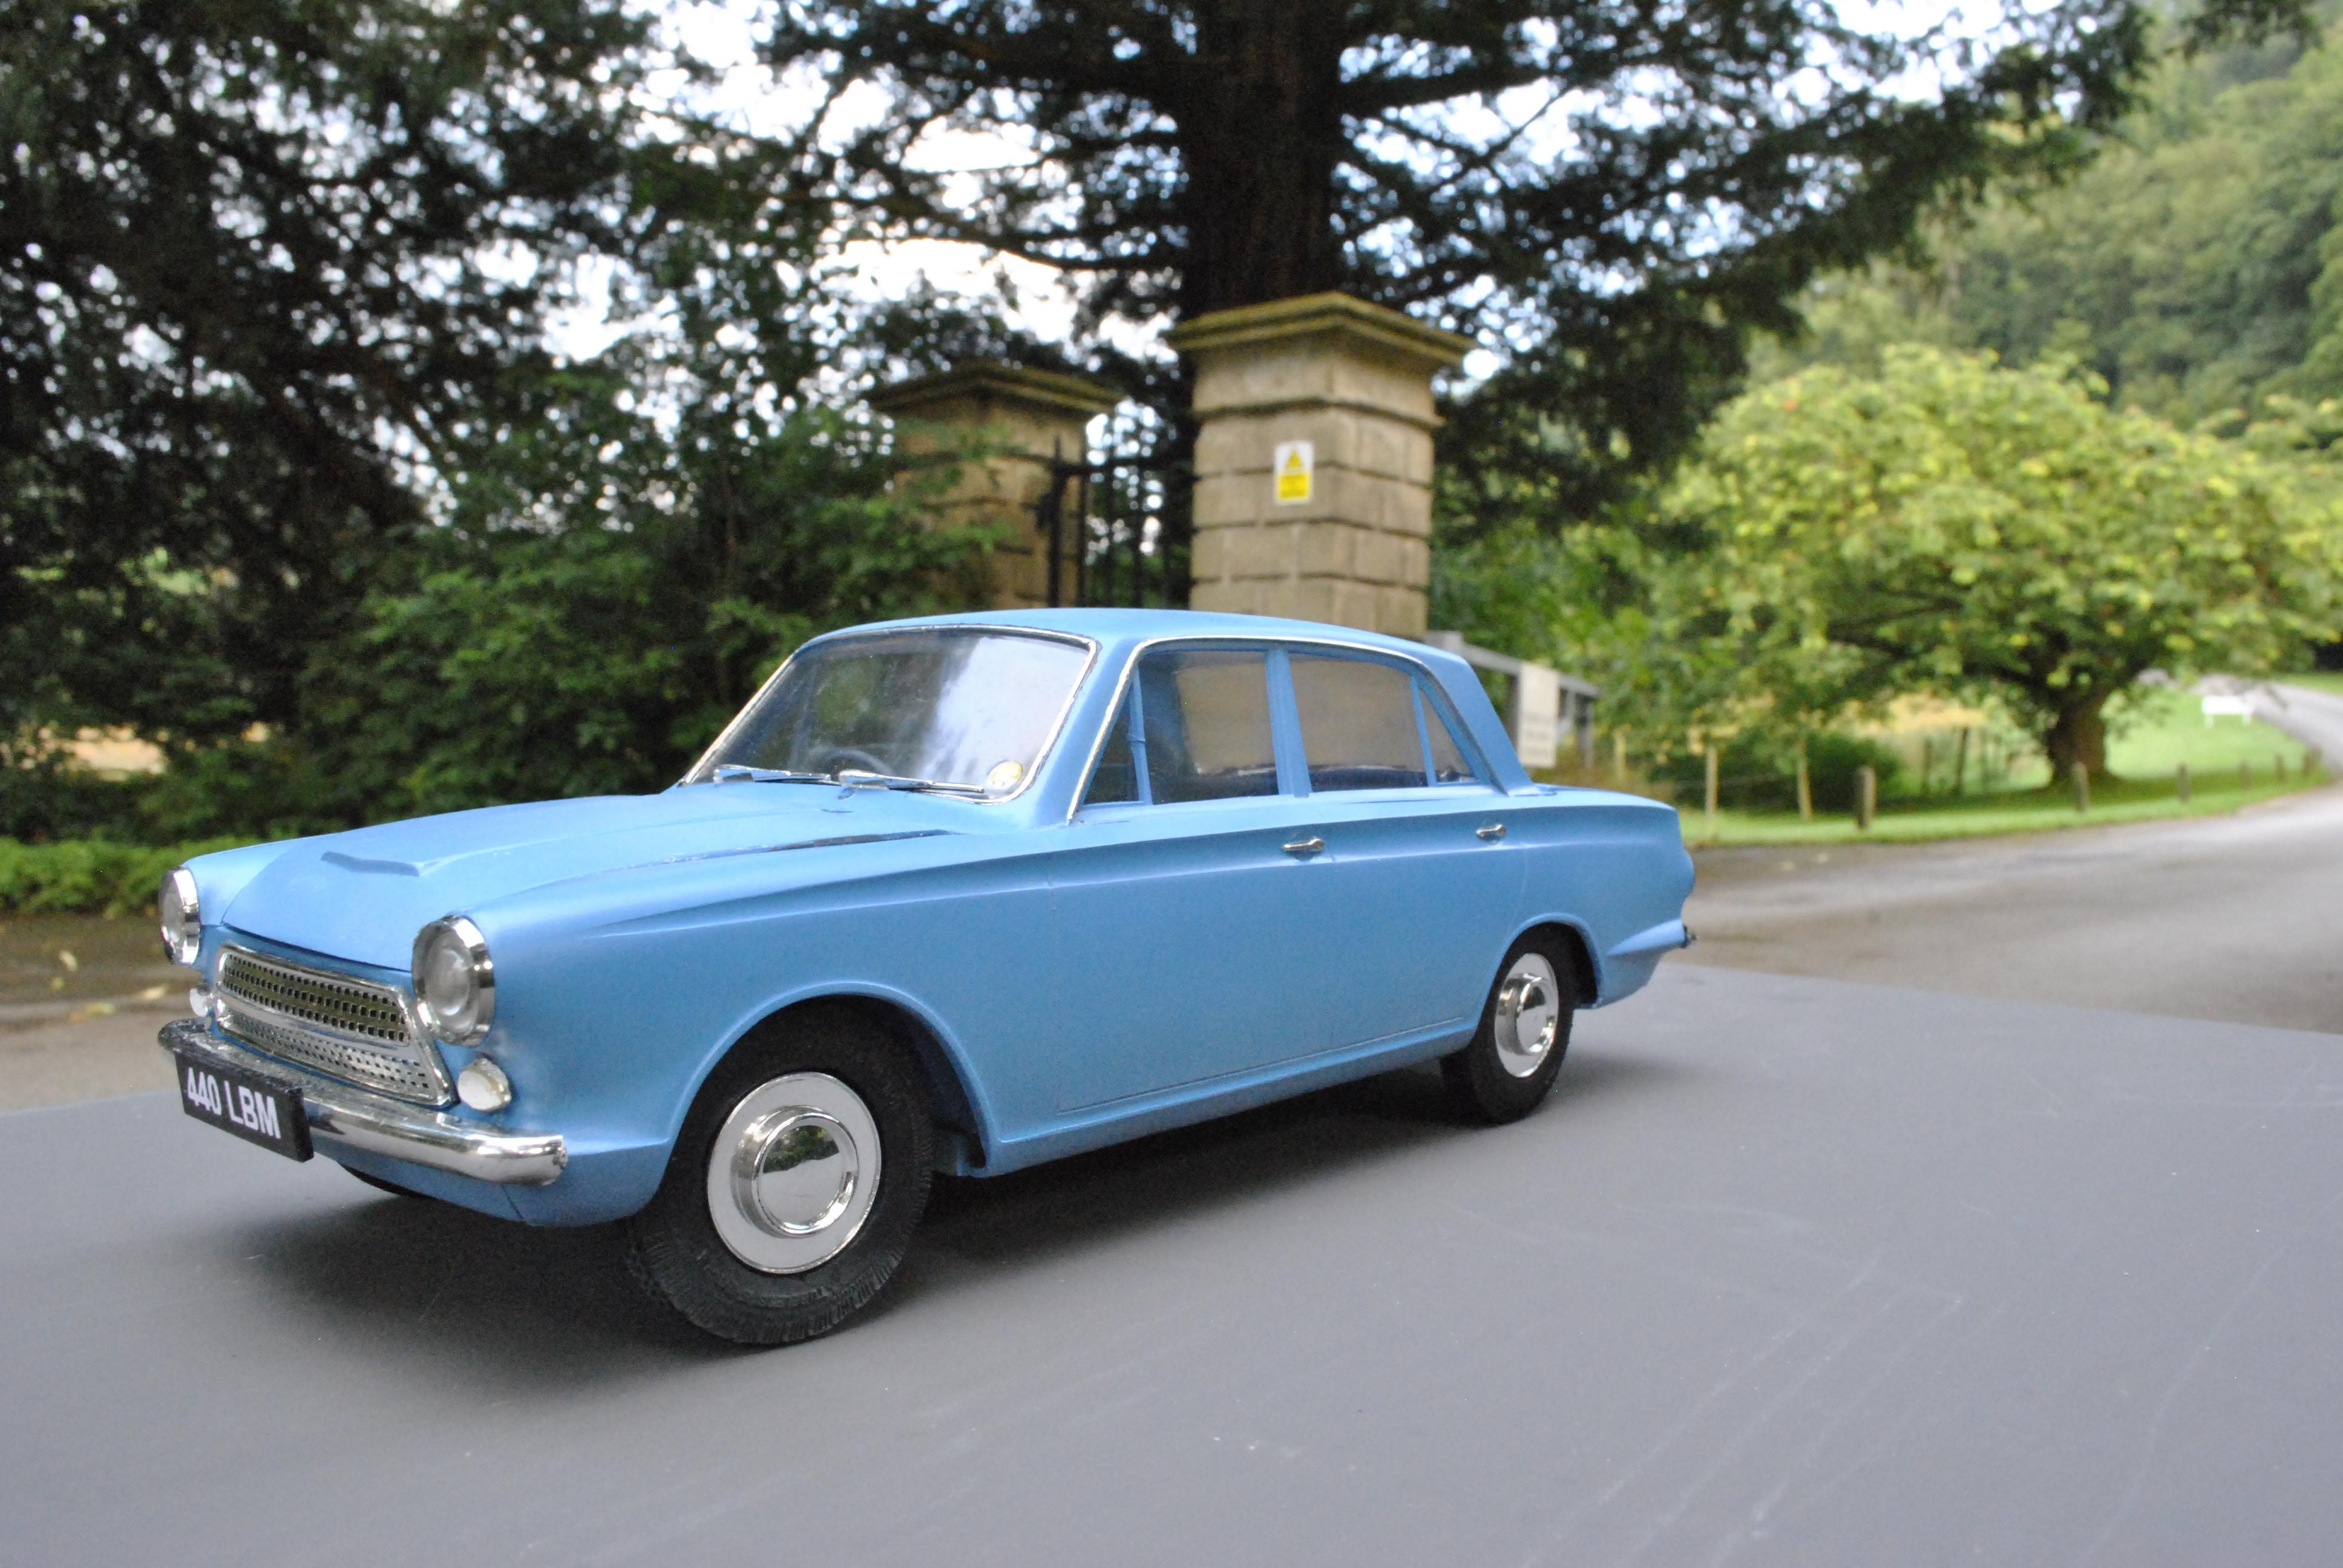
I can fully understand your quest to build a model replica of your Dad' car Kyle, as it is something that I have done myself . . . Like you, I only had one old and faded photograph to work from, plus my own memory of course. You are lucky to have multiple versions of the Pontiac GTO kit, and it sounds like some of your kits are better than others ! I am sure you will find this build most rewarding, and you are off to a good start . . . Hope you don't mind me adding this photo to your topic, which is a 1:16 scale FROG kit of a 1963 Ford Consul Cortina, thanks . . . David
-
1:16 Gunze Sangyo 1937 Rolls-Royce Phantom III Sports Saloon
Anglia105E replied to Anglia105E's topic in WIP: Model Cars
Thanks Noel . . . Your good humour is much appreciated. This one will not be easy, that's for sure, but there is always a way ! David -
1:16 Gunze Sangyo 1937 Rolls-Royce Phantom III Sports Saloon
Anglia105E replied to Anglia105E's topic in WIP: Model Cars
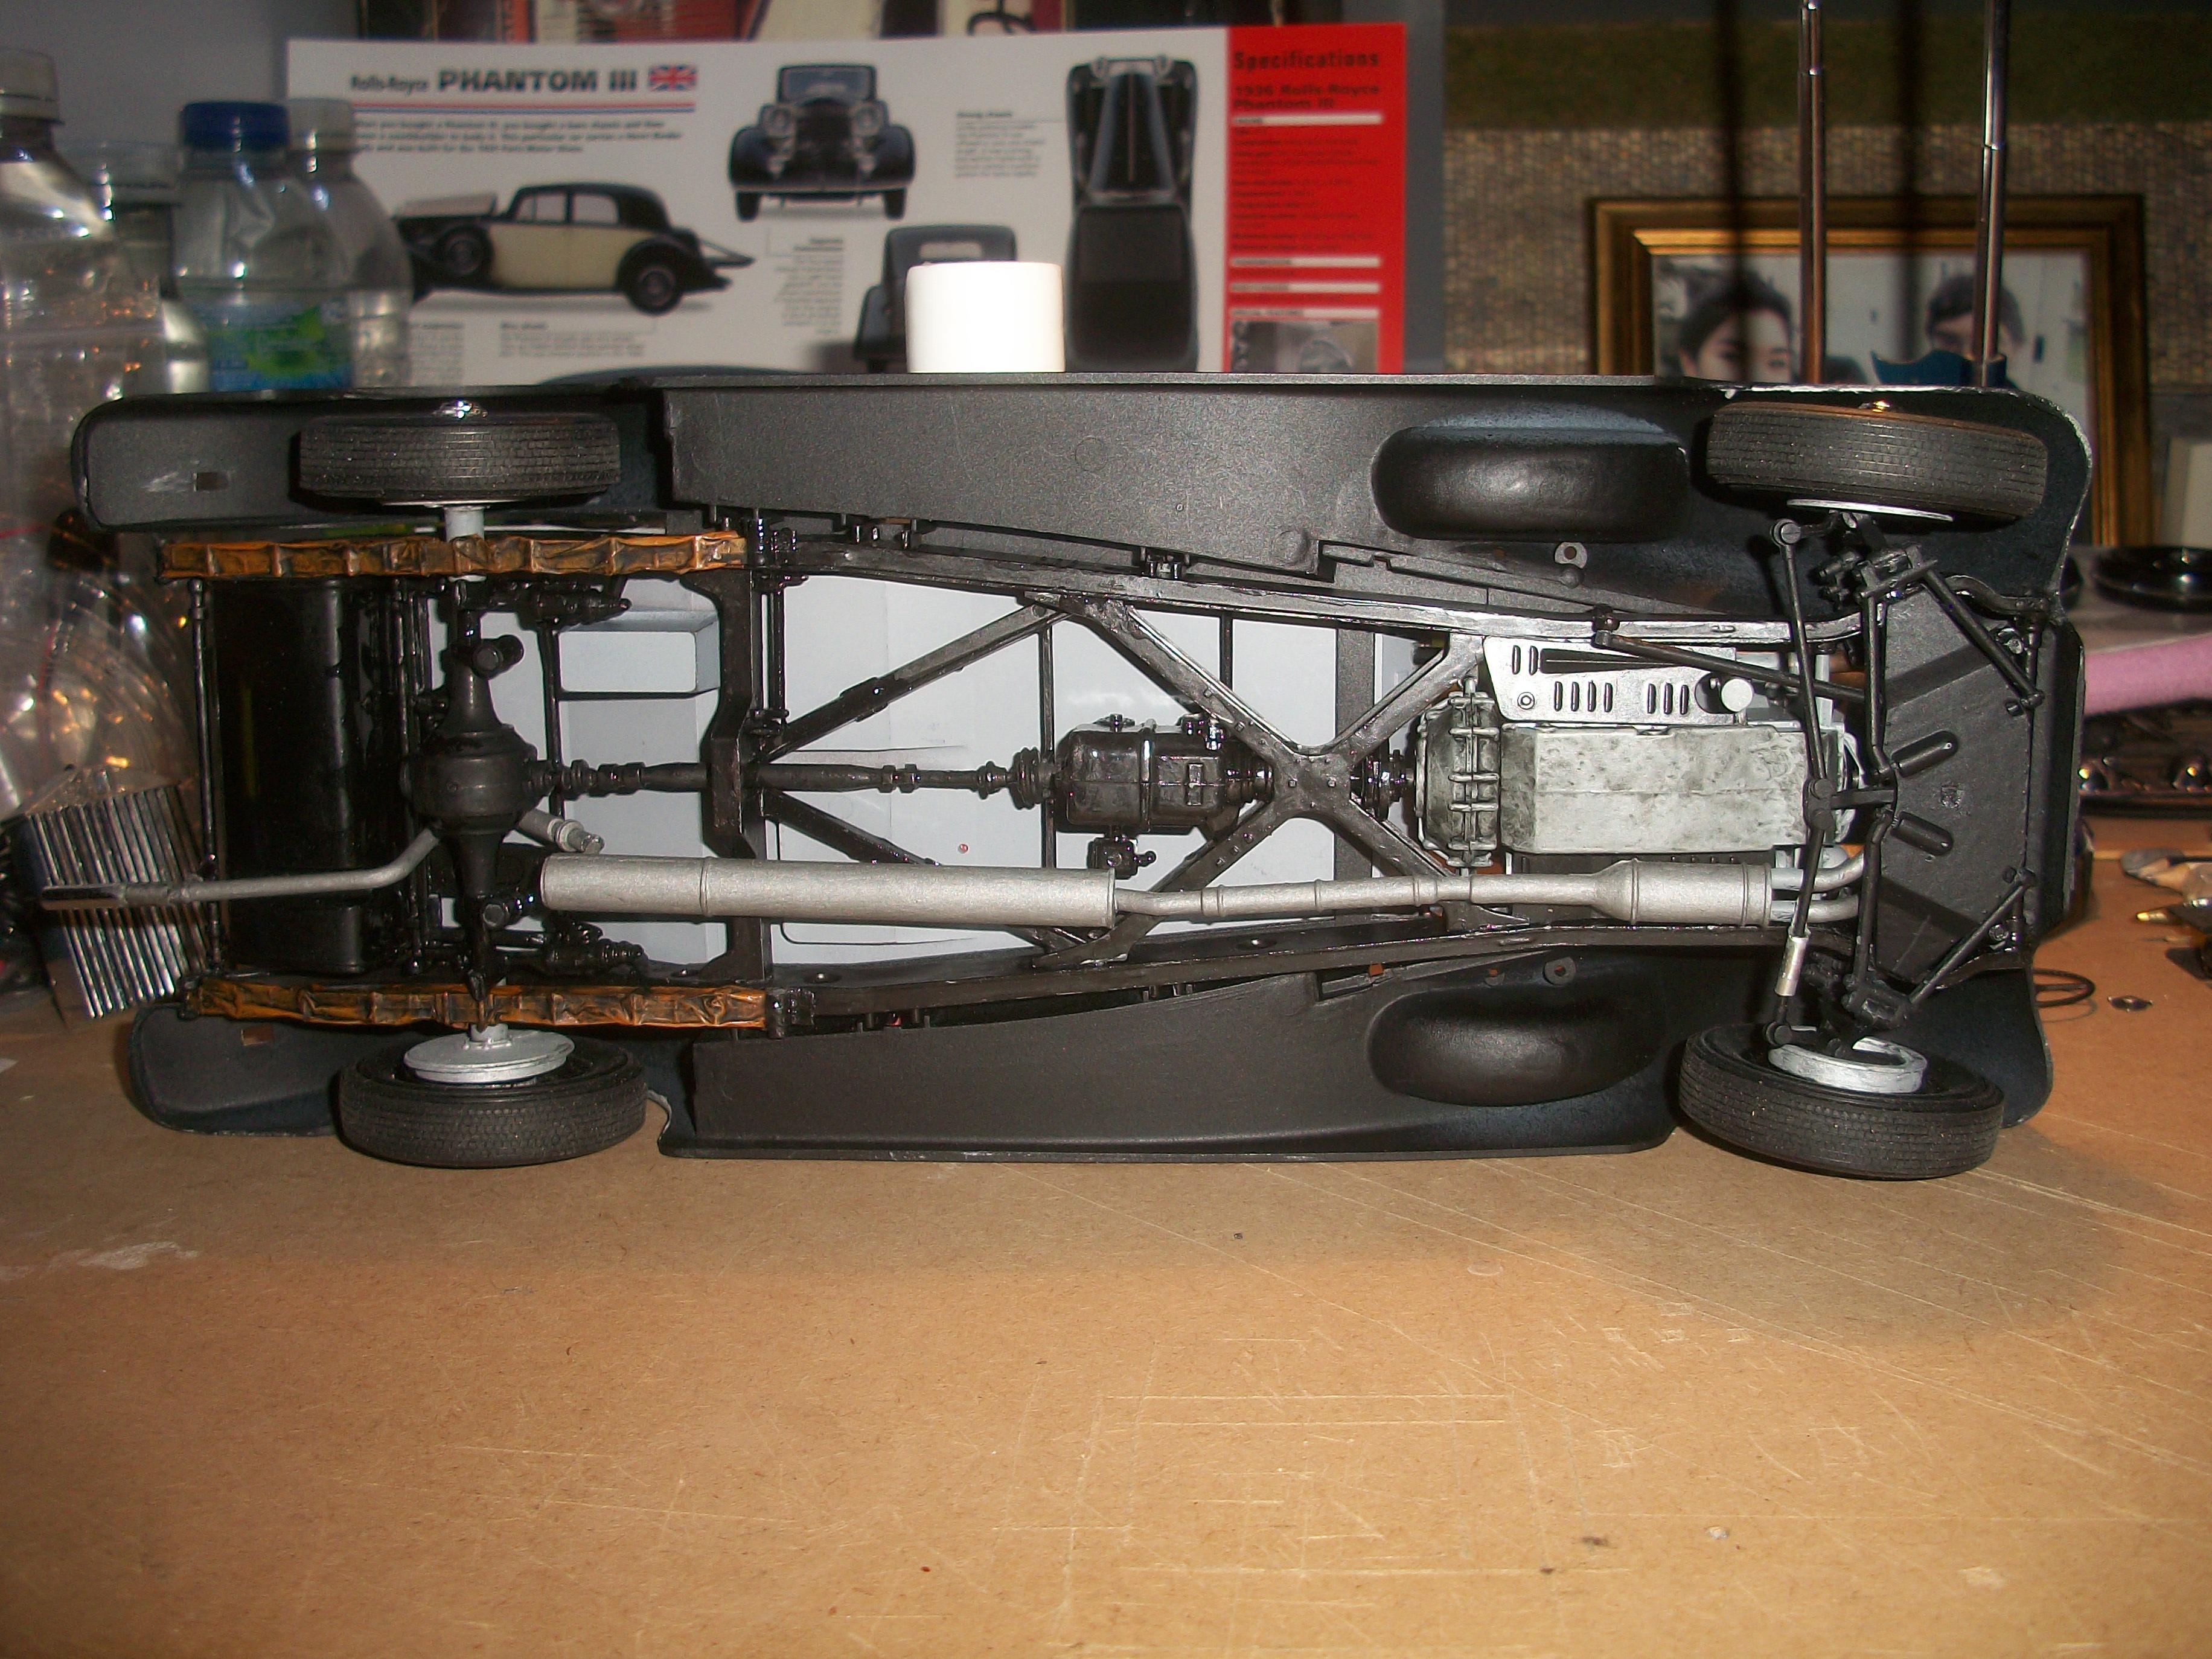
Here are three photos showing the severe distortion at the rear passenger side of the chassis . . . The second photo was my first assessment of the problem, and the third photo was taken after some adjustment. As you can see, the chassis is far from level at this point, and both edges of the floorboard are not actually glued to the lower body ( fenders / wings ) . . . During the tricky process of bringing the main components together, I did apply glue to the outer edges of the floorboard, but these surfaces are no longer making contact. Currently I am referring back to the drawings of the chassis that appear at the very beginning of the instruction sheet, in an attempt to work out what might be causing this issue . . . David
-
1:16 Gunze Sangyo 1937 Rolls-Royce Phantom III Sports Saloon
Anglia105E replied to Anglia105E's topic in WIP: Model Cars
Yes indeed Skip, I did find the front suspension in particular was rather fragile as you say . . . This fragility is compounded by the addition of working steering. For the most part, I would say that Gunze Sangyo have achieved a good balance of accuracy and strength, within the constraints of the original design . . . David -
1:16 Gunze Sangyo 1937 Rolls-Royce Phantom III Sports Saloon
Anglia105E replied to Anglia105E's topic in WIP: Model Cars
Thanks very much David, and each hurdle overcome is one more step nearer to completion . . . There were 727 Phantom III motor cars produced during a four year period between 1936 and 1939, so roughly 181 cars per year. Remarkably, around 650 of these have survived to this day . . . I shall post a few more photos later today, which show the rear end of the chassis . . . There is a serious distortion of the chassis frame going on, specifically the passenger side rear . . . This requires further investigation before proceeding ! Rolls-Royce managed to produce 15 cars per month, and so far my one build has taken 5 months . . . David W. -
1:16 Gunze Sangyo 1937 Rolls-Royce Phantom III Sports Saloon
Anglia105E replied to Anglia105E's topic in WIP: Model Cars
Thanks Noel, and this is what led me to take on this older large scale Rolls-Royce kit . . . The modern stuff does not appeal to me at all . . . David -
1:16 Gunze Sangyo 1937 Rolls-Royce Phantom III Sports Saloon
Anglia105E replied to Anglia105E's topic in WIP: Model Cars
Success !!! . . . At last I was able to achieve the fitting of the steering column part . . . The solution was to move the model to my kitchen table, where the overhead lighting was much better, and also to make use of a handheld torch to align the steering box in relation to the chassis . . . I could just about make out the hole in the side of the steering box, so this was filled with Revell styrene glue. Also, I could just make out the pin on the side of the chassis member, and following a lengthy and careful manipulation of the part I managed to locate the pin in the hole . . . This relatively simply operation took me around two hours, but the end result was extremely satisfying . . . Some time later, I was even able to test fit the steering wheel onto the top of the steering column, along with it's central hub and controls. I was quite nervous about the floorboard being in the correct position, and especially nervous about the precise position of the firewall, but as far as I can see, these two component parts appear to be located correctly . . . David
-
1:16 Gunze Sangyo 1937 Rolls-Royce Phantom III Sports Saloon
Anglia105E replied to Anglia105E's topic in WIP: Model Cars
That is good thinking on your part Dennis, thank you . . . You could say that is thinking outside the box ( pun intended ! ) Thinking outside the steering box. I was already toying with the idea of cutting the column from the box, and I did start thinking along the lines of inserting a metal pin into the box . . . Anyway, I am pleased to report, on Tuesday evening it all came together at once, and the steering box with column attached is glued in place. The solution was to move the model to a table in my kitchen, where the overhead tube lighting was much better, and I used a handheld torch to align the steering box hole with the pin on the chassis member and it all fitted beautifully ! Thanks again for your constructive suggestion Dennis, and I shall post a full report with photos later today . . . David -
1:16 Gunze Sangyo 1937 Rolls-Royce Phantom III Sports Saloon
Anglia105E replied to Anglia105E's topic in WIP: Model Cars
Thank you Thomas . . . David