Anglia105E
-
Posts
3,487 -
Joined
-
Last visited
Content Type
Profiles
Forums
Events
Gallery
Everything posted by Anglia105E
-

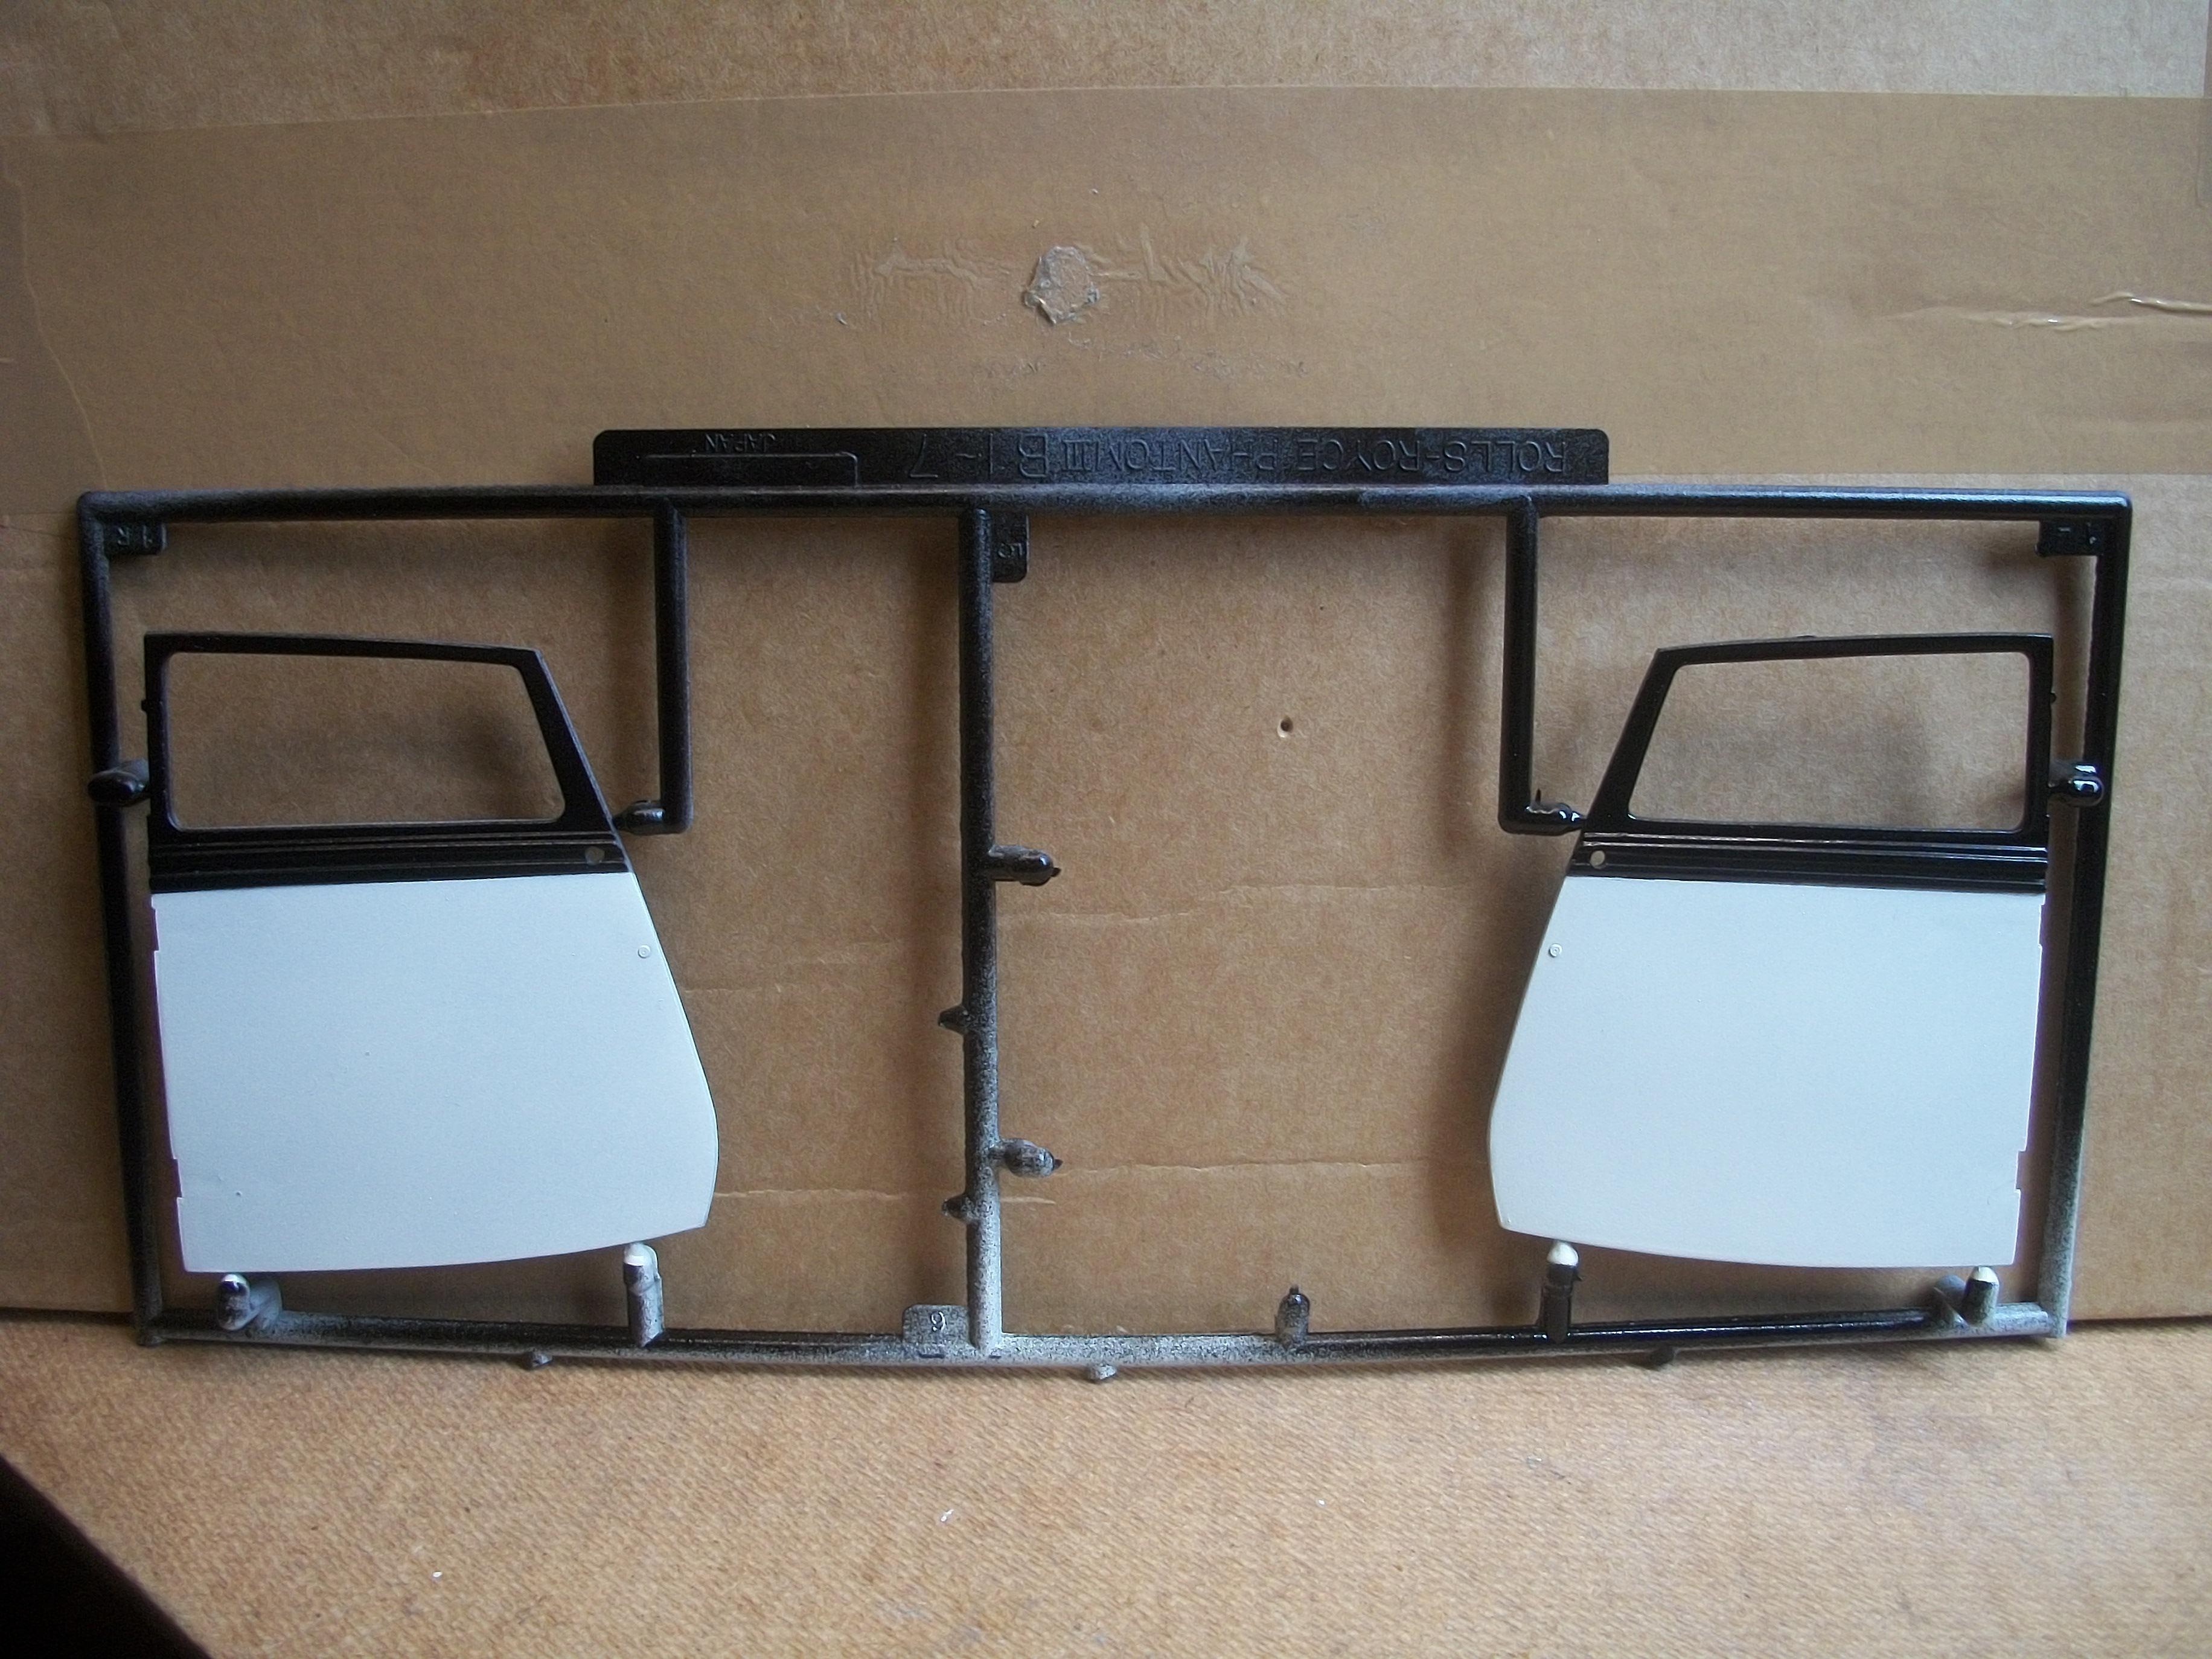
1:16 Gunze Sangyo 1937 Rolls-Royce Phantom III Sports Saloon
Anglia105E replied to Anglia105E's topic in WIP: Model Cars
Thanks again David . . . Your Cadillac Ambulance topic has generated a great deal of interest, and I am looking forward to seeing your hearse project when you get there . . . There are only two areas of my Phantom III project that I have not yet made a decision about, one of these being the spark plug leads, and the other being the possible wiring of the lights. As you can imagine, the intricate assembly of the plug leads, aluminium conduits and tubing is not for the faint hearted ! . . . Secondly, I would very much like to wire up the headlights, side lights, tail lights and fog lights to work from a 9 volt battery, or maybe a CR2032 coin cell battery . . . The battery would fit inside the luggage compartment, and there are plenty of options for routing the wiring under the chassis. Some model builders aiming for museum quality might also consider wiring the trafficator arm lights and the interior vanity mirror lights. David
-
1:16 Gunze Sangyo 1937 Rolls-Royce Phantom III Sports Saloon
Anglia105E replied to Anglia105E's topic in WIP: Model Cars
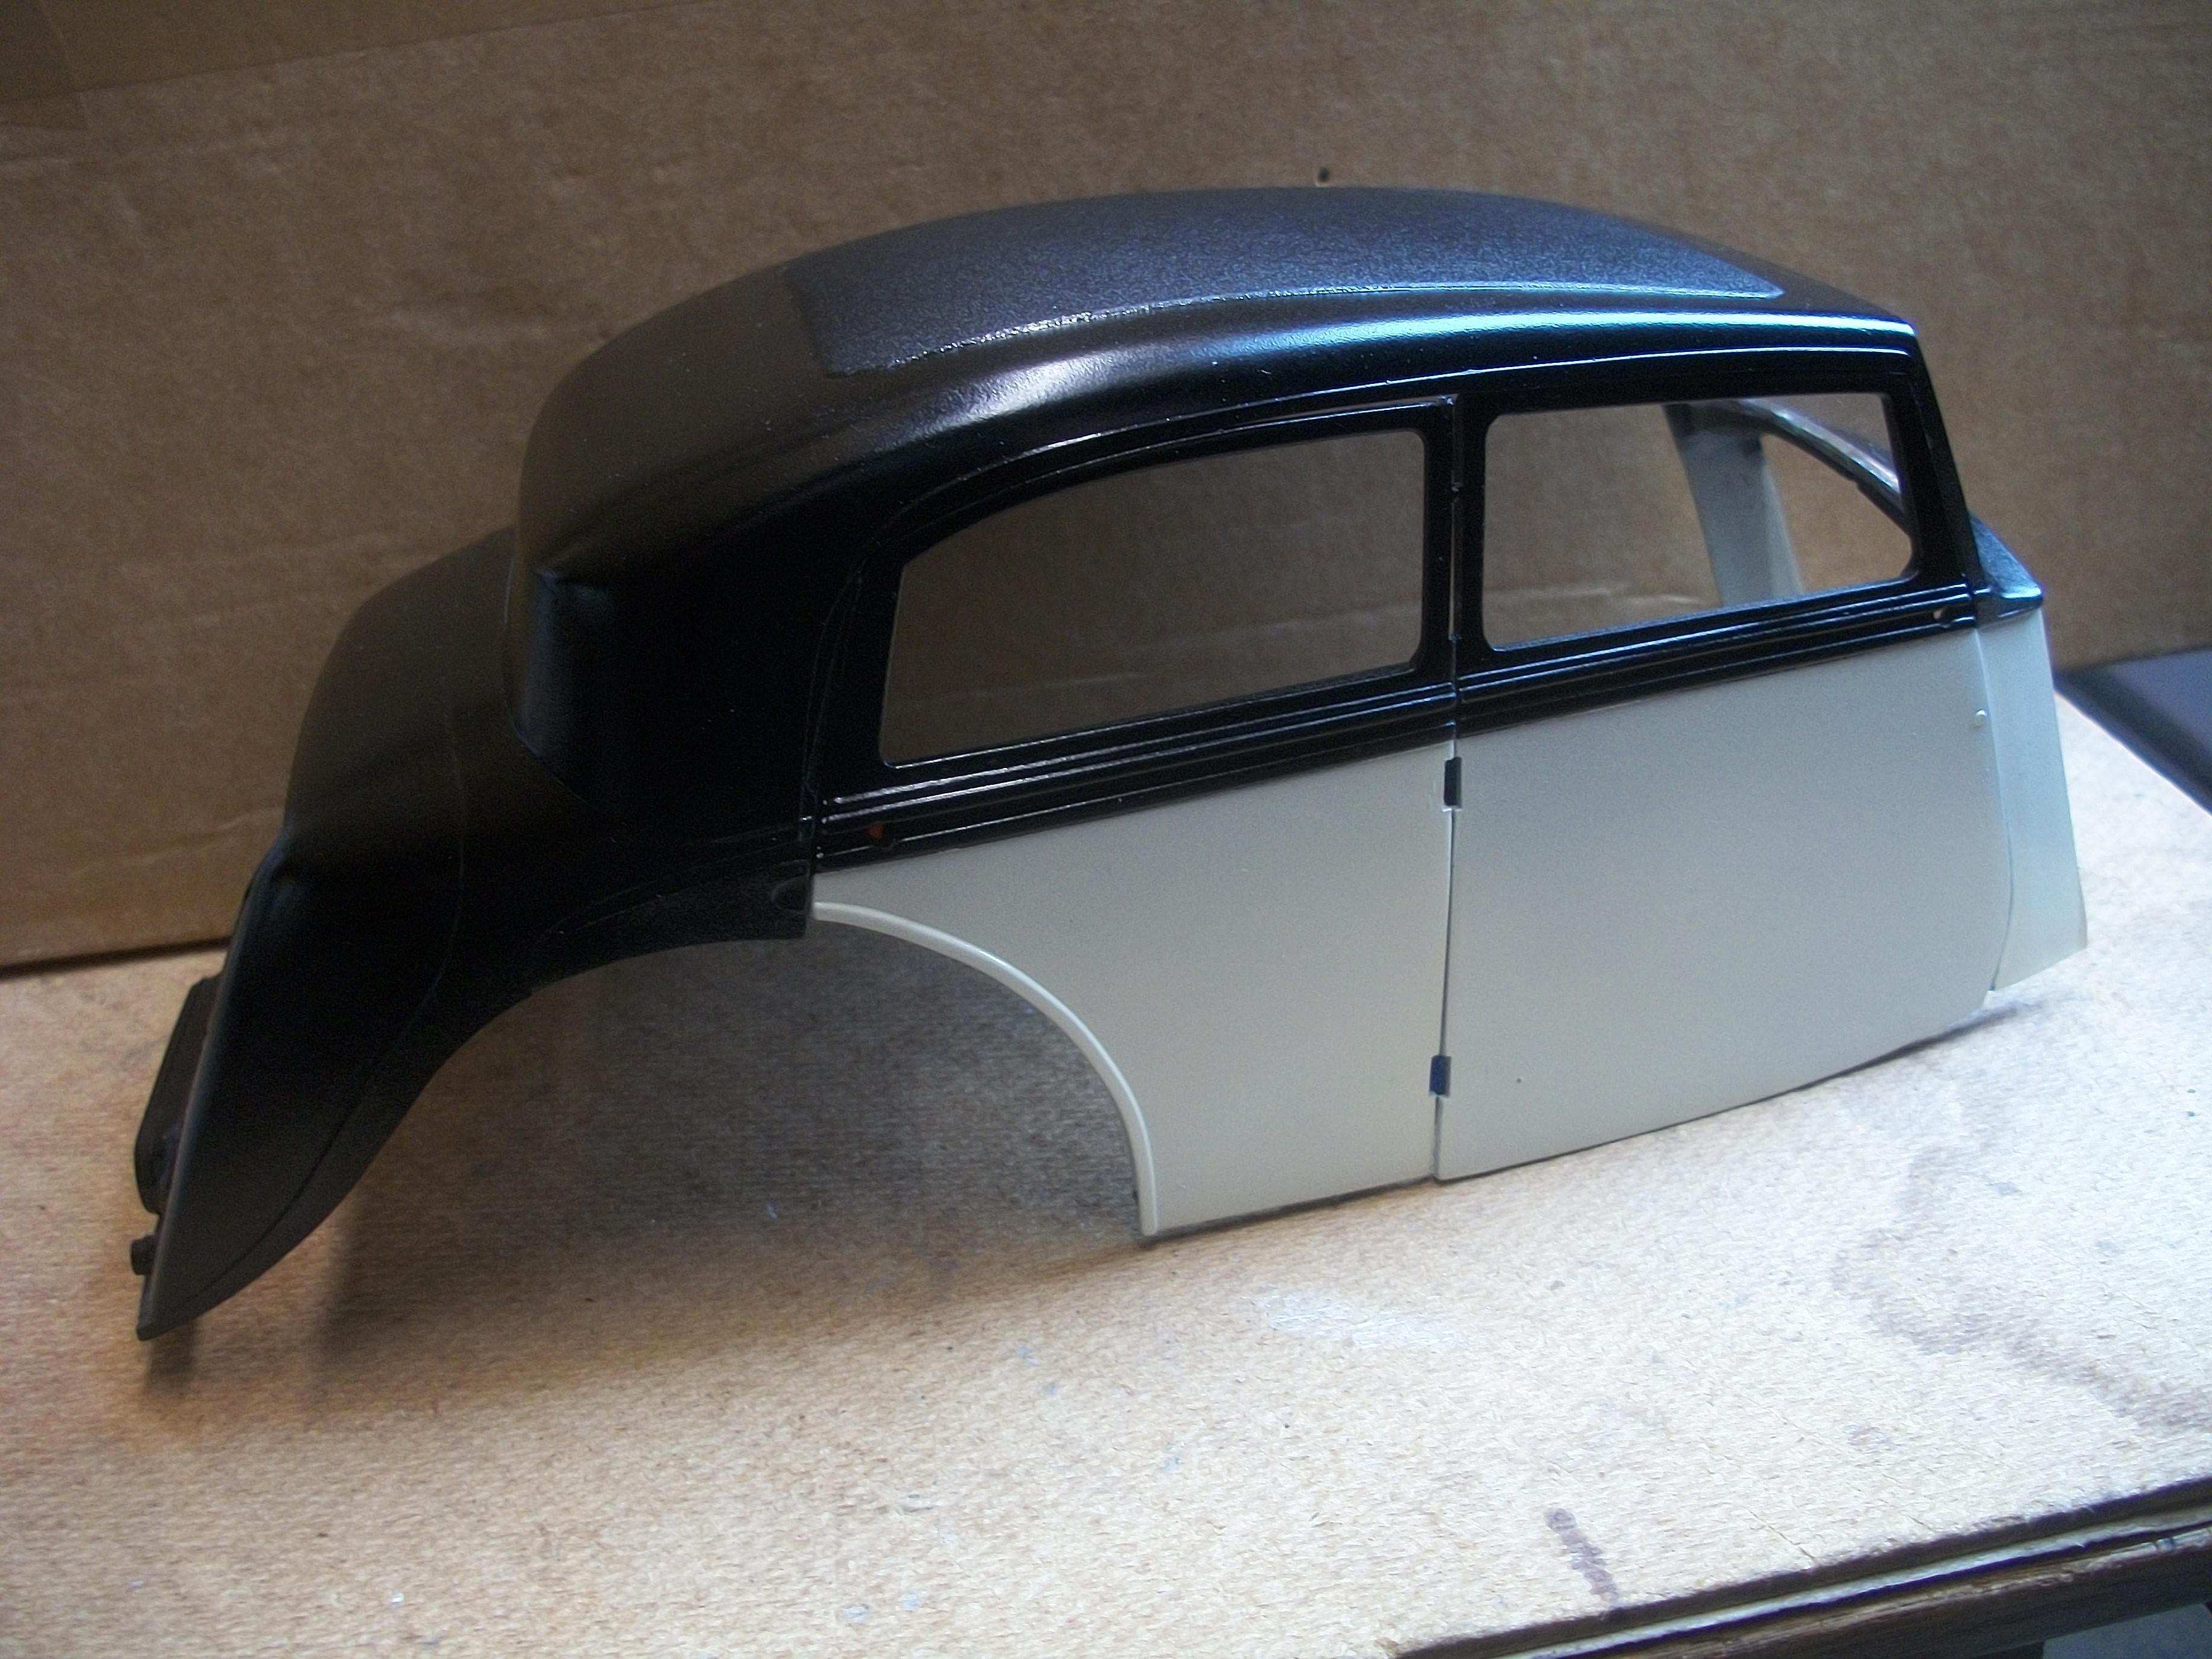
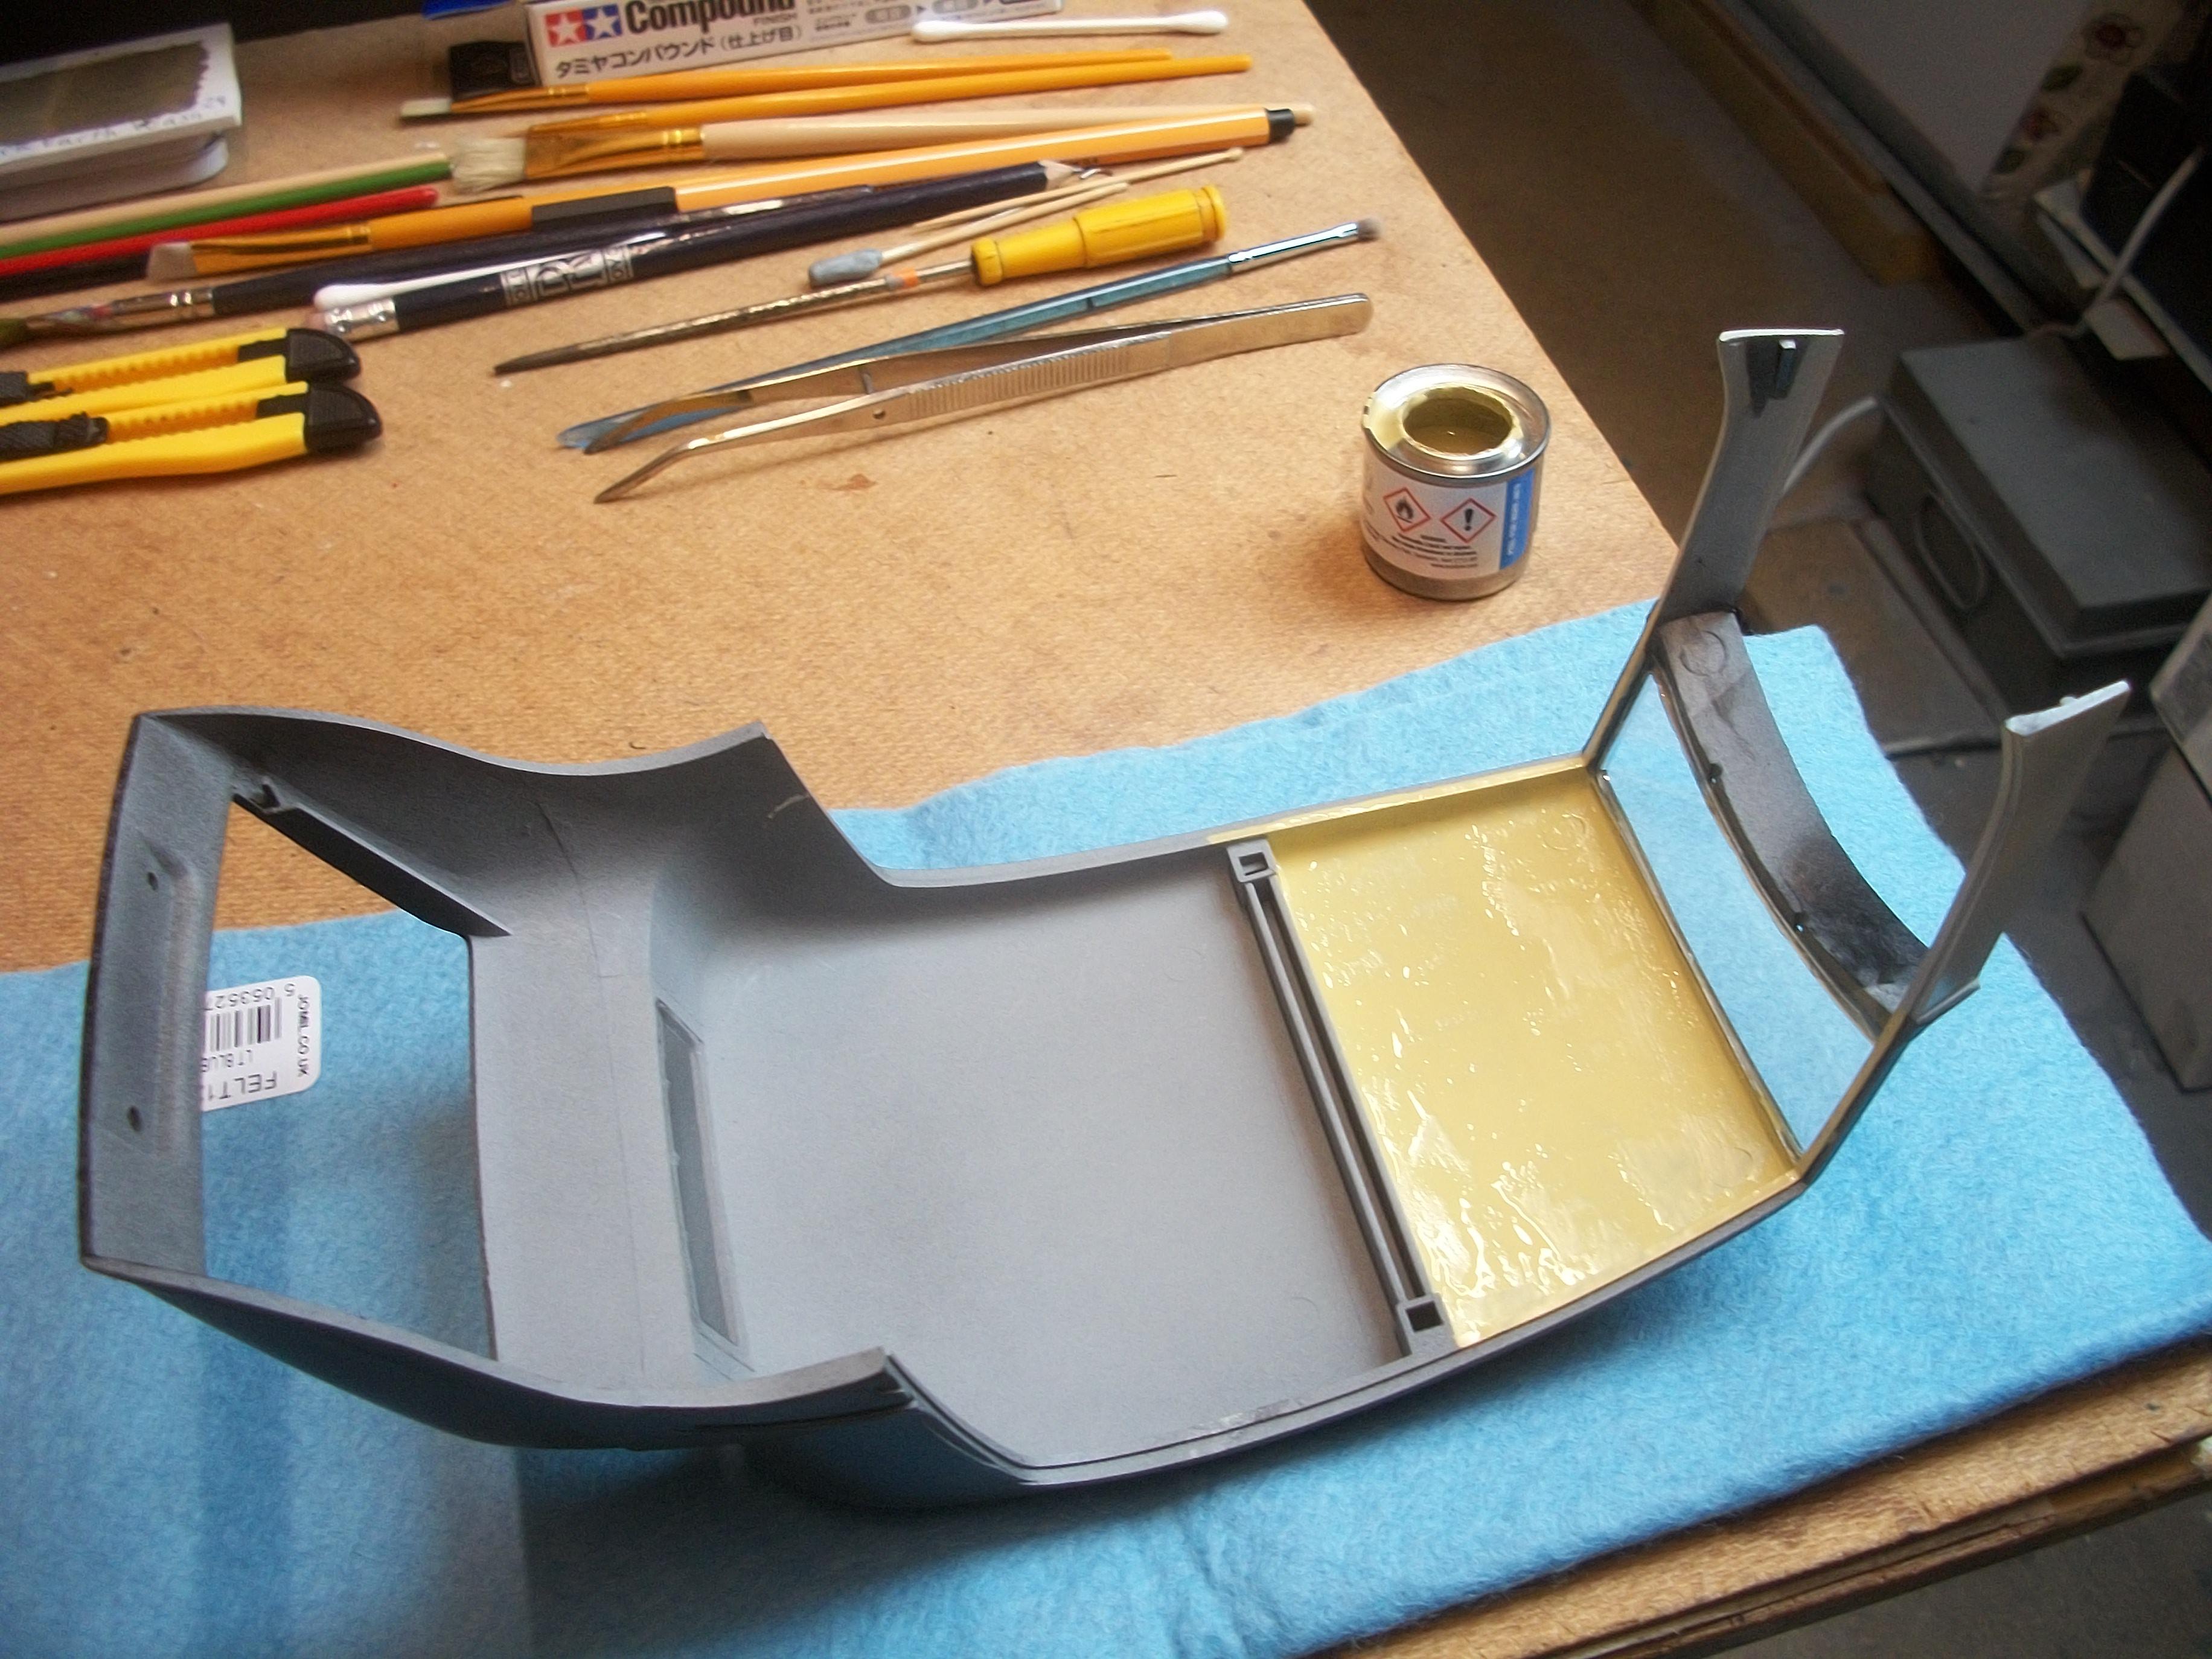
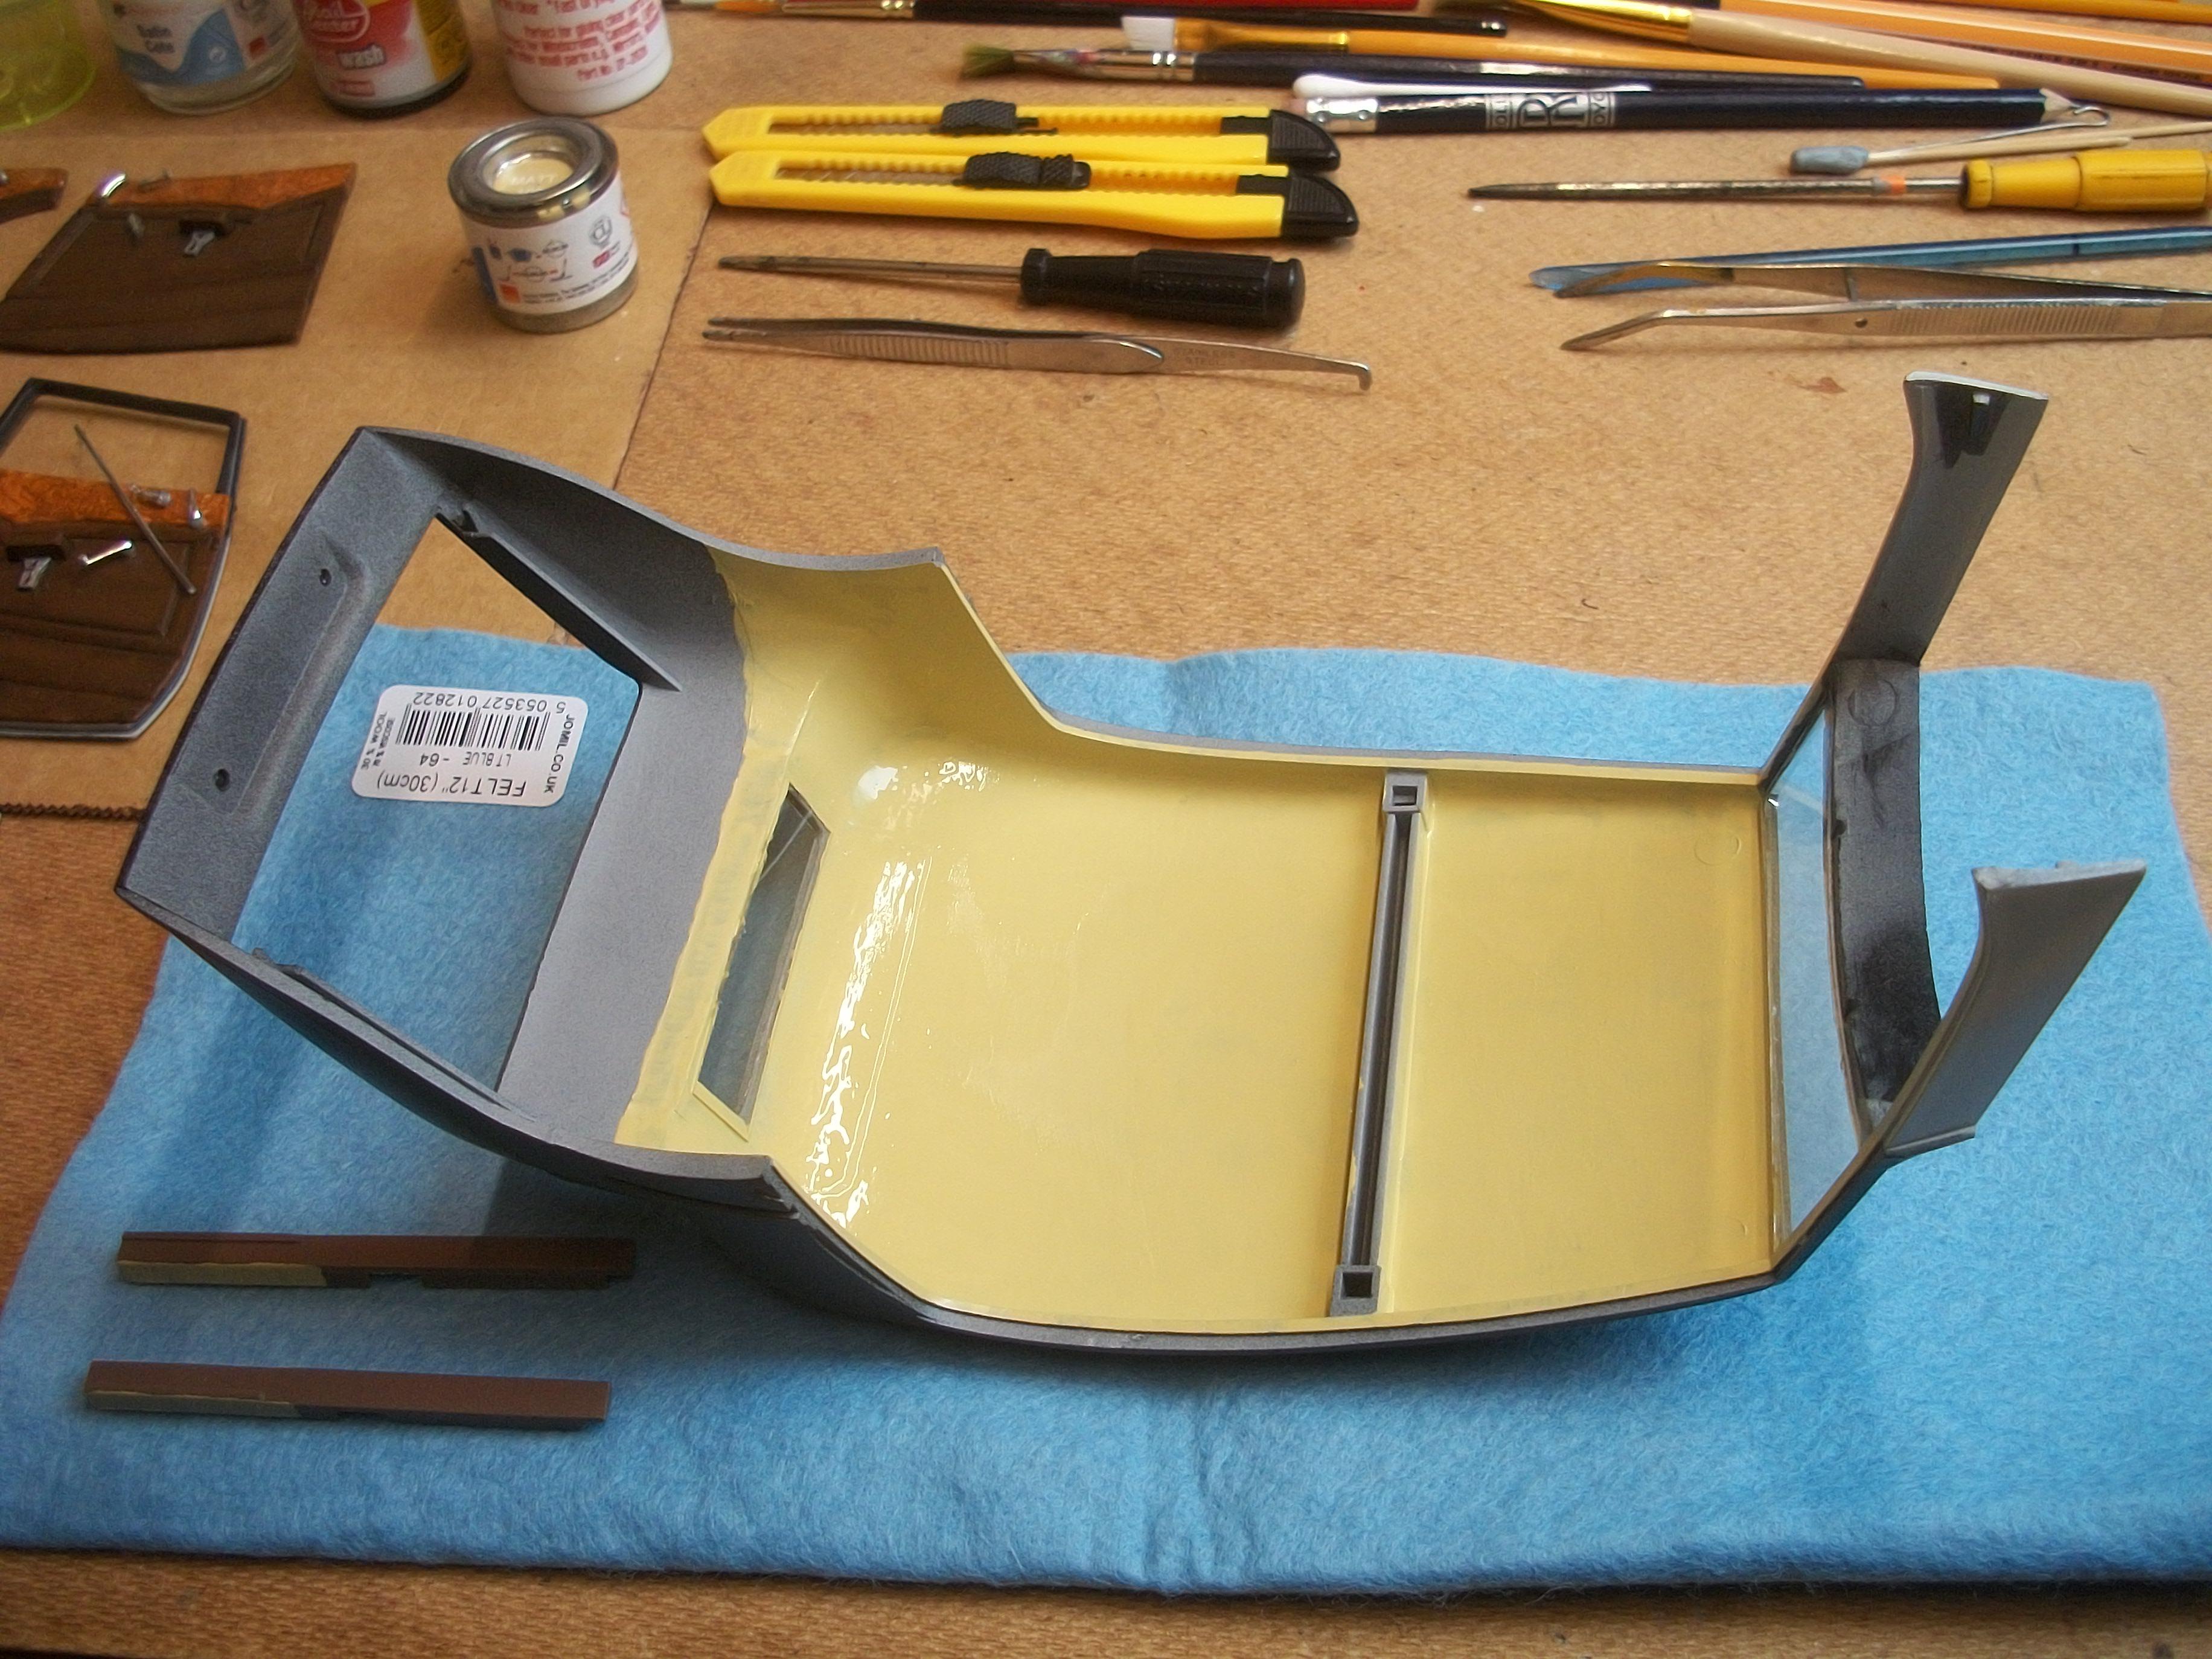
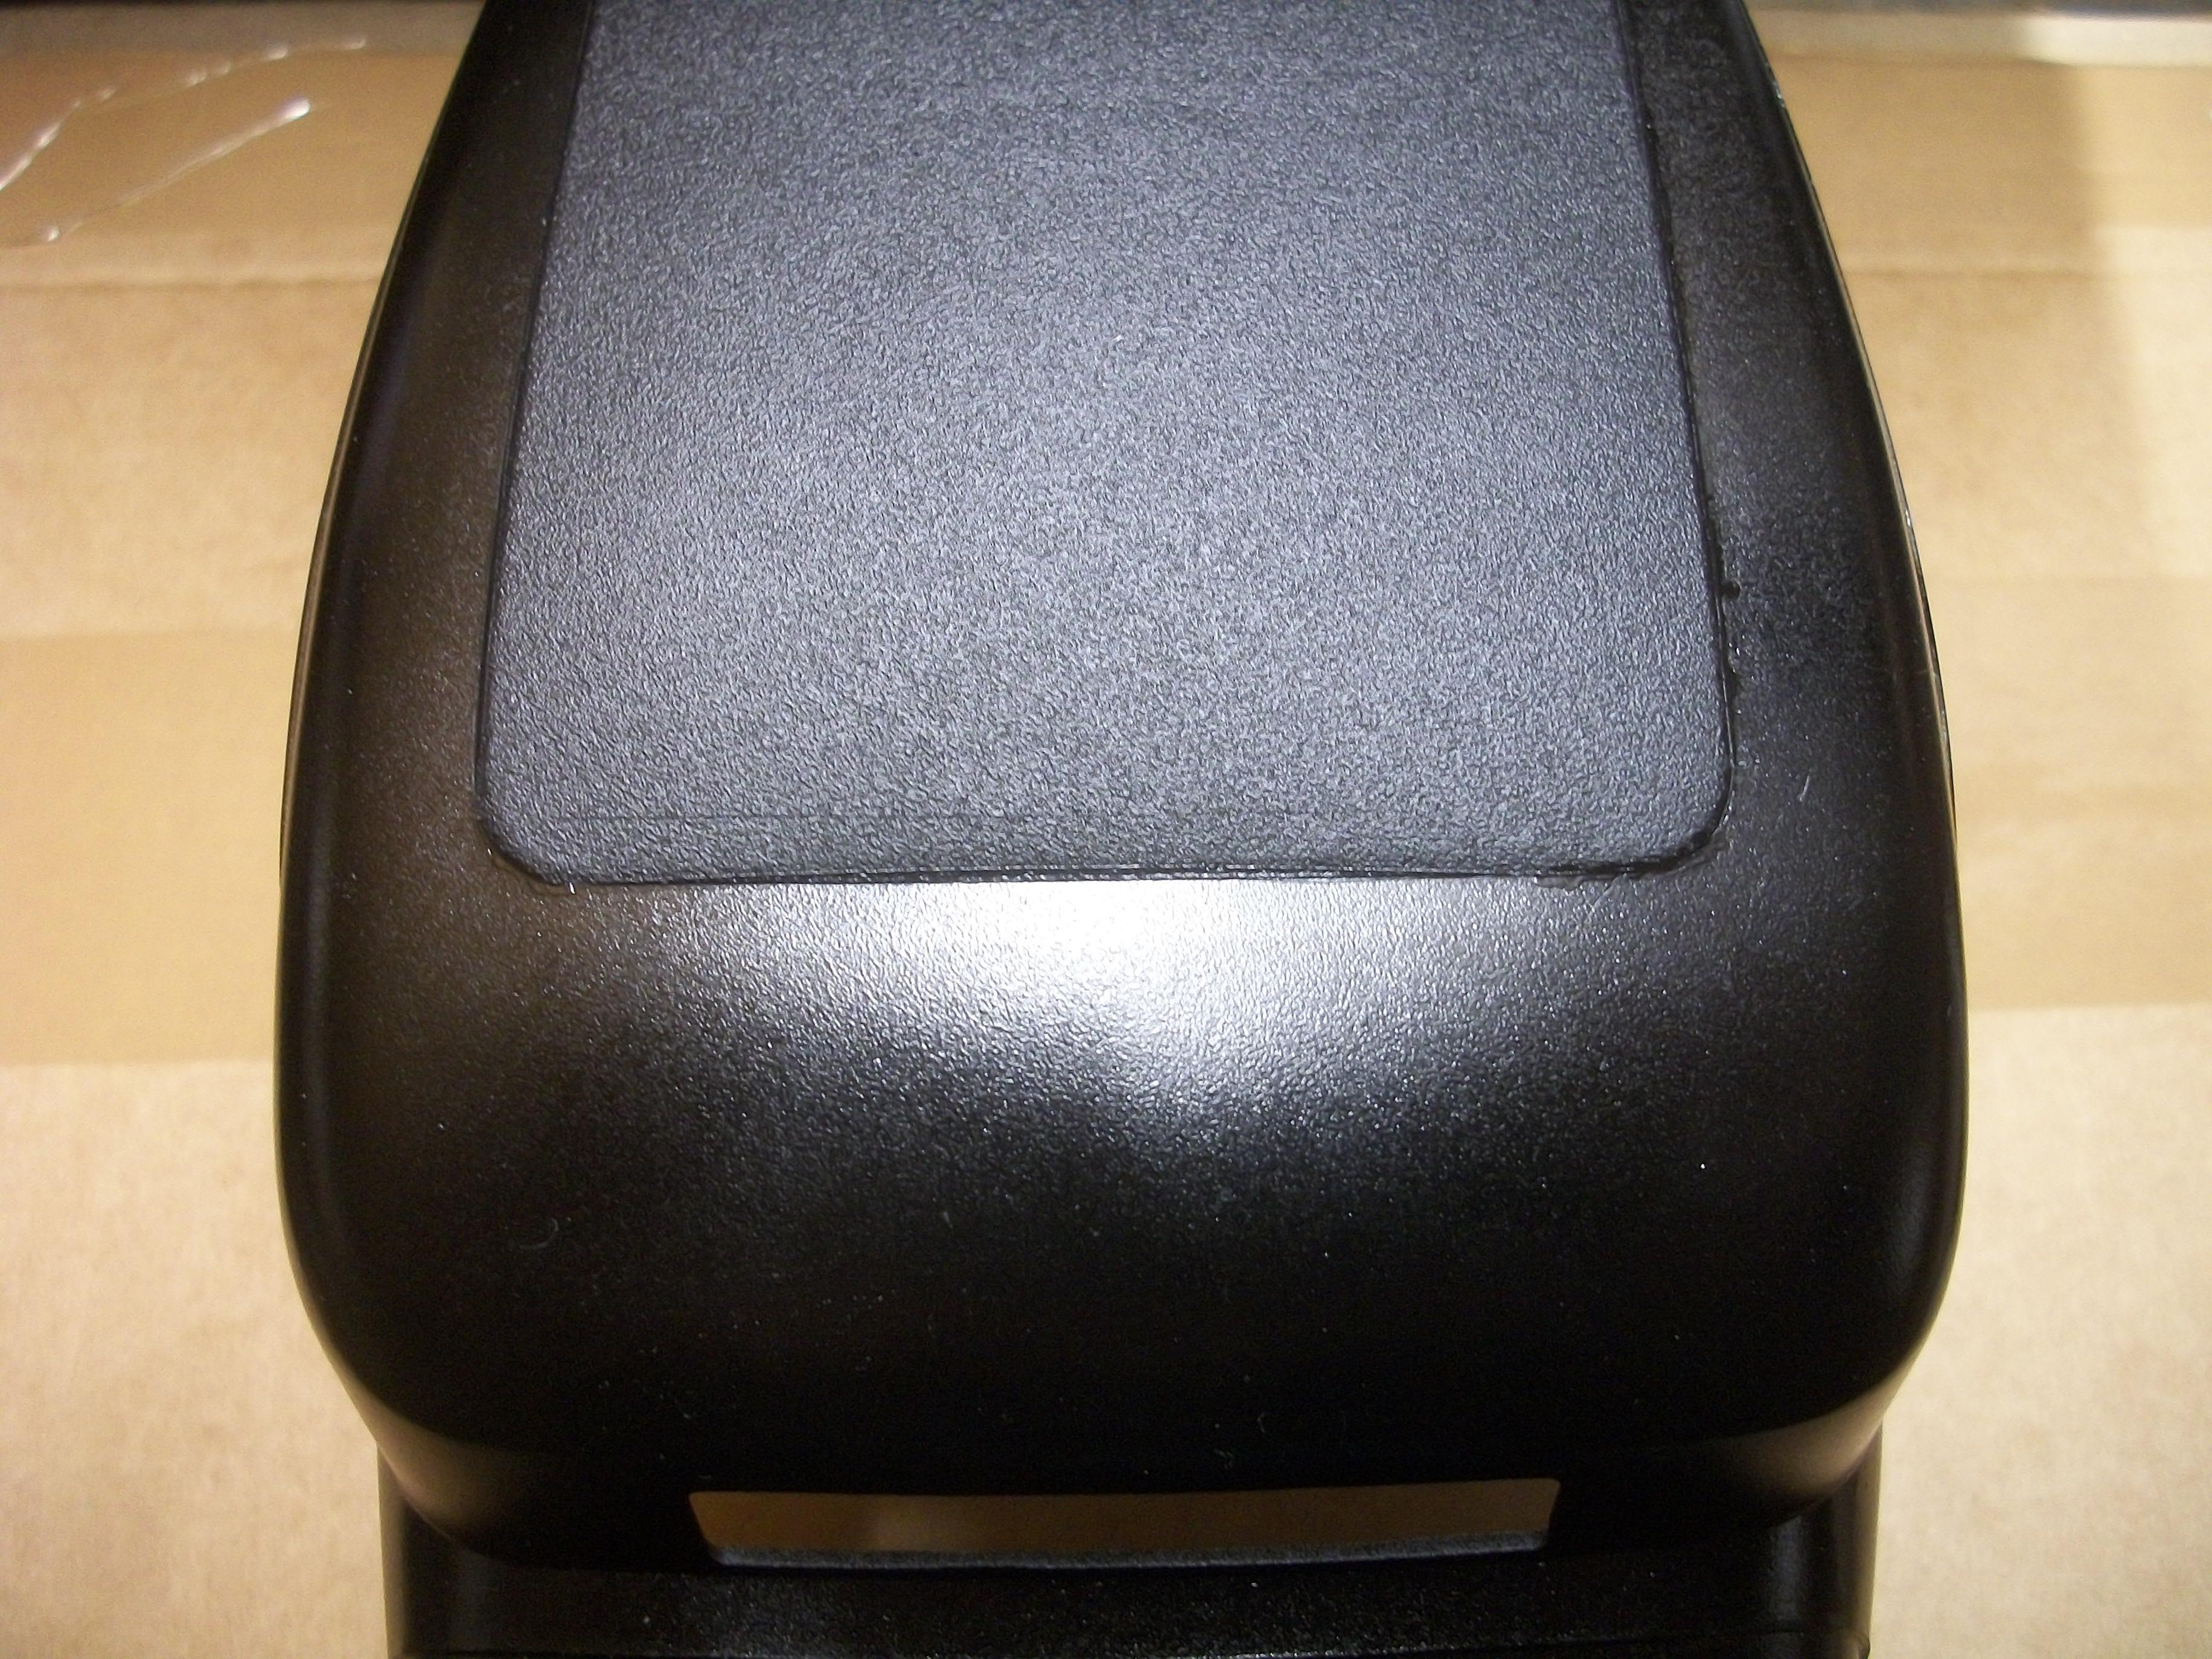
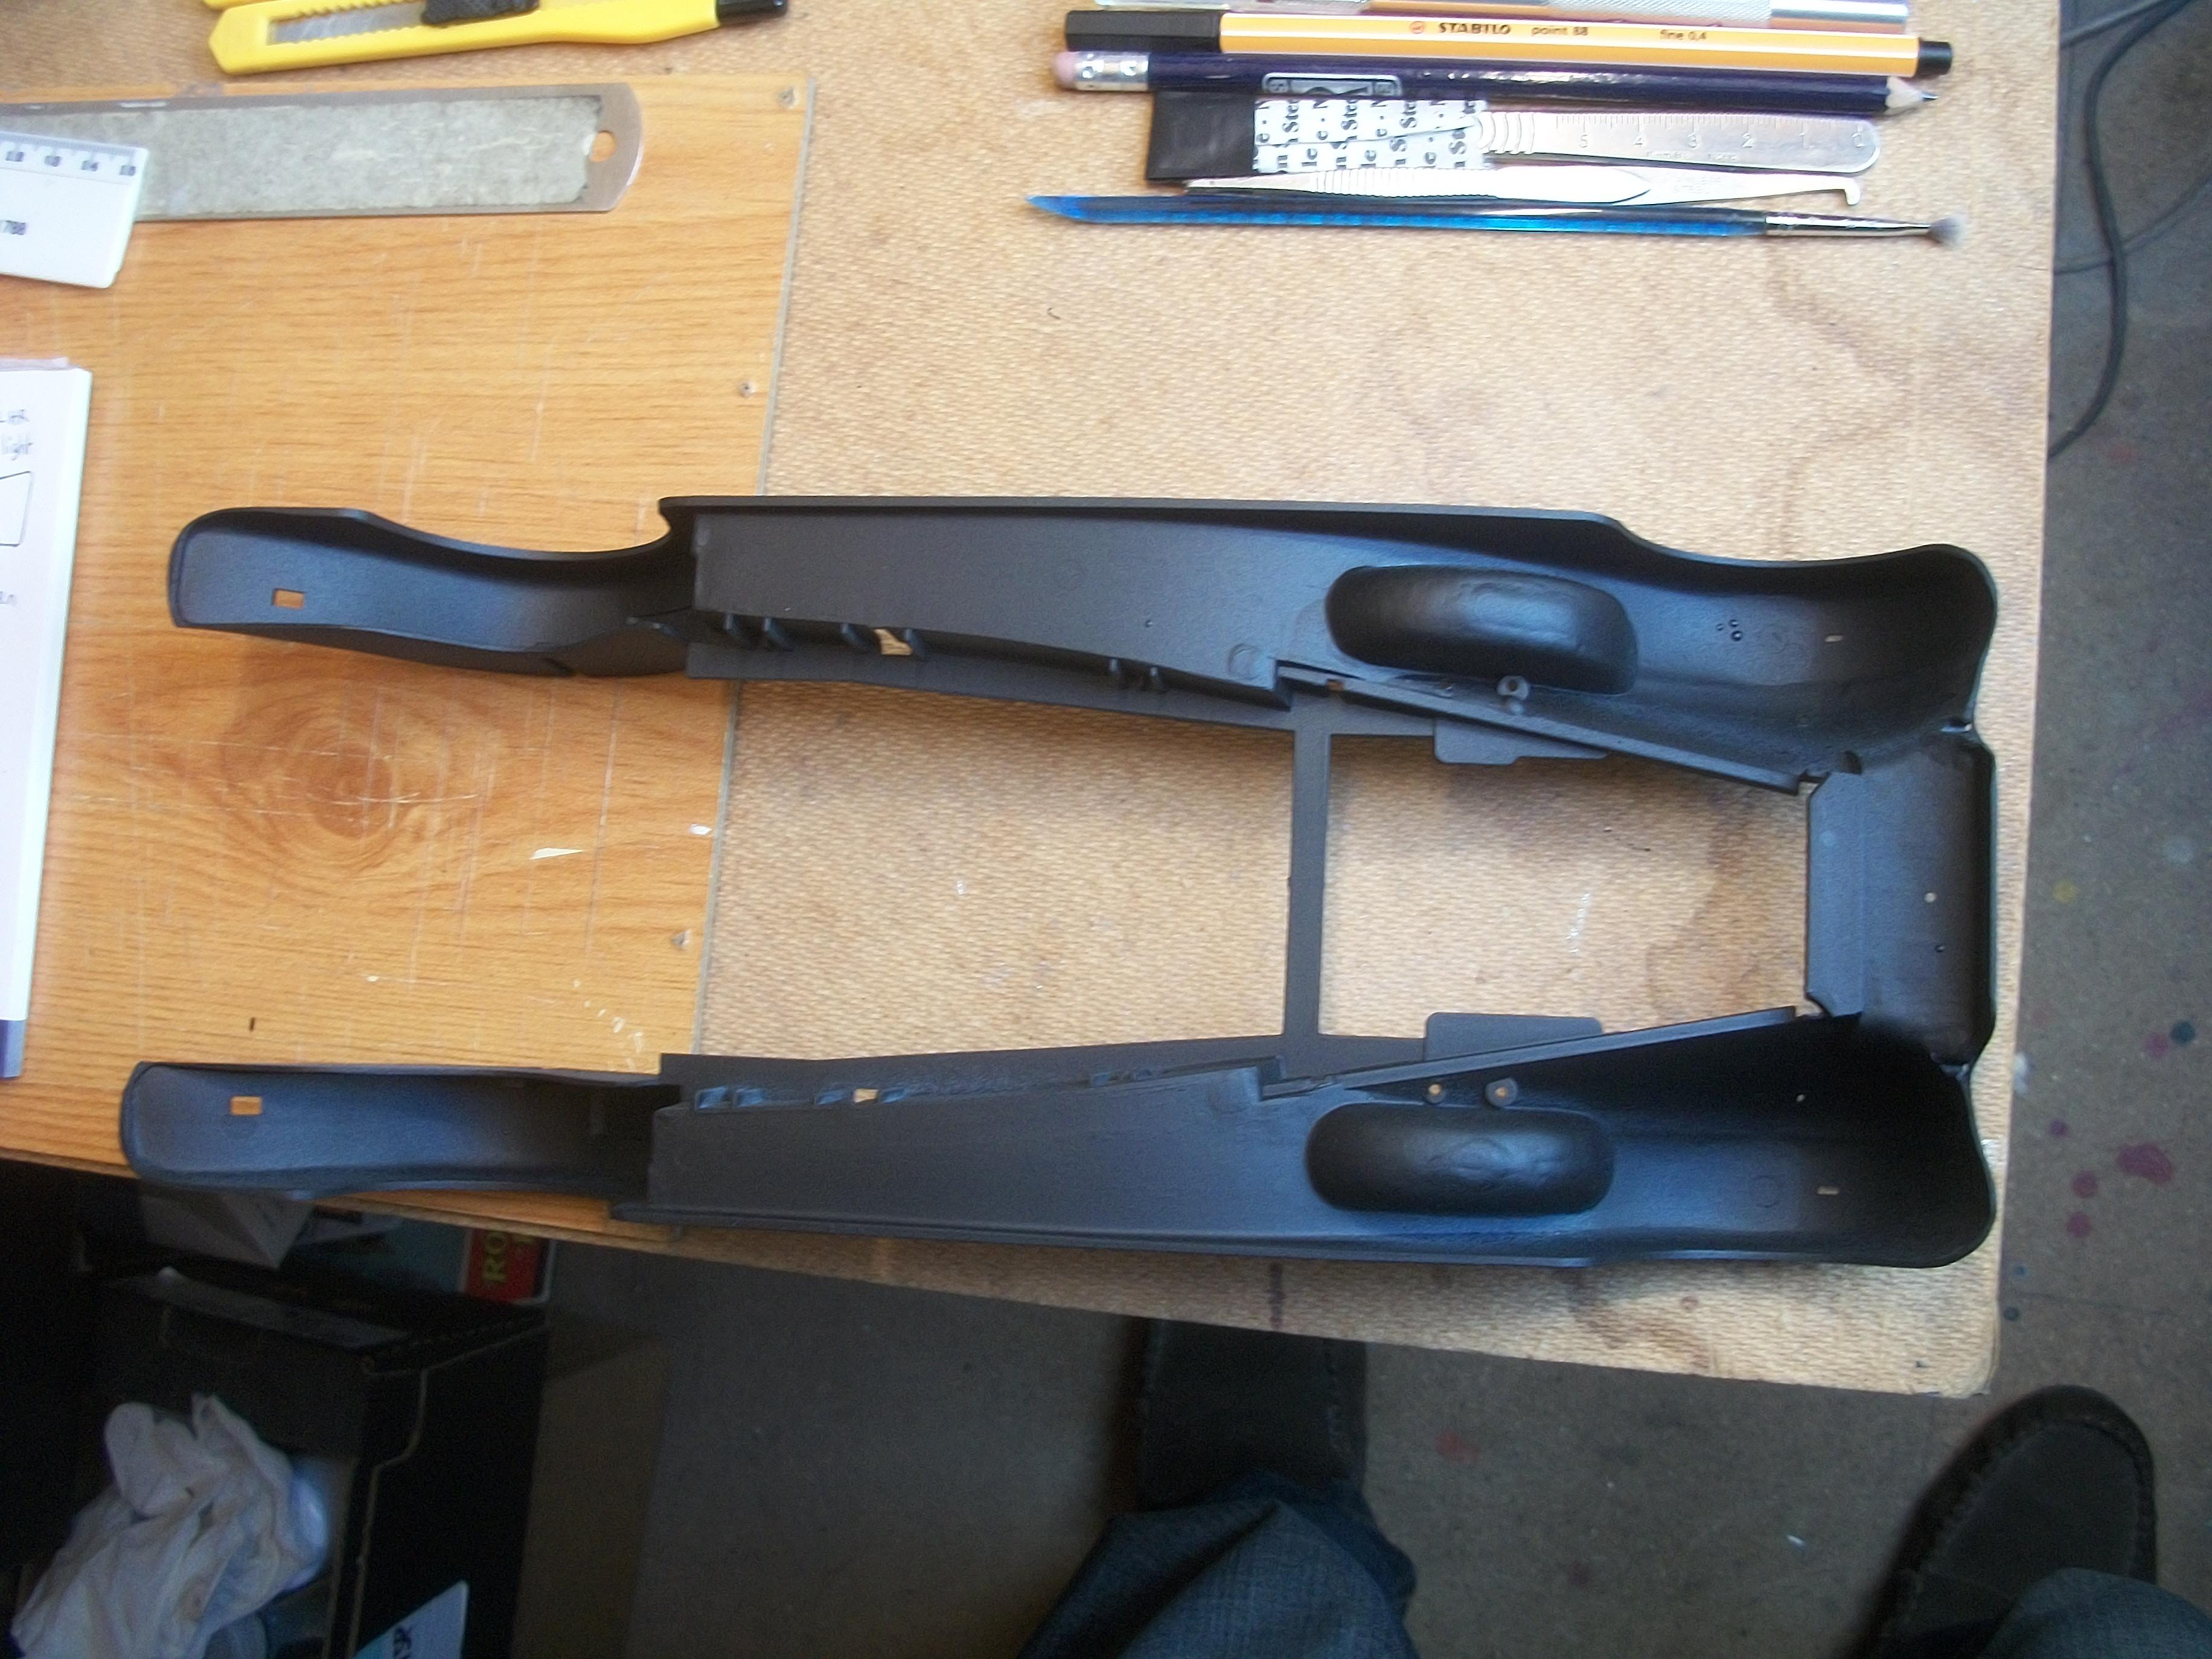
Now that the rear window glass has set overnight, I was able to get the headlining painted inside the roof . . . Using a wider brush than usual, the matt cream enamel was applied in two coats. This will be allowed to dry for 24 hours overnight . . . The front and rear doors on the driver's side of the car were taped together and test fitted into the upper body. There are 9 sections of the instruction sheet for the assembly of the doors and hinges, out of a total of 61 sections. These 9 sections represent a large amount of work, and of course it is very important to ensure that the four doors open and close correctly. There are many brass hinges that have to be heat sealed to the door panels, after bending the hinges and fixing together with tiny pins. David
-
Well this has turned out to be quite some build David . . . I am guessing that you must have mixed feelings about the AMT release, and who could have predicted that AMT would not only produce the ambulance kit, but it even has the gurney as well ! . . . I saw how much work you put into fabricating that gurney . . . just a few months could have made all the difference ! Anyway, your version is fabulous, and you will have the satisfaction of beating AMT to the line, in terms of launch date . . . David W.
-
1:16 Gunze Sangyo 1937 Rolls-Royce Phantom III Sports Saloon
Anglia105E replied to Anglia105E's topic in WIP: Model Cars
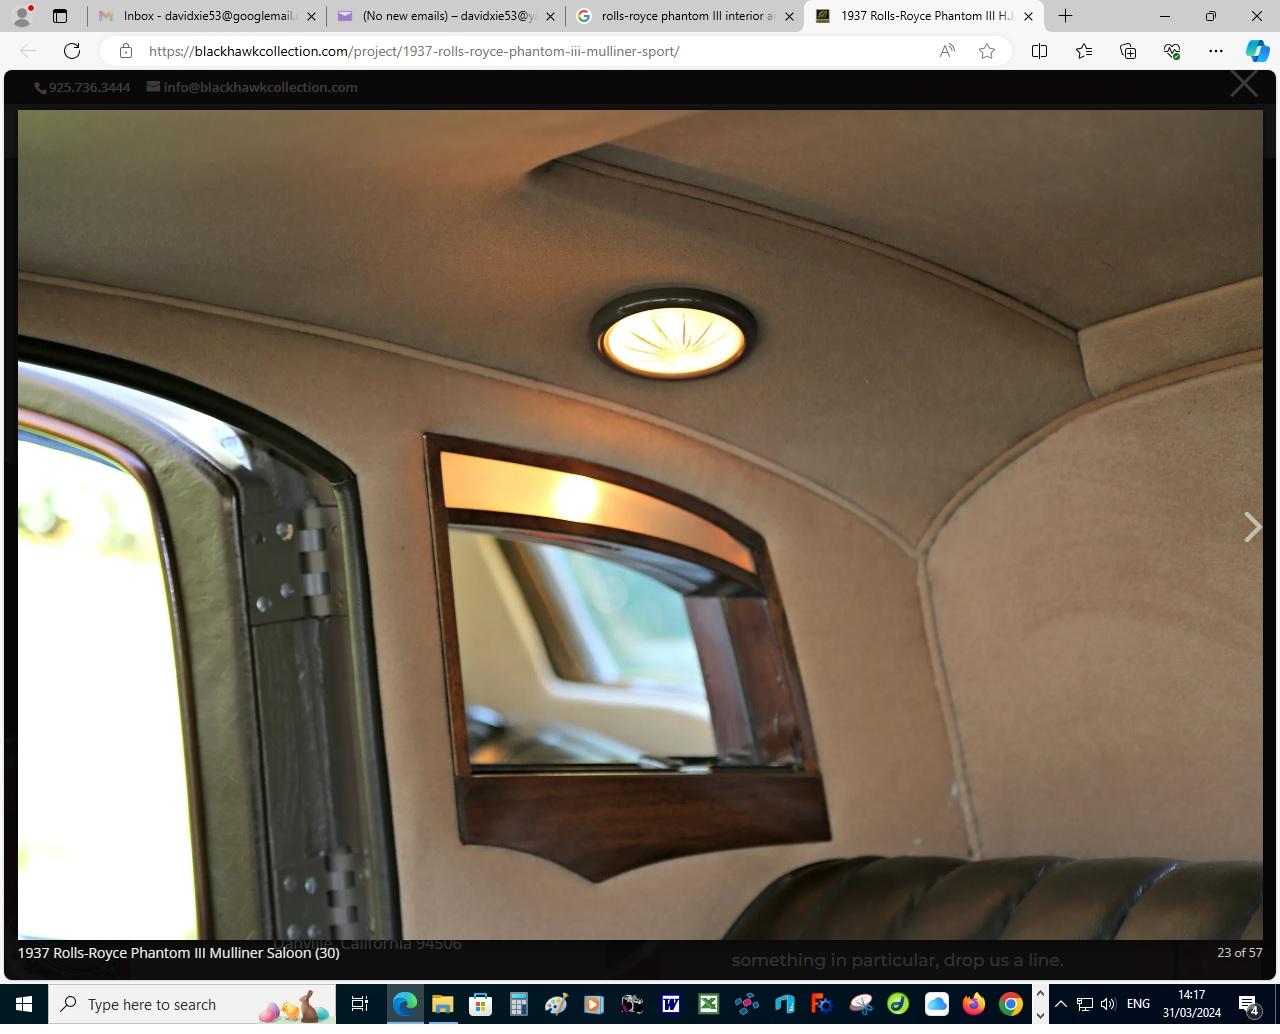
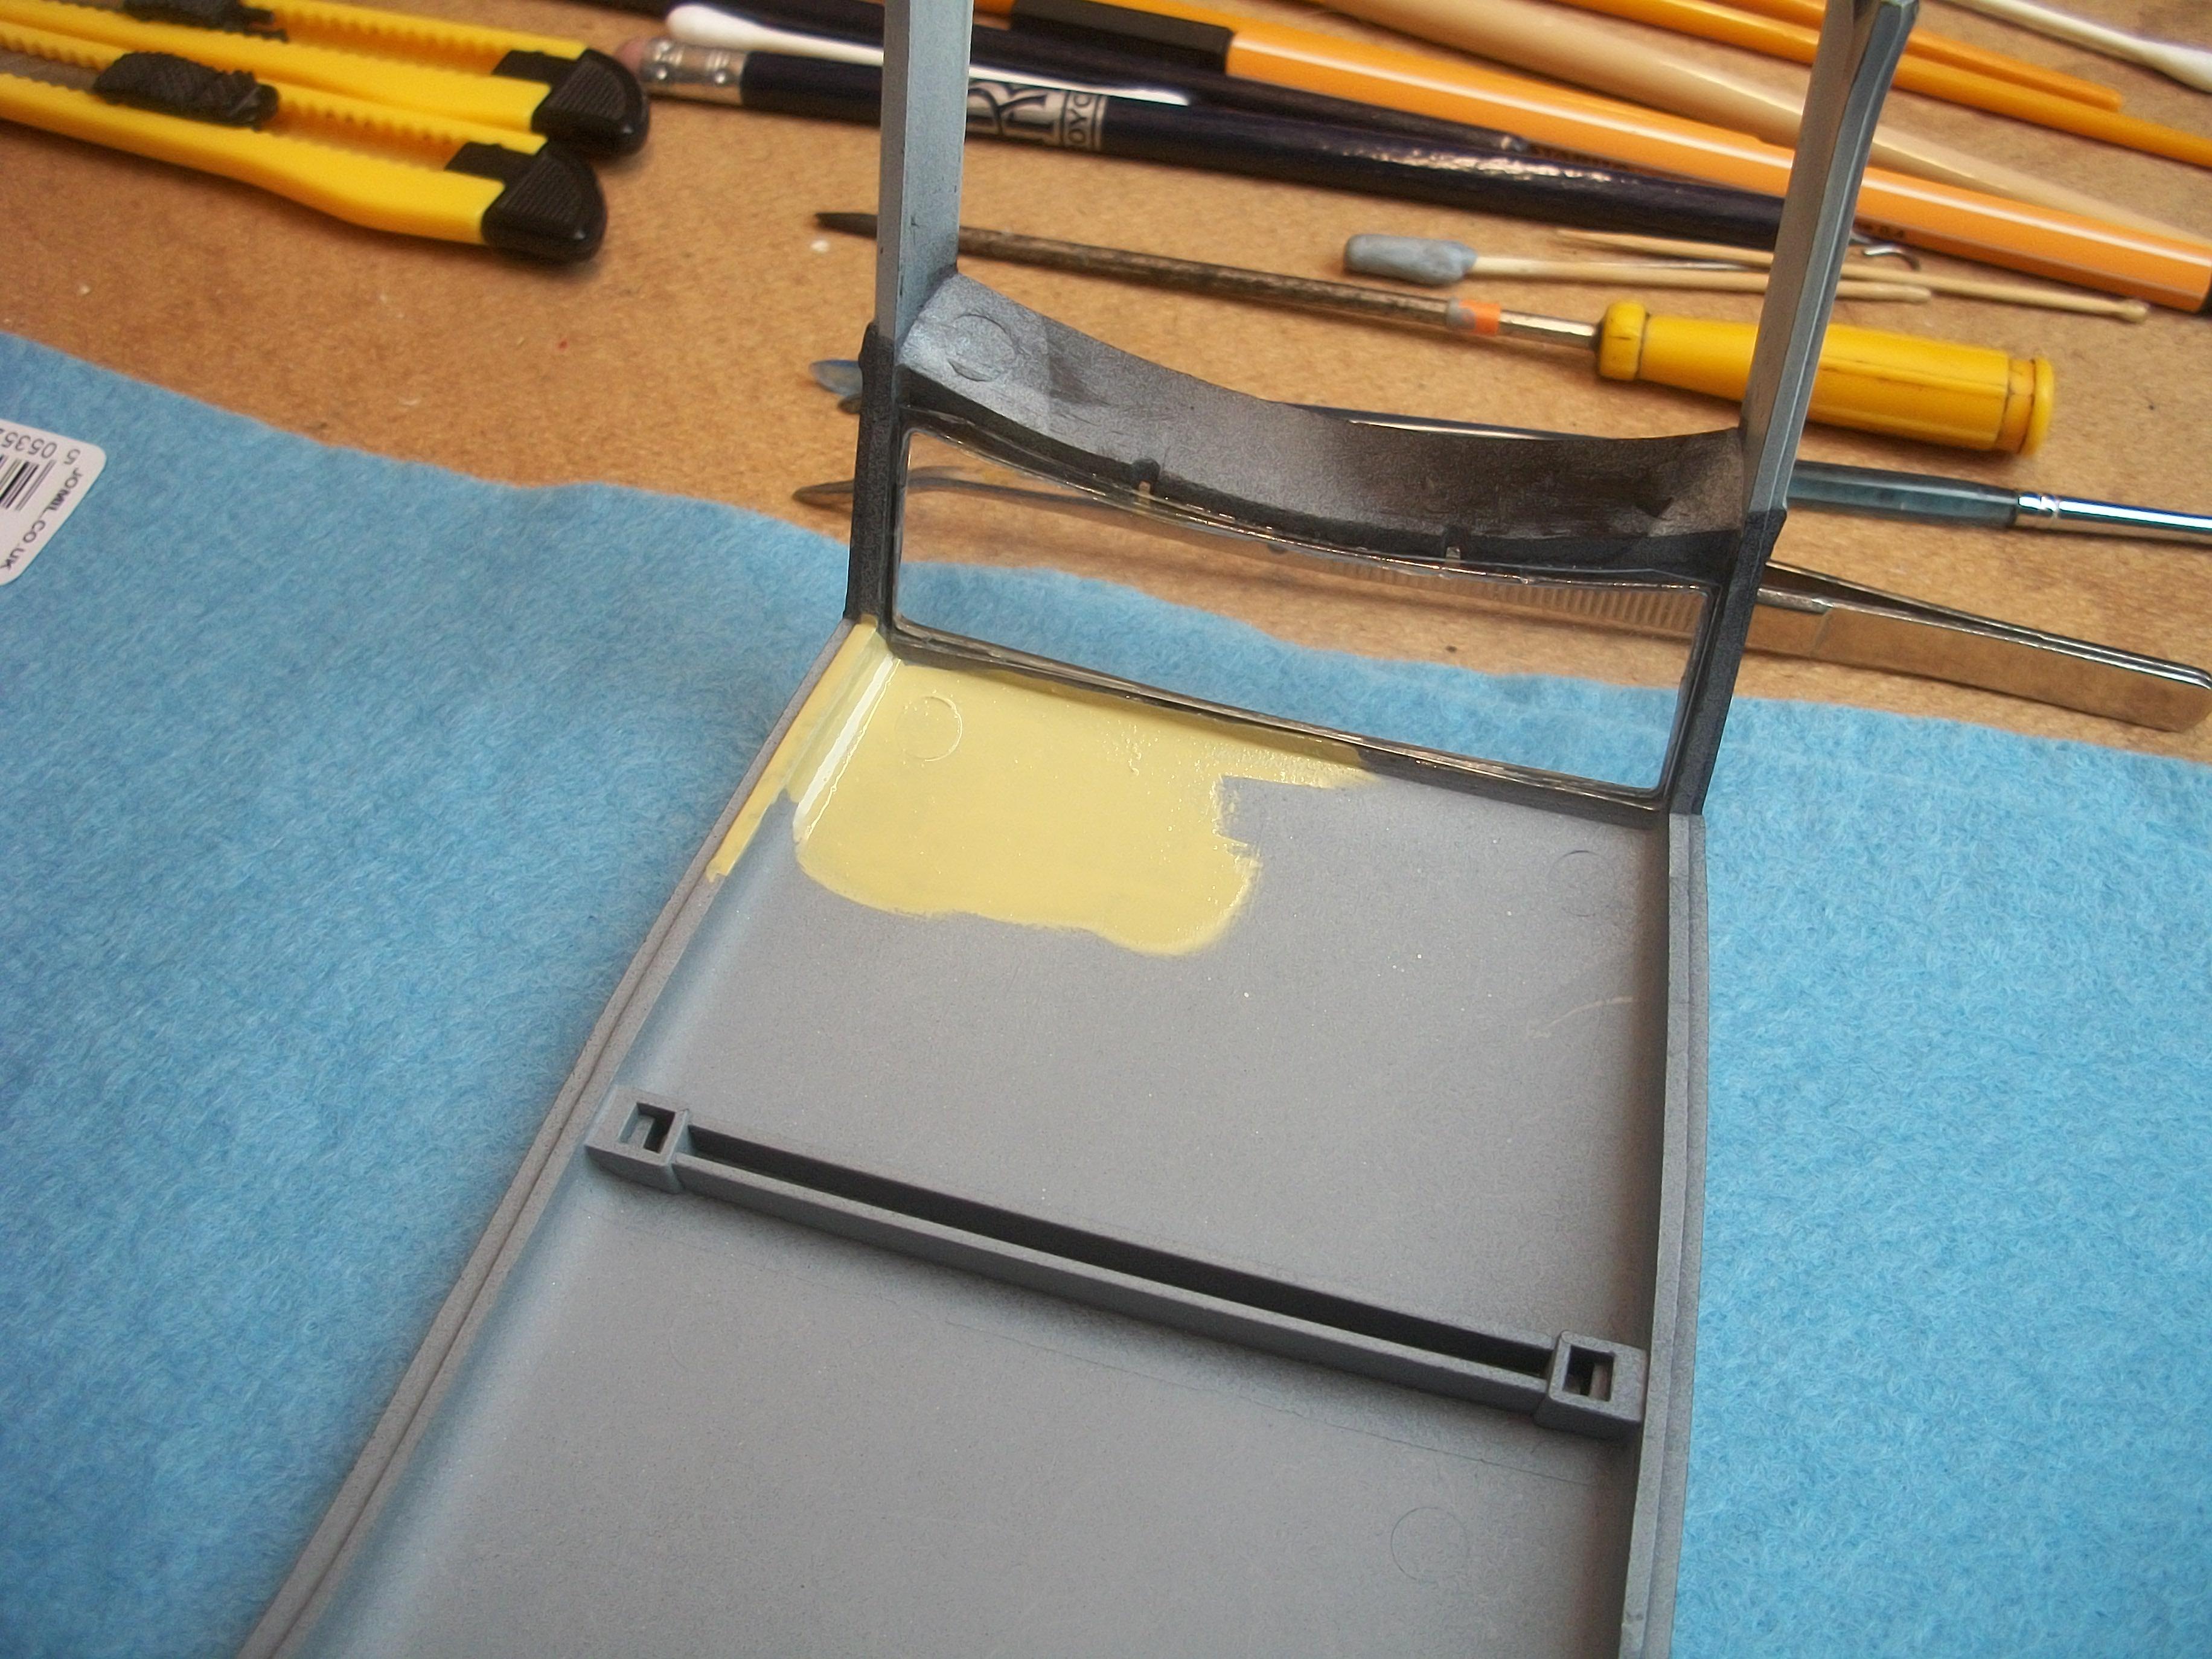
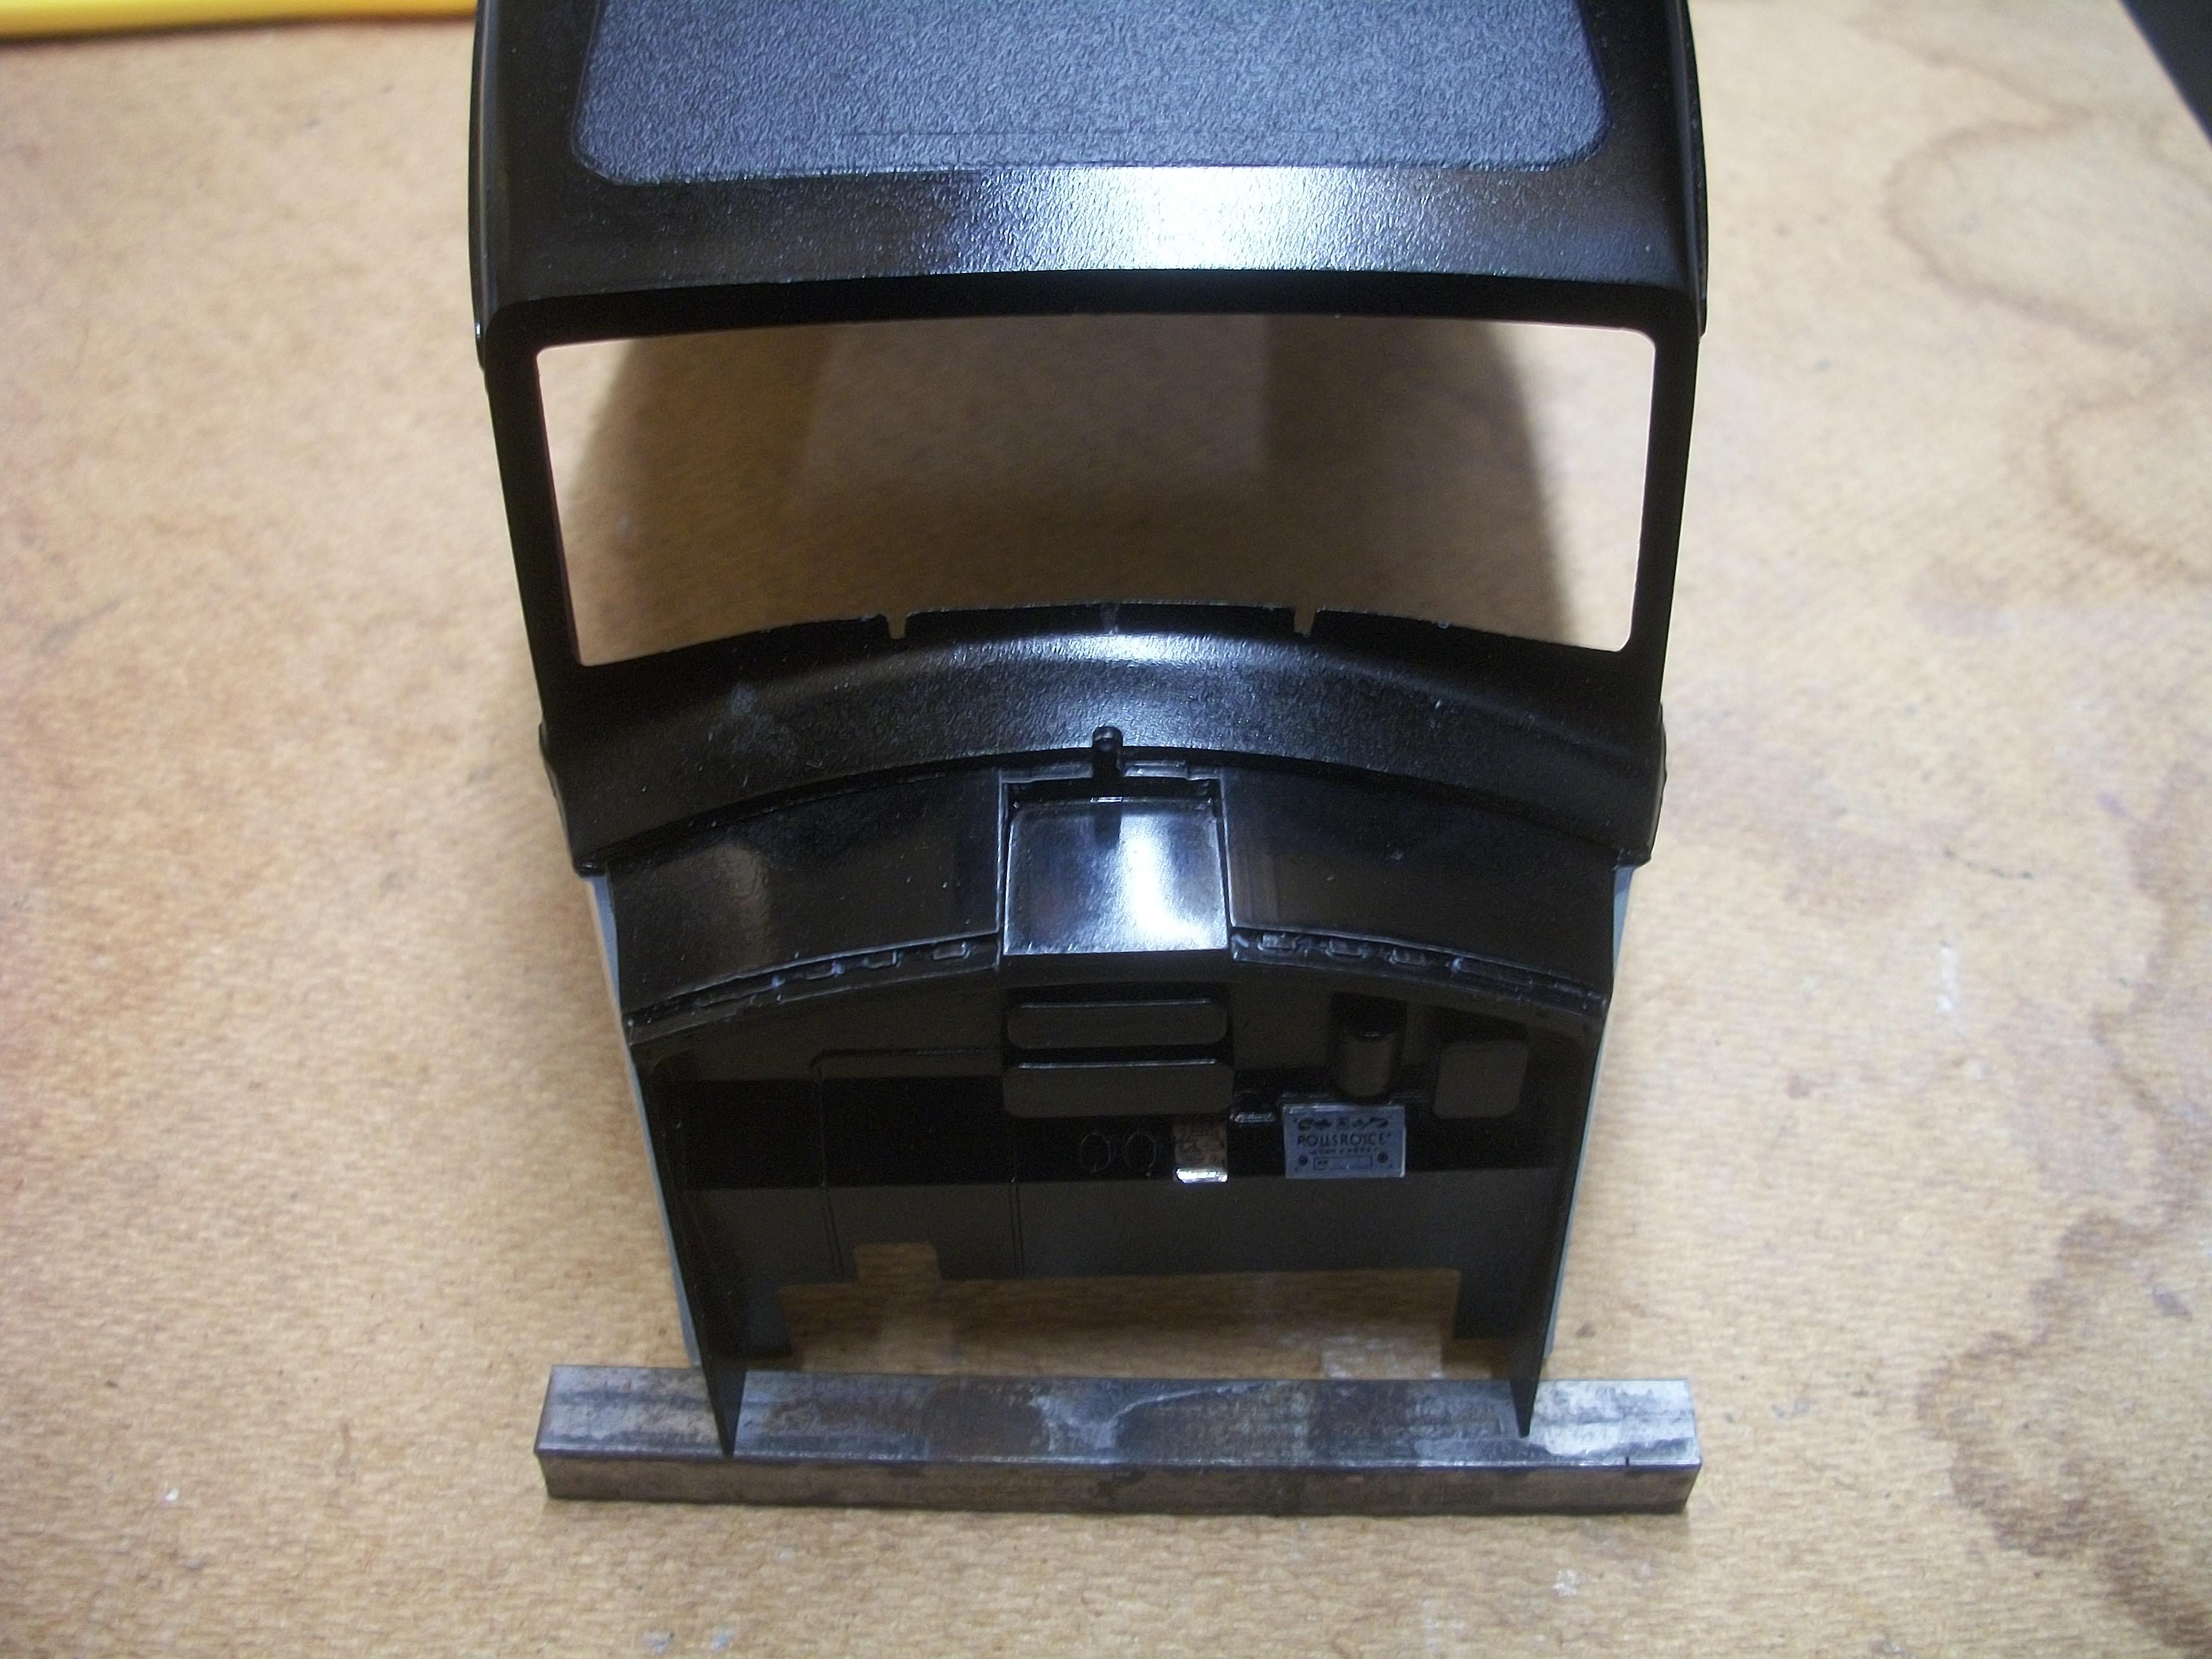
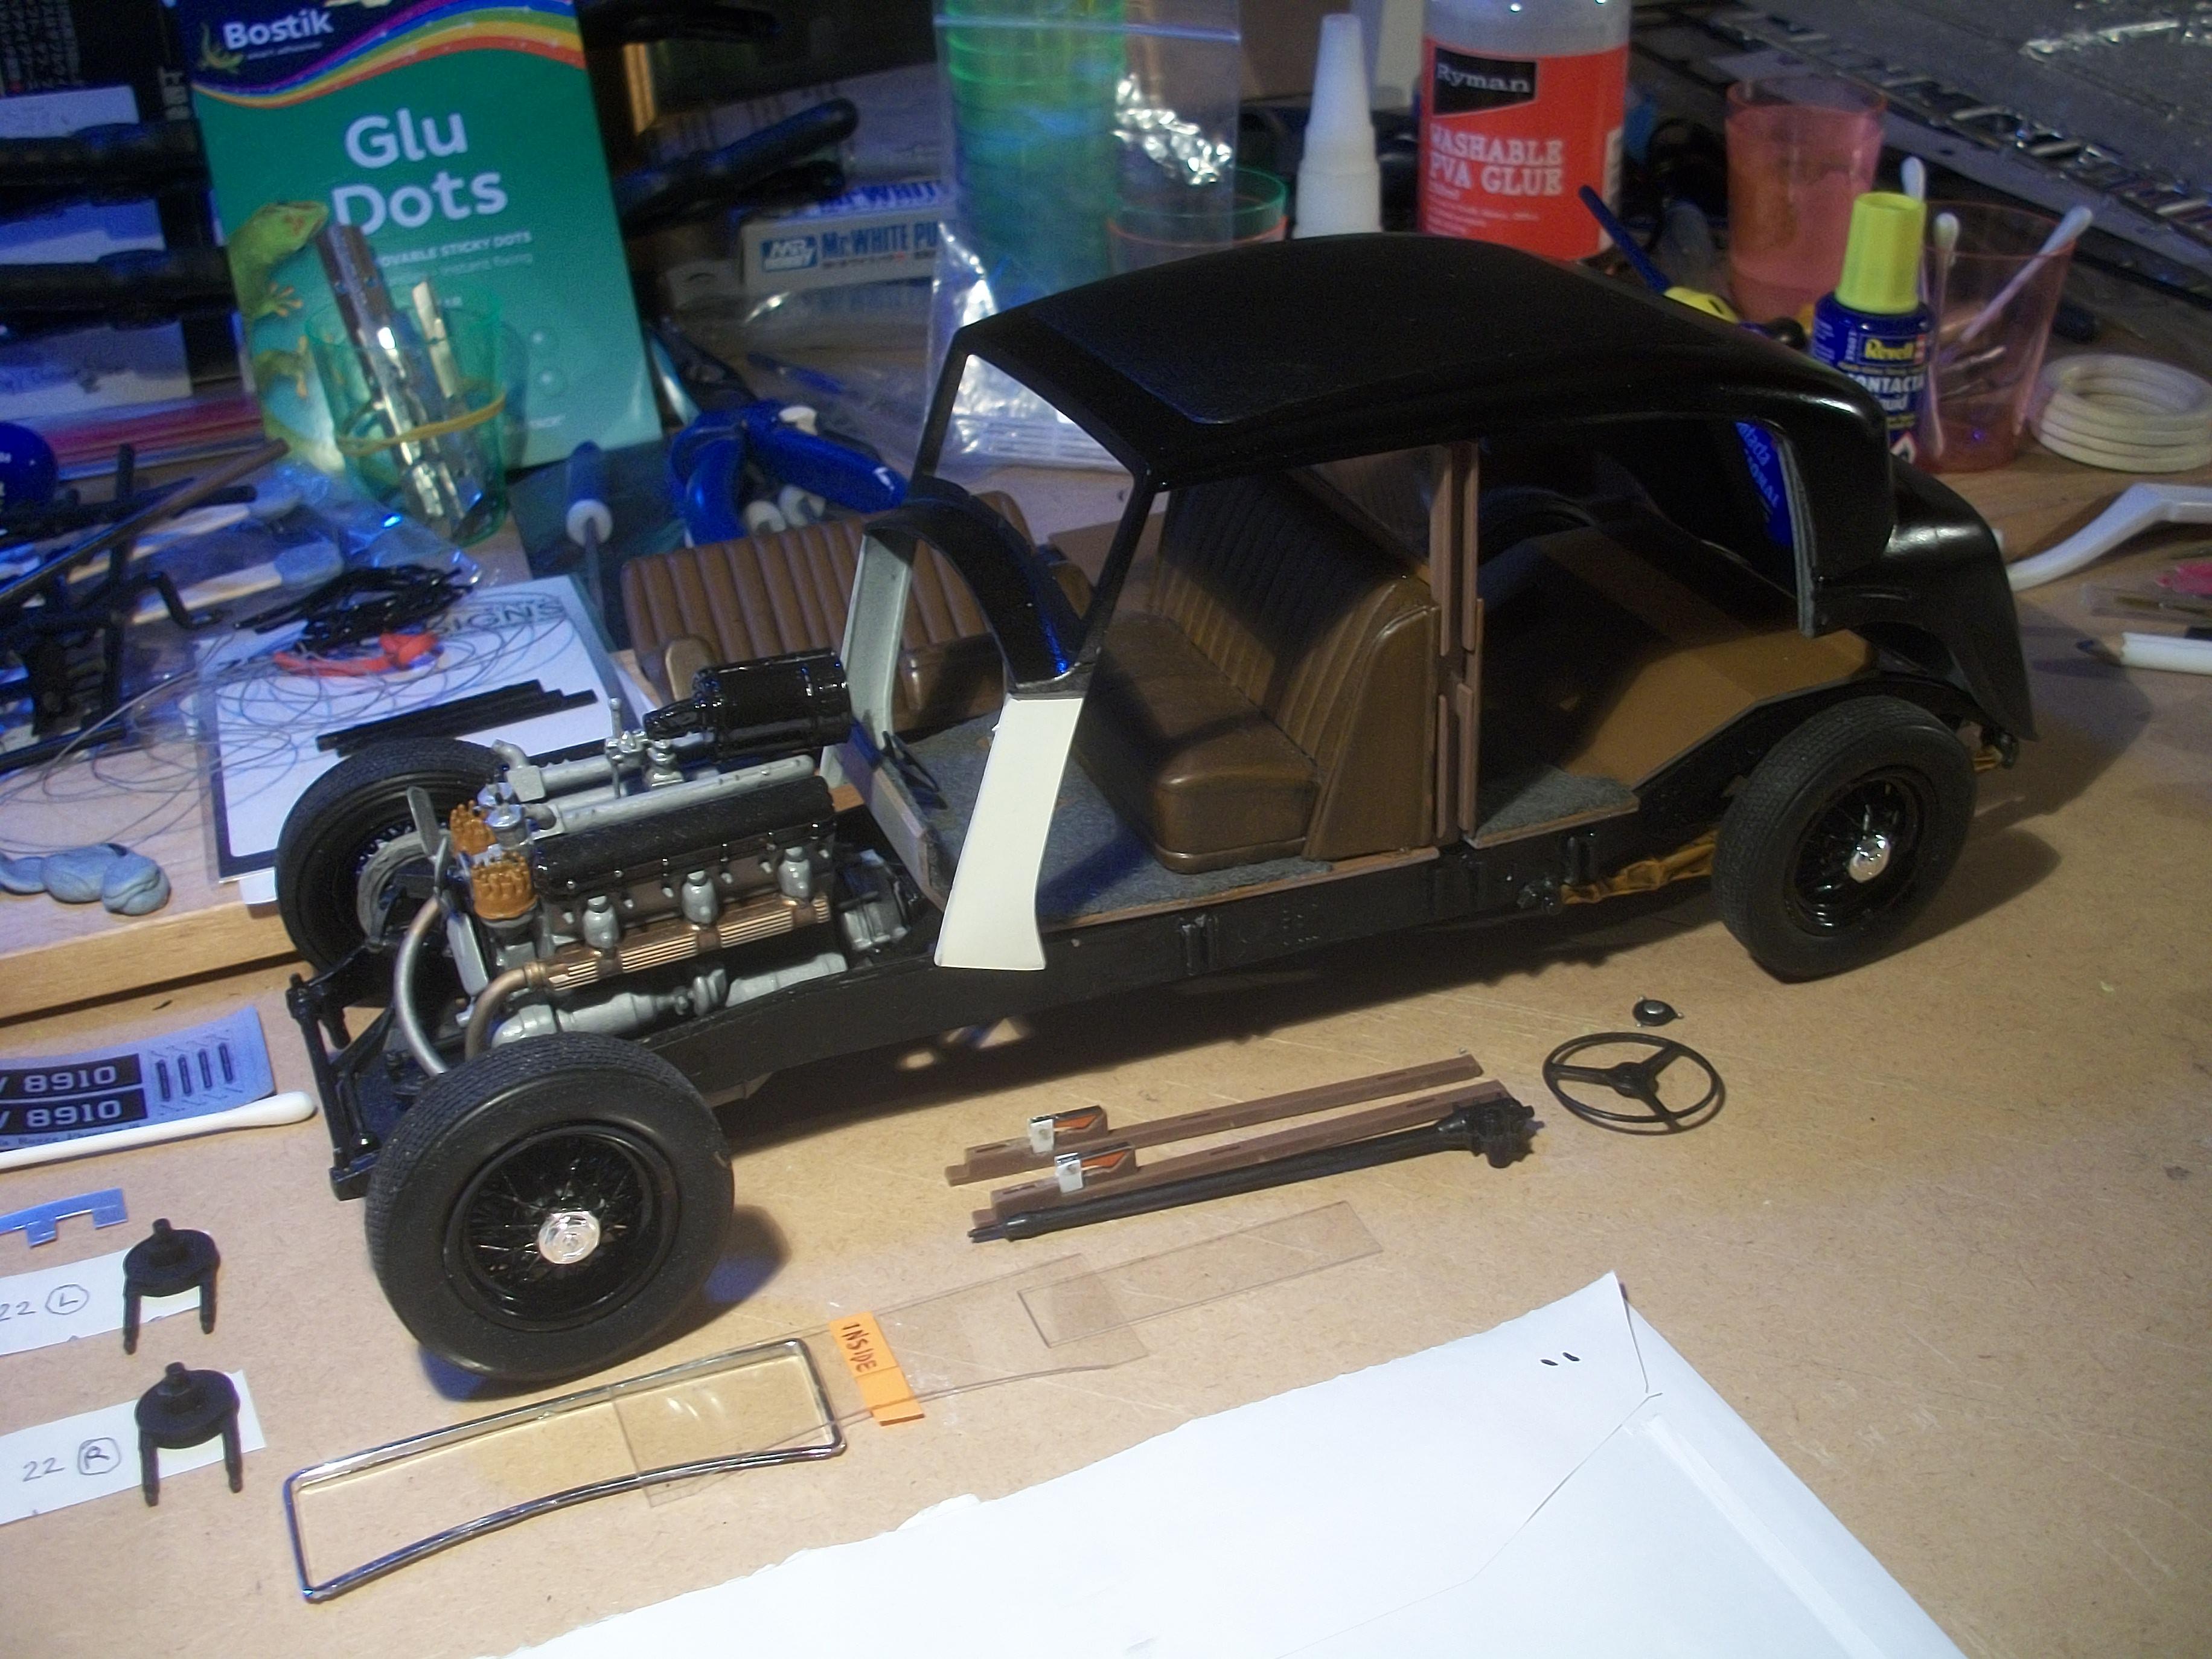
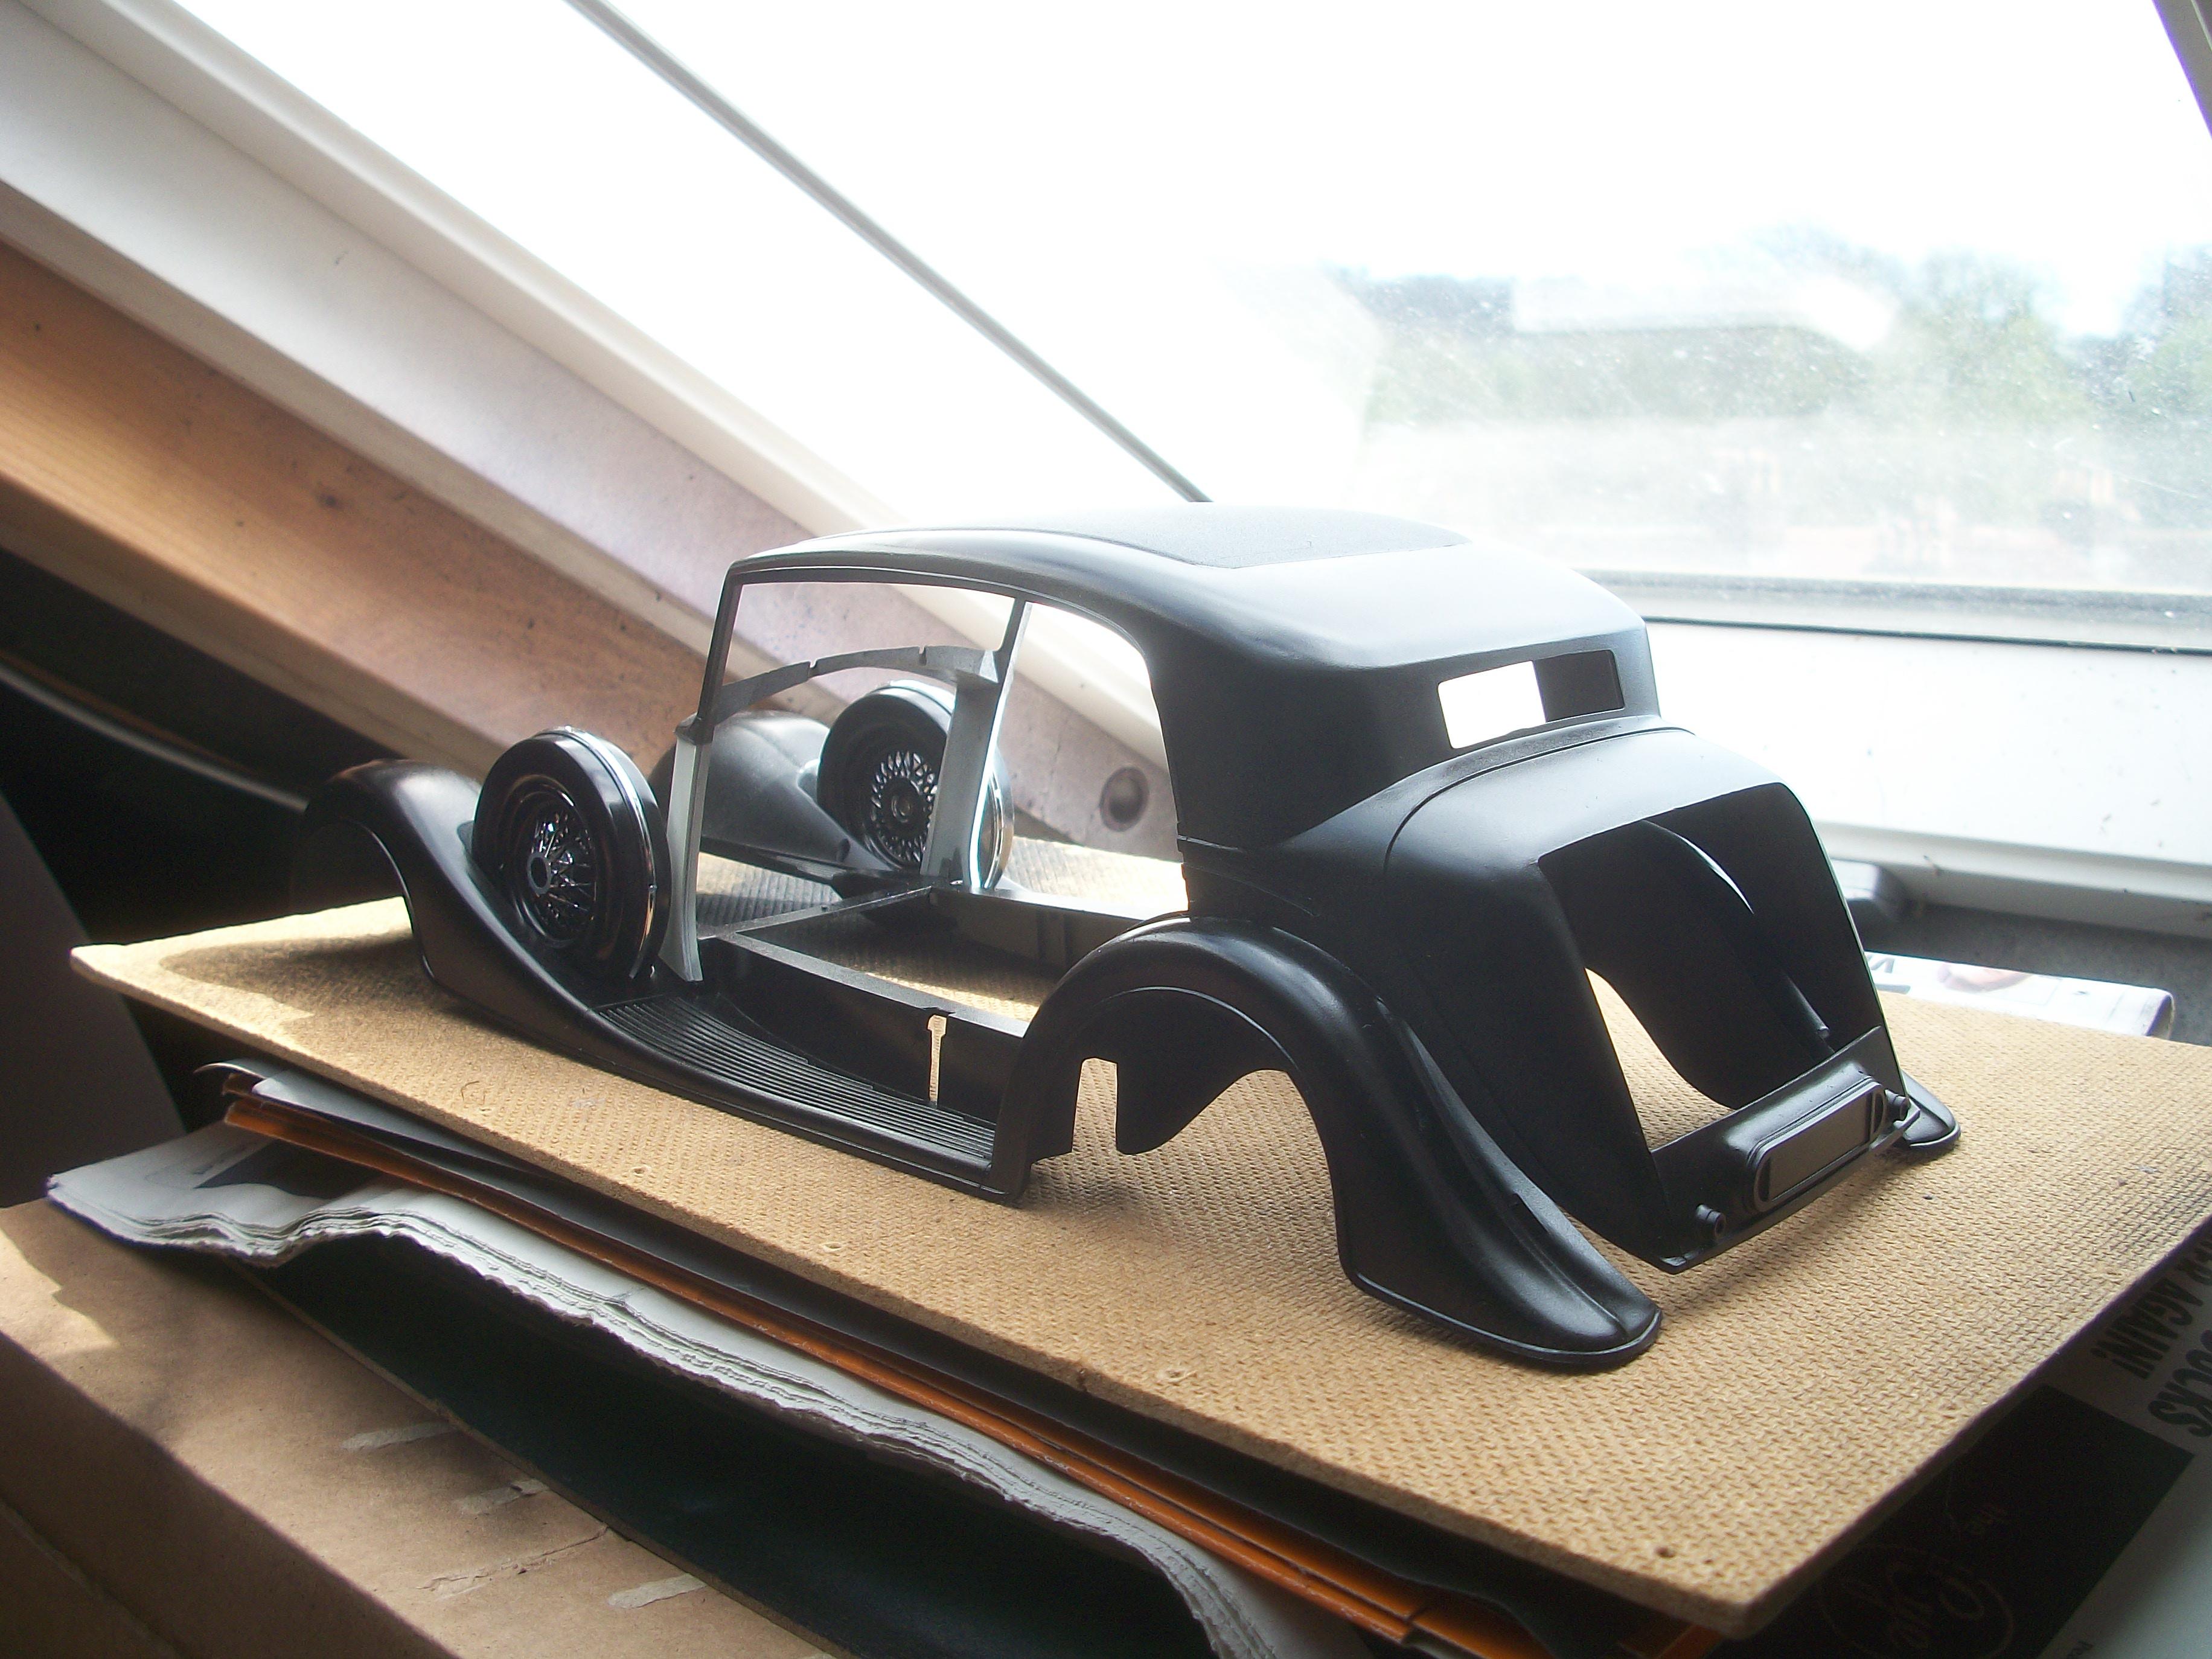
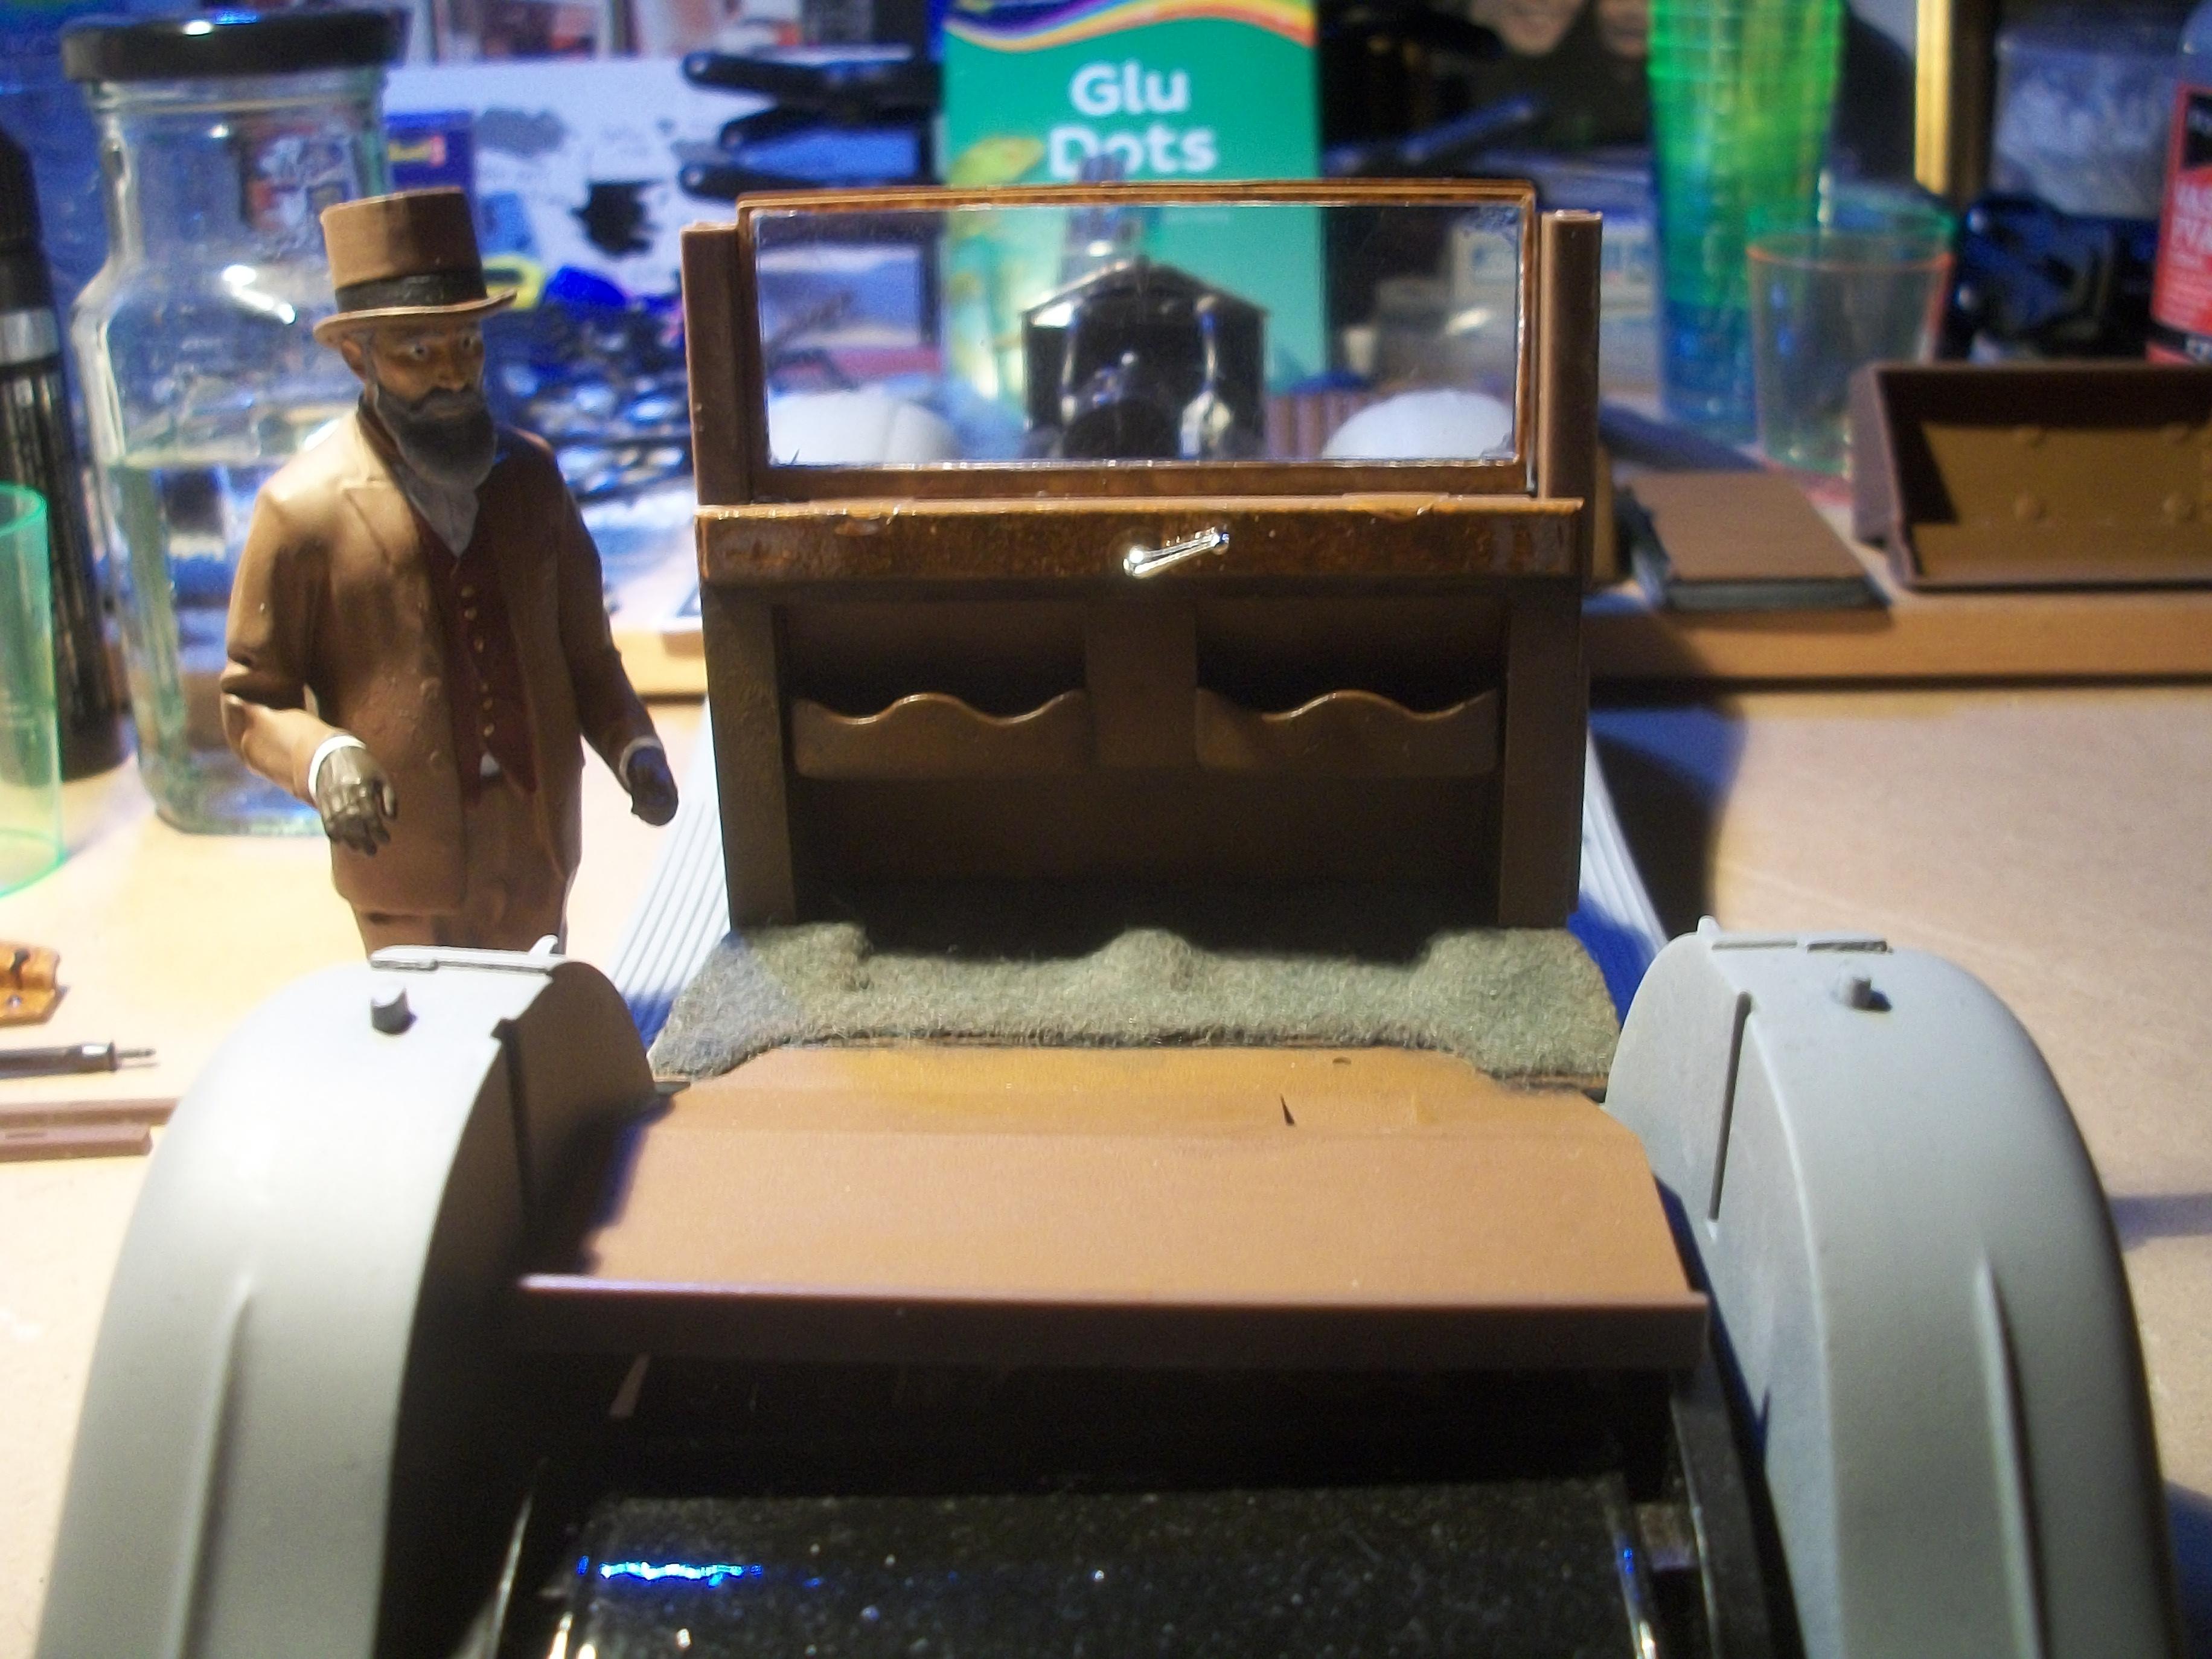
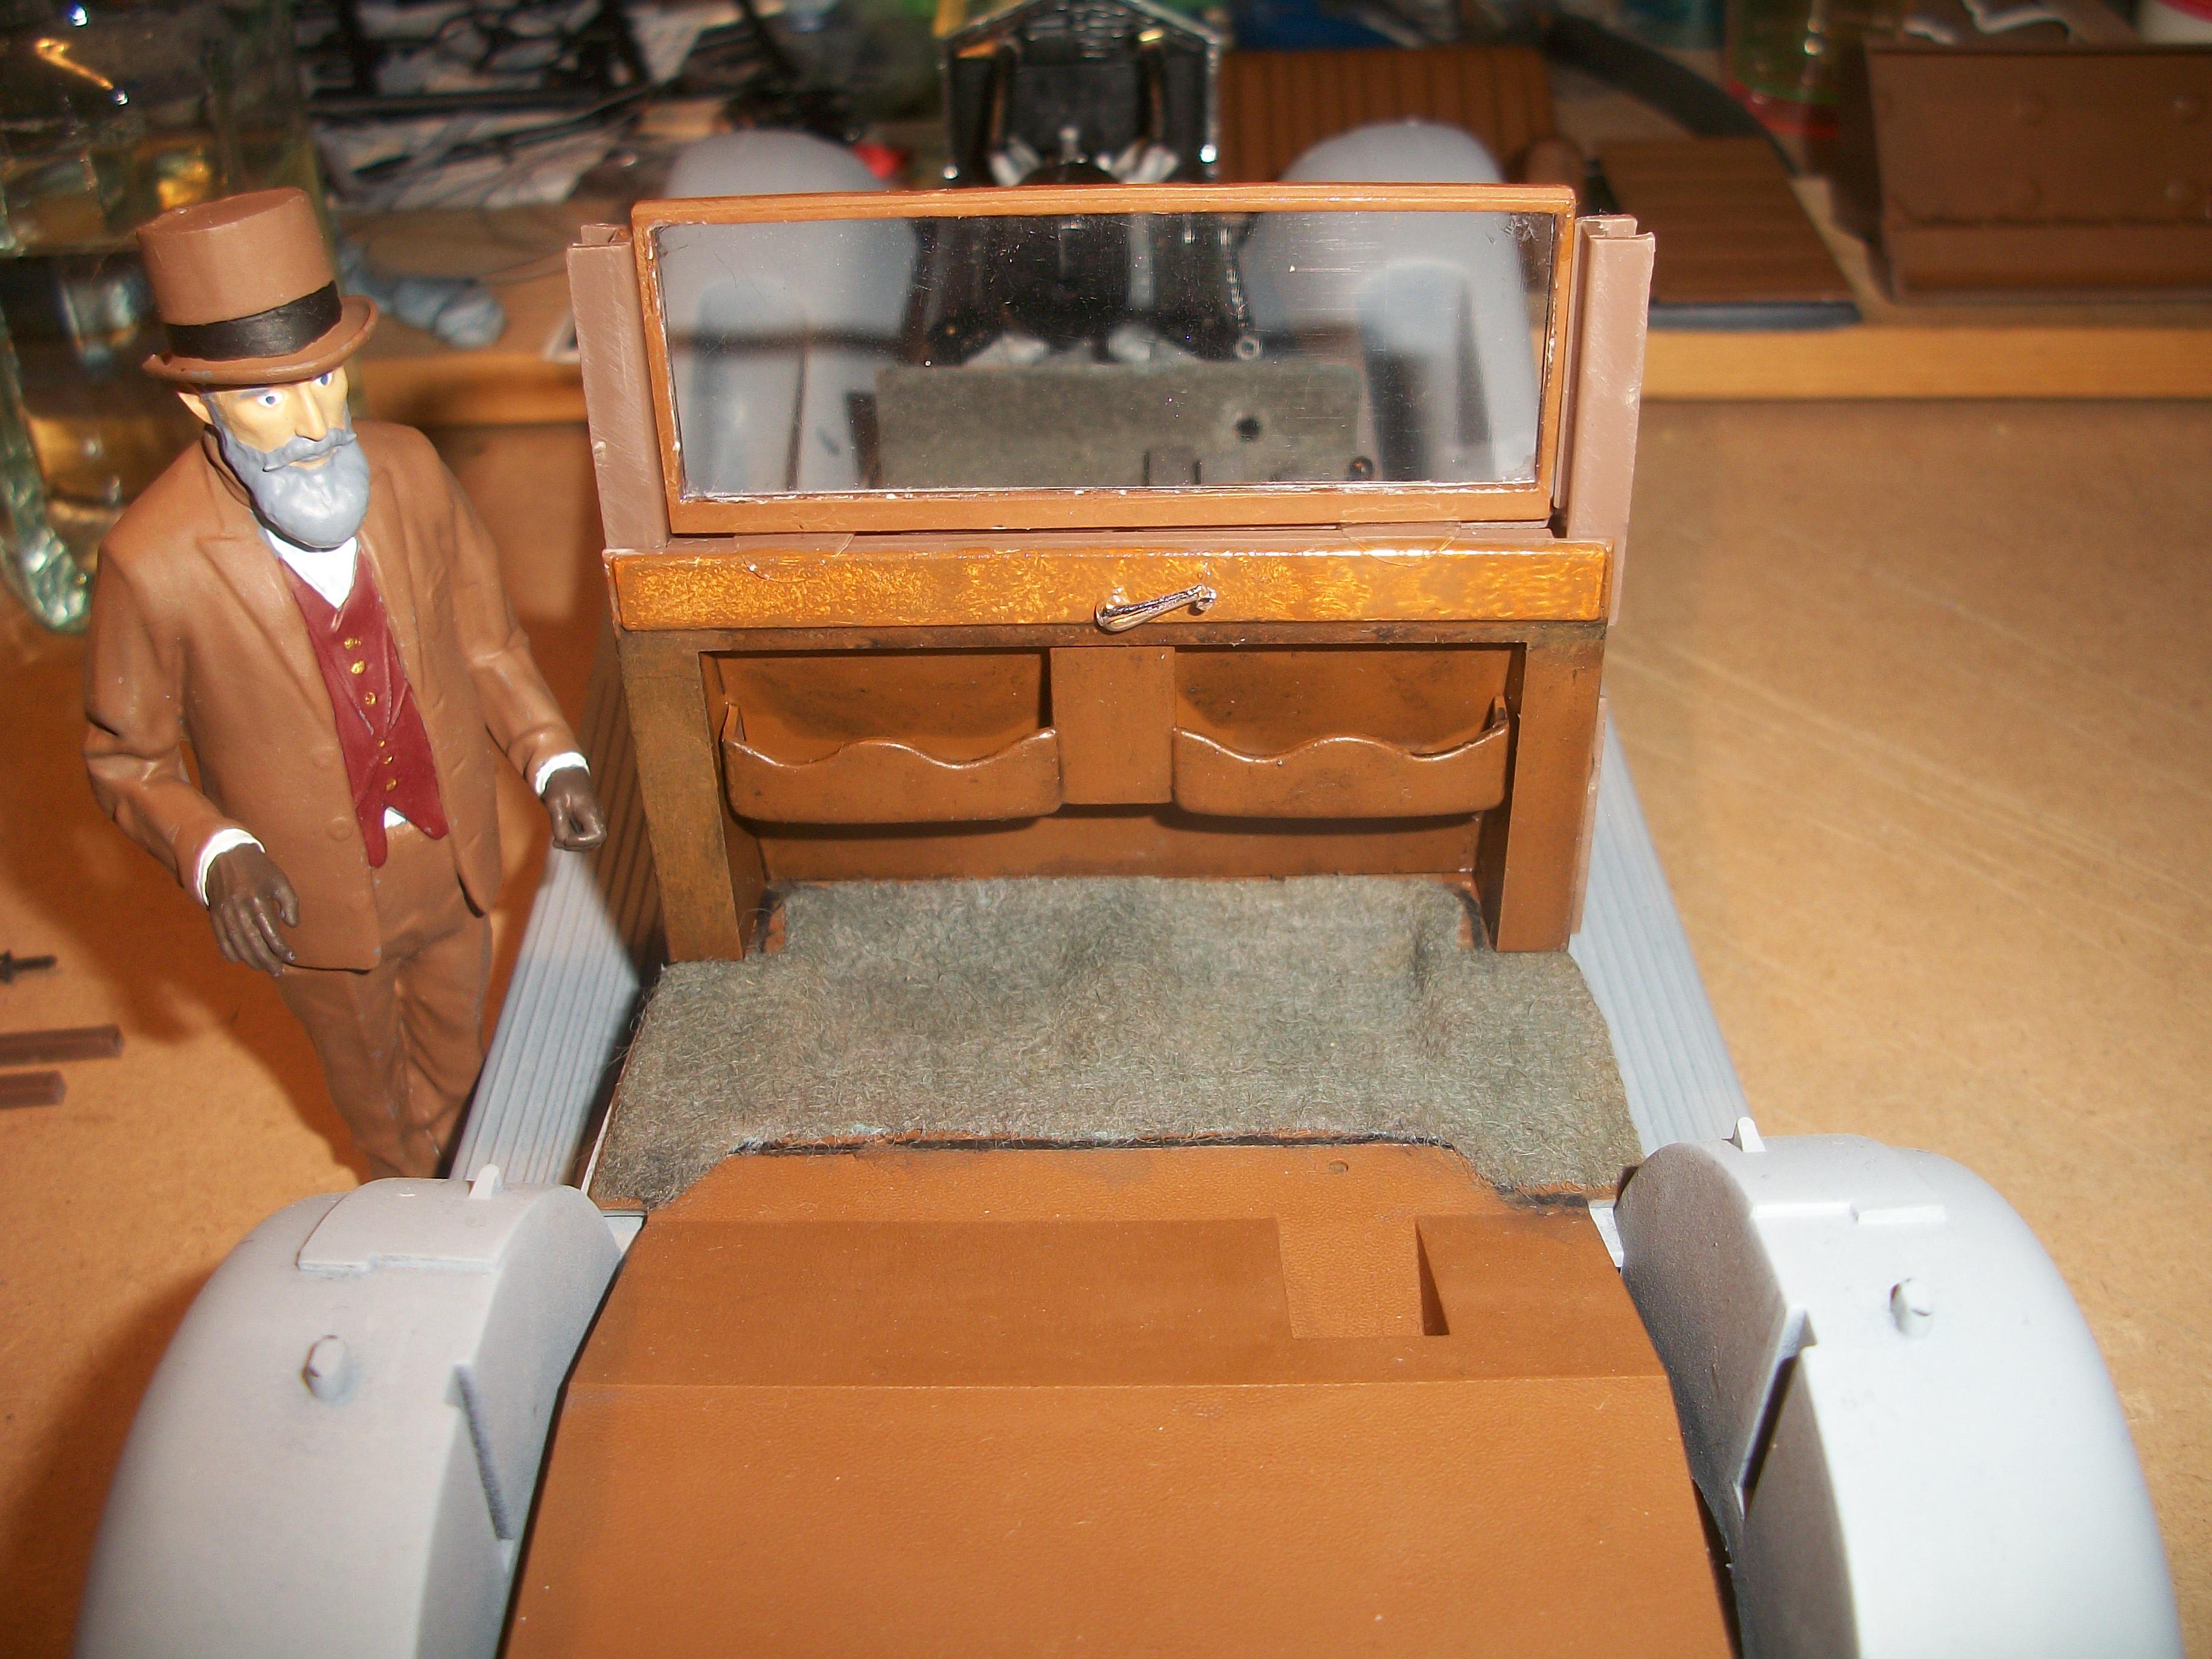
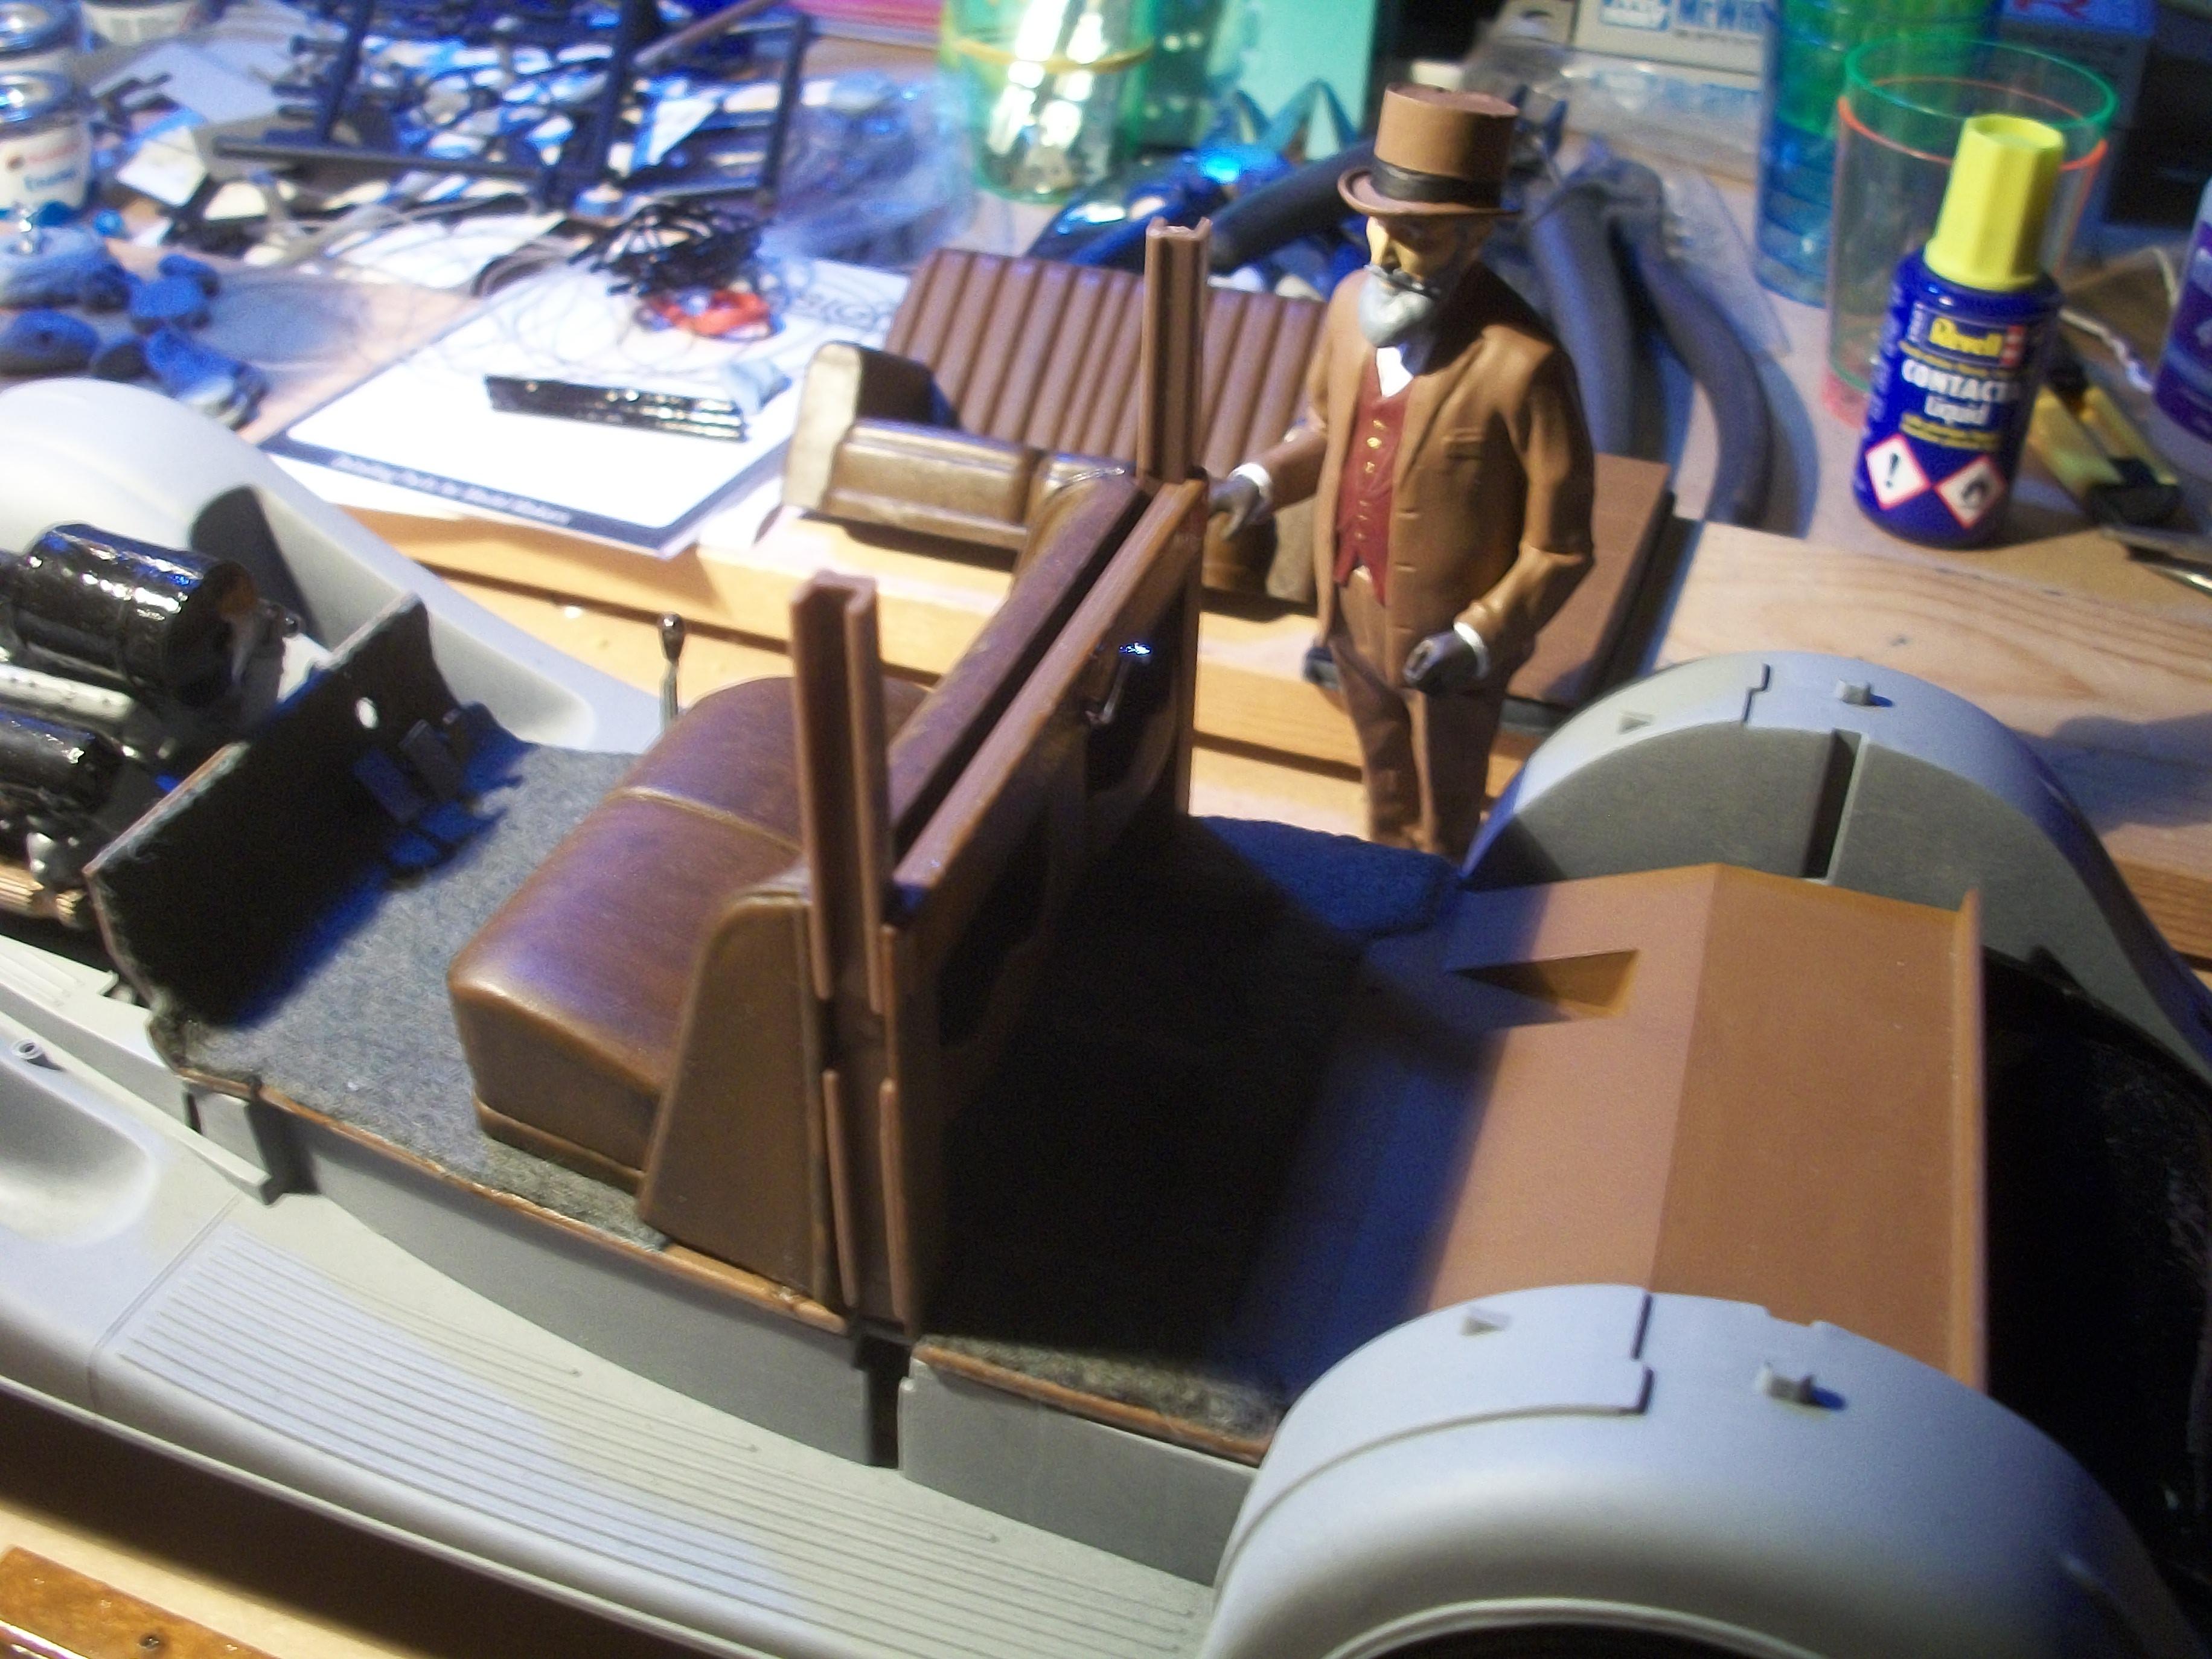
The two black wire-spoked spare wheels now have chrome hub caps . . . Gloss black touch up paint has nearly dried around the canvas roof panel, and the firewall has been test fitted with the upper body . . . Meanwhile, the interior door panels were test fitted on the inside of the door panels, and these will hide the brass hinges concealed within. Mounting the upper body onto the rolling chassis showed me how the inner door posts and the division are going to look later . . . I have marked the level above which the inner door posts will be painted in the headlining colour, which is Humbrol 103 Matt Cream enamel and these will be brush painted . . . The chrome windscreen surround moulding was glued in place today, using Revell brushed adhesive, and I noticed afterwards that the centre lower edge of the part was not making contact with the body. This was dealt with by applying a small amount of super glue to the gap between the parts. Last job for today was to glue in place the windscreen glass that I had fabricated previously . . . This was done using Crystal Clear white glue, which needs a good 12 hours setting time overnight . . . Once the rear window glass has been fitted tomorrow, the headlining can be brush painted inside the roof. David
-
1:16 Gunze Sangyo 1937 Rolls-Royce Phantom III Sports Saloon
Anglia105E replied to Anglia105E's topic in WIP: Model Cars
Thanks Pierre . . . As regards the polishing process, I don't do any wet sanding. The three grades of Tamiya Polishing Compound are applied in sequence, so Coarse, Fine and Finish . . . Sometimes I might repeat the process if I feel it is necessary for a particular part, and I might also finish off with Meguiars Carnauba Wax polish to bring out the mirror finish that we all strive for ! I like to polish in a circular motion, rather than laterally . . . I really like the black and cream paint colour scheme for this car, which when combined with the dark brown interior colours, captures the essence of the 1930's period . . . certainly on the lawn at Ascot, as you say. David -
1:16 Gunze Sangyo 1937 Rolls-Royce Phantom III Sports Saloon
Anglia105E replied to Anglia105E's topic in WIP: Model Cars
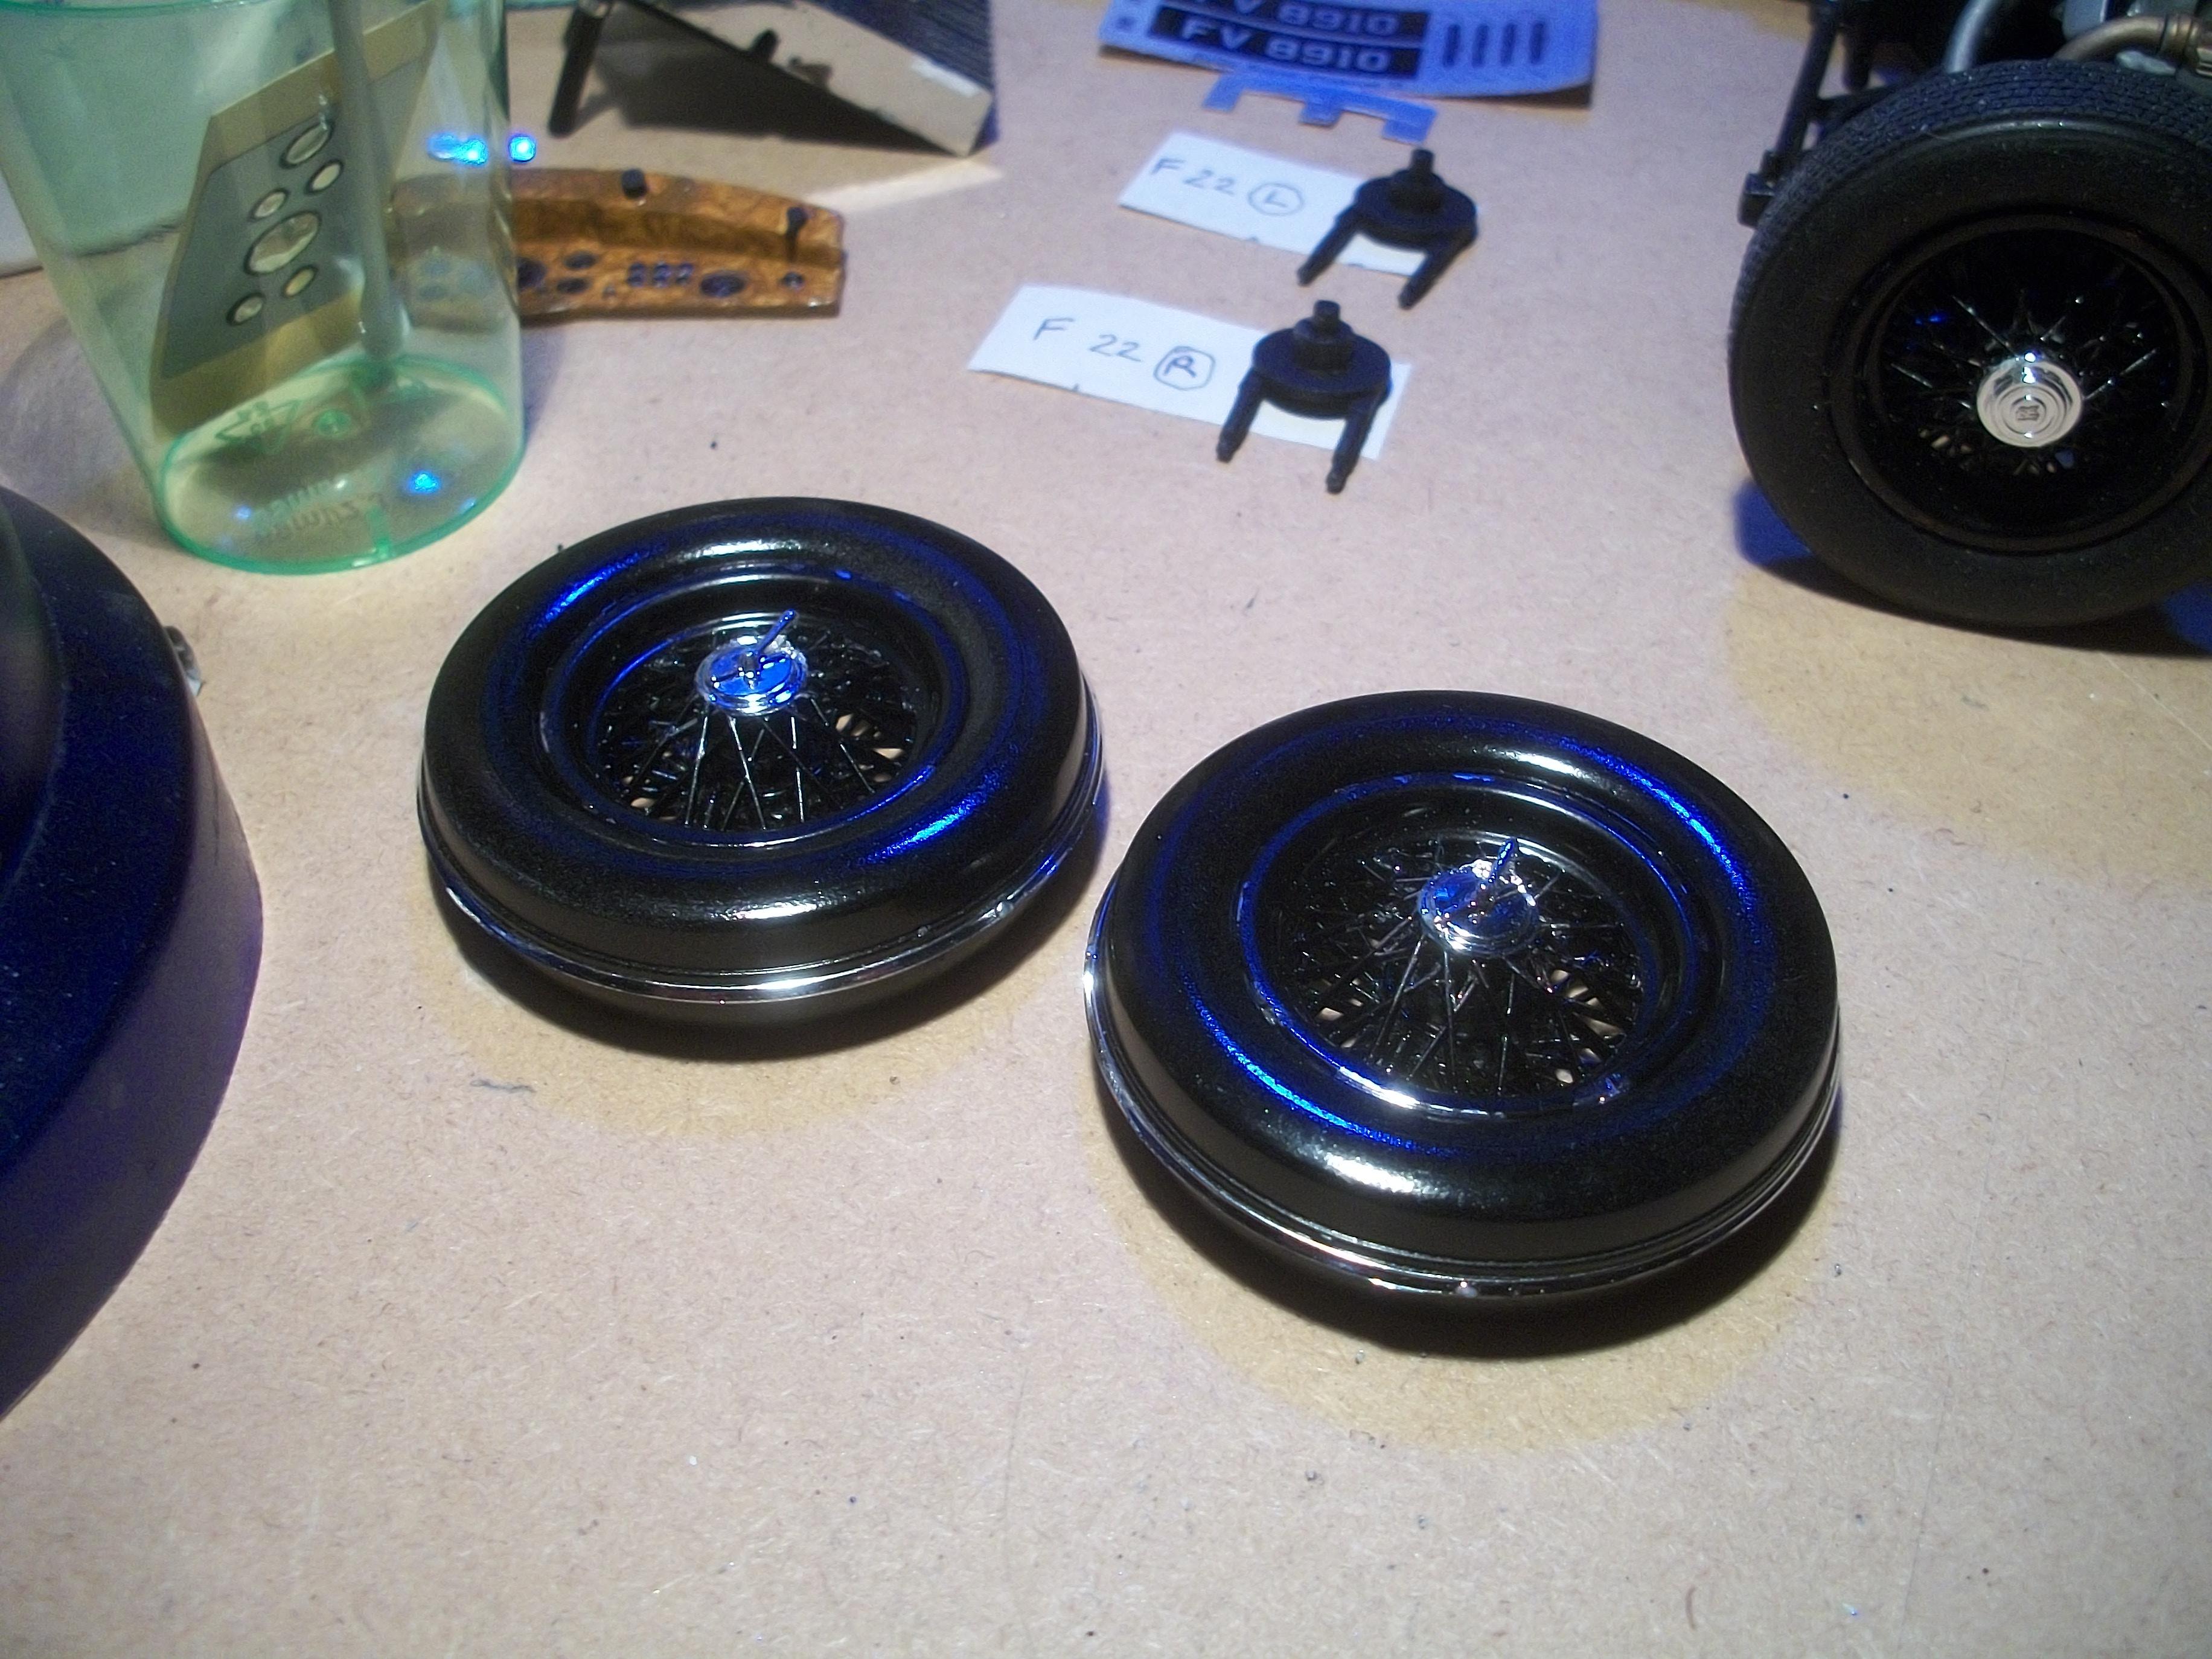
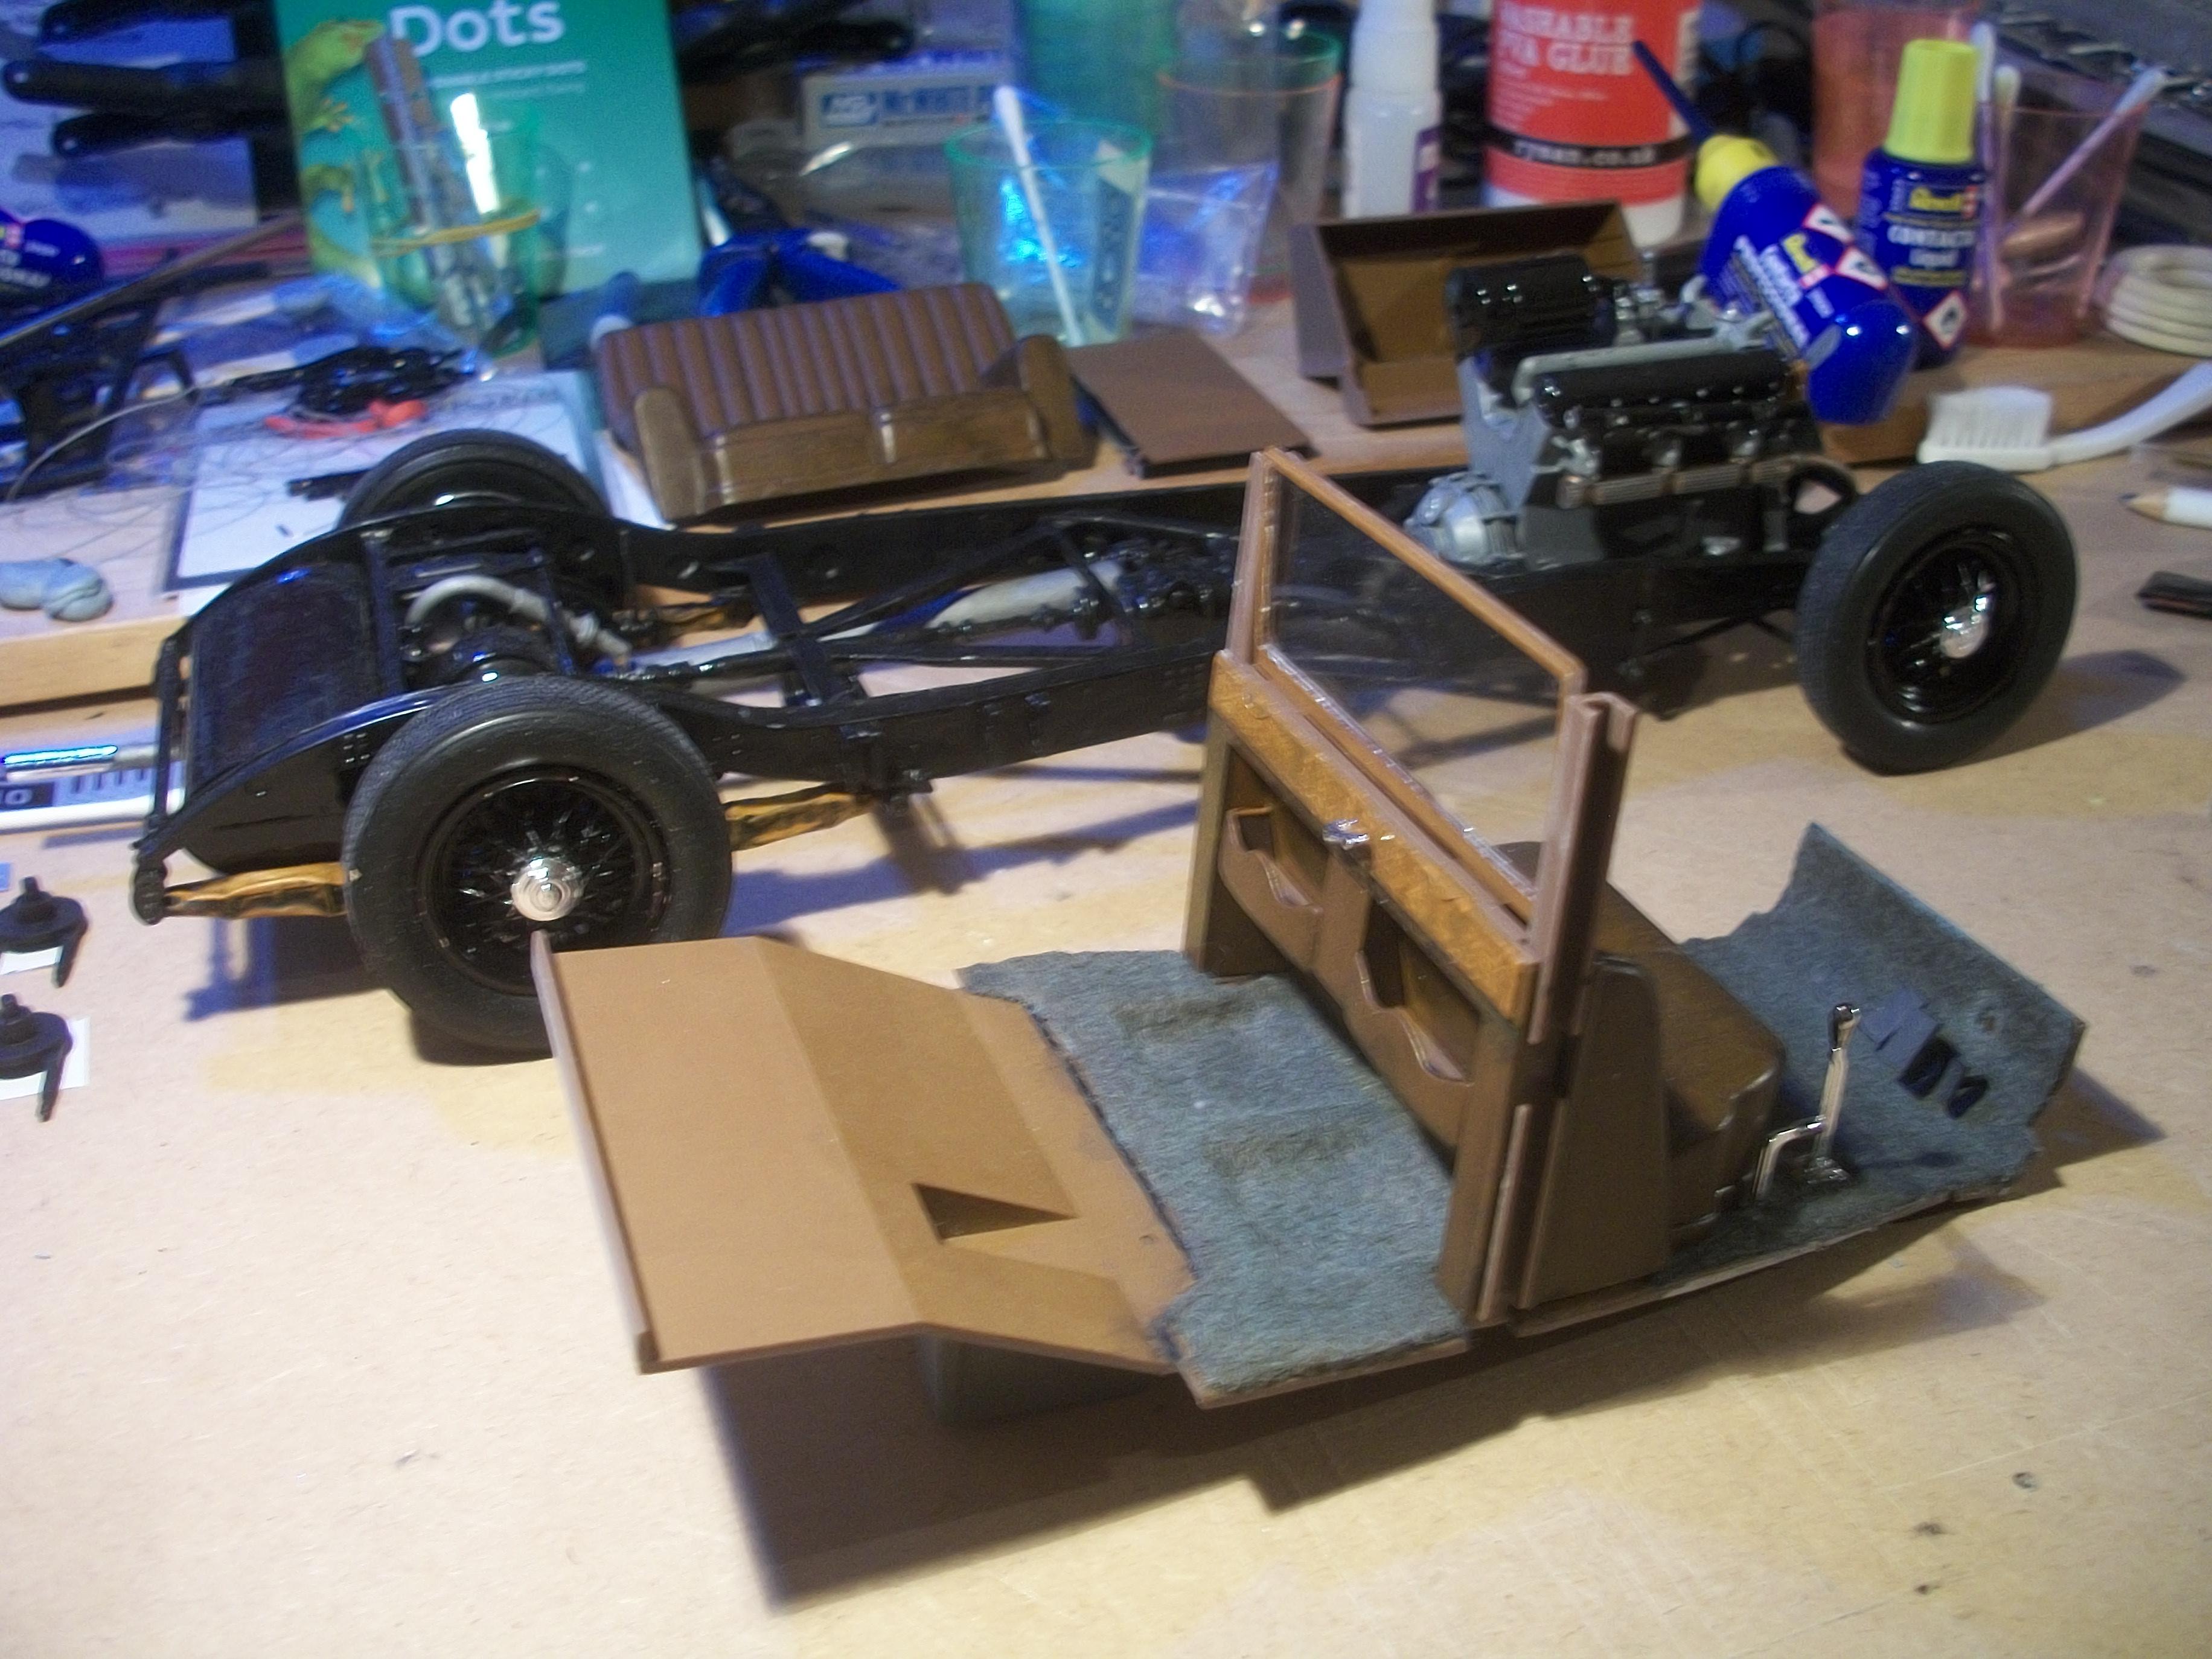
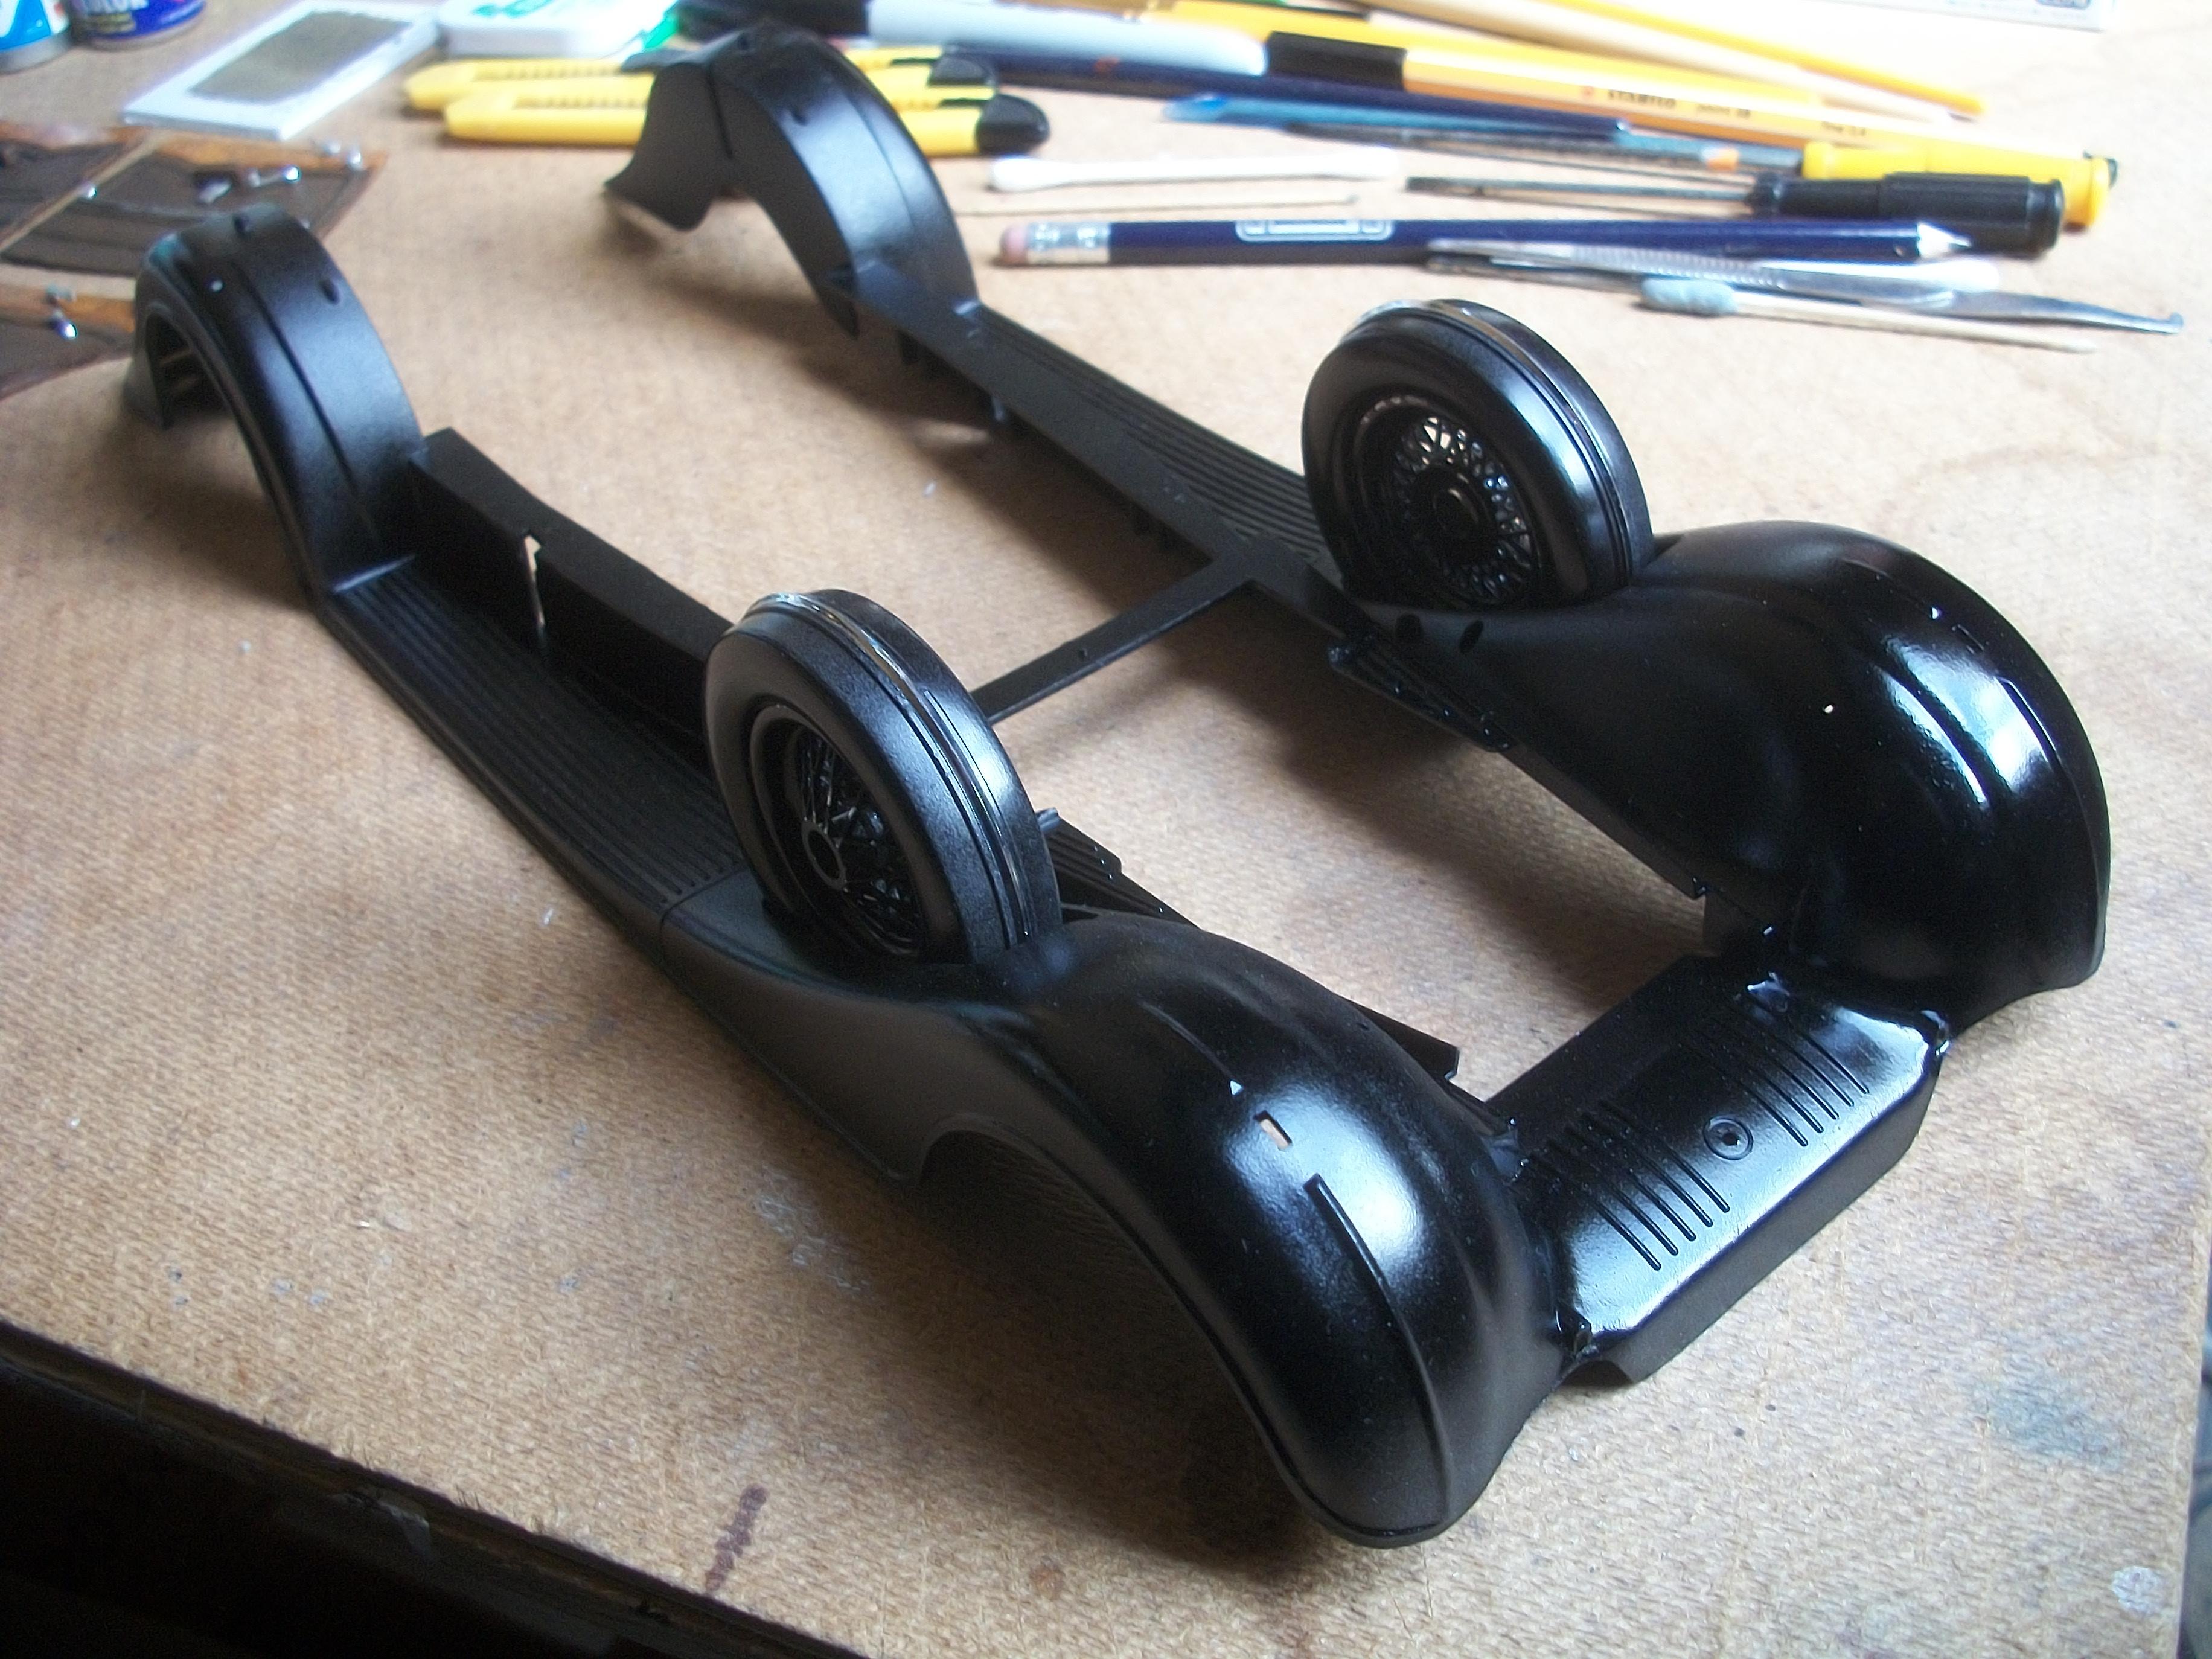
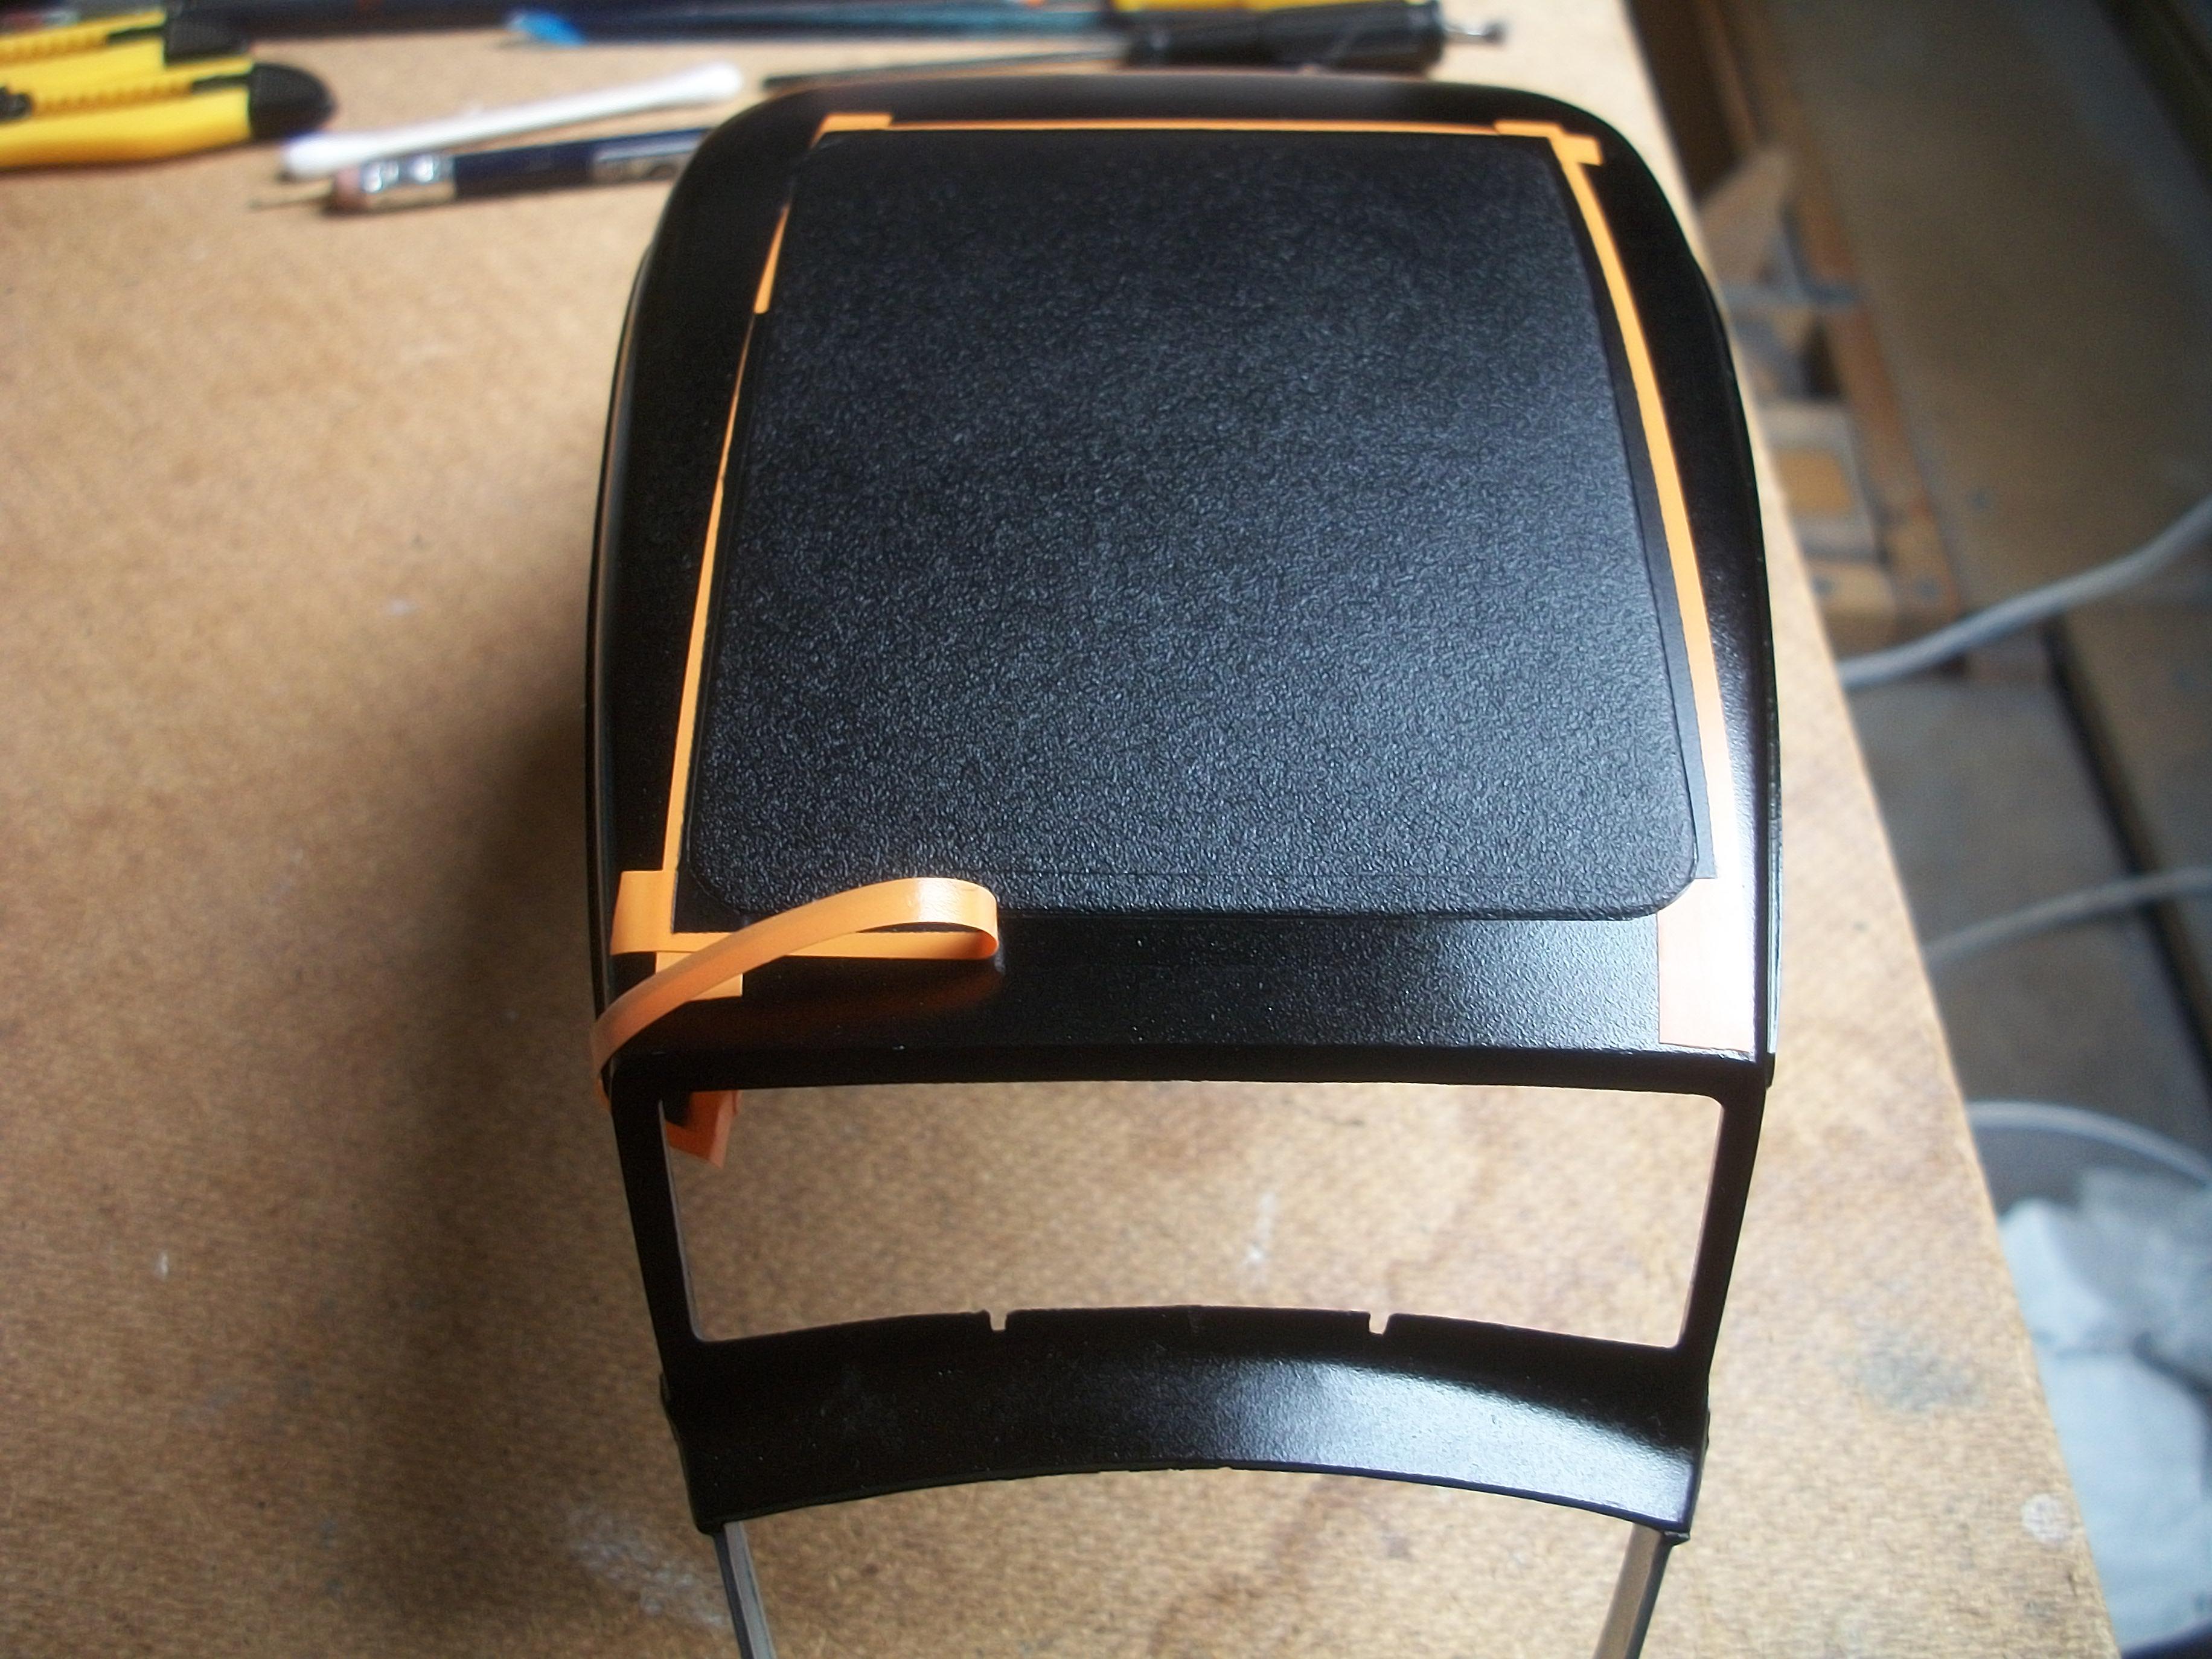
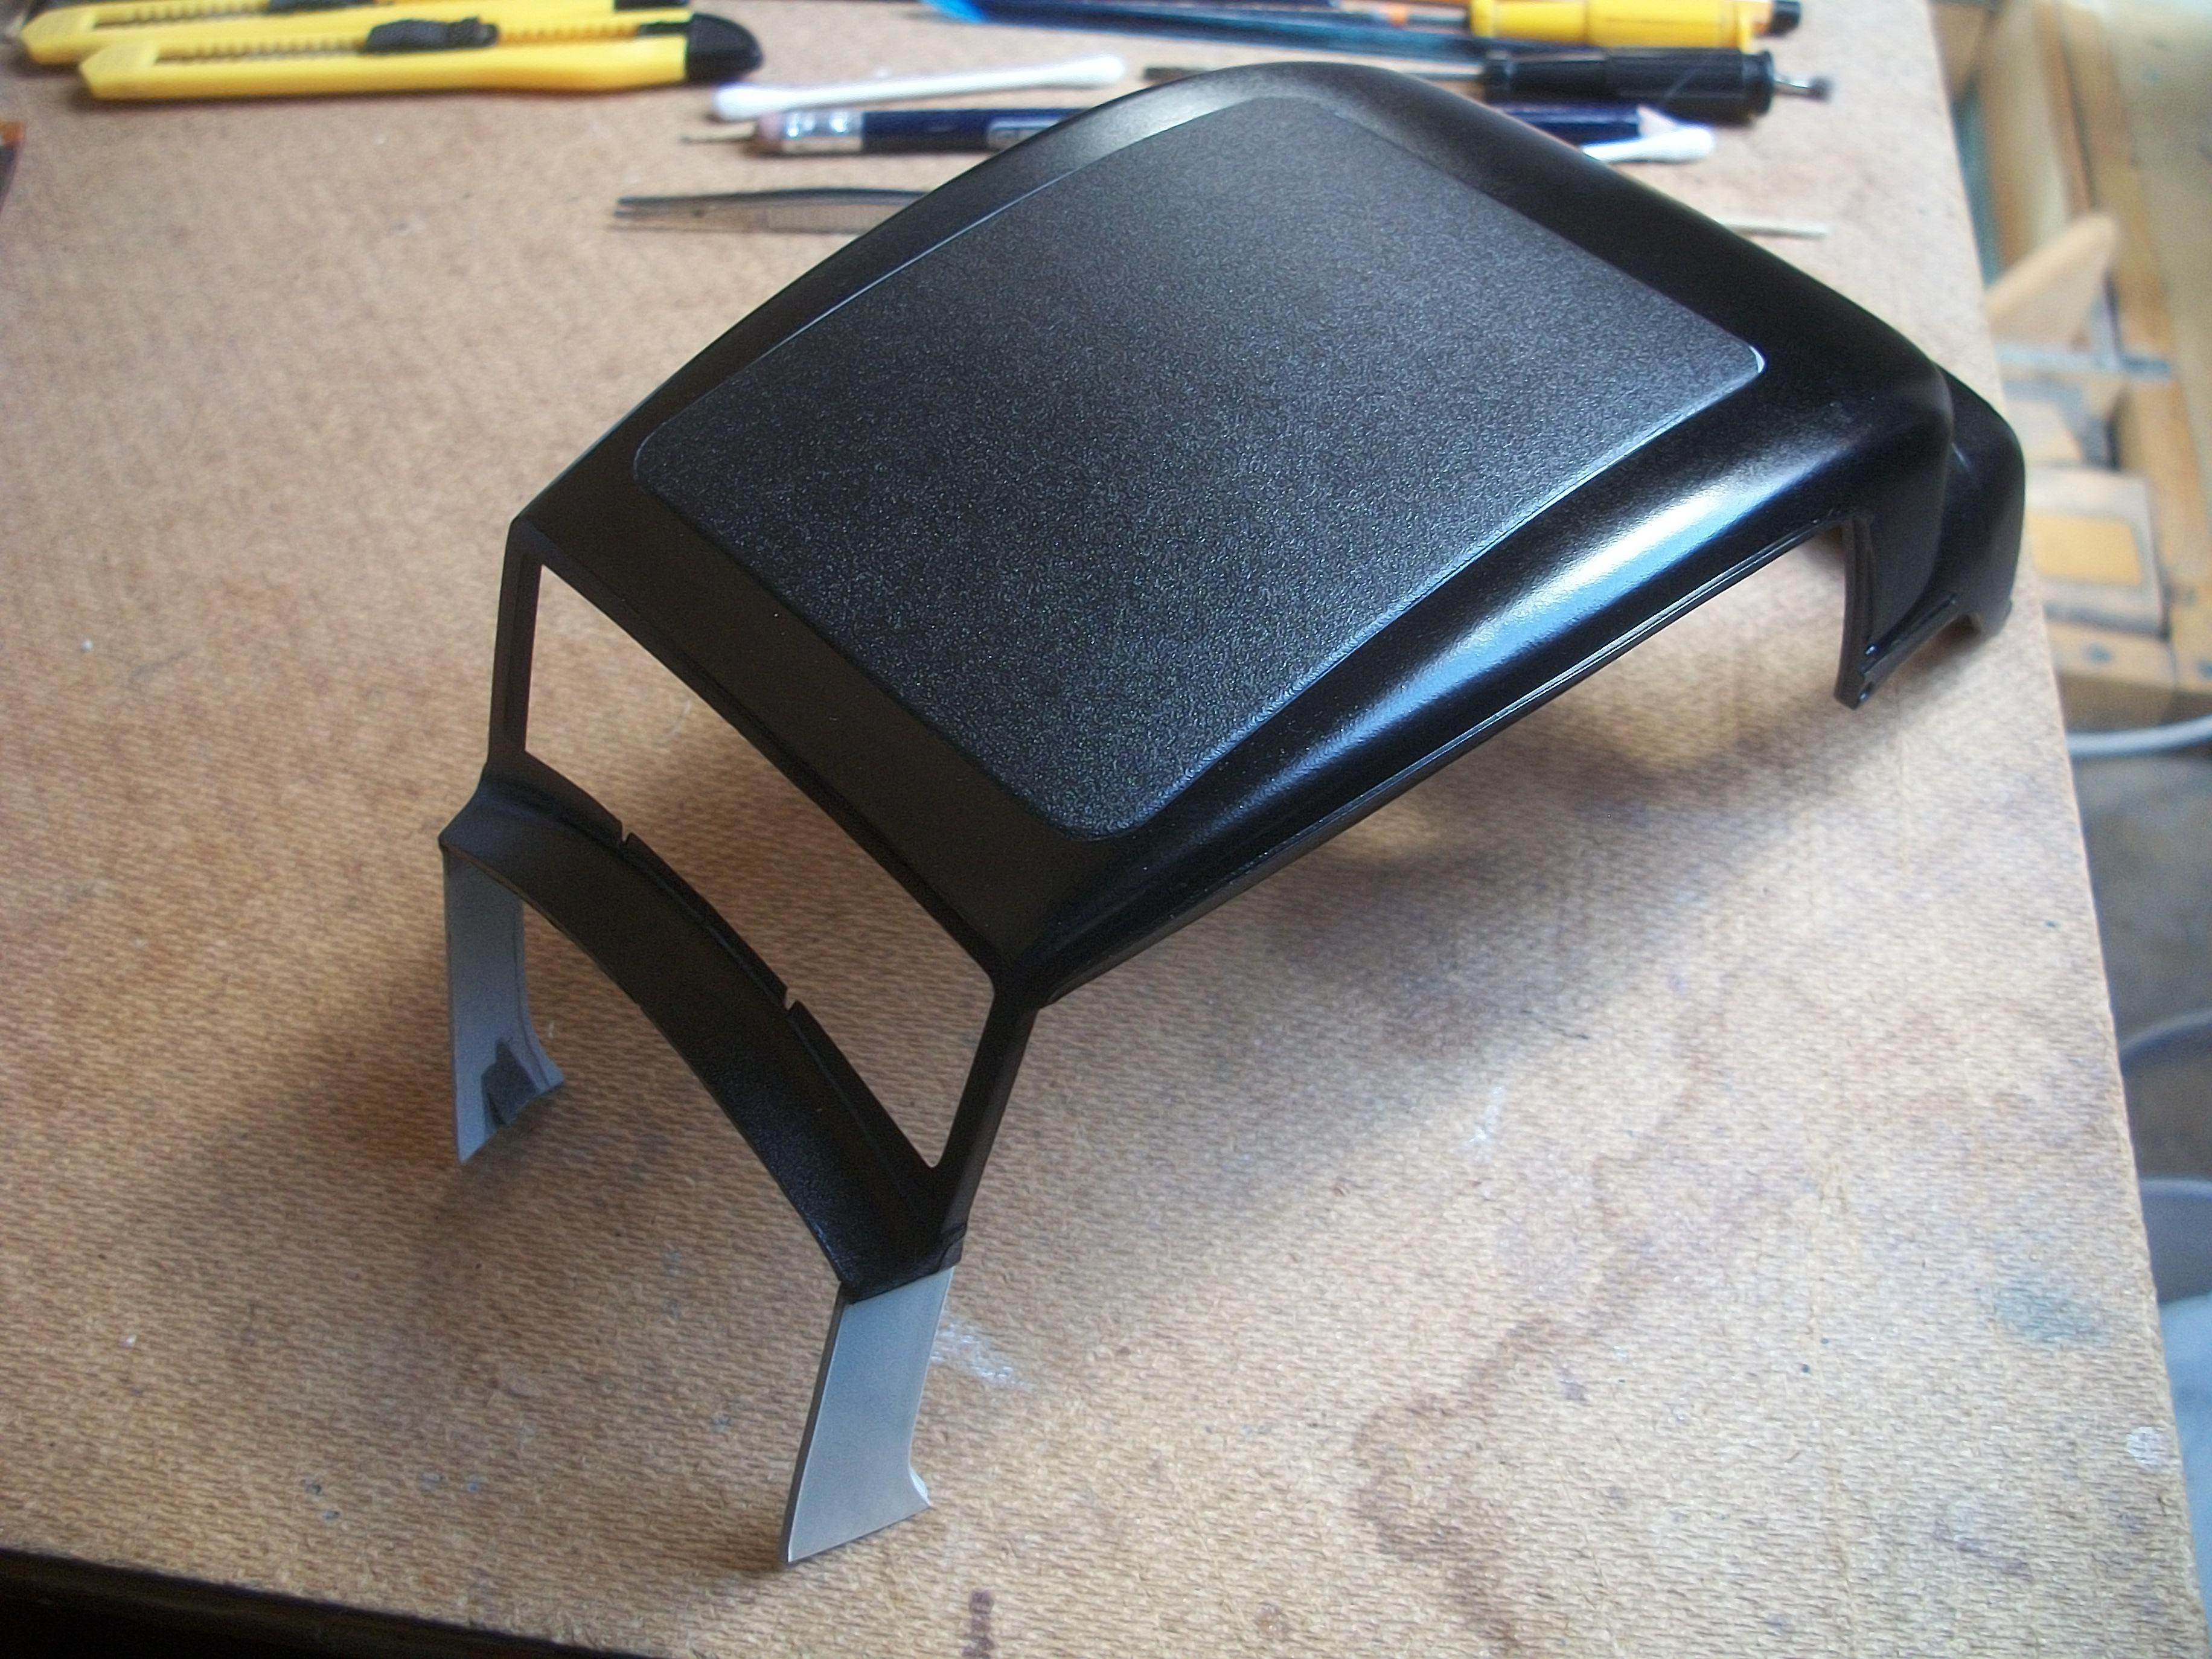
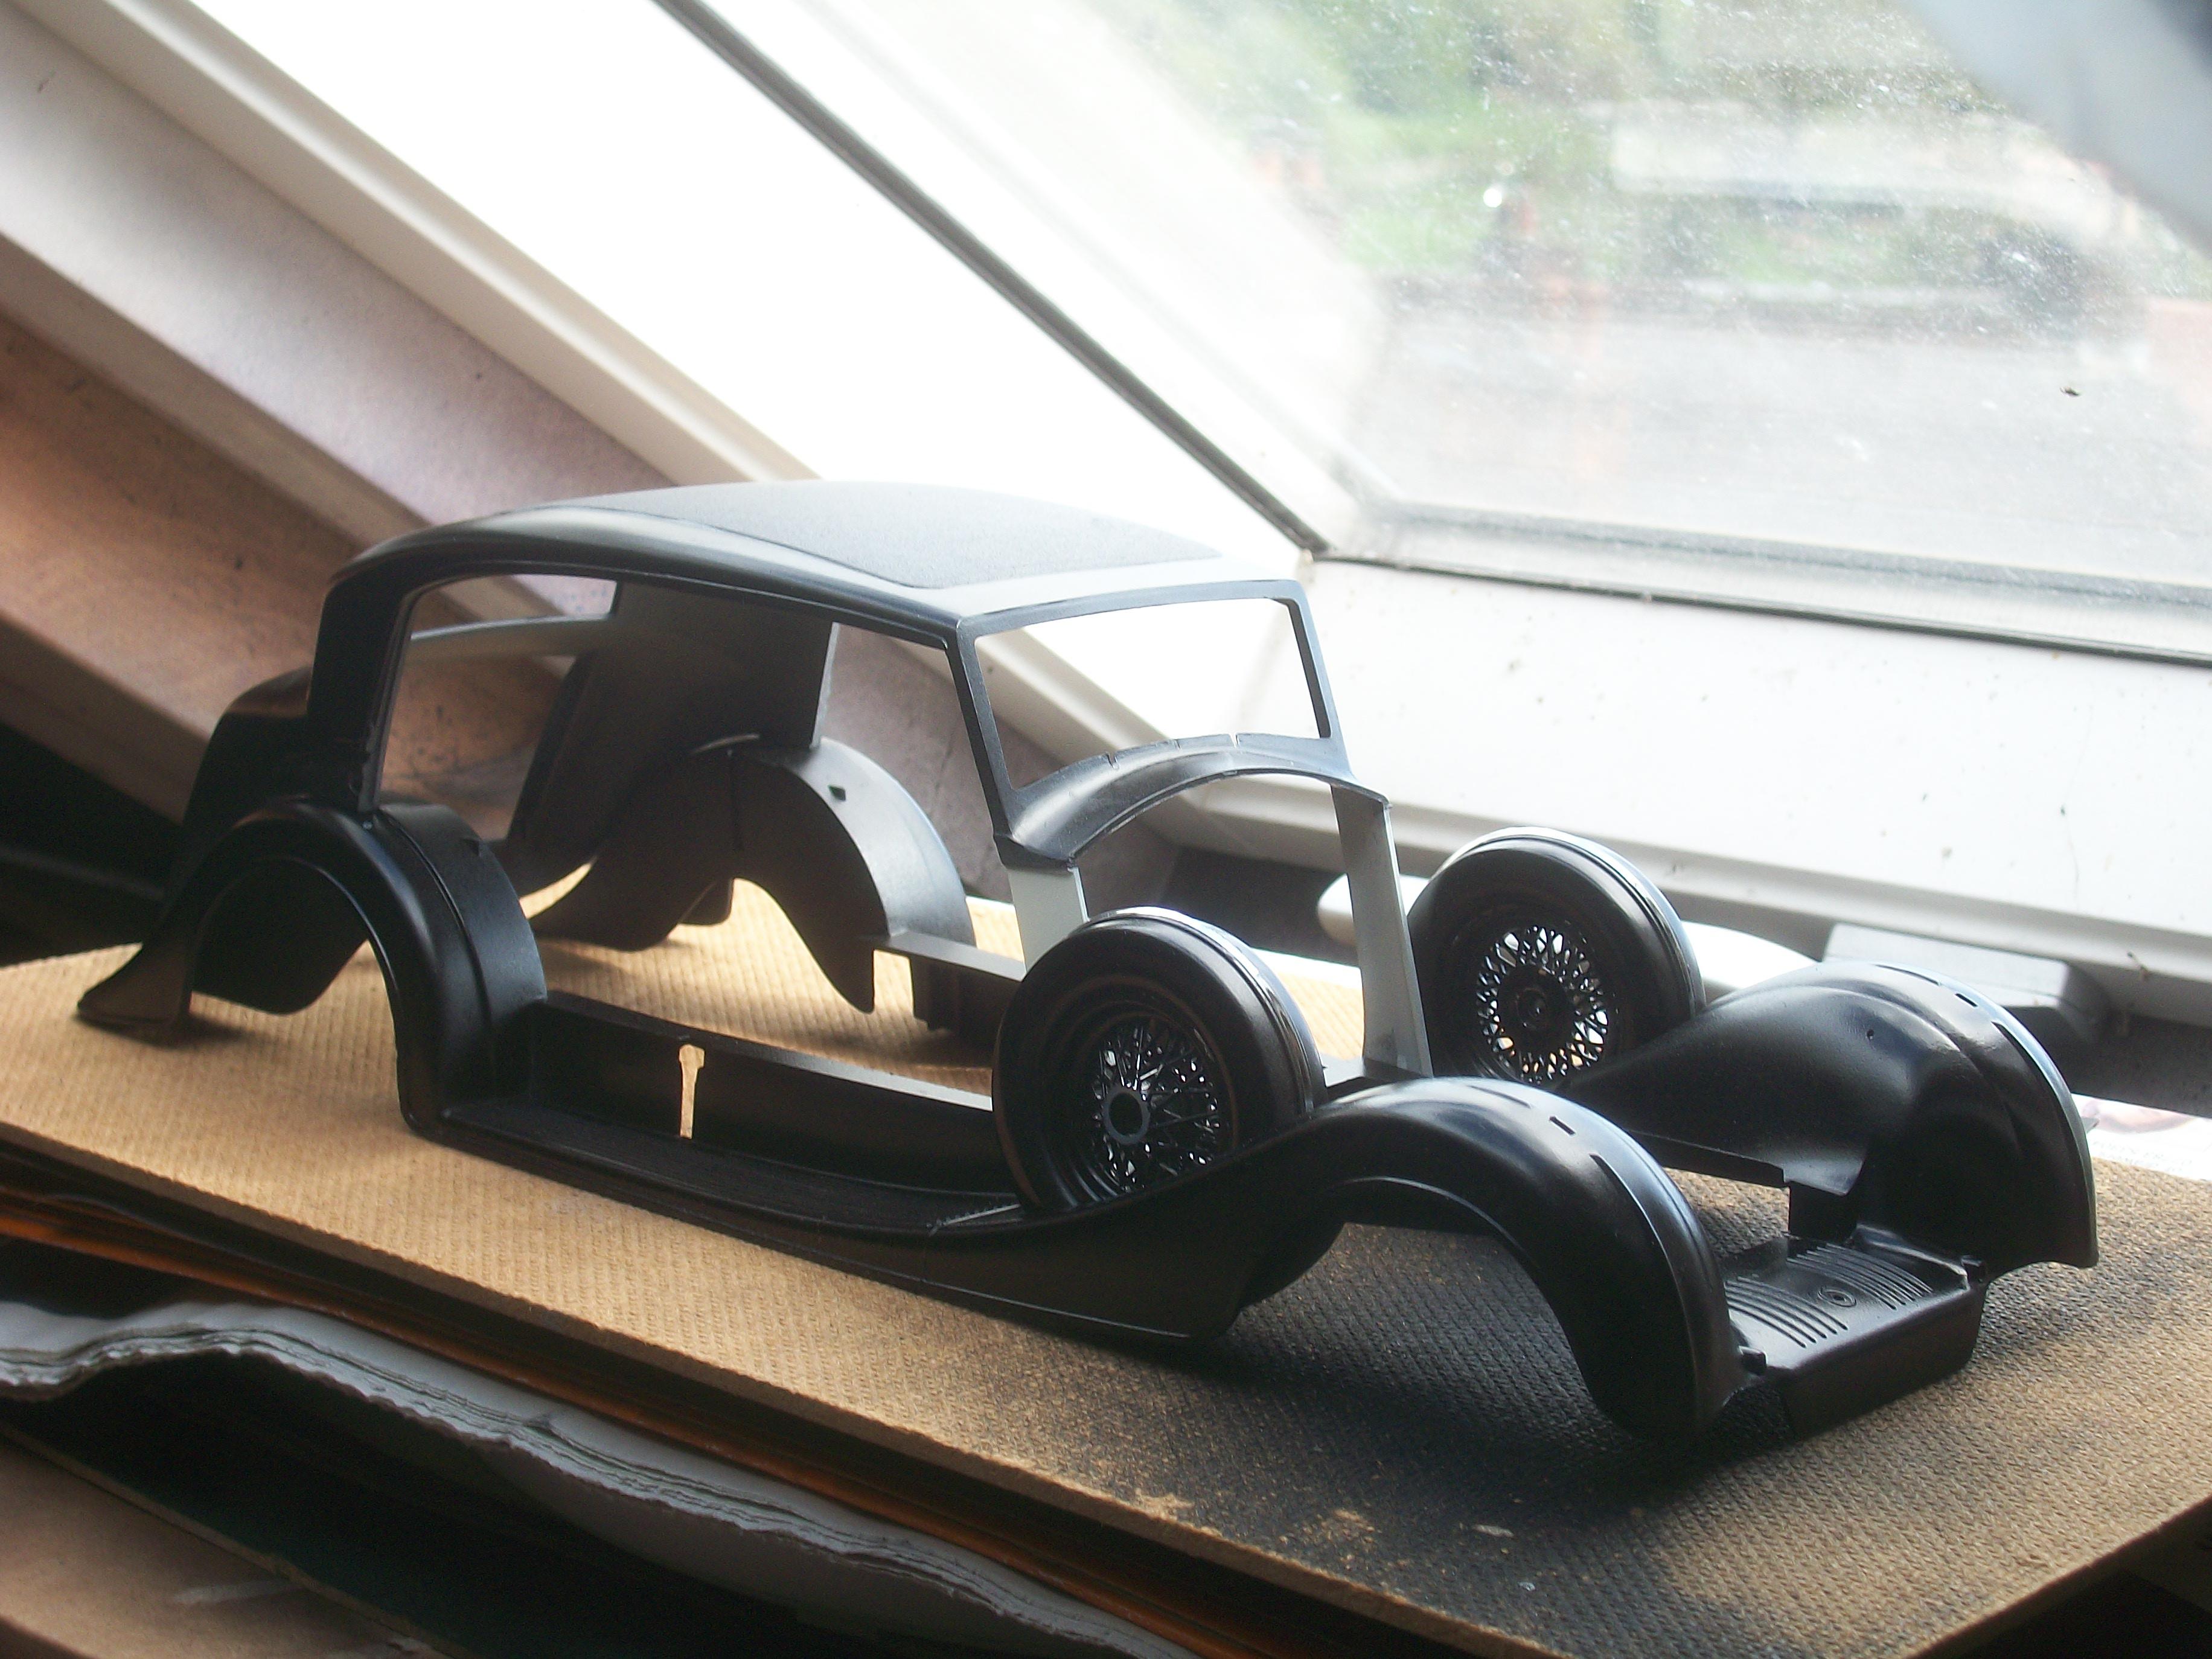
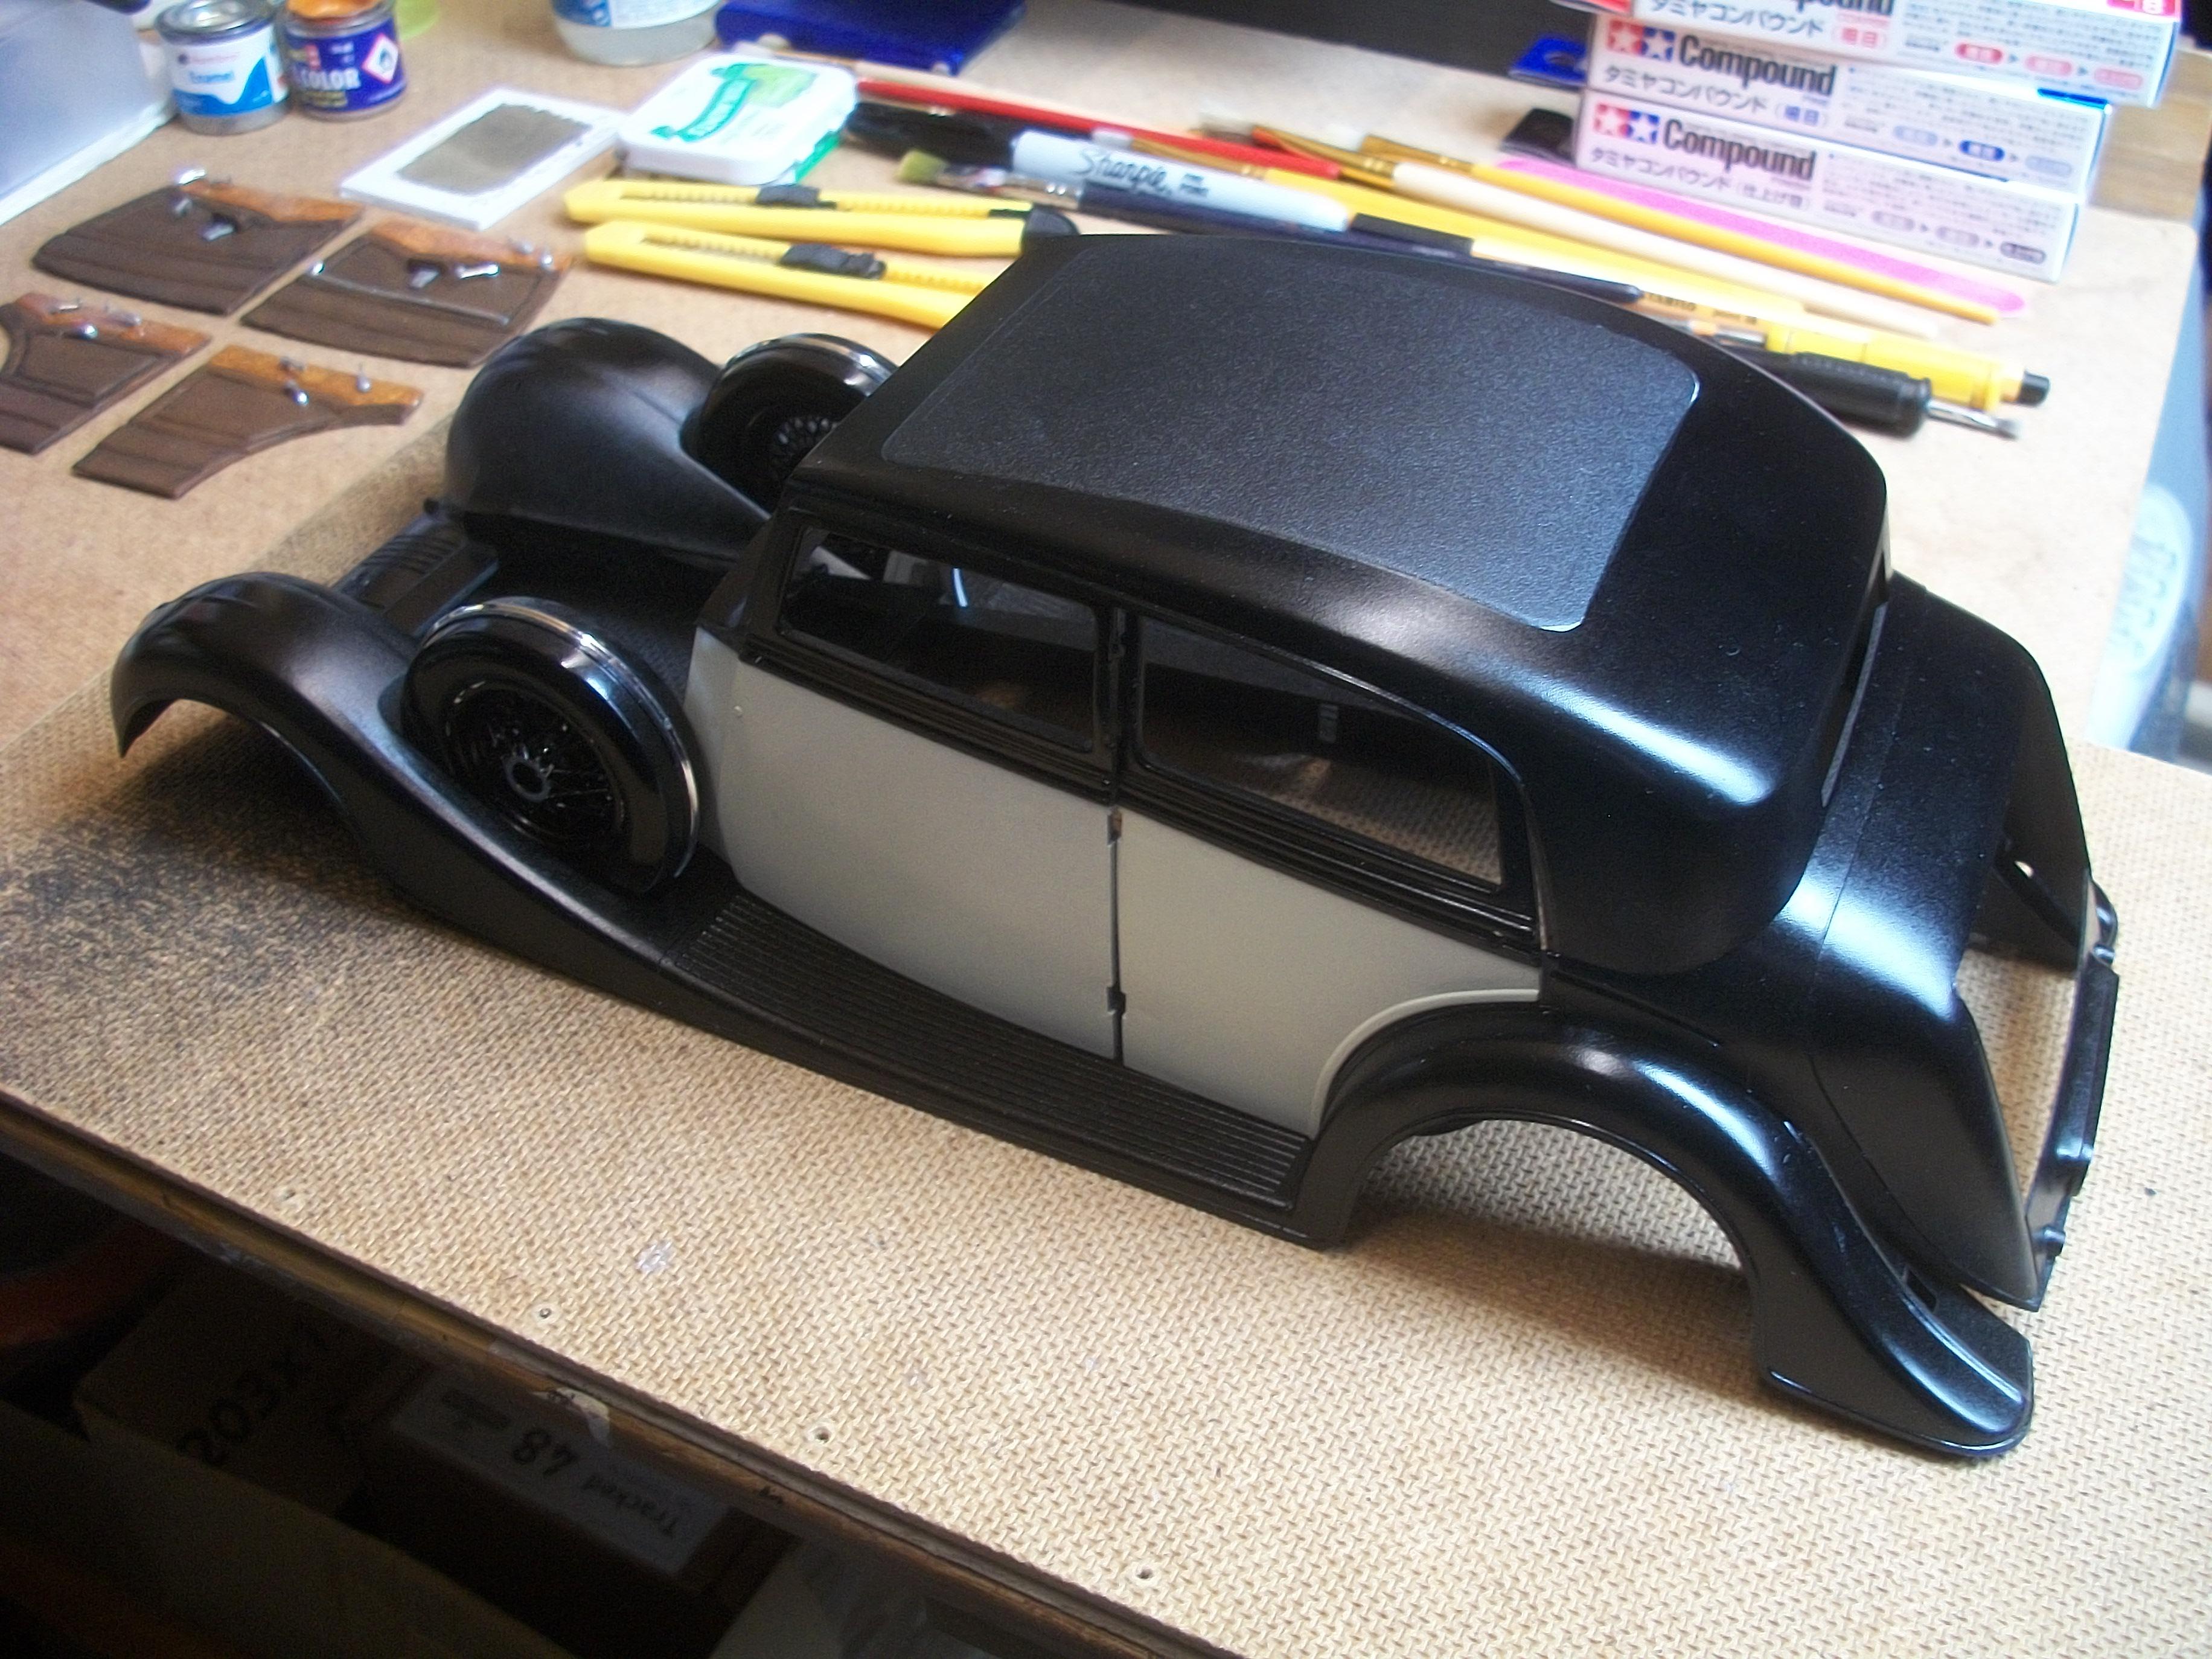
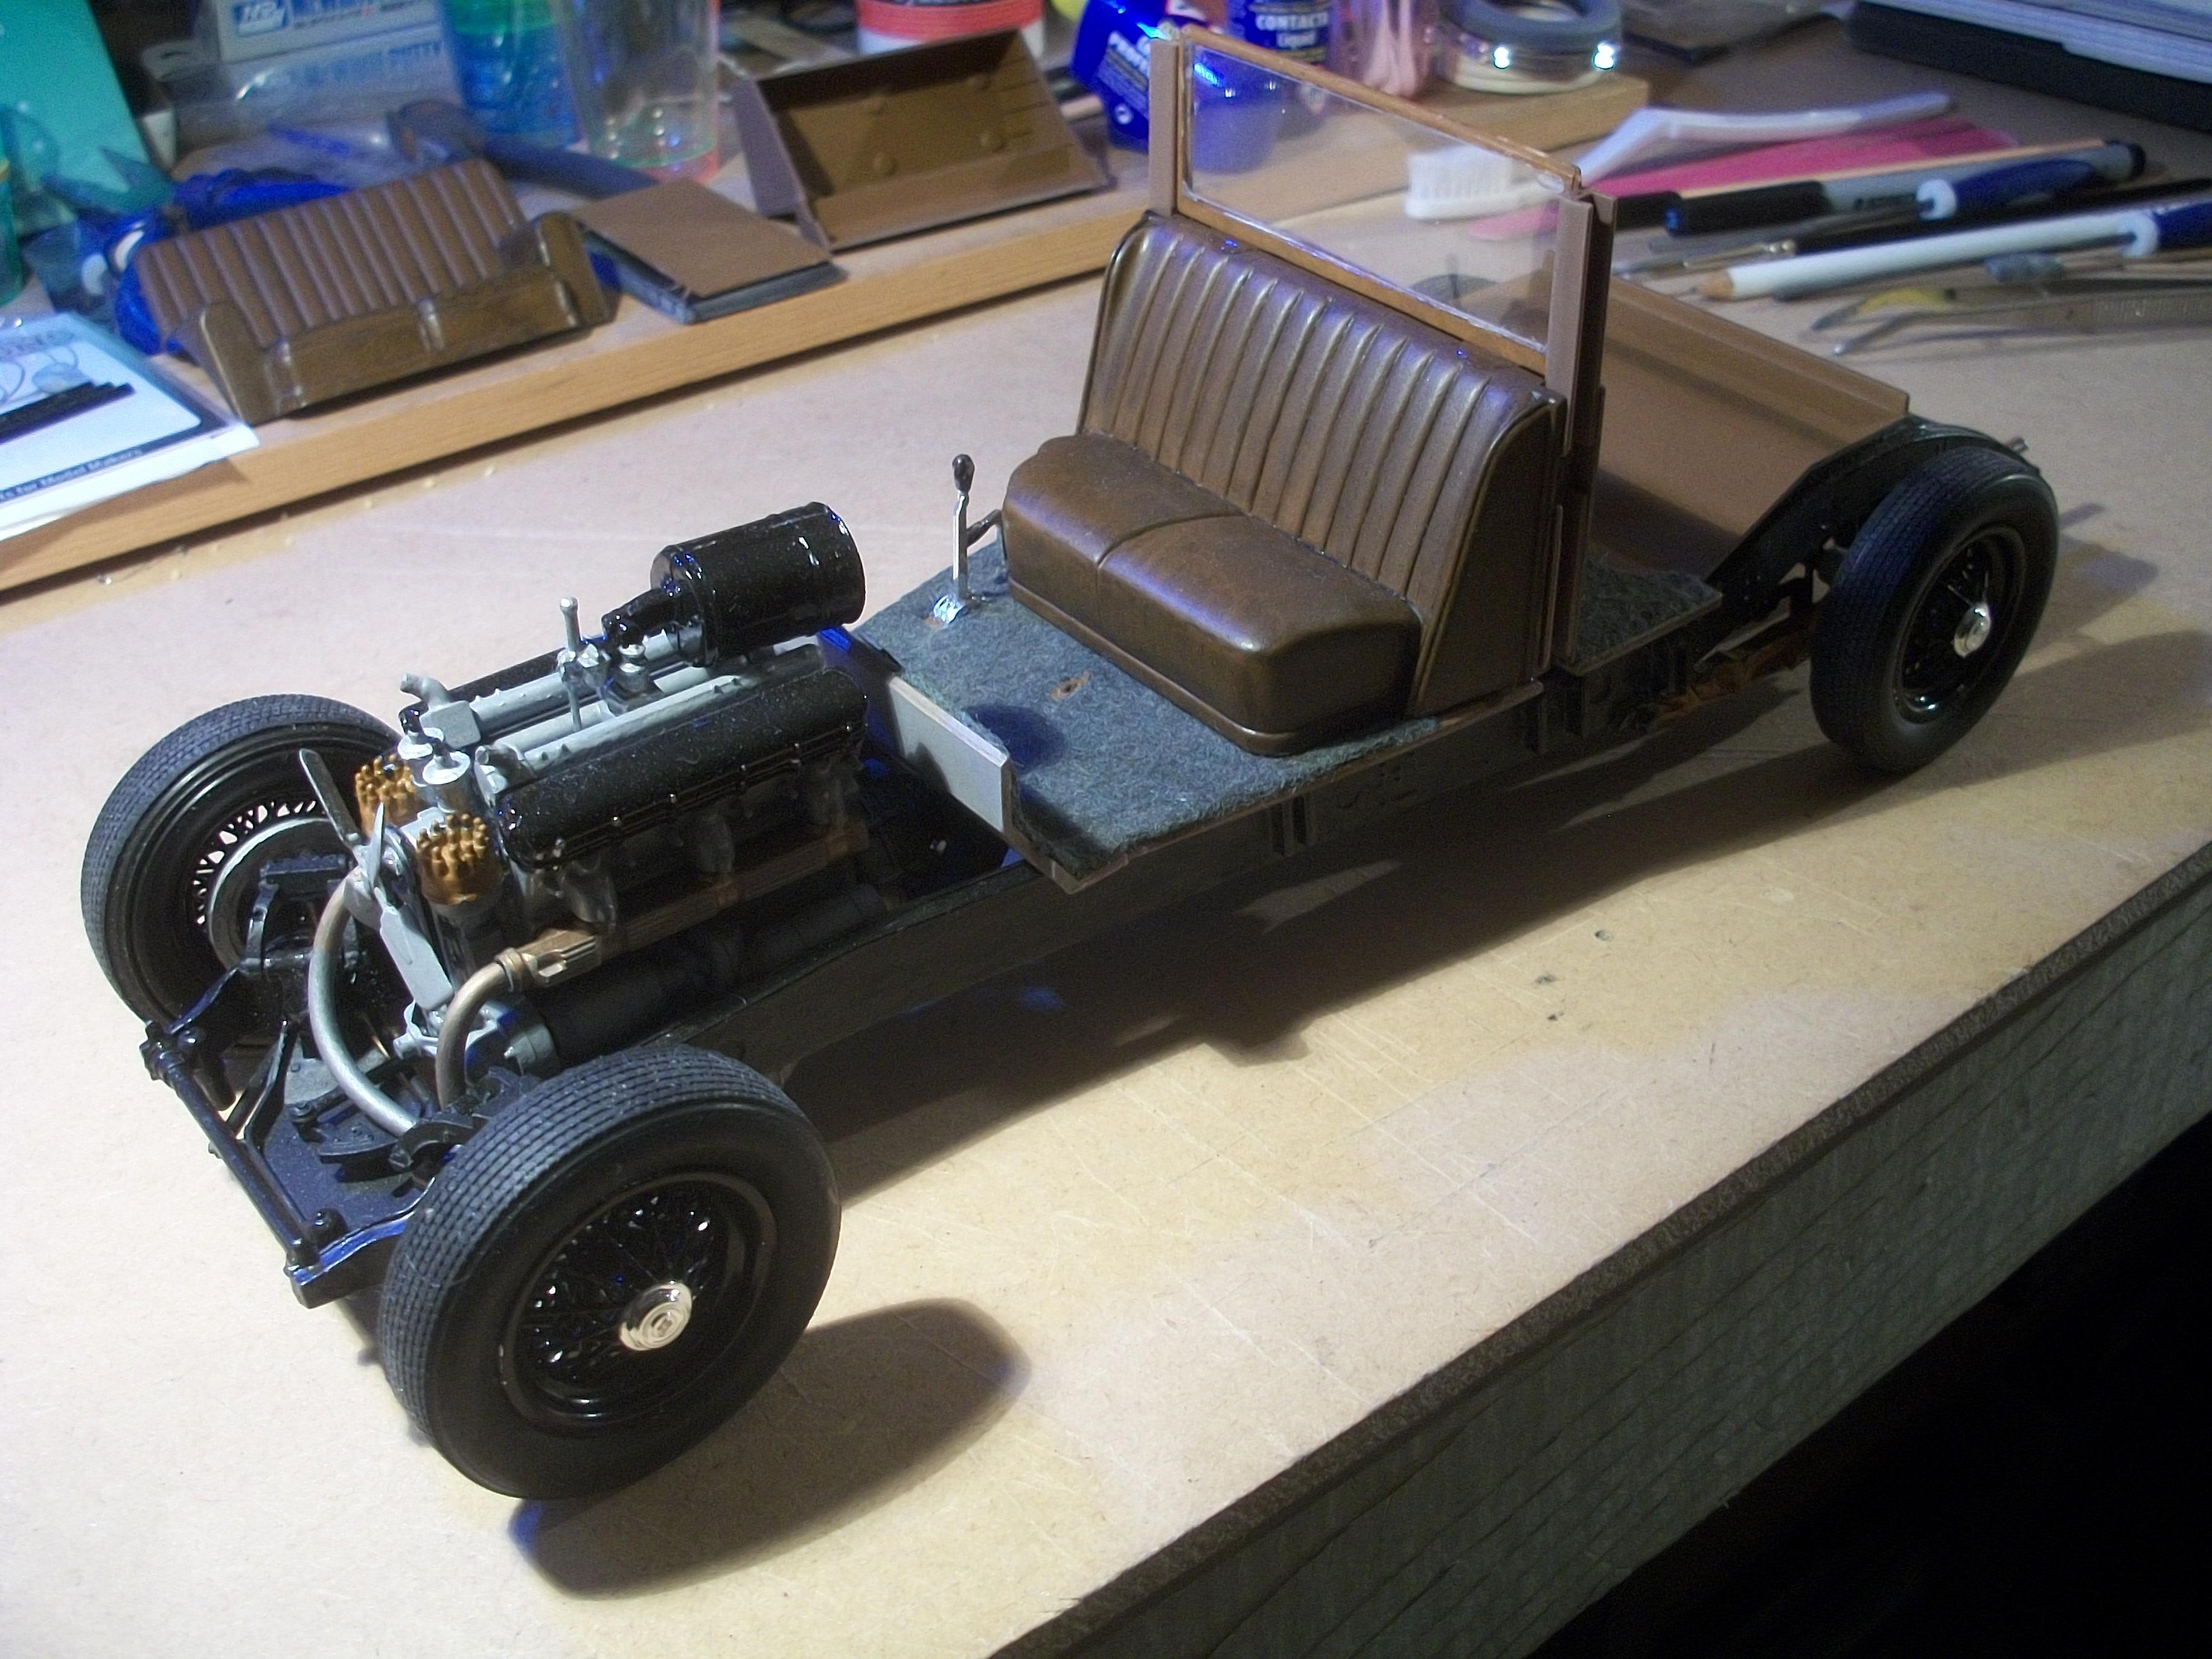
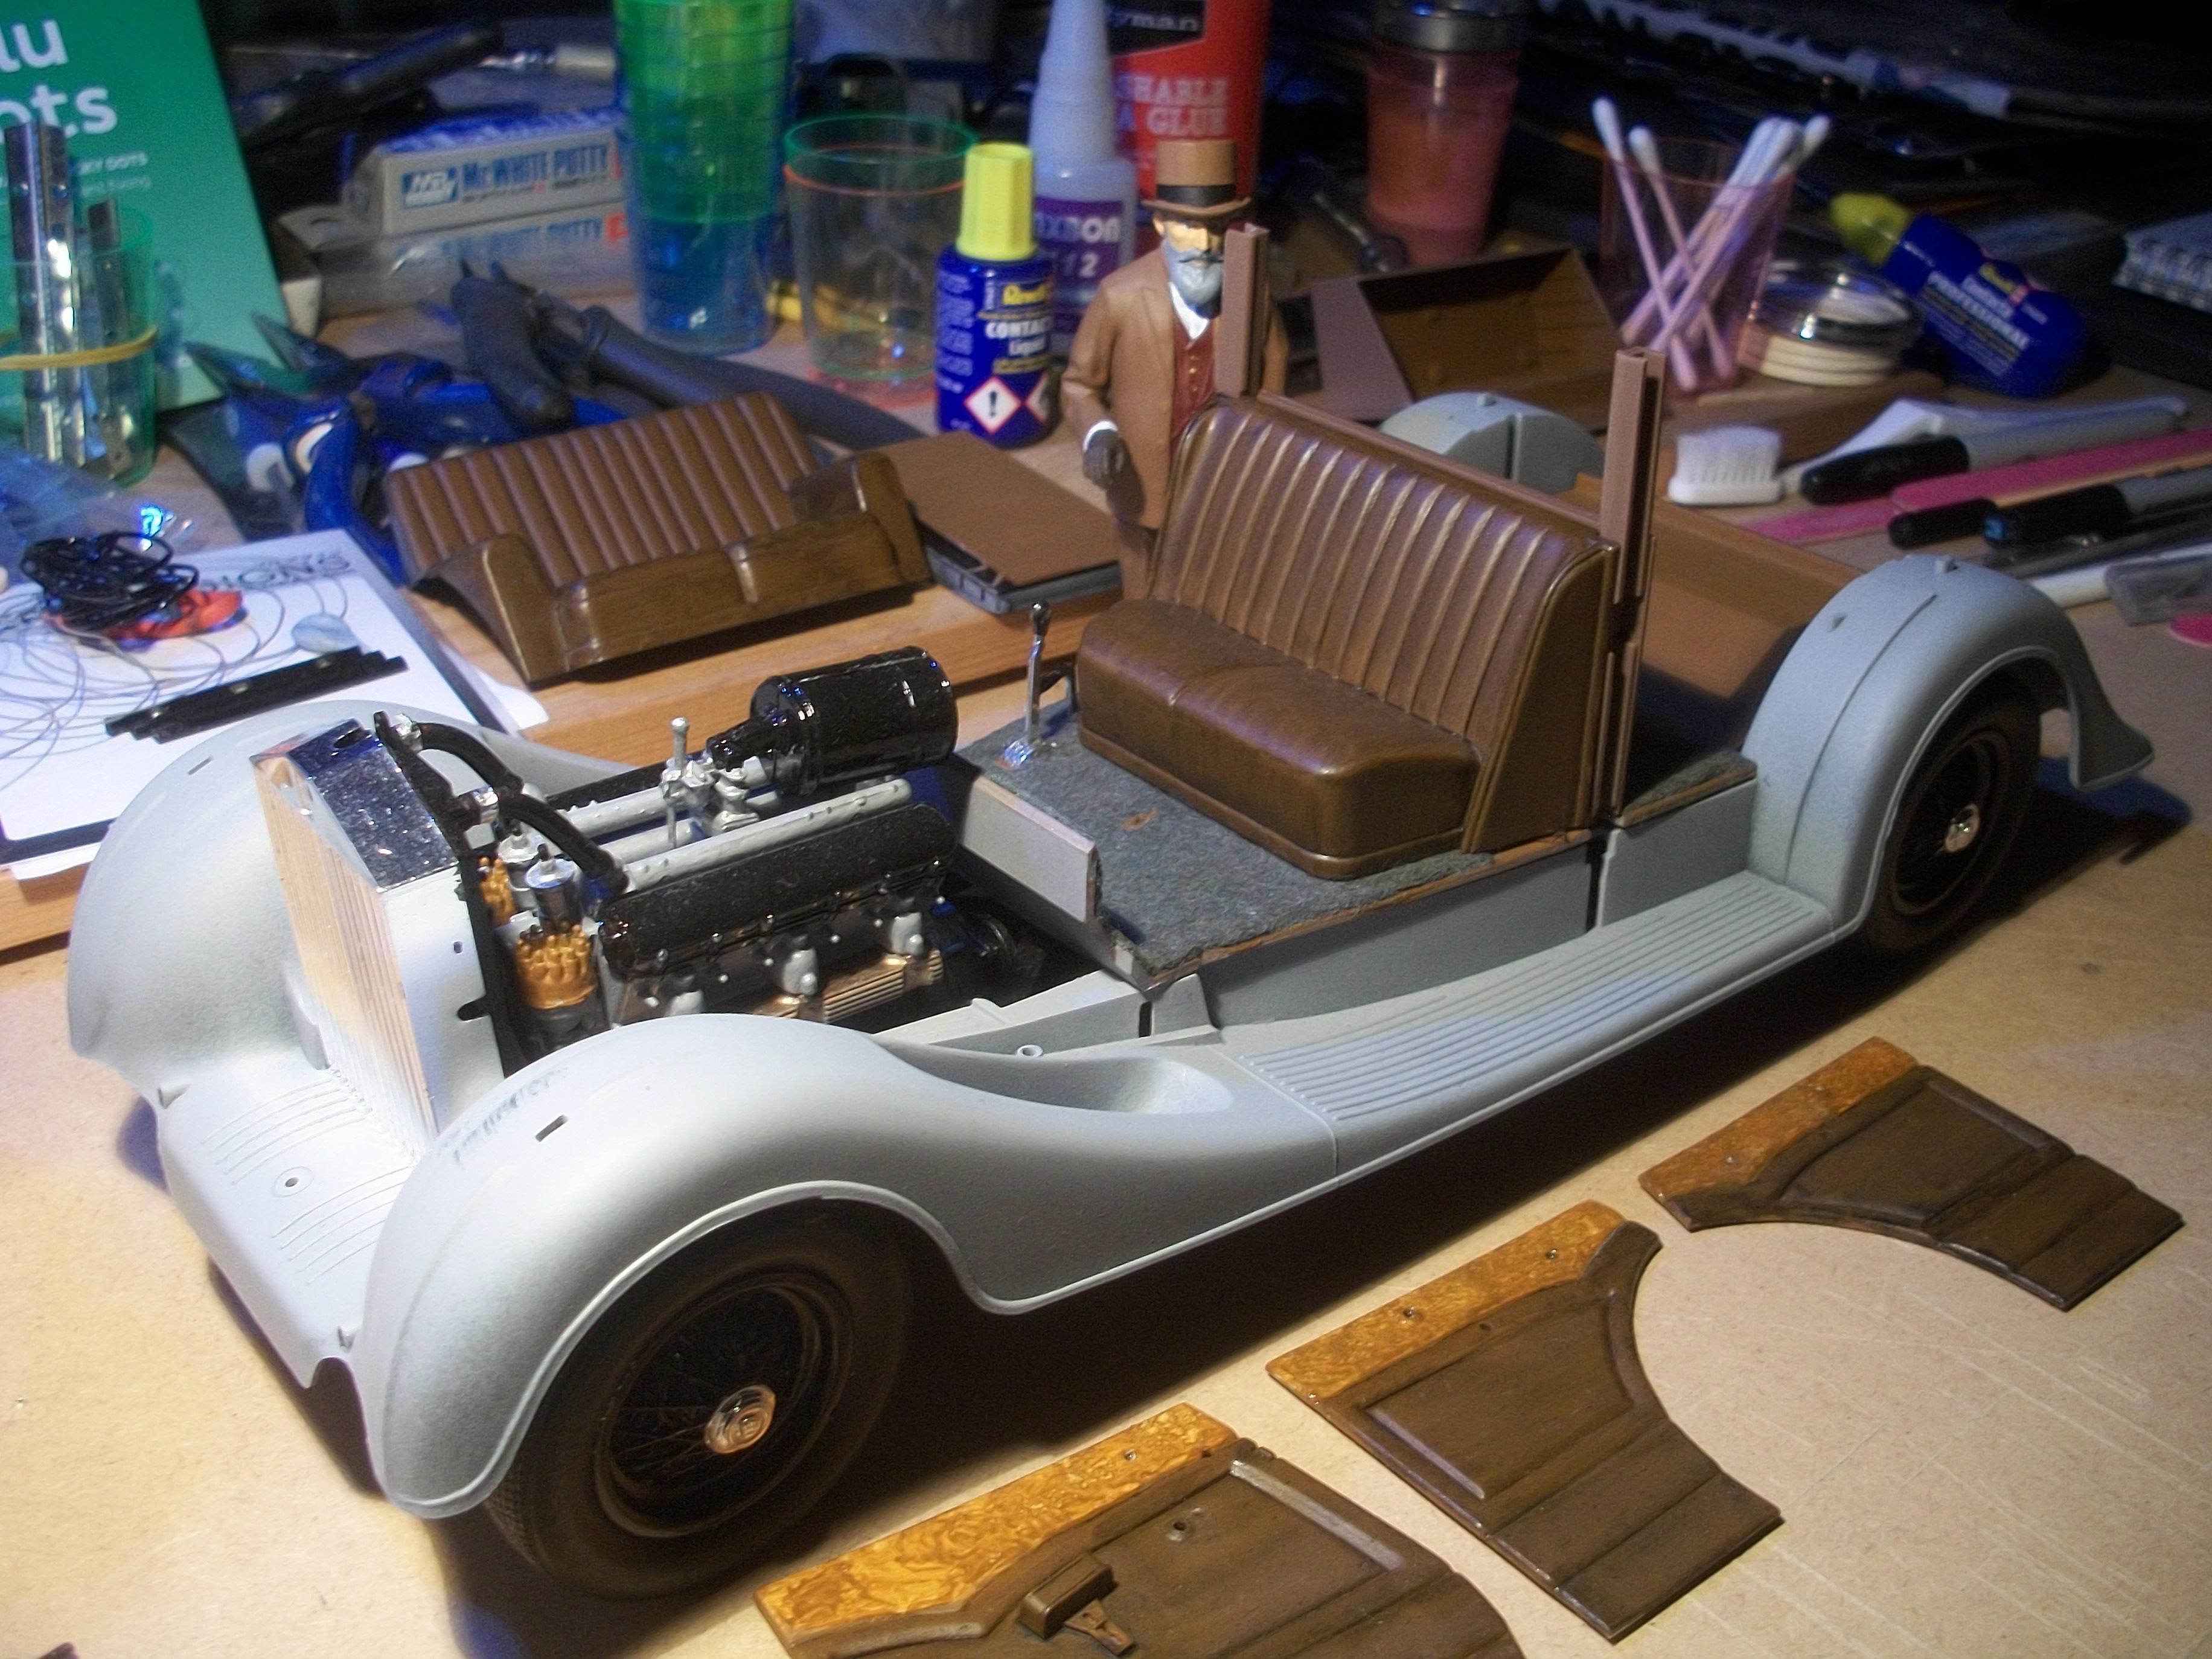
Lots of workbench time over the past few days, and nice steady progress . . . The pack of three new tubes of Tamiya Polishing Compound arrived in the post, so polishing is now under way, starting with the boot lid and also the spare wheel casings . . . I decided to assemble the spare wheels and casings, which have 7 parts to each side of the car. The masking tape has been removed from around the canvas roof panel and the contrast between the semi-gloss black against the gloss black is good. There were three very small areas of grey primer showing along one edge of the roof panel and near two of the corners, which have now been touched up with brush applied Humbrol enamel gloss black . . . Two stickers ( not decals ) represent the chassis number plates that have been placed on the firewall, and rather than try to use 40 year old stickers, I cut out the plates with the stickers mounted on the backing card. This gives them more depth and therefore appear more realistic . . . As well as taking the spare wheel up to the loft to photograph them in the wells on the lower body, I took the opportunity to photograph a mock-up of the upper body, lower body, two doors and the spare wheels . . . David
-
I have a cocktail stick, to which I place a blob of Blu-Tack on one end, and then when I lightly press the end of my ' tool ' on the part it can be picked up and positioned where you want it to go . . . Carefully tilting the tool to one side will release the grip, once your glue takes hold . . . David
-
1:16 Gunze Sangyo 1937 Rolls-Royce Phantom III Sports Saloon
Anglia105E replied to Anglia105E's topic in WIP: Model Cars
If you get time to build this kit Sam, I would say that you will not be disappointed . . . Yes, there are almost 300 parts, and some of the assembly procedures are rather unusual, but this kit by Gunze Sangyo is one of the best that I have had the pleasure to build . . . From the beginning of this project I have allowed myself at least 6 months to complete the model, and at the moment this looks like extending beyond 6 months I would say . . . Having reached 13 weeks into the build, I have managed to get the paint finish applied, and the polishing process is under way. The only reason the painting wasn't done earlier in the build was due to cold Winter temperatures here in rural England. During May my annual holiday trip will interrupt the workbench activity for one week, so this is a further short delay . . . The assembly of the four doors of this car is a significant task in itself, with metal hinges that need to be heat sealed in place, and also a complex door pillar setup that initially had me baffled. The four bonnet / hood panels also have metal hinges, and the sequence of assembly steps that bring together the upper body, the lower body, floor board, firewall and rolling chassis does require a careful approach . . . The Rolls-Royce Phantom III in your stash is just waiting for you to find the courage ! ( and the time of course ). David -
Welcome to MCM Forums Mike . . . Here is a photo of my Canadian build, which is a 1968 Pontiac Parisienne, 4-door RHD in 1:25 scale . . . David
-
It is all coming together very nicely now Ken ! David W.
-
1:16 Gunze Sangyo 1937 Rolls-Royce Phantom III Sports Saloon
Anglia105E replied to Anglia105E's topic in WIP: Model Cars
Thanks David G. . . . Although not an easy task, I feel it was well worth the effort. David W. -
1:16 Gunze Sangyo 1937 Rolls-Royce Phantom III Sports Saloon
Anglia105E replied to Anglia105E's topic in WIP: Model Cars
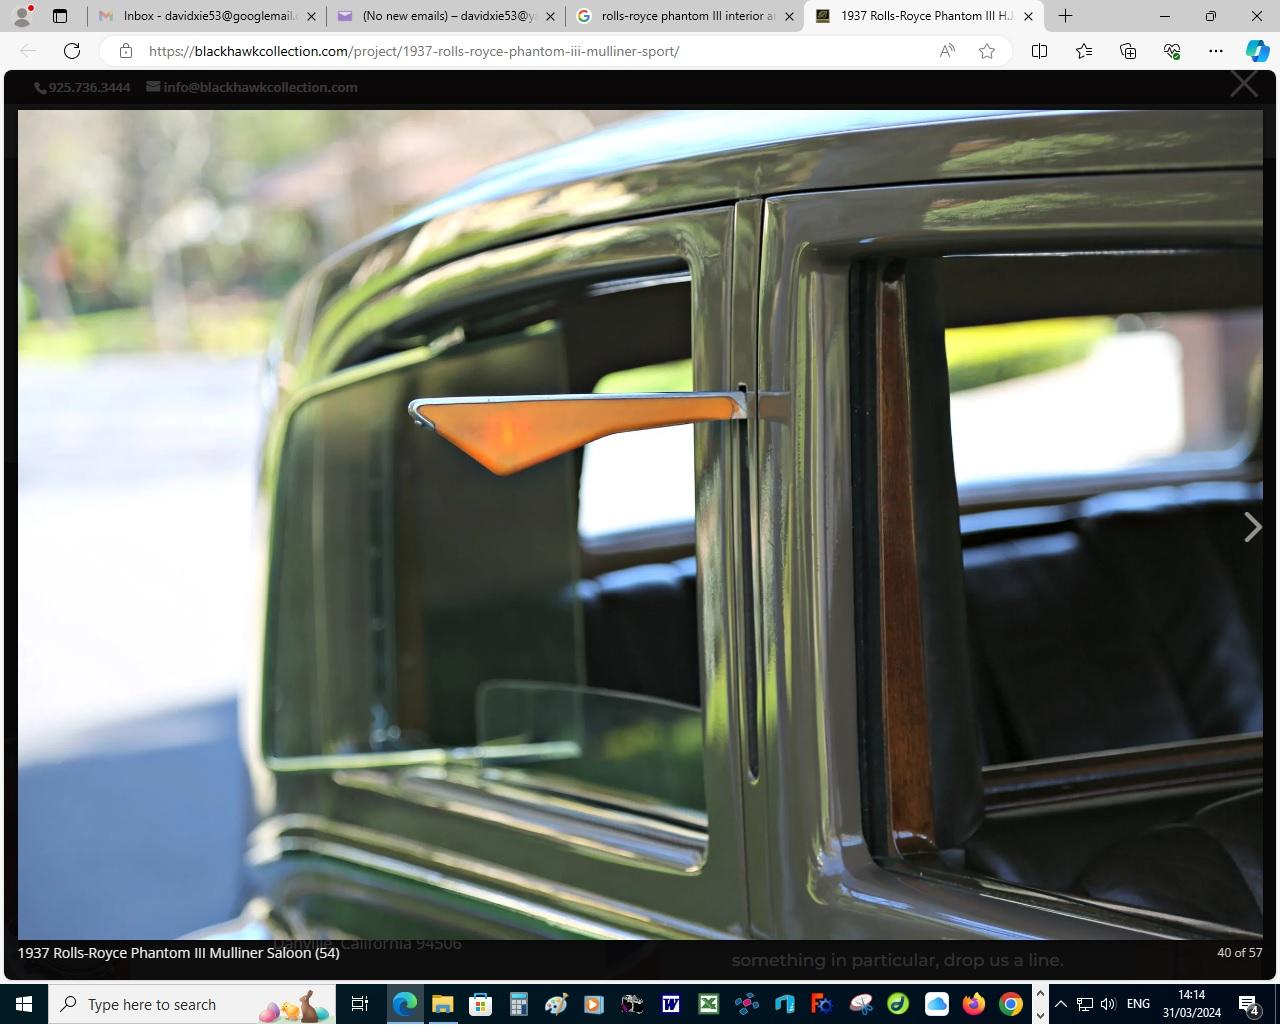
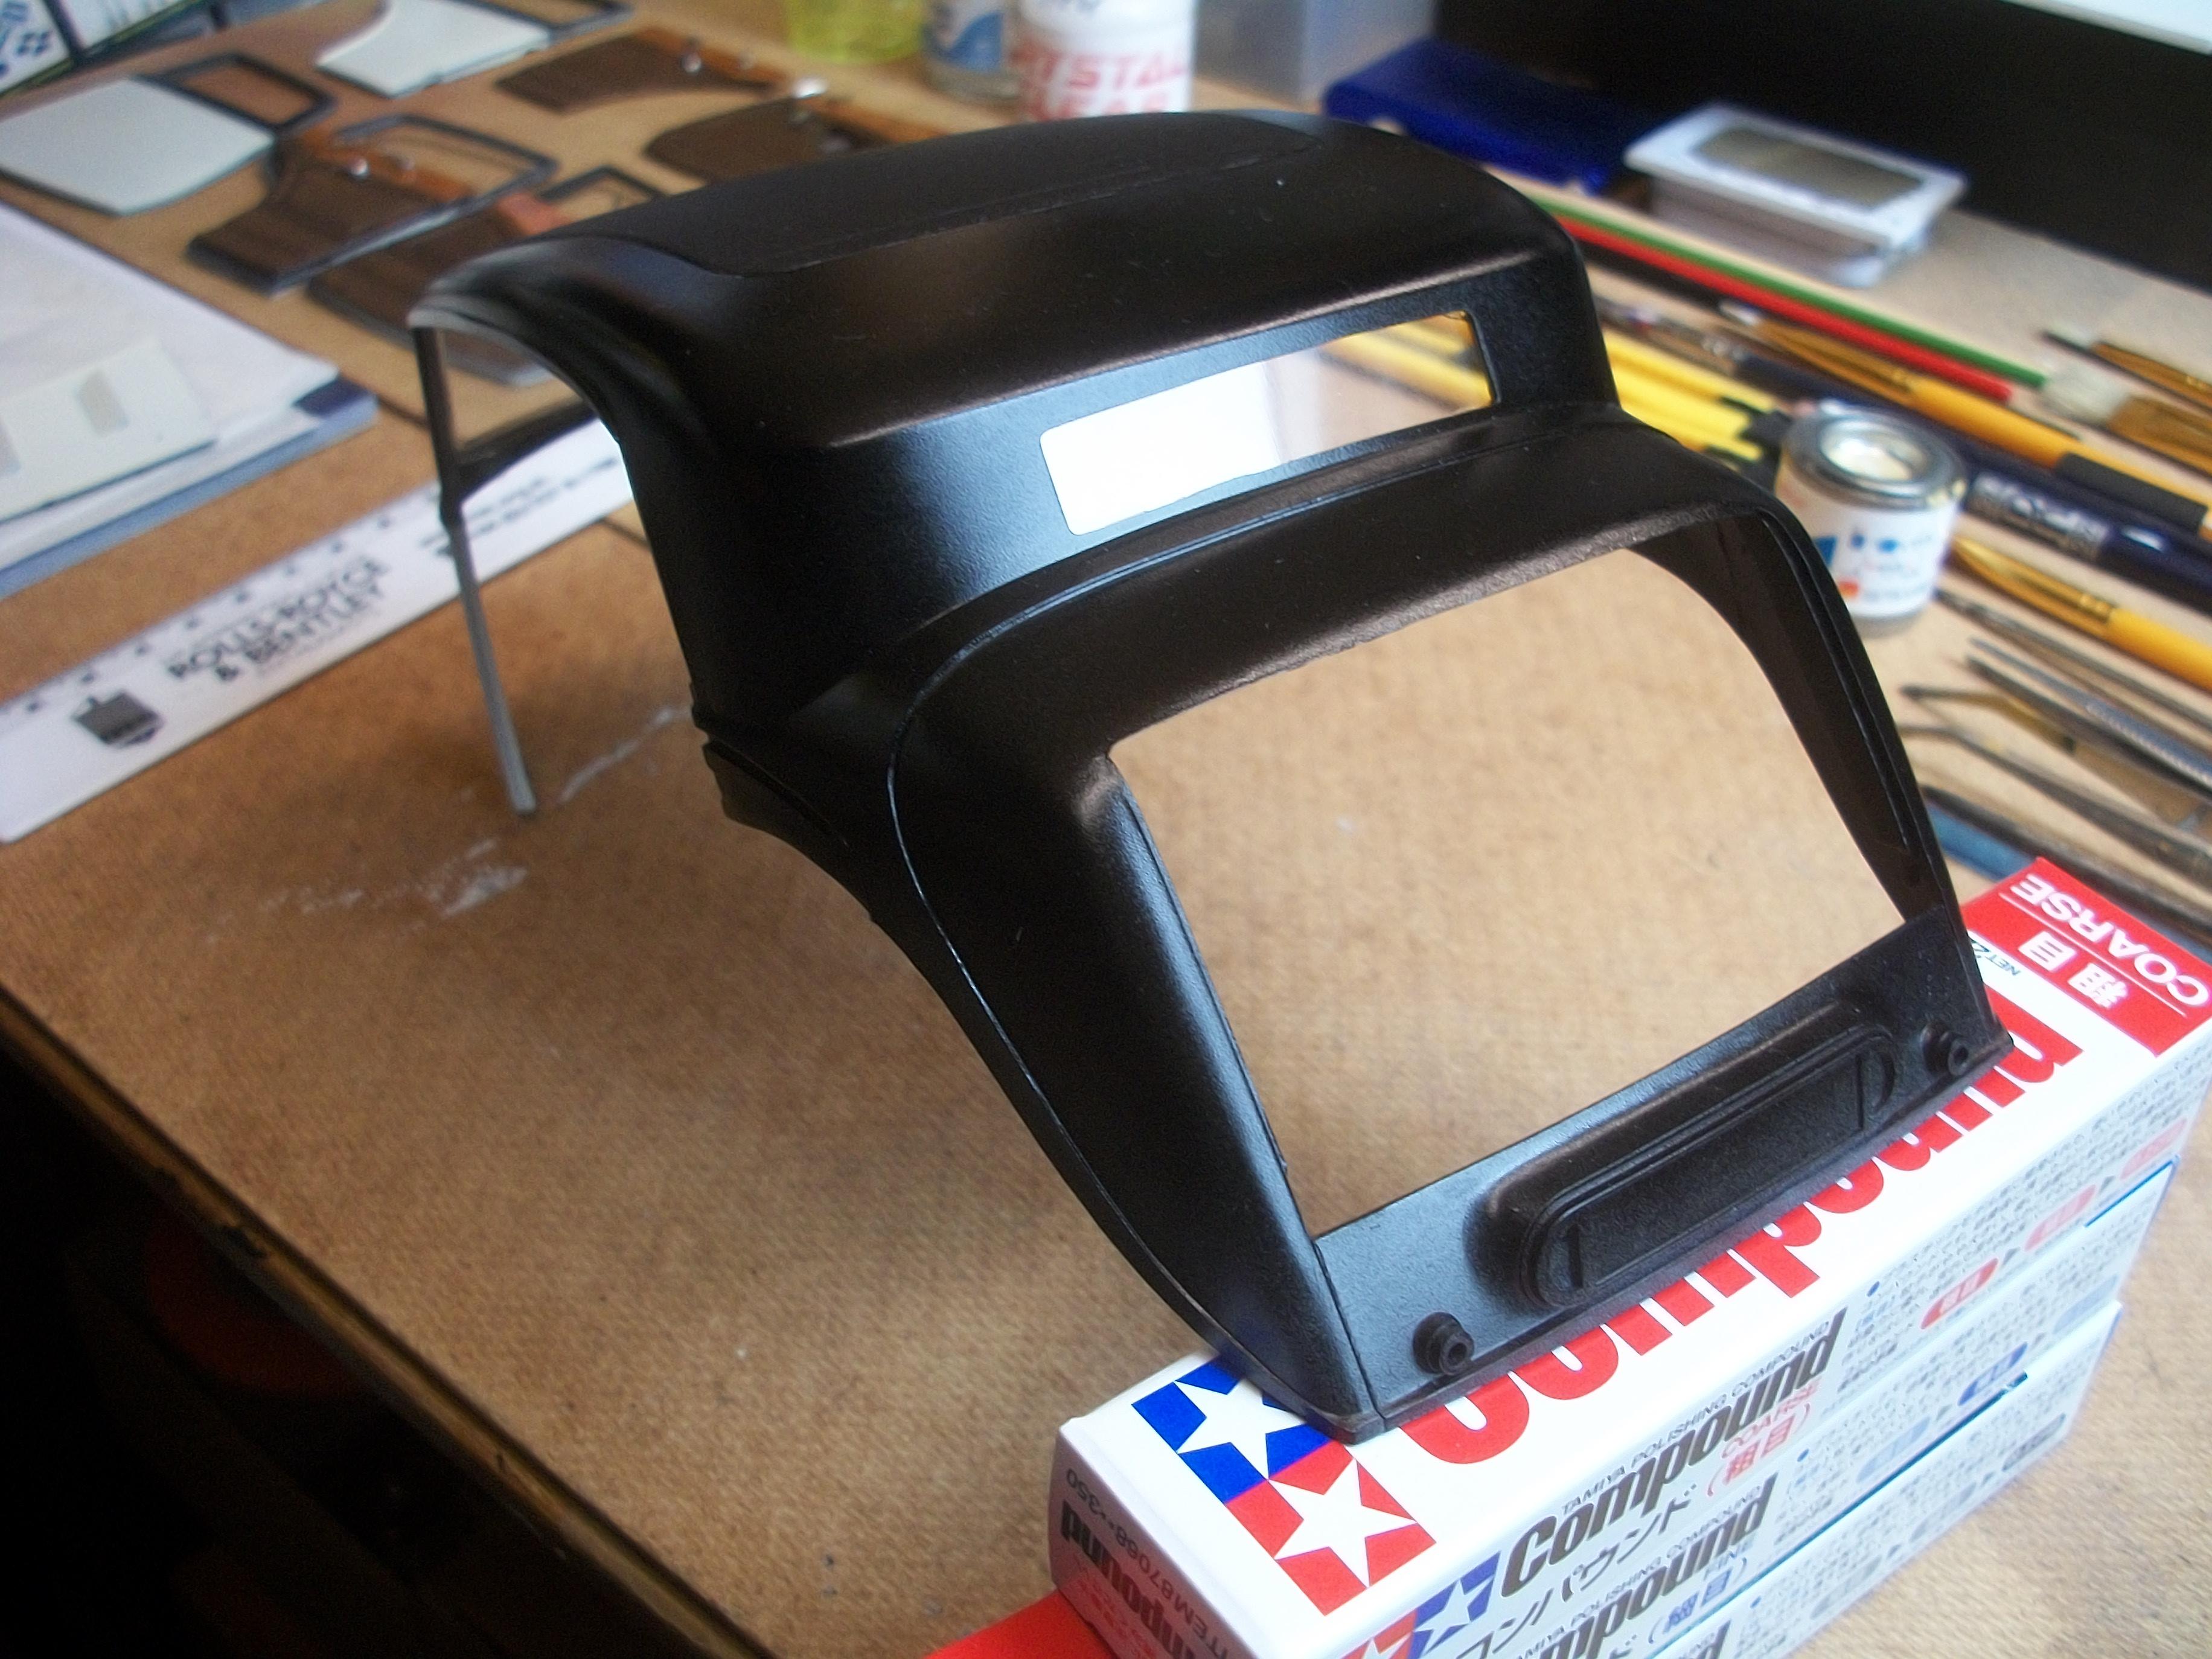
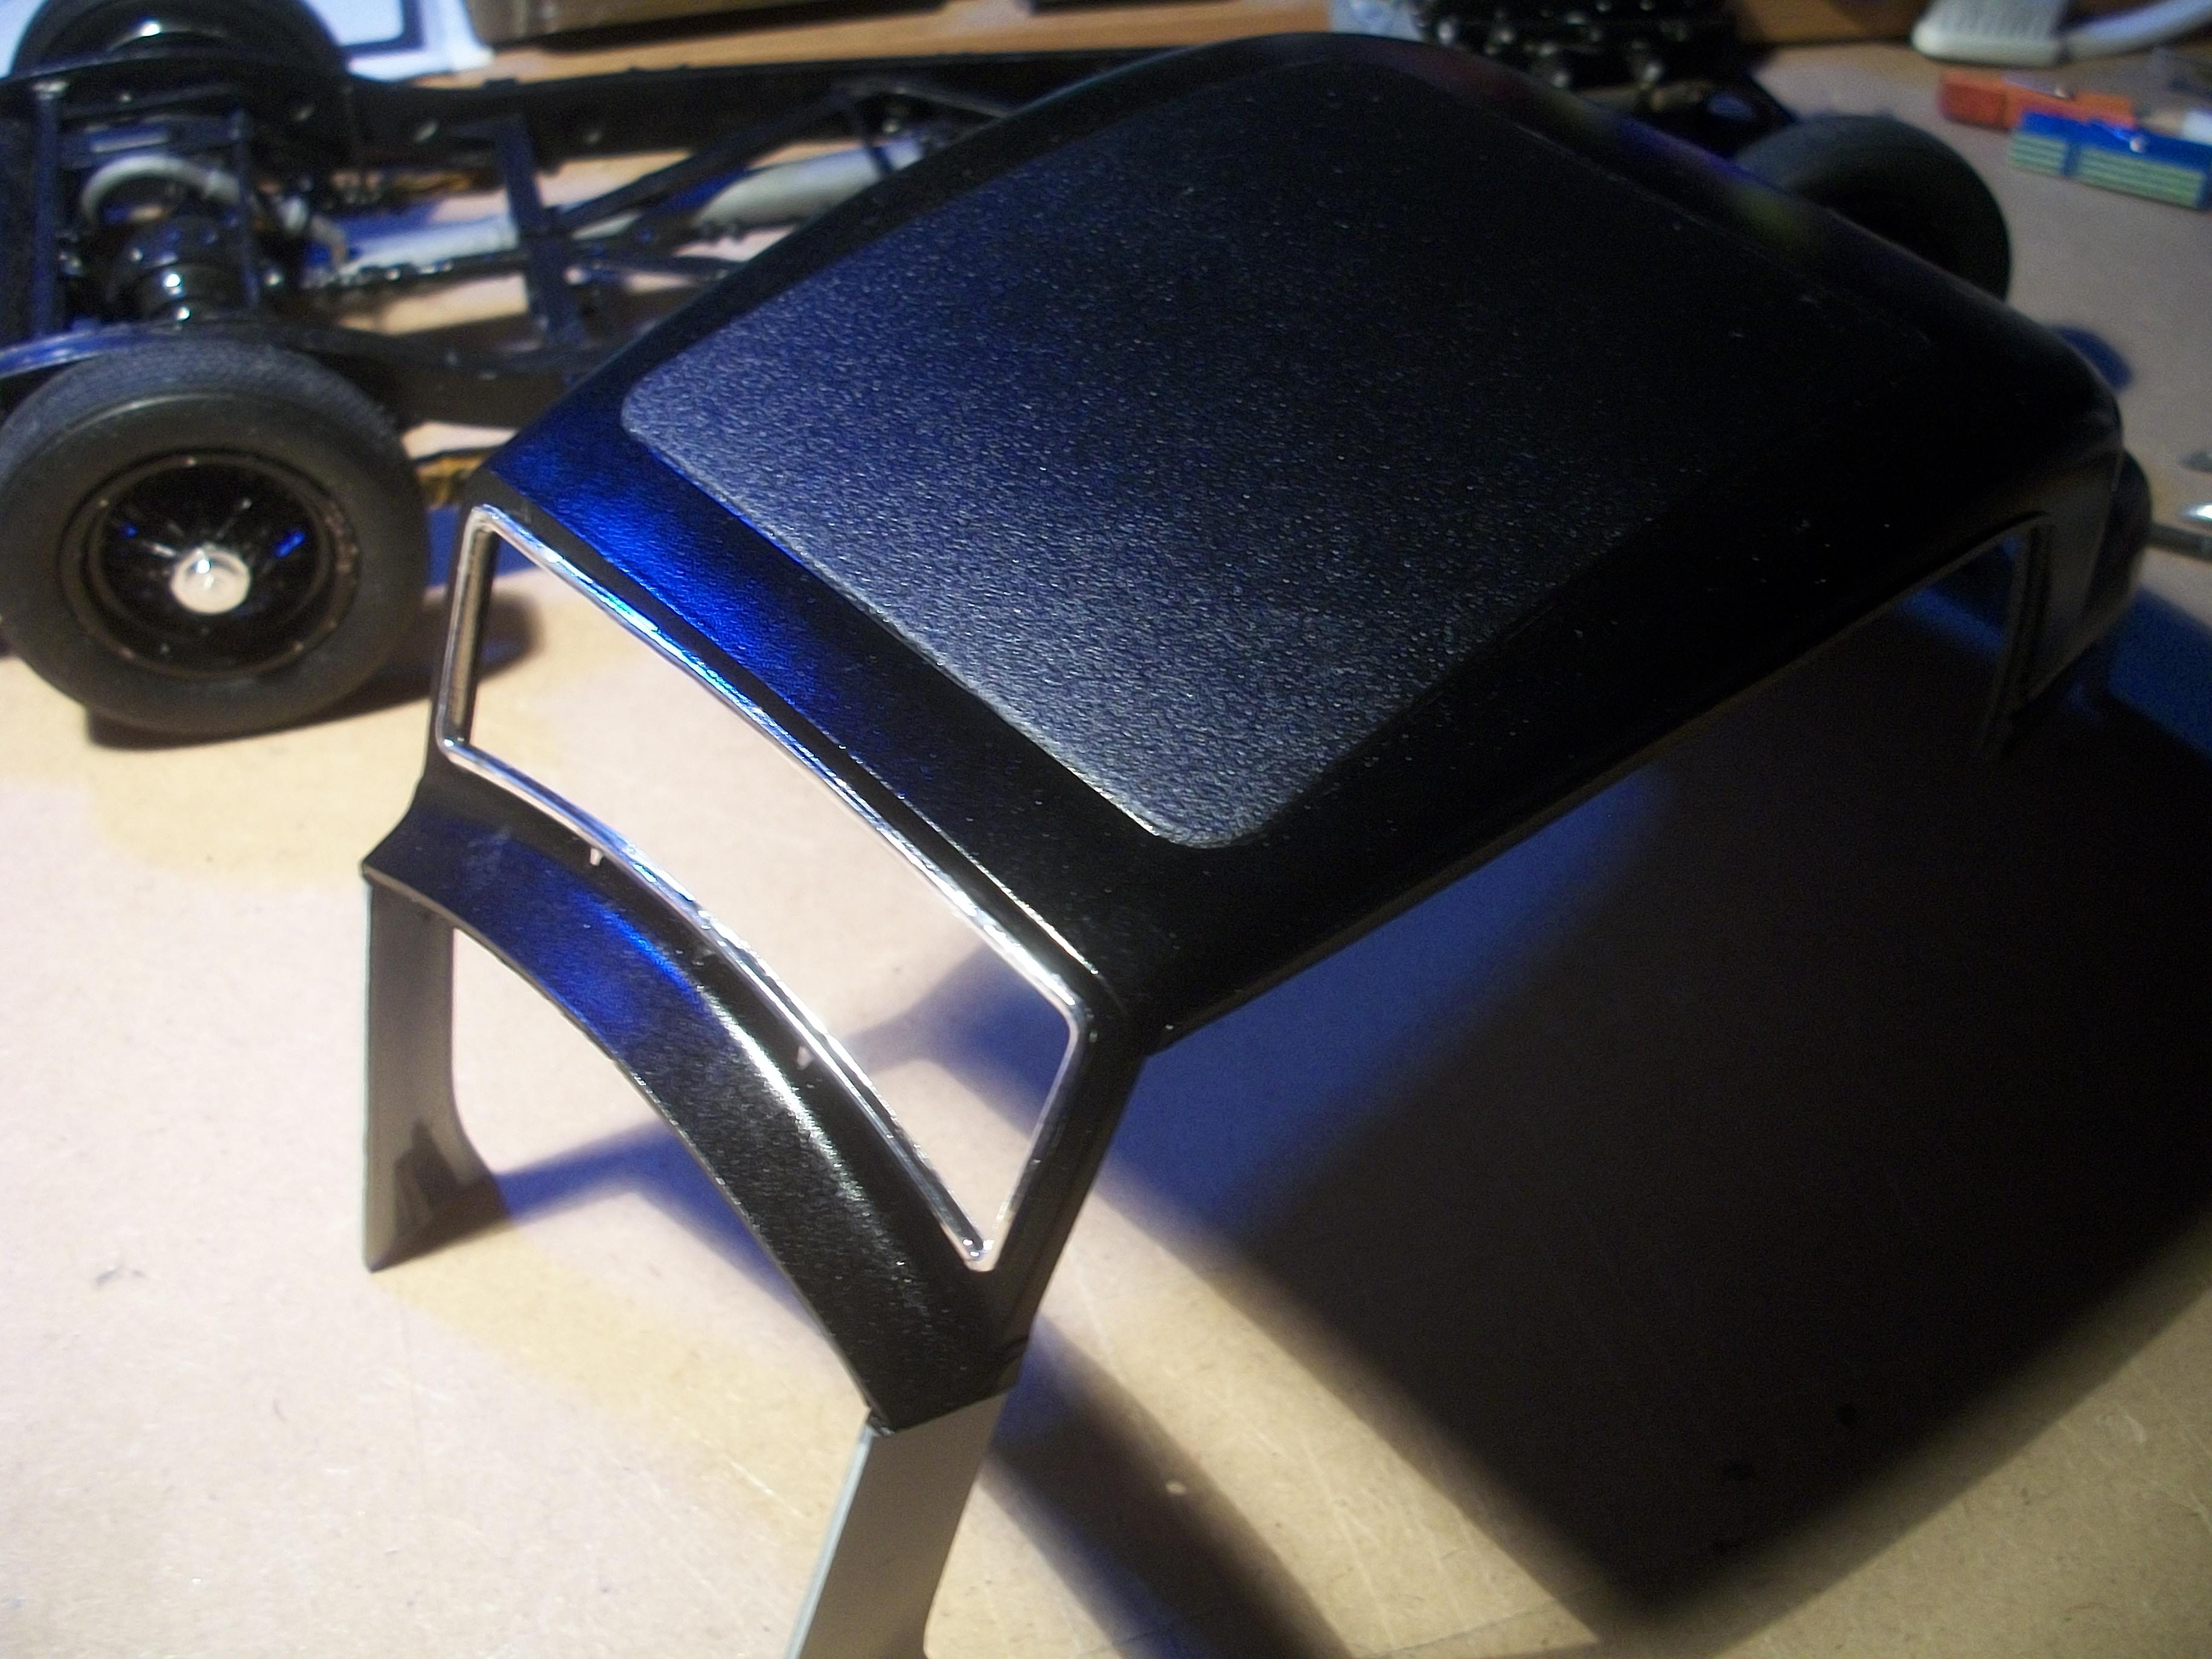
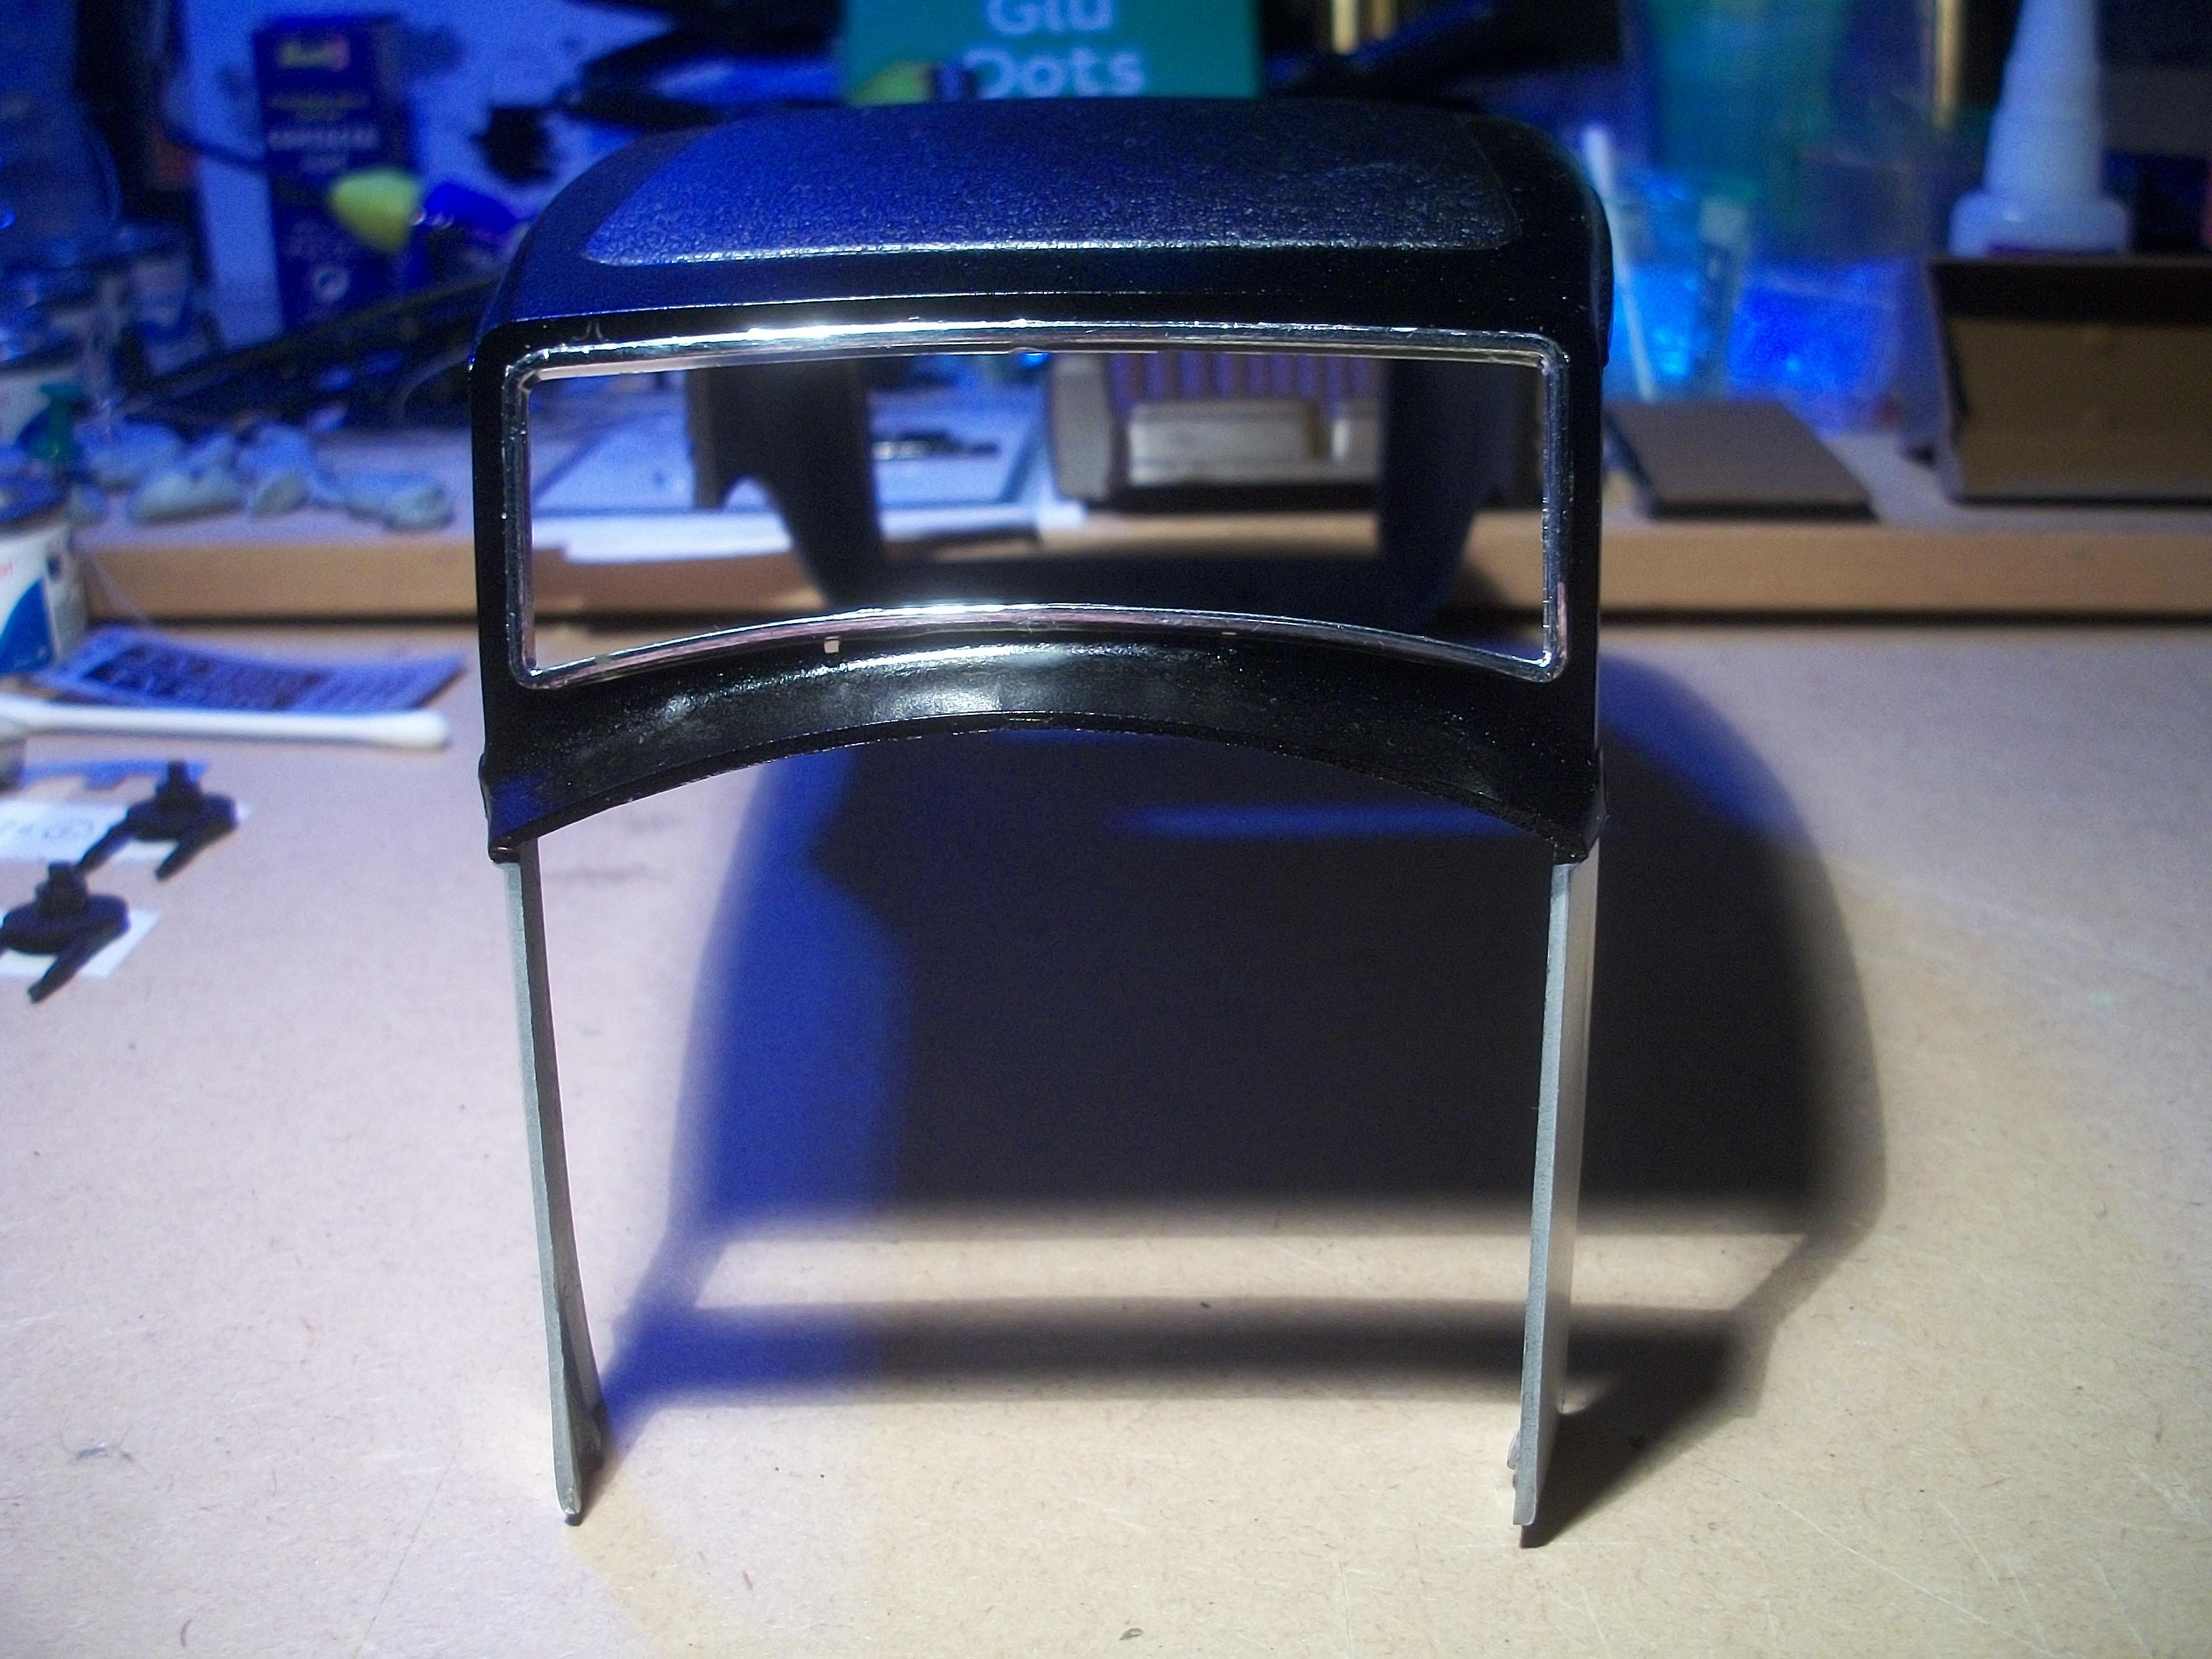
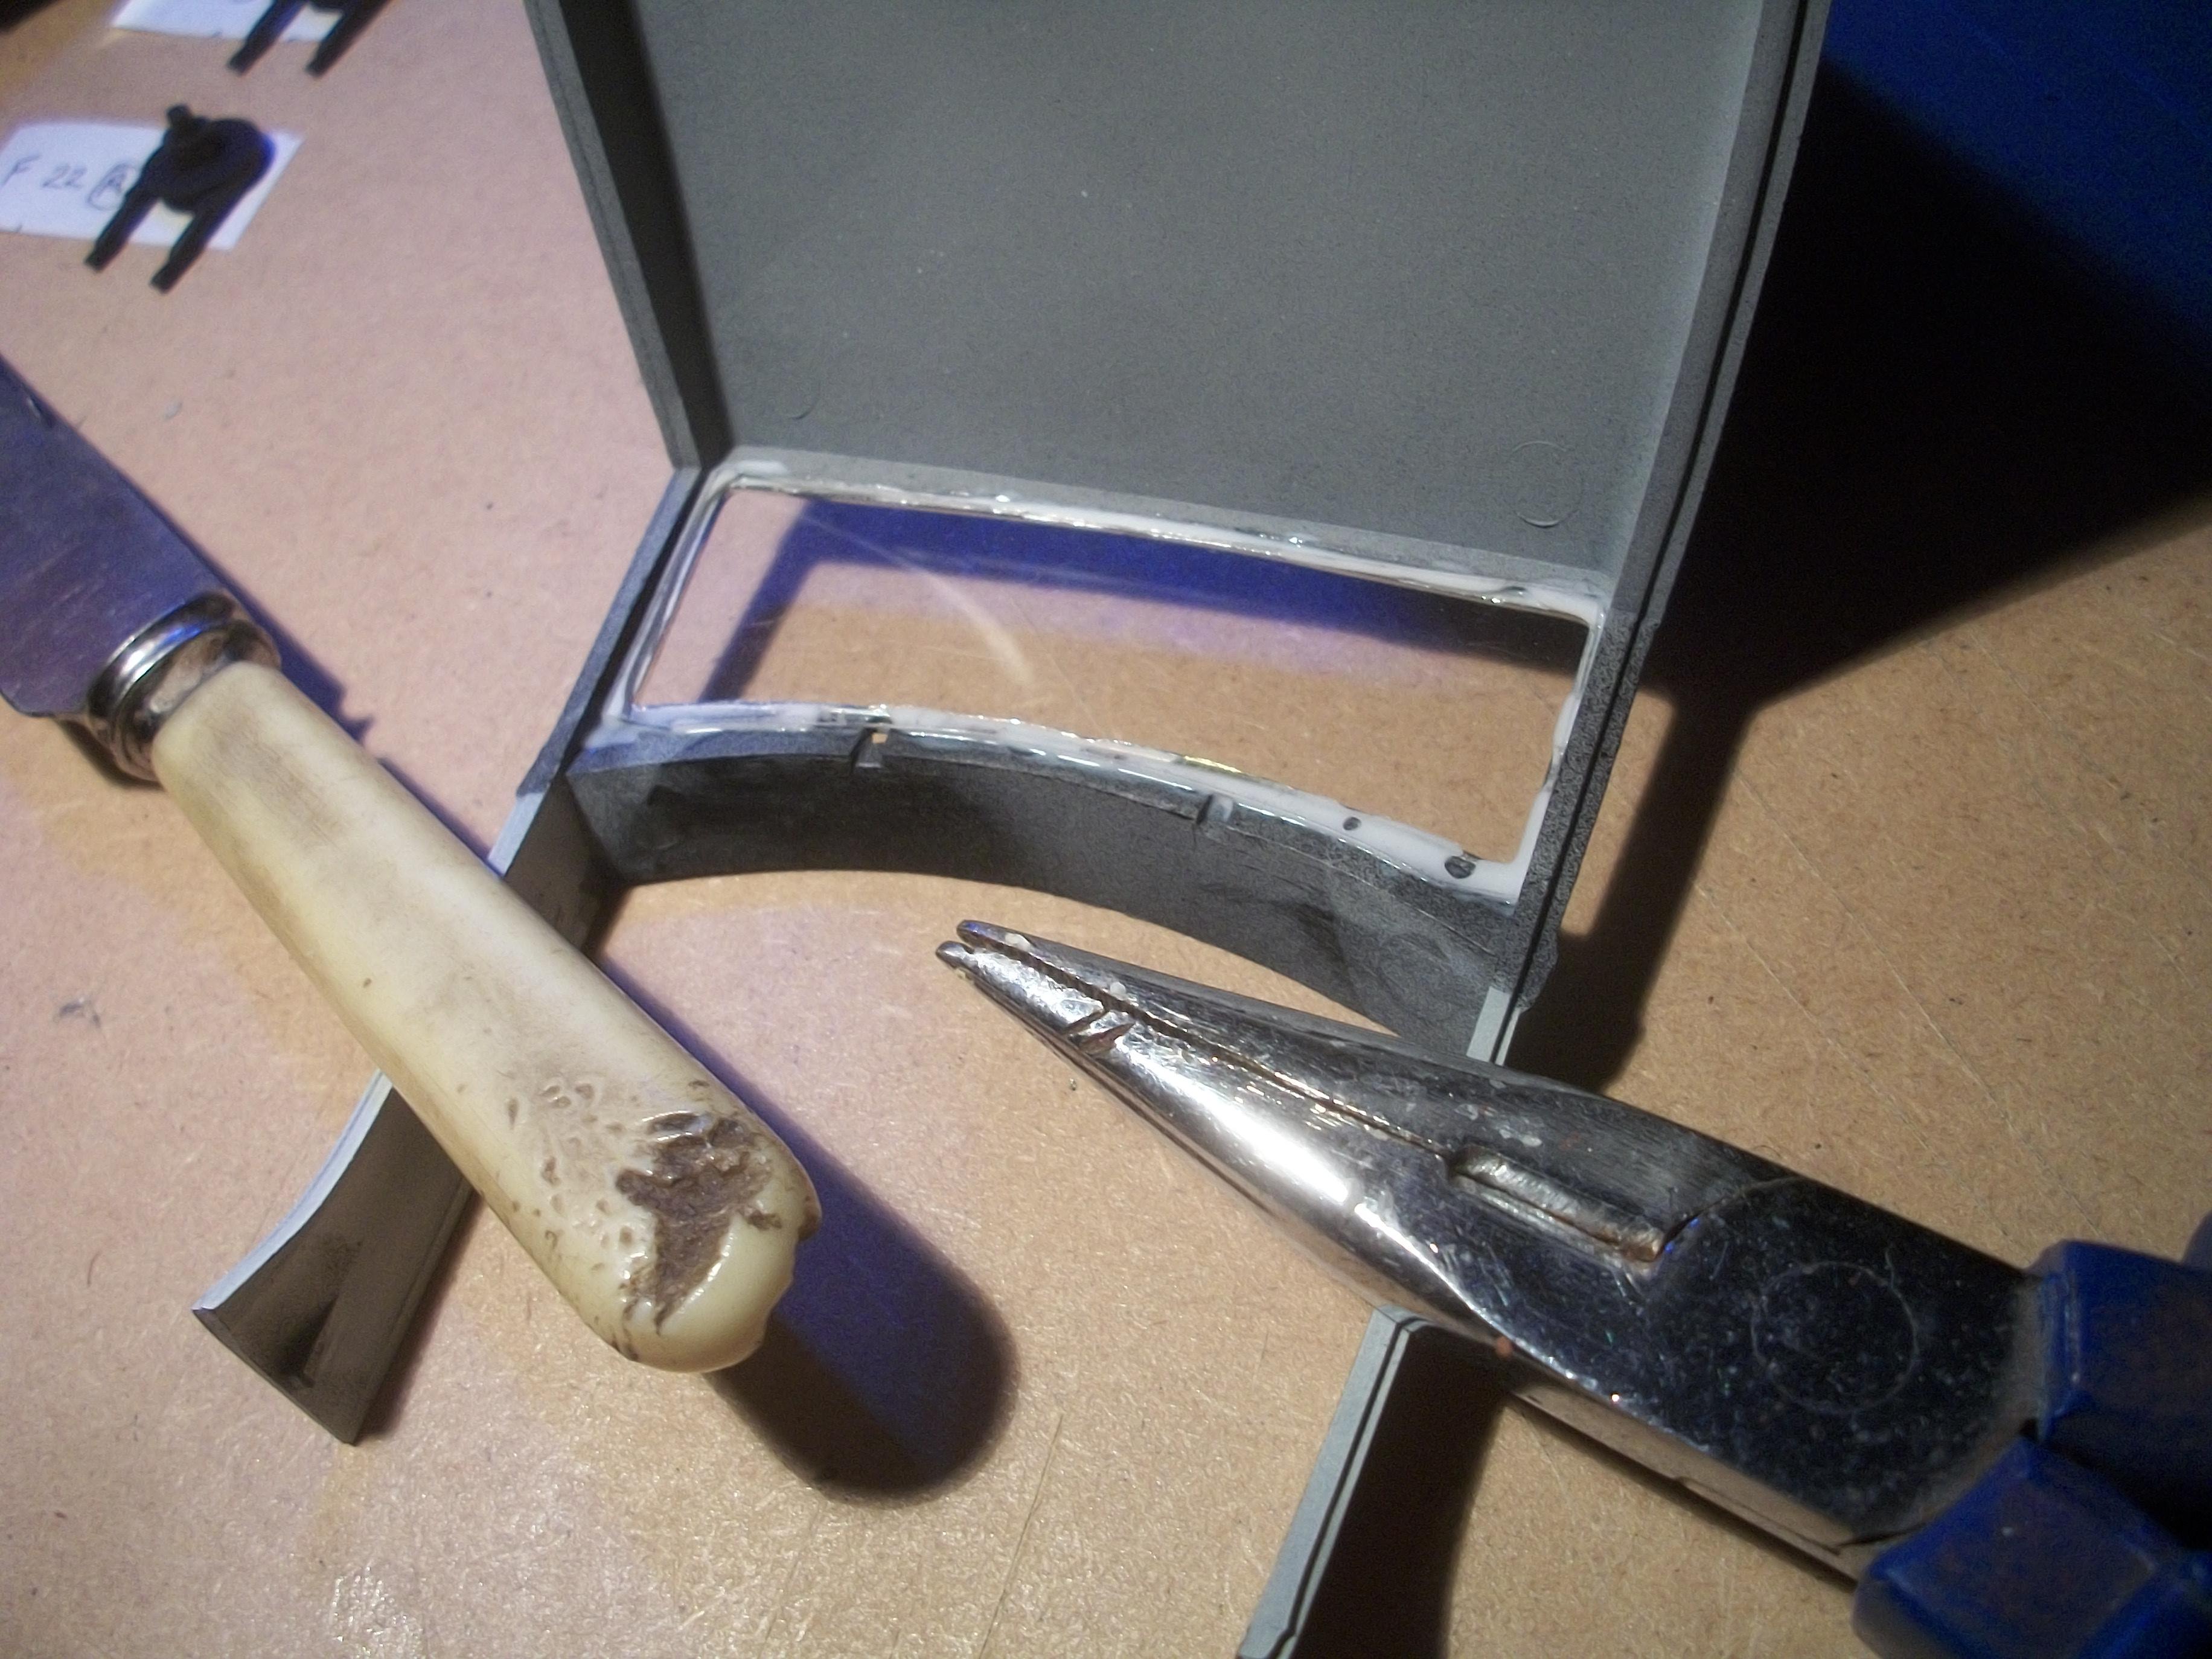
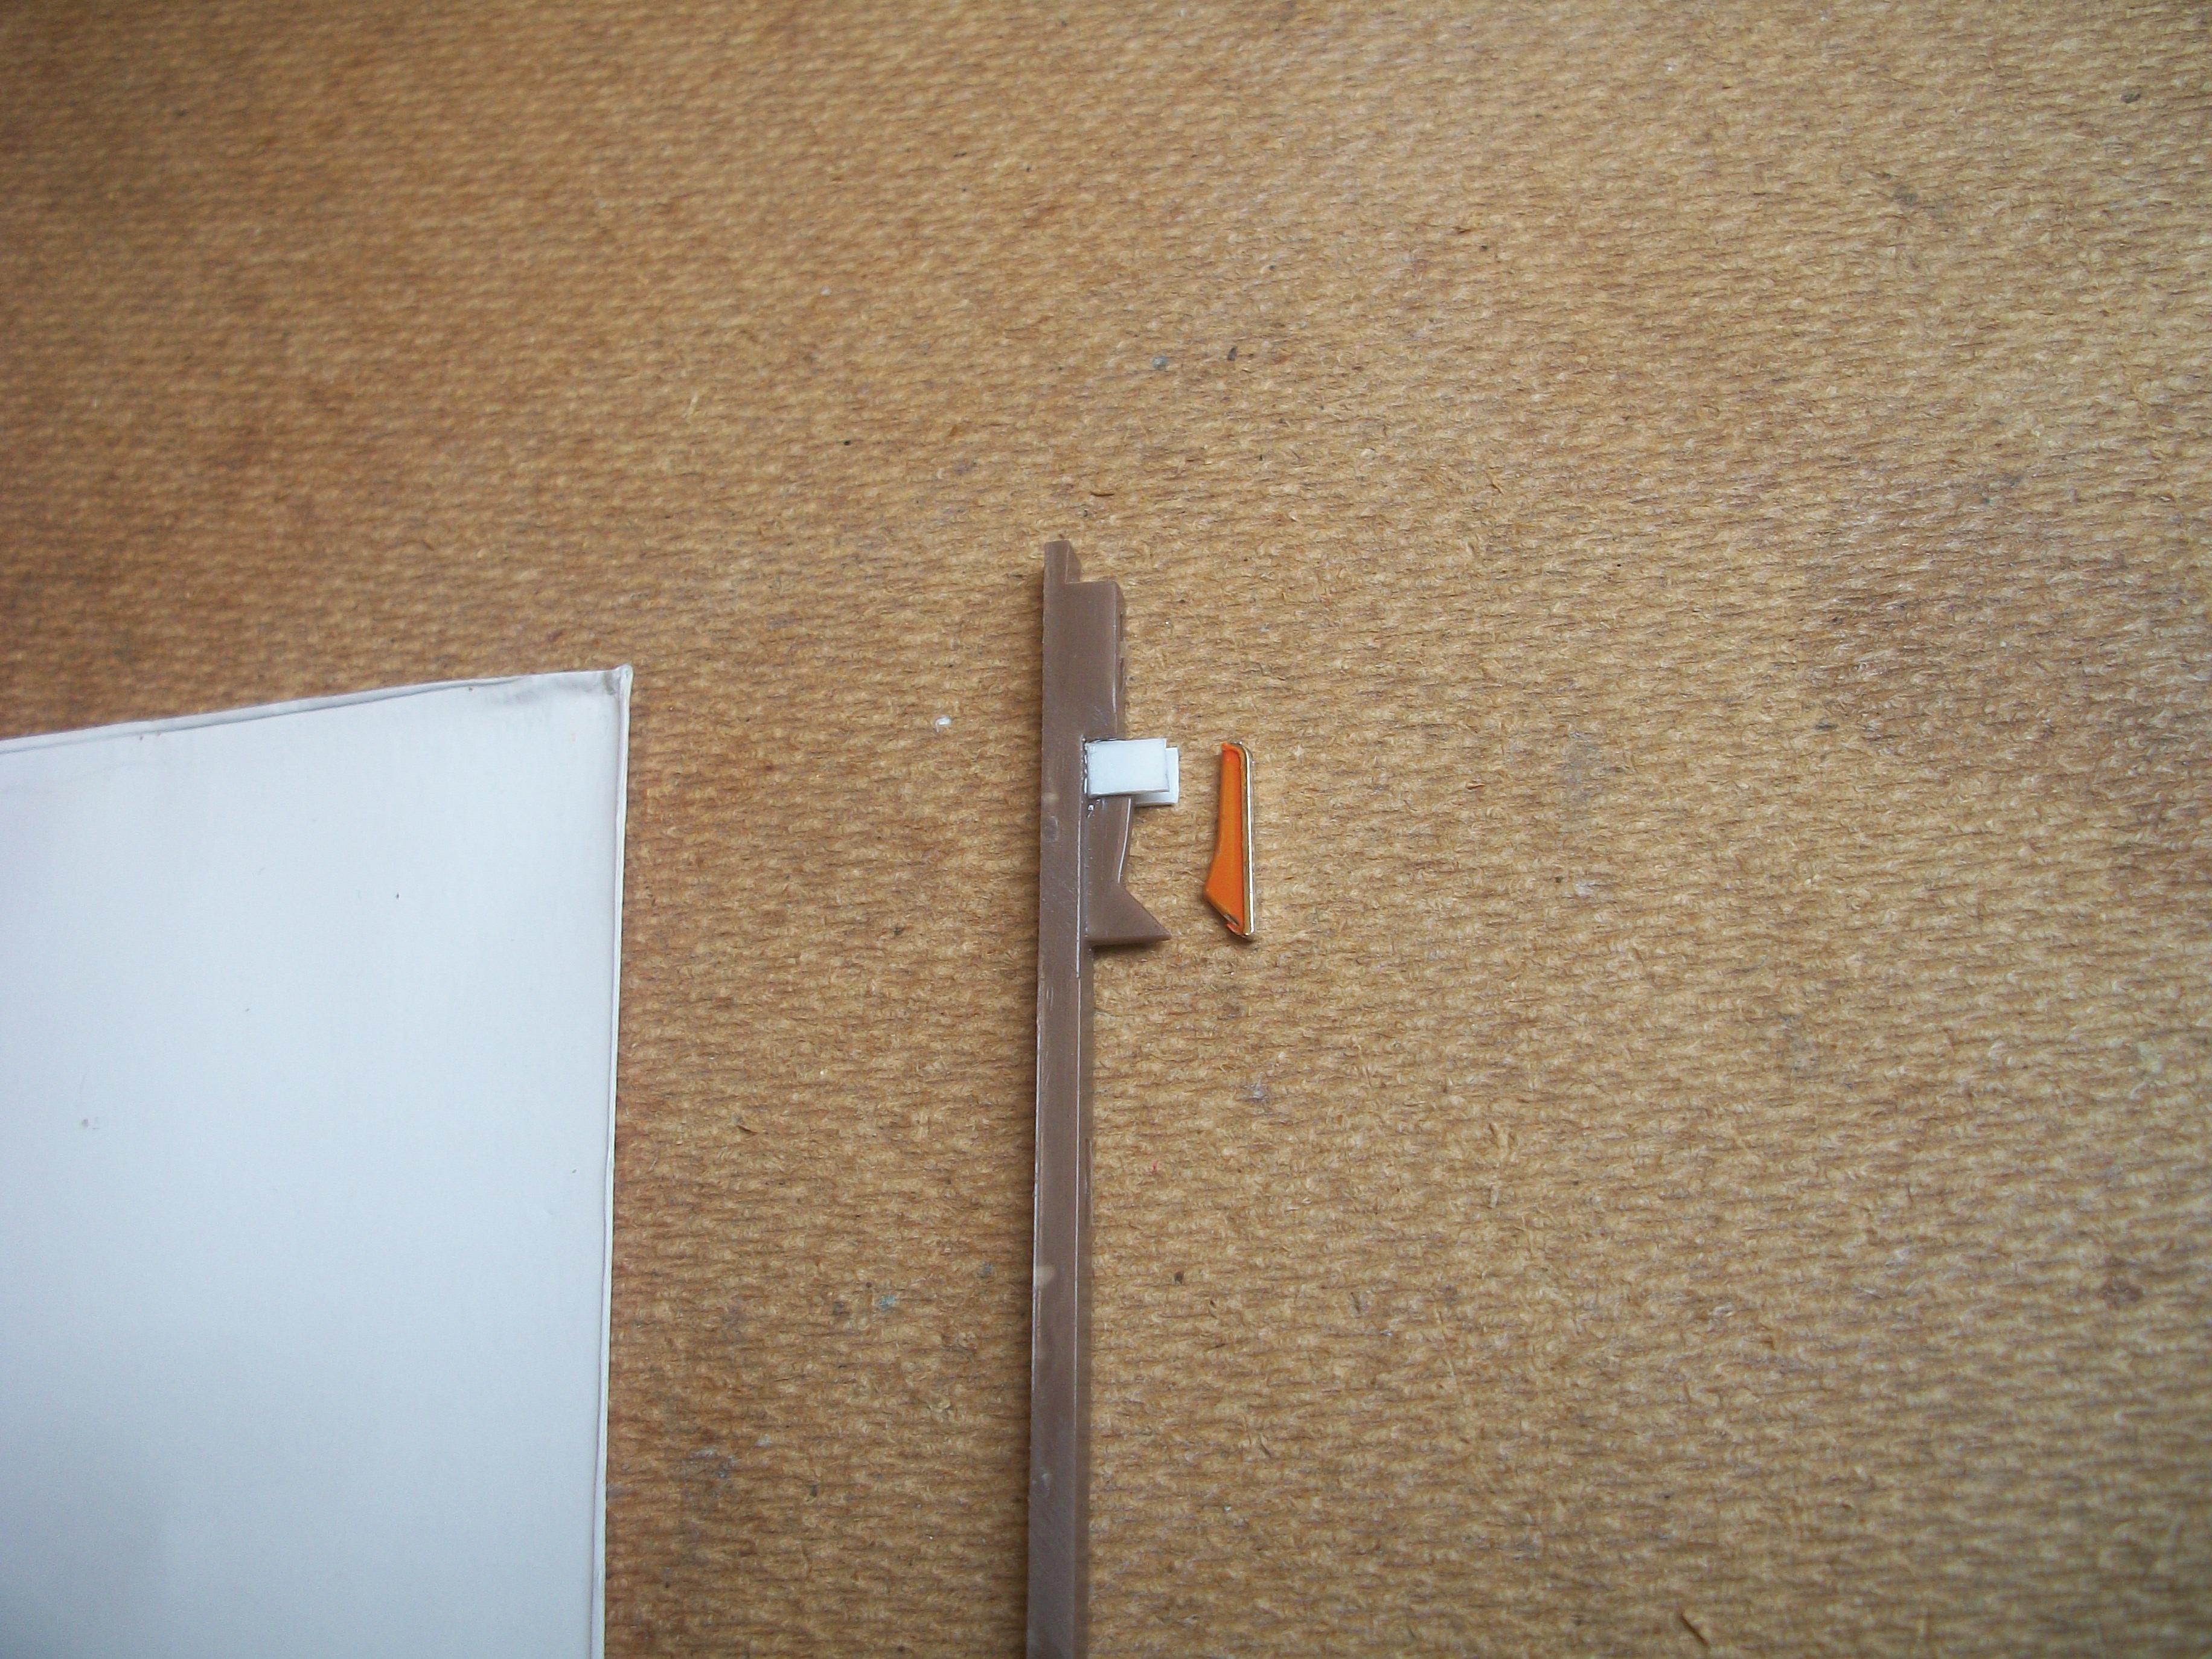
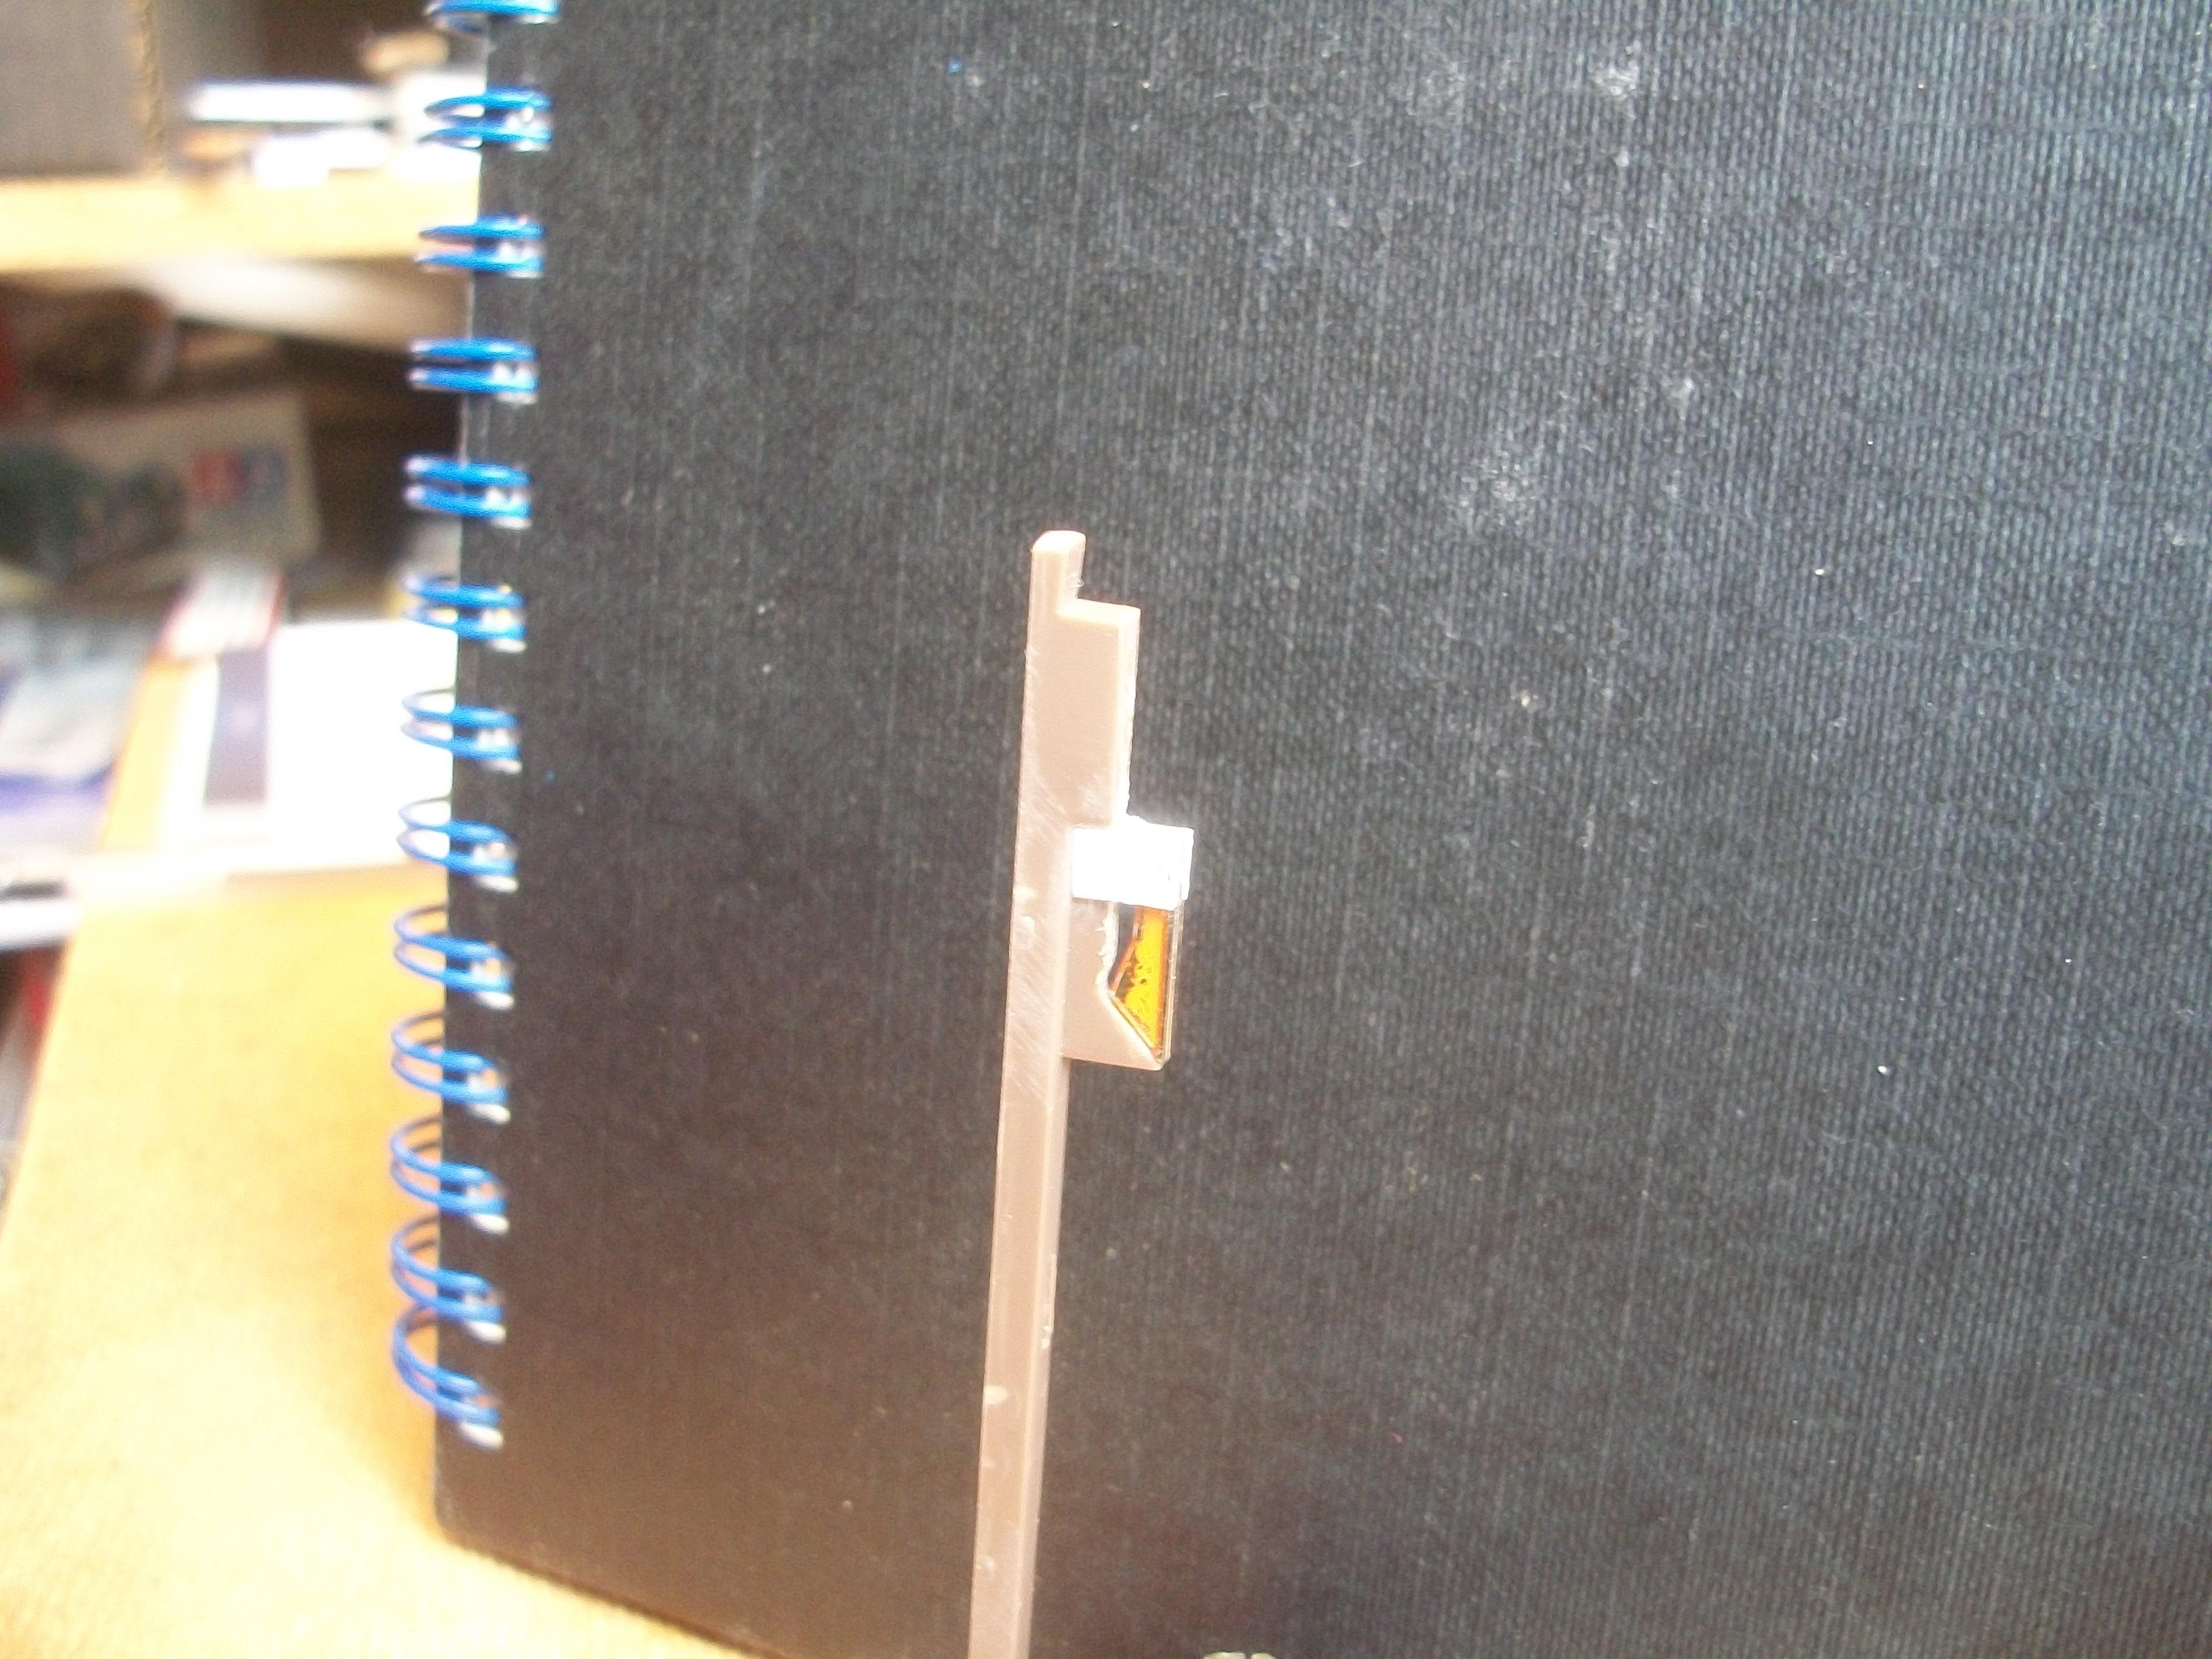
Today was all about ' Trafficators ' . . . The Rolls-Royce Phantom III, like many British motor cars of the 1930's, had the trafficator arms that were raised and lowered electronically as opposed to the later flashing lights front and rear . . . These trafficators were located on each side of the car, where the central door pillars form part of the body. I particularly wanted to modify the kit parts to enable these trafficator arms to pivot, as on the real car . . . The shape of the trafficator arm is moulded into the outer door pillar, and the trafficator lights are on the sprue for chrome parts. As you can see from the following photos, I fabricated two tiny pieces of thin styrene sheet, that are 5 mm x 3 mm, and super glued them to the door pillar with a space in between. Then I placed the trafficator arm / light between the two pieces of styrene and drilled a hole through all three parts horizontally, using my Revell hand drill. The piece of long brass rod fitted through the holes perfectly, so I cut a short length of 3 mm rod to act as a pin to hold the trafficator in place . . . The pin has super glue on the outside ends to prevent it from falling out of the brackets . . . At this point I realised that the trafficator could not pivot through 90° from the vertical lowered position to the horizontal raised position. This issue required the removal of some plastic material from the door pillar part, and once this was done the whole thing worked as it should . . . The second trafficator was made in half the time, now that I had worked out the correct method . . . The orange lenses of the trafficator arms were touched up with Revell Orange Gloss enamel, as the paint had rubbed off the surface of the chrome while handling. I am actually rather pleased with this result, and I think once the door pillar and also the styrene brackets are painted black gloss, the modification will not be too visible, except on close examination . . . The first photo shows the trafficator as fiited to the real Phantom III . . . David
-
Those wheels and tyres look really good Ken, and now that you have a rolling chassis you can see how well this all fits together . . . Certainly a good idea to have the louvres in the open position on the hood sides, as indeed they are on my Rolls-Royce hood side panels. Your CAD work and your 3D printed parts are excellent . . . It is interesting how you have built this model from the original plans. David
-
That is a nicely built model Pat, and it came together quite quickly too . . . Forced Perspective is a very tricky thing to get right, as I can testify from first hand experience ! . . . Part of the process does involve your own eyesight of course, and then it comes down to what type of camera you are using, followed by the choice of background. The weather, sunshine and lighting, and the time of day all play a considerable part in the success or failure of a photo. I have found that a very basic camera like my KODAK M340 can sometimes capture brilliant shots, and the camera that was used by Michael Paul Smith was also a fairly basic camera, but I did achieve better results with my NIKON D3000 DSLR camera . . . As you will have found, the way that you position your grey board on the table, in relation to the chosen background is absolutely crucial to get the illusion right, and then it is all down to the actual camera settings to somehow get both the background and foregound in focus for the same shot. Your third photo above is probably the best, and if only the grey board had been turned slightly anti-clockwise to follow the curve of the road surface, you might have been lucky to get the background more in focus. The colour of the grey board is also very important, and getting it painted to match the same colour as the road is not easy . . . Well done anyway Pat ! David
-
1:16 Gunze Sangyo 1937 Rolls-Royce Phantom III Sports Saloon
Anglia105E replied to Anglia105E's topic in WIP: Model Cars
Thanks a lot David . . . Always nice to receive a compliment ! This narrow orange tape that I purchased some time ago was one of my best purchases ever. The tape sticks well, does not leave any residue on the paintwork, peels off nicely when the job is done and always provides a clean precise line . . . You can write on it, bend it around corners, cut it easily and I just love it . . . I seem to remember the tape being a bit pricey, but then again it is intended for professional car painters, full size cars that is. I purchased two good sized rolls of the orange tape, so if they stop producing the product, I am okay for years to come (hopefully) . . . David W. -
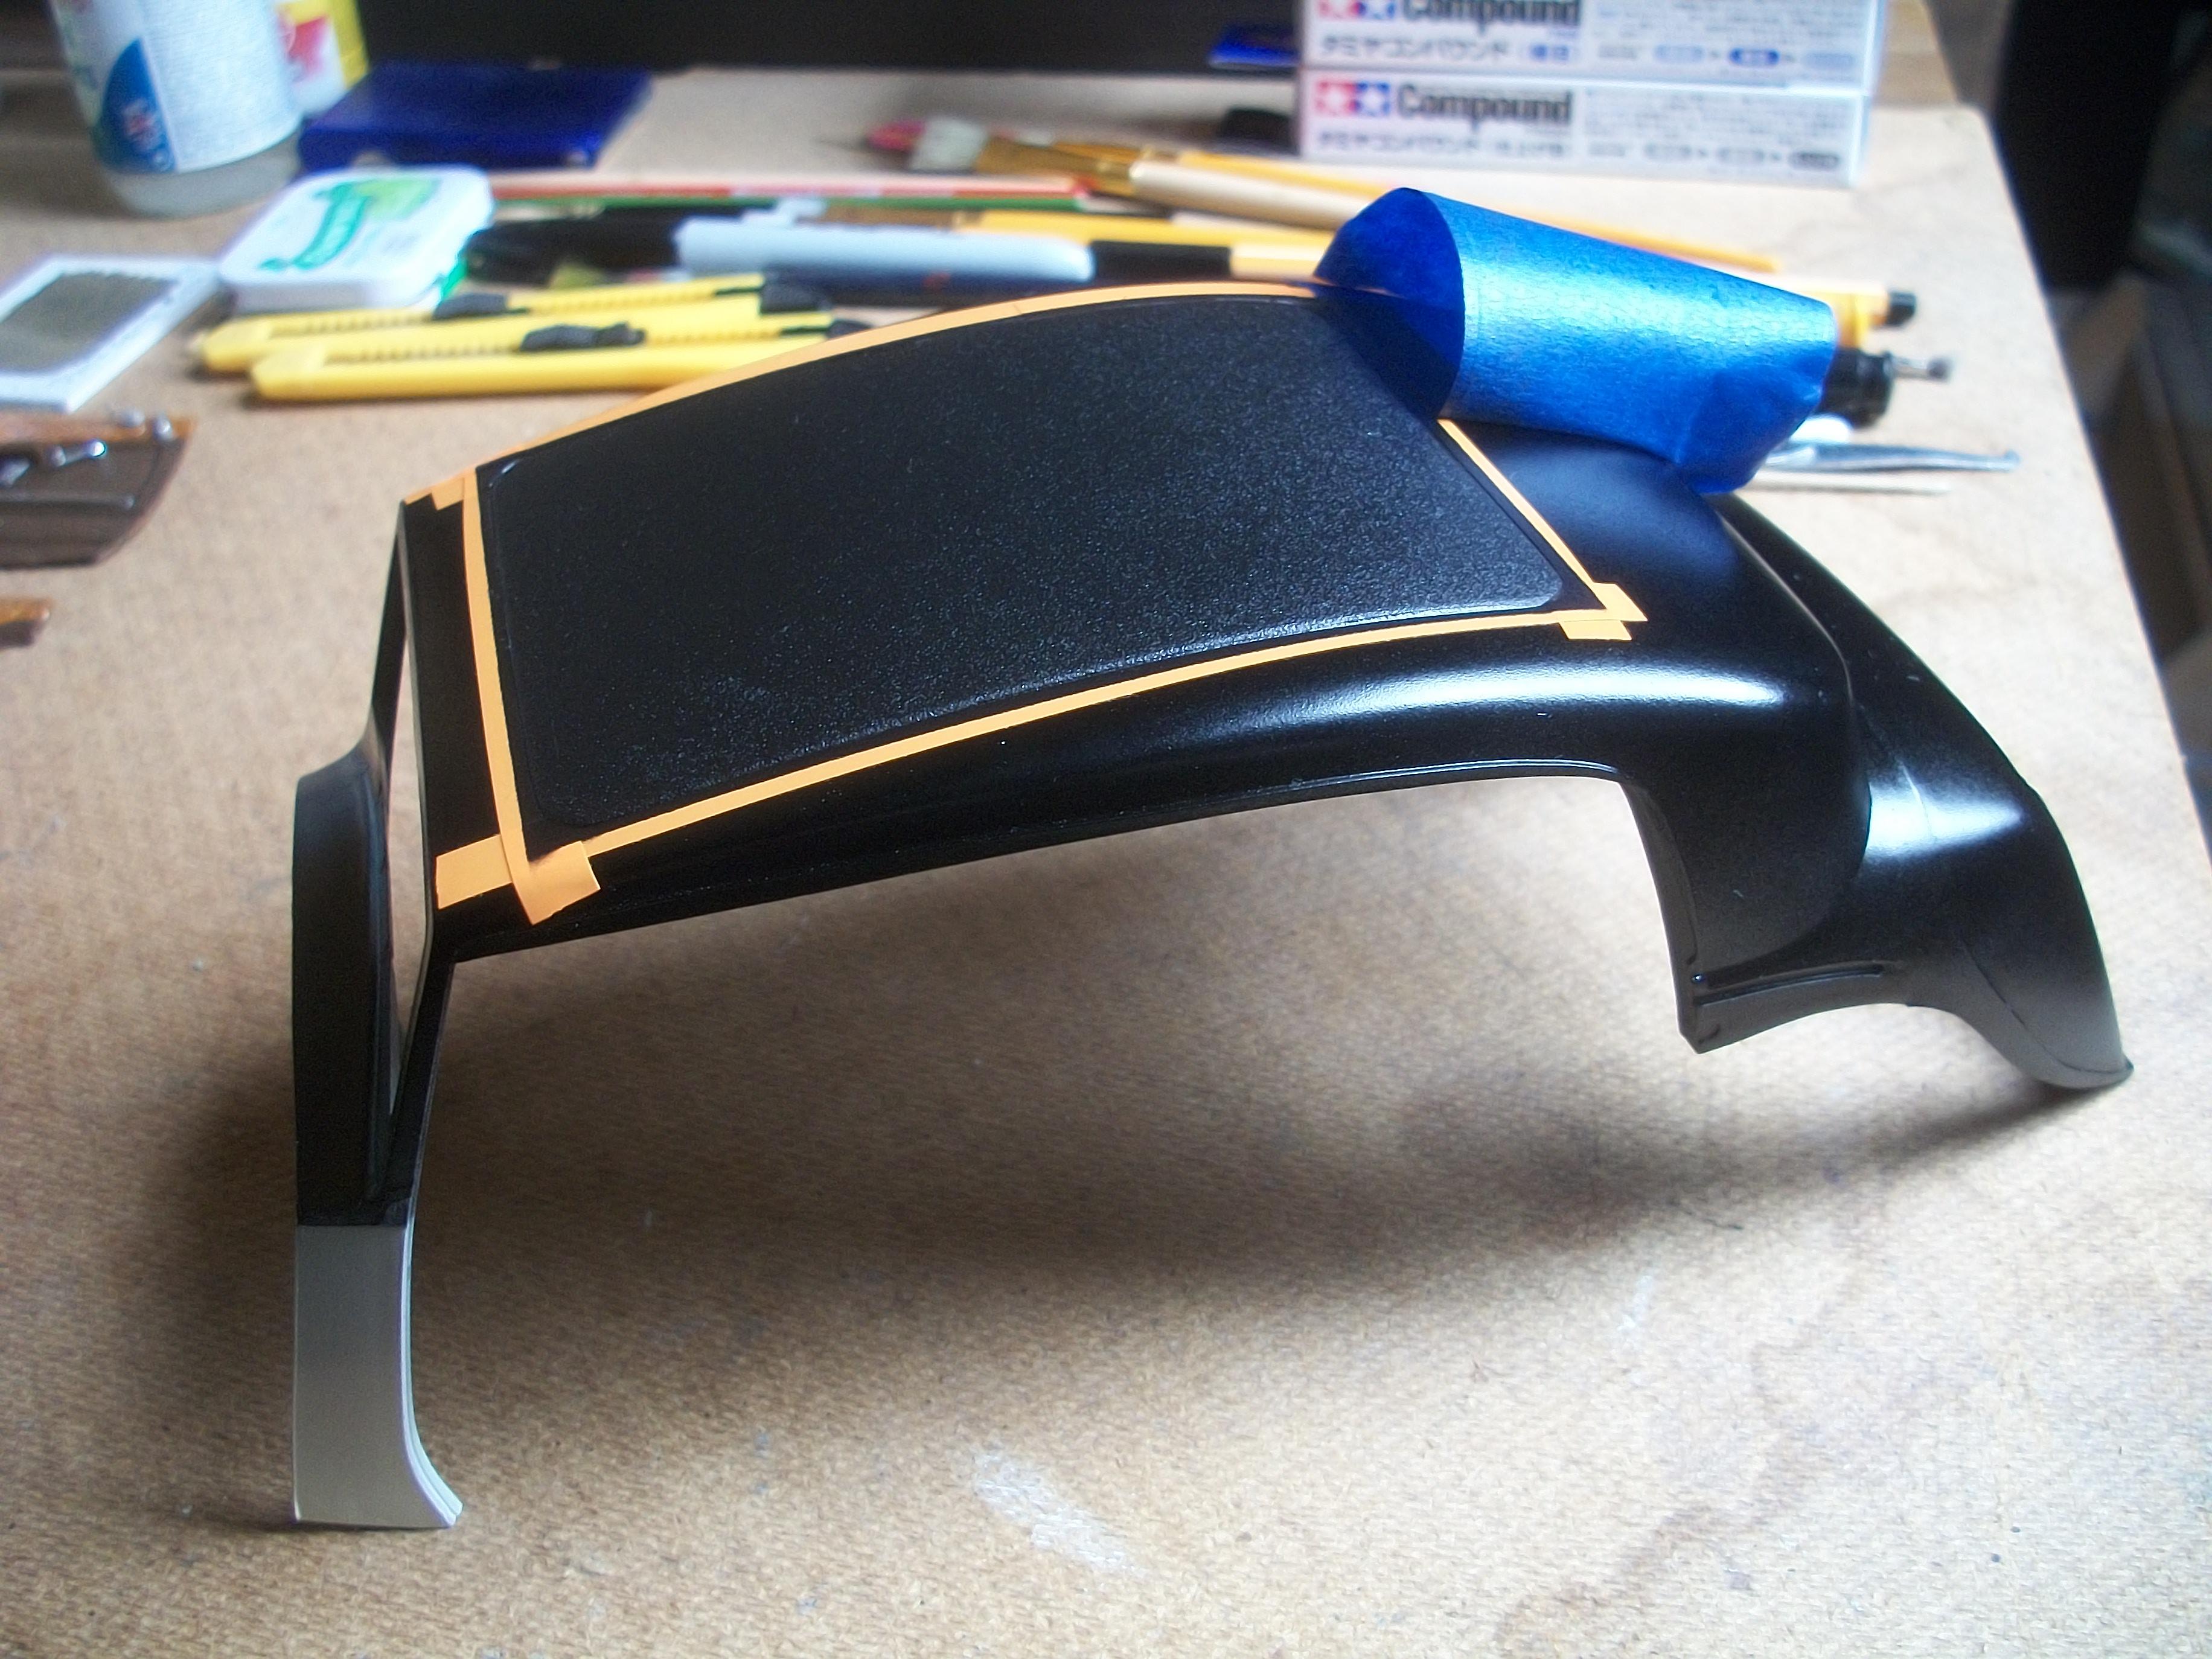
1:16 Gunze Sangyo 1937 Rolls-Royce Phantom III Sports Saloon
Anglia105E replied to Anglia105E's topic in WIP: Model Cars
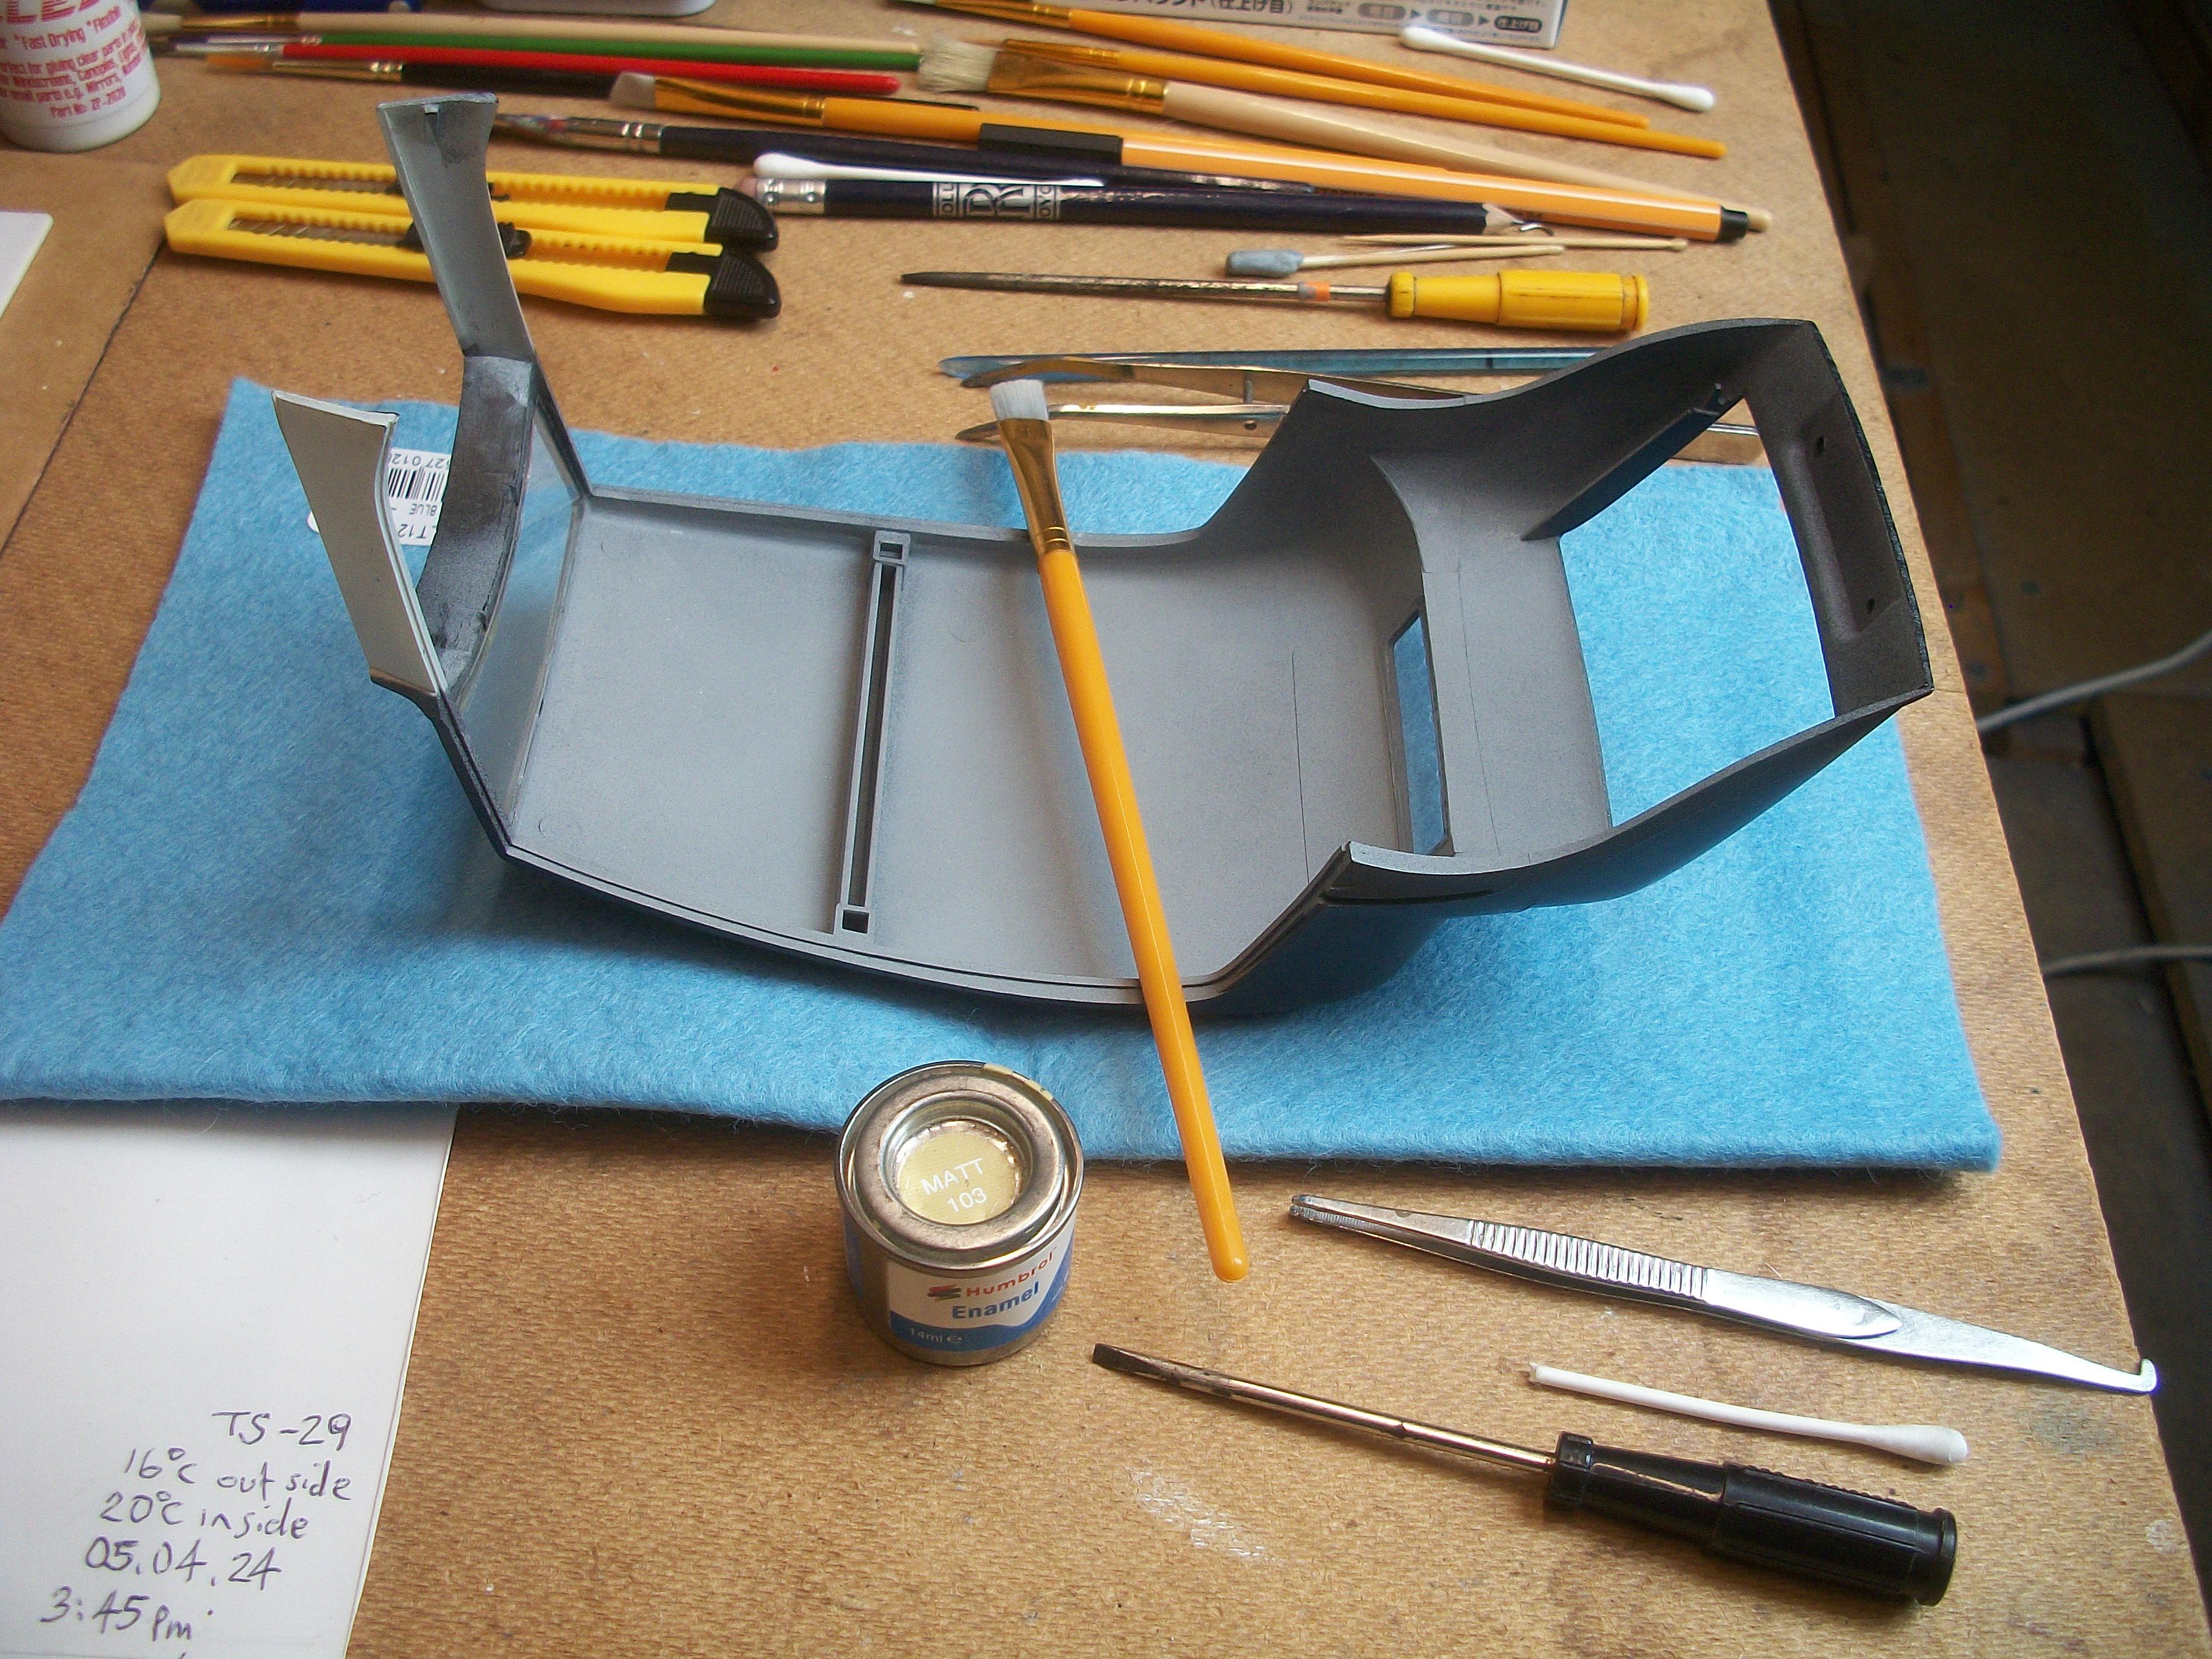
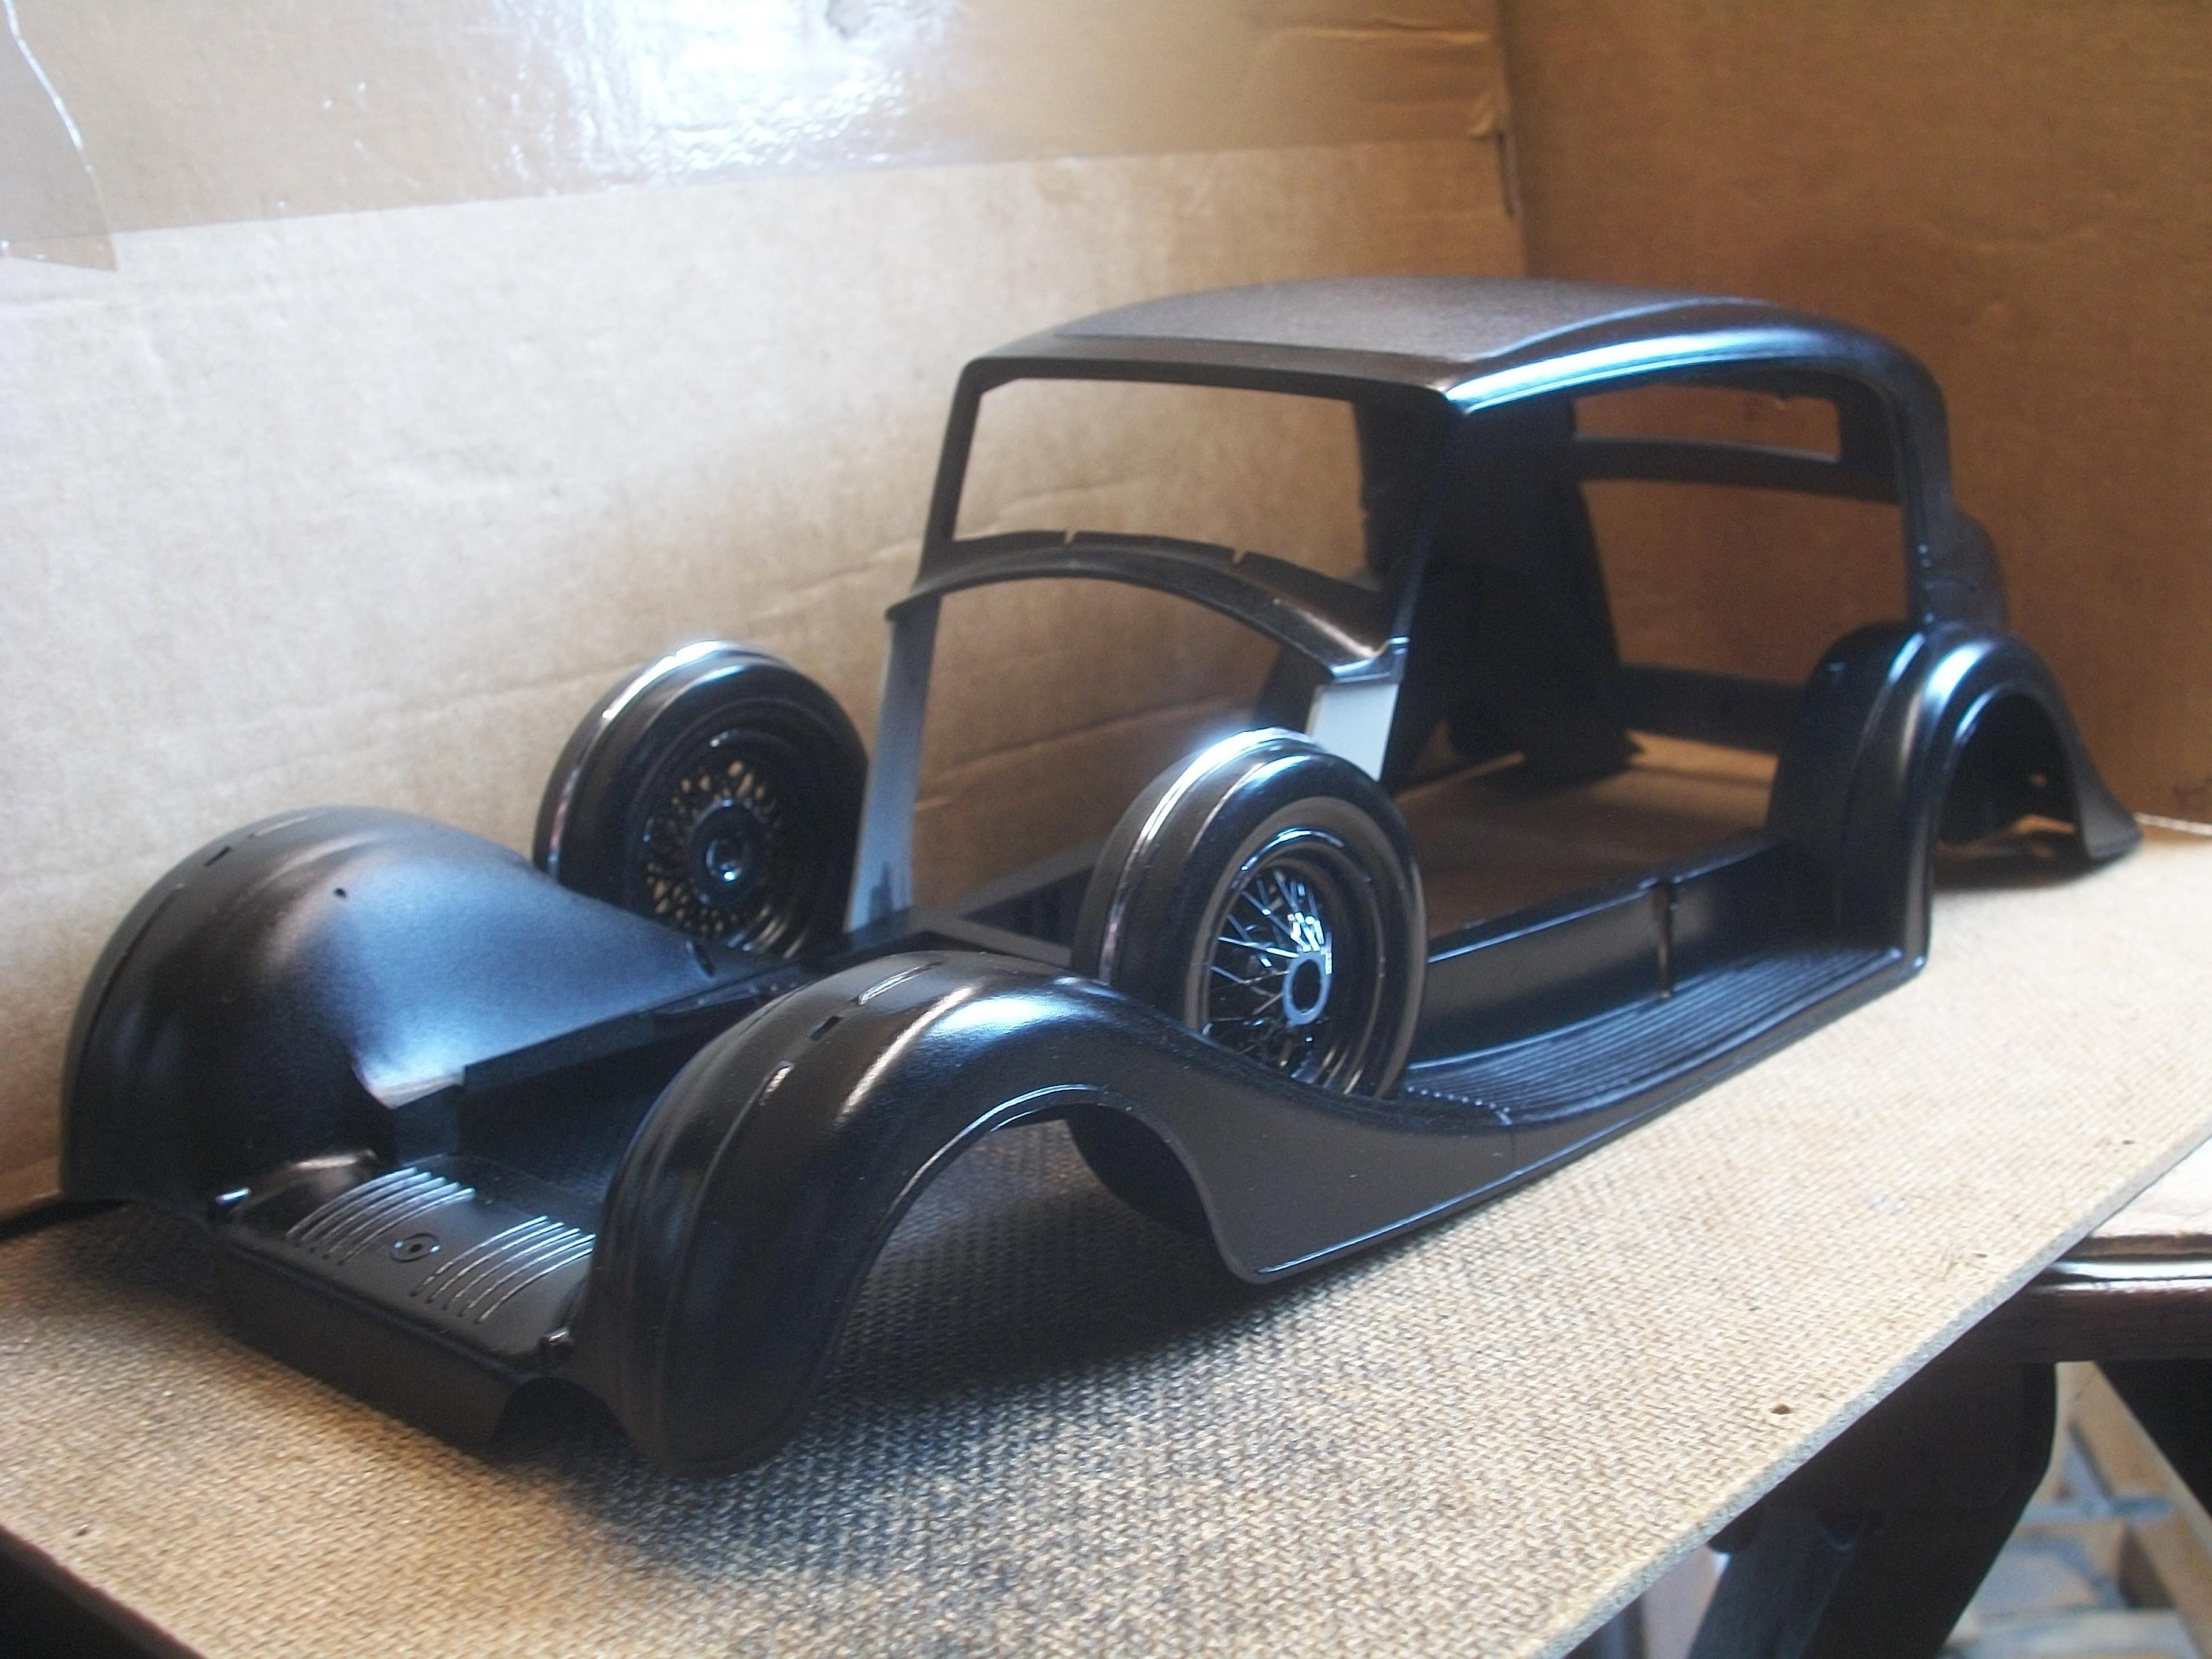
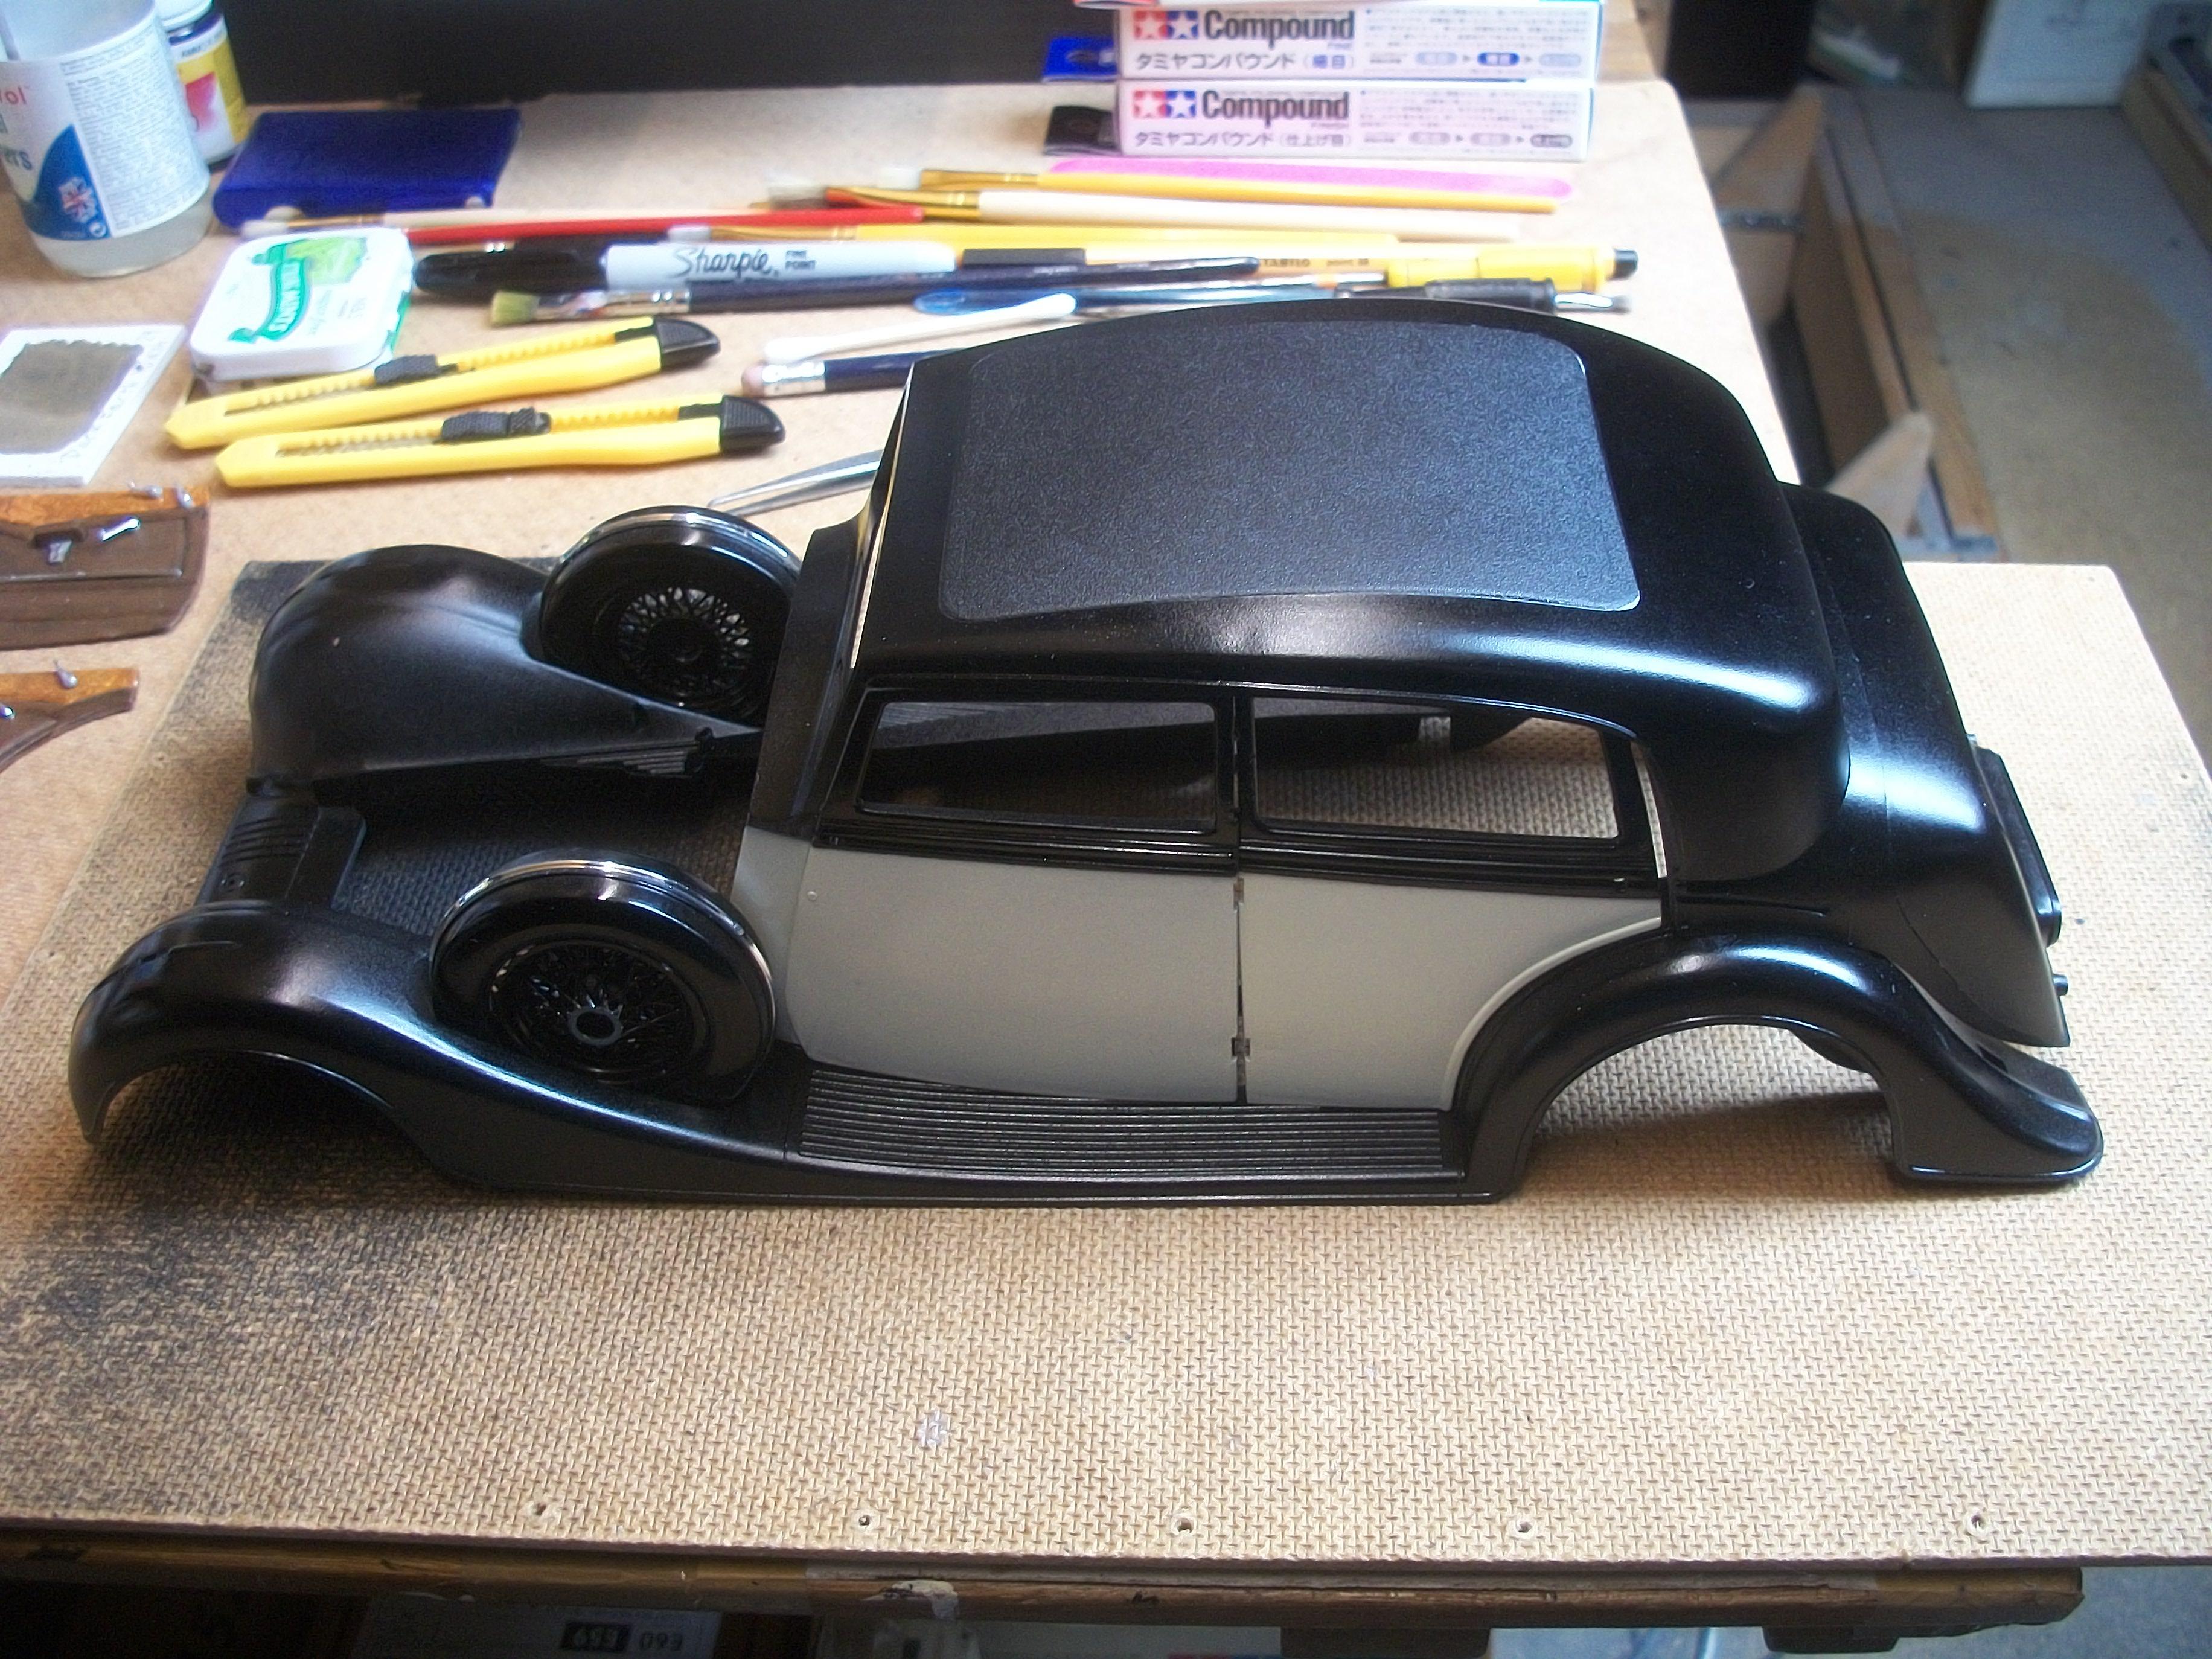
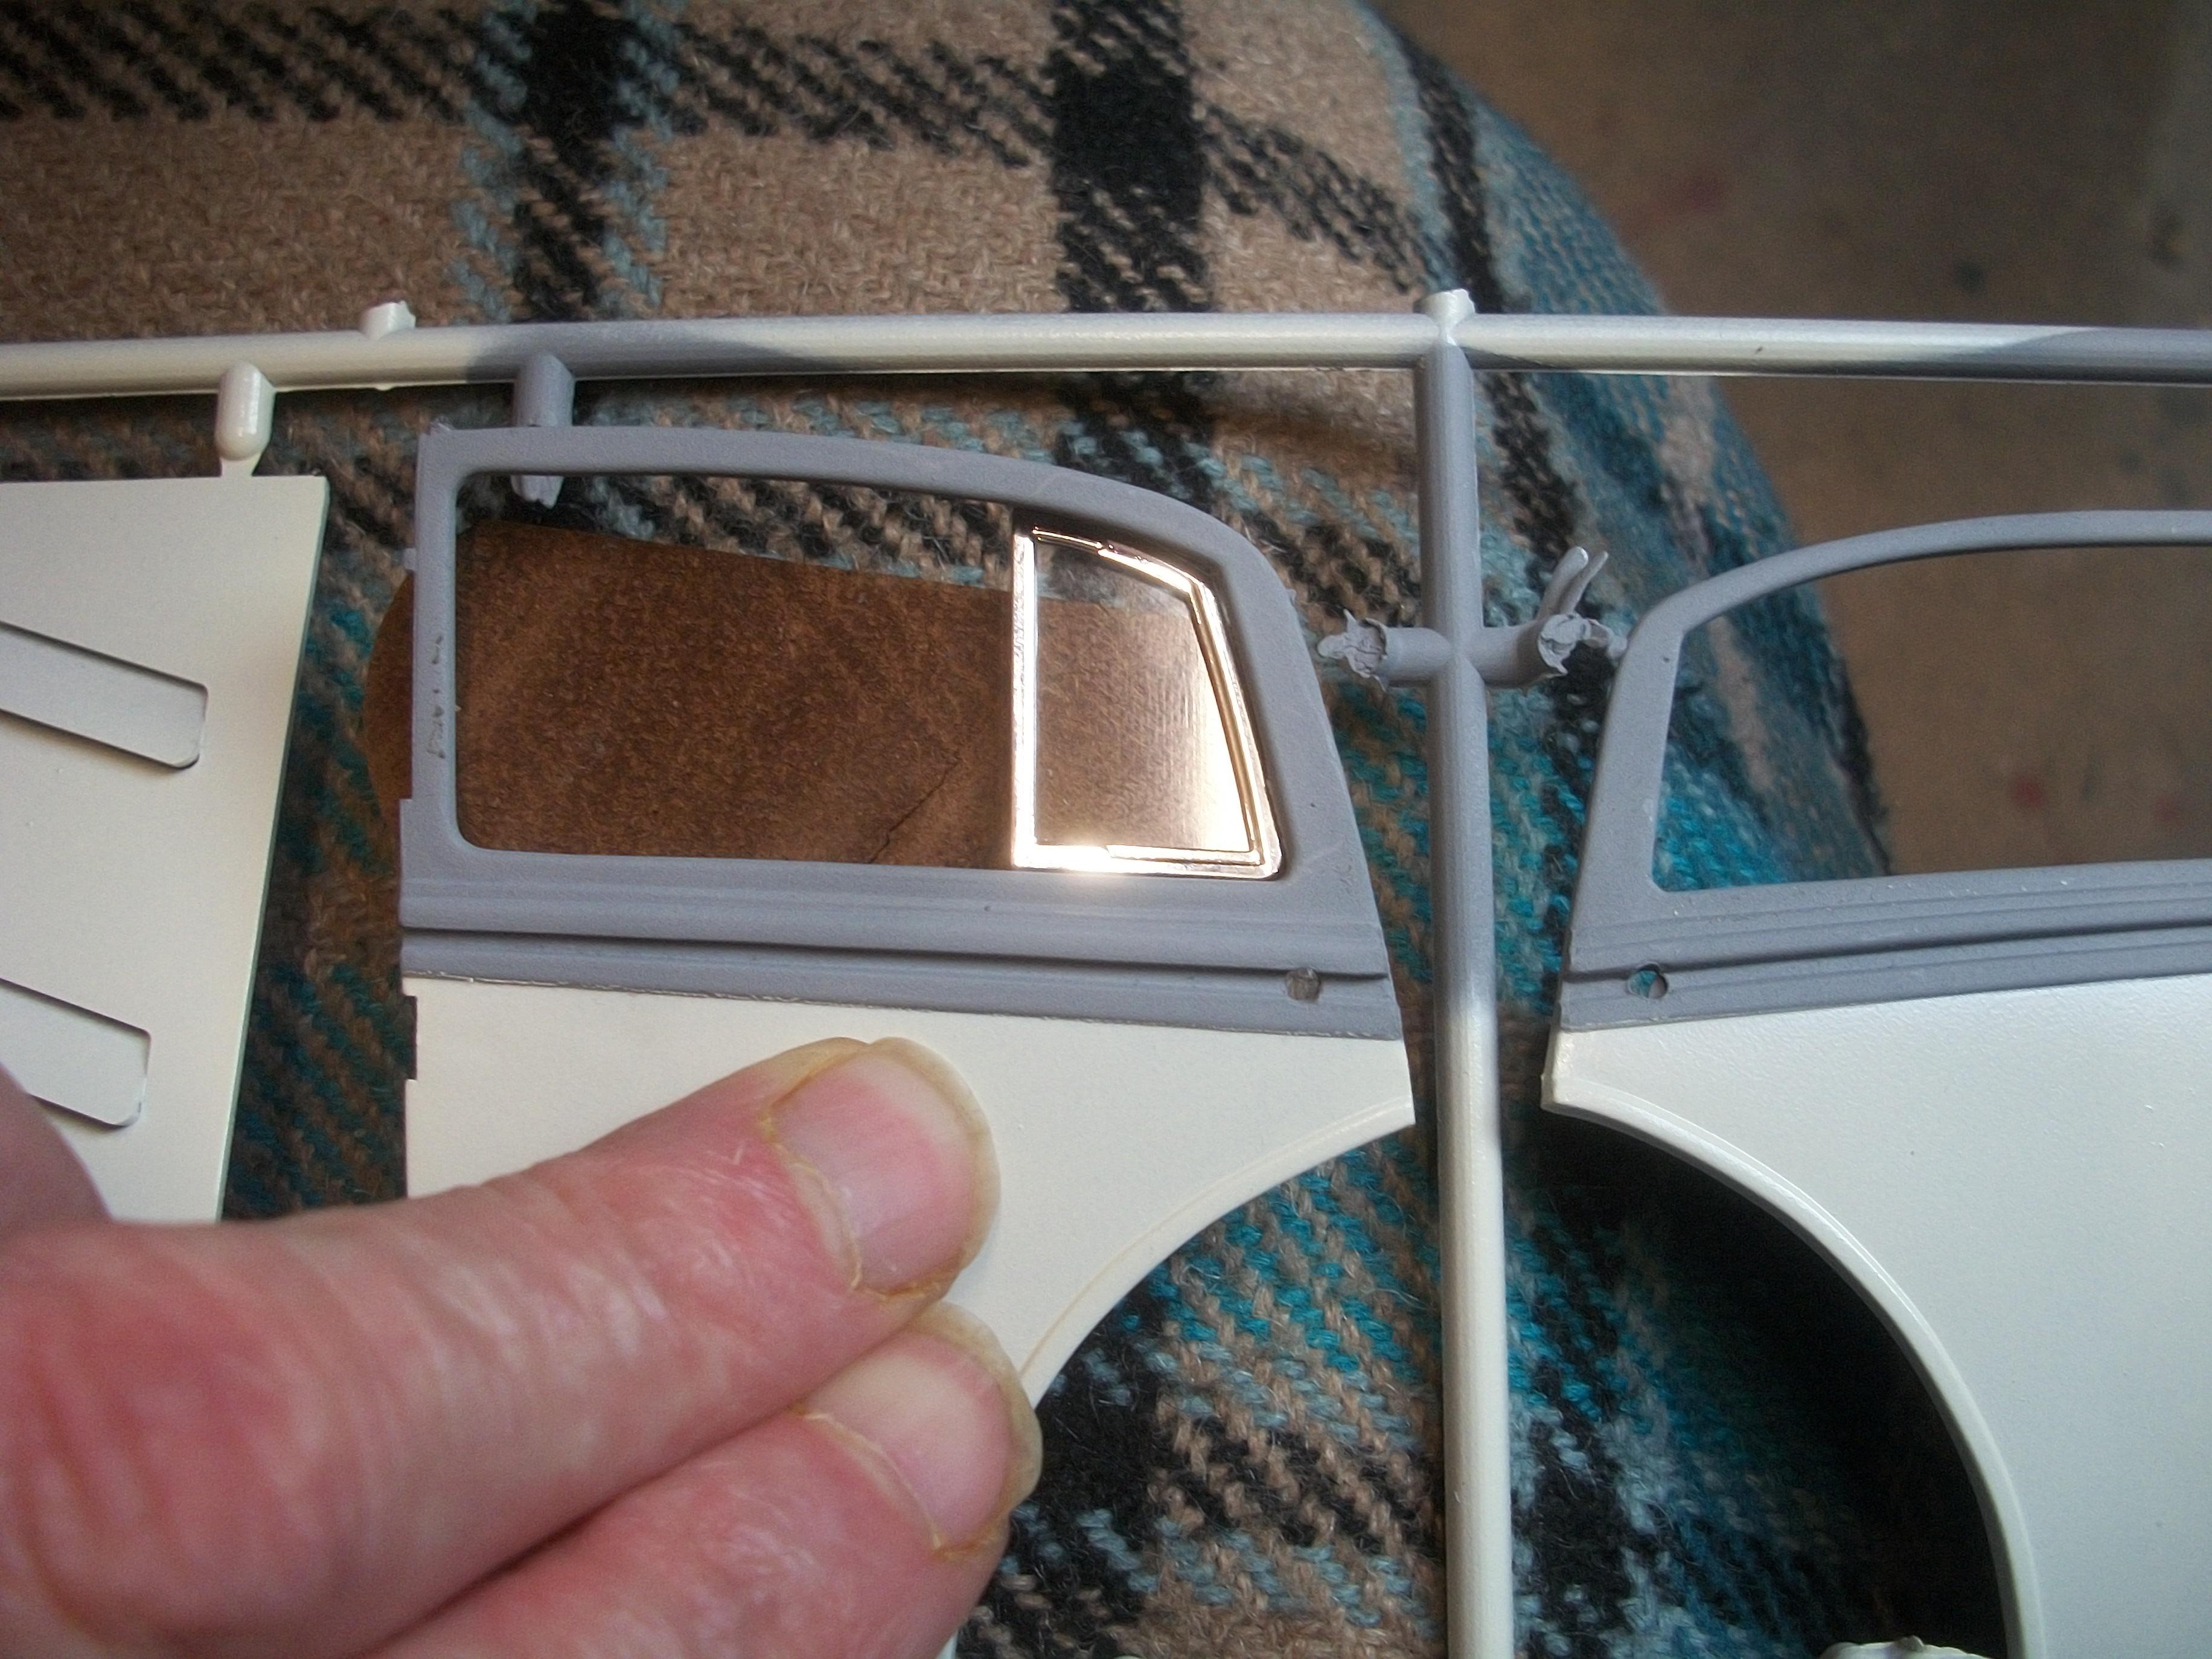
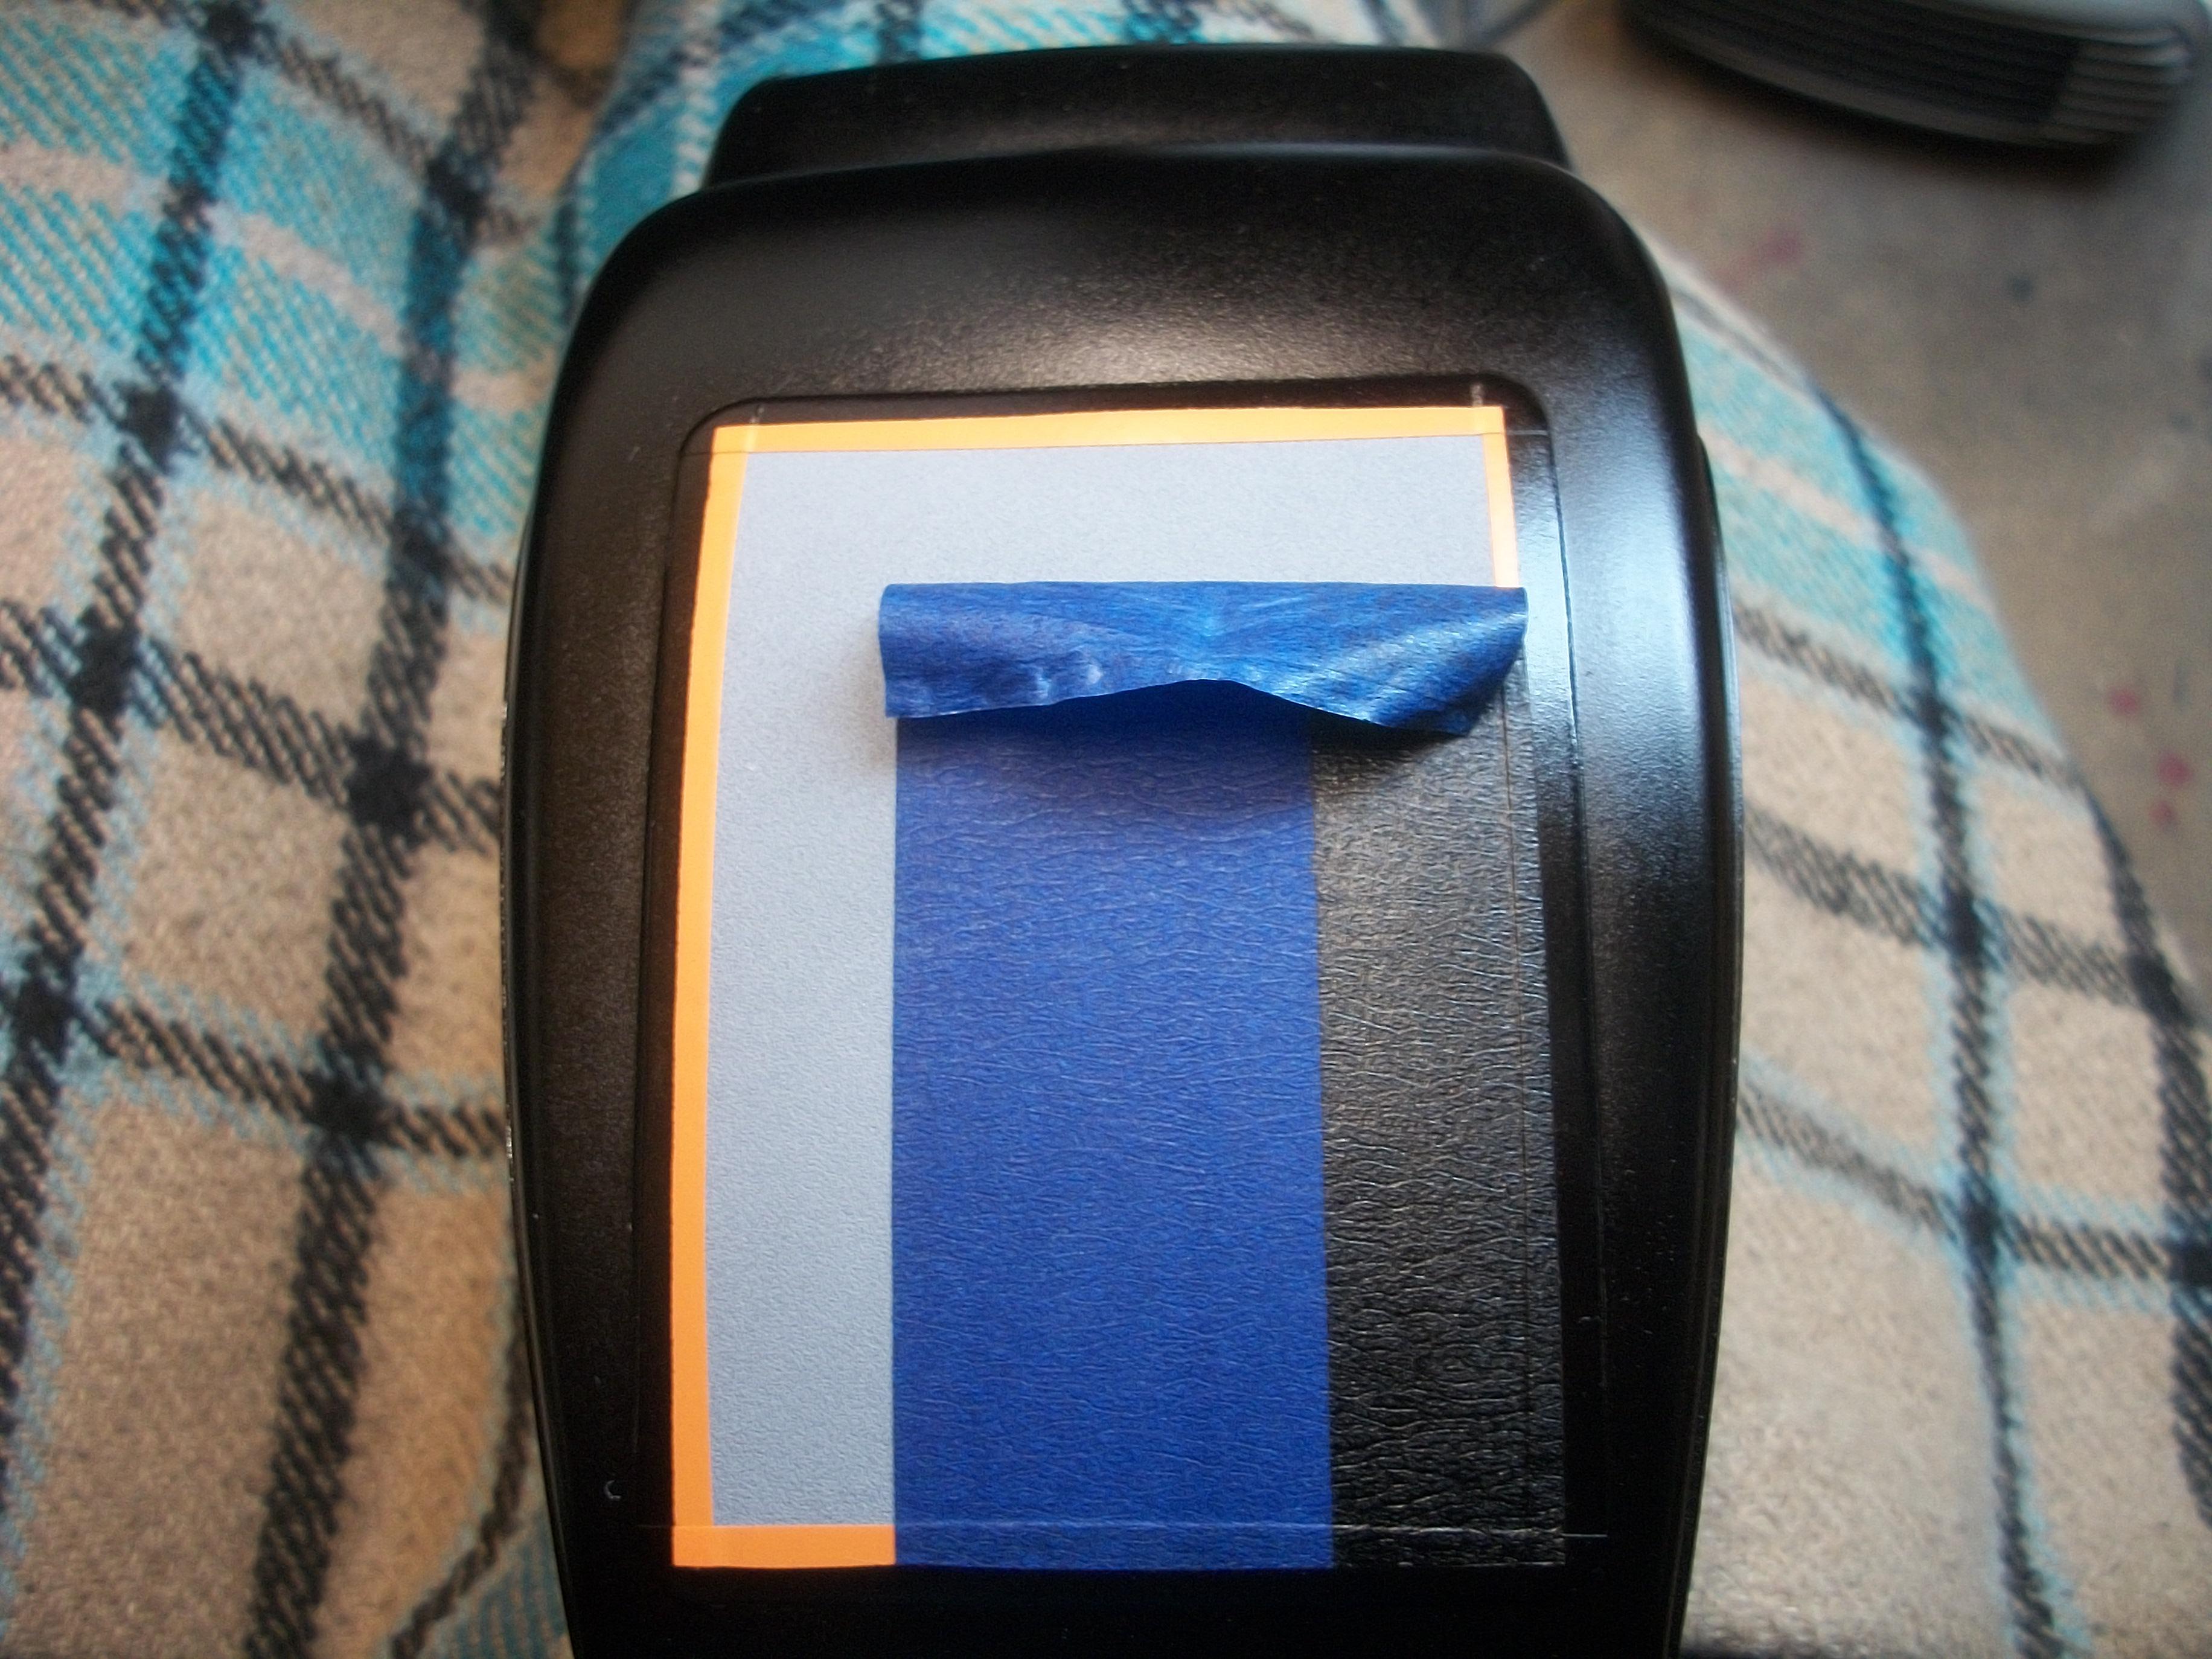
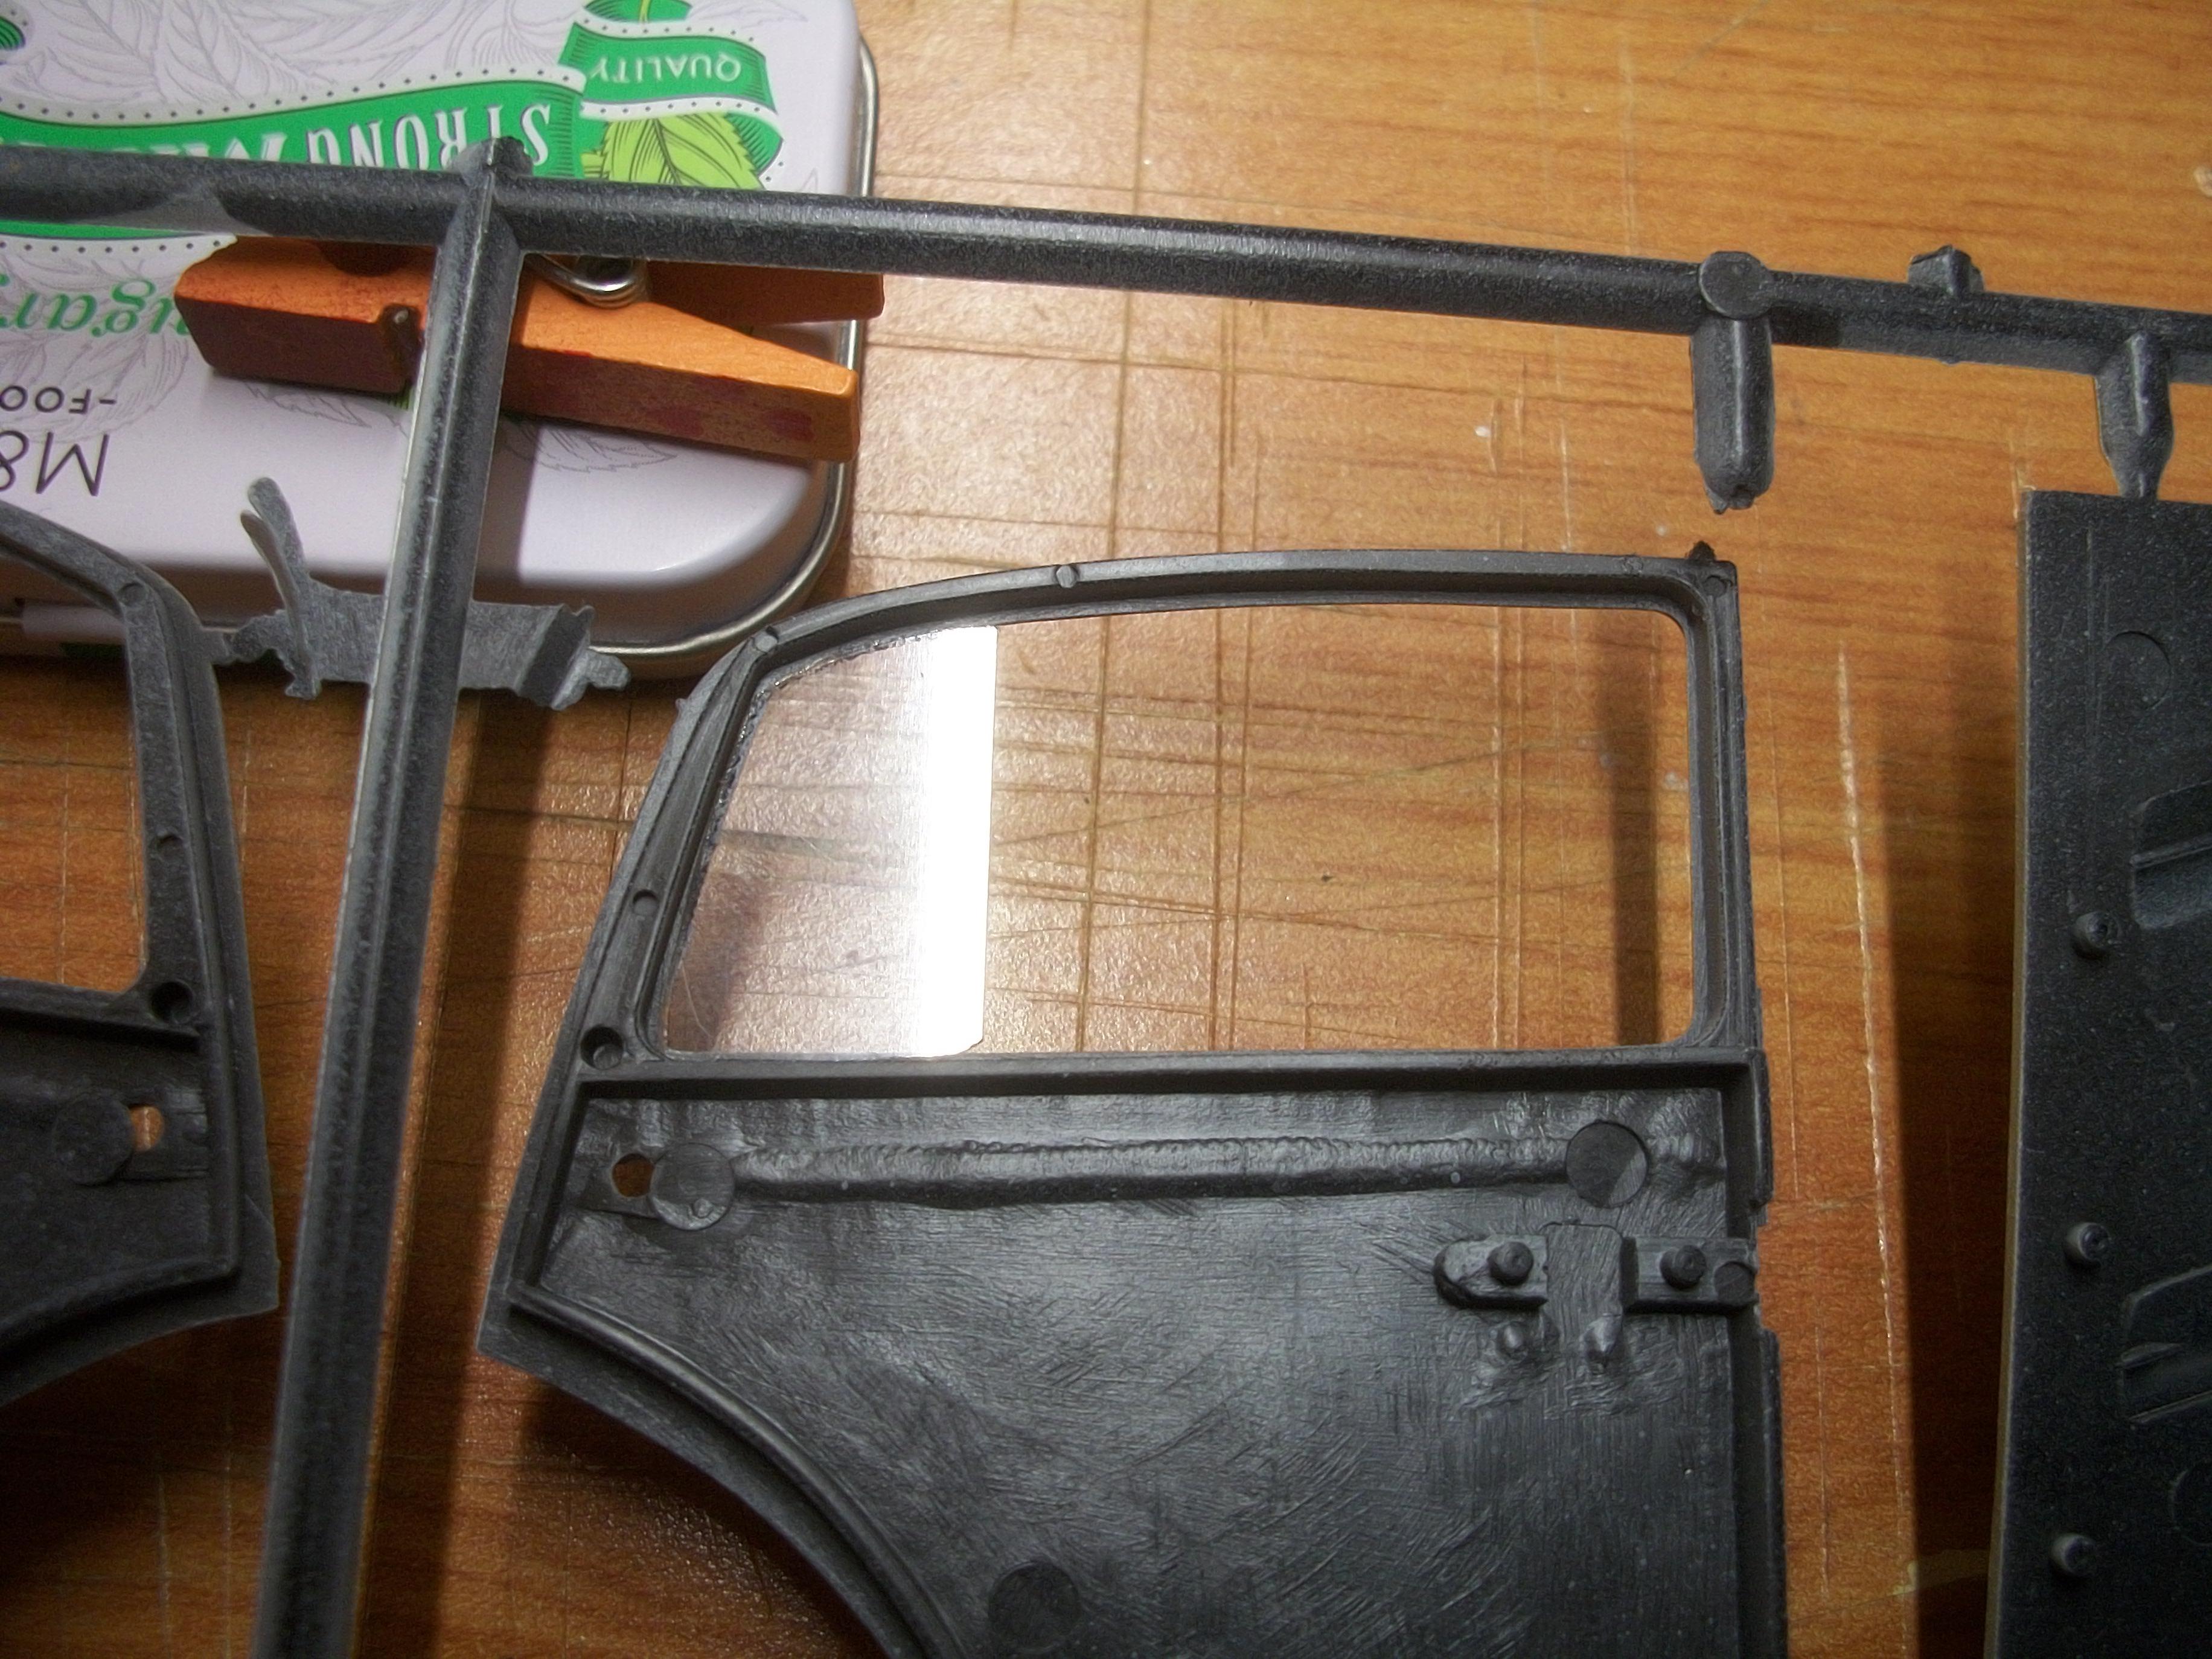
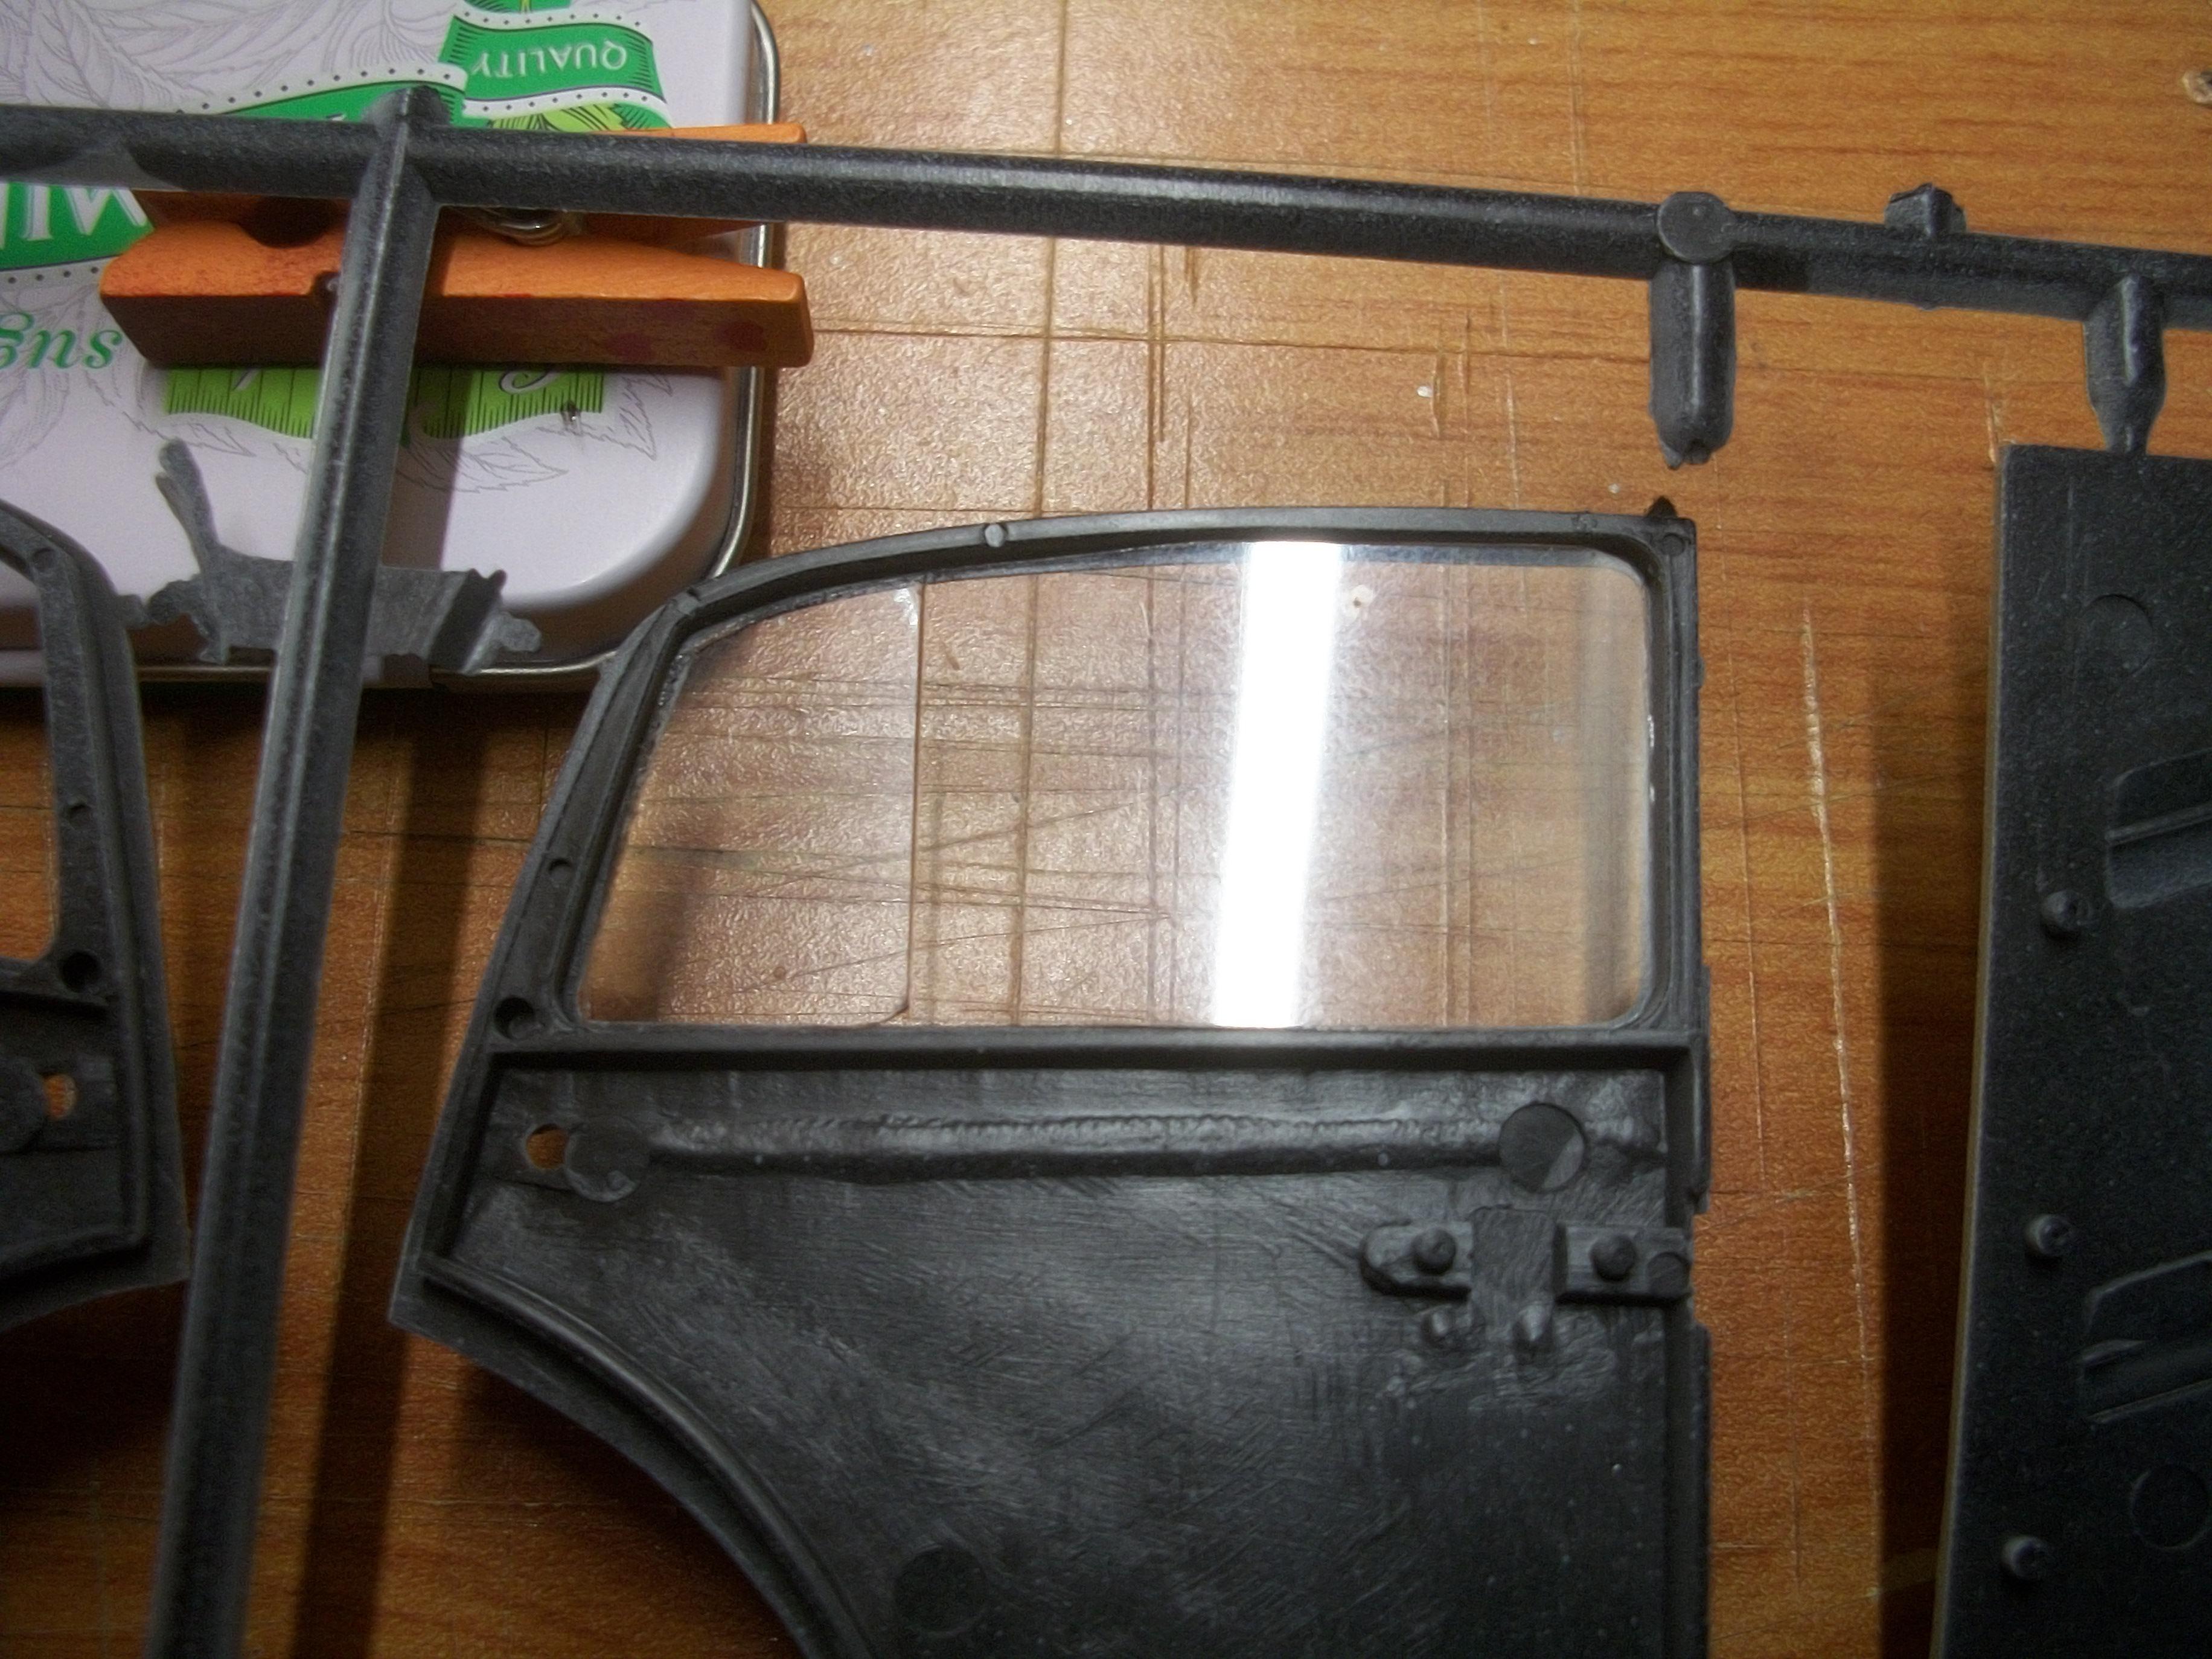
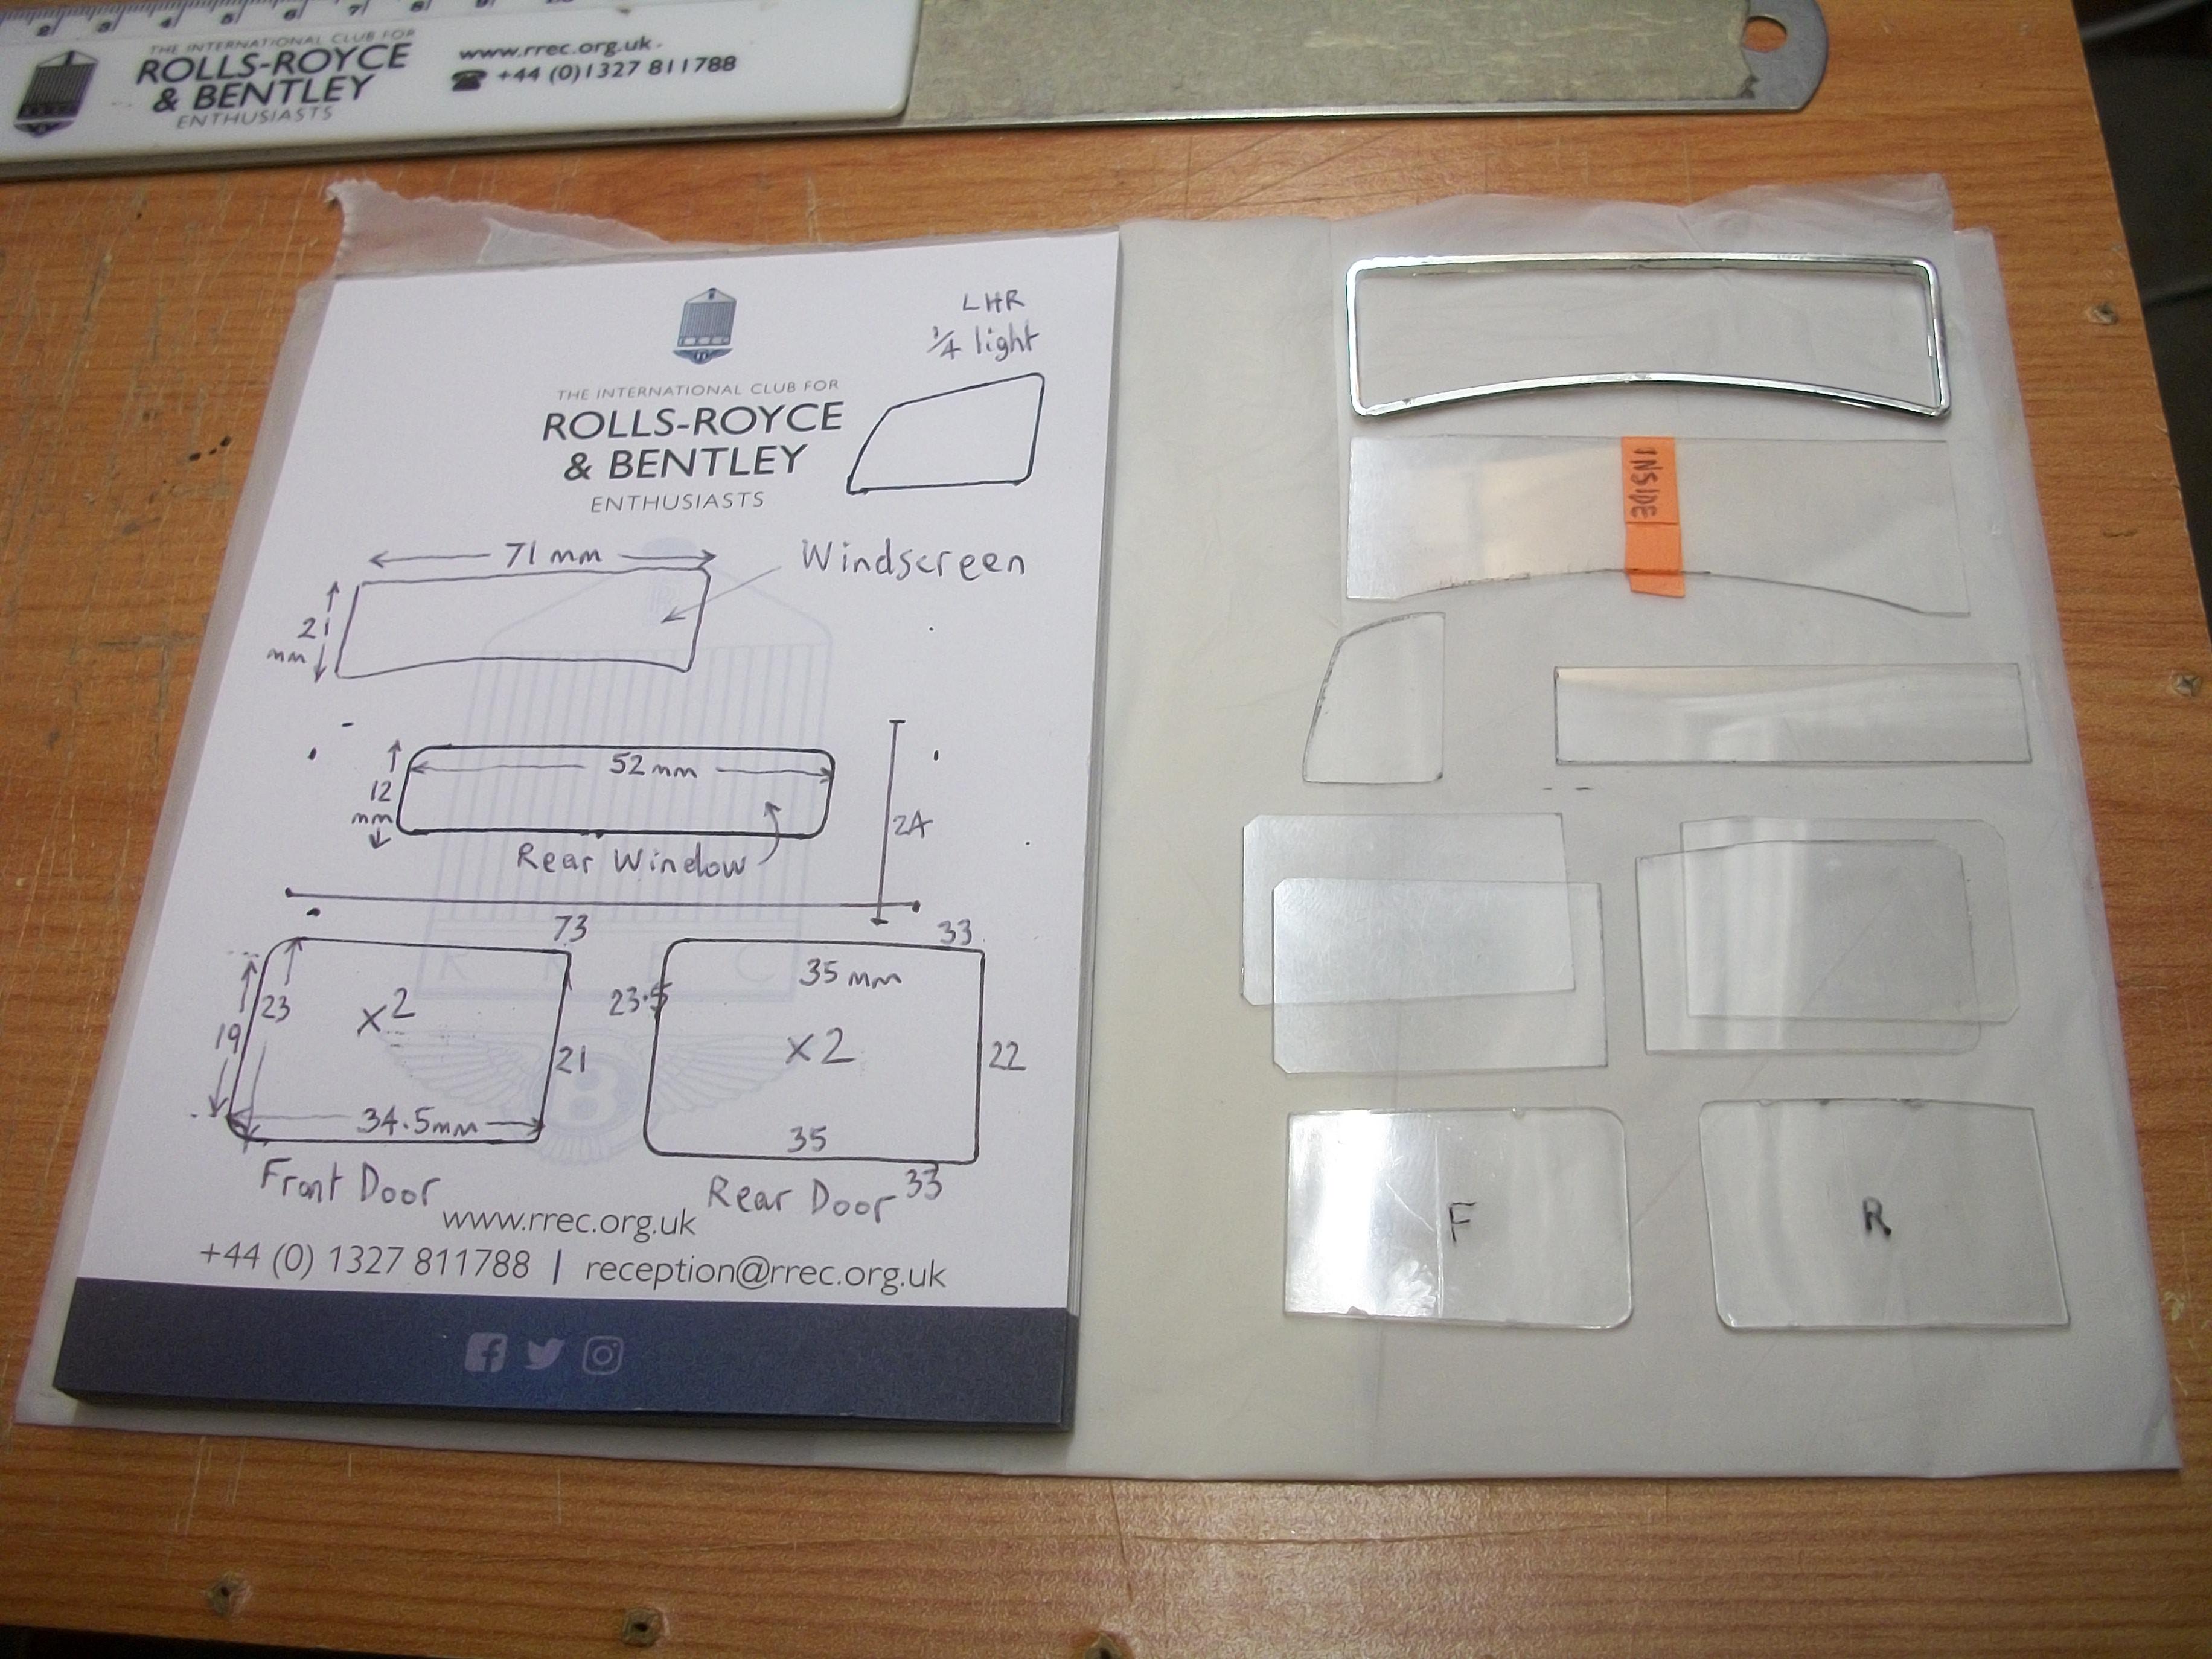
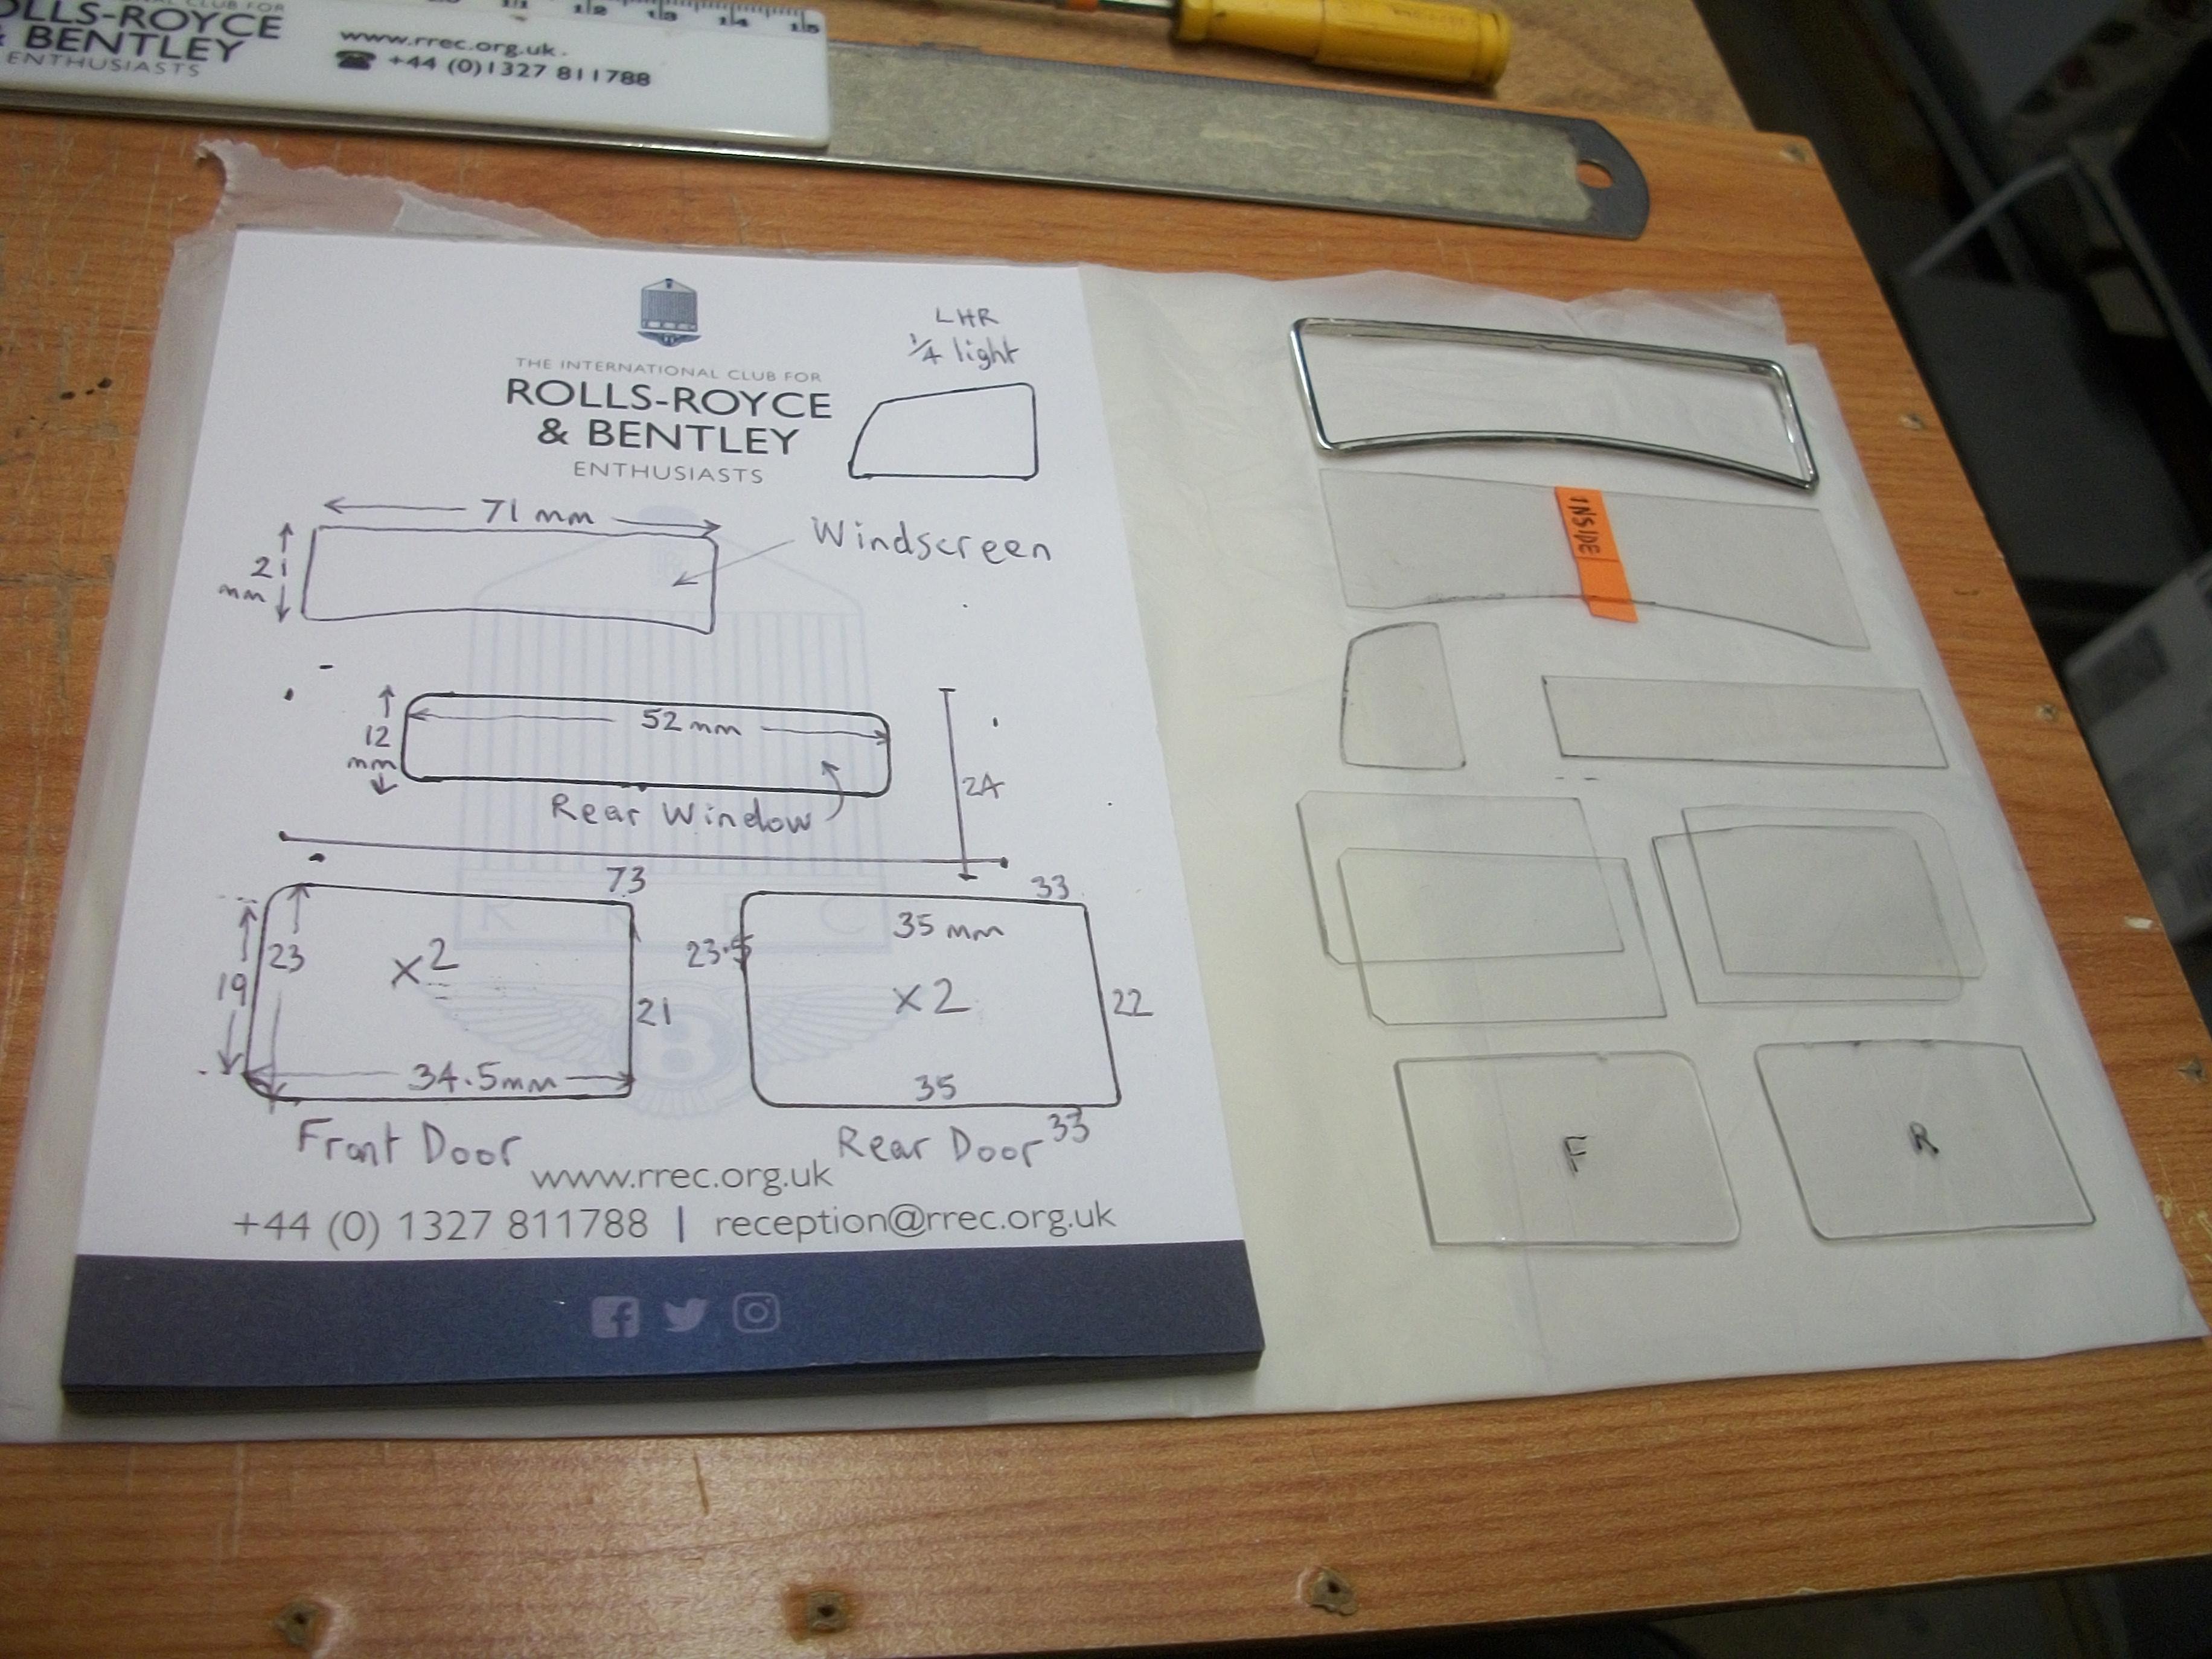
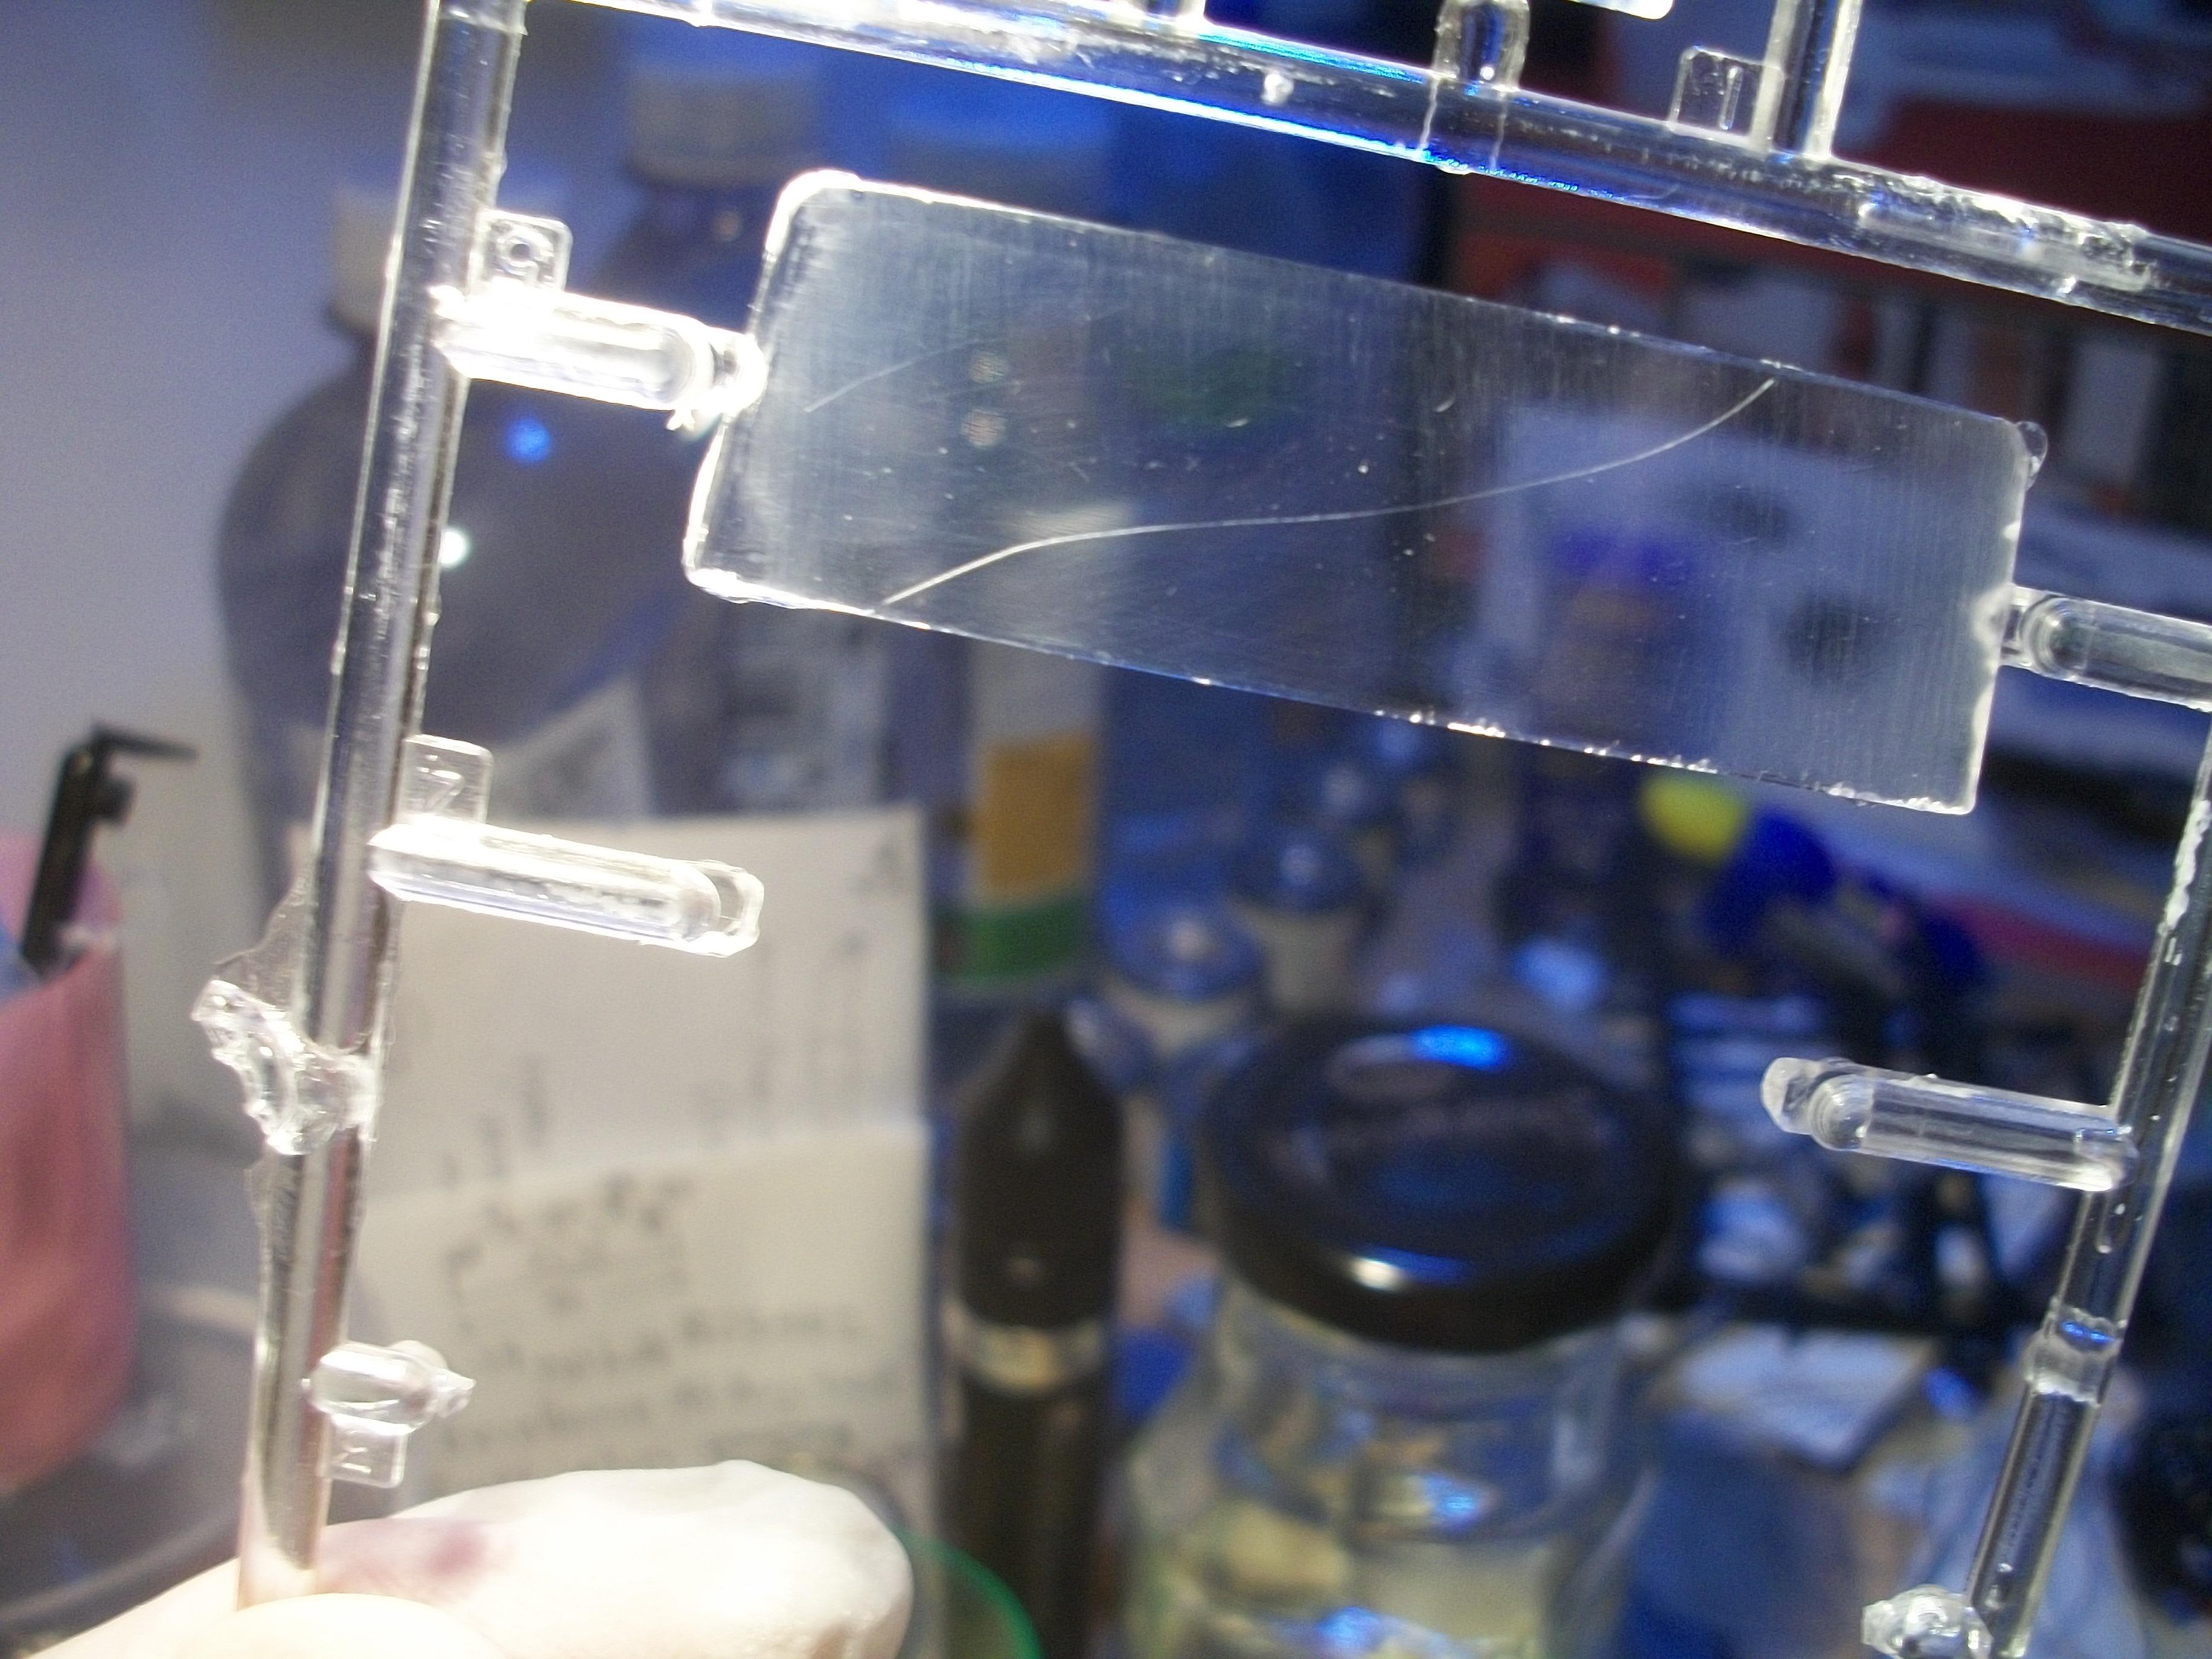
The underside of the lower body has been coated with Plastikote Black Primer, which is somewhere between matt black and satin black once it has dried. Turning my attention to the four quarter lights for the door windows, I have cut to size one quarter light glass, which is the only one that has cracks in it. From the first photo below you will see there is a chrome quarter light frame part, then to the left of it there is the kit part for the glass, and the next one to the left is my fabricated glass part . . . I decided to apply the Tamiya TS-14 Black paint during Saturday afternoon, rather than wait for the Sunday, because the outside temperature was 13°C for two hours on Saturday, but only 12°C for one hour on Sunday . . . All the masking was done by early afternoon, with the canvas roof panel area taking the most time. The dividing lines between the black and the cream are defined using some narrow orange tape, while the remaining areas to be masked off are covered with wide blue tape . . . A fan heater was run for 20 minutes just before the paint spraying, which brought the temperature in the loft up to 22°C. Once two coats of the gloss black had been applied, with five minutes between coats, the parts were placed under cover overnight . . . The following day, so 24 hours later, all the masking tape was carefully removed and the result is pretty good. The next stage of the painting process will be to mask off the area around the grey primer of the canvas roof panel, and then apply two coats of Tamiya TS-29 Semi Gloss Black after the five days curing period . . . There will be a further five days curing for the semi gloss black. David
-
Looks like you are making good use of your added acreage Paul . . . One part of our hobby is building the cars, one part is making the buildings and yet another part is fabricating the terrain. All three parts come together for a diorama, which is why I find the whole process so interesting and absorbing. David W.
-
1:16 Gunze Sangyo 1937 Rolls-Royce Phantom III Sports Saloon
Anglia105E replied to Anglia105E's topic in WIP: Model Cars
I would agree with you David, the new window glass does look quite good . . . The kit windows do have a thickness that is probably correct for 1:16 scale, so my windows might actually be too thin. The kit window thickness is around the same as you find in 1:24 kits, which is way too thick at that scale. Your expected high of 25°C is what we would expect during June here in England . . . I see your problem with the paint drying between the nozzle and the surface of the model car, which must make the painting process difficult at best ! Most of the painting for this Rolls-Royce is being done with Tamiya spray cans, and of course brush painted Humbrol enamels. I don't usually have much success with the Vallejo acrylics, apart from the figure painting, where these paints seem to be more suited . . . David -
1:16 Gunze Sangyo 1937 Rolls-Royce Phantom III Sports Saloon
Anglia105E replied to Anglia105E's topic in WIP: Model Cars
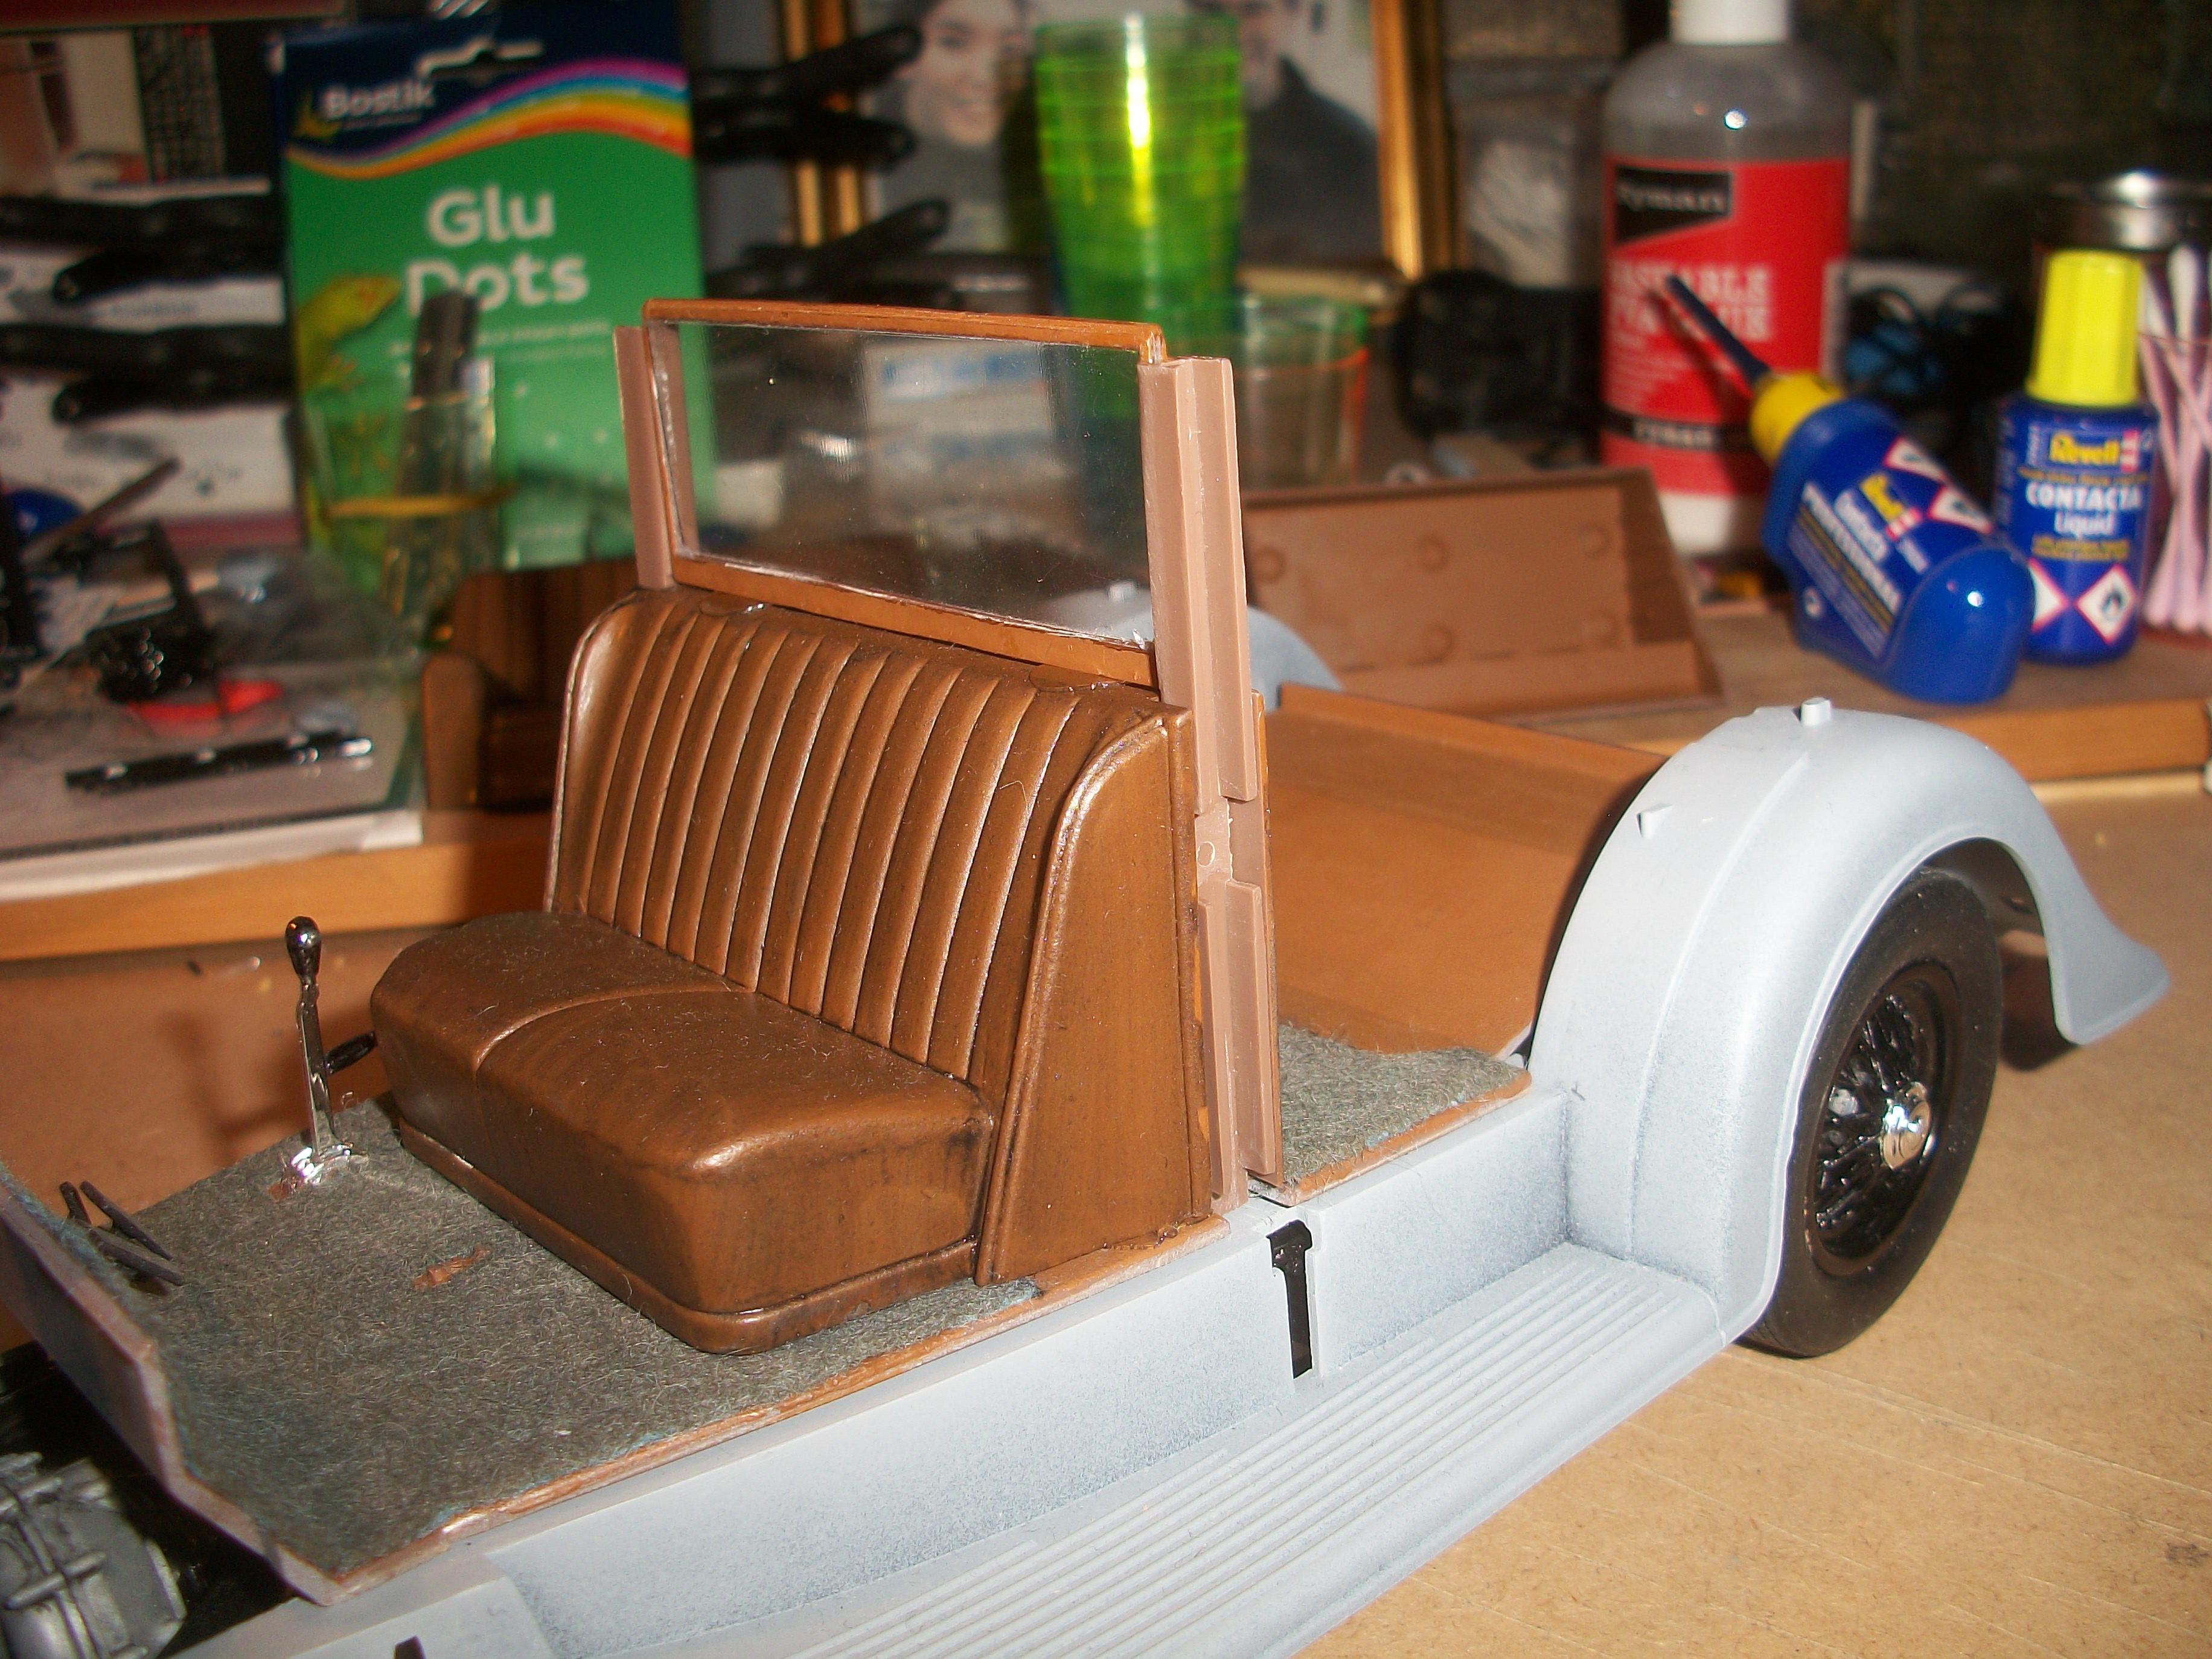
The lower body was separated from the rolling chassis today, and the floorboard with the division mock-up still in place was mounted onto the rolling chassis. All the parts that will require spray painting with Tamiya TS-14 Black have been taken up to the loft area, where they will be prepared for painting. There is a weather window on Sunday 31st March during the afternoon, when the outside temperature should reach 13°C . . . Hopefully, I should be able to apply two coats of the gloss black to the exterior body parts. Some interior heating can bring the inside temperature up to around 17°C just before I have to open the Velux window in the roof for ventilation. . . All of the 8 clear glass parts have been cut out and test fitted, including the rear window, the four door windows and the one quarter light. The remaining three quarter lights do not have any cracks in the glass . . . Alongside my notes and diagrams, these photos show the clear glass parts all ready for use, with the other two parts being the division glass and the windscreen . . . David
-
1:16 Gunze Sangyo 1937 Rolls-Royce Phantom III Sports Saloon
Anglia105E replied to Anglia105E's topic in WIP: Model Cars
Thanks David . . . The glass fabrication did go well, I am pleased to say, and here are the resulting parts . . . David
-
1:16 Gunze Sangyo 1937 Rolls-Royce Phantom III Sports Saloon
Anglia105E replied to Anglia105E's topic in WIP: Model Cars
Thank you Ulf . . . Here is a photo of the notes, now that all of the 8 clear glass parts have been cut out . . . David
-
1:16 Gunze Sangyo 1937 Rolls-Royce Phantom III Sports Saloon
Anglia105E replied to Anglia105E's topic in WIP: Model Cars
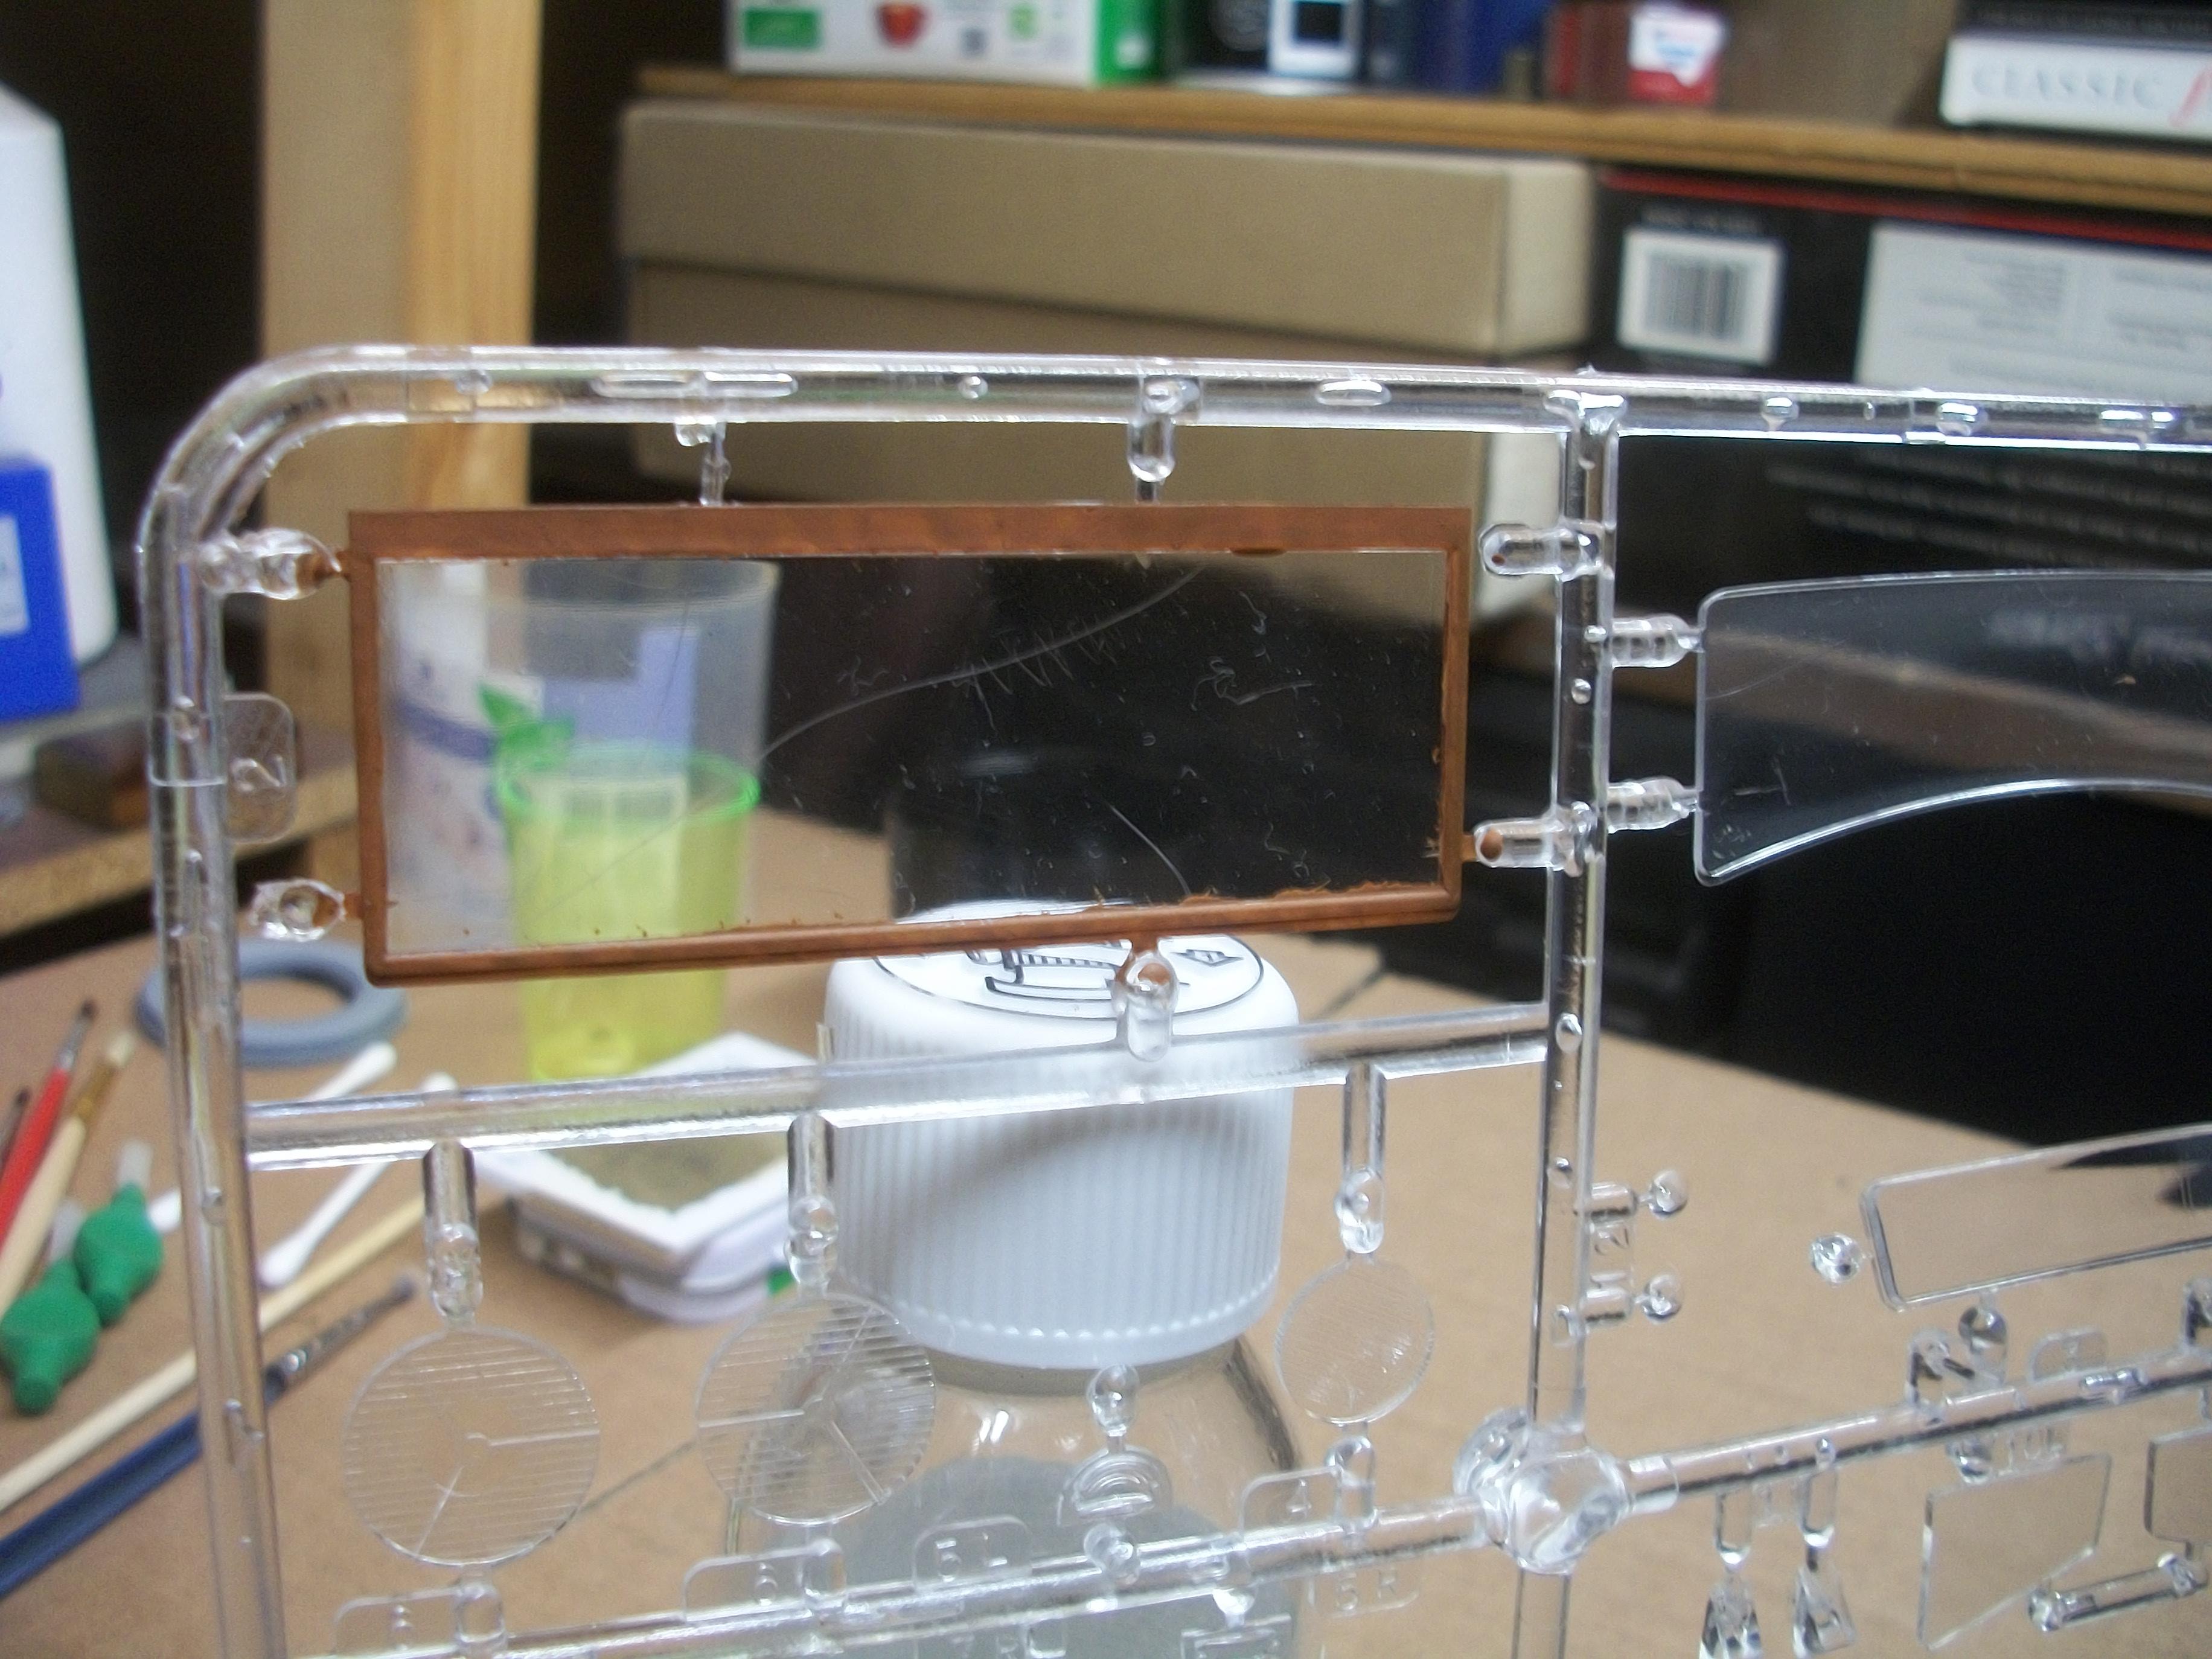
Okay, so following a busy few days, this is the result . . . Extracting the central portion of the division glass was difficult, mainly because the kit plastic is very strong. Eventually the damaged (cracked) window pane came out, leaving the matt brown painted division glass frame intact and undamaged . . . Inserting the new window pane that I had cut from thin clear plastic was also problematic, as the glass needed to be precisely the exact size . . . After many hours struggling, the new division glass was done. Crystal Clear glue was used to hold just the four corners inside the frame. Patience and persistence won in the end . . . I have test fitted the new glass part into the mock up within the car itself, and I can say that I am pleased with the end result. From the following photos you can see how the glass would wind down into the gap between the driver's seat and the division casing in the rear compartment. I managed to get a new windscreen part made today, so only six more of the eight clear glass parts to fabricate . . . David
-
1:16 Gunze Sangyo 1937 Rolls-Royce Phantom III Sports Saloon
Anglia105E replied to Anglia105E's topic in WIP: Model Cars
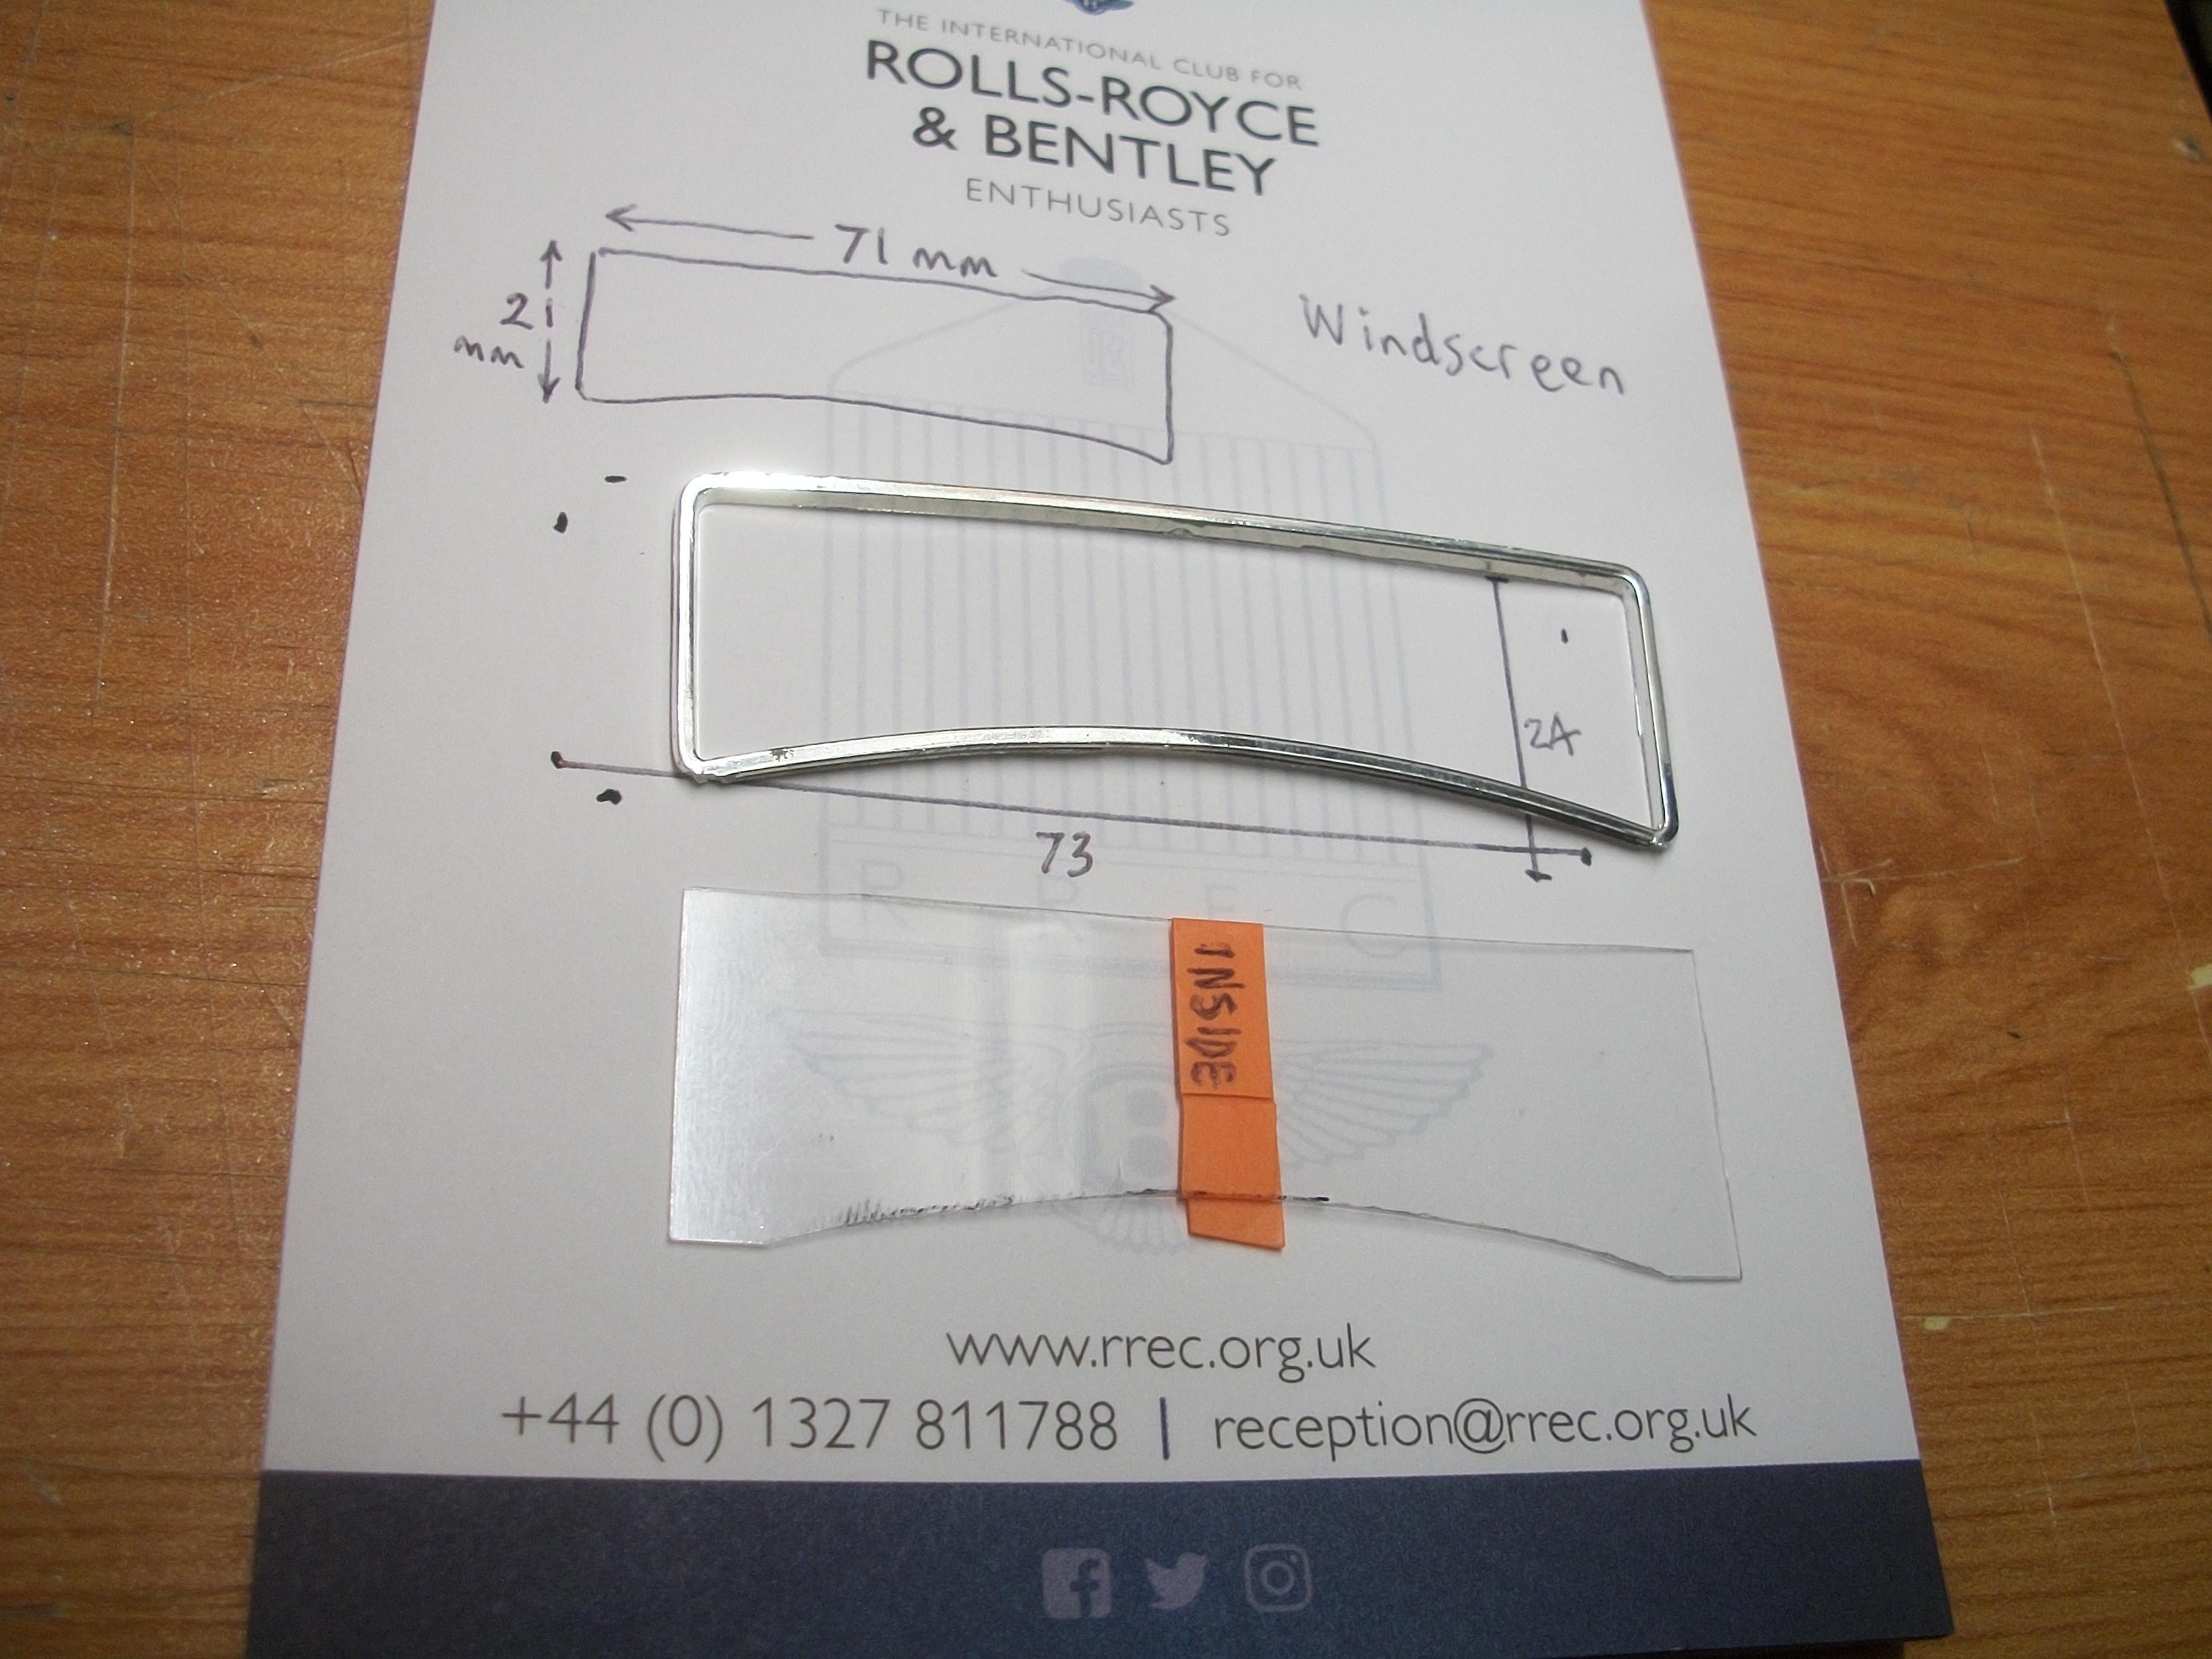
I found a 1:24 scale Rolls-Royce Silver Cloud windscreen from a Minicraft or a Revell kit that had no damage on it. Using an Excel knife and a Swann Morton scalpel knife, I scored two scratches in the surface of the screen . . . Following a well documented process, I cleaned the part with Isopropyl Alcohol, then sanded the screen horizontally with 1200 grit wet & dry, applied wet . . . then after washing the part in clean water I sanded vertically, also with 1200 grit wet & dry, and washed again . . . This was followed by using Tamiya Polishing Compound in three stages, Coarse, Fine and Finish, applied in a circular motion . . . As you will see from the following photos, the scratches are still visible so the process has not worked. These ' scratches ' are actually ' cracks ' inside the glass, so polishing is not going to remove them. I have now painted the frame of the division glass part with Humbrol Matt Brown 186 enamel, and once this has been allowed to dry overnight I shall carefully cut out the central glass pane, while the part remains attached to the sprue . . . My plan is to precisely cut out a piece of thin clear plastic, then apply black Sharpie to the edges and carefully glue the new glass window into the painted frame. After removing the division glass part from the sprue this can be placed into the division itself. David
-
1:16 Gunze Sangyo 1937 Rolls-Royce Phantom III Sports Saloon
Anglia105E replied to Anglia105E's topic in WIP: Model Cars
My next post will explain why the sanding and polishing option has not worked, so as you say, the window glass parts are fairly flat and should be straightforward to replicate in thin clear plastic . . . David W. -
Nice shade of yellow Urs . . . What is it about this build that you are not happy with, may I ask ? Looks good to me . . . David