ShakyCraftsman
-
Posts
797 -
Joined
-
Last visited
Content Type
Profiles
Forums
Events
Gallery
Everything posted by ShakyCraftsman
-

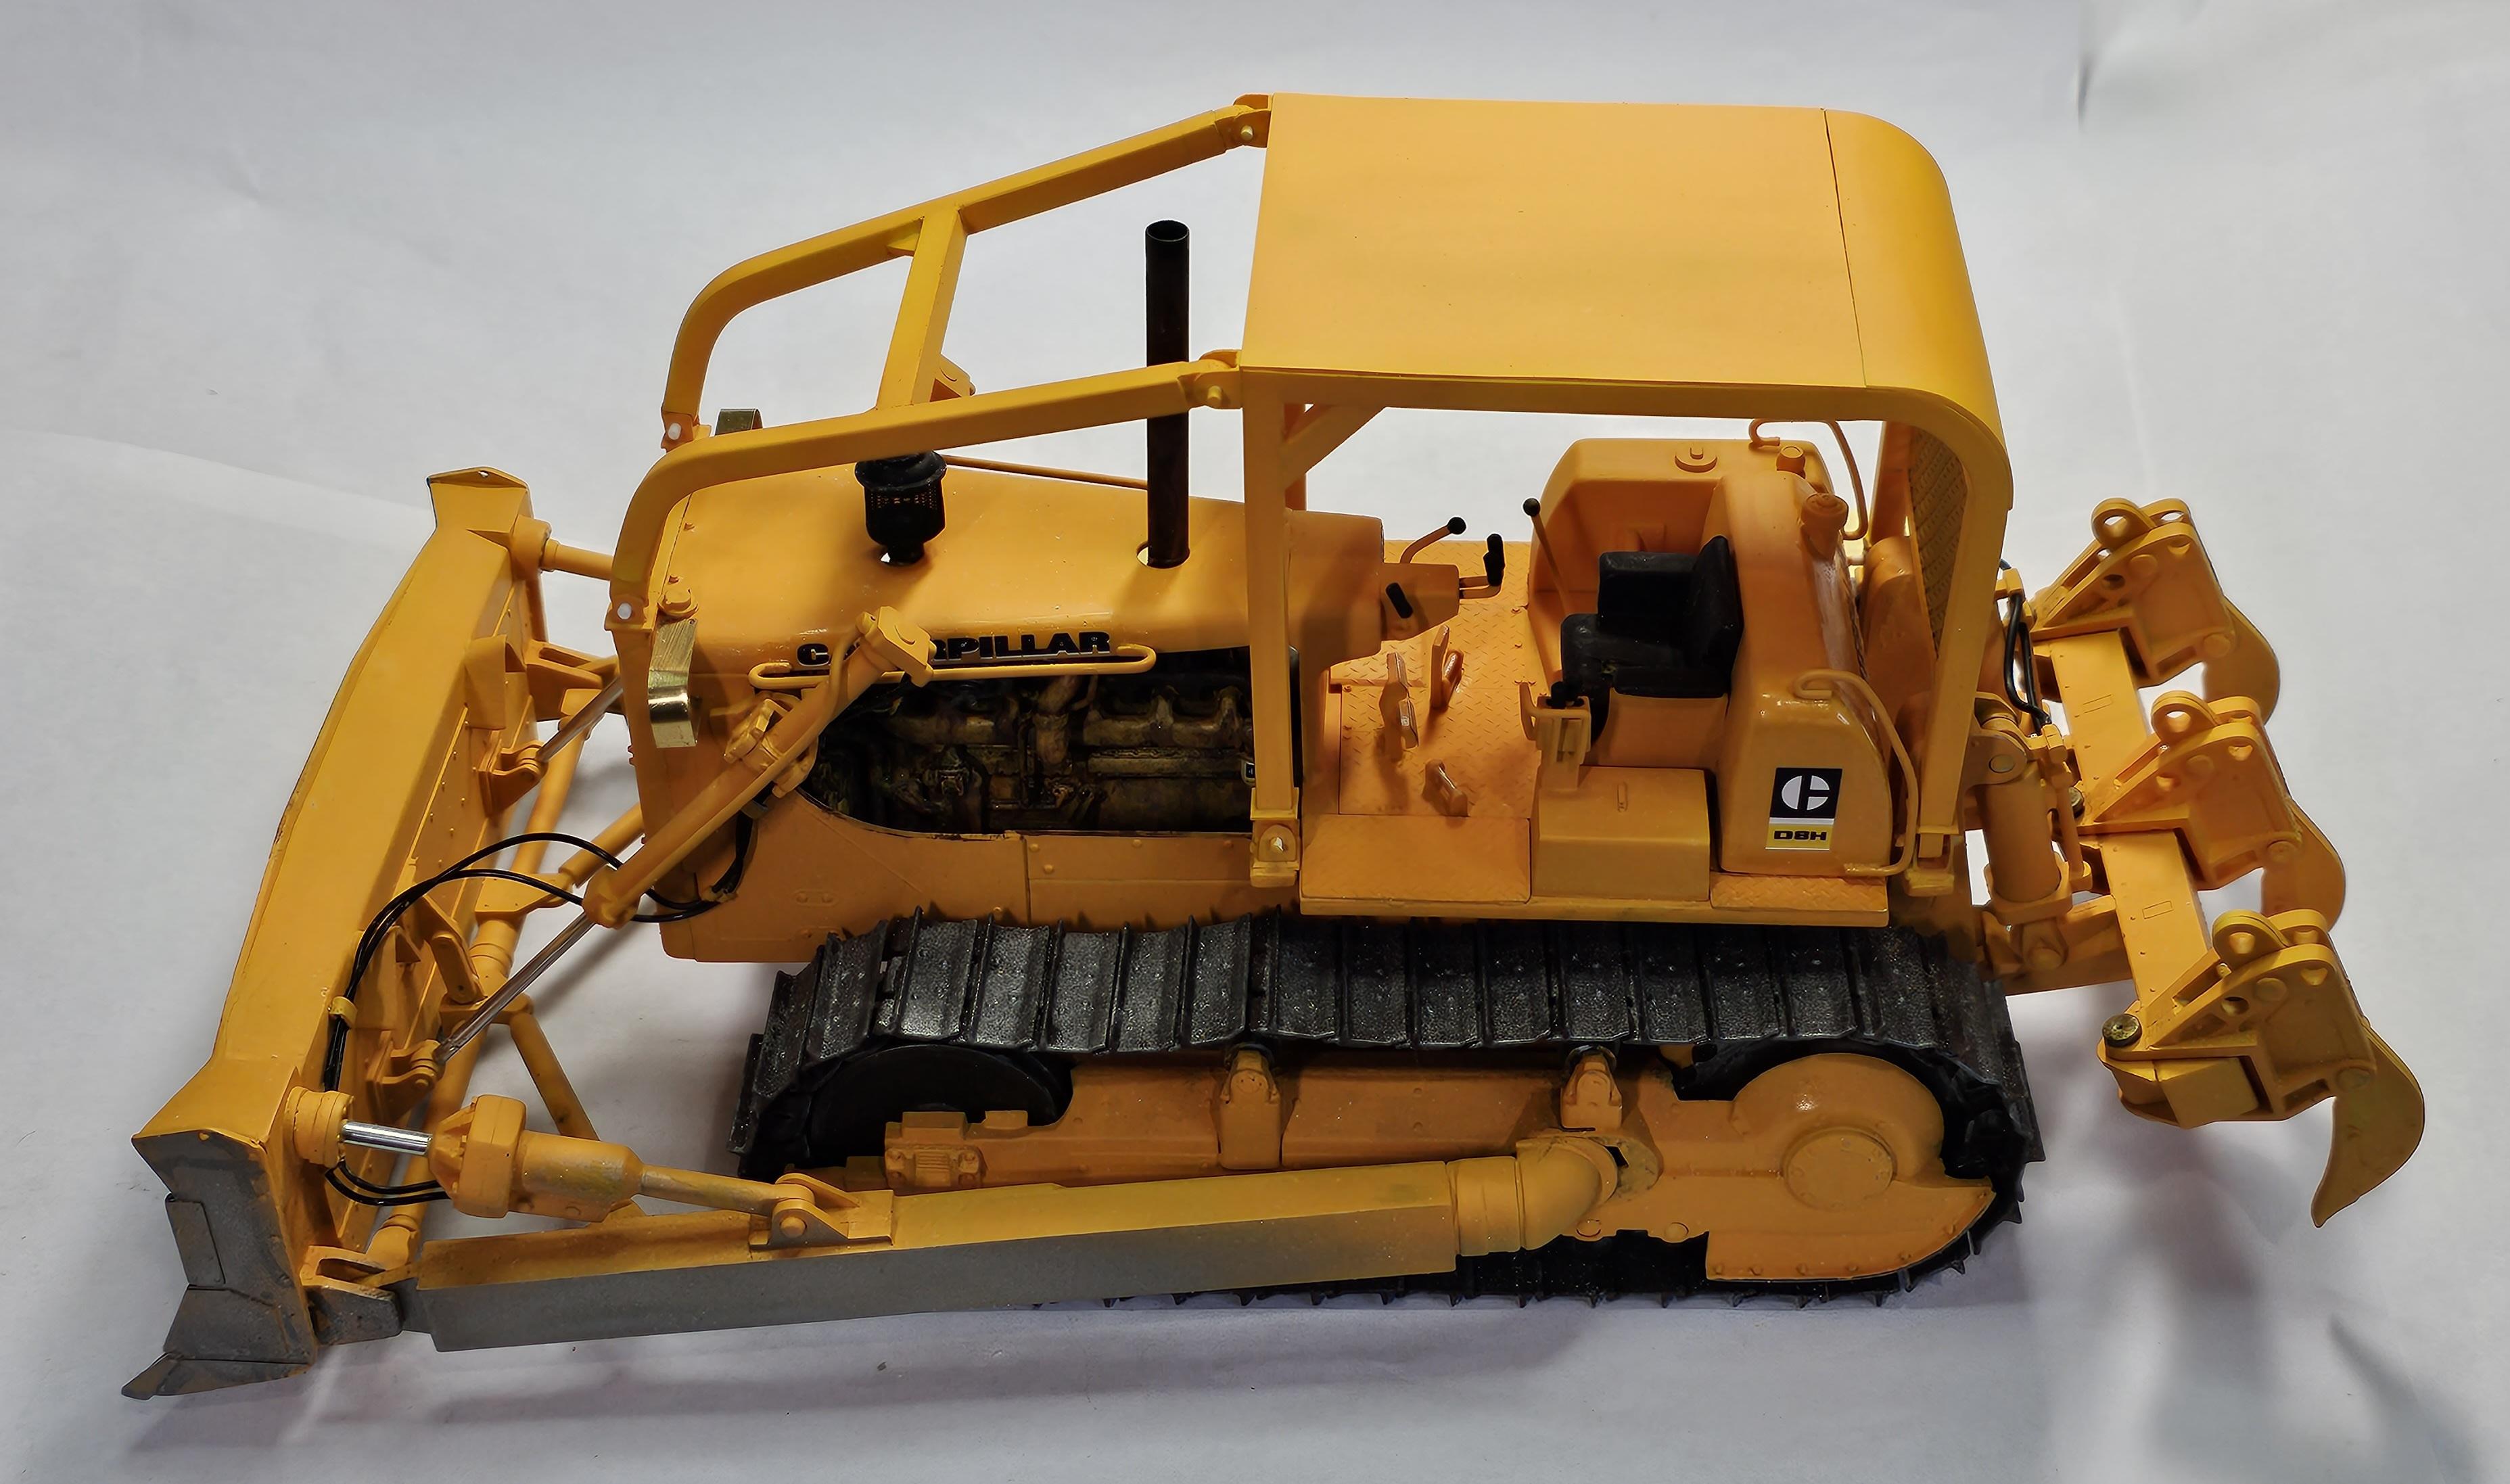
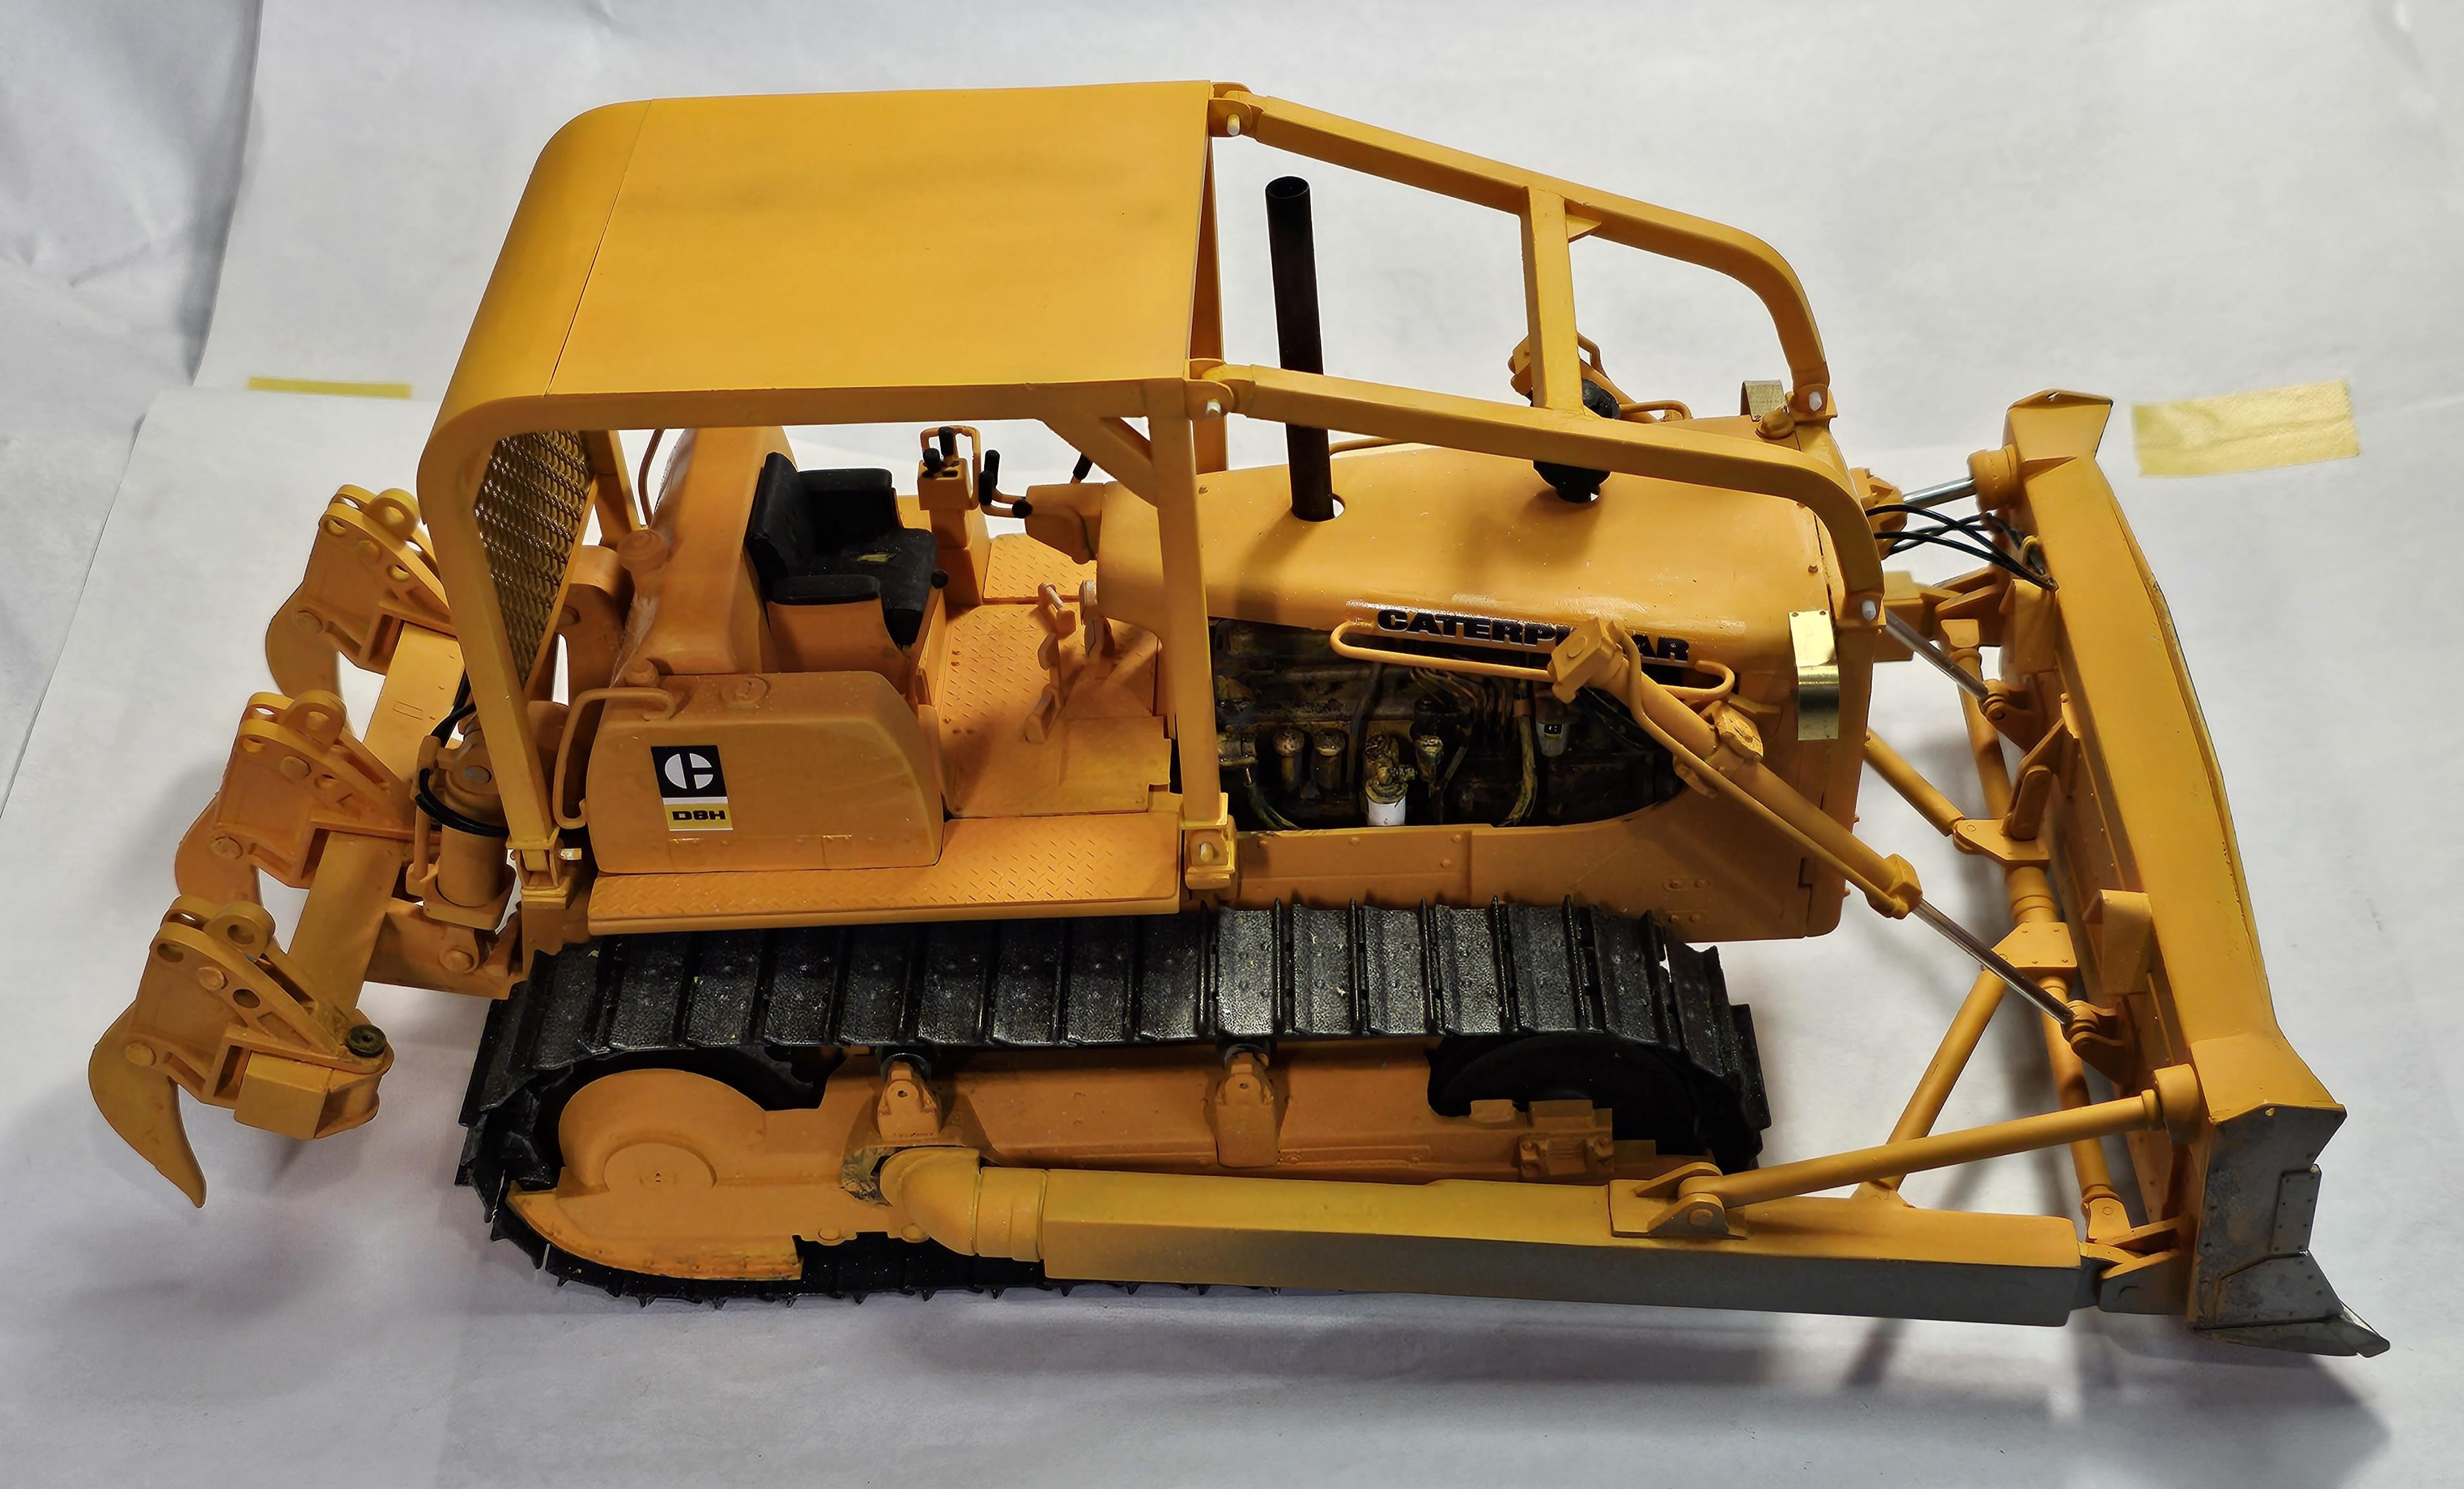
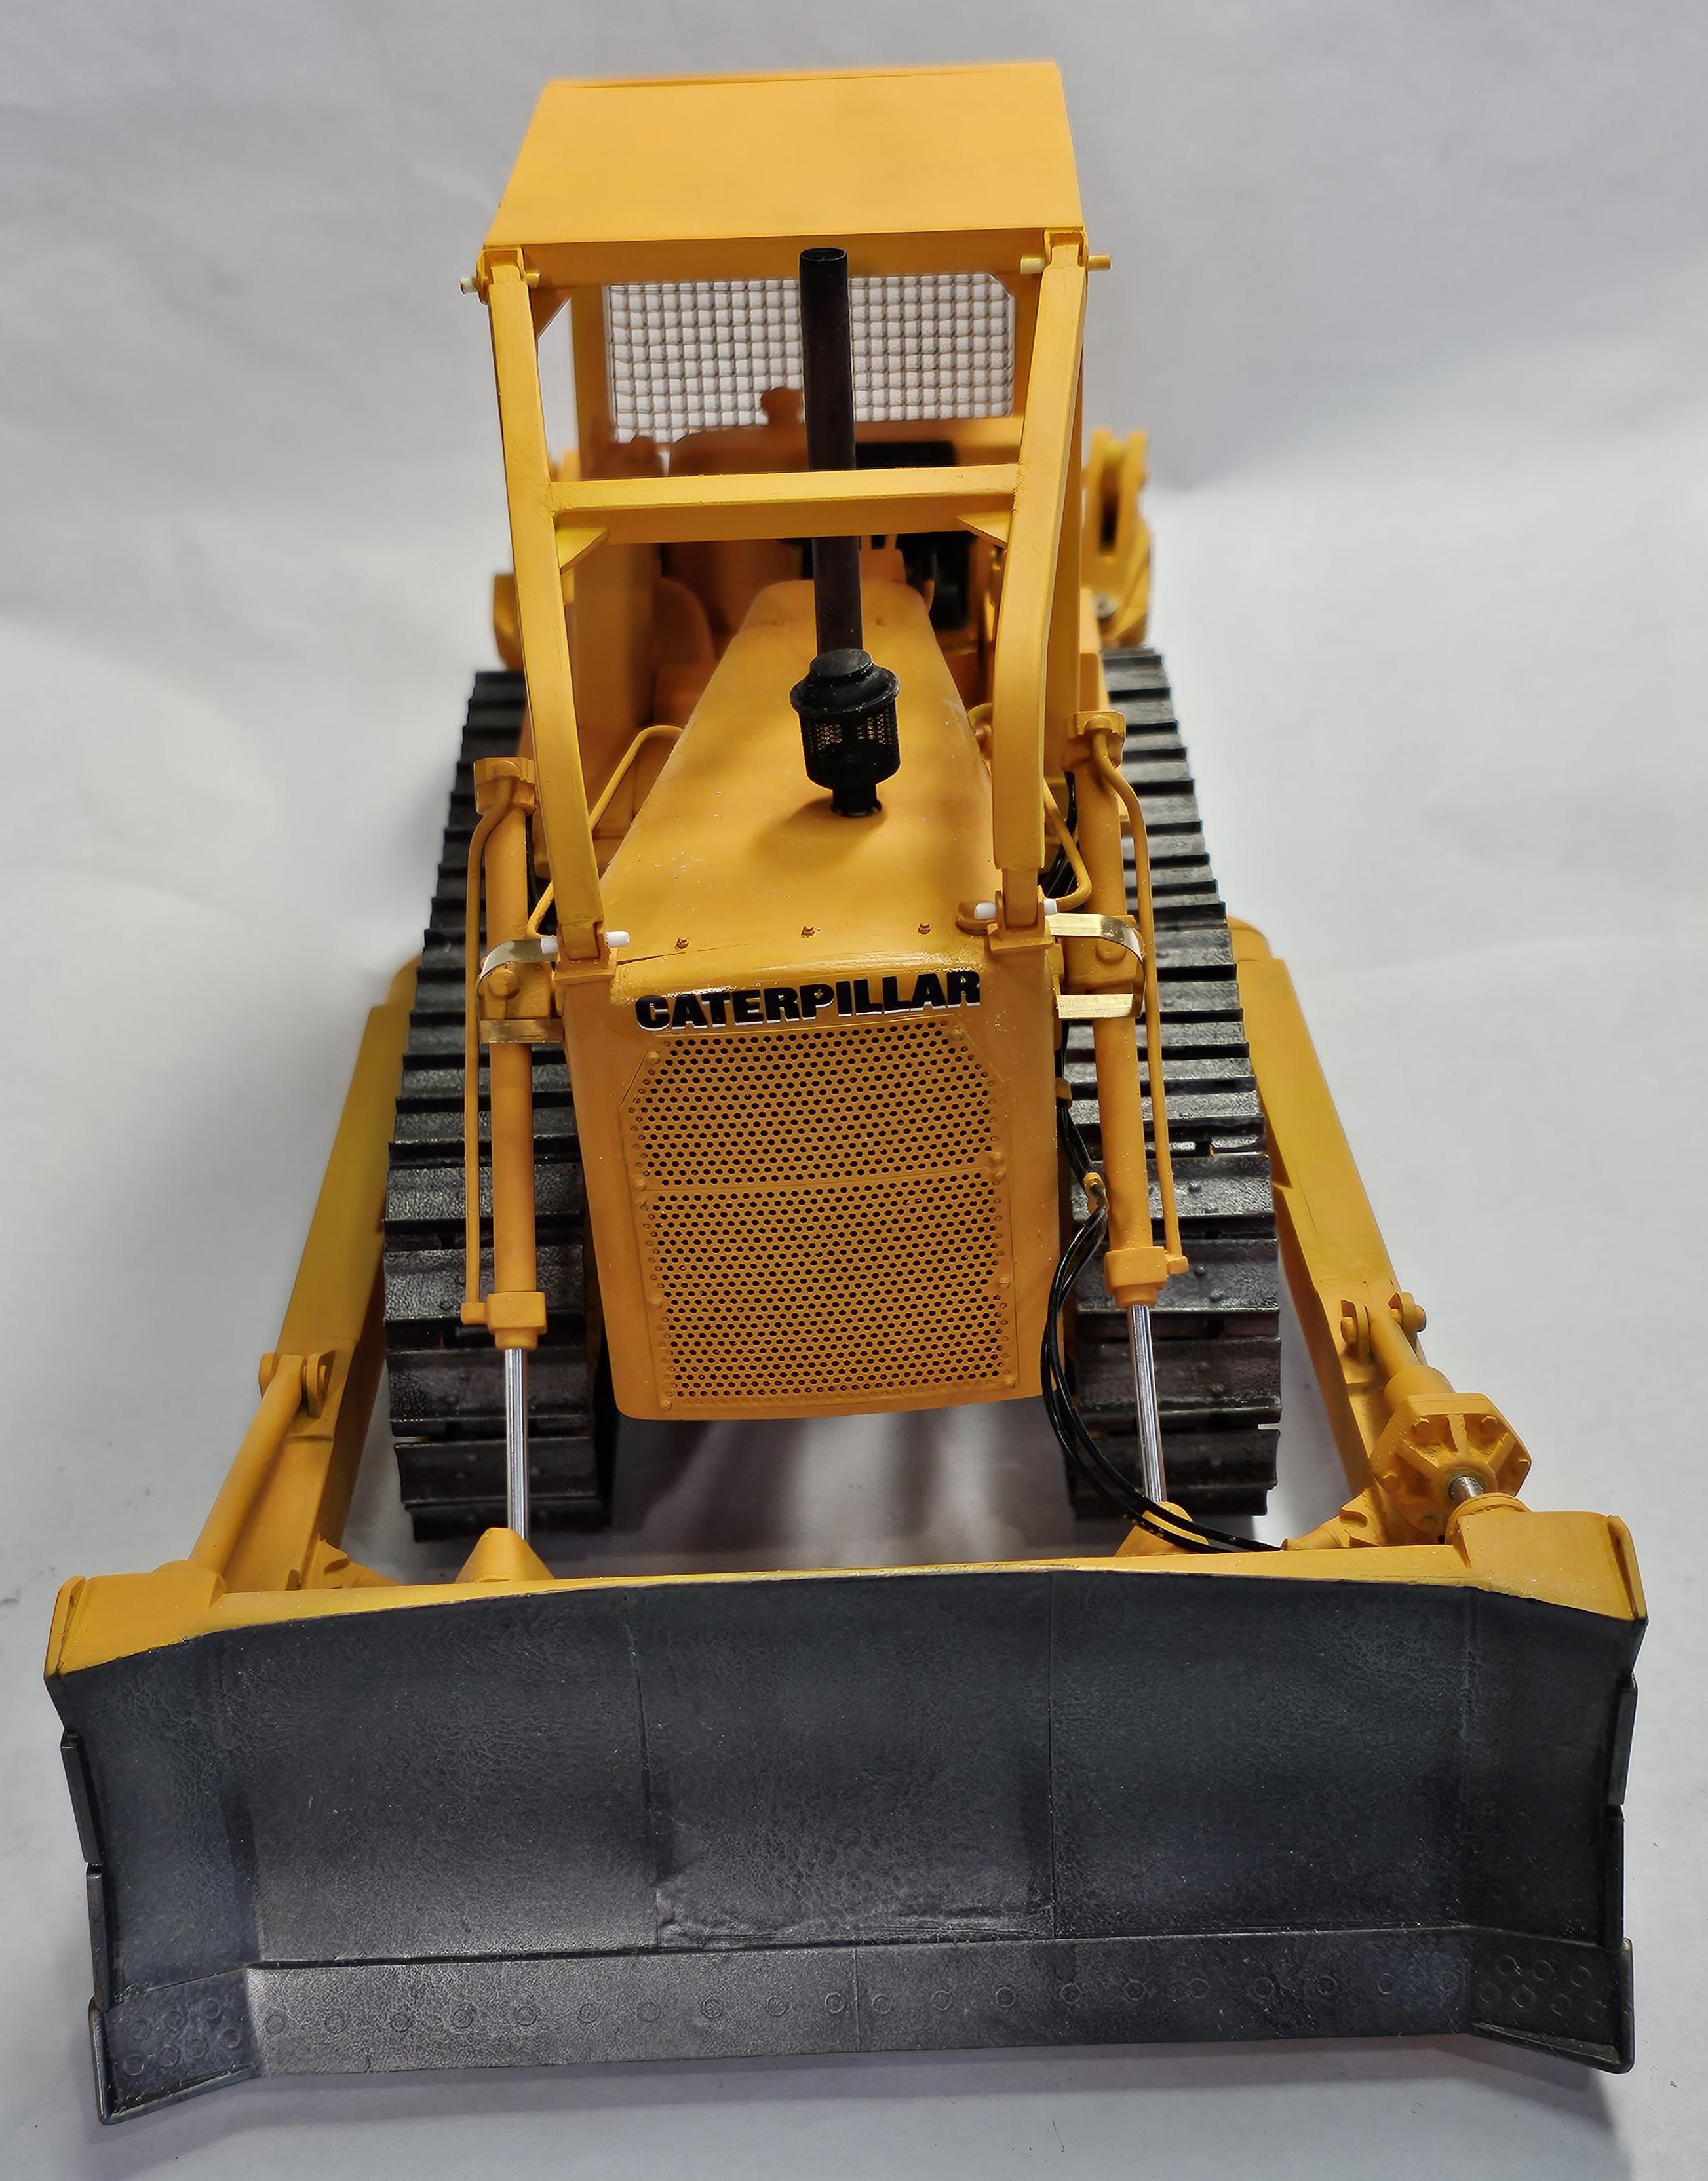
Cat D8H Dozer
ShakyCraftsman replied to Warren D's topic in WIP: Model Trucks: Big Rigs and Heavy Equipment
Here are a couple of pics of my Cat.
-
Big Rig Mock up’s
ShakyCraftsman replied to Pete68's topic in WIP: Model Trucks: Big Rigs and Heavy Equipment
Here's mine
-
Nice looking rig Gary.? Ron G
-
359 Pete
ShakyCraftsman replied to TopherMcGinnis's topic in WIP: Model Trucks: Big Rigs and Heavy Equipment
Hey Topher Nice build, are those rear tires from the kit, or aftermarket? Ron G -
Yeah I know, I started this build before I knew what those where, I've fixed them since. Ron G
-
Yeah, like I said I did this before I knew better, but thanks for the tip. Ron G
-
Scratch end dump in progress
ShakyCraftsman replied to cdntrucking's topic in WIP: Model Trucks: Big Rigs and Heavy Equipment
Nice scratch building skills. This is preety cool, looks like an AMT Peterbilt you got pulling it. Ron G -
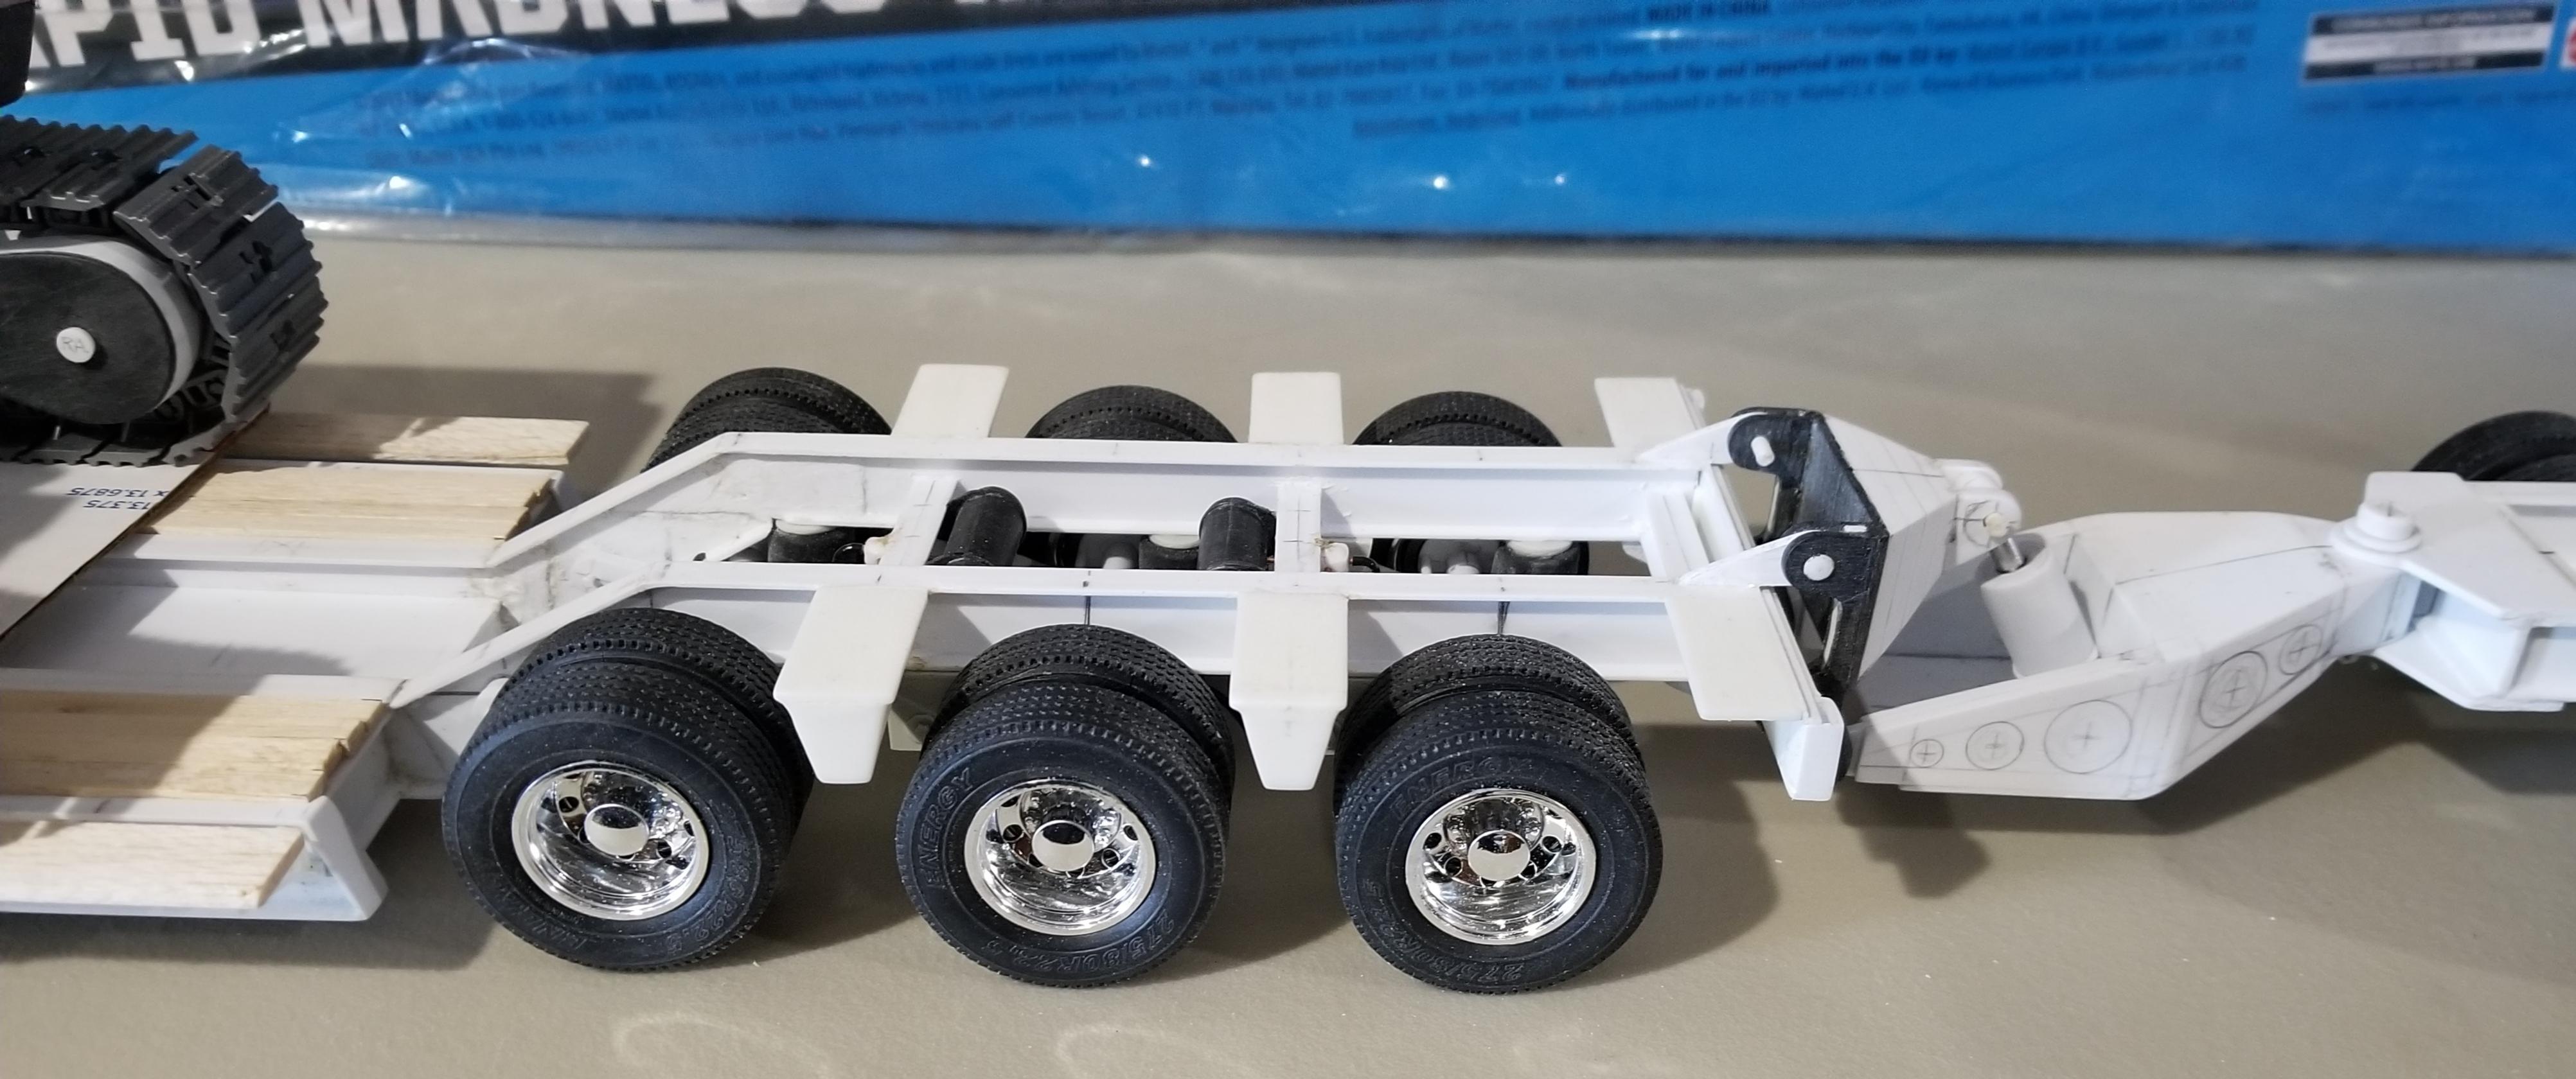
Hey everyone I started this build about a year ago and I'm still in the process of getting it done. It is a scratch built XL Specialized RGN XL120 Lowboy, XL120 jeep and stinger. Here are some pictures for you to look at. This view shows the tractor, jeep, trailer and stinger with the bottom half of a scratch built Cat 374D excavator sitting on it. This setup is almost 6 foot long! This is the truck, it's the 359 Peterbilt from the Revell "Can Do" wreaker kit modified into a heavy haul tractor. This is the scratch built XL120 jeep. This is the scratch built XL120 Lowboy and Cat 374D. Rear of trailer. Landing gear for the stinger. This view shows the plumbing on the rear of the trailer. This view shows the rear suspension and plumbing. Suspension is from Moluminum. This is the lift cylinder for when you unhook the goose neck. It rides on the frame of the tractor so you can remove it from the deck for loading equipment. This view shows the goose neck, main cylinders, lift cylinder and the pony motor for the hydraulics. The front of the goose neck is flip able. Pony motor and hydraulic tank. The motor is 3D printed and everything else is scratch built. These are the main cylinders. This view shows the rear of the goose neck pivot and how it attaches to the deck of the trailer. This is the stinger, it has air & hydraulics for adding pressure to the rear of the Lowboy and to lift it up. Like I said I started this a while ago and haven't done much on it recently. I have more pictures if you guys are interested. Ron G
-
No problem and thanks Ron G
-
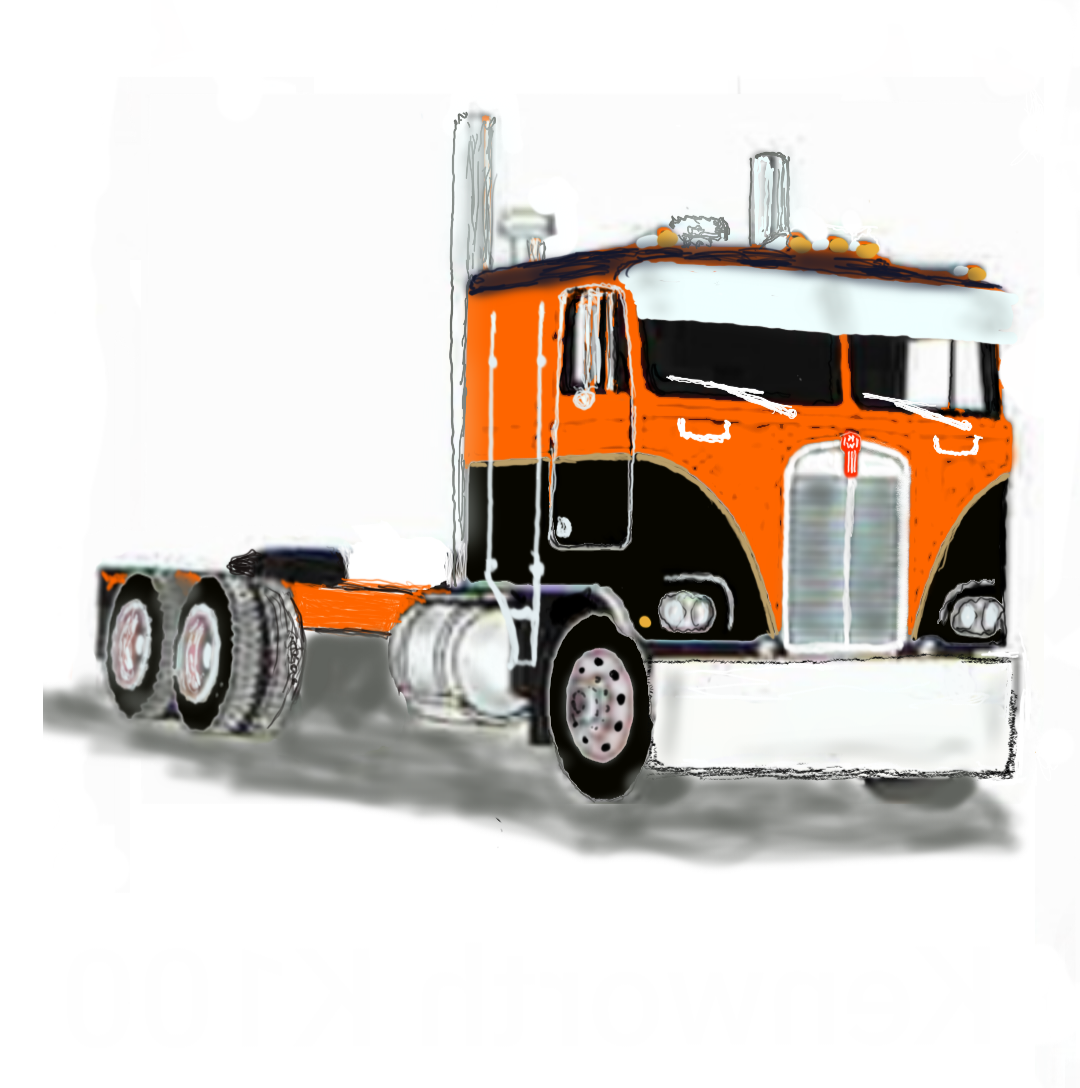
It's not red, it's orange. Ron G
-
Hey all I started to do all of the plumbing: air, fuel and electric. I made a "T" fitting for the air bags, now I need to make 3 more. This view shows the air valves that I scratch built and added. This view shows the air valves painted blue. That's it for now be back soon. Ron G
-
Hey all Some more work done on this build. Drivers side view of the rear of the frame. I painted the 8 air bags with Tamiya rubber black Passenger side view of the rear of the frame. This view shows the brake canisters that I painted a goldish color and aluminum. Front view of the brake canisters. This view shows the exhaust pipe painted a steel/silver color. I added some very small lead wire to the exhaust pipe to simulate the corrugated tubes that connect the exhaust pipe to the stacks. Well that's it for now. Ron G
-
Hey all Some more work done on this build. Added the black around the lights with some Tamiya rubber black. Did some more detail work on the engine. Other side of the engine I added some rust texture to the turbo and exhaust manifold. I painted the valve packs on the rear of the transmission black. This view shows the frame finished painted along with the three deck plates and the fifth wheel. This is a view of the rolling chassis temporarily together. The other side of the rolling chassis. Closer view of the engine in the frame. This view shows the cab temporarily in place on the rolling chassis. Well that's it for now be back soon with more. Ron G
-
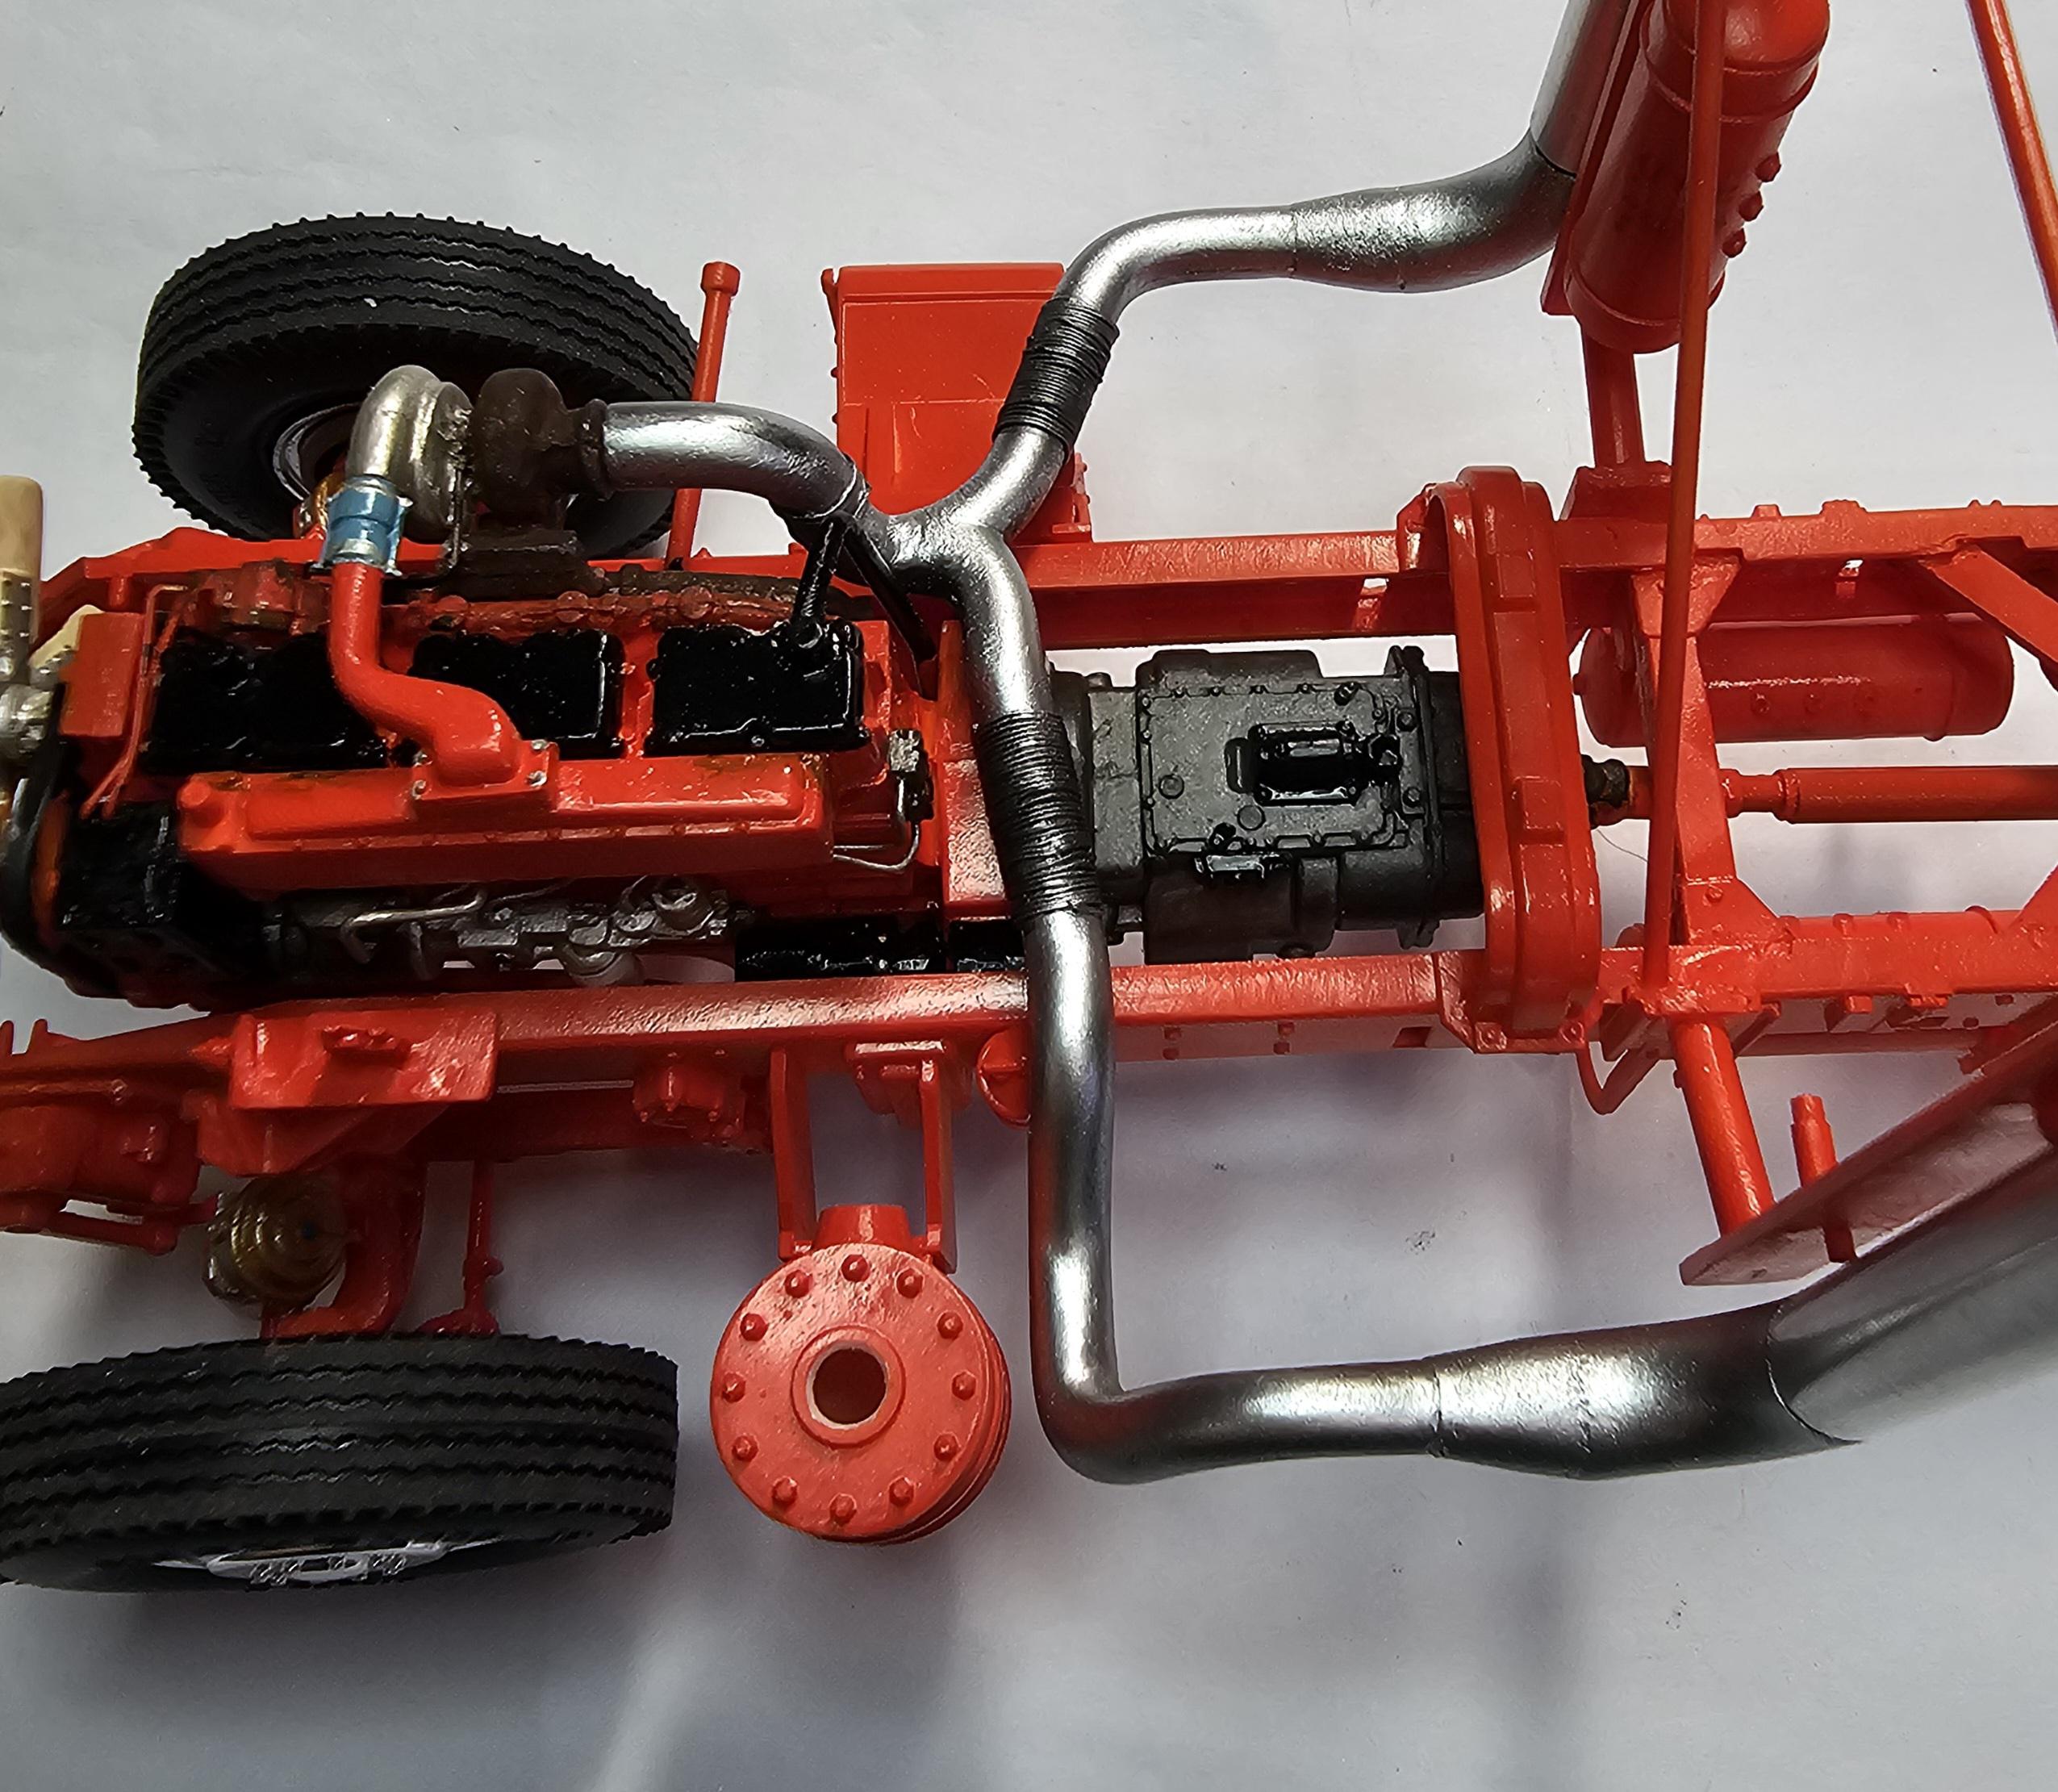
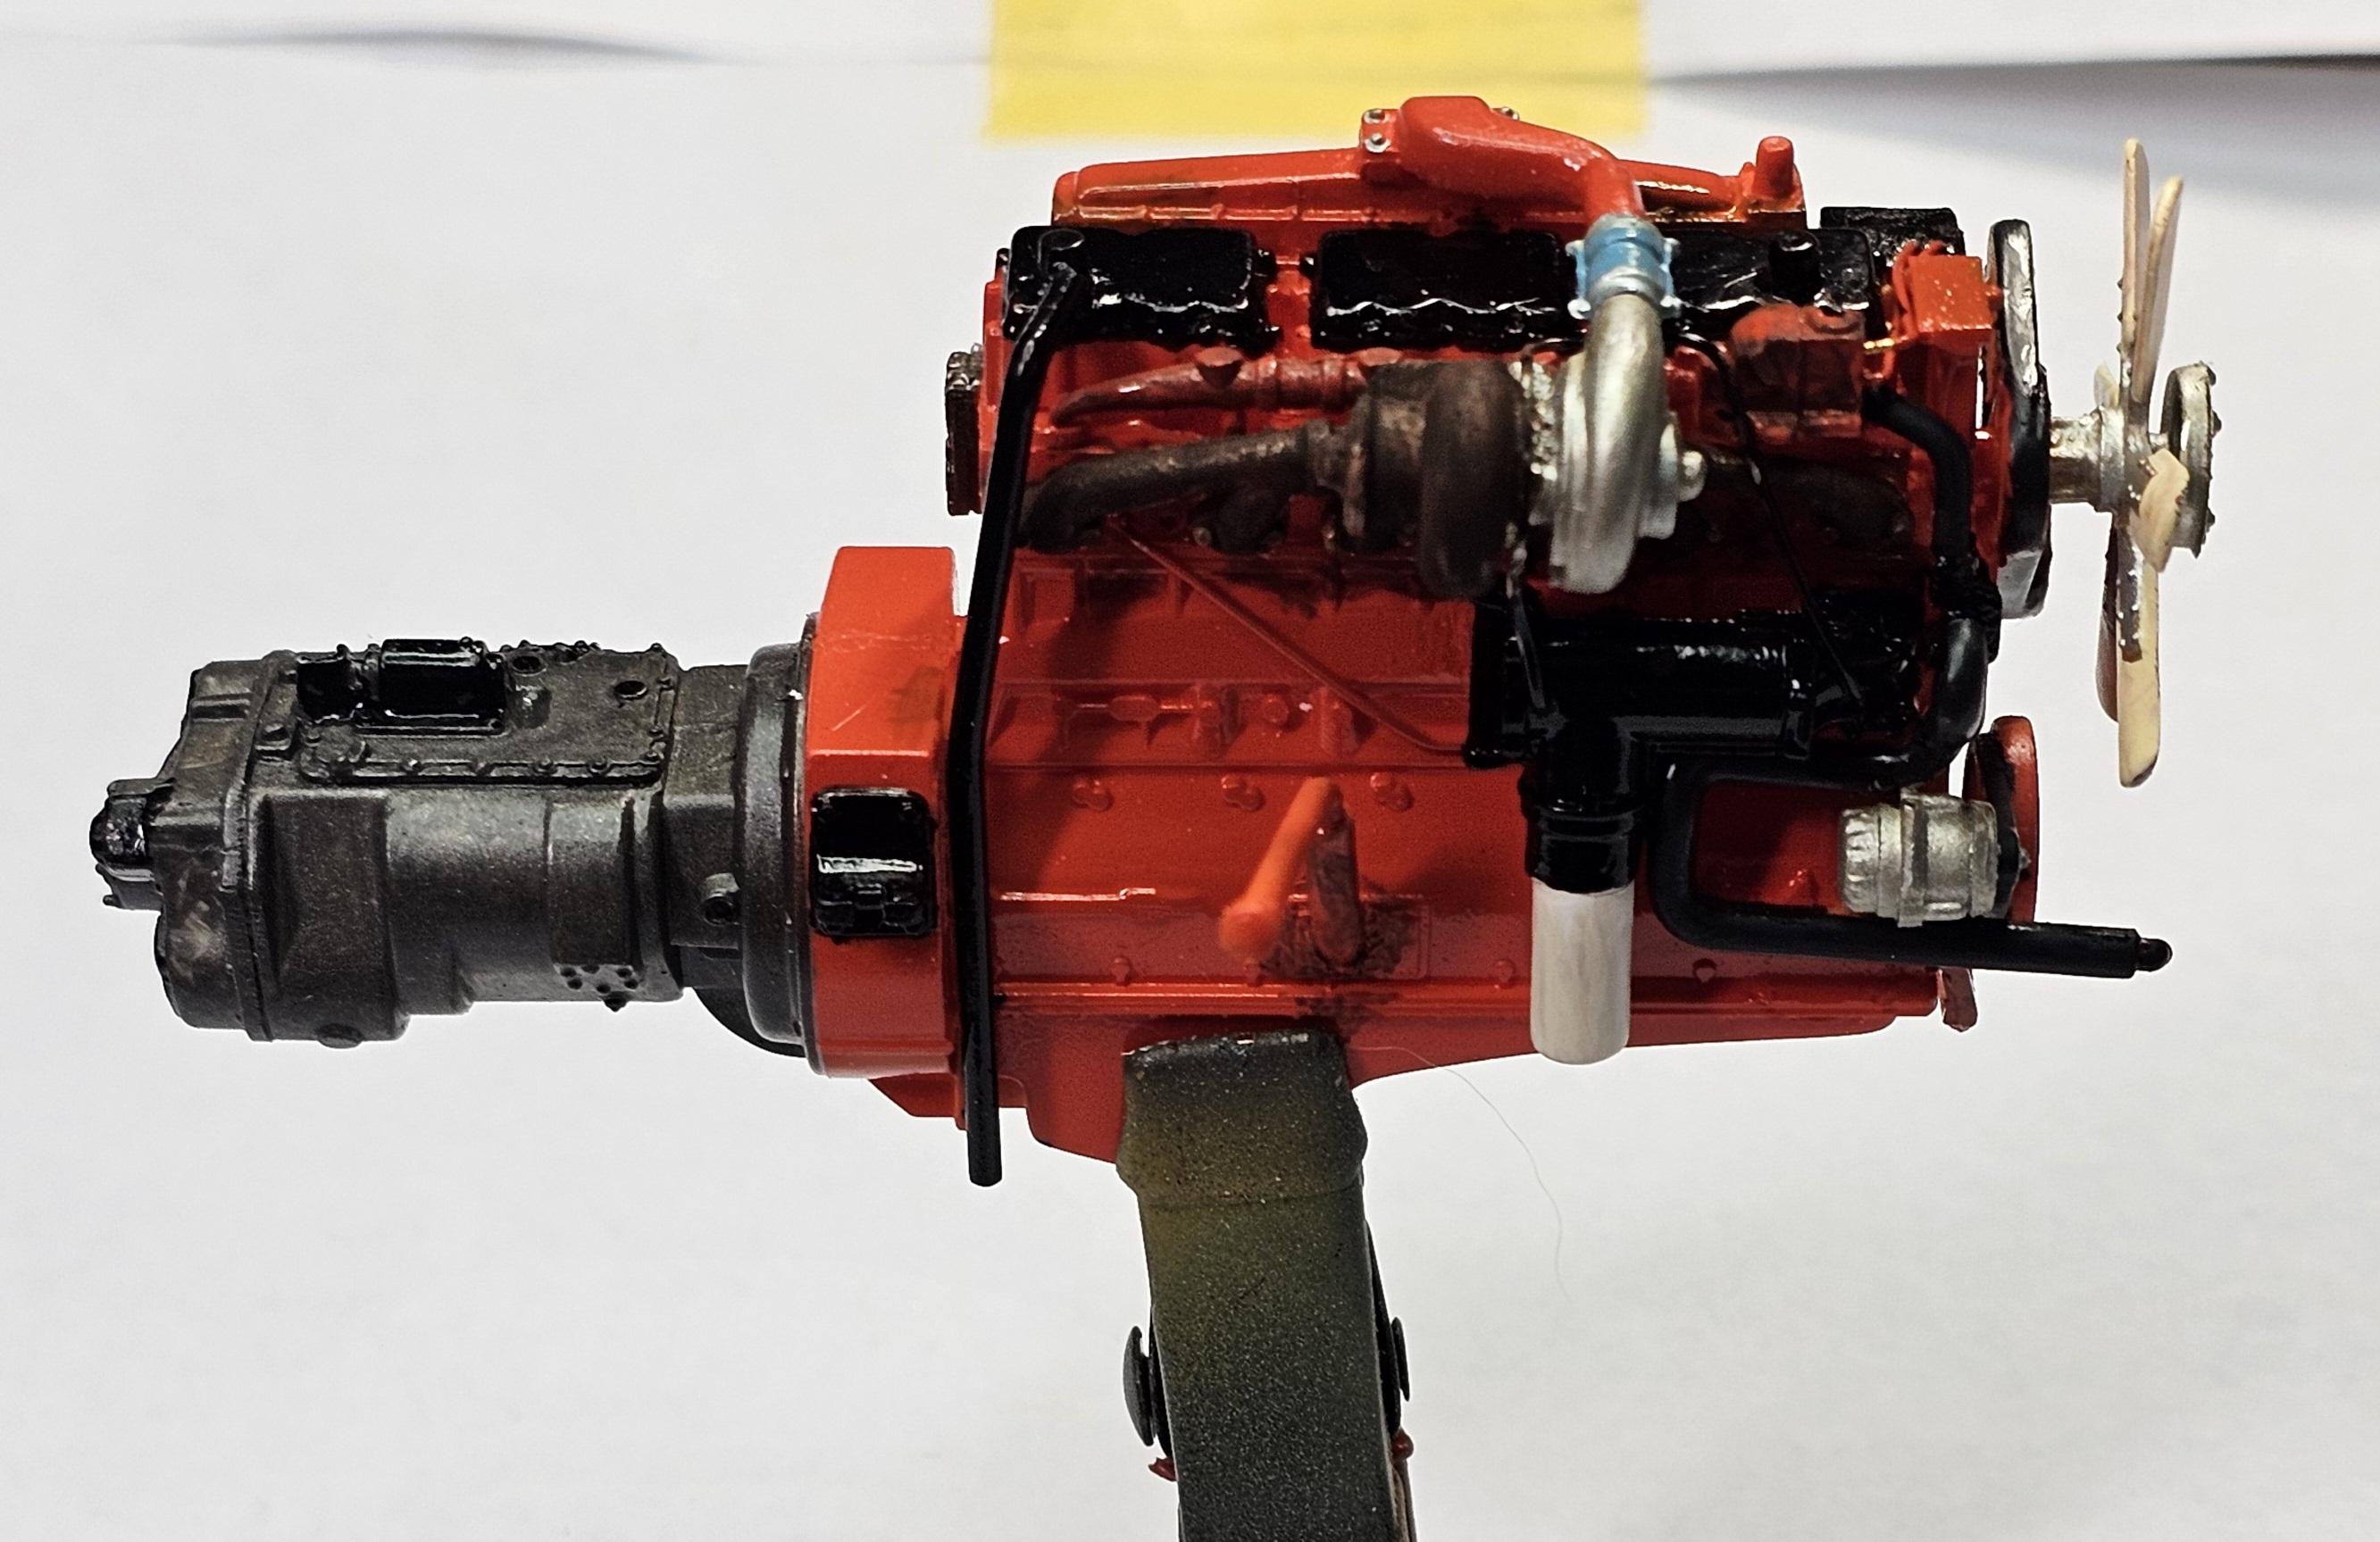
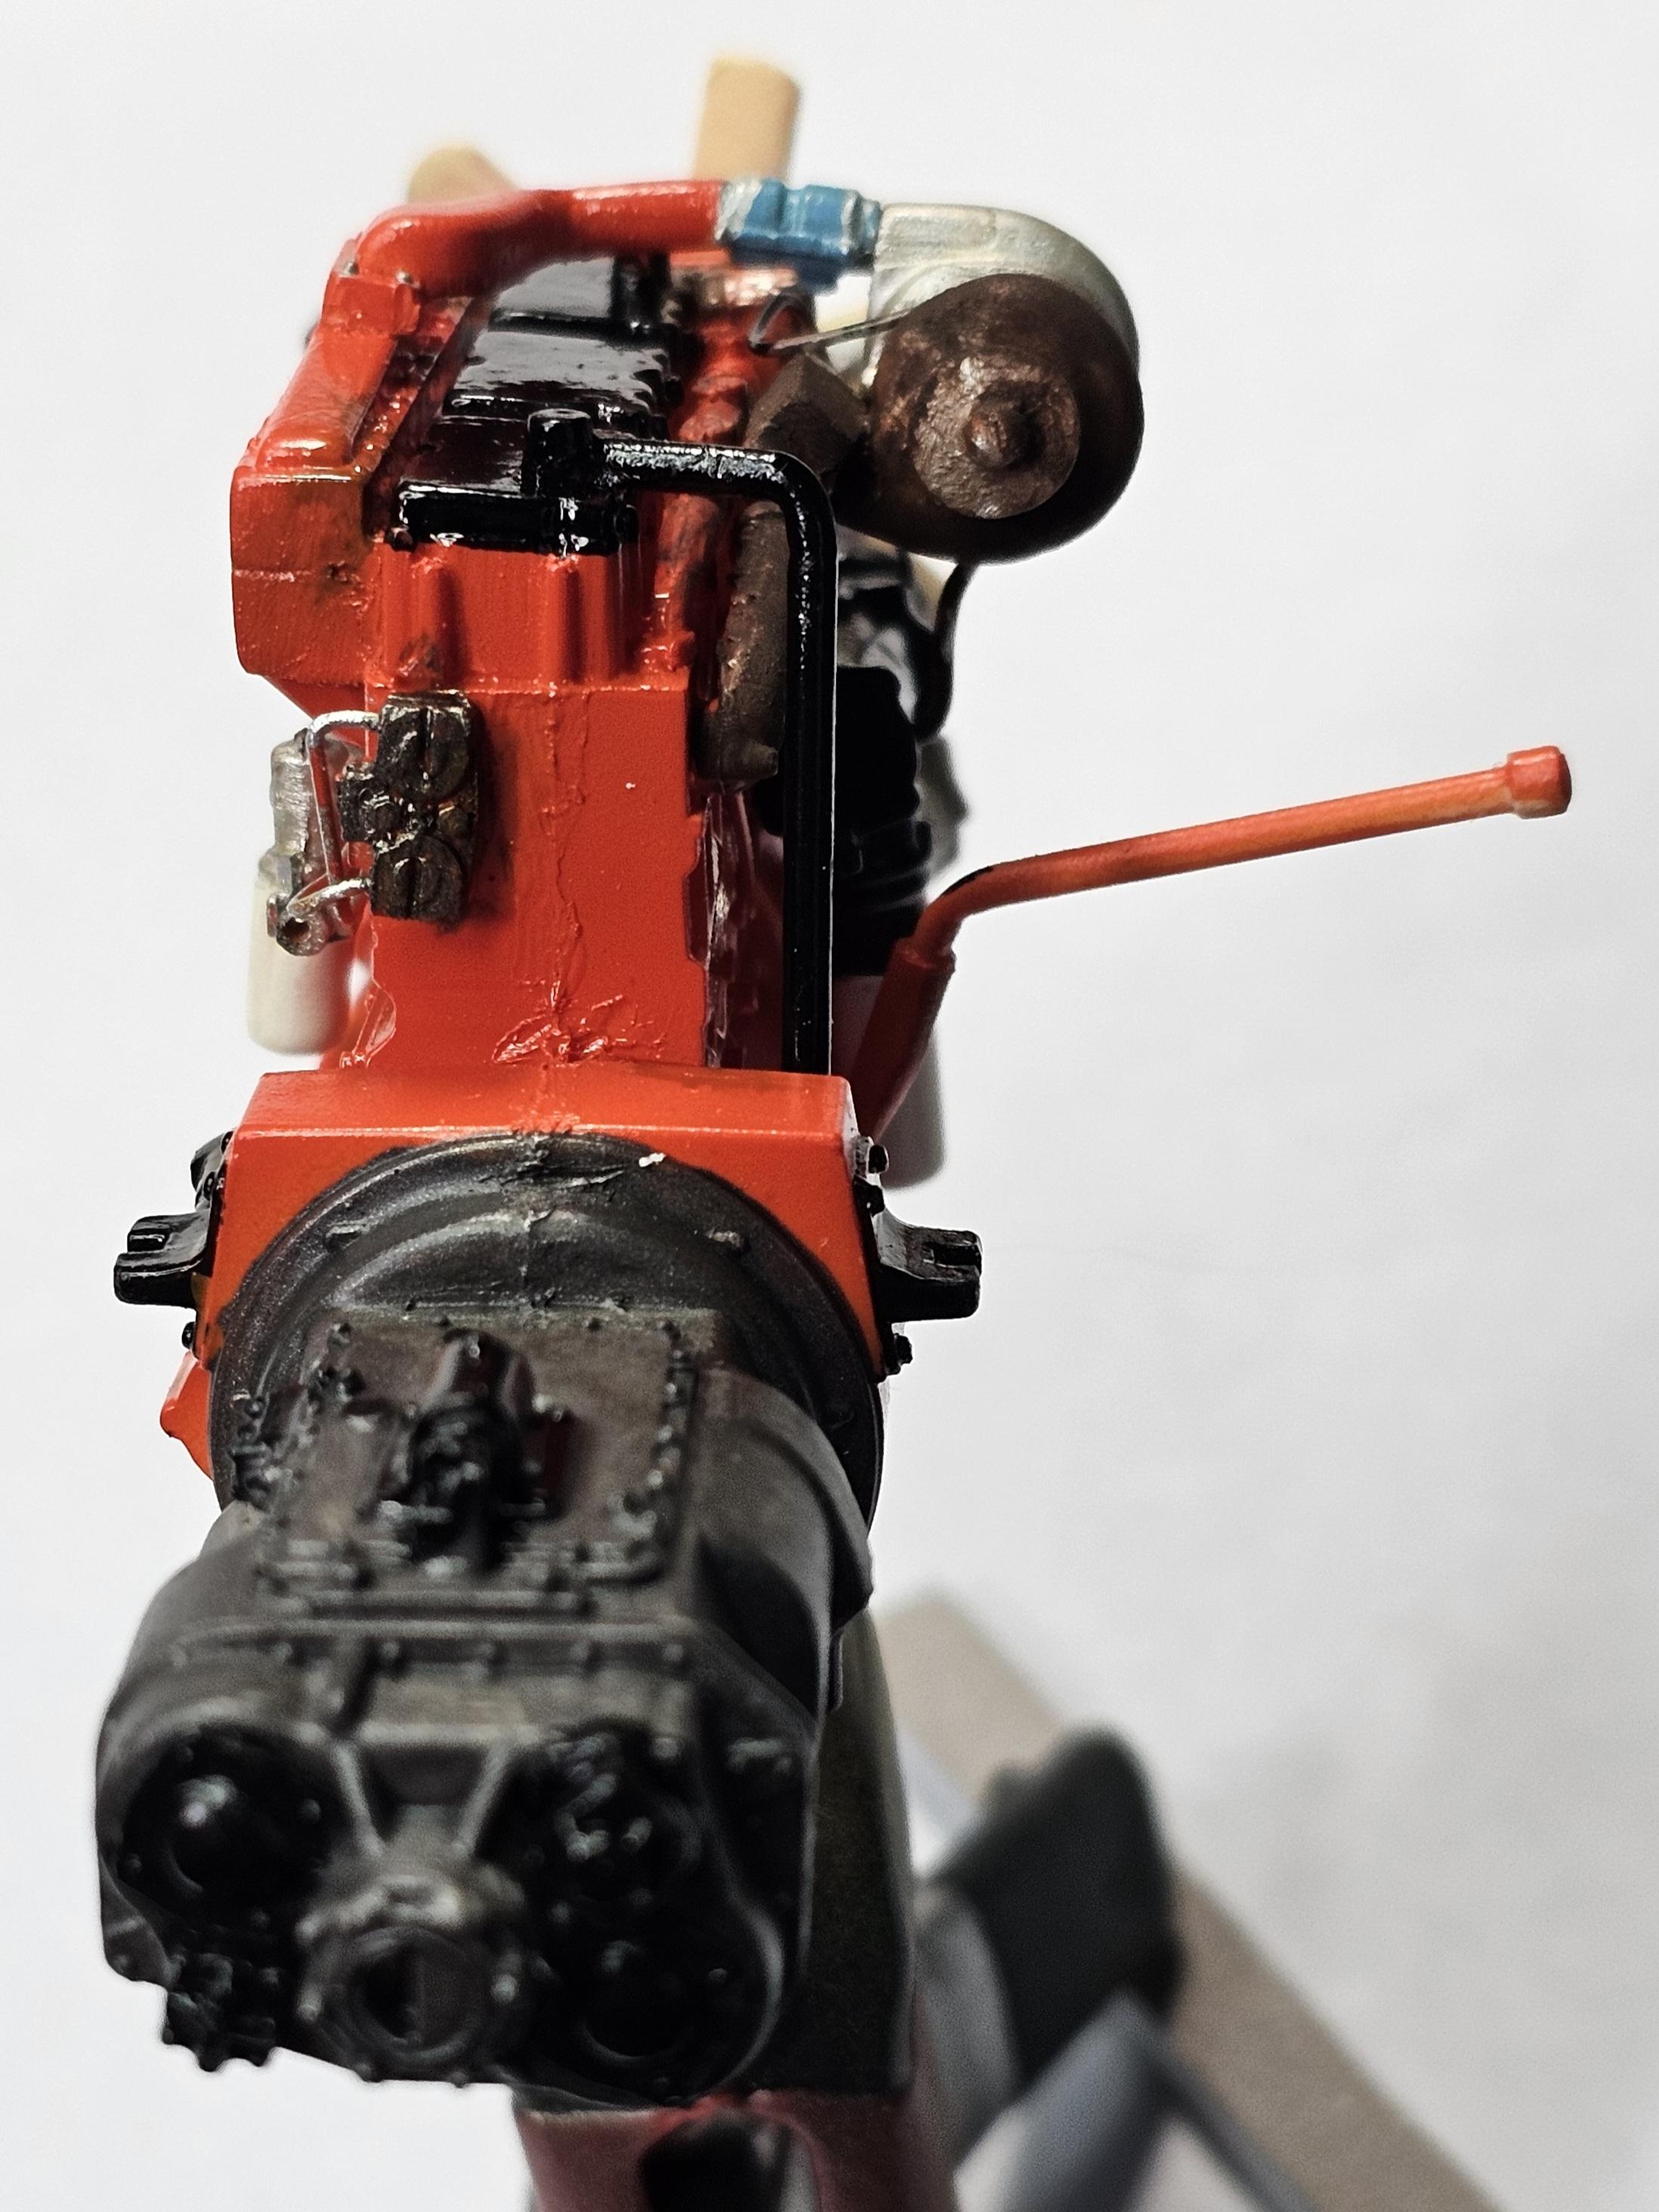
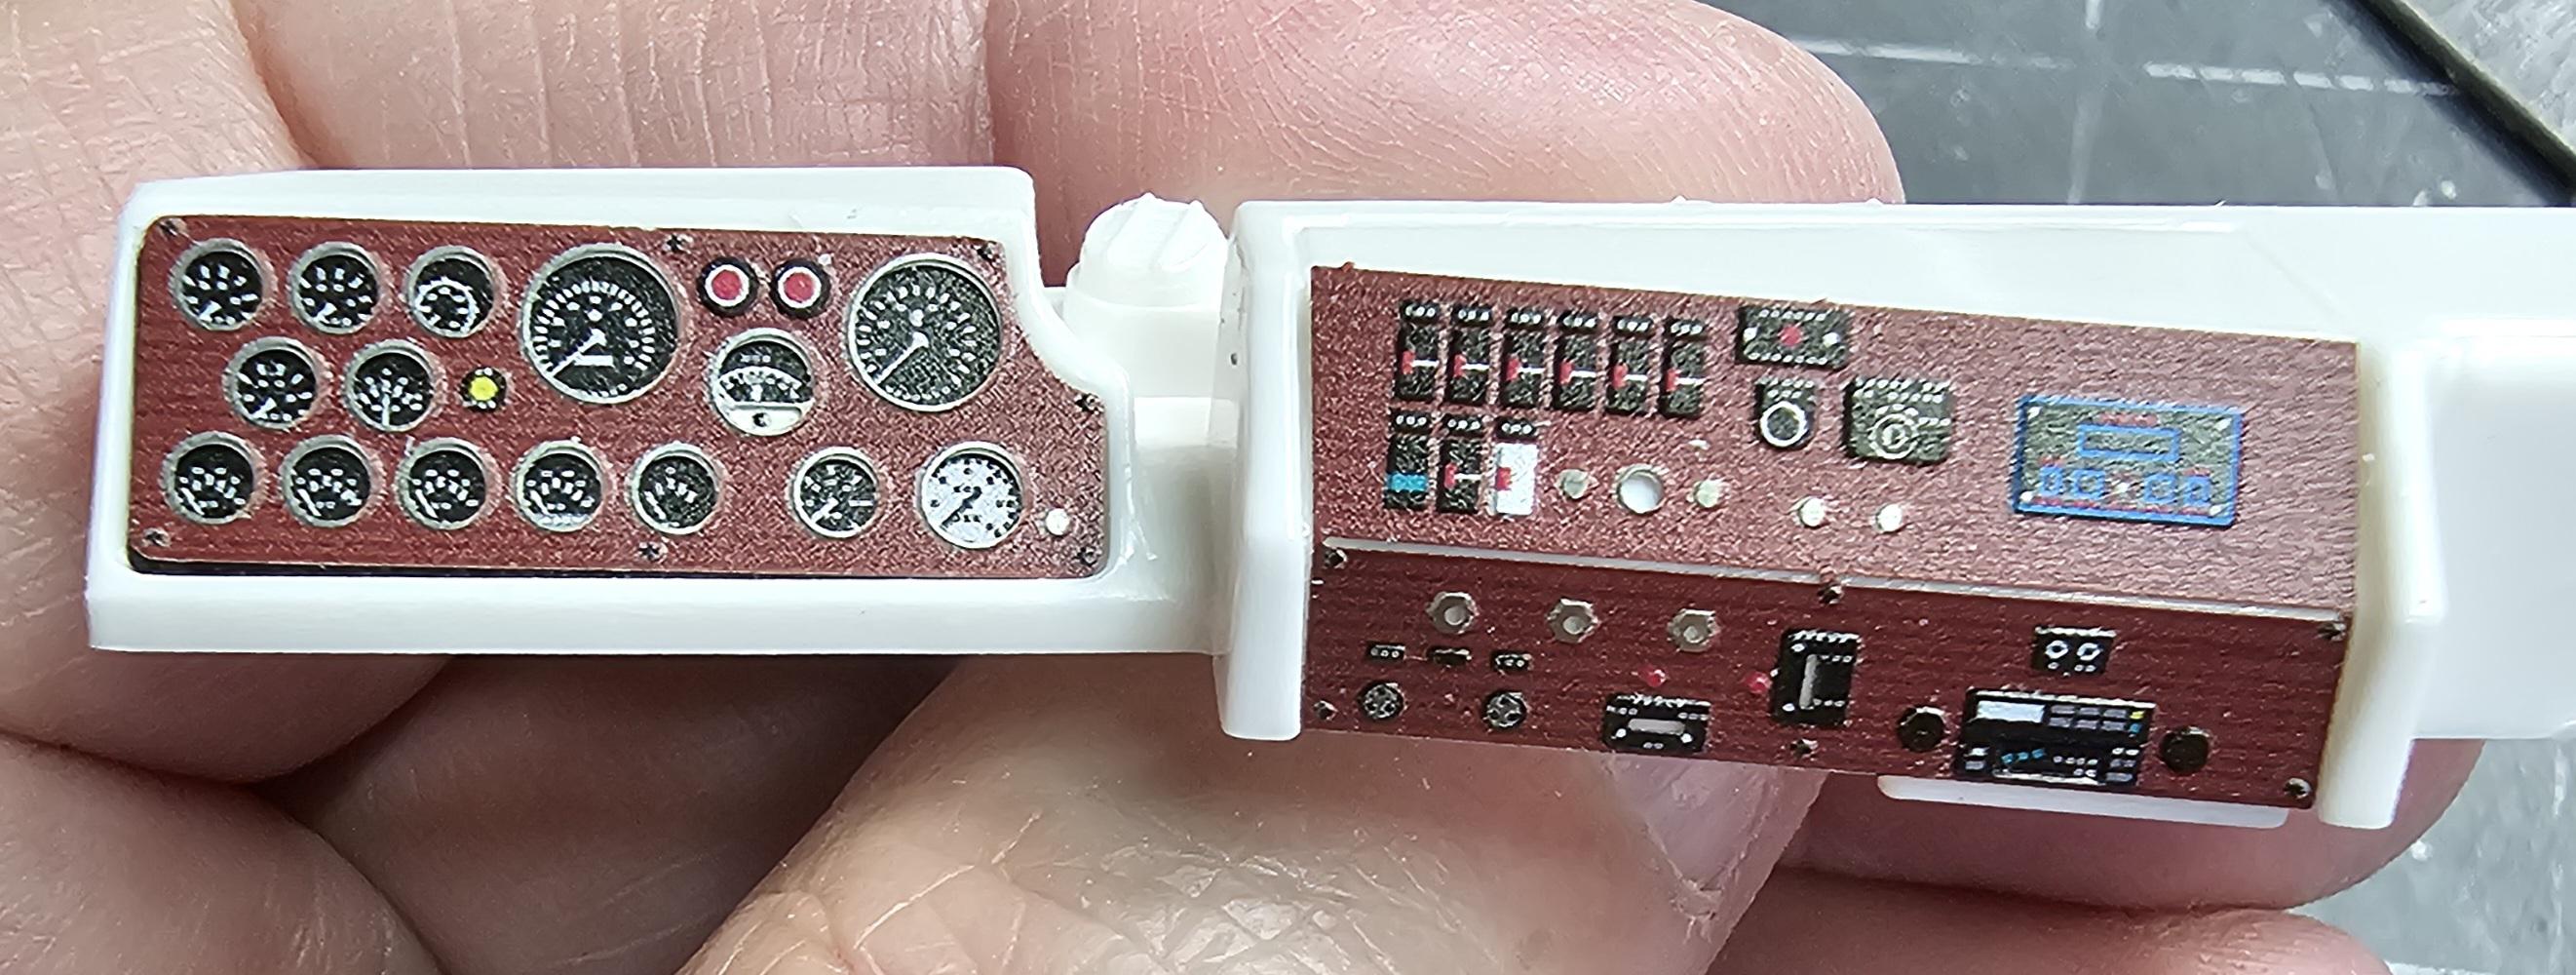
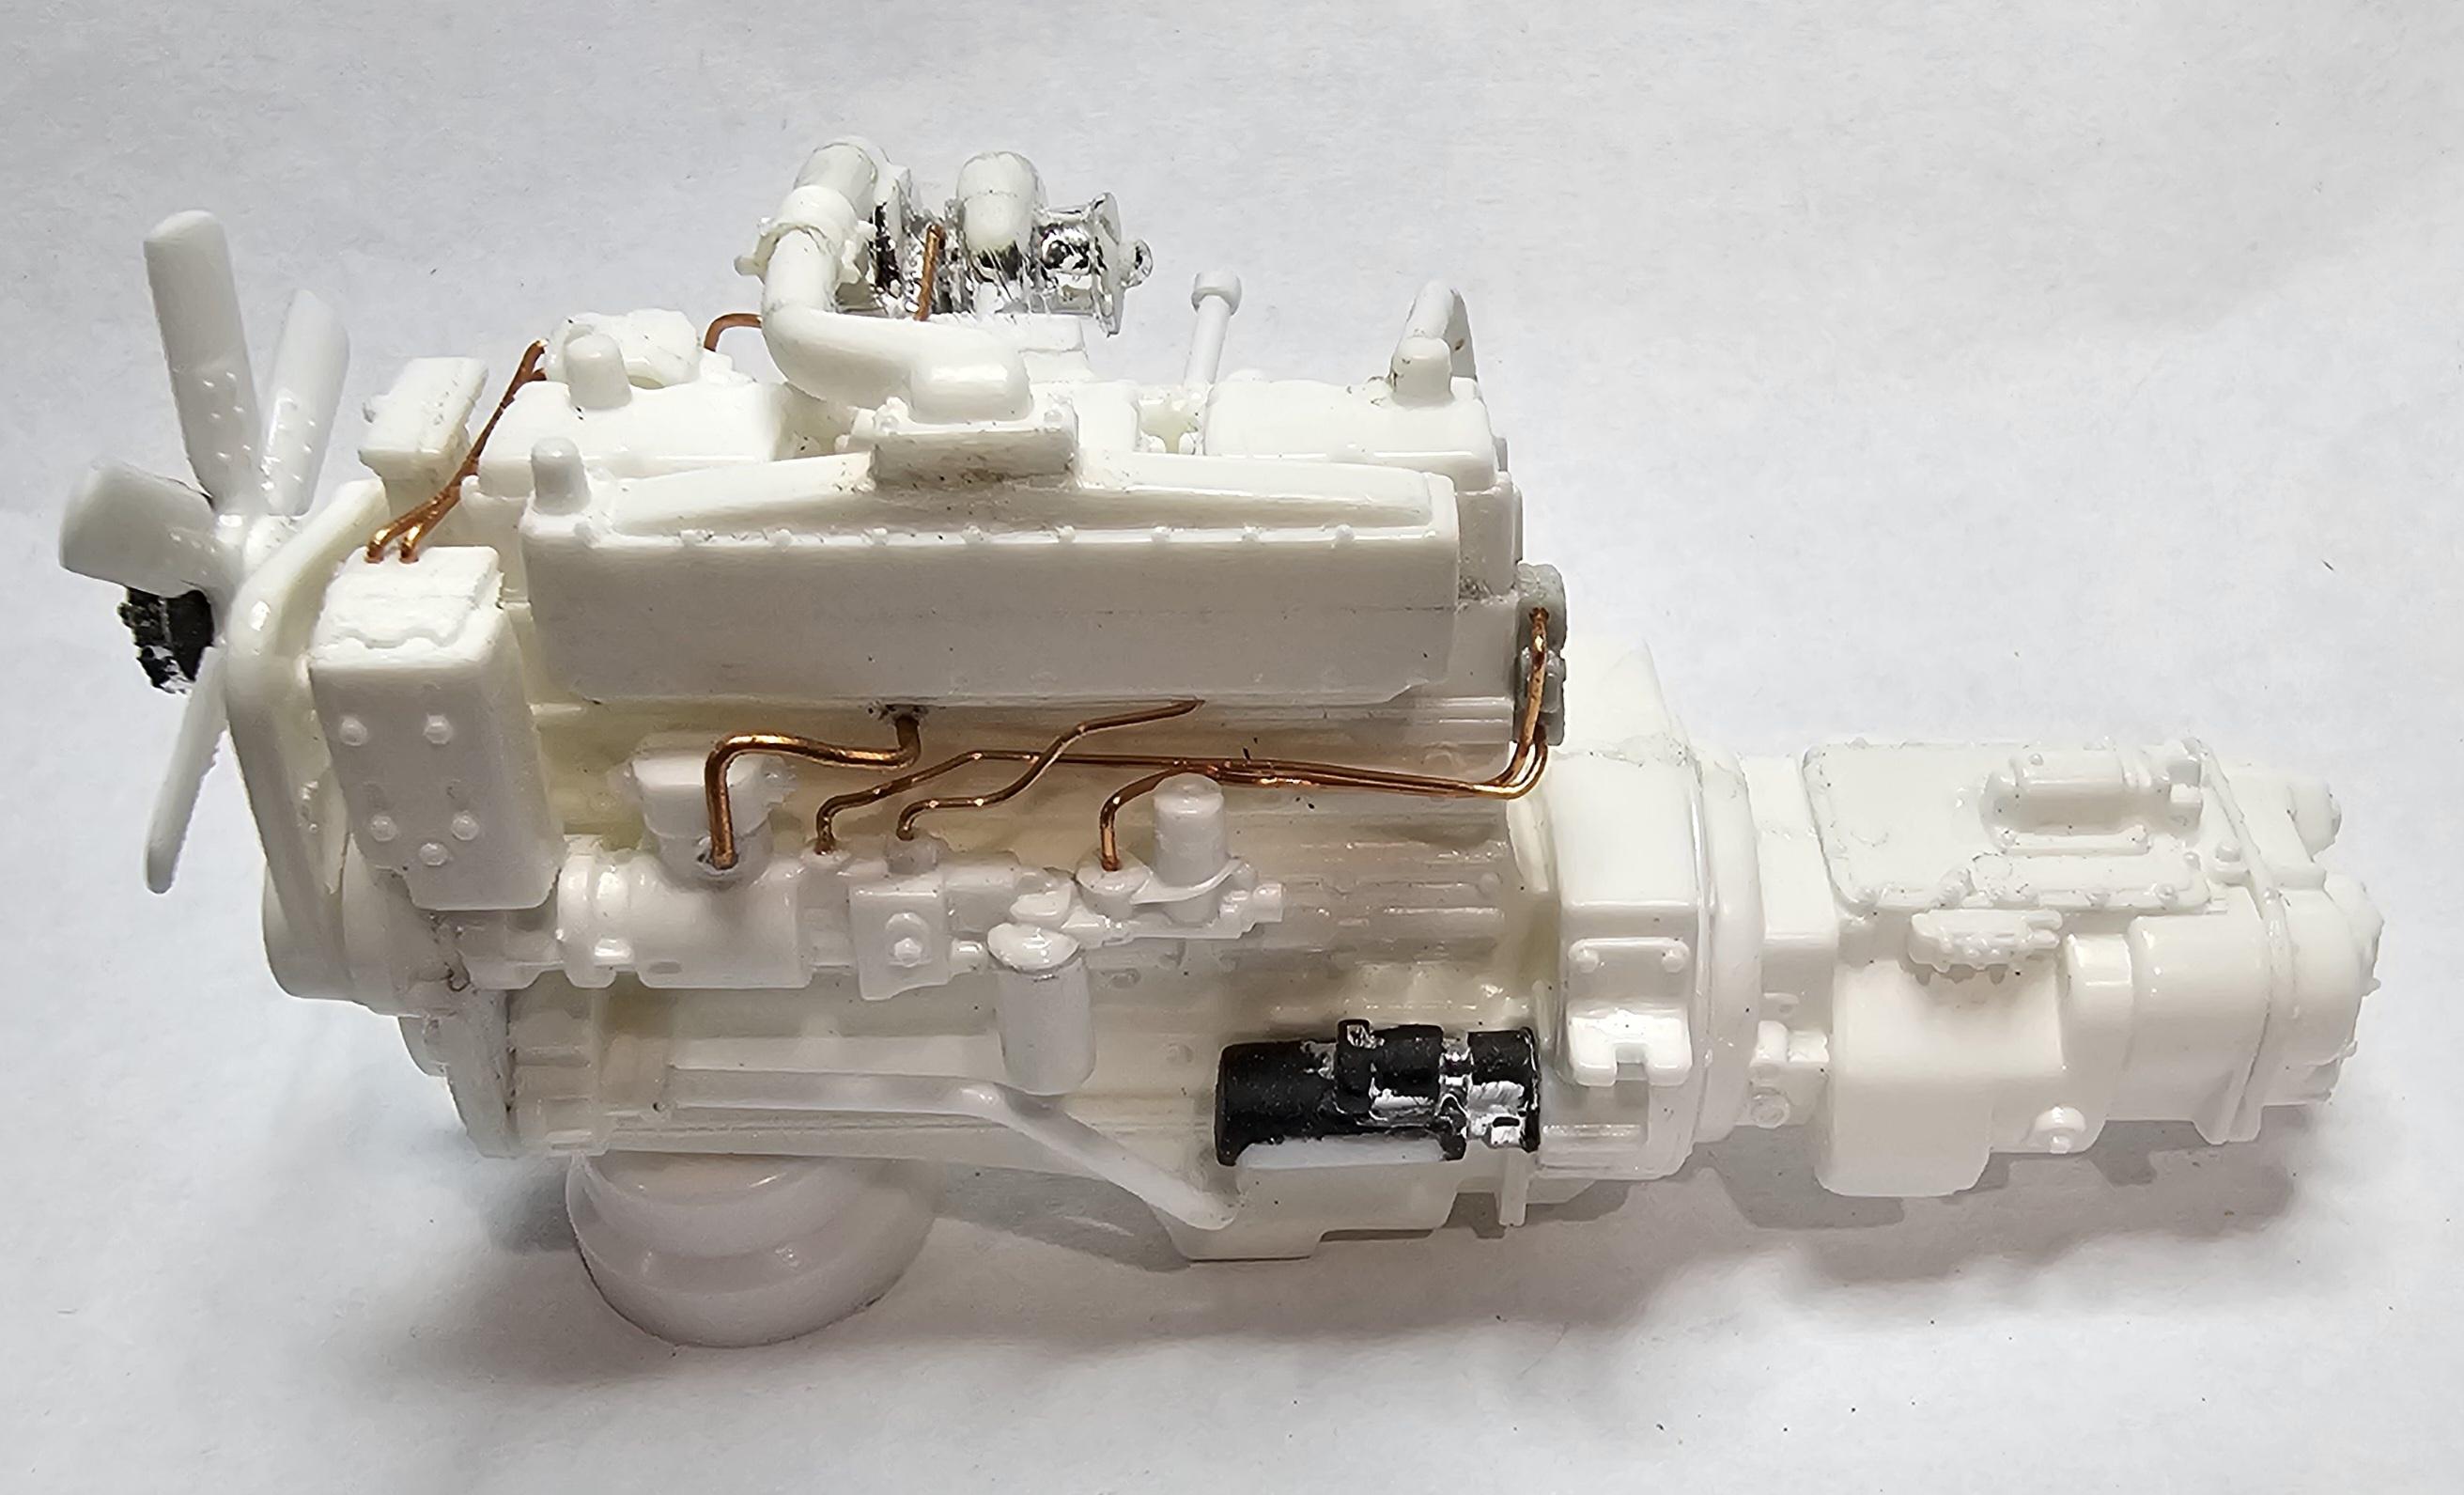
Hey all This is the kit I'm using for this build. As the title says it is going to be stretched out to a 300 inch wheel base. I started this build on another forum that I belong to, so it's quit a ways along. This view shows the color scheme I'm going for. Another view of the color scheme. This view shows the stretched frame. I used some frame pieces that I had left over from my "can do" wreaker kit. This view shows the modified exhaust plumbing that I scratch built. I modified the kit part by adding a scratch built adapter from the 5" pipe to the 8" pipes and used two Plastsruct elbows and some aluminum tubes for the exhaust stacks This is the Photo-etch dash panels that I got from Moluminum. I will be adding red, yellow and blue knobs for the air brakes to this. This view shows the modifications I made to the kit engine. I converted it to a single turbo and added some plumbing. The other side of the engine. I added a starter to it, because the kit didn't supply one. I added brake drums to the kit wheels/tires. This view shows the aluminum drop visor and Texas bumper This view shows the aluminum full rear fenders and the line for the fifth wheel slide. This view shows the left side of the engine painted orange and black. I still have to add some detail painting to this. Turbo side of the engine. top view of the engine. This view shows the rear side of the fan blades. This view shows the under side of the frame. This view shows the top of the frame. I have made custom deck plates that fit between the rails front to back. I still have alot of wiring, plumbing and detail work to finish on this one. That's it for now be back with more updates soon. Ron G
-
Payhauler 350 Build.
ShakyCraftsman replied to Oldmopars's topic in WIP: Model Trucks: Big Rigs and Heavy Equipment
Be very careful with those! I used them on my custom lowboy and they are VERY fragile, because they are printed in the best detail resin, which has great detail, but is very brittle. If you can contact the gentleman that makes these on Shapeways see if he will print them in the white processed plastic/vinyl. A little more clean up but much stronger. Ron G -
ford cabover blue mule
ShakyCraftsman replied to Bronzekeg's topic in WIP: Model Trucks: Big Rigs and Heavy Equipment
Hey Bronzekeg She looks ASSUME! Now all you need is a 1/25 scale Jan Michael Vincent and she'd be perfect. ? Ron G -
ford cabover blue mule
ShakyCraftsman replied to Bronzekeg's topic in WIP: Model Trucks: Big Rigs and Heavy Equipment
Hey Ken This build "kicks ass" Ron G -
1956 Great Dane Reefer
ShakyCraftsman replied to KJ790's topic in WIP: Model Trucks: Big Rigs and Heavy Equipment
Hey Fog There actually small dots of resin embedded in the decal film, so when you put them on and paint over them the film pretty much disappears and you have the rivets showing through. Ron G -
1956 Great Dane Reefer
ShakyCraftsman replied to KJ790's topic in WIP: Model Trucks: Big Rigs and Heavy Equipment
WOW! This is sweet! Great scratch building skills. Ron G -
Hey all I'm doing better, almost fixed, should be back at it soon Ron G
-
Not yet, I've been down with eye infections, so I haven't been able to do any modeling. Hopefully it will clear up in a week or so. Ron G ???? Ron G
-
Thanks tiger1 Constructive criticism is always appreciated, unconstructive criticism is never appreciated. Ron G
-
I got them from www.gardentrucking.com they are actually 1/14 scale tires for Tamiya RC trucks. The ones I'm using for the lift axle are off of a 1/16 scale Ertl dump truck toy. Ron G
-
Hey all Did some more work on the fuel tanks. this view shows the new fuel tank temporarily in position on the truck. this view shows the tank straps, which are made from 0.02" thk. Plastic strip sitting on black rubber strips. These will be covered by chrome mylar tape and are attached to the mounting brackets with pins and bolts. closer view showing the mounting brackets. Ron G
-
Thanks Bigred Hey all Did some more work on the big KW. I got the rolled aluminum fenders, visor and front bumper from Ryan Mlynek off of Ebay. Here's what they look like. this view shows the rear dual fenders and the ones for the lift axle. Thay have a protective film over them that you peel off to reveal the polished aluminum surfaces. this view shows the visor and the "Texas" front bumper. a closer view of the fenders. this view shows the custom fuel tank and the engine now detail painted sitting in place. closer view of the Cat 3408 V8 engine. Well that's it for now be back soon. Ron G