Oldmopars
-
Posts
2,058 -
Joined
-
Last visited
Content Type
Profiles
Forums
Events
Gallery
Everything posted by Oldmopars
-
1977 Ford Motor Home
Oldmopars replied to Oldmopars's topic in WIP: Model Trucks: Pickups, Vans, SUVs, Light Commercial
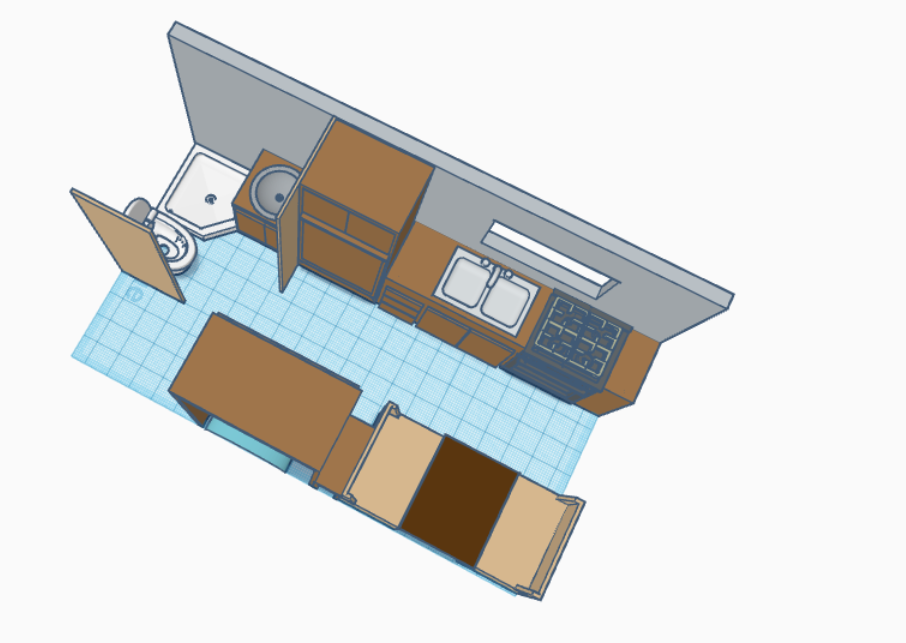
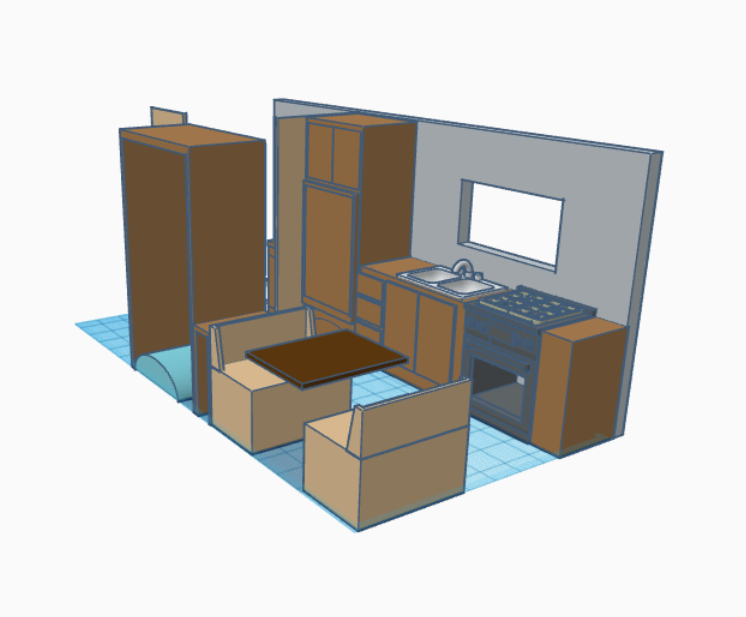
This project has been put on the back burner for a few months. I got to a point that I needed to start on the interior of the "home". This became a challenge I was putting off. In the following months I have been teaching myself TinkerCad and now Fusion 360. I have also purchased a medium format Resin 3D printer. Now the solution is much easier. I designed everything in the following pictures in TinkerCad except the Stove, that I cut apart from a 6 burner to make a 4 burner, hollowed it out and I will be adding the "Glass" to the front. The original stove I got from Thingiverse as well as the Toilet. Both were modified from their original design. Everything else was my design. I will add "Glass" or a shower curtain to the shower, a tube to the table for a leg, and a few more scratch built items. The interior walls will be styrene sheet, not printed. What would have taken me weeks to scratch build, I designed in one day and will print in one more. There are a lot of separate parts that in the pictures are together, and they will all print grey, no colors. This Motorhome is moving closer to being a reality.
-
Beautiful clean build. I love the color. I have 2 of these, one is the Rat Fink. I think I need about 5 more of them. Really nice build and great job on the pictures, it shows it off well.
-
Ford lnt8000 snowplow
Oldmopars replied to 53gmc's topic in Model Trucks: Big Rigs and Heavy Equipment
Very cool, I love this as a single drive and the bigger tires/wheels make the SD look perfect. The weathering looks great and the added details finish it off, great job. -
International Transtar 4300 Eagle
Oldmopars replied to raisin27's topic in WIP: Model Trucks: Big Rigs and Heavy Equipment
I also love this kit. I builds great for the most part. Decals are challenging just due to how they are routed over a contour. The sleeper also is a bit of an interesting challenge as you want to paint the parts separate and then assemble the sleeper, but I prefer to assemble it first and I do not think you can easily. Other than those 2 slight challenges, this kit goes together like Legos, very good quality and the fit is spot on. Typical kit of the ERTL era, excellent stuff. -
BRBO 2022 - Peterbilt 351
Oldmopars replied to carsntrucks4you's topic in WIP: Model Trucks: Big Rigs and Heavy Equipment
I love the vintage look of this rig. Excellent job on the trailer. It looks like this was one print, what printer do you have? Also, any chance you would be willing to share your print file? -
Anyone doing any projects in 3D-printed plastic?
Oldmopars replied to ibj40's topic in Tips, Tricks, and Tutorials
That white plastic that Shapeways uses is pure garbage. I got an 1/8 scale 32 Ford grill. I tried to sand it and it just won't sand. The plastic is more like a nylon, no glue sticks to it. I nw have my own resin printer and don't buy from Shapeways. -
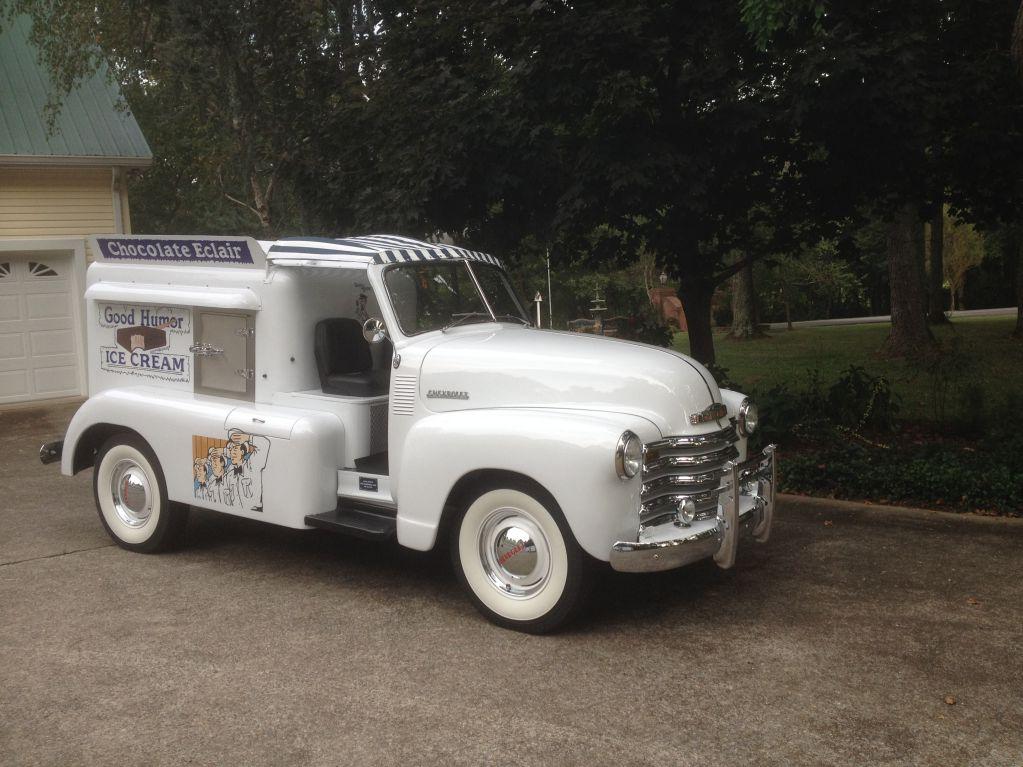
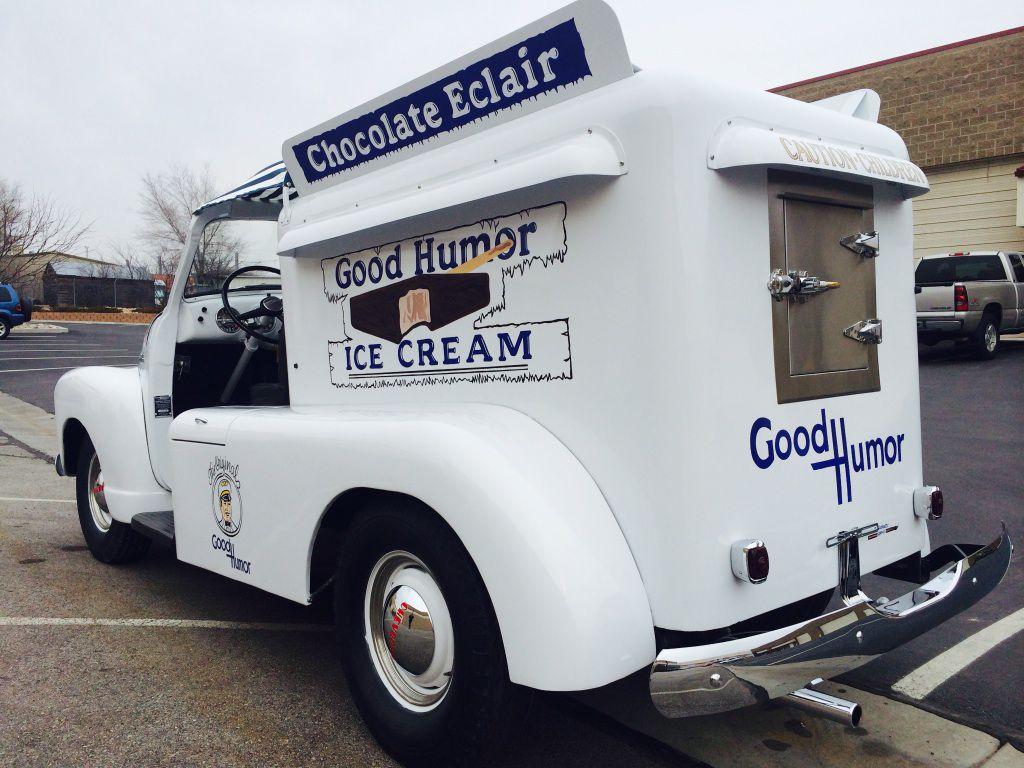
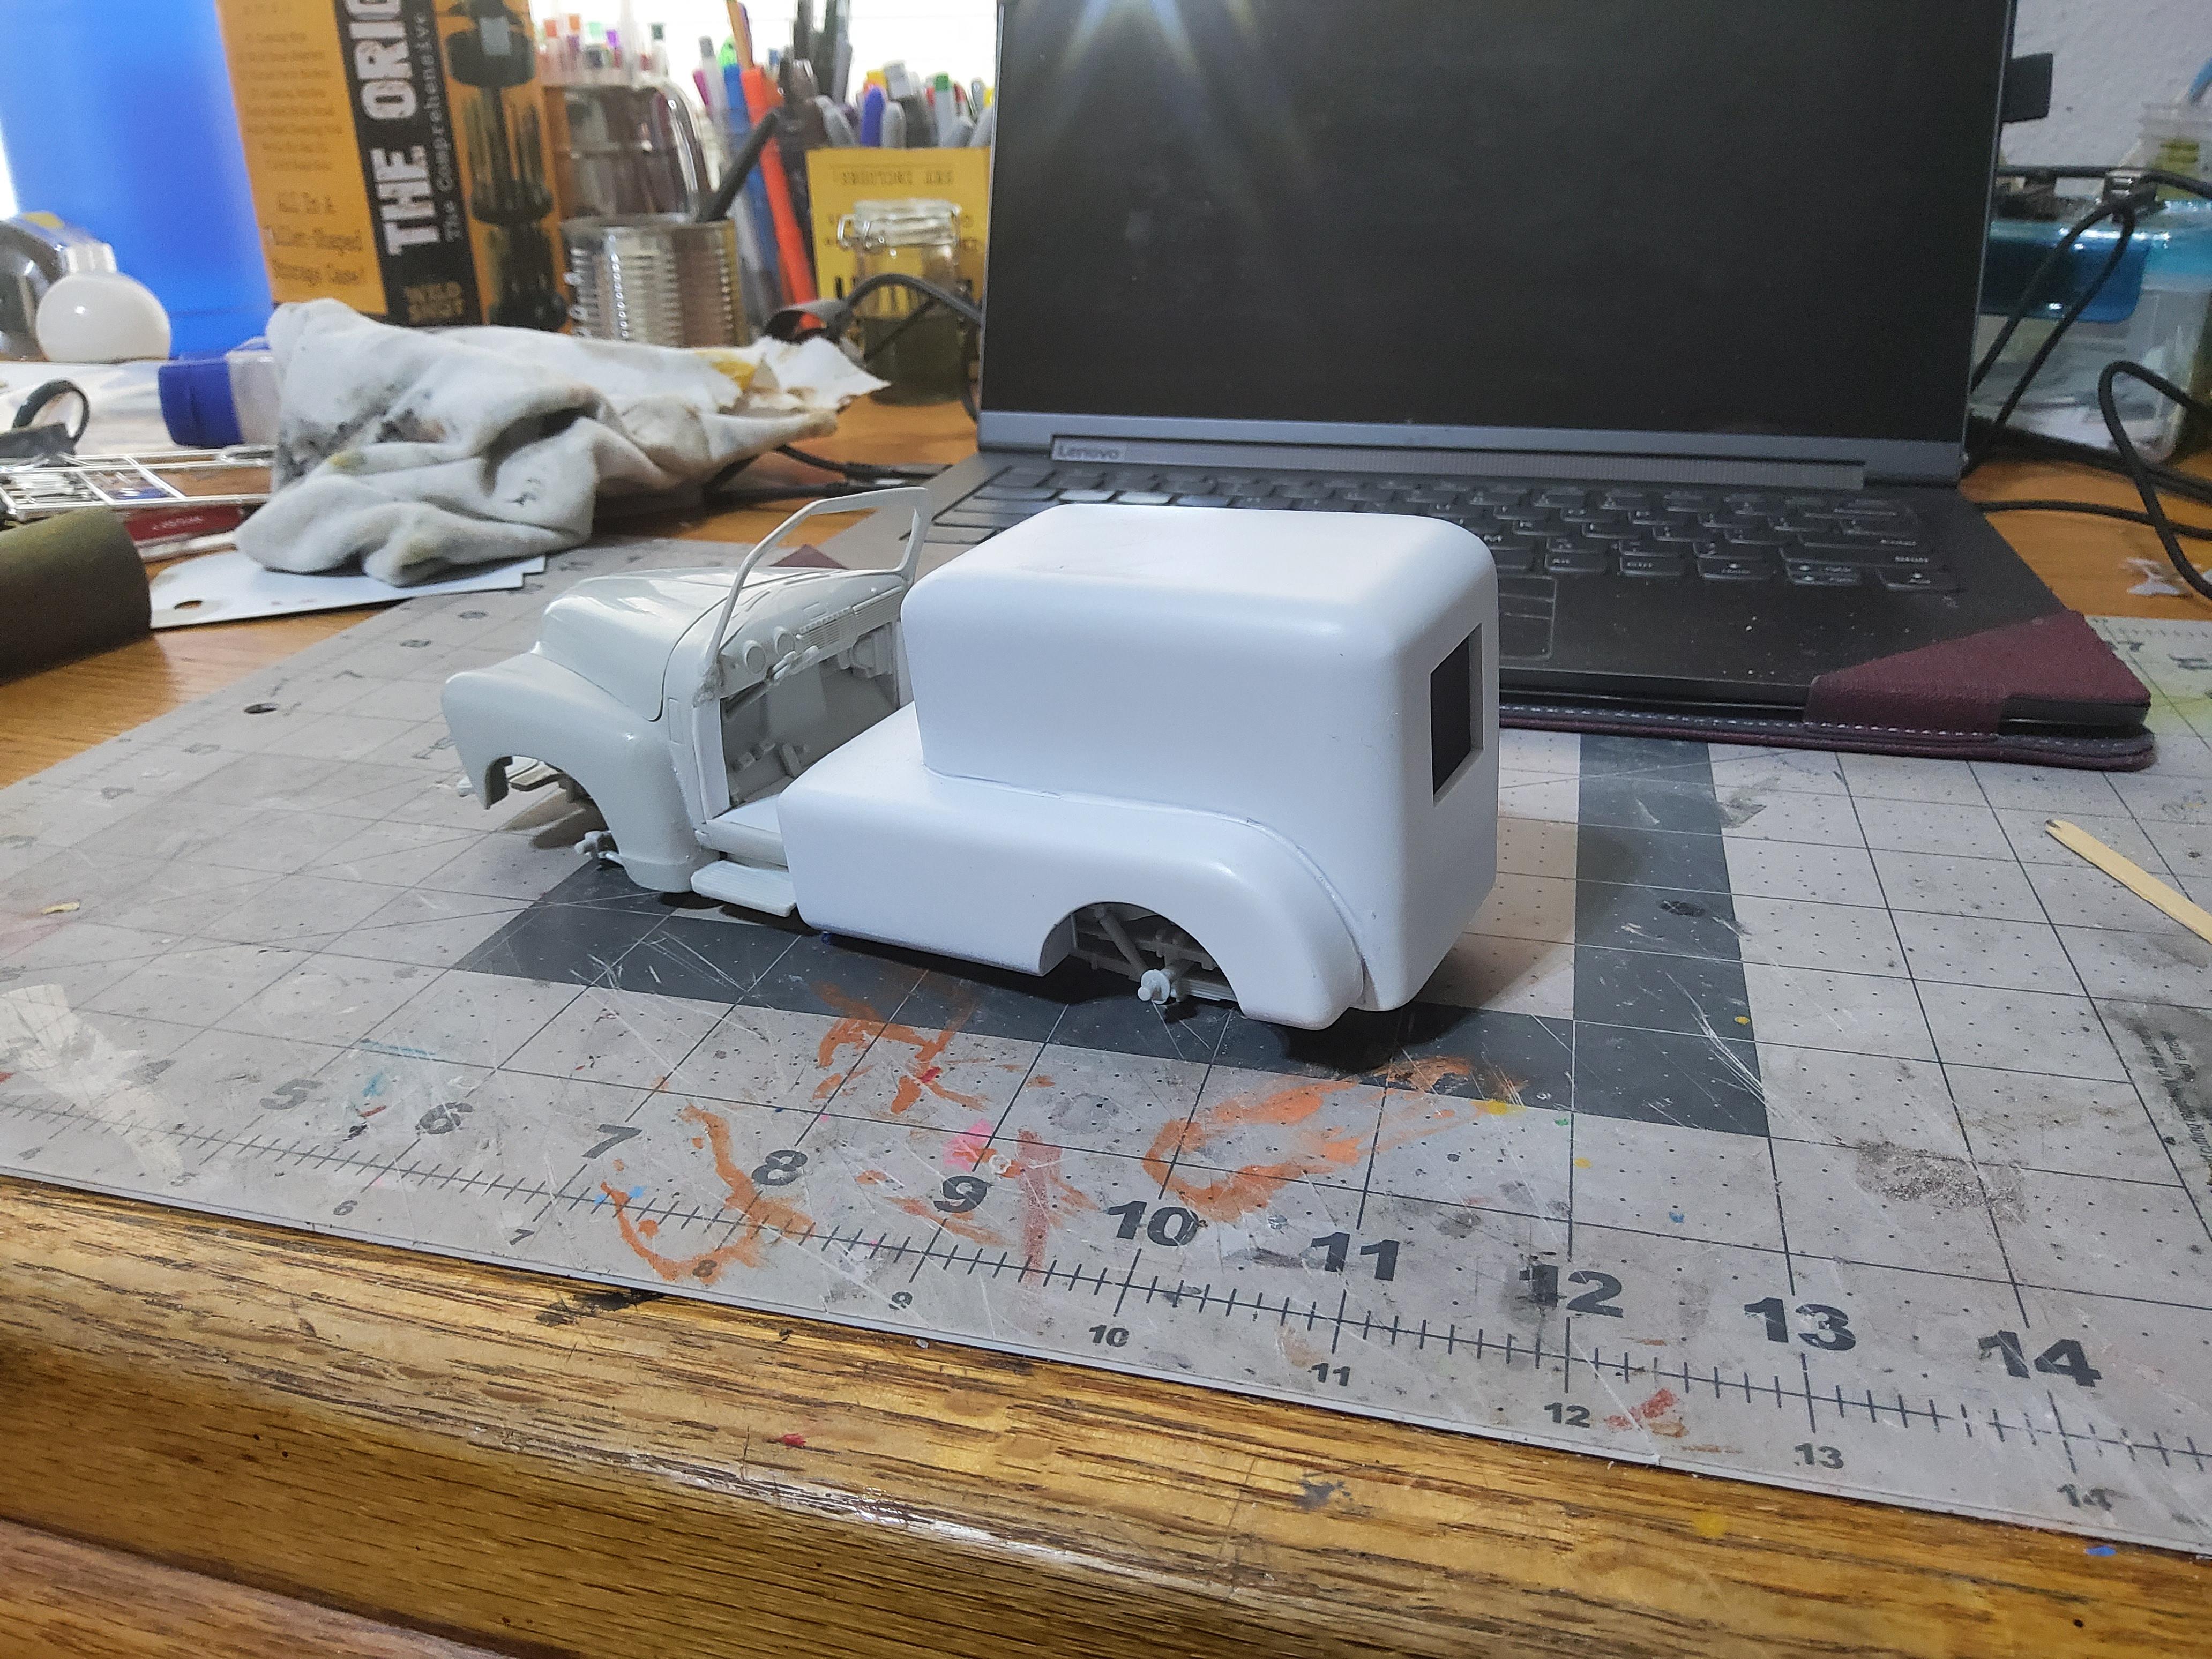
I have had this idea rolling around in my head for a while now. However with all the rounded contours it just seemed a bit too much for me to completely scratch build. I bought a 3D resin printer last month and no it is a reality. I designed the box, fenders, cooler doors and seat area in TinkerCad. I also redesigned some wheels I got from Thingiverse. I hate the wheels that come with the kit, the depth is all wrong and it makes the hubcaps stick out way too far. So, I redesigned the wheels to be deeper and have a rescess for the hubcap. The Cooler box on this is hollow and has a seperate floor. The fenders took a few attempts as the first ones were too short. But, I like it now. There are many versions of the Good Humor trucks out there, even for 1950. I really like the open cab version and so that is what I tried to copy. I have decal paper to make the decals. The box is in primer and I still have a bit to do. I have included pictures of the one I am making. I have the door covers/rain sheilds made, but I need to reprint one of them. I will make the fabric cab cover and signs too.
-
Custom 60 Chevrolet
Oldmopars replied to Alexander Foster's topic in WIP: Model Trucks: Pickups, Vans, SUVs, Light Commercial
I can see from the pictures that this is a resin frame. Tell us more about that. Did you make it? Buy it? Design it? Where did it come from? I am also working on one of these, no build yet, but I am very interested in what you are doing. I like where it is going so far. -
Detachable Lowboy Trailer
Oldmopars replied to Mopar - D's topic in WIP: Model Trucks: Big Rigs and Heavy Equipment
This is looking great. I did one of these about a year ago and figuring out the detachable section was a fun challenge. -
1976 Chevy Van - The Tickler
Oldmopars replied to Gerald Haney's topic in Model Trucks: Pickups, Vans, SUVs, Light Commercial
I like it, super creapy, but I like it. Great job. -
LLV “mail truck“
Oldmopars replied to ridinframe's topic in WIP: Model Trucks: Pickups, Vans, SUVs, Light Commercial
If you have a link to the original LLV dimensions and info, I would love to have that. I plan to build one on a S-10 I picked up. I love service type vehicles and this will go good with my Pinto mail car. -
3D resin printer
Oldmopars replied to Spruslayer's topic in General Automotive Talk (Trucks and Cars)
It is about 9in tall. Not sure the scale. But it turned out fantastic -
3D resin printer
Oldmopars replied to Spruslayer's topic in General Automotive Talk (Trucks and Cars)
Some things I made for a friend. All of these were one print.
-
3D resin printer
Oldmopars replied to Spruslayer's topic in General Automotive Talk (Trucks and Cars)
I went with the Saturn S. I absolutely love it. Print area is large enough for full sized bodies to print in one piece. Resolution is great, easy to use so far. This is not to say everything is perfect, but so far all failures are on me. I have had some learning to do. But the machine is great. BTW, one thing I really like, is due to the large size, it has 2 Z axis rails, so it is very stable, no layers out of place. -
Measure the OD of the wheel, then try some of the aftermarket vendors. They list the tires they offer with an ID, match them up and order as many as you want.
-
Free 3D File sharing here? (Admin?)
Oldmopars replied to Oldmopars's topic in Model Building Questions and Answers
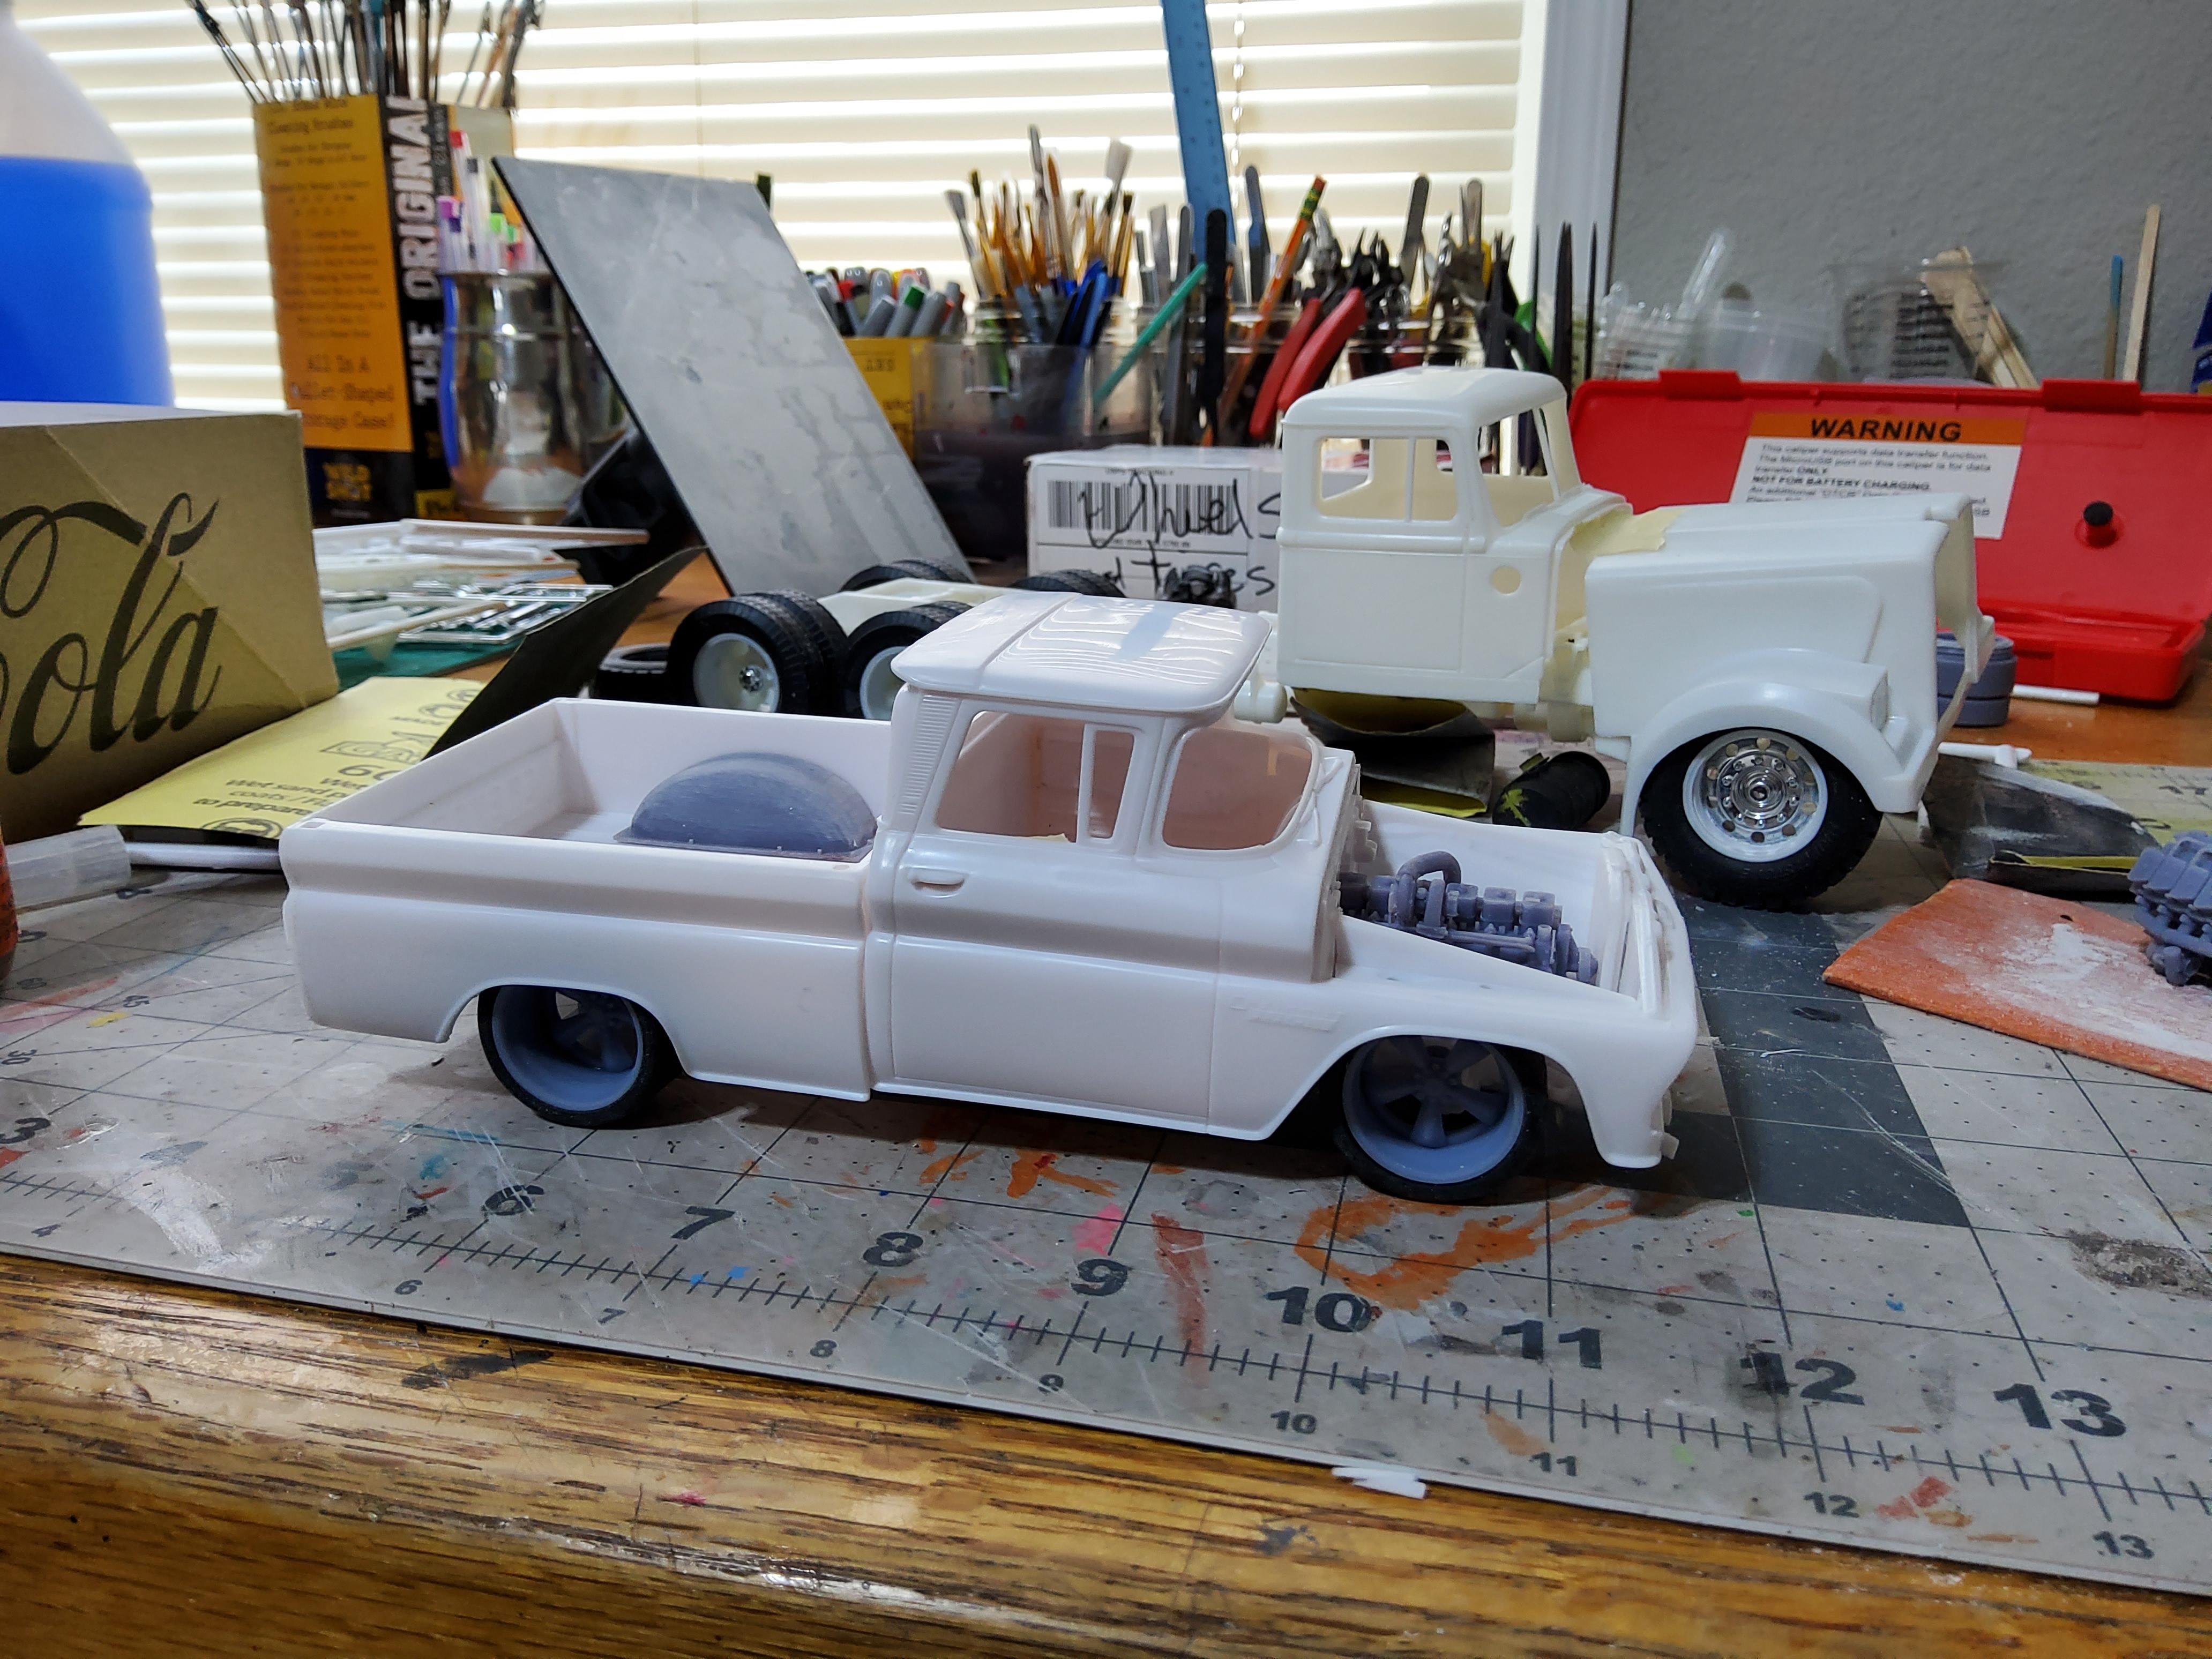
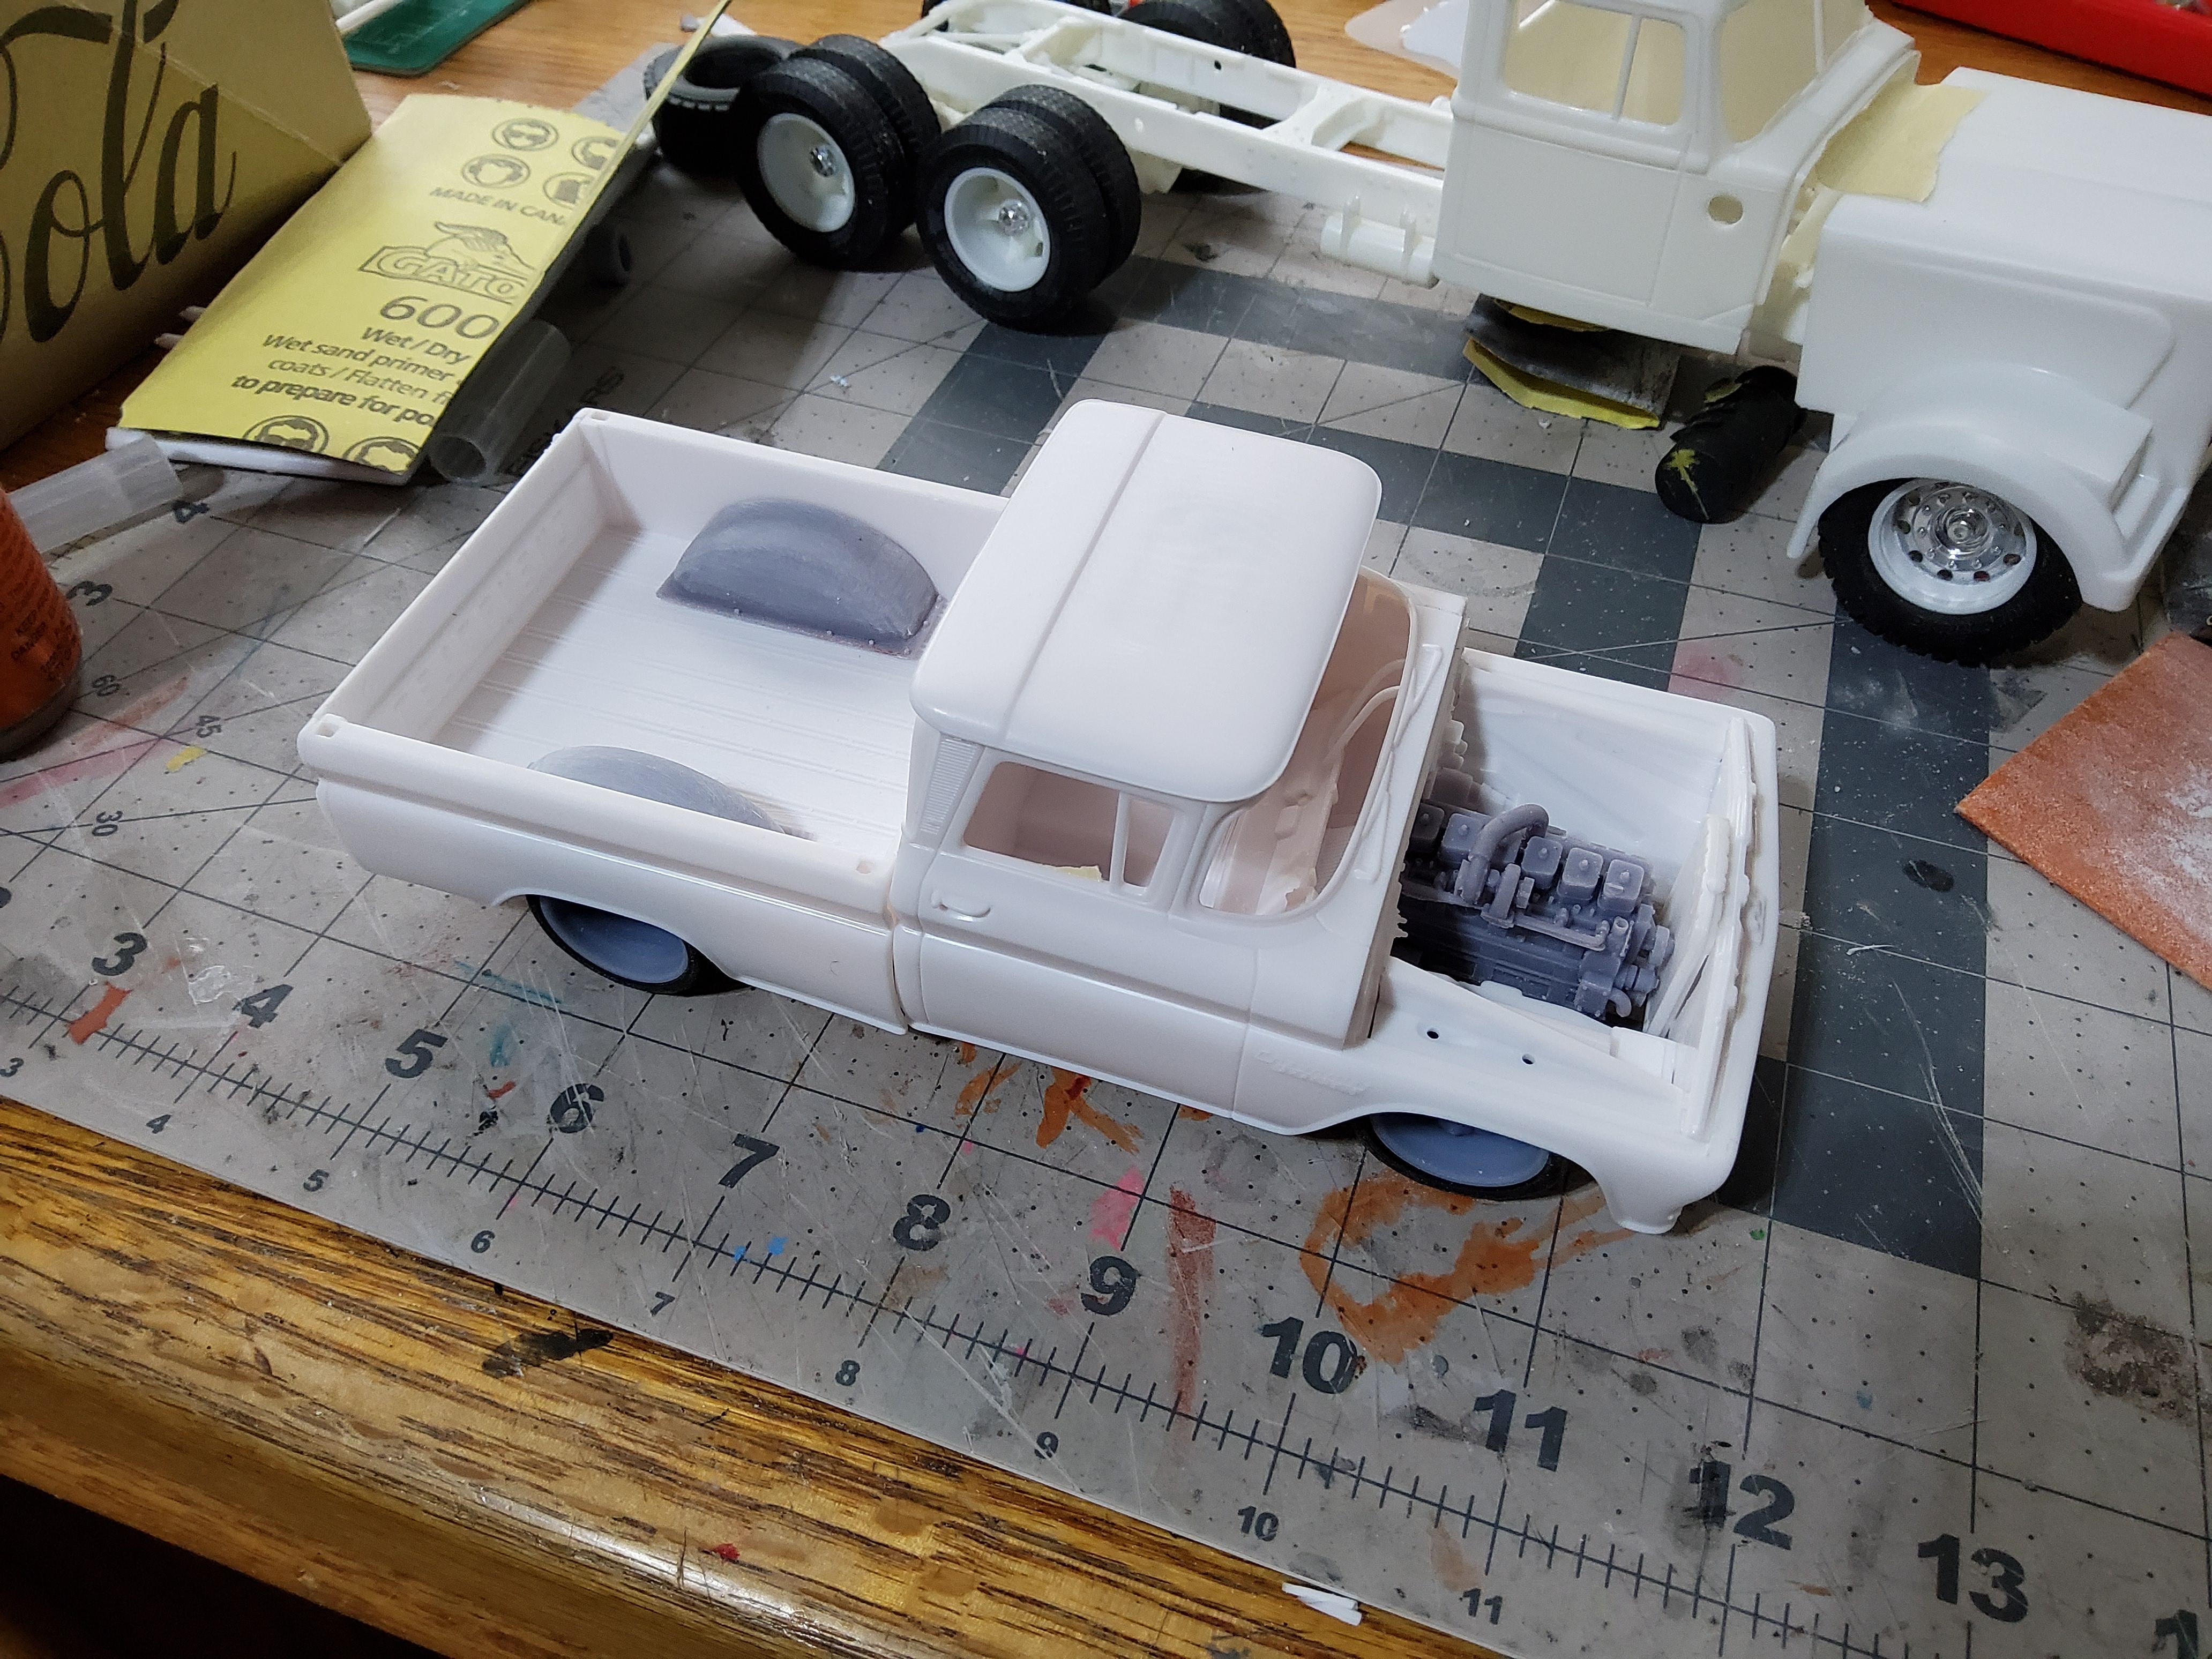
One more example. I needed to fit bigger tires on the AMT 1960 Chevy. I made the wheel tubs to match the stock wheel tubs, but bigger. I also wanted a different engine, so I made a Cummins 12V 6BT. The tires and wheels are 3D printed, but I bought them before I got my printer.
-
Free 3D File sharing here? (Admin?)
Oldmopars replied to Oldmopars's topic in Model Building Questions and Answers
It has really opened the door for me. I never build a kit out of the box, always changing, scratch building, etc. This has given me a way to really add to my models without having to order $150 in resin parts for every kit. It also lets me make things that nobody offers -
As I am also a bit new to the whole 3D printing thing, I am no expert. However I have found that many times it is better to print your parts/bodies at an angle, even compound angles. If you have a flat surface, the thick resin will flex and move the "Cured" parts and give bad results. Also, what is the size and resolution of your printer? I have a large 4K printer and I get very very little layer effect. I am very excited to do as you are doing. I plan to print an entire kit soon. Where did you get that "kit" file from?
-
Free 3D File sharing here? (Admin?)
Oldmopars posted a topic in Model Building Questions and Answers
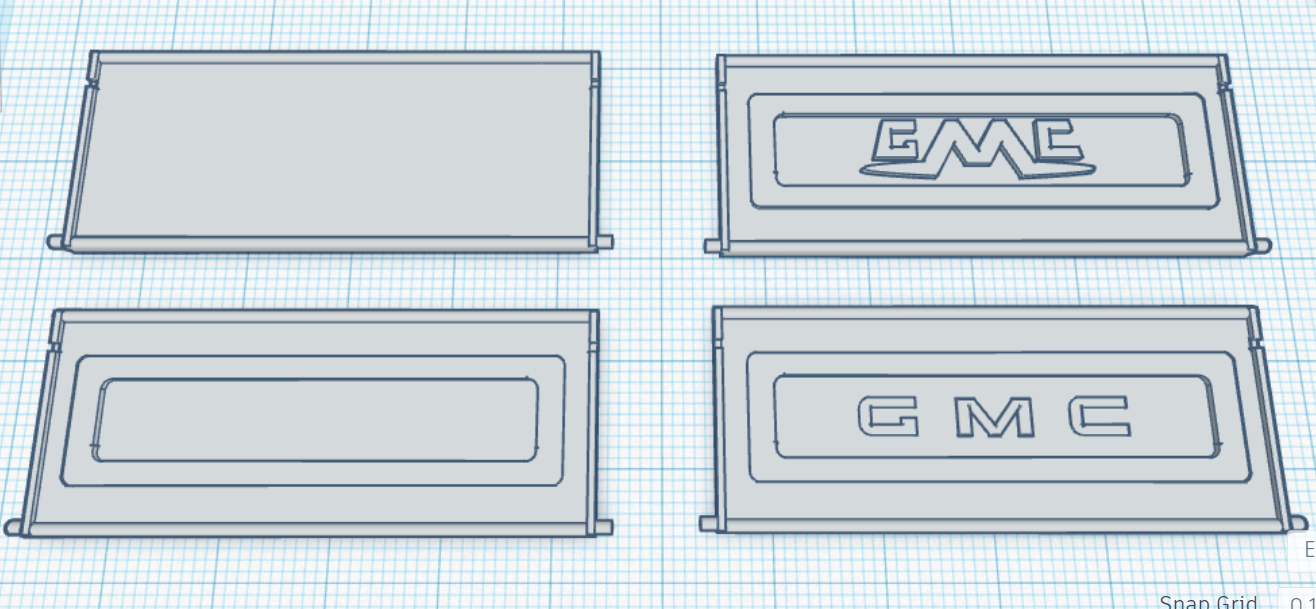
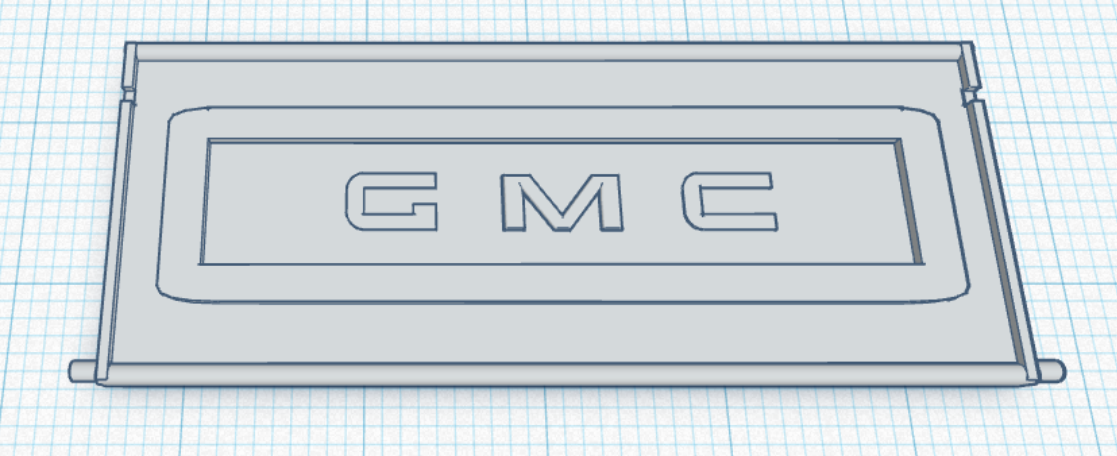
So I know that as time goes on more and more of us are getting into 3D printing. This involves creating things in various 3D modeling programs. I have a lot of fun creating stuff to print, but I really do not have the time or desire to start selling or printing stuff for others. However I am more than happy to share files I have made. I guess this is a question both for the admin and the users here. Do we want, and can we create a section in the forum for file sharing specific to Model cars and Trucks? I know that there are many file sharing sites for everything 3D, however nothing model specific or free. As an example, I have created the tail gates pictured below for the Revell 73-87 Chevy stepside truck kits to convert to a GMC. Keeping with the theme of this forum, the files would be free and need to be model related. Either directly for a kit, or maybe tools, etc. We could list what kits they are made for. Is this possible?
-
OK, 4 options. 1 flat, 1 plain no letters, 1 54-62 Old Script, 1 63-87 New Script.
-
OK, I did a little more work on this one. I think this is as close as I can get to the original tailgate posted.
-
Yes, the op has posted a picture of a 60-80s tailgate. I’m not sure what year it changed, but the lettering changed over the years. While not 100% perfect, the one I made is correct for the 73-87 kits. According to the research I have done, the tail gate is correct fit for 54-87, the lettering is correct for 63-87. Only the 54-62 had the fancy lettering you show.
-
That is not like the one shown in the first post. that is why year info is important. Let us know year and kit.
-
I think the biggest issue with the Yoder is that the kit is a curb side and the chassis is really bag, was designed to have a motor like a toy. However, if all you want is a nice 1/24 cop car that looks the part, they are not too bad from what I have seen.
-
I went back and fixed the sharp outer corners.