Claude Thibodeau
-
Posts
6,129 -
Joined
-
Last visited
Content Type
Profiles
Forums
Events
Gallery
Everything posted by Claude Thibodeau
-
2022: My year in styrene: 10 creations...
Claude Thibodeau replied to Claude Thibodeau's topic in Model Cars
Thank you Craig, and happy new year! CT -
2022: My year in styrene: 10 creations...
Claude Thibodeau replied to Claude Thibodeau's topic in Model Cars
Thank you Steve, and happy new year! CT PS: My yearly lakester is coming along nicely. At paint now. and you'll get a sneak peak soon... -
Hi Sir! World class, bravo! CT
-
2022: My year in styrene: 10 creations...
Claude Thibodeau replied to Claude Thibodeau's topic in Model Cars
Thank you Bruce, and happy new year! CT -
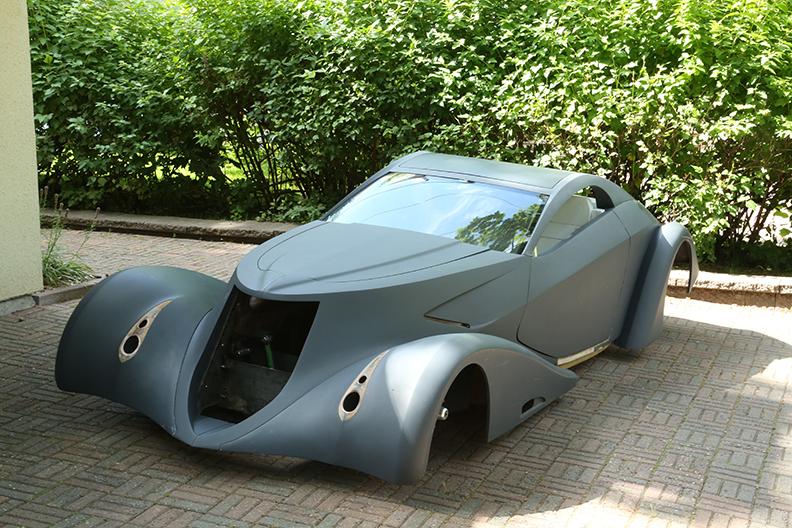
Hi Peter! Thank you. I know what you are talking about. I worked once a a signmaker, and we used some of it. It was "new" at the time. In 2006, I sculpted an entire 1/1 street rod body for a customer (see pix below), out of HD40 insulation foam that the factory sliced in huge blocks from the 49 X49X97 raw castings. Lots a foam particles left over, but it was later coated with latex paint to create a barrier, and laminated over with fiberglass. Quicker to produce a one-off body like that than making molds. Happy new year to you, and many creations in 2023! CT

-
2022: My year in styrene: 10 creations...
Claude Thibodeau replied to Claude Thibodeau's topic in Model Cars
Thank you Ryan, and happy new year! CT -
2022: My year in styrene: 10 creations...
Claude Thibodeau replied to Claude Thibodeau's topic in Model Cars
Thank you Tom! 2023 will be better, I'm certain! CT -
Hi Al! Great production, bravo! Is the roof on the two-doors Ford the kit's roof, or did you swap it? Just curious... CT
-
Hi Peter! Great productive year, bravo! If I may: what is the material that your Atlantic vacuum buck is made of? The texture puzzles me... CT
-
2022: My year in styrene: 10 creations...
Claude Thibodeau replied to Claude Thibodeau's topic in Model Cars
Thank you Al, much appreciated. Happy new year! CT -
2022: My year in styrene: 10 creations...
Claude Thibodeau replied to Claude Thibodeau's topic in Model Cars
Hi Rick! Thank you. Somehow, my wife seems to think likewise... Go figure LOL! CT -
Thanks Bob! I'll check it out. CT
-
Hi Bob! All very nice, bravo! My favorite would be the F100. May I ask the provenance of the spoked wheels on the 37 slantback? Very distinctive... CT
-
she chose wisely
-
2022: My year in styrene: 10 creations...
Claude Thibodeau replied to Claude Thibodeau's topic in Model Cars
Thank you Bill, and happy holidays! CT -
2022: My year in styrene: 10 creations...
Claude Thibodeau replied to Claude Thibodeau's topic in Model Cars
Thank you Paul, and happy holidays to all your family! CT -
2022: My year in styrene: 10 creations...
Claude Thibodeau replied to Claude Thibodeau's topic in Model Cars
Hi Ricky! Thanks for the comments. You have an eagle eye: indeed, the roof comes from an '90 Cougar (as the dash and bucket seats). It did fit with minimum fuss, and it really pulls the car forward by a few decades. The most troublesome part was molding the opening doord shut, and retracing door lines. Oh well... Happy holidays! CT -
Are you supposed to dance to Steely Dan?
Claude Thibodeau replied to JollySipper's topic in The Off-Topic Lounge
Hi! Having just read "NIGHTFLY: The Donald Fagen story", my takeaway is that "danceability" was the least of their concern. Happy for us! CT -
2022: My year in styrene: 10 creations...
Claude Thibodeau replied to Claude Thibodeau's topic in Model Cars
Thank you Carl, and happy holidays! CT -
Monogram embroidered on my shirt would be swell.
-
Follow the money
-
2022: My year in styrene: 10 creations...
Claude Thibodeau replied to Claude Thibodeau's topic in Model Cars
Hi Oliver! Thanks. I'm currently finishing five models at once: a vintage funny-car, a Custom Riviera, a pro-touring 71 Mustang, a Bonneville lakester, and... a jet boat (!?). More later on this forum. Happy holidays to you! CT -
2022: My year in styrene: 10 creations...
Claude Thibodeau replied to Claude Thibodeau's topic in Model Cars
Thank you Bob, and happy holidays! ct -
Hi Phil! It would have been VERY surprising not to find a few 32's in that list... And you did not disapoint! Bravo! CT
-
Hi Steve! Somehow, I can't help suspecting that the mid-60's were formative years for your automotive tastes... Seriously, great production! CT