
Mike Williams
-
Posts
366 -
Joined
-
Last visited
Content Type
Profiles
Forums
Events
Gallery
Everything posted by Mike Williams
-
Hi Jason, the photo you show is for sure a Sport Fury interior, a '65 model. The 64's had a nicer dashboard though. As far as I know, the A990 cars had either beige or red interiors, the panels being very clean, smooth and without any fanciness. I had many, many hours and ride time in a red 64 Sport Fury, back in the day. Good luck with your project.
-
Again, another stunning model car from your bench. Just gorgeous. The only thing that strikes my eye as being somewhat out of place is the crease under the vinyl top at the rear. It seems a bit too pronounced. I checked out 65's online, so definitely an issue with this mold, not your fault. Your models are so perfect, there is really nothing to knock. I don't mean to knock either, your expertise is so far advanced this small comment does not affect whatsoever. I like the motor swap. I saw a 65 just now online for sale, with a 426 Max Wedge. Love it. And now....how on earth do you make such beautiful and correct carbs? Just an amazing model. Compliments. Mike..
-
The Peterbilt 359 is a lord
Mike Williams replied to grodudulle77's topic in Model Trucks: Big Rigs and Heavy Equipment
Hello grodudulle, Thank you for the reply. I understand now about the tires. Concerning the motor, my intention was not to induce a "weathering", but only to add some color to break the overall "whiteness" of the motor. Please excuse that I offer a photo on your topic. Here a white motor, brand new, just it shows some color contrast; You have wonderfully added a few accessory details to your white motor, excellent. I really don't realize the need to use a "dark grey primer before white painting", just here and there a touch of something other than stark white could prove to be a good thing for a truck model. But this is just my opinion. Yes, I've built a 359 model before. Just not in styrene. -
The Peterbilt 359 is a lord
Mike Williams replied to grodudulle77's topic in Model Trucks: Big Rigs and Heavy Equipment
A wonderful 359 model here, respect. With all of your accuracy and obvious expertise, I feel there are two things that keep this from being about perfect. 1. Shiny tires. I think they look out of place. 2. The all too white motor. My opinion, even with a clean-type, showroom floor presentation, would look even better with a somewhat duller tire finish. Concerning the motor, you added great detailing, lines and such....just the motor looks unreal. The all white shows no shadows, nothing breaks the extreme white appearance. Of course, this is a new motor and not a dirty and oily machine. It's just too white in my opinion. Maybe a slight wash here and there, without letting the motor appear to be used. What do you think? Mike.. -
AMT 23 Ford T, Fuel Altered, new pics
Mike Williams replied to Mike Williams's topic in WIP: Drag Racing Models
Thanks guys for the gracious comments. I don't come around here too often, hence my negligence. -
AMT 23 Ford T, Fuel Altered, new pics
Mike Williams replied to Mike Williams's topic in WIP: Drag Racing Models
A novelty for sure now, I'll quote myself. On a right handed scissors, the top blade while opened, will flip the cut material off to the right side, this excess will have a curl, the remainder to the left of the scissors will remain flat. So, in other words, the part you want to keep clean should be to the left of the scissors. -
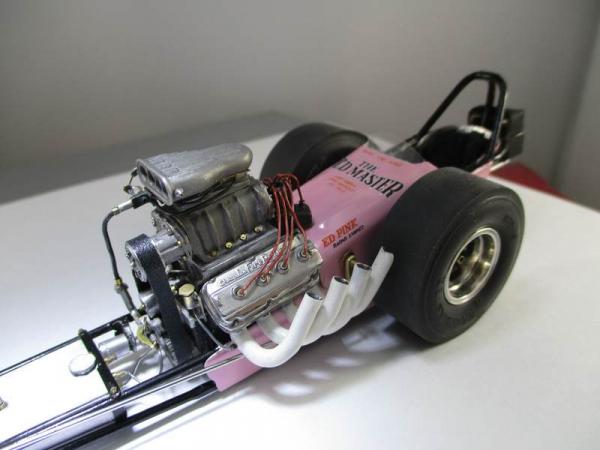
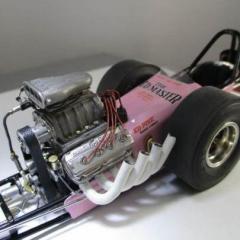
Indeed, very sad to hear of his death. OK, on another note, check out echo's photo above. Low and behold….a car with really banged up headers. I'm struggling with headers for "The Old Master", getting them straight and aligned properly is a task….then I see these. I just decided mine are done. Dan....now you know for sure. Any headers will do, no problem. ?
-
Thanks John, appreciated. They do look good on those beautiful motors, well done.
-
AMT 23 Ford T, Fuel Altered, new pics
Mike Williams replied to Mike Williams's topic in WIP: Drag Racing Models
Here a few shots of the interior, getting ready for the final buildup. Some tinwork, rear tubs; Trunk; Belly pan; Small windshield; Looking at the rear wheels before mounting, the lug nuts are way too big. I used these for a truck, so these were changed for smaller ones; Getting closer now; Here the finished car…..well, except the paint. It will be painted a simple red, I think the color looks good on these cars. As soon as my paint booth is finished in the basement. ….and finally, this car sits alongside the two other cousins. 3 Altereds, built the same way. This car will be my last altered for a while, time to move on to dragsters. That's it. -
John, this is great looking build going on here. Motors look really fine. Question: The carbs look fantastic, where are they from? Mick..
-
AMT 23 Ford T, Fuel Altered, new pics
Mike Williams replied to Mike Williams's topic in WIP: Drag Racing Models
OK, I think I see what you mean now. I think though, the "falloff" would be to the other side of the scissors, away from the cut. I see too about the "flat side". This is interesting, also about the scissors for lefties. As soon as my bench is free of laced wheels and jigs, I'll look into this further. Dan, thanks for posting. Mick.. -
AMT 23 Ford T, Fuel Altered, new pics
Mike Williams replied to Mike Williams's topic in WIP: Drag Racing Models
Hi Dan, thanks for the info. I don't quite understand what you mean about "flat against the cutting surface". Can you post a pic of how you mean to hold the sheet/scissors? Mick.. -
AMT 23 Ford T, Fuel Altered, new pics
Mike Williams replied to Mike Williams's topic in WIP: Drag Racing Models
Thanks Jim. Here the next step with the buildup. The front end mounted and steering unit. My next build is a Top Fuel dragster from around 1967, and I needed practice for lacing the wire wheels. Since I didn't have any 12 spoke wheels at hand, might as well use some wire wheels up front, after lots of internet searching, a few Ford T Altereds were found with wire wheels up front. Good enough for me. Here a few build pics; This time for the radius rods, I found a steel wire that polished up like chrome and the metal can be soldered too; Here the wire wheels, laced with a silver coated copper wire, solders up nicely and looks like polished metal. This wire is in 0.3mm, next time around I'll use 0.25mm for the 32 spokes. The rims are a scale 18", copper rims. Each half has 16 soldered wires. A problem is though the silly dragster tires are really skinny. Here the 1st attempt, meanwhile they look a little different; The paint is just primer. Thanks for looking, Mick.. -
AMT 23 Ford T, Fuel Altered, new pics
Mike Williams replied to Mike Williams's topic in WIP: Drag Racing Models
@Roadracer, Straightliner59 and cobraman, your viewing and commenting is greatly appreciated. A wonderful incentive, many thanks. CabDriver, thanks, and good question. Aluminum and brass sheet that I use is rarely thicker than 0.3mm, a good scissors is a great and easy way to cut away what's needed. The edges and corners will bend up a little, both on the cut piece as well as the bulk sheet that's left. No problem, lay them flat on a hard surface and run a rounded instrument or steel edge along the perimeter and it's all flat again. For rods and tubes, a thin separating disc using a Dremel or similar tool makes for a quick cut. For tubes, you can place a thin, sharp blade on the tube and roll it till it cuts through, just the pieces fly all over the place and I hate looking for things. Discs are efficient. If you don't mind, these burs here are about all that you'll need for shaping up metal. Thin disc for slicing, carbide burs for rough grinding and shaping, diamond points, rubber wheels and points for smoothing up solder joints; Good luck with your brass building, it's addictive though... -
Here's a model I finished up just last month. This is the AMT Ford Kit, only body and a few elements are in the box. Very similar to the "Wild Willie Borsch" model, just this AMT kit has a much finer and thinner mold, a nice piece. Included is a dashboard, a Tonneau cover and a grill shell and a view linkage parts. It's called "Ford Model T Roadster Racing Body". Starting with the finished frame, a few pics will be posted showing progress to the final and finished model. Here a look at the bare frame painted Hammerite gold from spray can, with the rear axle and tire support still attached. I'll need this setup till the rear end is mounted; Here with the mounted motor mock up and rear end positioned; A view of the rear end set up and ready to go; The fitment of the kit tonneau cover was miserable. After some researching, some cars had aluminum coverings for the interior so I was glad to find this out; The kit grill shell was way too thick, so I had to make one in brass sheet; Here a fuel tank in brass, all shiny because sometimes I hate to have to paint brass, Here more mockup, with motor and grill shell and tank; Thanks for viewing, critique, comments or questions are welcomed. Mick..
-
@Mark, thanks for the nice welcome.
-
Hi Richard. I can't do any modeling to speak of without a well lit magnifying lamp. Finally, I found a nice one on eBay, with a circular neon daylight bulb, and 2.5 magnification...for around $40. Now I can see all I need, and the depth of field is such that I can move around and still remain focused. The objects are viewed with your reading glasses, or bare eyes. Regular eyeglasses won't work. My hands hurt sometimes a lot, some days it works, some it doesn't. I'm in no hurry, so take it how it happens. All in all, this model took about 6 months, on and off. About the metal casting, I have a buddy who does this for me. I prepare the styrene-kit parts then send them over. I receive the parts that were cast, then finish them myself. Wheels and rear ends, anything that's in a styrene model kit can be re-produced in metal. Indeed, it is very interesting, I've watched it being done many times, and the result is just killer. That is, if you want a car in metal, which is not everyone's thing. I love it! Here another view of this car as a WIP; Mick..
-
Outstanding work, excellent.
-
Well! I wasn't expecting much attention, but am happy to read of encouragement, which makes me happy. Guys, I'm a wooden ship model builder at heart. Big ones, 3 feet and more. Historical sailing ships, the sails can be raised and lowered, the rigging works….read, Baltimore Clipper!! For me, the quintessence of sailing vessels. But I'm also a metal worker by trade, retired nowadays. I do 1:25 cars, drag racing from the 60's is my theme. All metal, the body in resin. I haven't seen much of this on the internet, hence I'm kind of weary of posting. Here just a view of a motor; This one has 385 single parts. No styrene here, all metal. I appreciate the warm welcome. Mick..
-
GMC 7500 Spreader Truck
Mike Williams replied to DRIPTROIT 71's topic in Model Trucks: Big Rigs and Heavy Equipment
@DRIPTROIT...thanks for the reply and the explanation. Compliments. Giving so much attention to detail is a big plus for our hobby...and a great salute to modelers who go to the trouble of making their own way. Wonderful. Your model is very good, with excellent detailing. -
Oh yeah! Look at this beauty….Dan, this ride looks real. Sensational. Looking at this model, I like the lack of bling. Depending on the light source, the beautifully done body shines, maybe a little on the valve covers, or tank caps. The eyes are not drowned in shiny stuff...this looks like a serious private effort of a drag racing fan, for sure. No big dollar team here. Just a car that you might see anytime, back in the day. Absolute excellent quality and lots of thought and expertise is easily shown here. The first time I've ever seen a manifold that's bolted to the heads. Yes! We have a winner. Question: Just for comparison purposes, what is the scale wheelbase of this car? 150"? Mike..
-
Techno Bubble 41 Willys Bonneville car
Mike Williams replied to Claude Thibodeau's topic in WIP: Drag Racing Models
Hi Claude, It's possible that a Bud deal was in the making….just they decided the cars are going so fast, no one could see it. Mike.. -
Techno Bubble 41 Willys Bonneville car
Mike Williams replied to Claude Thibodeau's topic in WIP: Drag Racing Models
Excellent, and many thanks for this valuable info. lol. Cool cars and cool beers go together well, so I've been told. -
Super glue question
Mike Williams replied to slusher's topic in Model Building Questions and Answers
I've enjoyed reading through this interesting topic. My first experience with CA was '72. The Superintendant, read a gray head, tough E-9 "fixed" something that I flubbed for a showcase theme. He told me to wipe off the excess from the tube with my fingertips. Well....let's say that once was enough. I know for a fact, the "showcase" still exists as well as the objects inside. Very interesting, as this was from the USAFE Hospital way back when. The flubbed piece was a fractured skull segment that we'd provisionally replicated so that the pilot could be finally treated at a later time. He survived. Yep, many brands out there now, just the best deal is buying the smallest amount. It all goes south soon enough. I build models with lots of metal, Zap-A-Gap is killer. It dries up as fast as the others, so buy a small quantity at a time. Once thick, will only get thicker. -
Hello Ken, let me write that wooden ships are my favorite modeling experience….my opinion is, this genre is the real deal. This model is looking very good. I can imagine this being as Artesania Latina rendition (edit; you mentioned Corel) , and your attention to cannon rigging is well done, the planking looks to be correctly executed on the deck and hull, and the overall appearance is a treat. Did I say that I love wooden ship models…? lol. A magnificent model, compliments. I'll be dropping by when you update, thanks for sharing this endeavor.