Bills72sj
-
Posts
4,583 -
Joined
-
Last visited
Content Type
Profiles
Forums
Events
Gallery
Everything posted by Bills72sj
-

1964 Pontiac Bonneville Convertible.
Bills72sj replied to StevenGuthmiller's topic in WIP: Model Cars
All I can say is WOW! -
"I second that emotion" ...Smokey Robinson.
-
Changing Gears
Bills72sj replied to J.B. Customs's topic in WIP: Model Trucks: Big Rigs and Heavy Equipment
Do you have your kit(s) picked out already? The AMT Ford C-600 straight truck and the C-900 has be reissued many times over the years. https://www.scalemates.com/search.php?fkSECTION[]=Kits&q=Ford+C-600&fkCOMPNAME[]="AMT" https://www.scalemates.com/search.php?fkSECTION[]=Kits&q=Ford+C-900&fkSCALENORMALISED[]="1:00025" The American LaFrance Pumper would be the closest for the rear section. https://www.scalemates.com/search.php?fkSECTION[]=Kits&q=LaFrance+Pumper -
I posted a link here to help others find it faster.
-
Nice concept. Following.
-
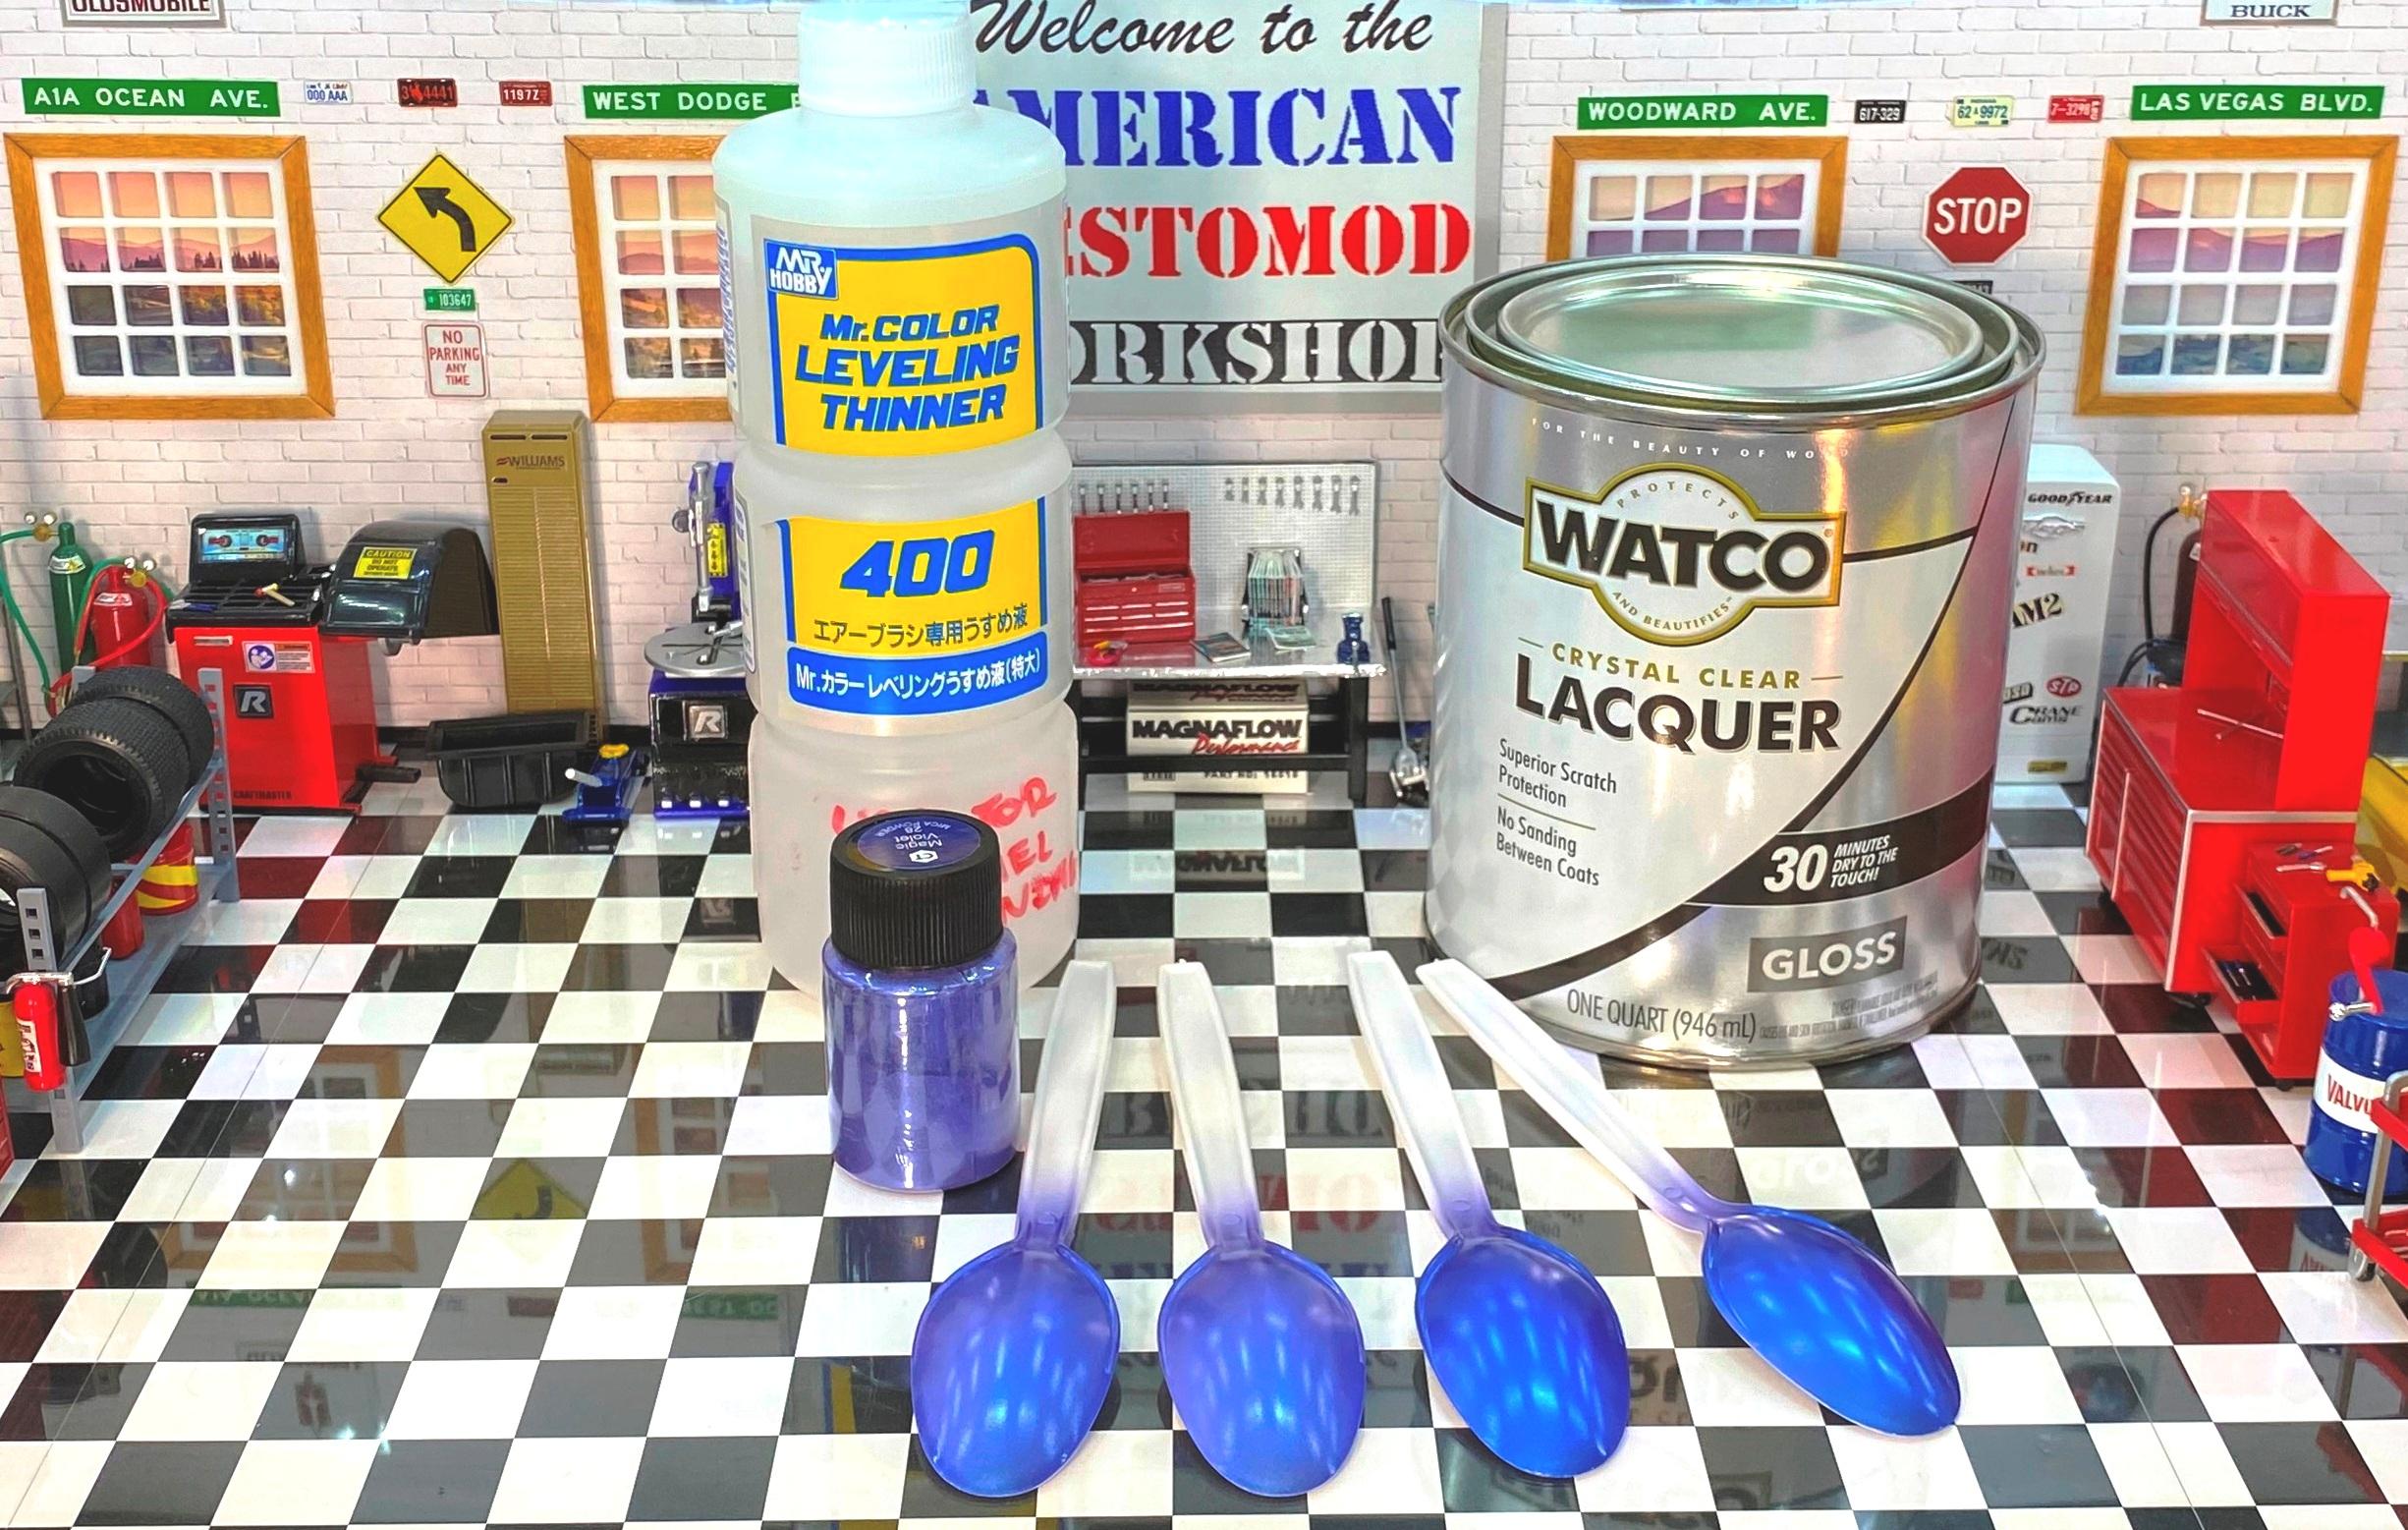
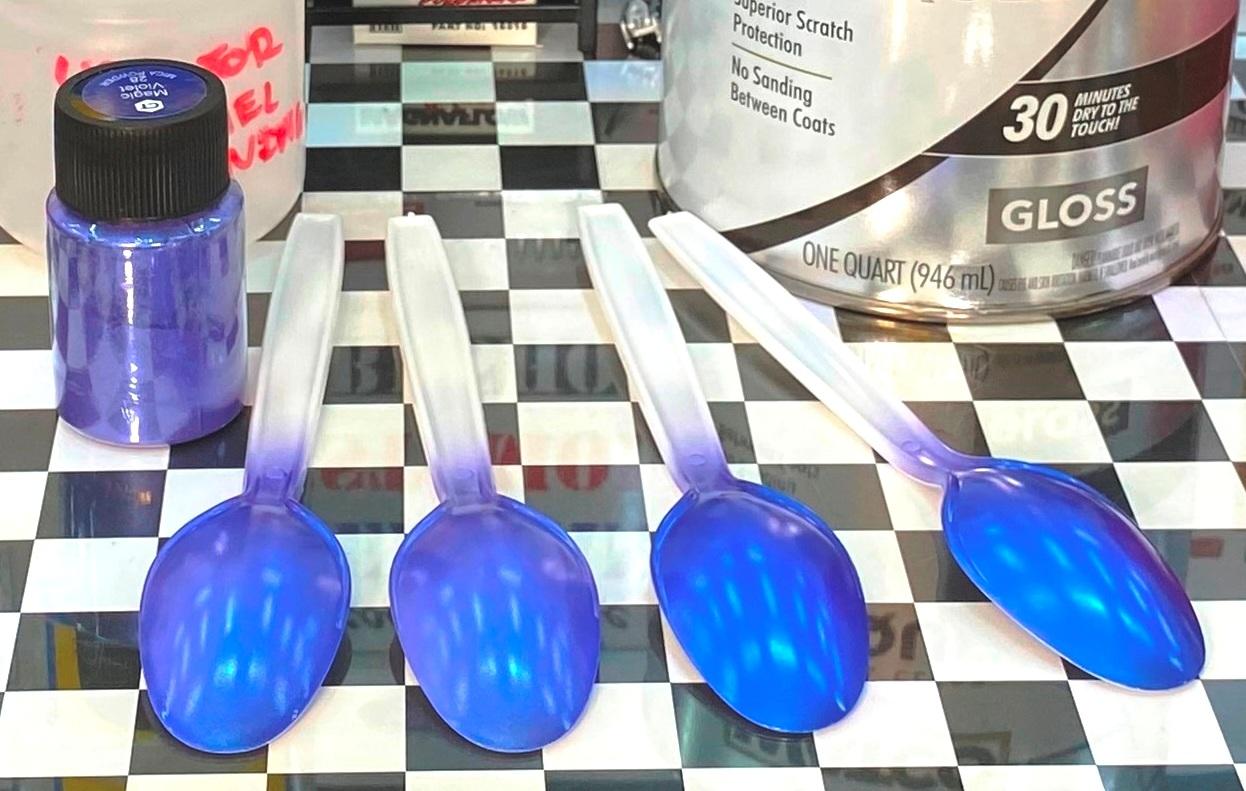
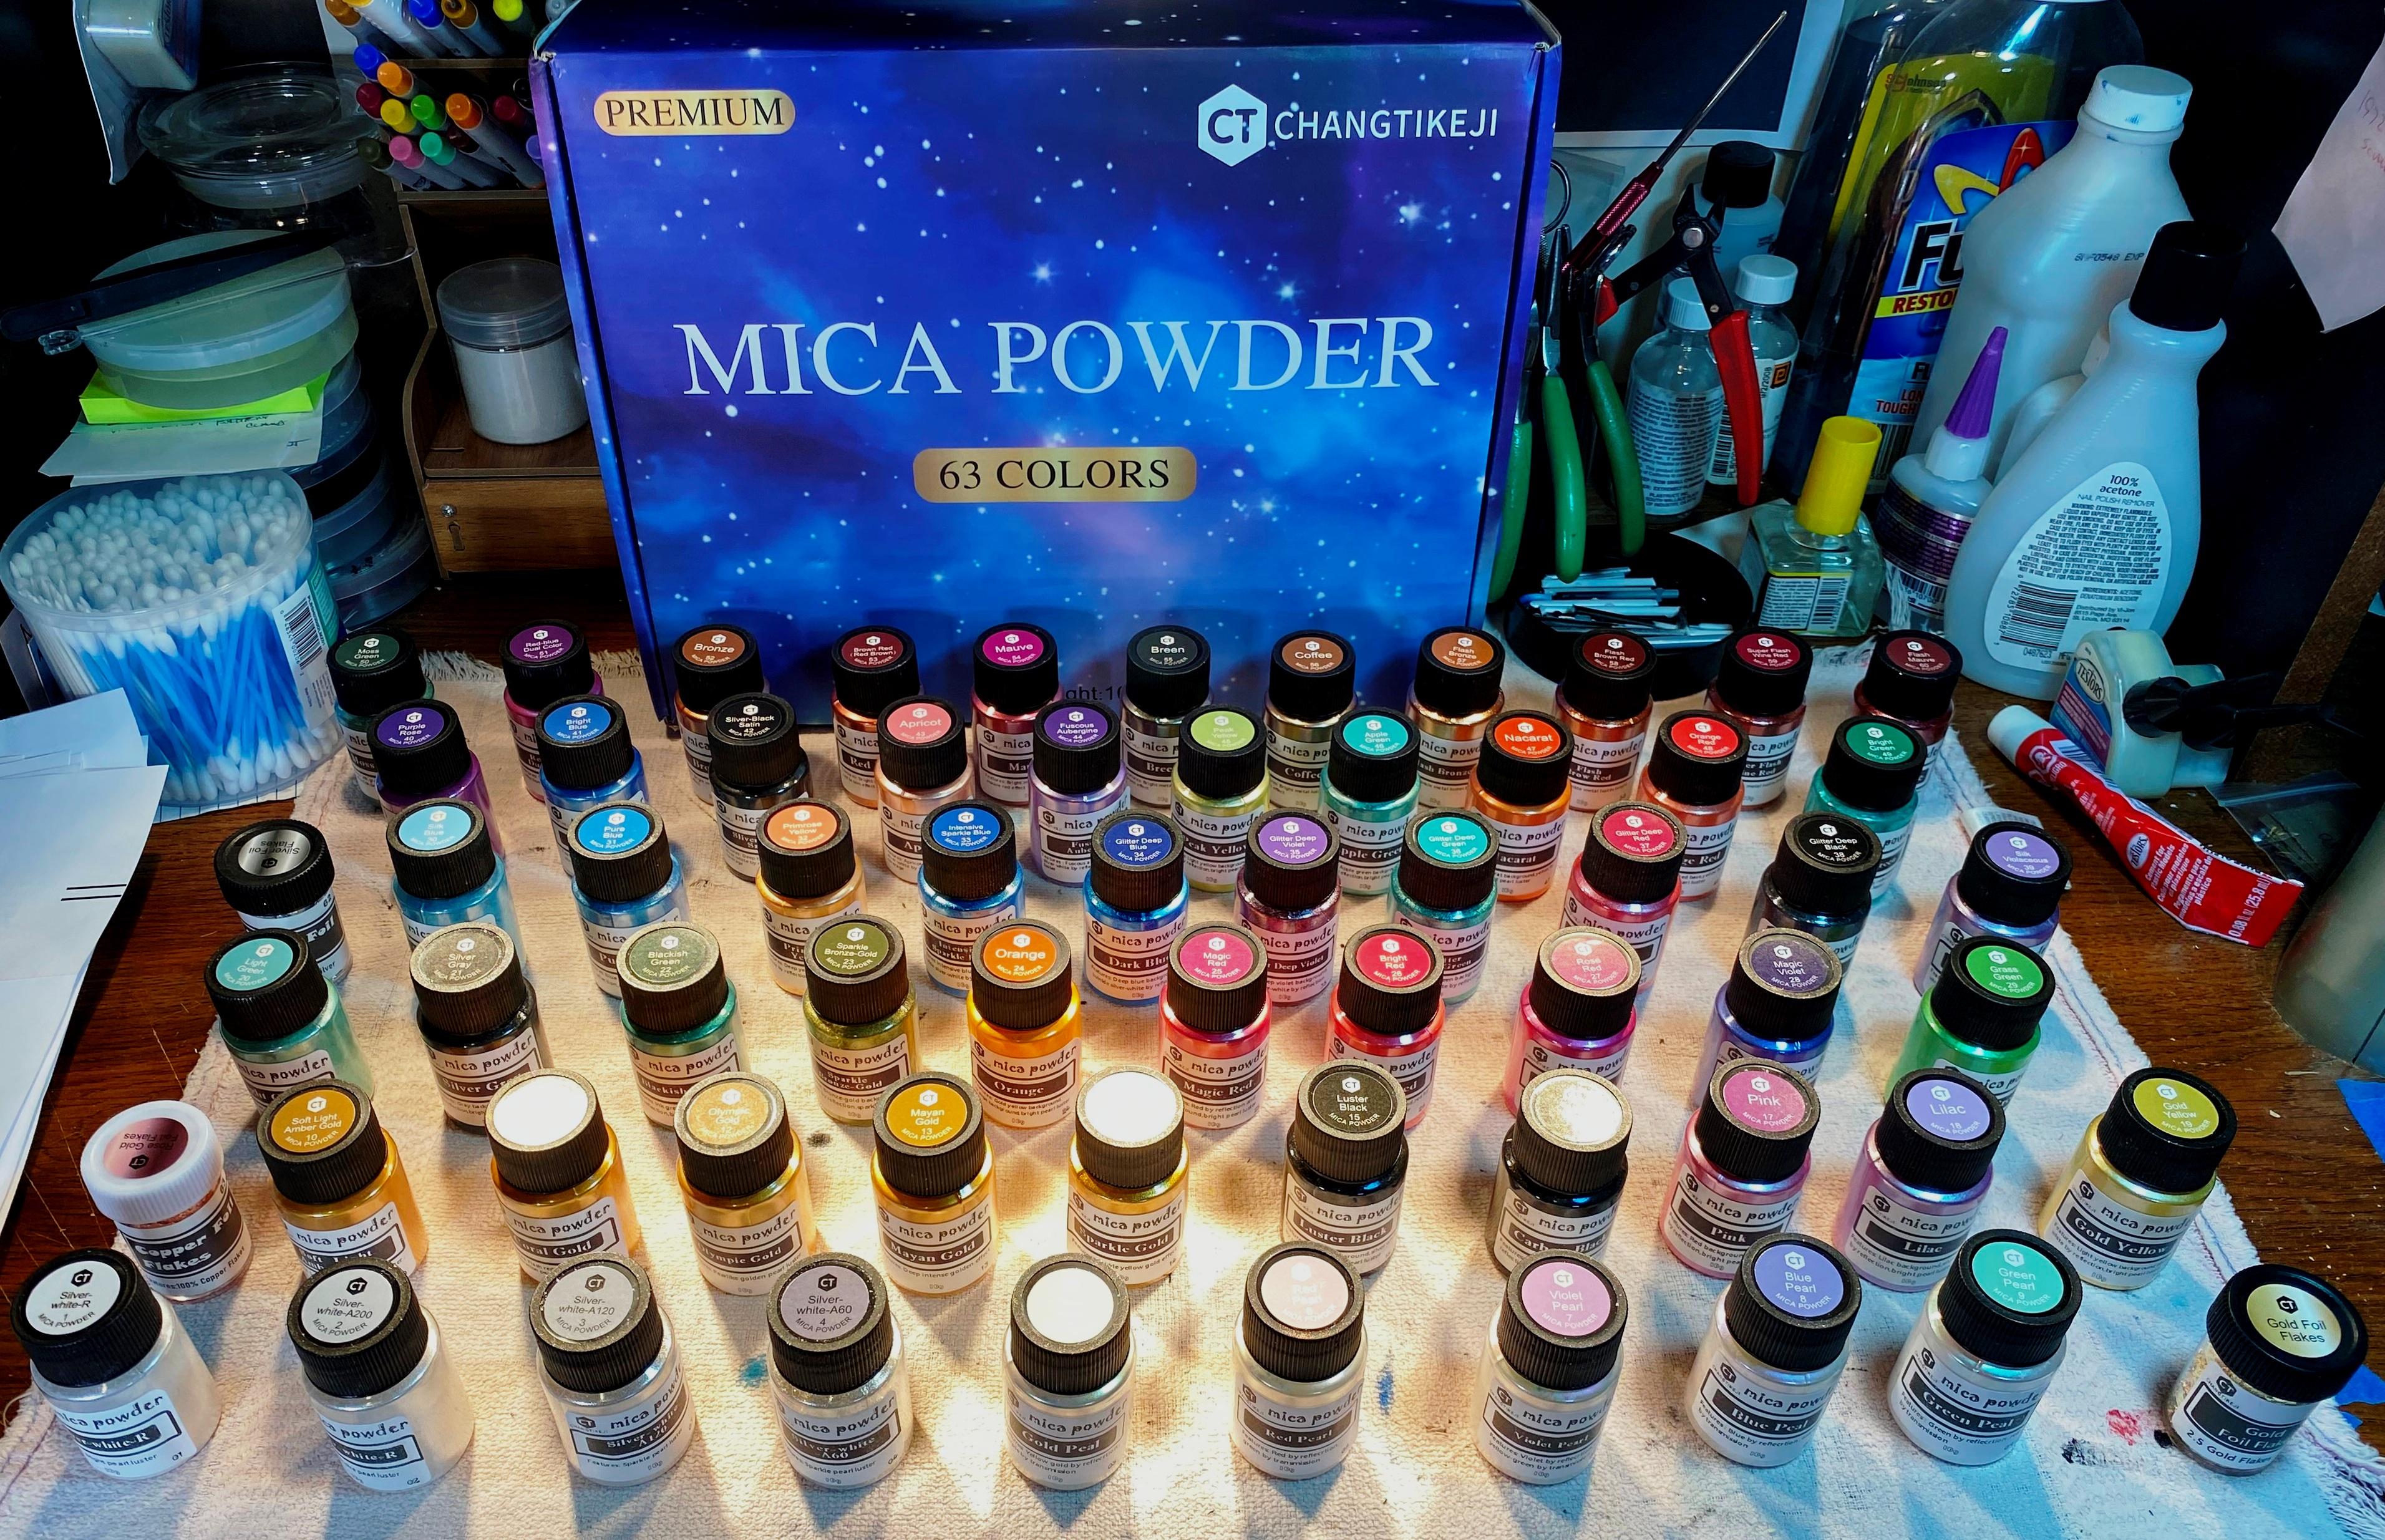
Paint too expensive? Try mica powders.
Bills72sj replied to Bills72sj's topic in Tips, Tricks, and Tutorials
Did some ongoing trials on this mica spray test. Sprayed Future over half of the spoons. Turned out great. Experimented with my clear lacquer carrier by topcoating more of the same clear over the other half of the spoons. Tried to use Xylene as a thinner 50/50. Nearly instantly made jelly. Used lacquer thinner instead of Mr Color leveling thinner. Sprayed just fine with no adverse reaction whatsoever to the mica pigmented clear laid two days ago. This experiment is giving great results so far. -
Rattle can "glop" leakage
Bills72sj replied to plasticprime's topic in Model Building Questions and Answers
I have had only one of my Testors cans ooze out like that. It was a bare minimum 10 years old but more likely 15. I simply decanted it and sprayed it through my airbrush. Like mentioned above, you MAY need to thin it with lacquer thinner depending on its consistency once you have it out. -
I built one of these years ago in Yellow. Following.
-
Paint too expensive? Try mica powders.
Bills72sj replied to Bills72sj's topic in Tips, Tricks, and Tutorials
Depending on the paints you use, you could try getting a smaller sample box and mixing in the mica into your existing paints. -
Paint too expensive? Try mica powders.
Bills72sj replied to Bills72sj's topic in Tips, Tricks, and Tutorials
I did some over some primered spoons. Over white primer, the color looked better with some of the colors. My grey duplicolor primer was nearly impossible to cover completely and exaggerated the orange peel of the primer. I painted some light colors over some prepainted dark parts and it takes quite few layers for coverage. This should be expected with a clear base. This gives me the idea to maybe try mixing some powders into non metallic base colors. -
Thank you for sharing this here AND back then,
-
I saw a couple of videos on Youtube about mixing mica powders with clear and airbrushing them. It looks like an economical way to get a whole bunch of cool metallic colors relatively cheaply. I did some research on Amazon and found a 63 color box of 10g each mica powders for $40. I also found a quart can of clear lacquer for $20. Today, I tried out a few of the colors with a rudimentary mixing ratio of 1/8 teaspoon of powder to 2ml of Mr Color Leveling thinner and 2ml of the relatively thick clear. The superfine powders mix with the thinner pretty well and then the clear was added. I shot it through a 0.5mm airbrush at 20 psi. It lays down like a typical tinted clear whereas you keep adding layers until the color is where you want it. It is very tolerant of running if you wait 15-20 seconds between applications of 6-7 passes. You can go heavier towards the end. When you are done, it looks really glossy. It dries in a couple of hours to a satin to semigloss sheen. I am sure with experimentation of ratios or technique, the gloss could be manipulated. As is, the sheen would be perfect to simulate a vinyl interior. Overall most colors that I tried look like 1/25 scale factory metallics. The few that have larger flecks in them have the "bass boat" look to them. The one pearl I tried really has a pearl effect with pink highlights and a light green aura. It just does not show in the pics. The other reason I got the mica powders was to try it as flocking for carpet. I have yet to do that. $60 for almost a lifetime of metallic paint colors is not a bad deal.

-
That is some nice work right there.
-
Scribing panel lines. How is it done?
Bills72sj replied to conchan's topic in Model Building Questions and Answers
Experience and finesse are the key. I use a #11 blade with just a smidgen of the tip broken off. You must start out slowly and with a light touch. You can get a little more aggressive as you progress. I bought a Tamiya scribing tool and made 2 off line gouges in the first five strokes. Once I settled down, I found the groove too wide for my liking. It will probably be used for something else some day. Scribing is a finessed skill. Practice on junk bodies. Panel liner after the fact is hit or miss so far for me. Too dark on lighter colors and sometimes goes/wicks where I do not want is to. Steve's results speak for themselves. -
Do you have a WIP link? I would like to see the mods you did to improve the kit. Nice result BTW.
-
Surprisingly it had a well built 383 Magnum with a Holley 930 cfm 3 barrel and lots of other goodies.
-
Very fast too. The summer of 1984 we street raced a number of times in Missouri and Nebraska. NEVER got beat even once.
-
Very nice. I built one withe same color combo. I sprayed Testors Plum Crazy Purple but too much. It came out WAY darker than I wanted.
-
Make and use these. I sand diagonally a couple of strokes then diagonally the other direction. It is how bodymen sand with a longboard.
-
Nirvana Chevy van
Bills72sj replied to Limeyglue's topic in WIP: Model Trucks: Pickups, Vans, SUVs, Light Commercial
I like what i see so far. Following for inspiration. -
I would like to see the red one as well. My buddy in the Navy had a 70 R/T SE in red.
-
Running out of Future / Pledge Floor Care?
Bills72sj replied to Pierre Rivard's topic in Tips, Tricks, and Tutorials
Steve, I hear your points on Molotow and Future. Are the absolute best solutions for chrome and clear? No, but for us 90%ers, they get the job done. I have become gun shy on solvent based clears after watching it crinkle an irreplaceable and expensive set of decals. Future is very forgiving and can be removed with household ammonia and cotton swab. This avoids repaints for those of us who have limited build time. Regarding your tinted window inquiry. Food coloring does work with Future on kit glass. However, you have to get it pretty dark in the cup to show decent tint on the glass. The nice thing is, it will never harm the glass and you can do innumerable do-overs. I tinted the windows blue on my 1:25 Hot Wheels replica.
-
Well done. I just bought a resin body so I could build me a red one too. My cousin had one when I was in my 20's. How did you do the grille?
-
Thanks for the ideas. I ordered 300 clear plastic shot glasses from Amazon for $9.99. I use sprue sticks for disposable stirrers. They are basically free.
-
My model Roundup order came today. 68 Coronet 67 Streaker Vette 71 Olds 442 Resin X-body Ventura Resin mini liquid tank(er) Got some color from Amazon as well. 63 Colors for $40. Need to learn how to mix mica in clear.