AmericanMuscleFan
-
Posts
3,058 -
Joined
-
Last visited
Content Type
Profiles
Forums
Events
Gallery
Everything posted by AmericanMuscleFan
-

64 Dodge D100 Pickup Pro Street
AmericanMuscleFan replied to AmericanMuscleFan's topic in WIP: Drag Racing Models
Hello all, I just realize that I forgot to add the pics showing the hood on the body. I will try (later) to make the hinghes and some minor adjustment remain to be done. Cheers, Francis I did put the front fascia and the grille temporarily to check the fitment.
-
70 Plymouth HEMI GTX 1/25 Scale
AmericanMuscleFan replied to AmericanMuscleFan's topic in WIP: Drag Racing Models
I don't recall the exact size but I have taken them from a wristwatch repair kit and several sizes are available. You can find these on auction sites like eBay. Note that a slice of larger insulator wire can also do the trick. Francis -
70 Plymouth HEMI GTX 1/25 Scale
AmericanMuscleFan replied to AmericanMuscleFan's topic in WIP: Drag Racing Models
Directly over the red wire is simply a larger piece of black wire insulator that the red wire was slipped into. The donuts that fill the valve cover holes are tiny wrist watch stem gaskets. Hope it help, Francis -
70 Plymouth HEMI GTX 1/25 Scale
AmericanMuscleFan replied to AmericanMuscleFan's topic in WIP: Drag Racing Models
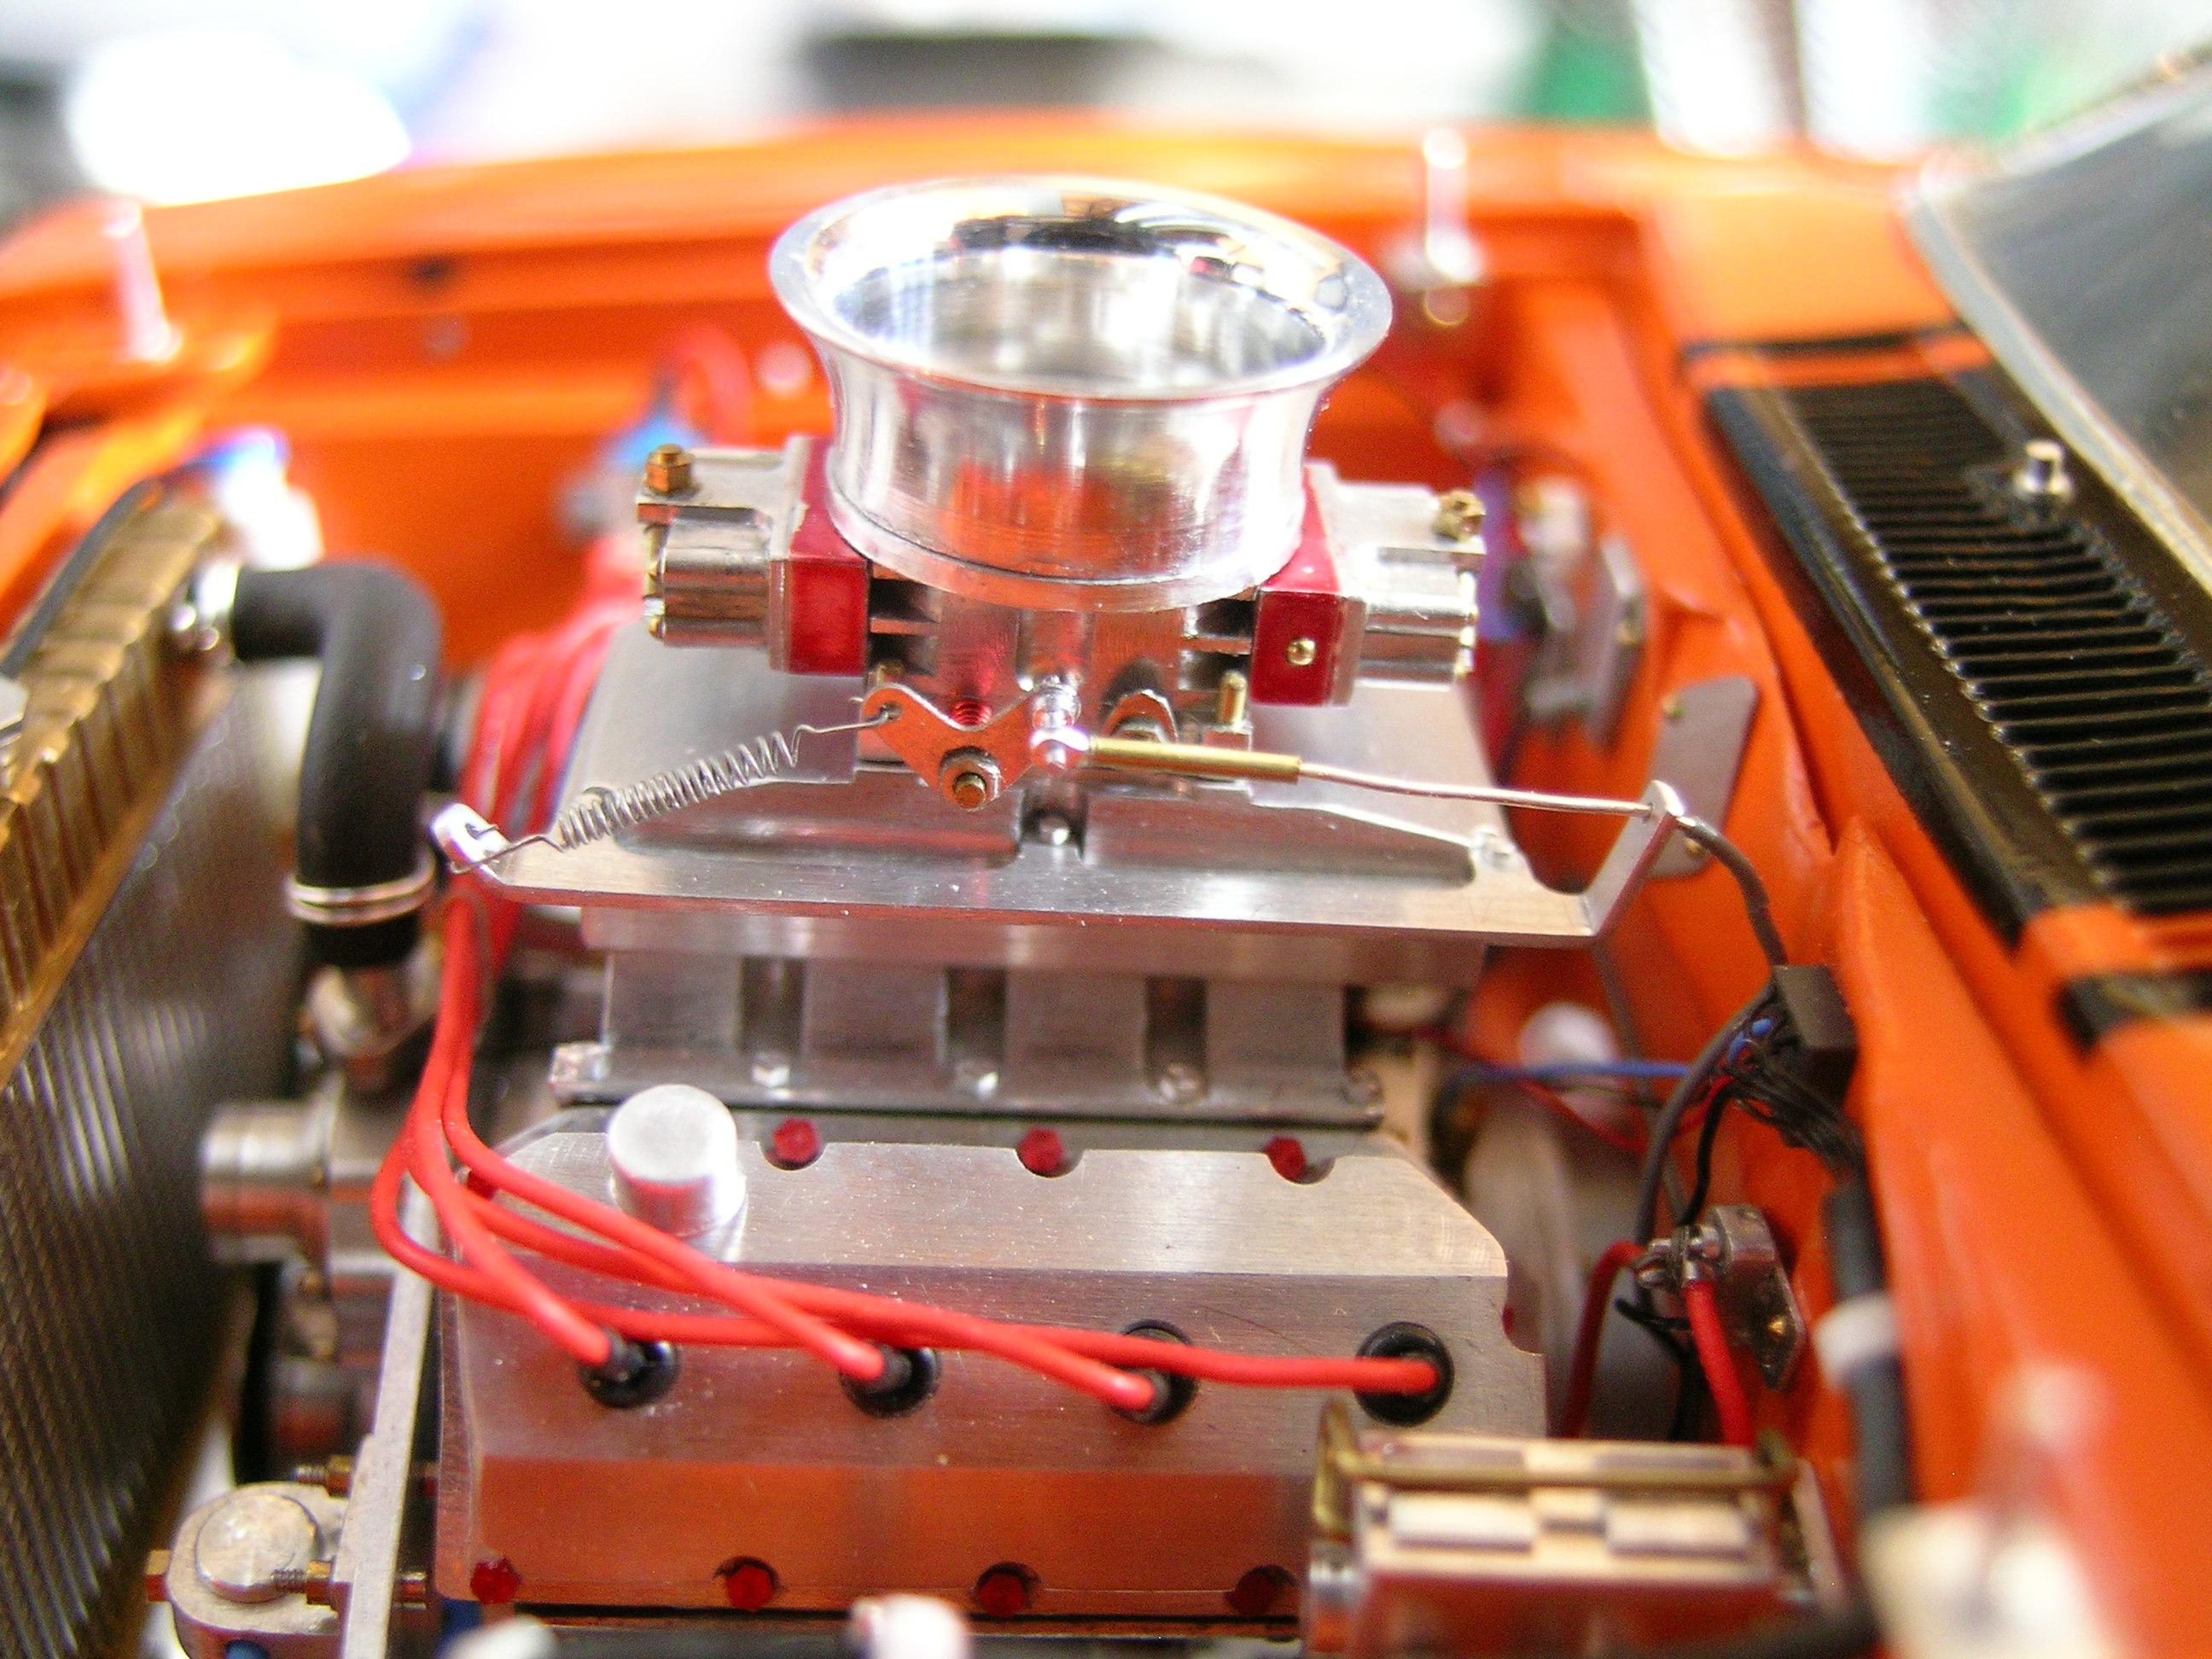
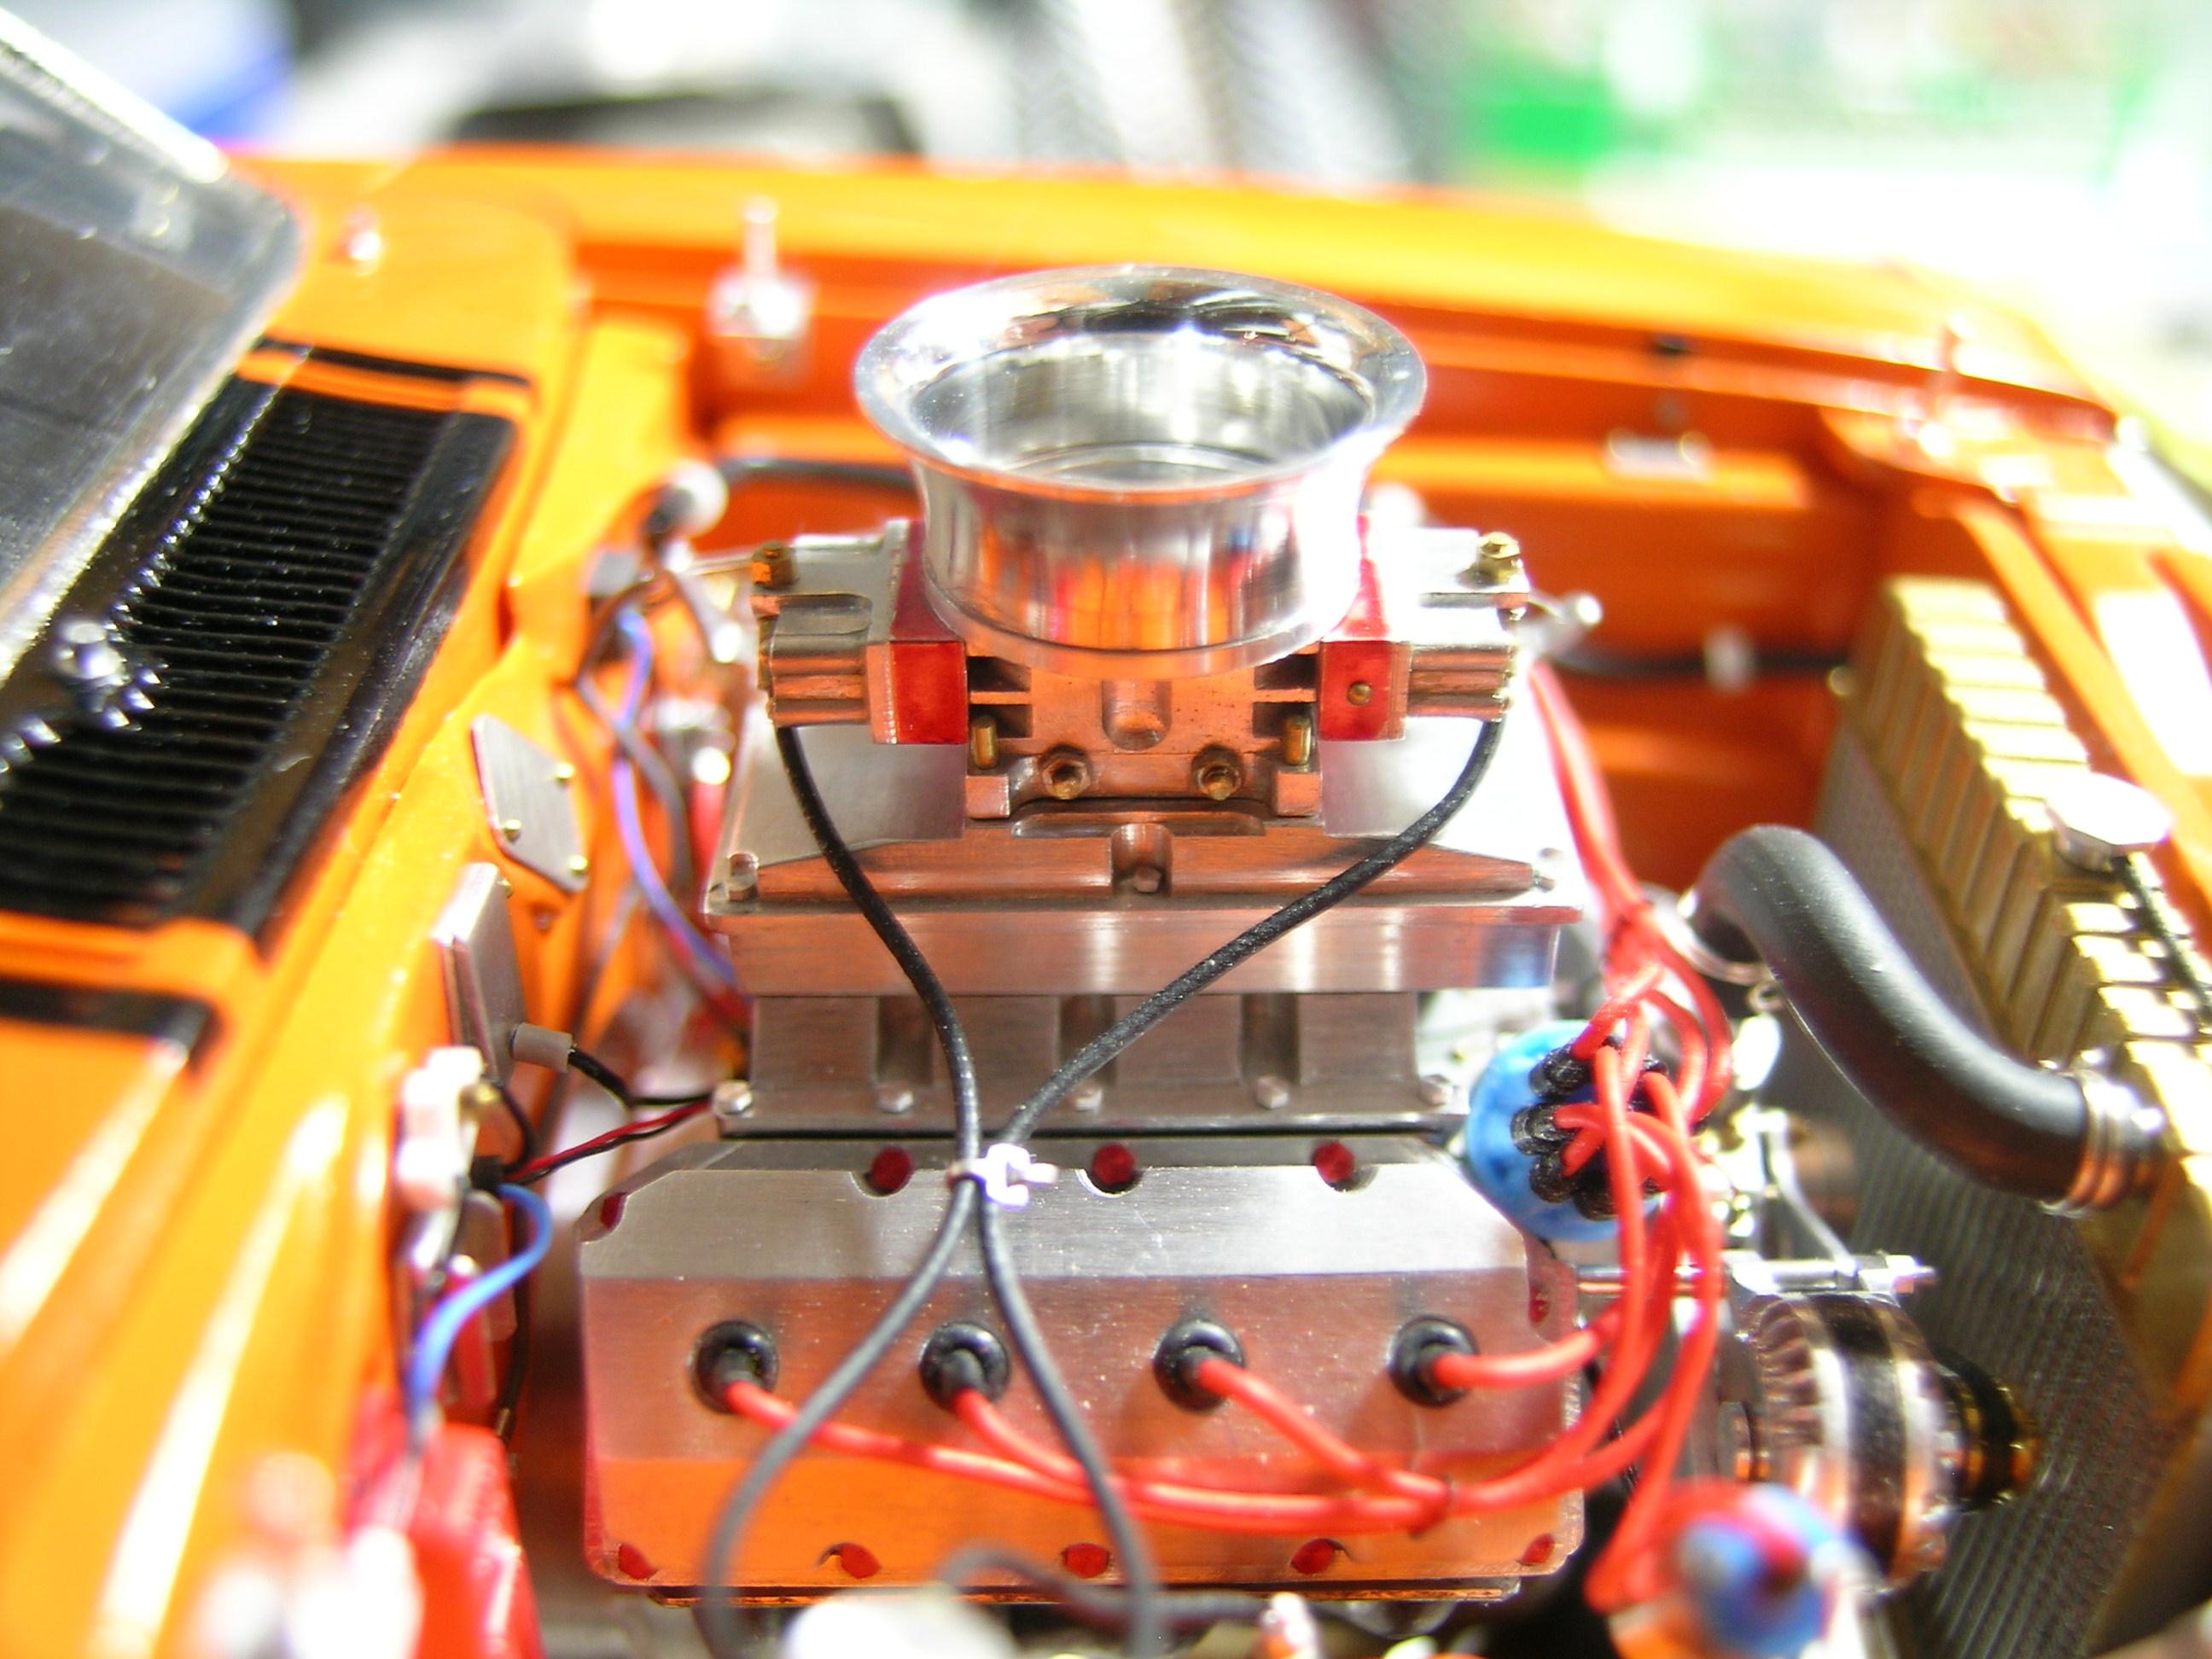
Hello All, I got a request from a fellow member to see some pics of each side of the intake manifold so here they are. Cheers, Francis
-
64 Dodge D100 Pickup Pro Street
AmericanMuscleFan replied to AmericanMuscleFan's topic in WIP: Drag Racing Models
Paul, keep in mind that the tubbing will become weaker after each cut so put just enough pressure on the vise jaws to secure the part. You could also slip a brass or aluminum rod inside the styrene tubbing if you have one in hand that fit perfectly. Keep me posted on your results! Cheers, Francis -
70 Plymouth HEMI GTX 1/25 Scale
AmericanMuscleFan replied to AmericanMuscleFan's topic in WIP: Drag Racing Models
Thanks for your visit Tim! Cheers, Francis -
64 Dodge D100 Pickup Pro Street
AmericanMuscleFan replied to AmericanMuscleFan's topic in WIP: Drag Racing Models
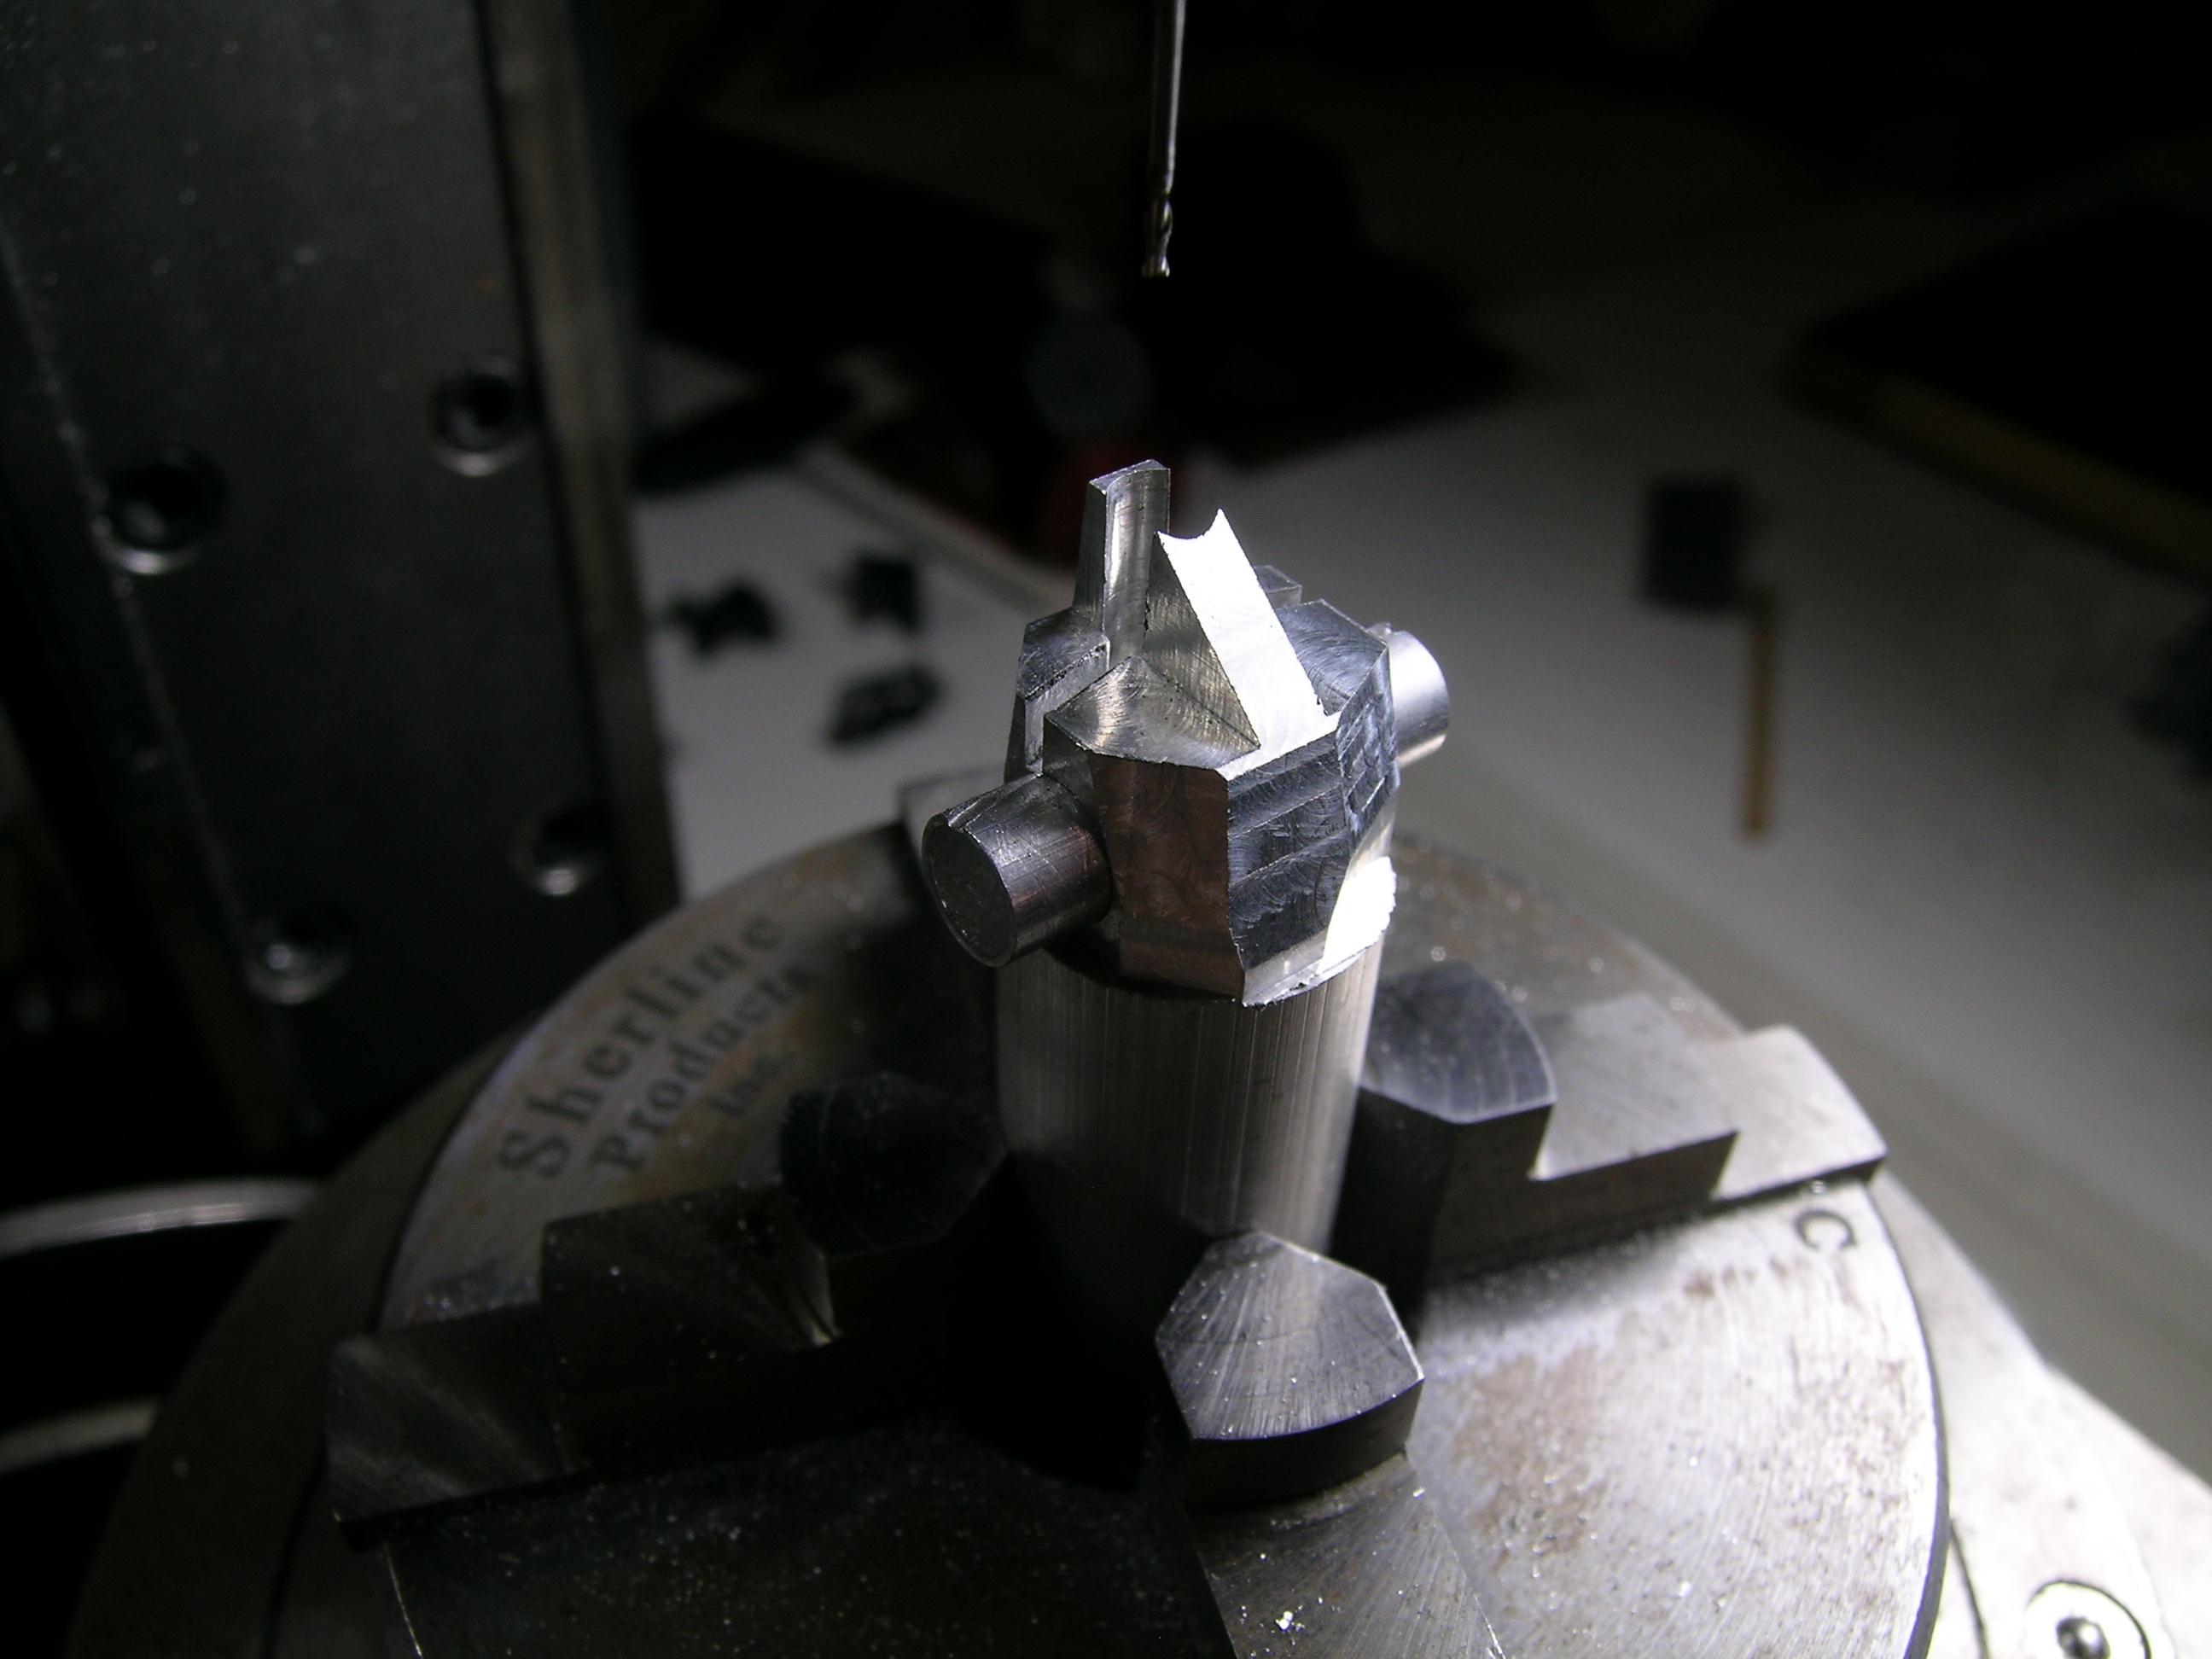
Hello Paul, Thanks for visiting and your kind comment! For your question, I placed the styrene tubing in the milling vise and I did use a 0.0625" square end mill. I made a couple of pass but didn't cut edge to edge keeping roughly 0.010" material. I then turn 180 degrees and did the same kind of cut. The third cut was done by turning the tubing by 90 degrees from the 2nd cut and finally another turn of 180 degrees from the 3rd cut. I end up with 4 grooves at 90 degrees from each other. I did finish by cutting from edge to edge with my xacto and got 4 parts. Hope it's clear enough but I agree that's a lot of operation to get these perfectly straight pieces. Cheers, Francis -
64 Dodge D100 Pickup Pro Street
AmericanMuscleFan replied to AmericanMuscleFan's topic in WIP: Drag Racing Models
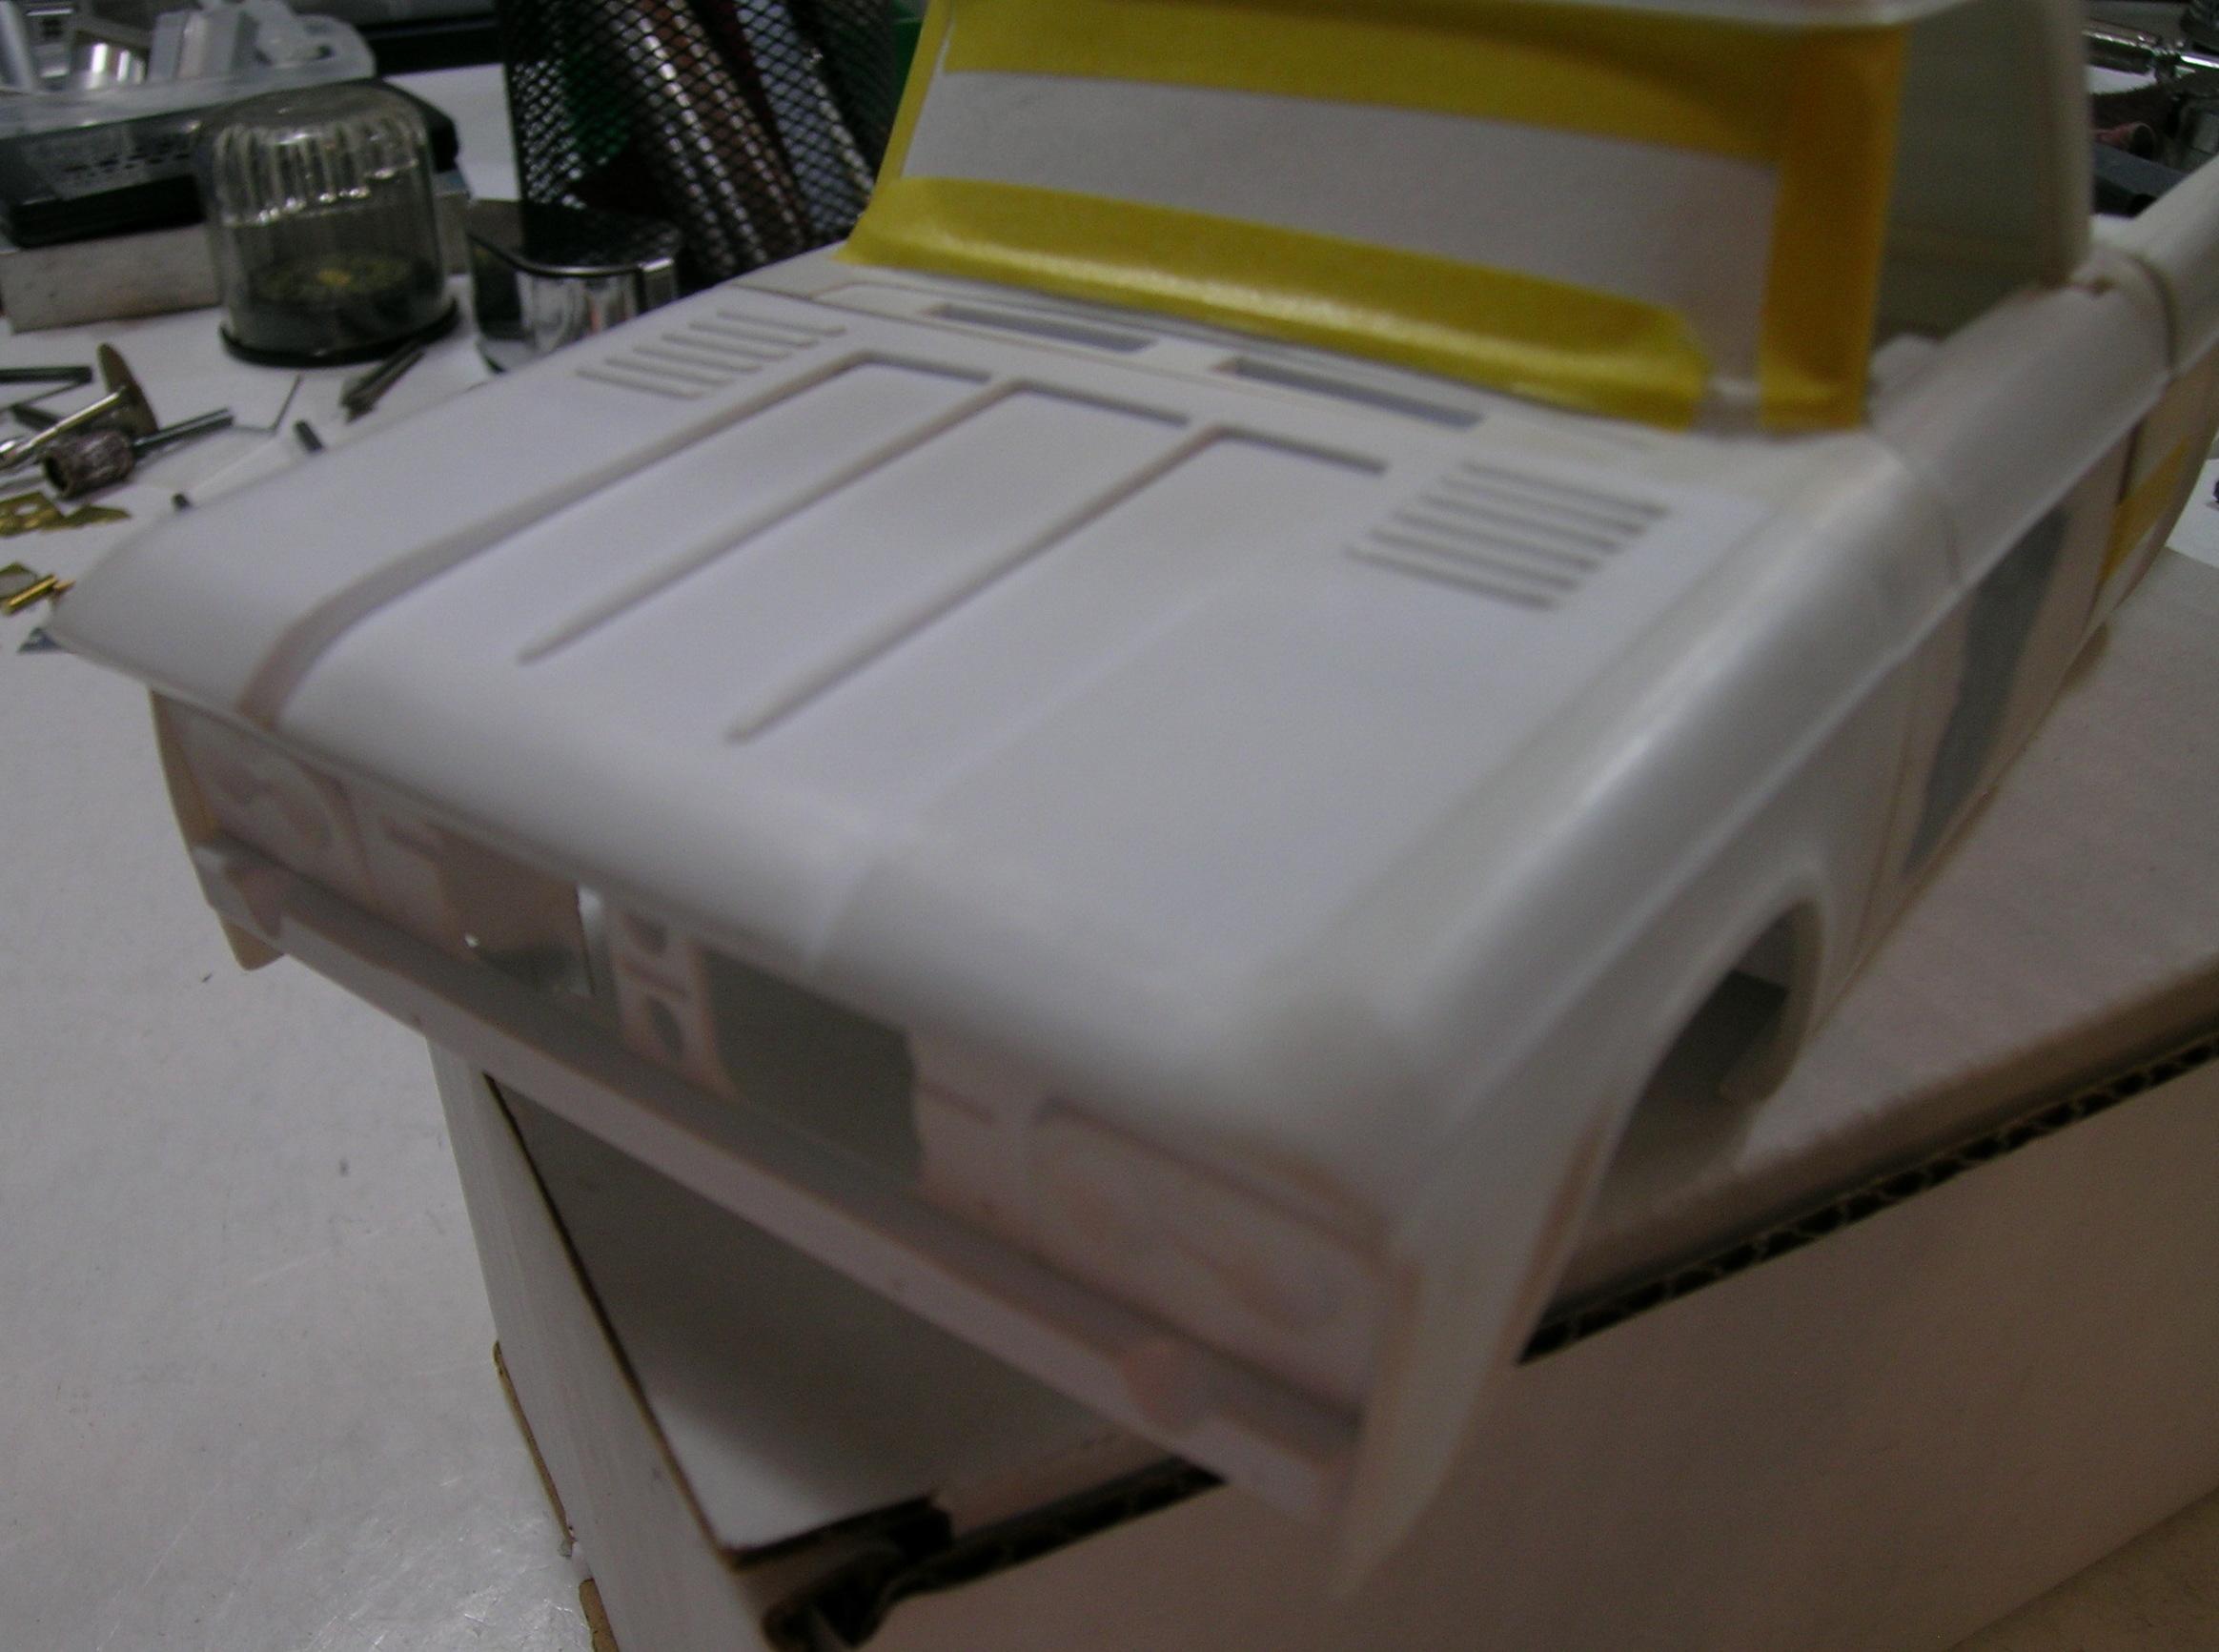
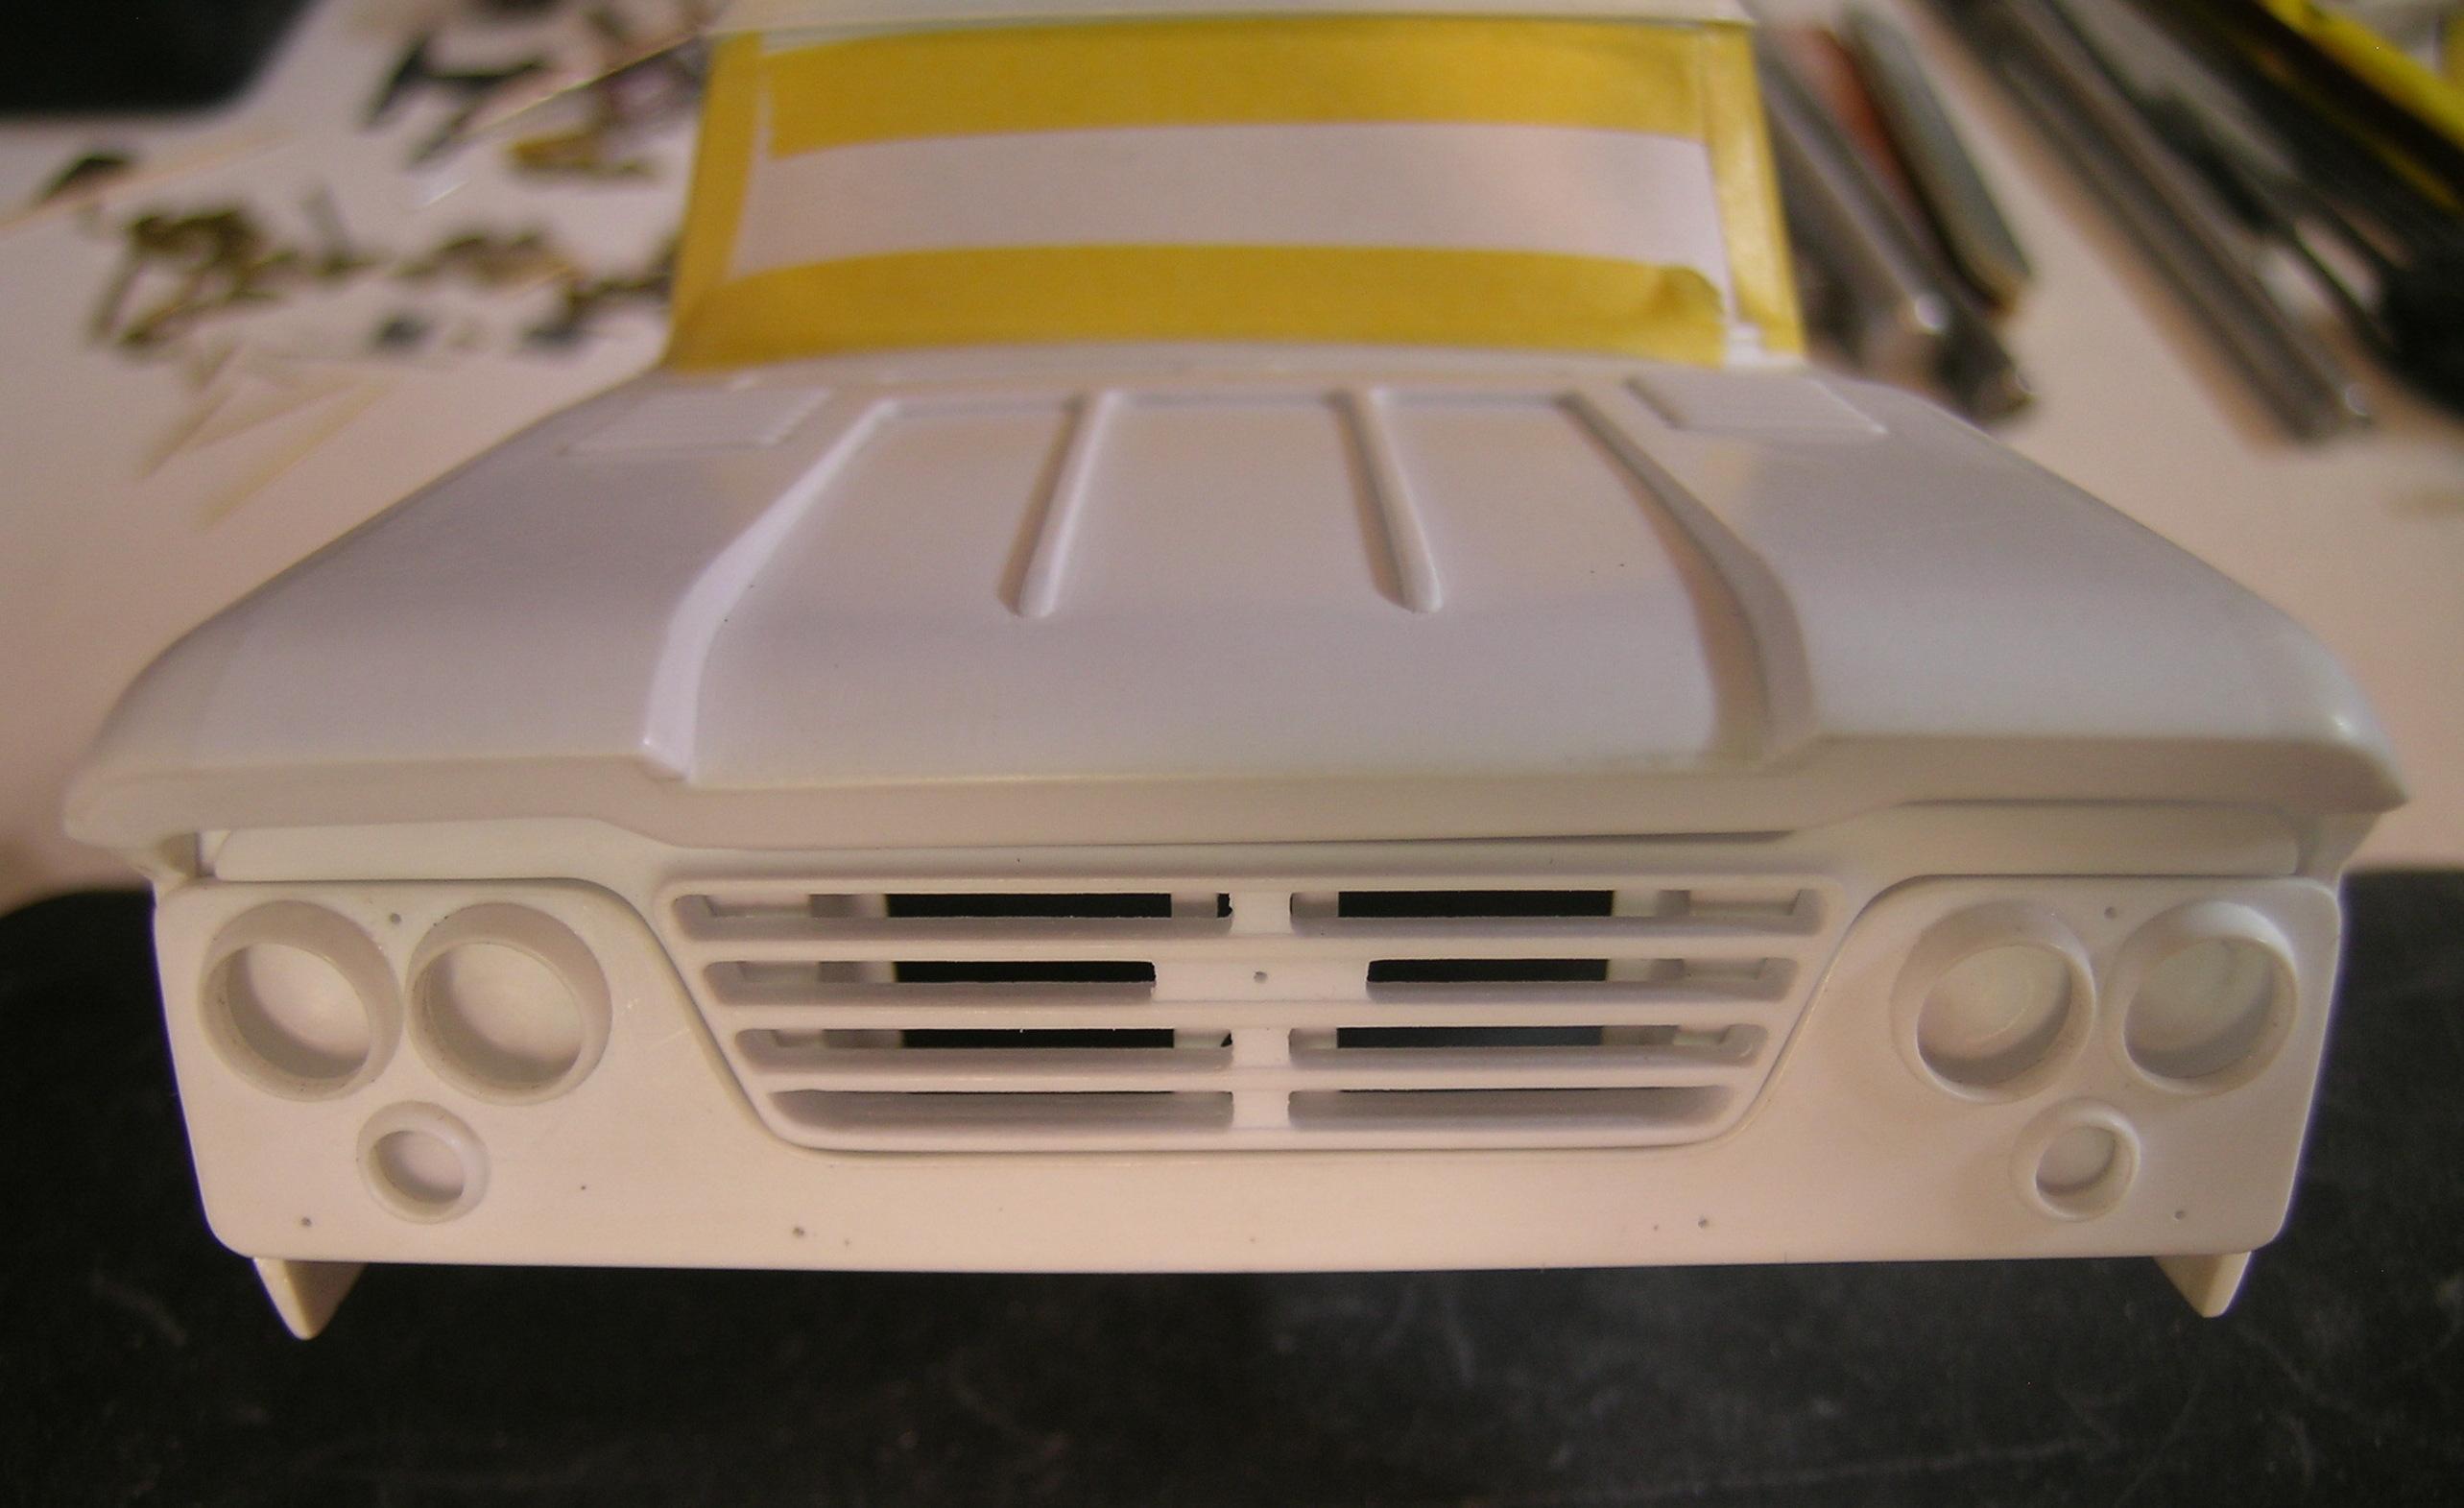
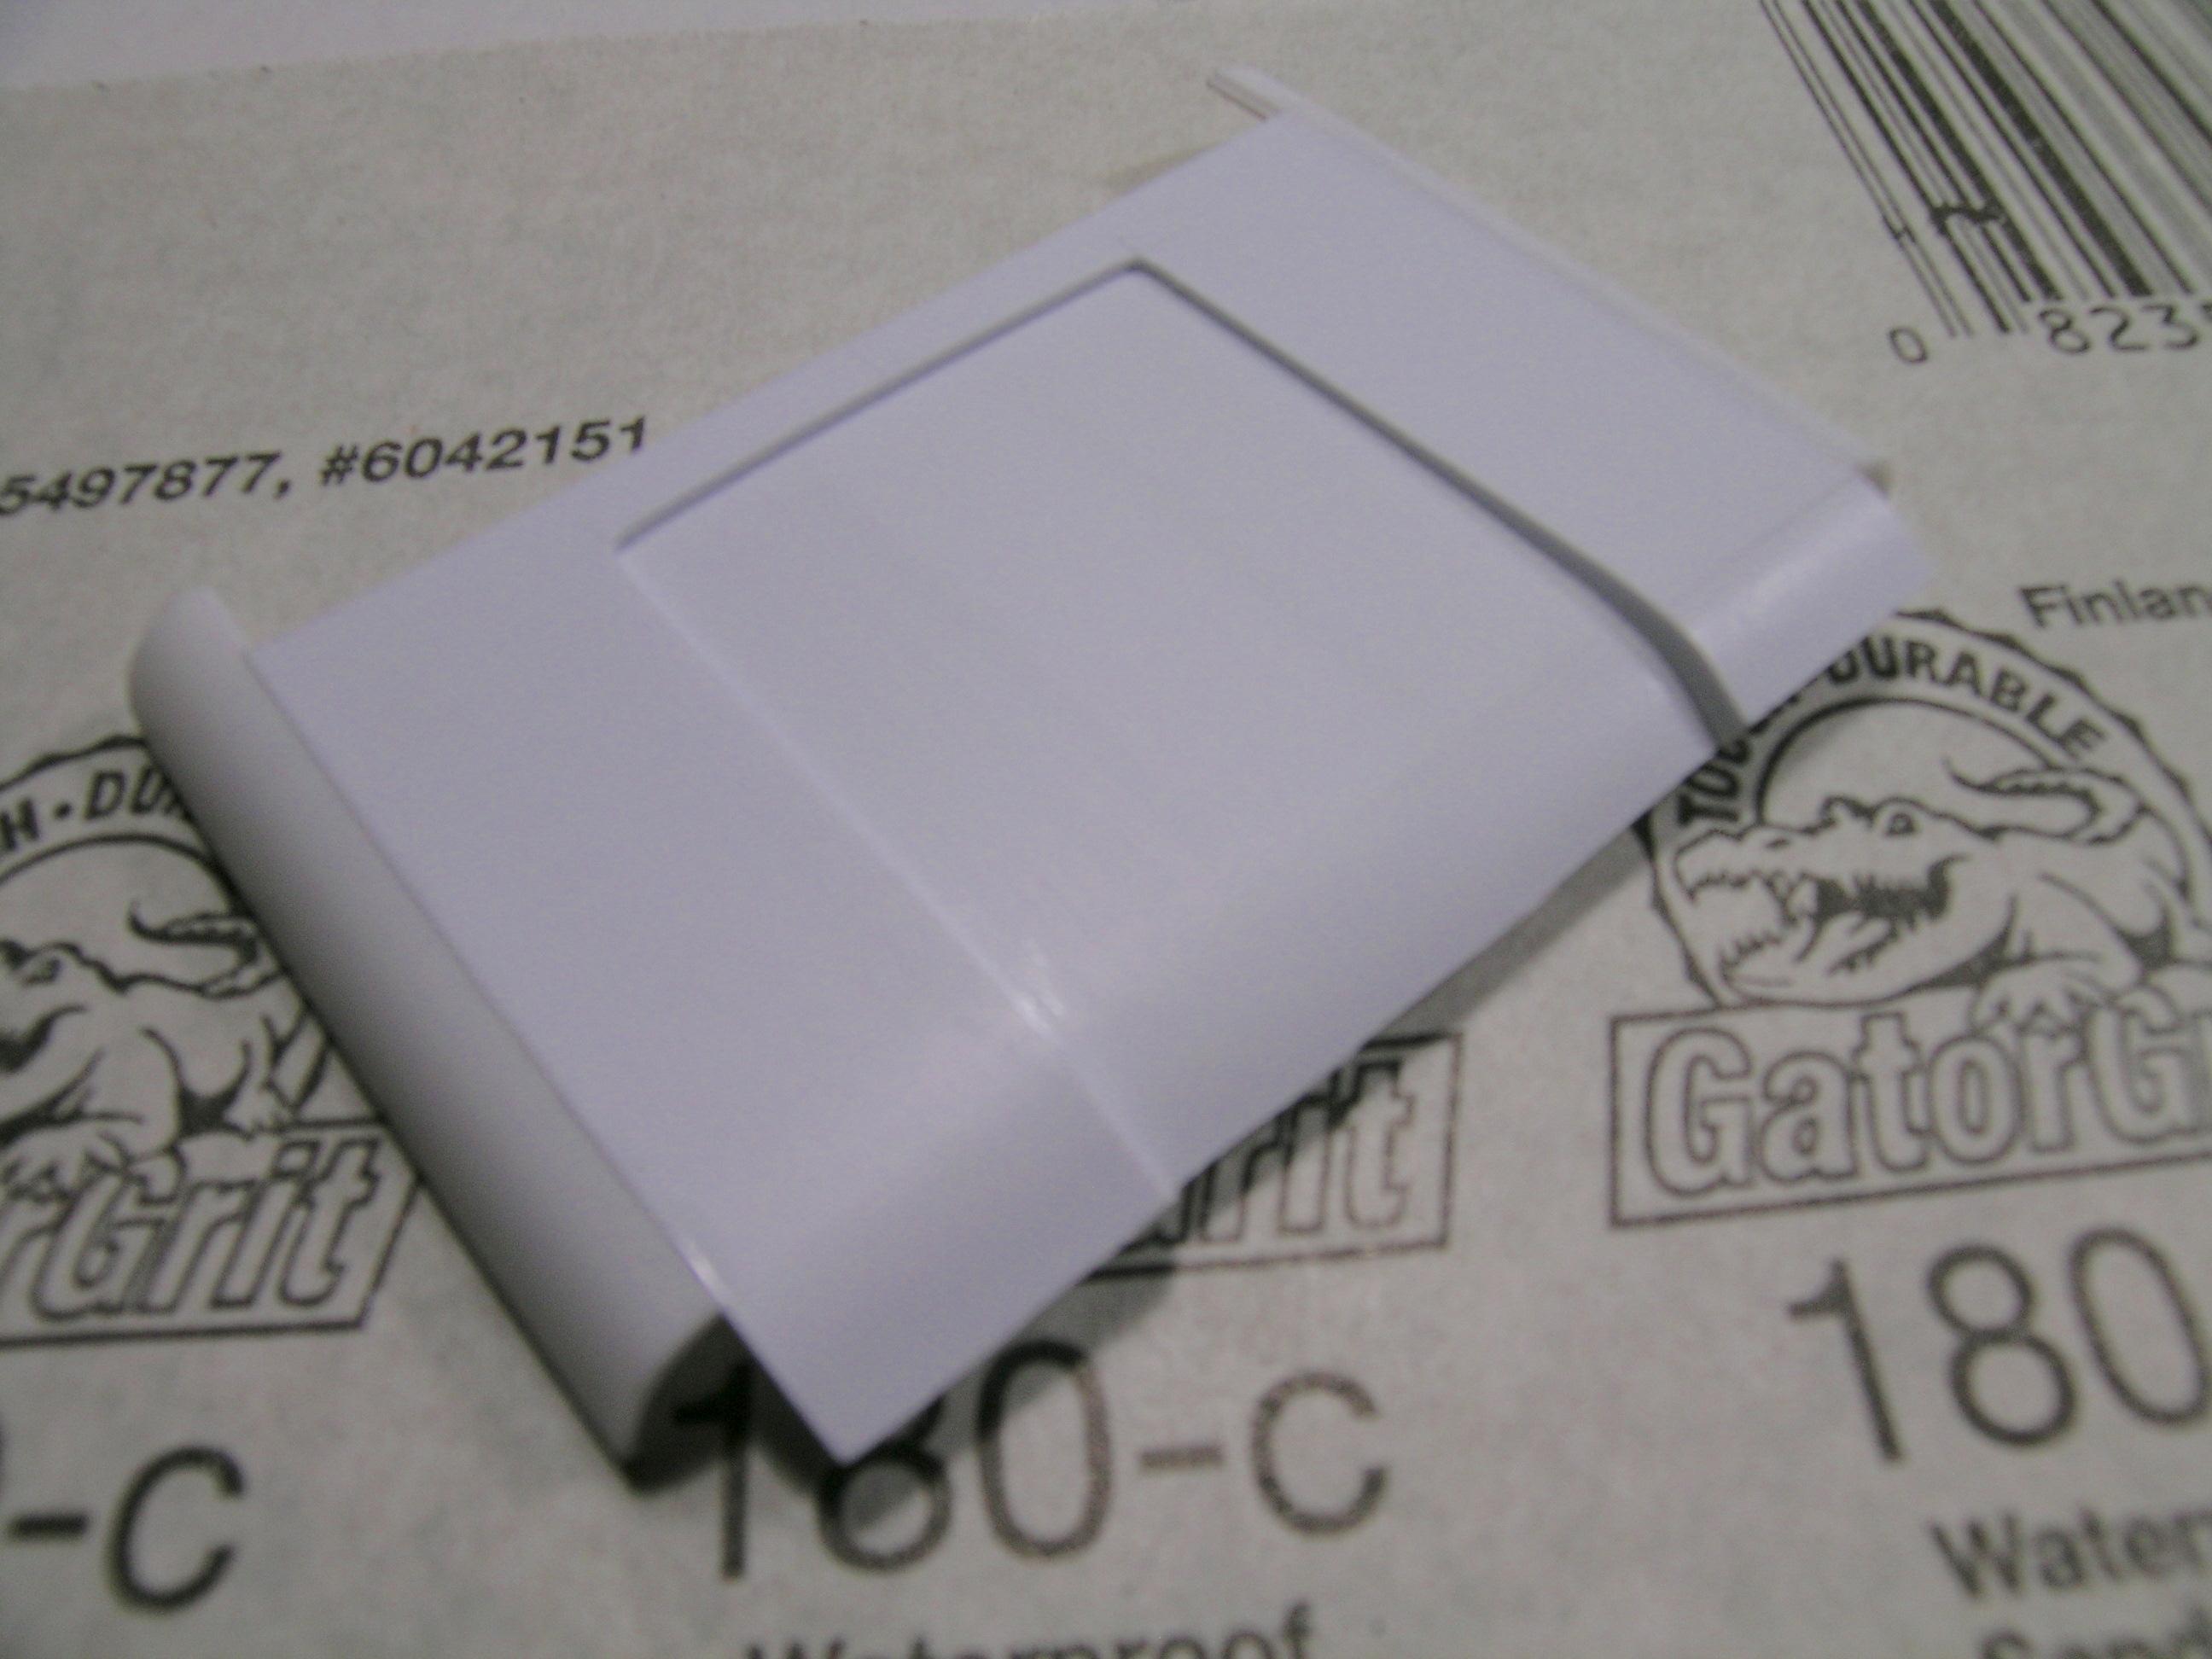
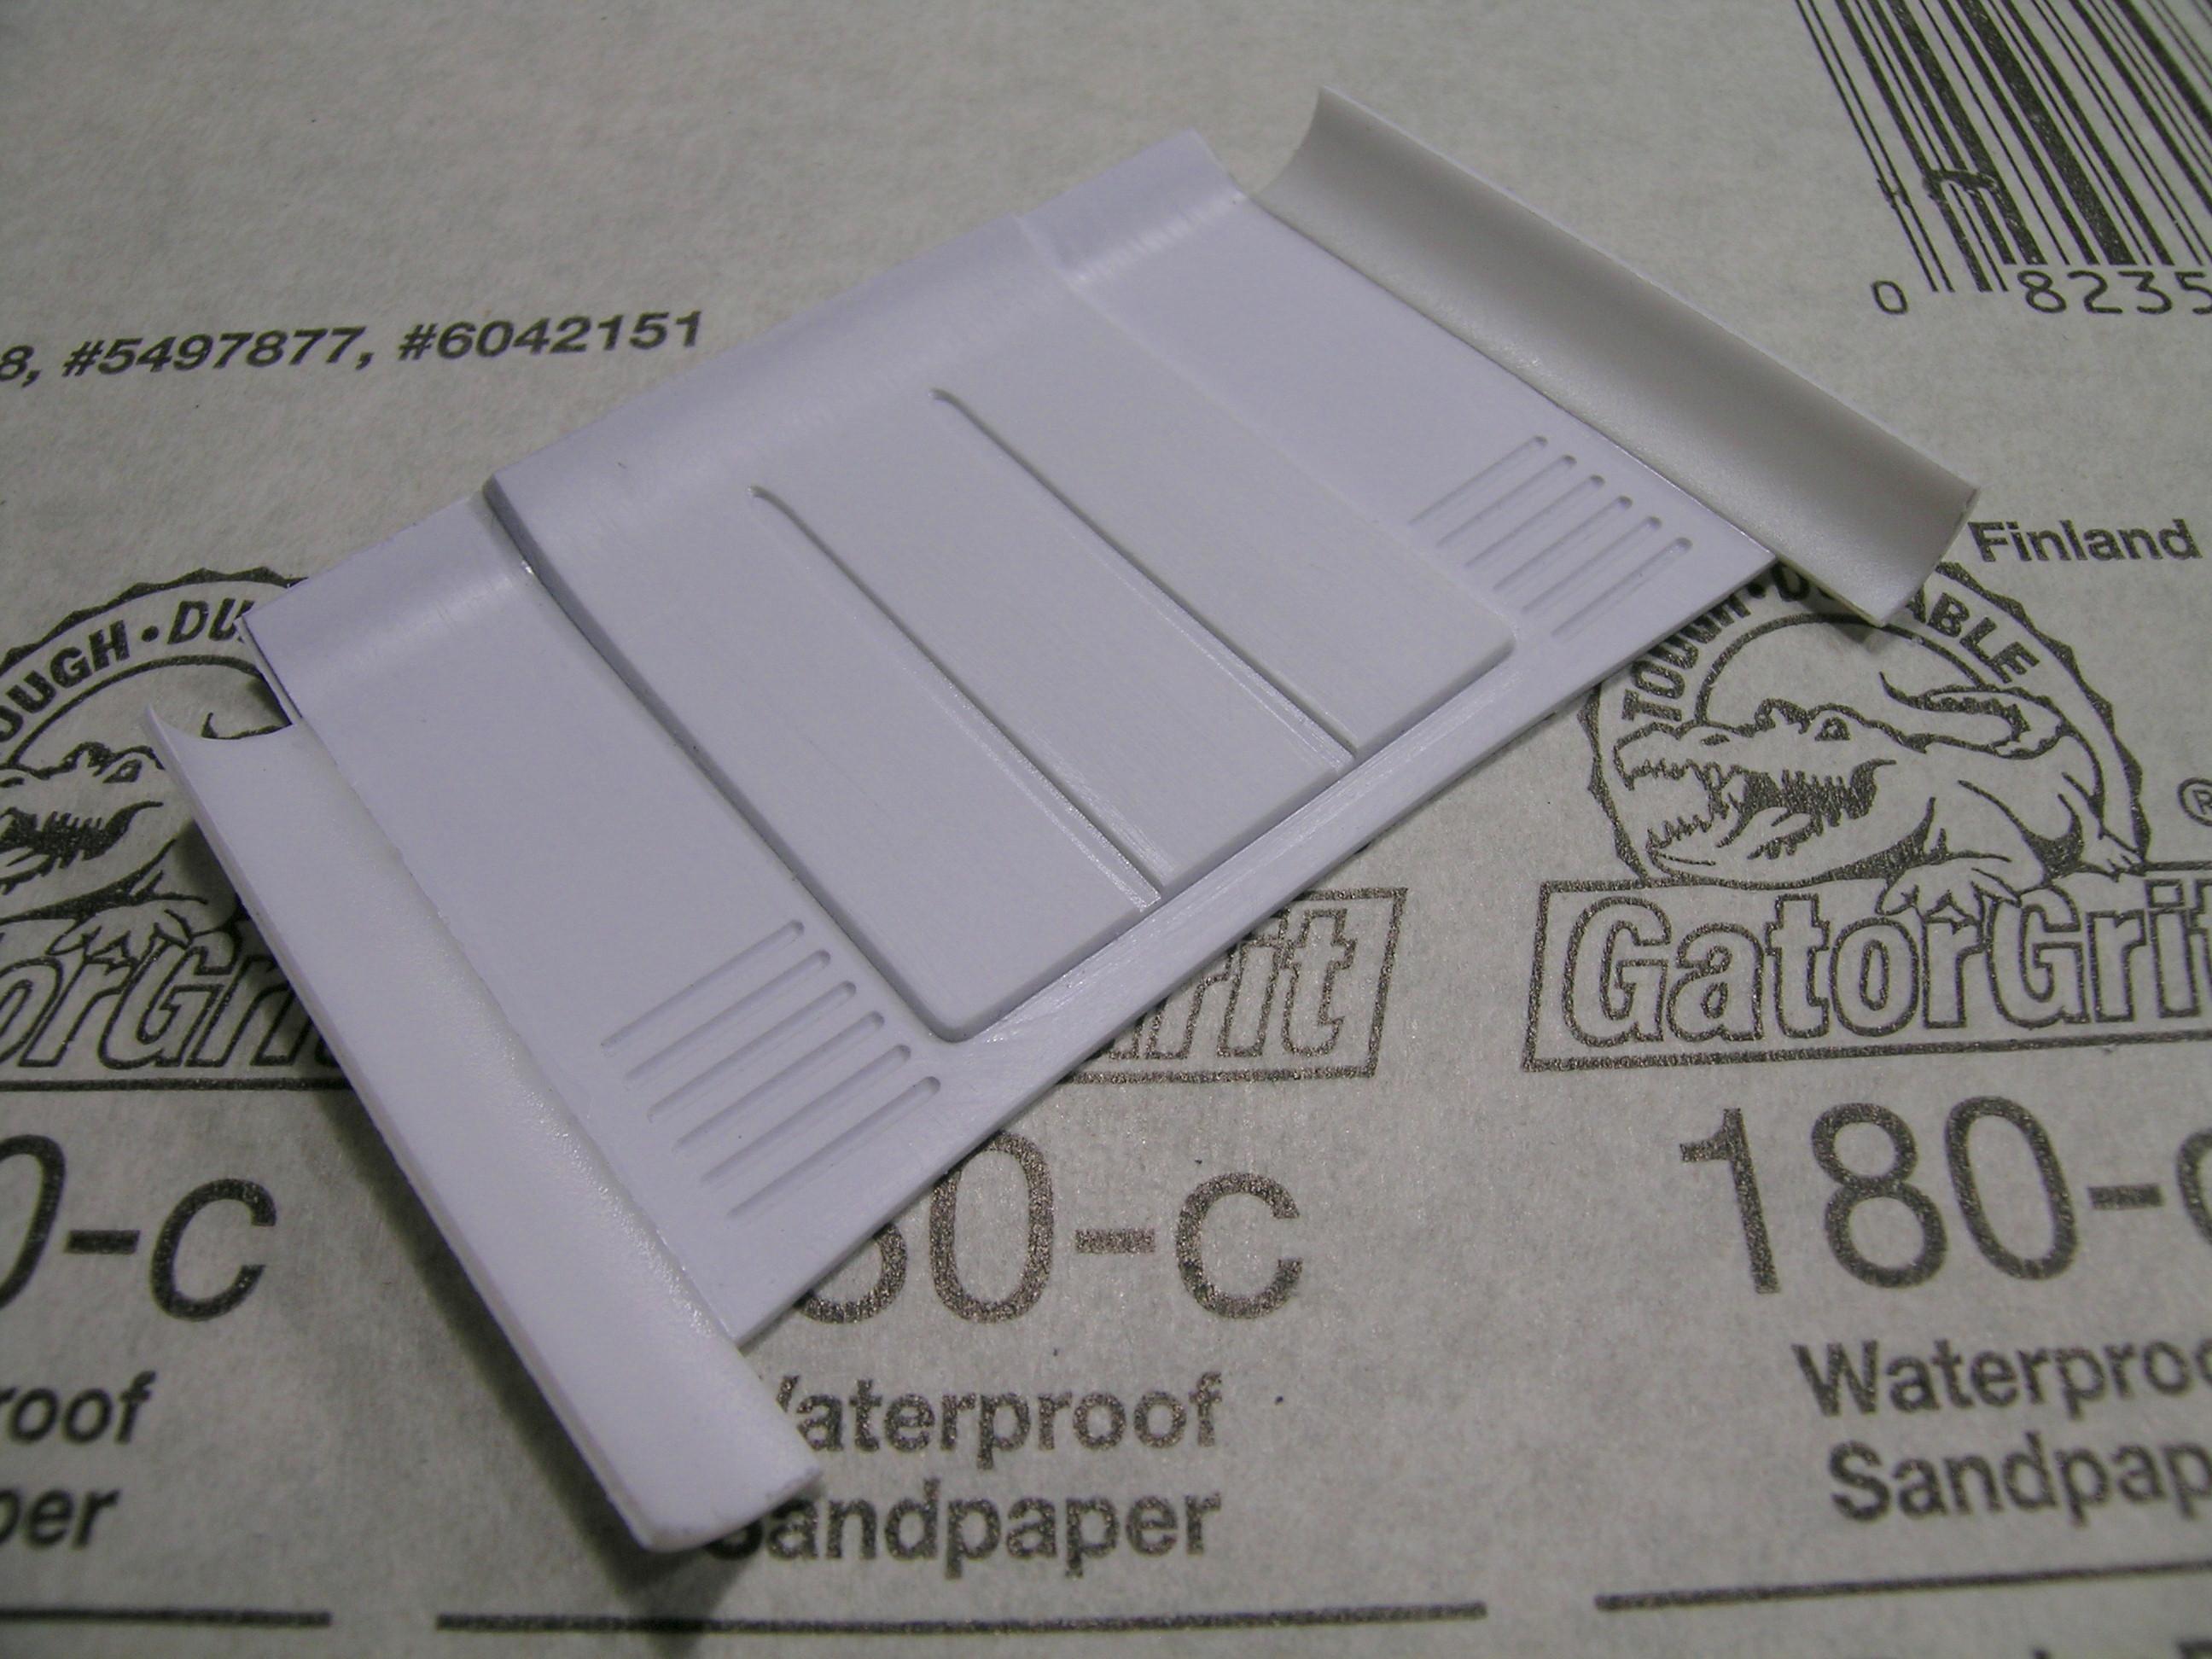
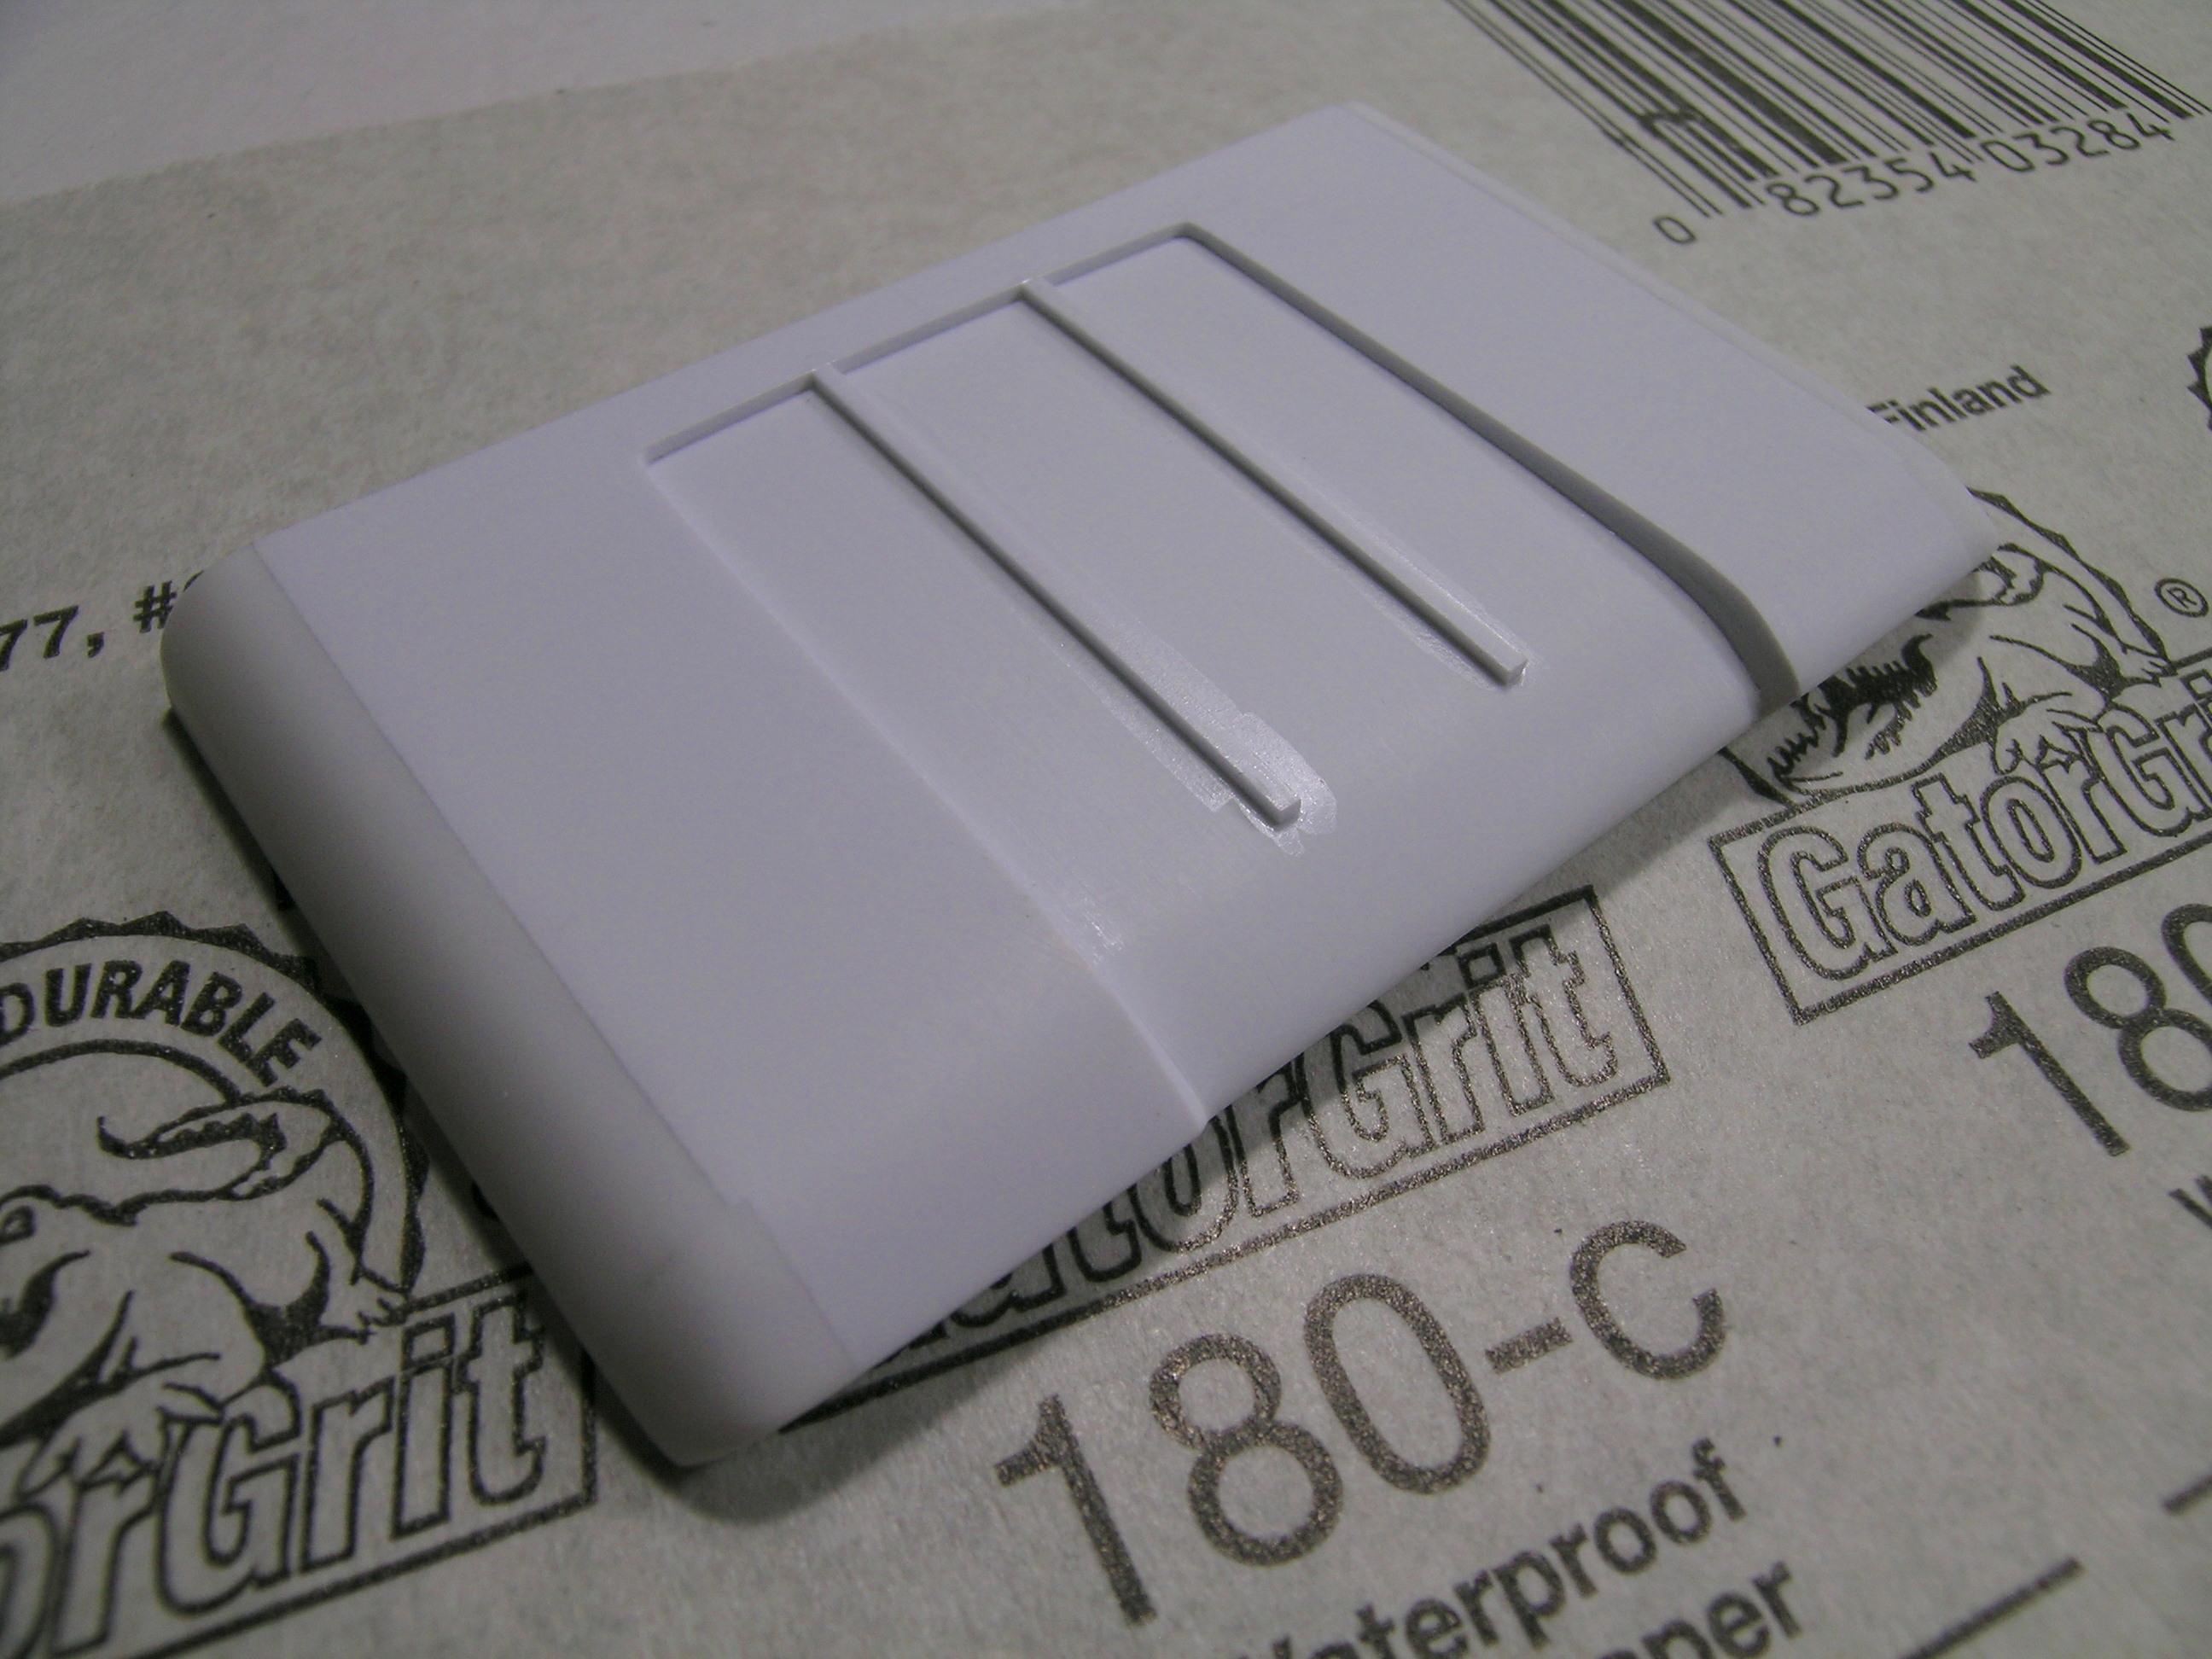
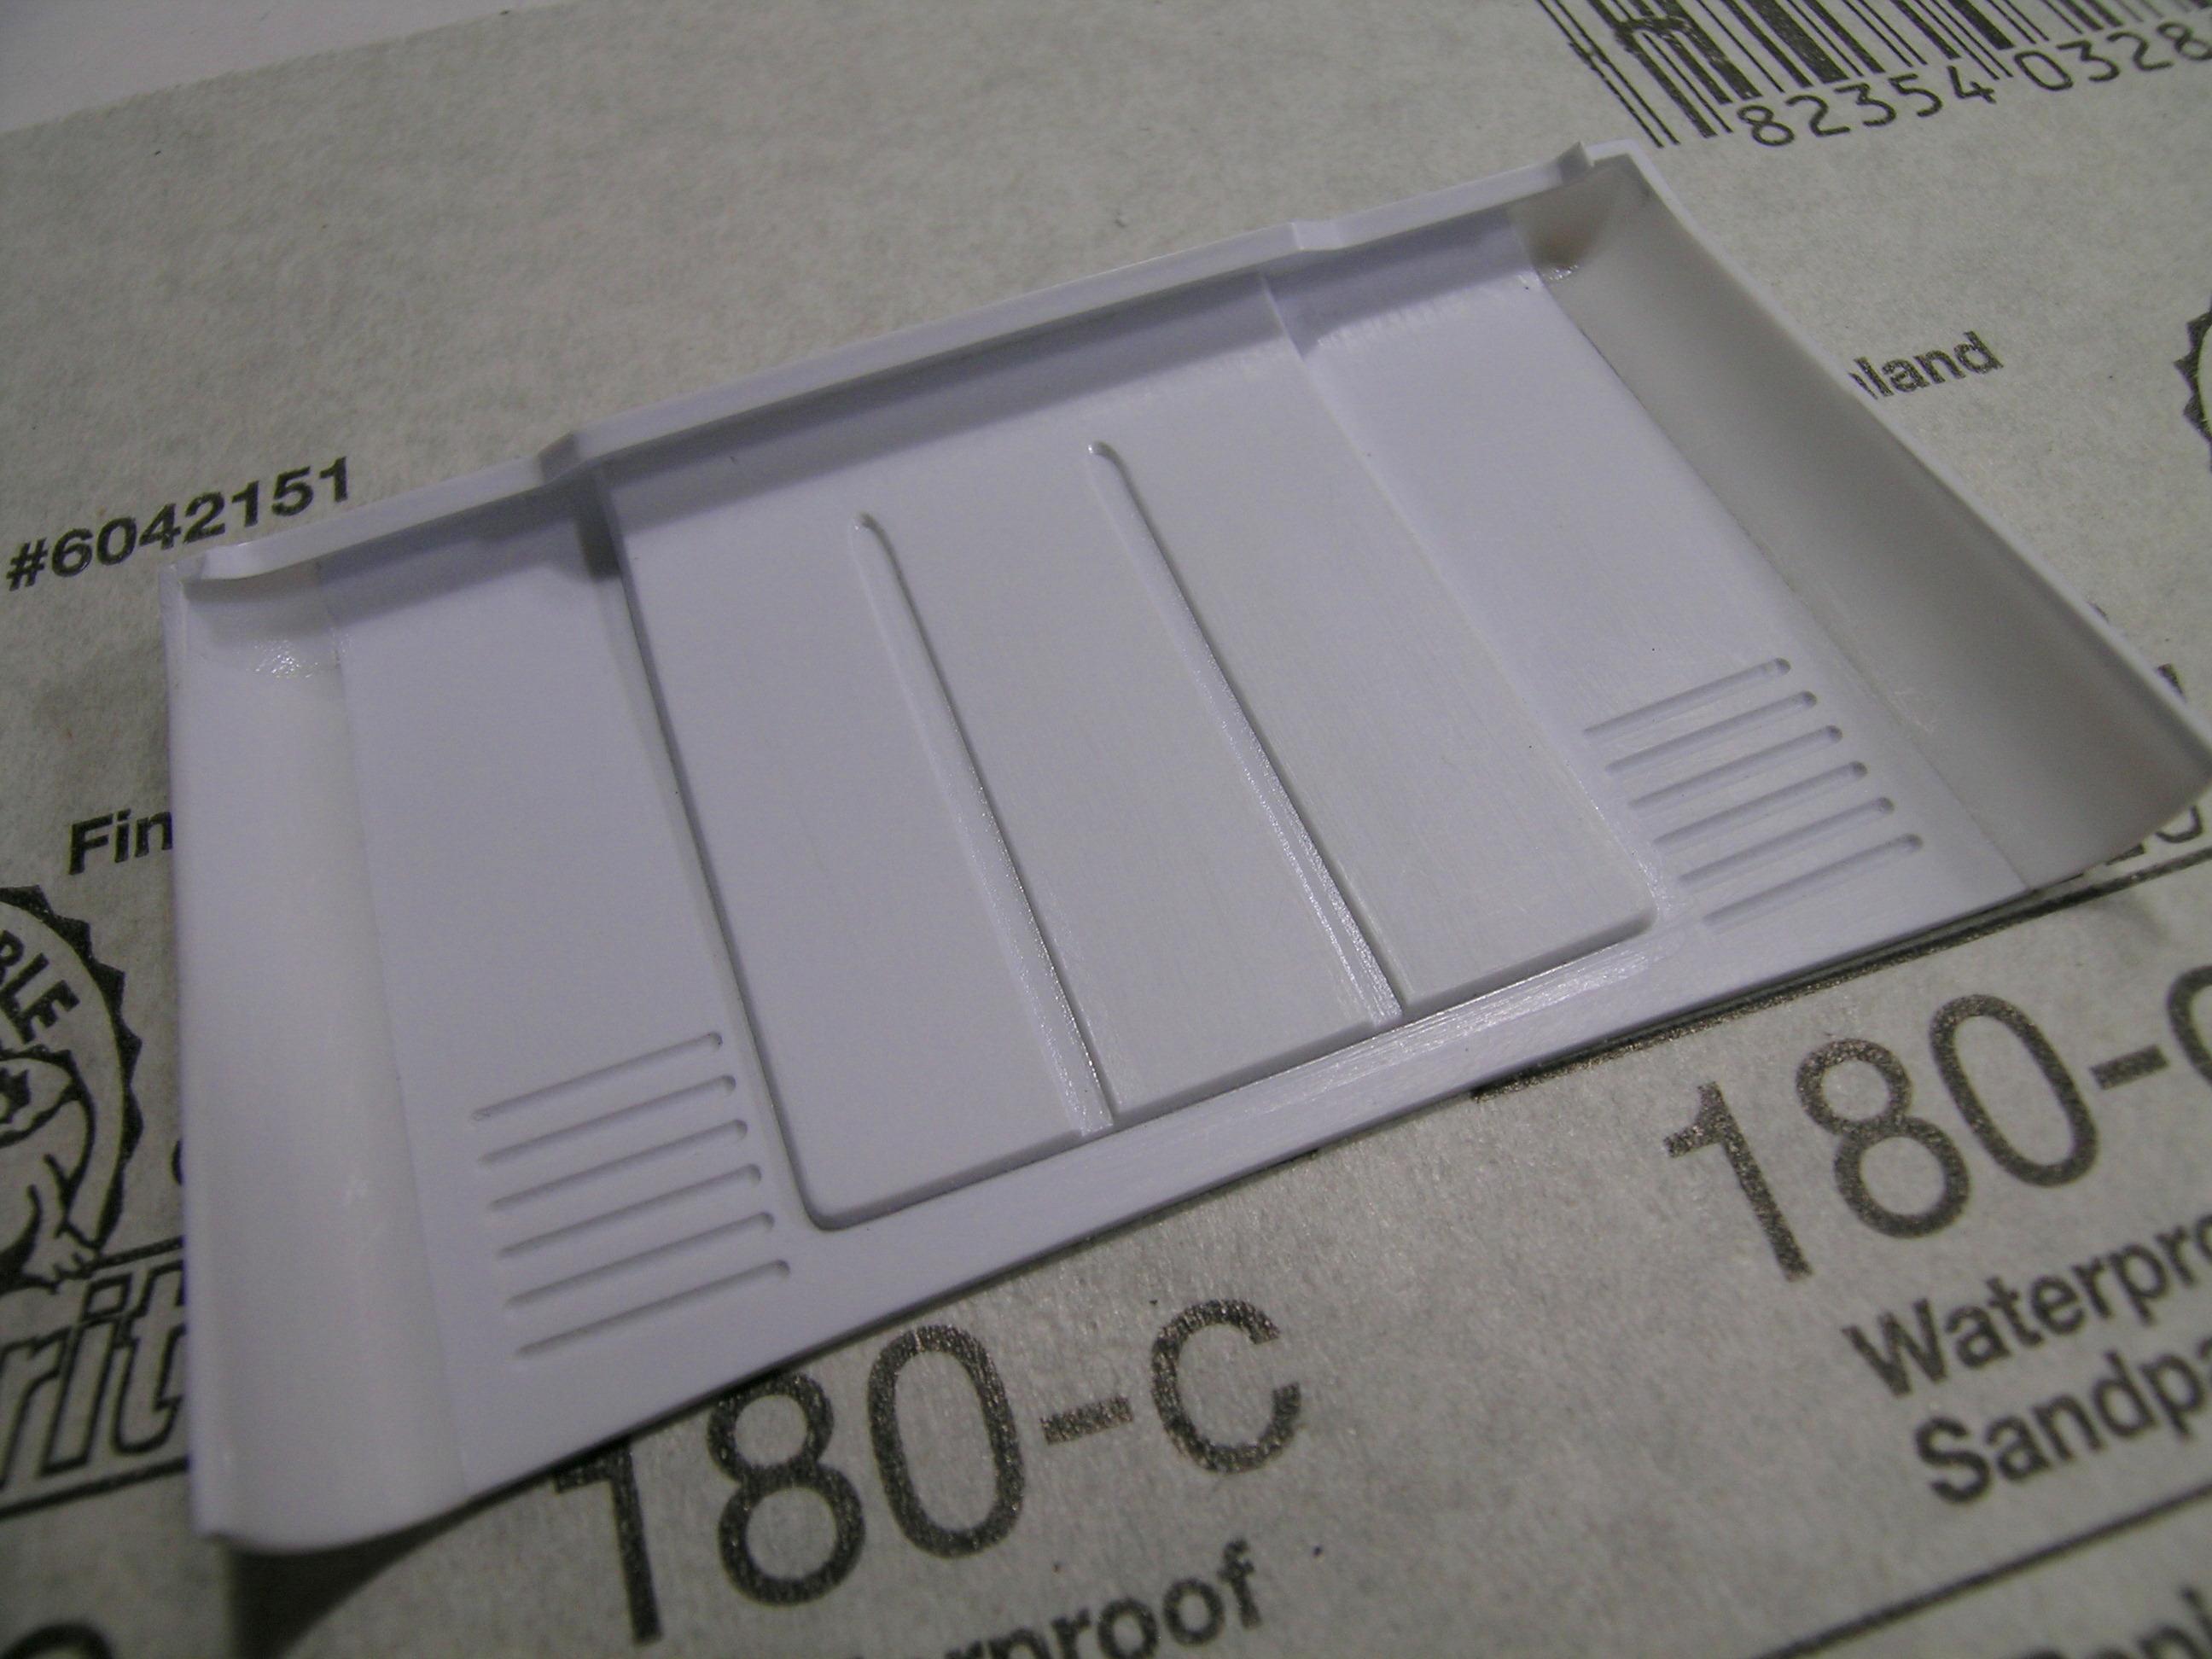
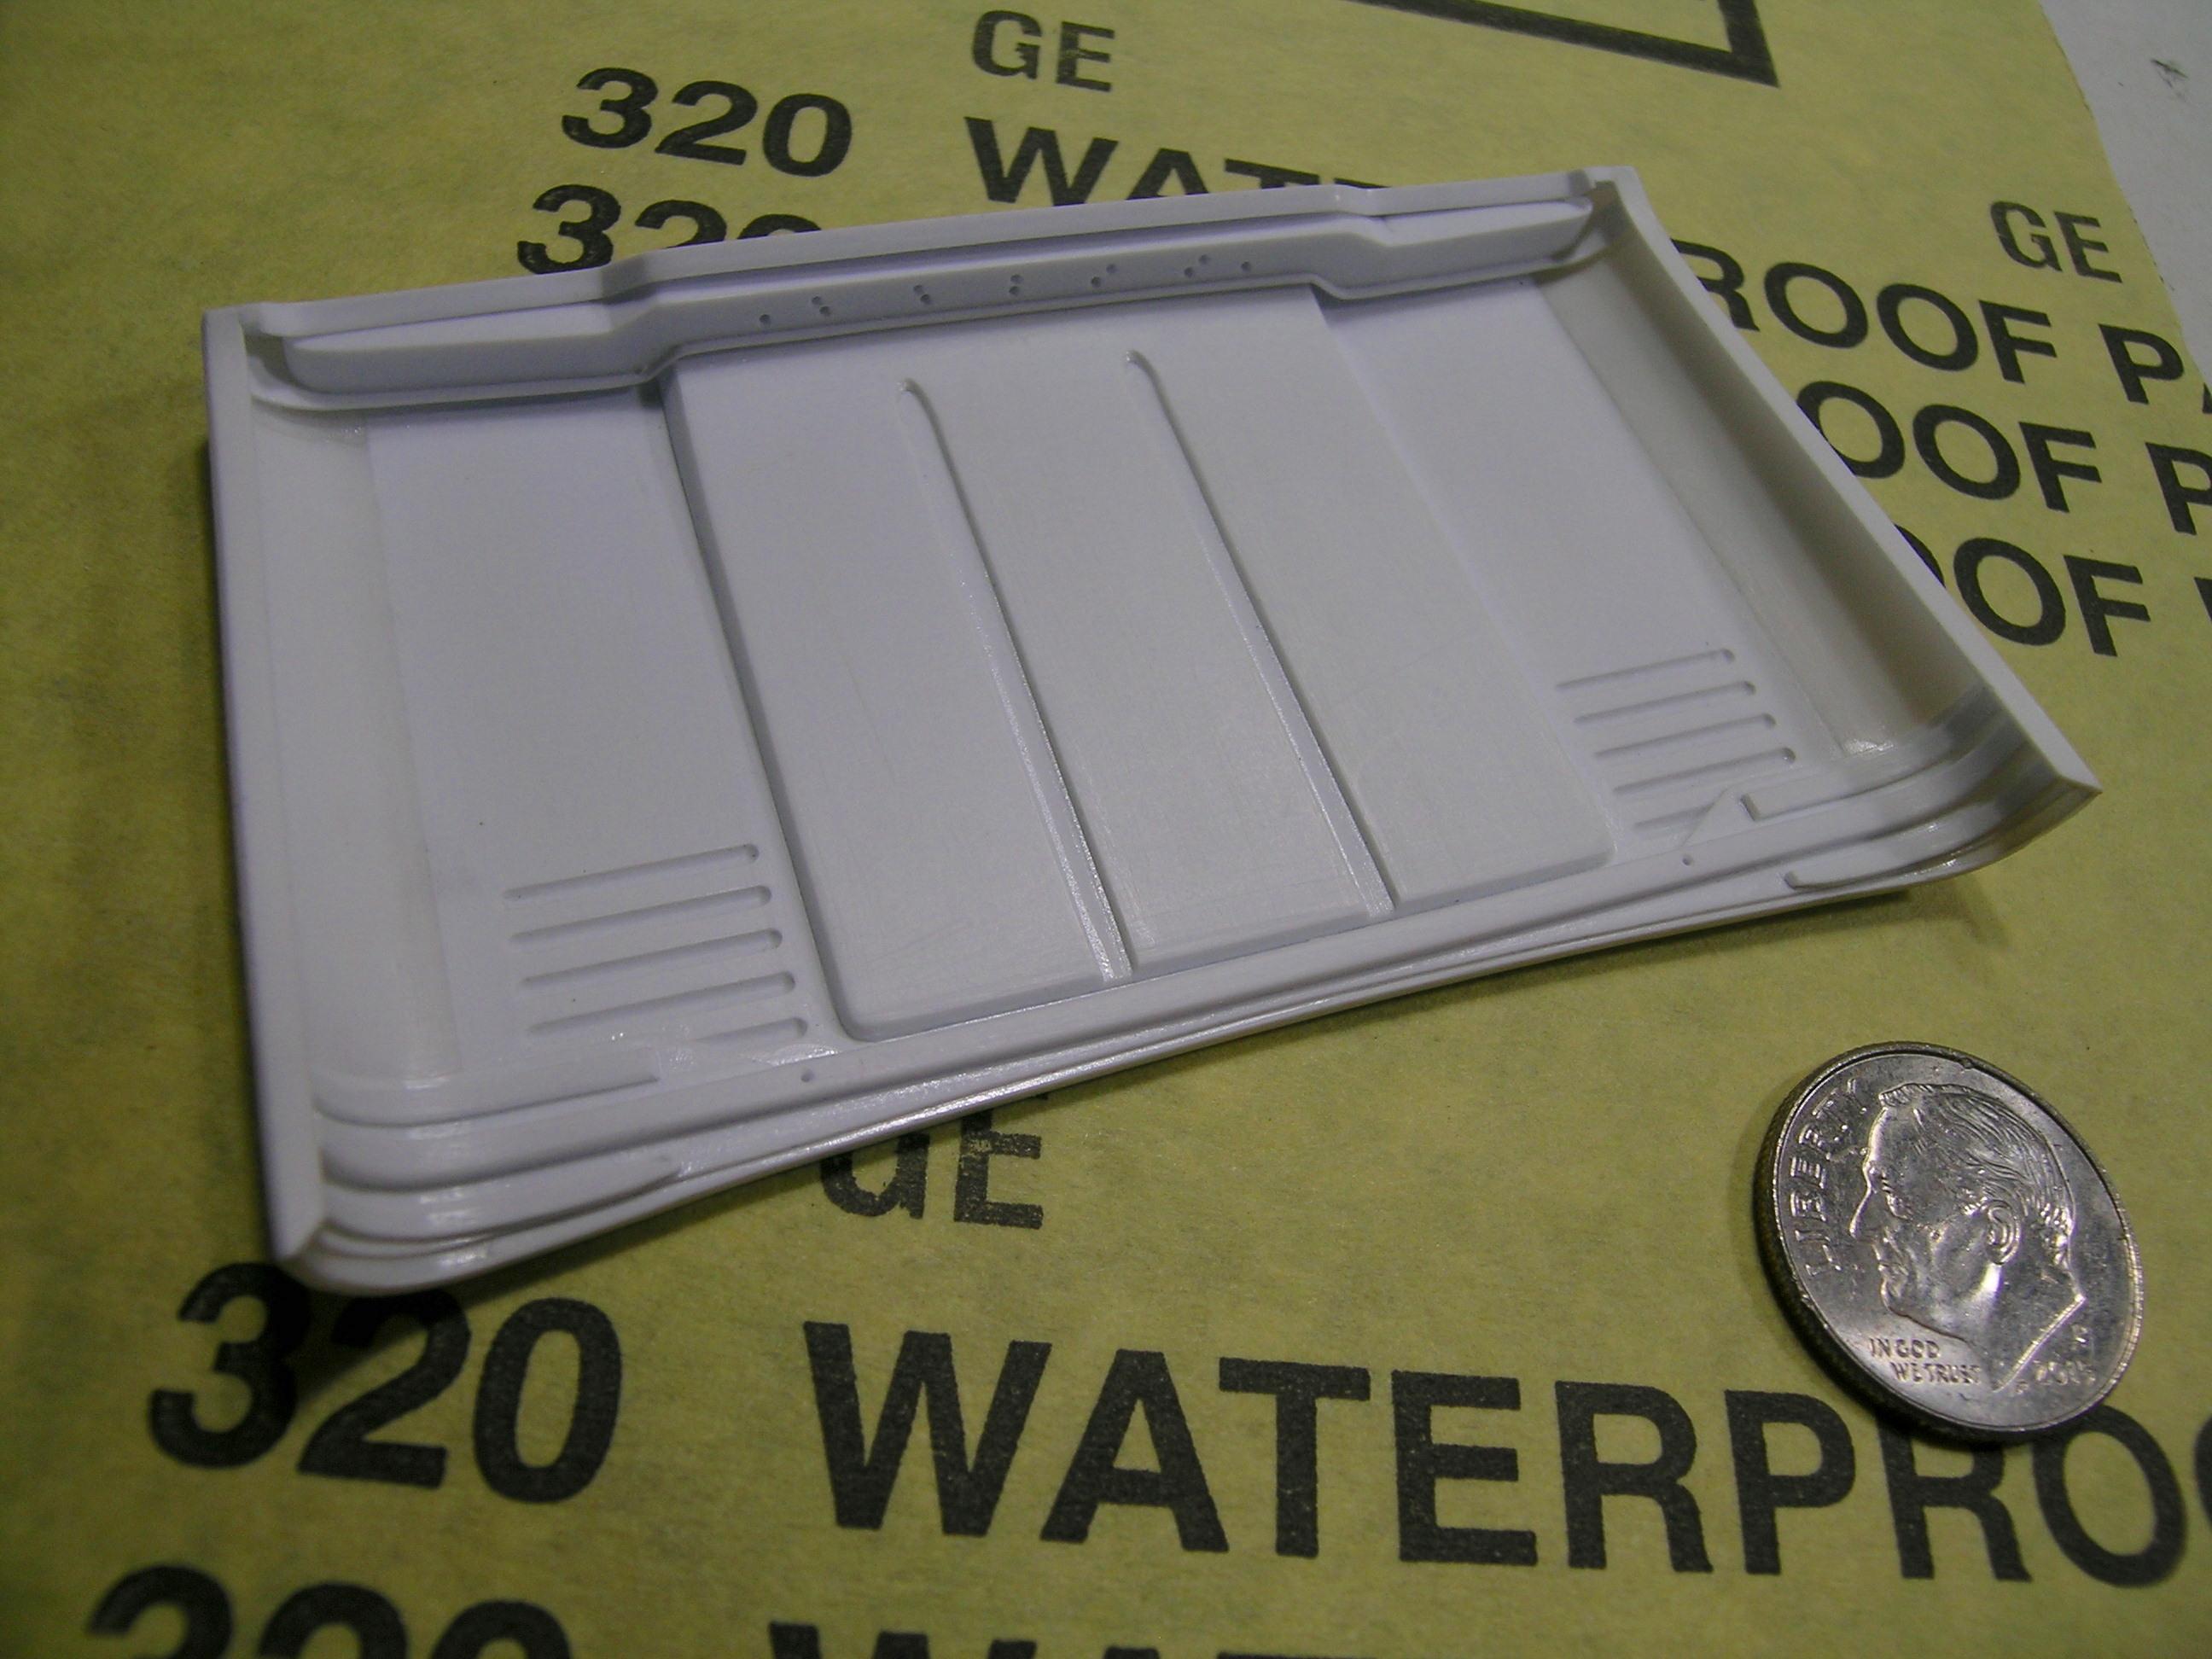
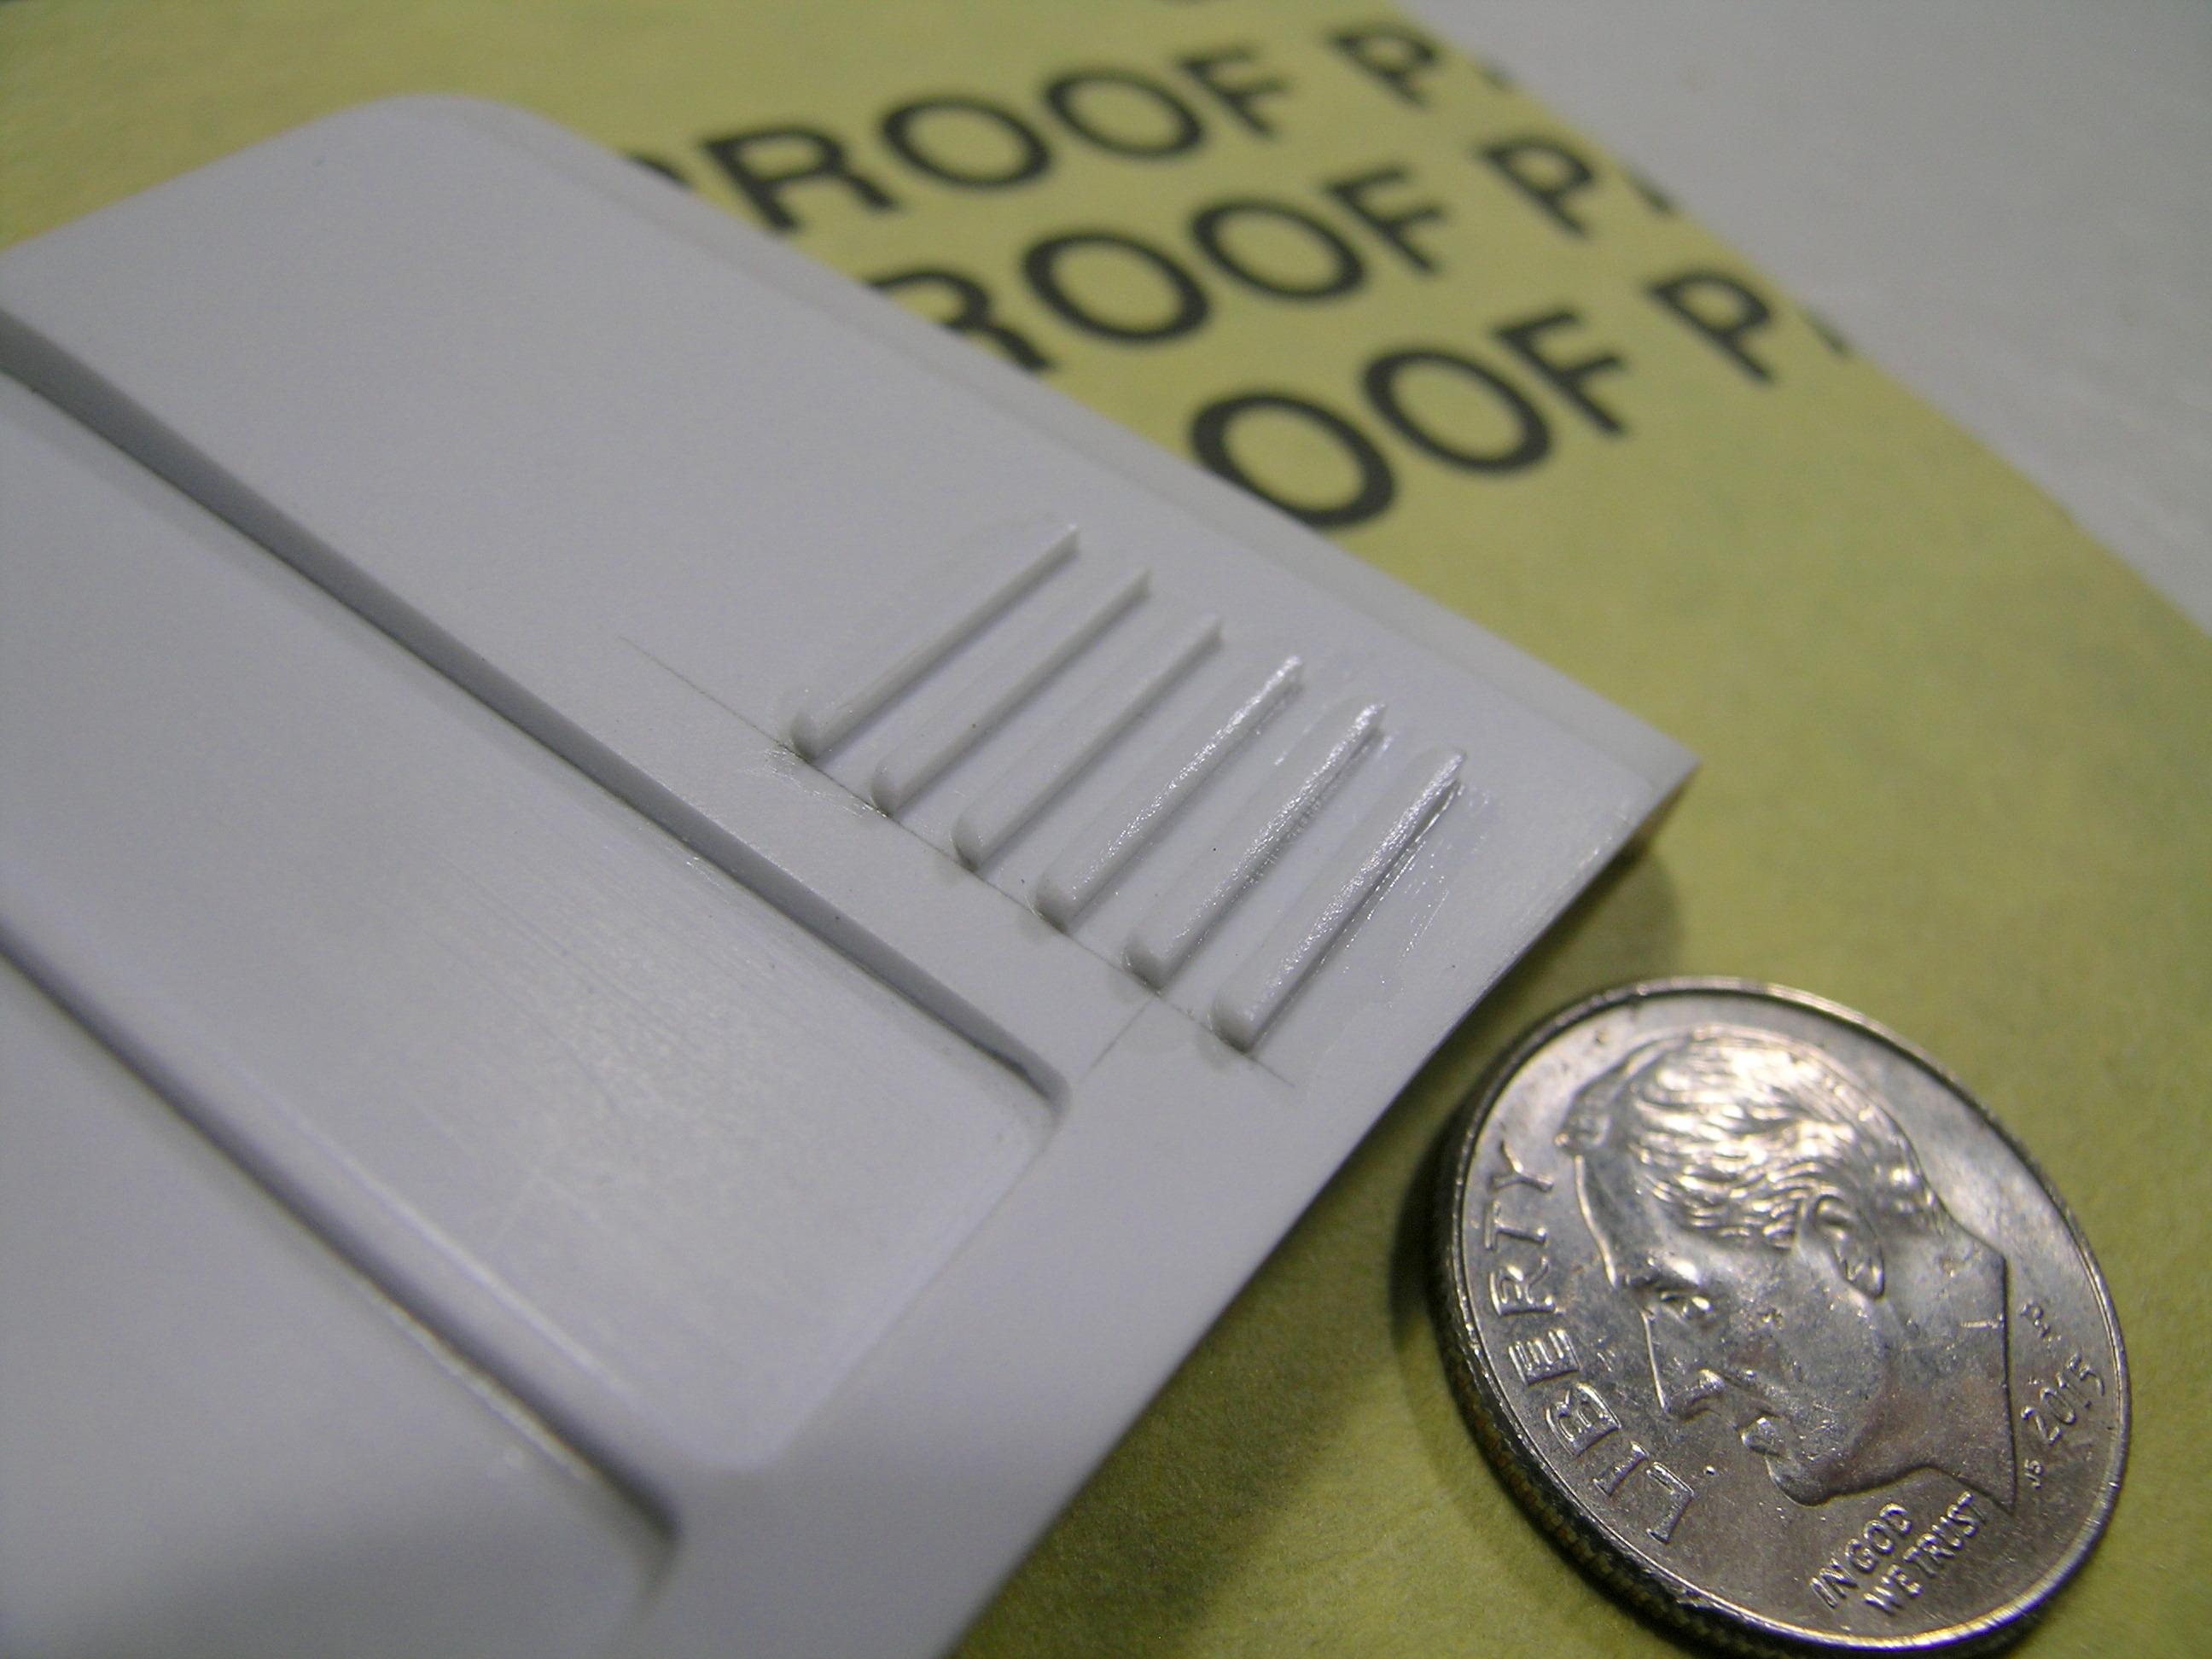
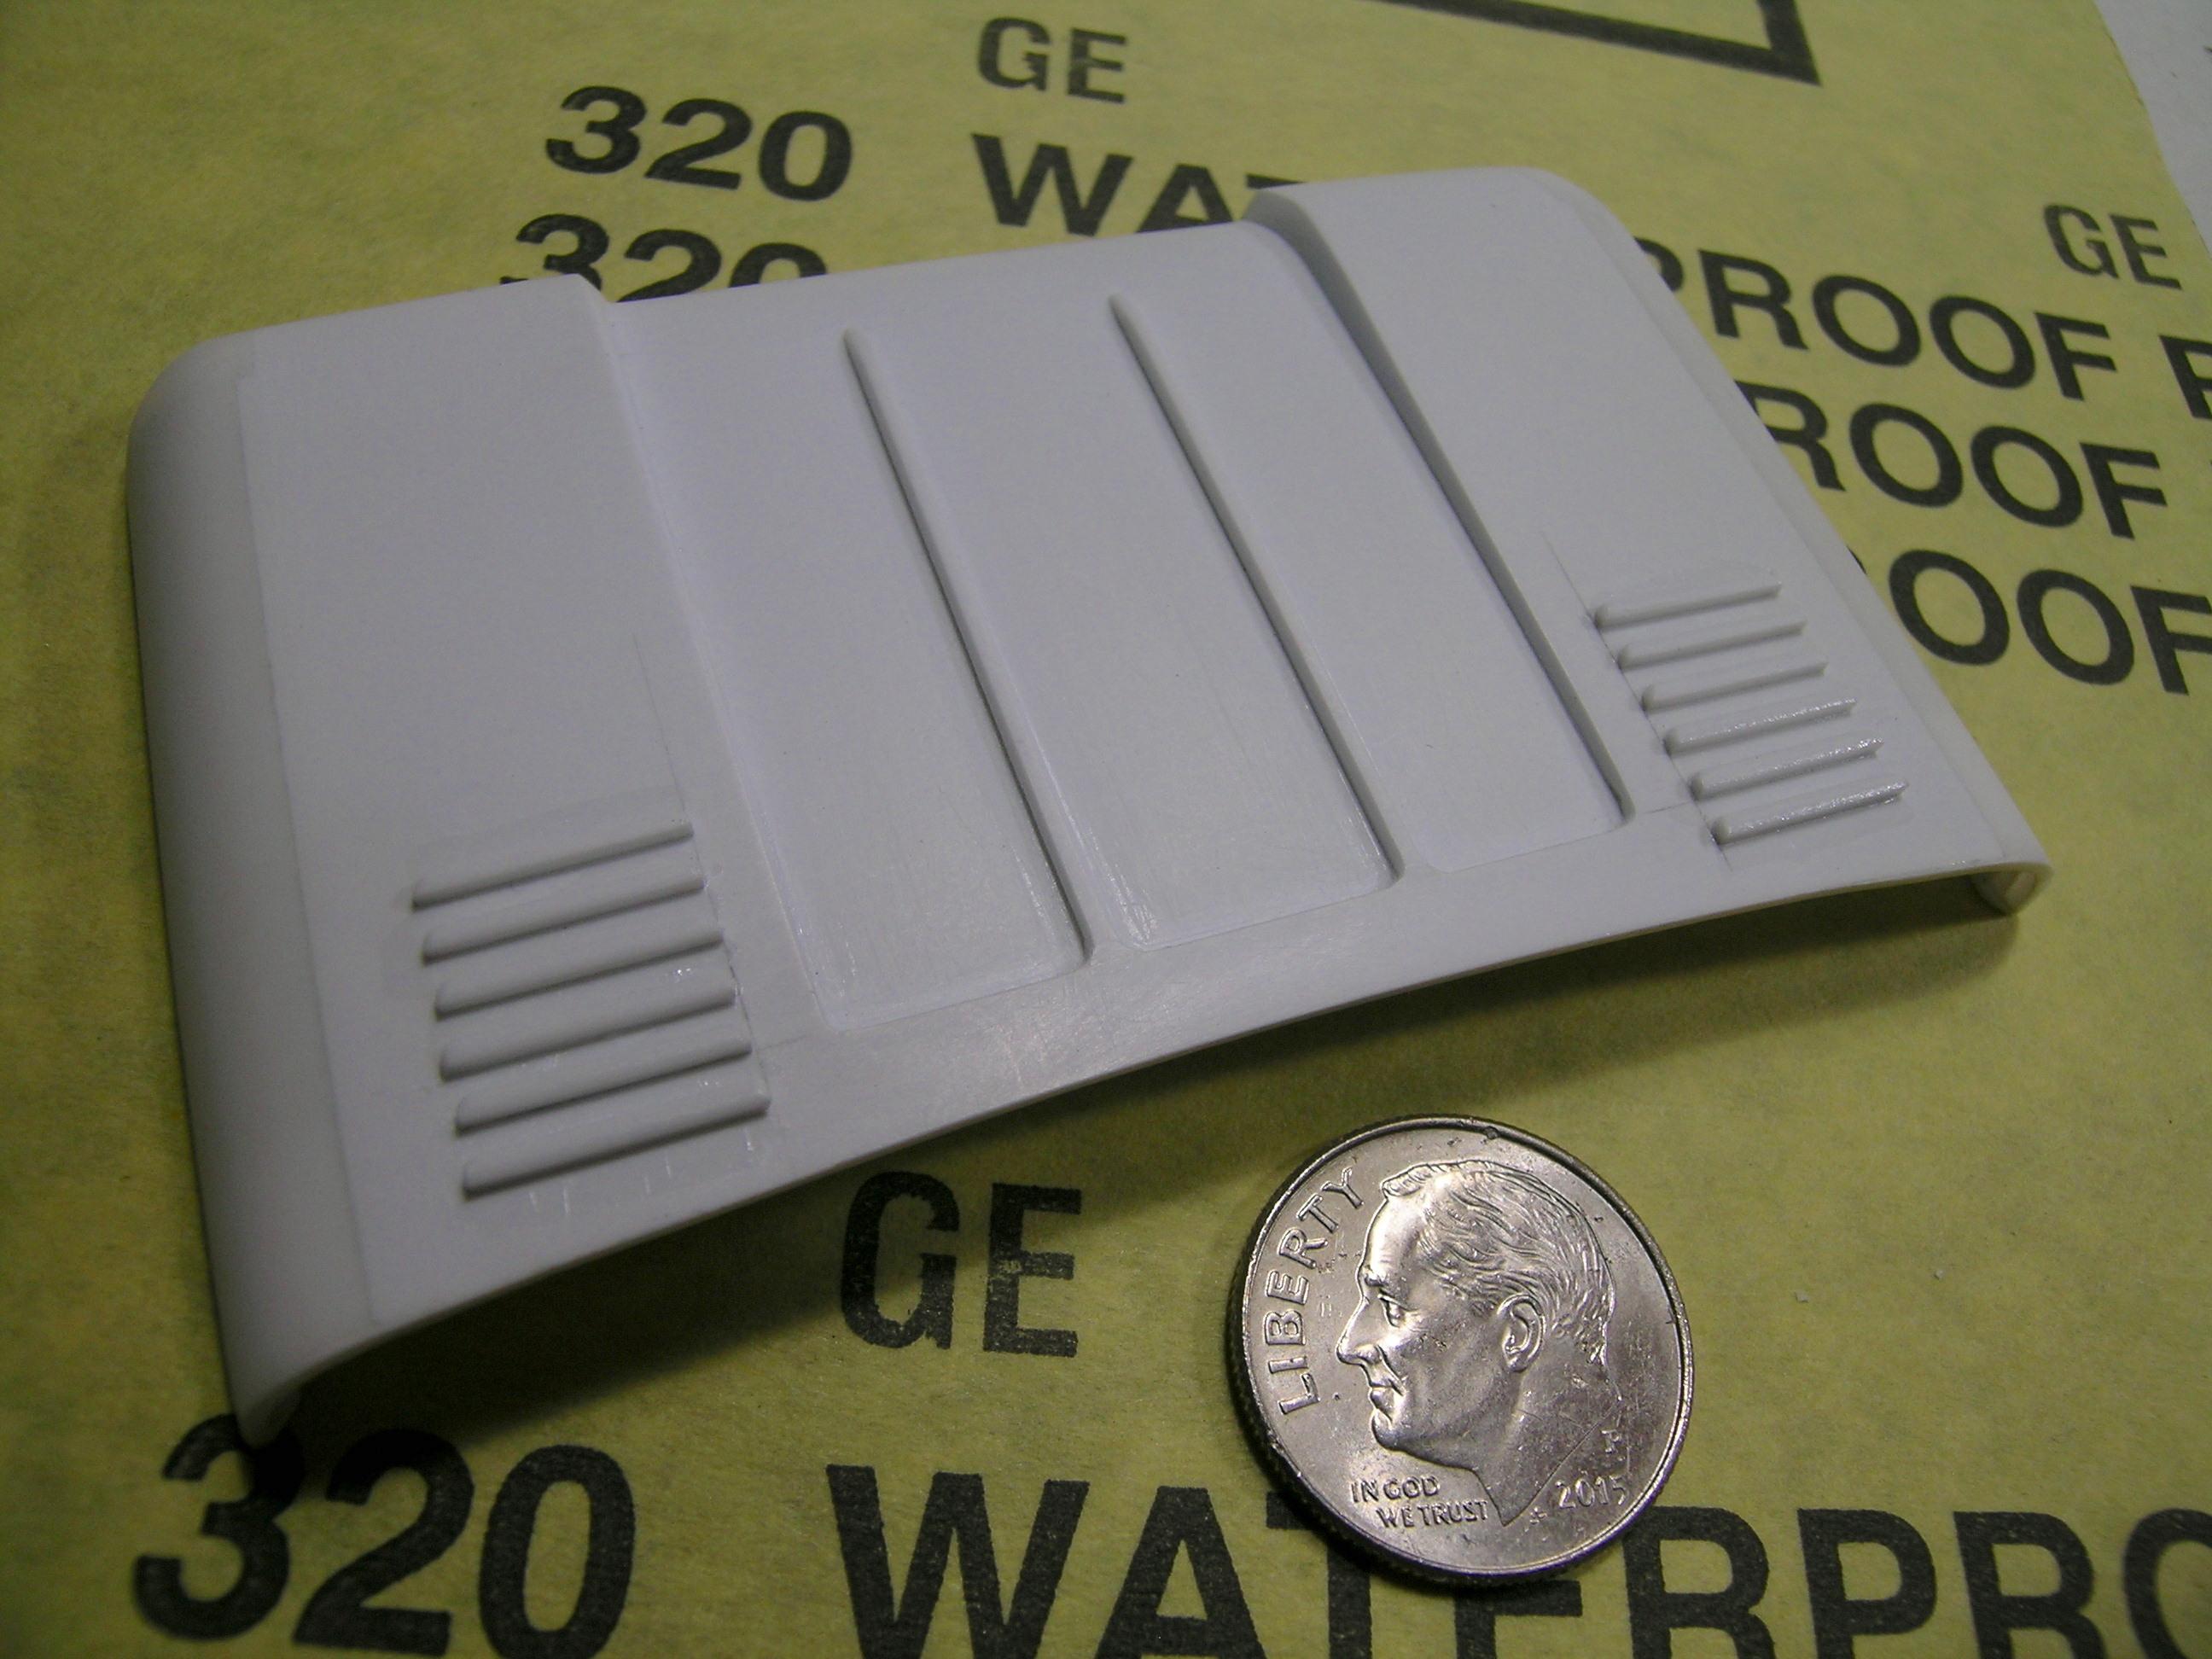
Hello All, I'm just back home of a pleasant weekend of snowshoeing with good friends but it kept me far from the workbench so I will be pretty excited to make more progress on the truck next week. Today's update is about the hood construction. After dealing (and wasted) too much time on the resin hood I deceided to move forward and make one from scratch. The Modelhaus resin hood was pretty nice on it's own body shell but it didn't fit well on my construction. I tried to slice it in the center to make it fit the front fenders properly but even with that modification done the front portion was way too high and the space between the grille way way too big. I was pretty nervous to get myself into the construction of that part because the D100 hood is very distinctive with a lot of shapes so I found a strategy and followed my instinct. I think it finally turned out pretty well but I let you judge by yourself... Beginning of the hood construction. Flat section using 0.030’’ styrene sheet and round edges using a 0.500’’ styrene tube cut in quarter sections. I engraved the fake air vents using a 0.063’’ ball nose end mill and the 2 grooves with a 0.093’’ standard end mill Glued 2 styrene strips on the hood (will be sanded at an angle to merge the flat section) Front section of the hood done. Front hood renforcement made with 0.080’’ x 0.188’’ styrene strip and sanded to fit under the fold. The tiny holes emulate the passages for the nuts holding the DODGE letters like the real hood. Back hood reinforcement. Also for the hood hinges brackets. Fake hood vents ornaments made with 0.040’’ quarter round strip. Hood almost completed, still some sanding and some minor adjustments to be made. Hood almost completed, different angle. I'll take care of the DODGE letters later.
-
Jo-Han Maverick-Dyno Don's Ride
AmericanMuscleFan replied to mustang1989's topic in WIP: Drag Racing Models
I do love those Maverick! They were widely present on the race tracks during the best era of the Pro Stock war between the american car makers. Your improvements on the frame and interior is very well done and this big 427 will look killer in that small engine bay! Nice fat tires in the back too!!! Keep up the good work! -
They shoot horses, don't they?
AmericanMuscleFan replied to STYRENE-SURFER's topic in WIP: Drag Racing Models
Impeccable build quality! It is obvious that you have the touch with styrene and that you pay much attention to details. Superb !!! -
64 Dodge D100 Pickup Pro Street
AmericanMuscleFan replied to AmericanMuscleFan's topic in WIP: Drag Racing Models
Hello Joe, Thanks for your always kind comments! You made great improvements on the Maverick so far and I can't wait to see your next update. Cheers, Francis -
64 Dodge D100 Pickup Pro Street
AmericanMuscleFan replied to AmericanMuscleFan's topic in WIP: Drag Racing Models
Thanks for your visit Tyrone! Still a long way to go and a lot of updates until the end of this project. I wll try to go as far as possible before the «slow building season» (summer). Cheers, Francis -
64 Dodge D100 Pickup Pro Street
AmericanMuscleFan replied to AmericanMuscleFan's topic in WIP: Drag Racing Models
Hello Claude, I am undecided between 4.88 and 5.57 but I will be fixed after the dynamometric tests... LOL Thanks for your kind comments, Francis Thanks for you encouragements Andy, it's very appreciated! Cheers, Francis I'm don't exactly know where they come from but I do have them I my parts bin for years. I got them with other parts including a cheap 69 Coronet resin body that I purchased from another builder on an eBay auction. They are close in size than the ones comming with the AMT 70 ProStreet Coronet. Thanks for your good words Rooster! Cheers, Francis -
64 Dodge D100 Pickup Pro Street
AmericanMuscleFan replied to AmericanMuscleFan's topic in WIP: Drag Racing Models
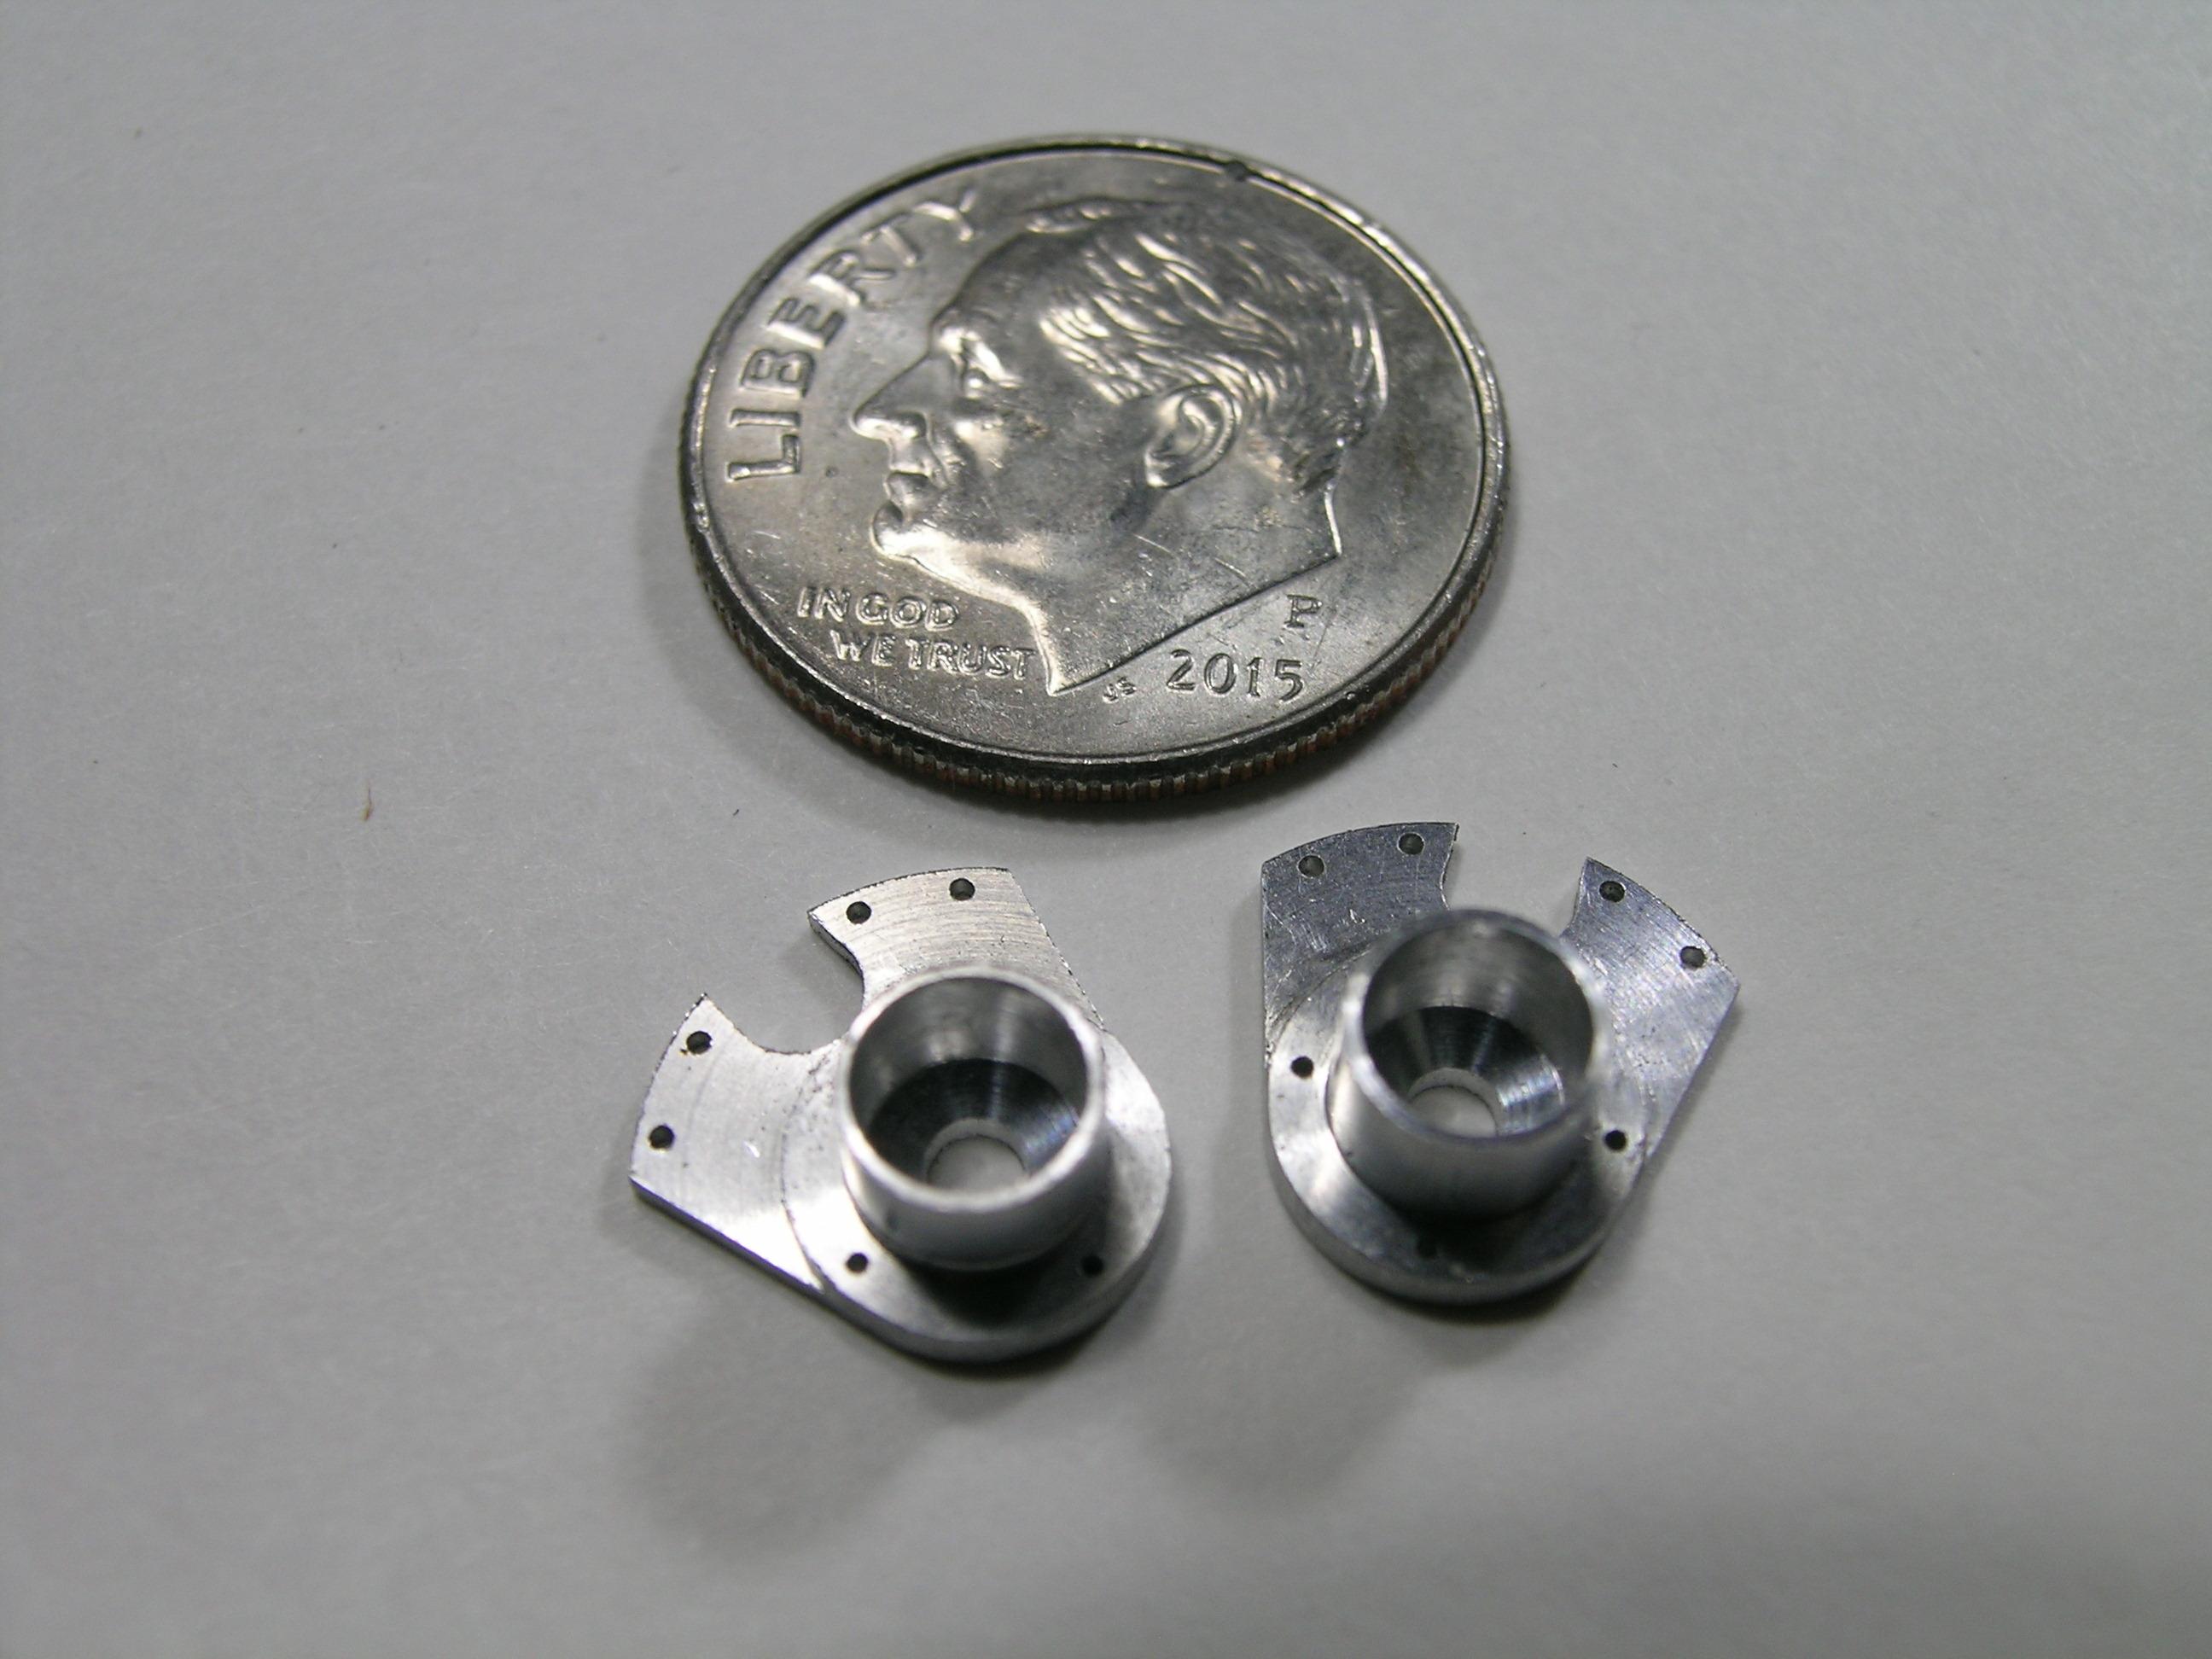
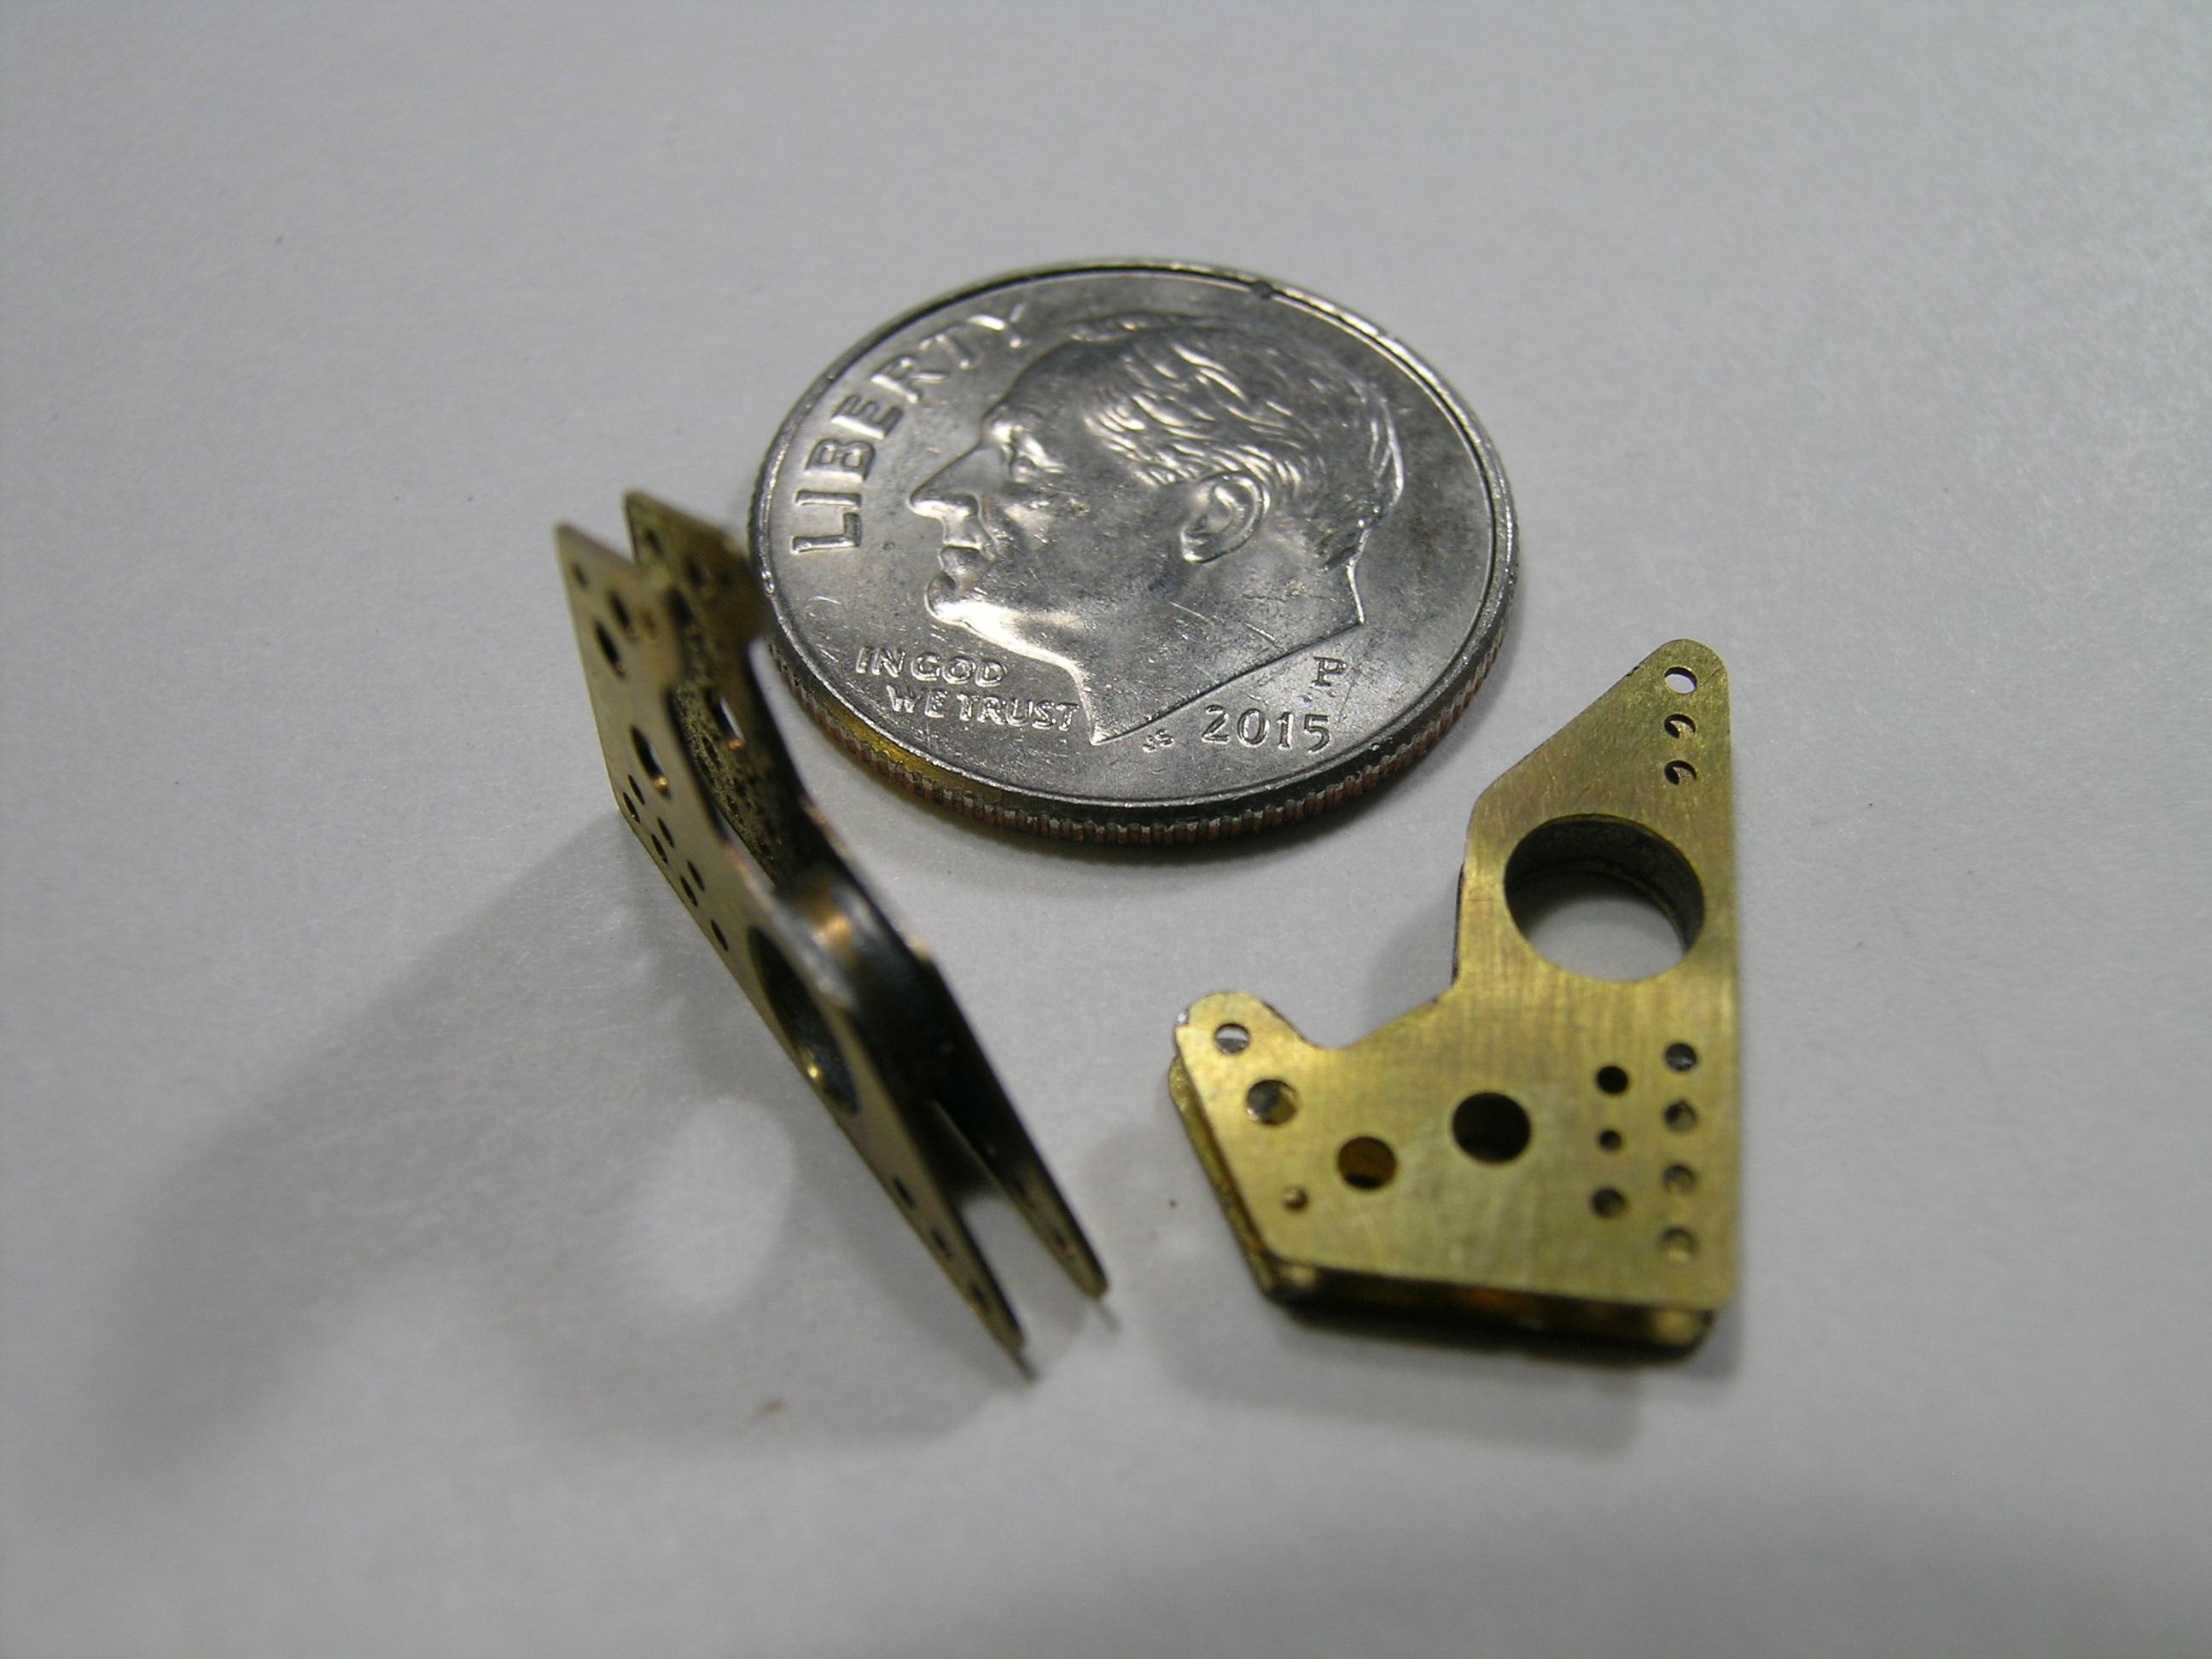
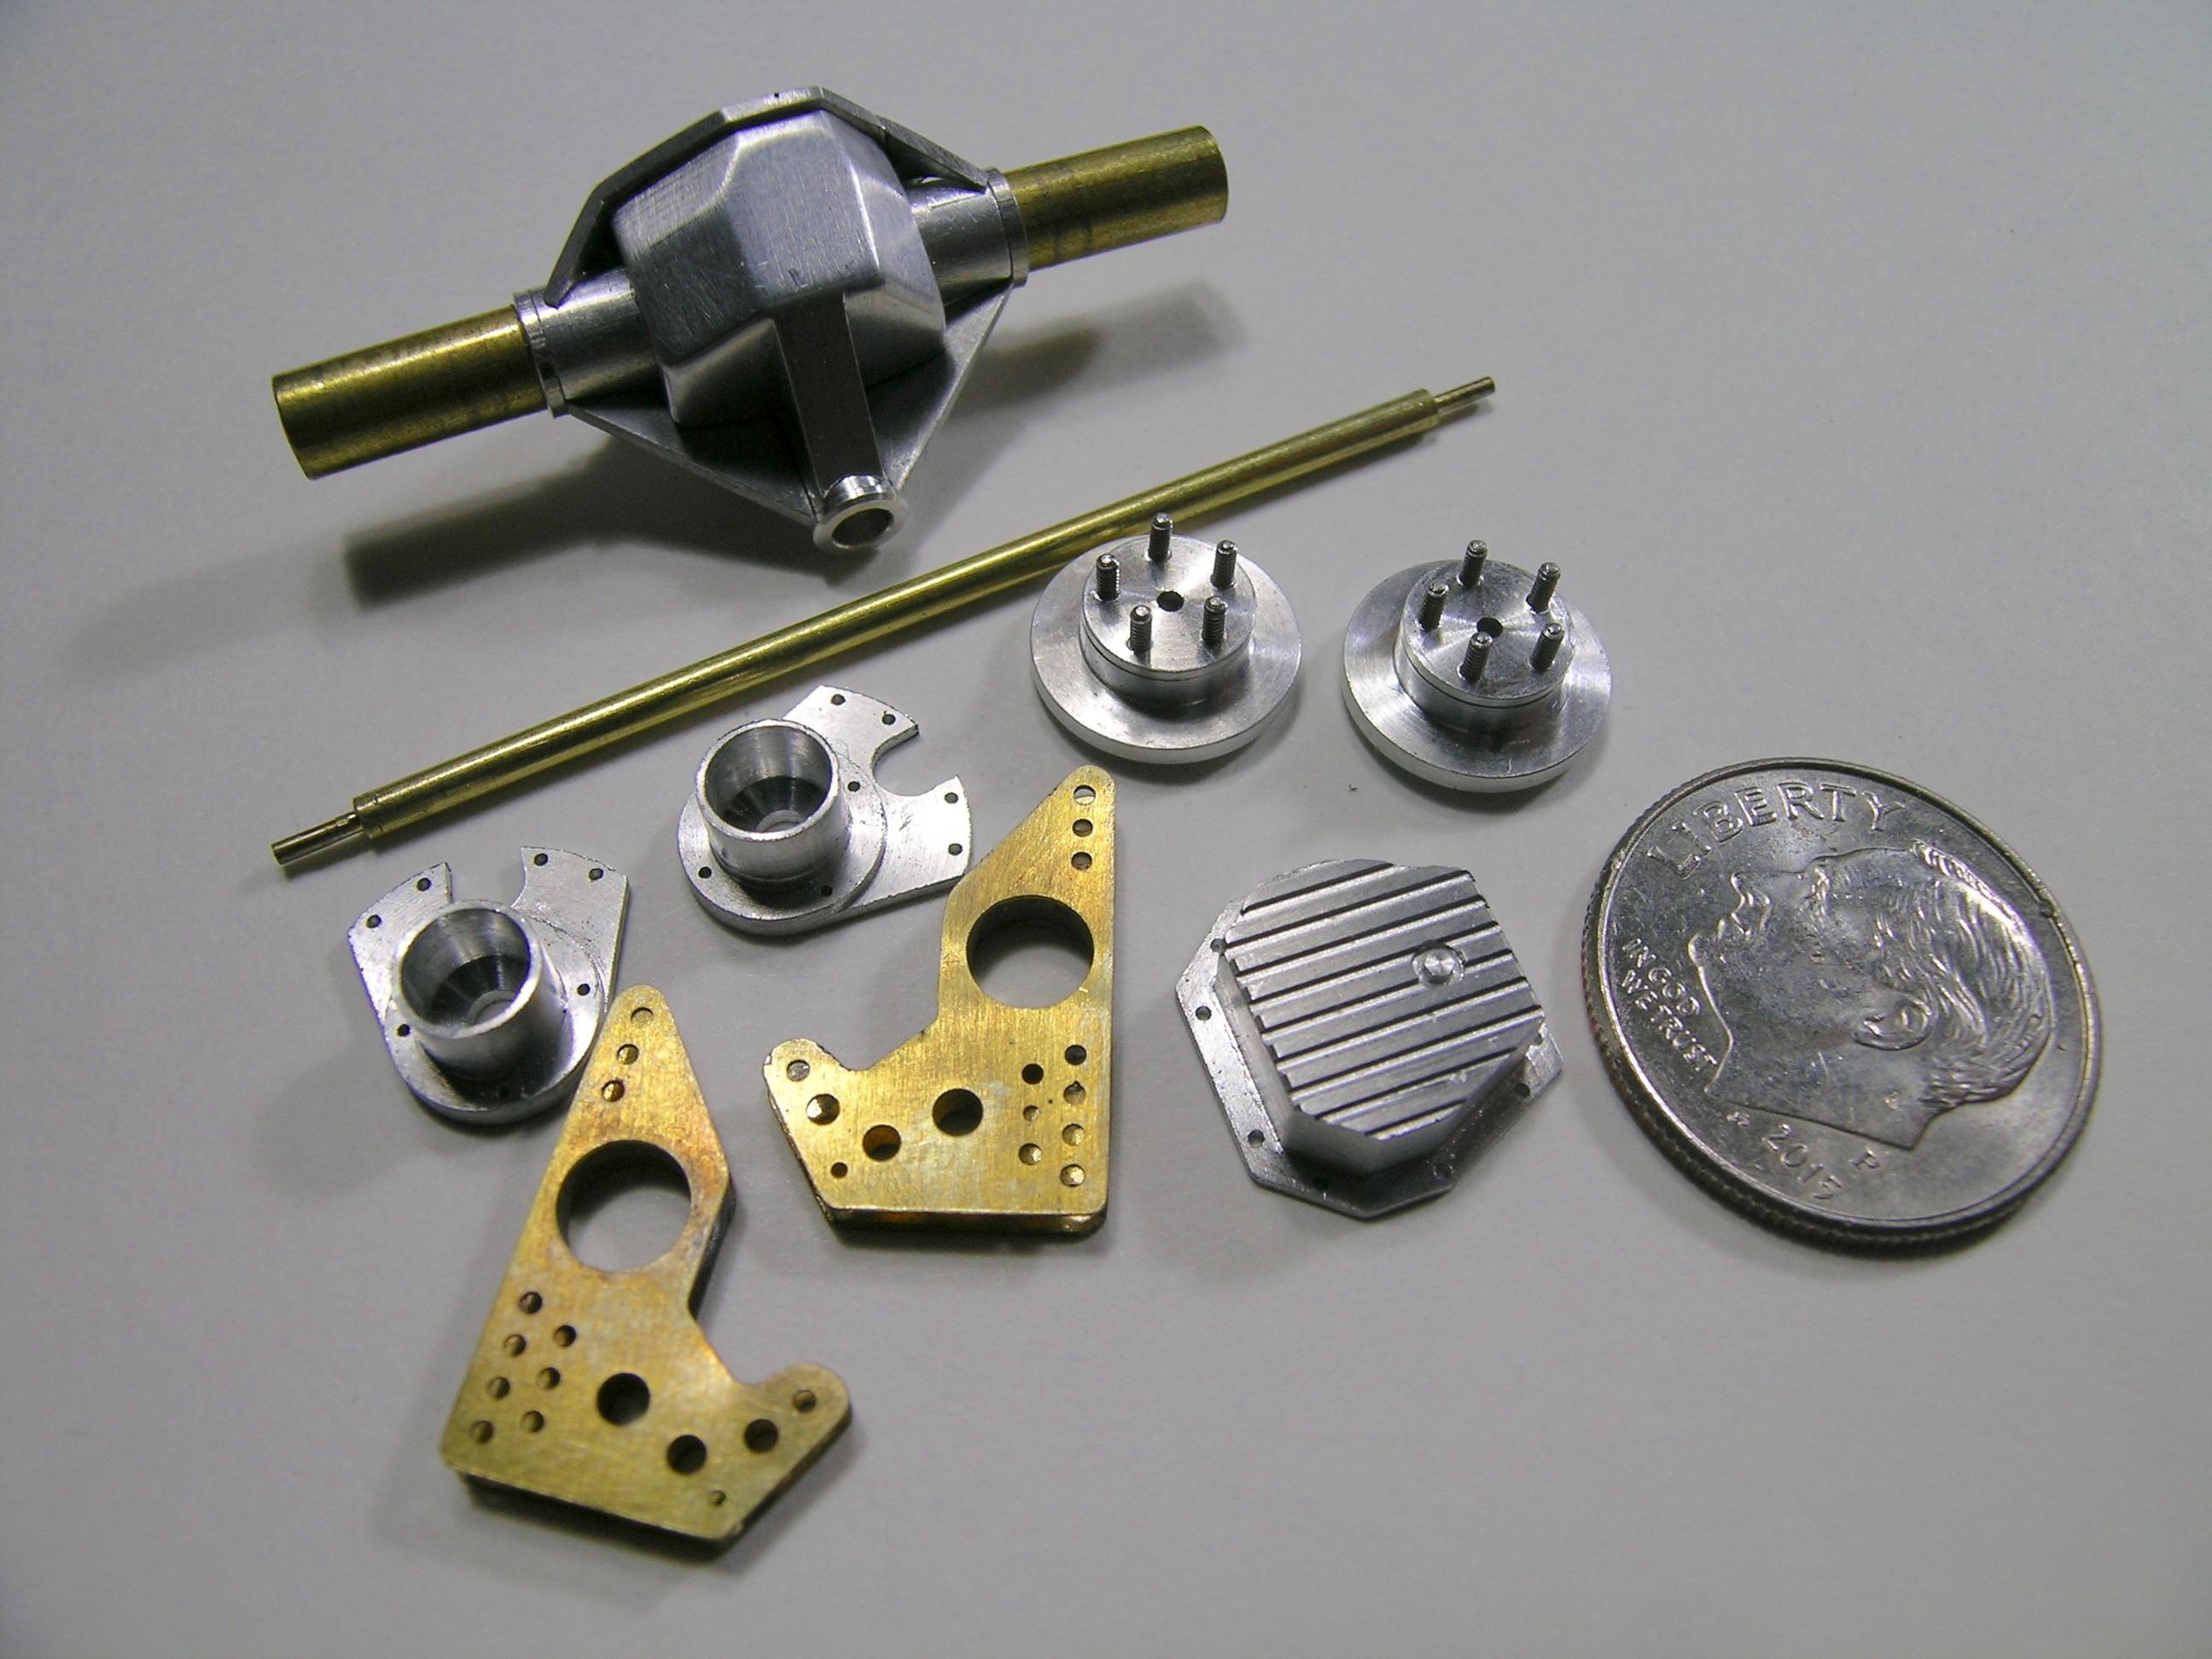
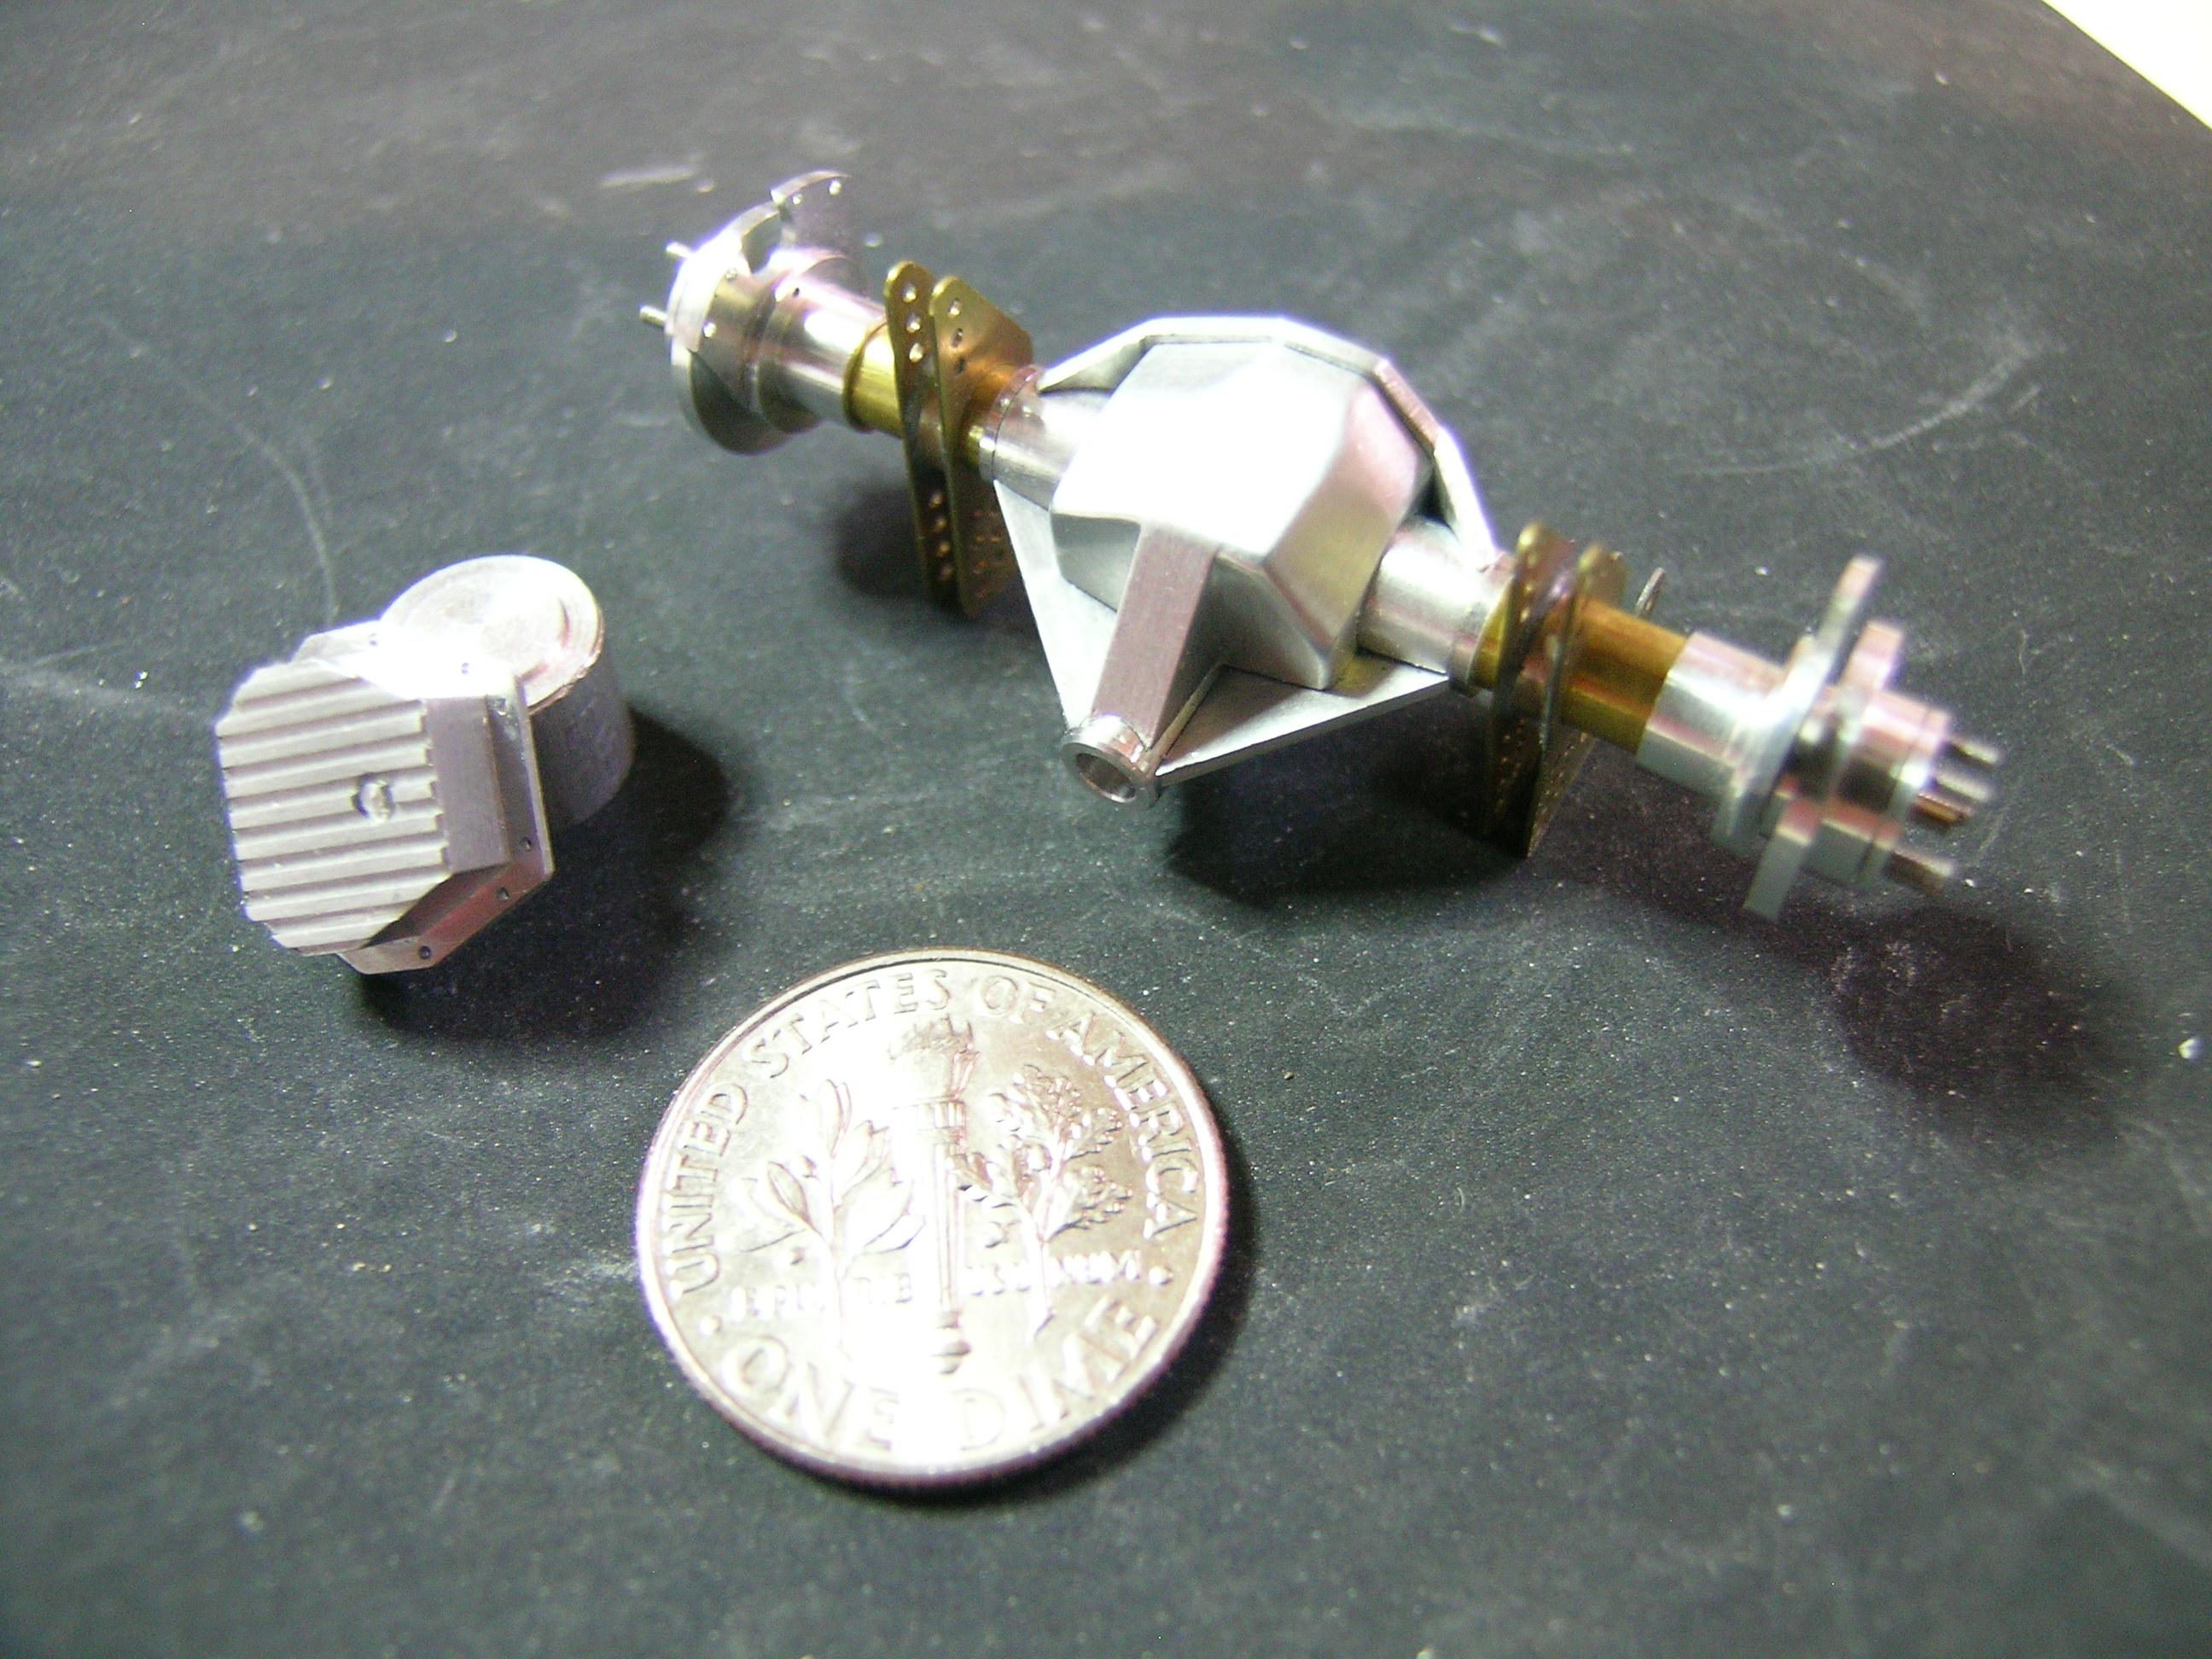
Hello All, Today's update is for the rear end with 4-link brackets and coilover suspension set-up. I didn't get much comments on the mag wheels post (maybe you don't like them?) but I think they will look good on the final product and the holes pattern will enable to see the brake calipers. Joe: Thanks to be so loyal my friend, you can count on my help and humble advice if someday you want to jump in machining your own parts! Cheers, Francis Rear caliper bracket in the milling chuck Rear end housing in the milling chuck Dana 60 rear end cover in the milling chuck. Rear disk brake with threaded studs. Rear disk brake different view. Rear brake calipers brackets final. Custom made differential 4-link brackets (made with 0.010’’ brass and welded using a resistance soldering unit). Rear End components. Differential assembled with 4-link brackets, caliper bracket and disk brake/spindle combo. The brass axle spin freely inside the differential. Functional rear coil over shocks (eyelets are from RB Motion)
-
70 Plymouth HEMI GTX 1/25 Scale
AmericanMuscleFan replied to AmericanMuscleFan's topic in Model Cars
Mark: Can't wait to see your first try and my best advise is to take small bites at a time (you must walk before you can run). Bo: Thanks for the comments and visiting. Joe: Always a pleasure and I will be trilled to see your nexts updates on the Maverick! Kevin: Thanks for the compliment and taking the time to leave your comments in both threads. Cheers, Francis -
Tim, It's great to see someone take the time to rebuild one of their models that has marked the history of model making in its own way. To be able to enjoy it in addition to the magazine and its original article is a fact that few model makers can do. You are a key figure in this hobby and it is reassuring for the future where patience and the desire to accomplish oneself tend to disappear in favor of ease. Long live this wonderful pastime and thank you for sharing this renaissance! Forward-thinking and Inspiring!
-
70 Plymouth HEMI GTX 1/25 Scale
AmericanMuscleFan replied to AmericanMuscleFan's topic in WIP: Drag Racing Models
Brad: Thanks for the comment, I love using simple things too... they are around us and often forsaken... Chris: Thanks for the compliment! Mike: Sorry, the GTX is currently winterized, we are still in January... LOL Niko: Thanks for your kind words! You may be right about the safety loop but I've seen it in both locations (front of back) and I did refer to that Roadrunner restauration picture for my GTX build (see picture attached). Thanks anyway to pointed this? Cheers, Francis
-
64 Dodge D100 Pickup Pro Street
AmericanMuscleFan replied to AmericanMuscleFan's topic in WIP: Drag Racing Models
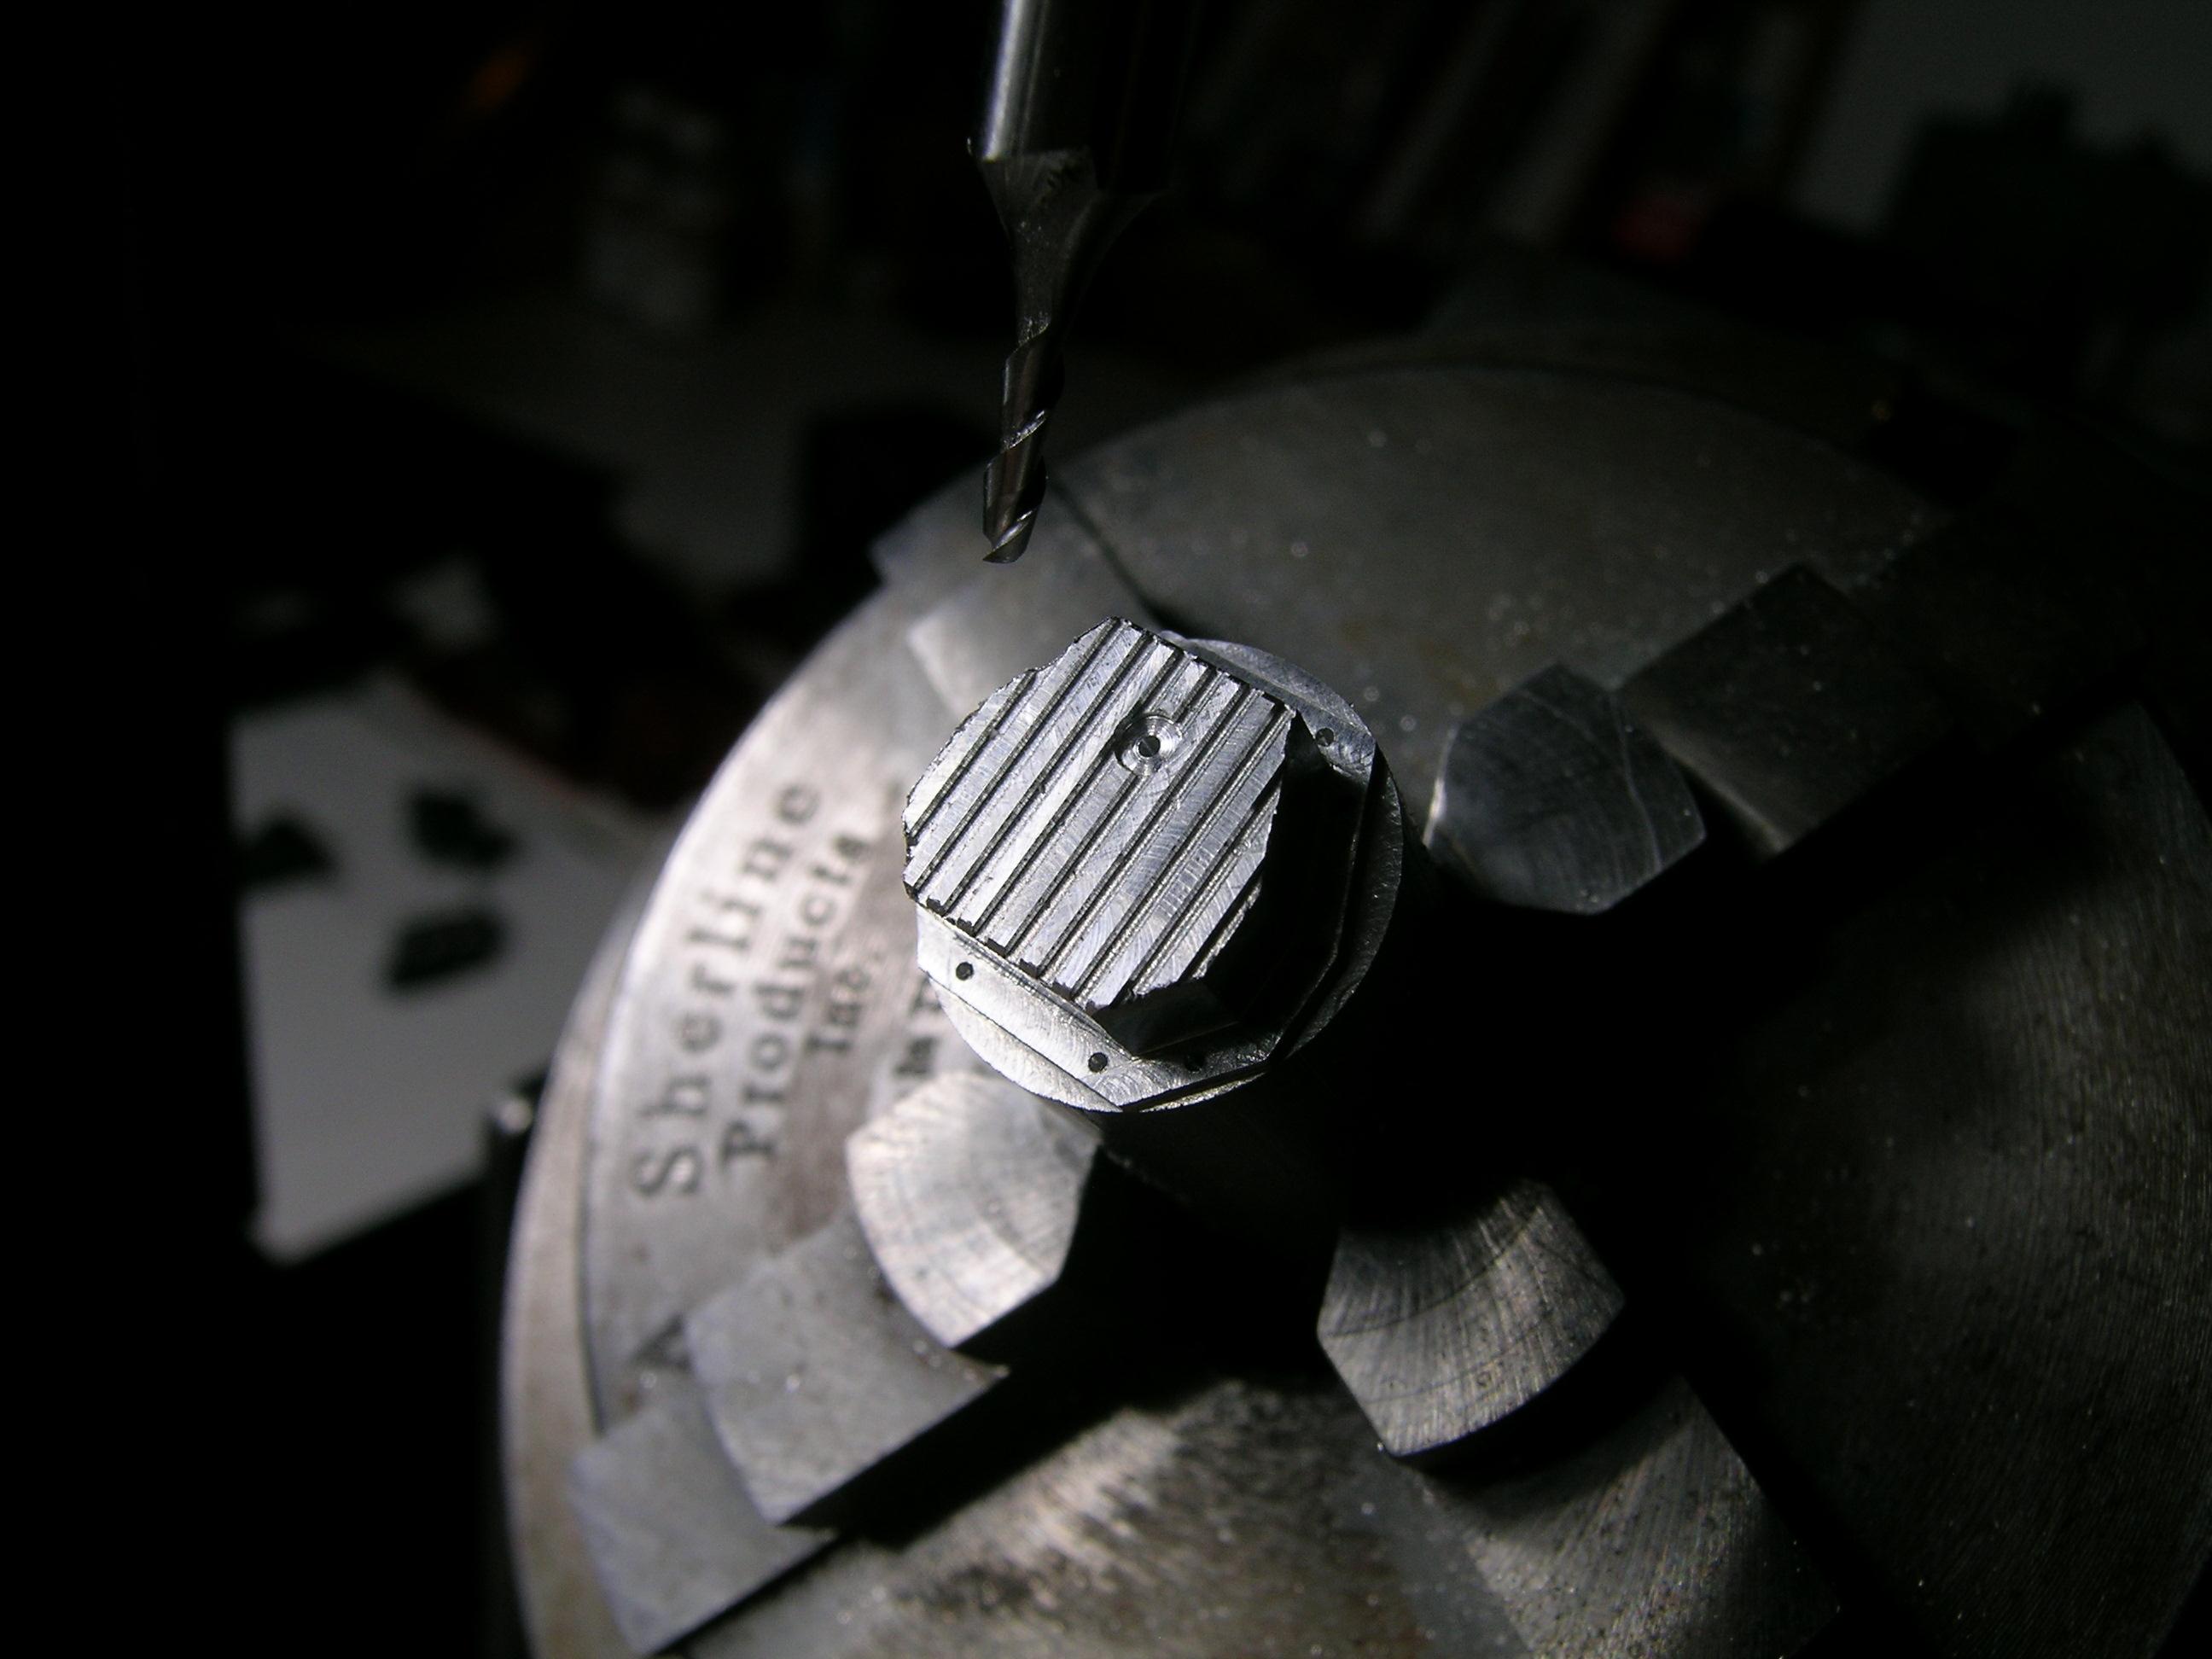
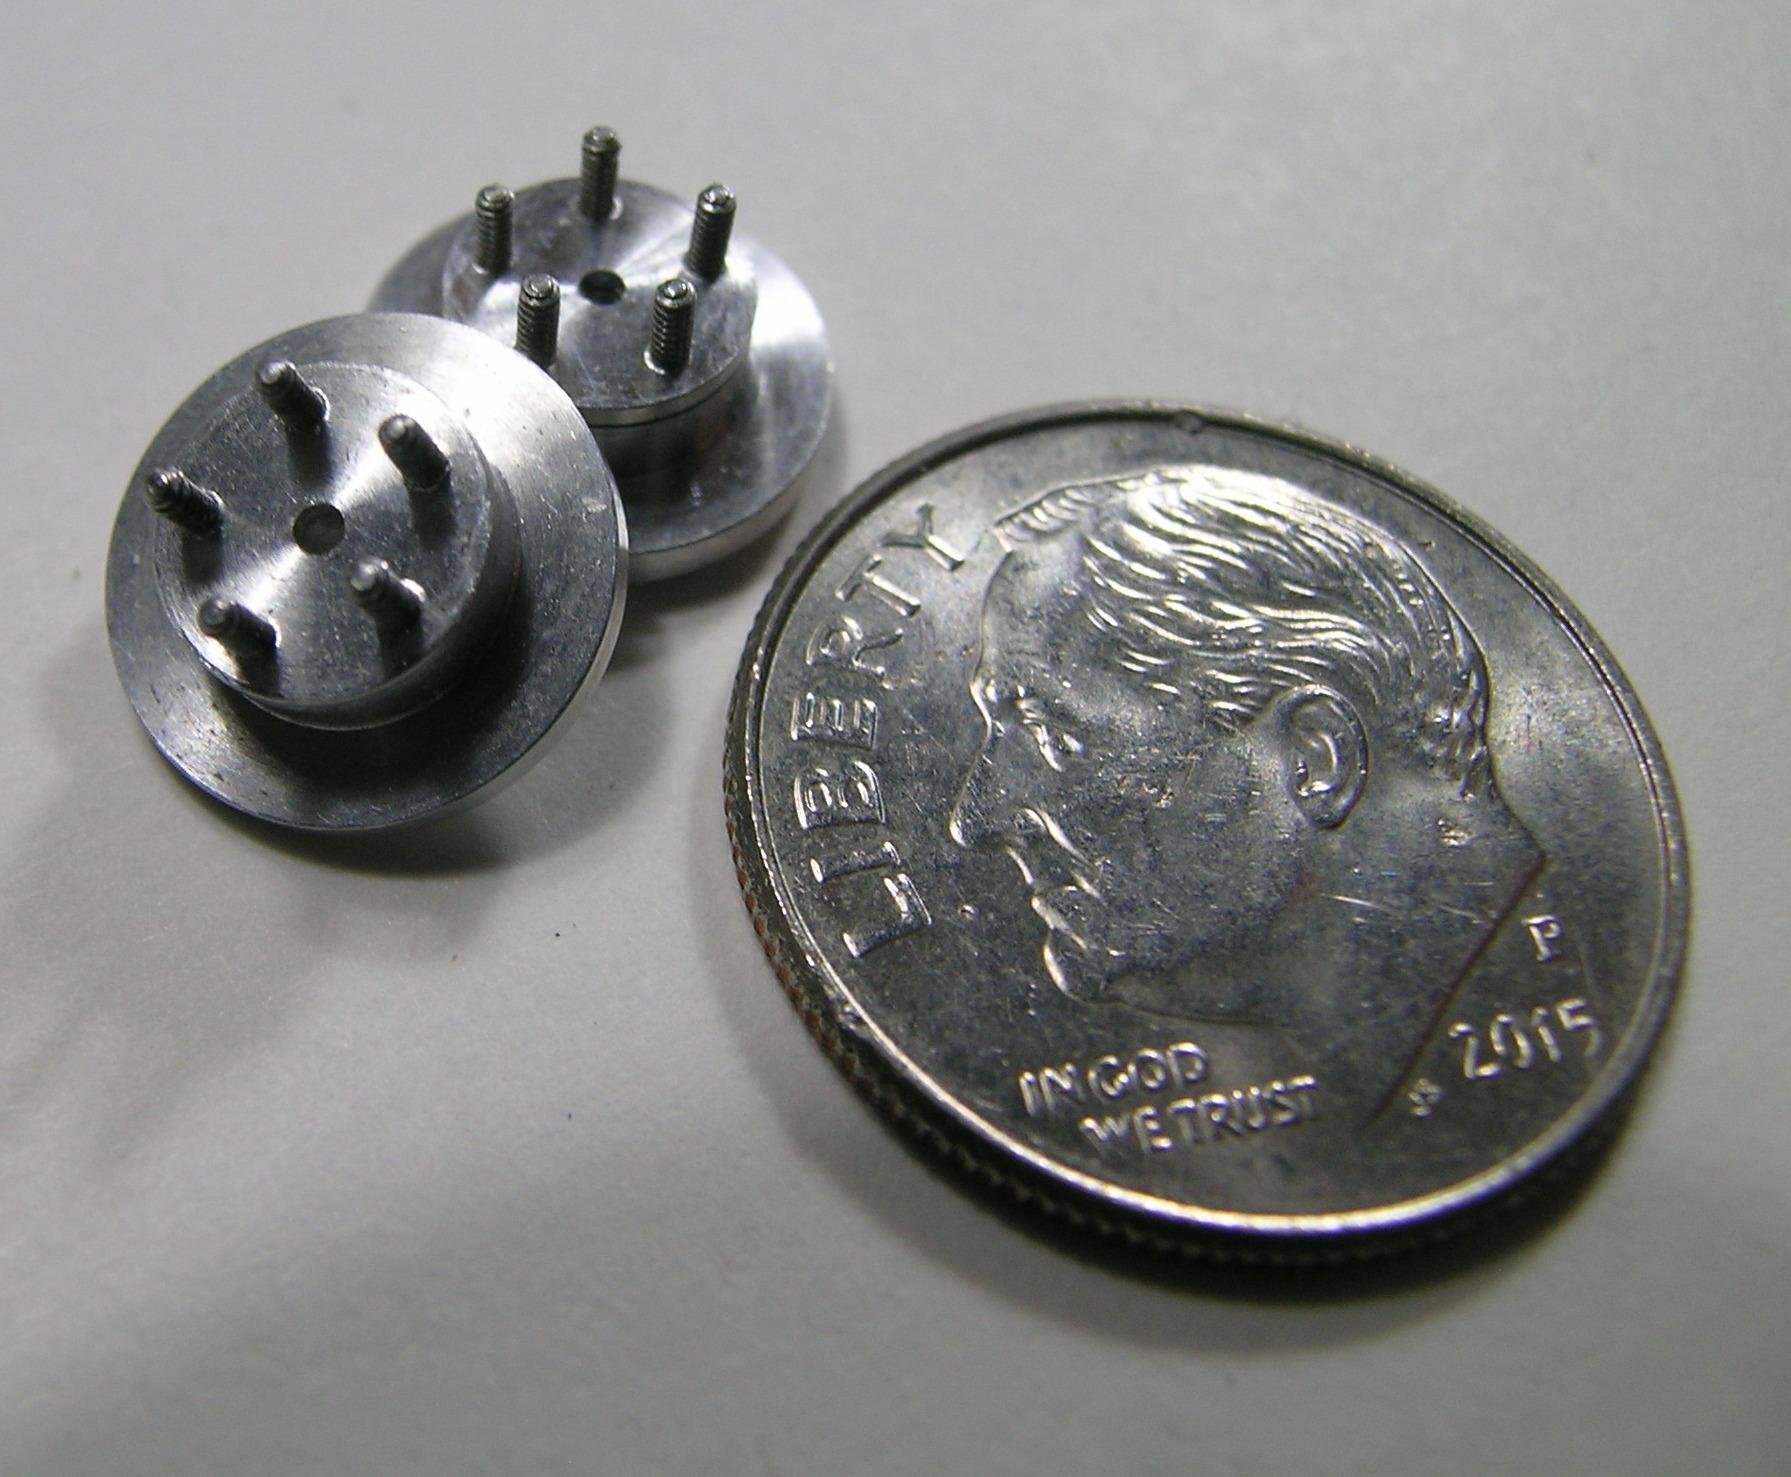
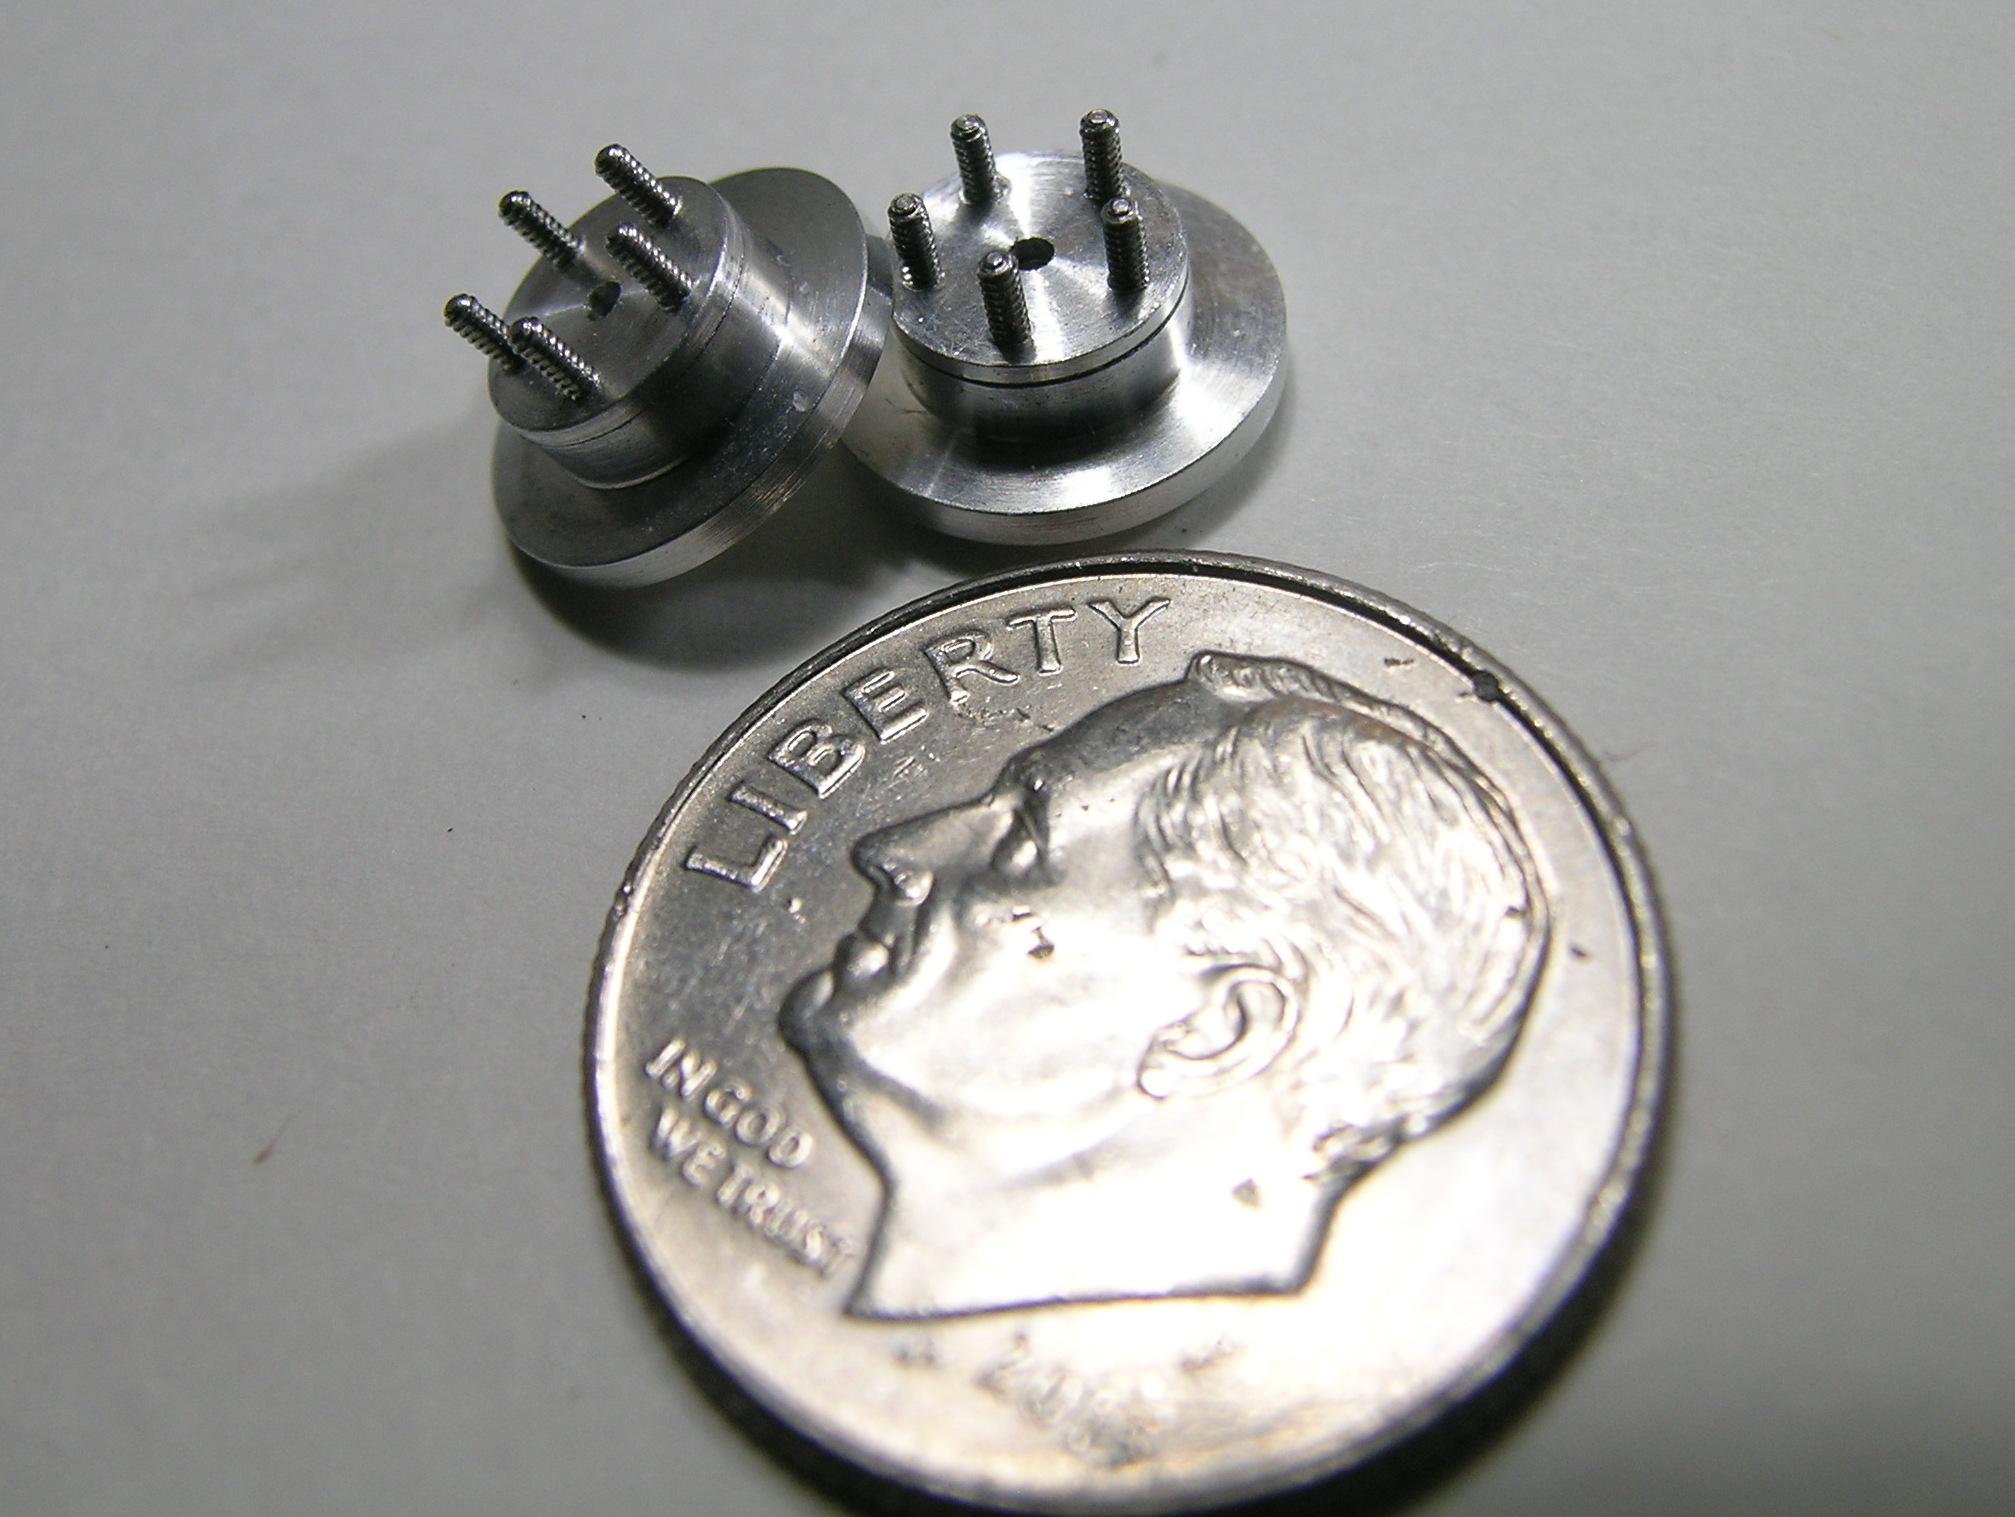
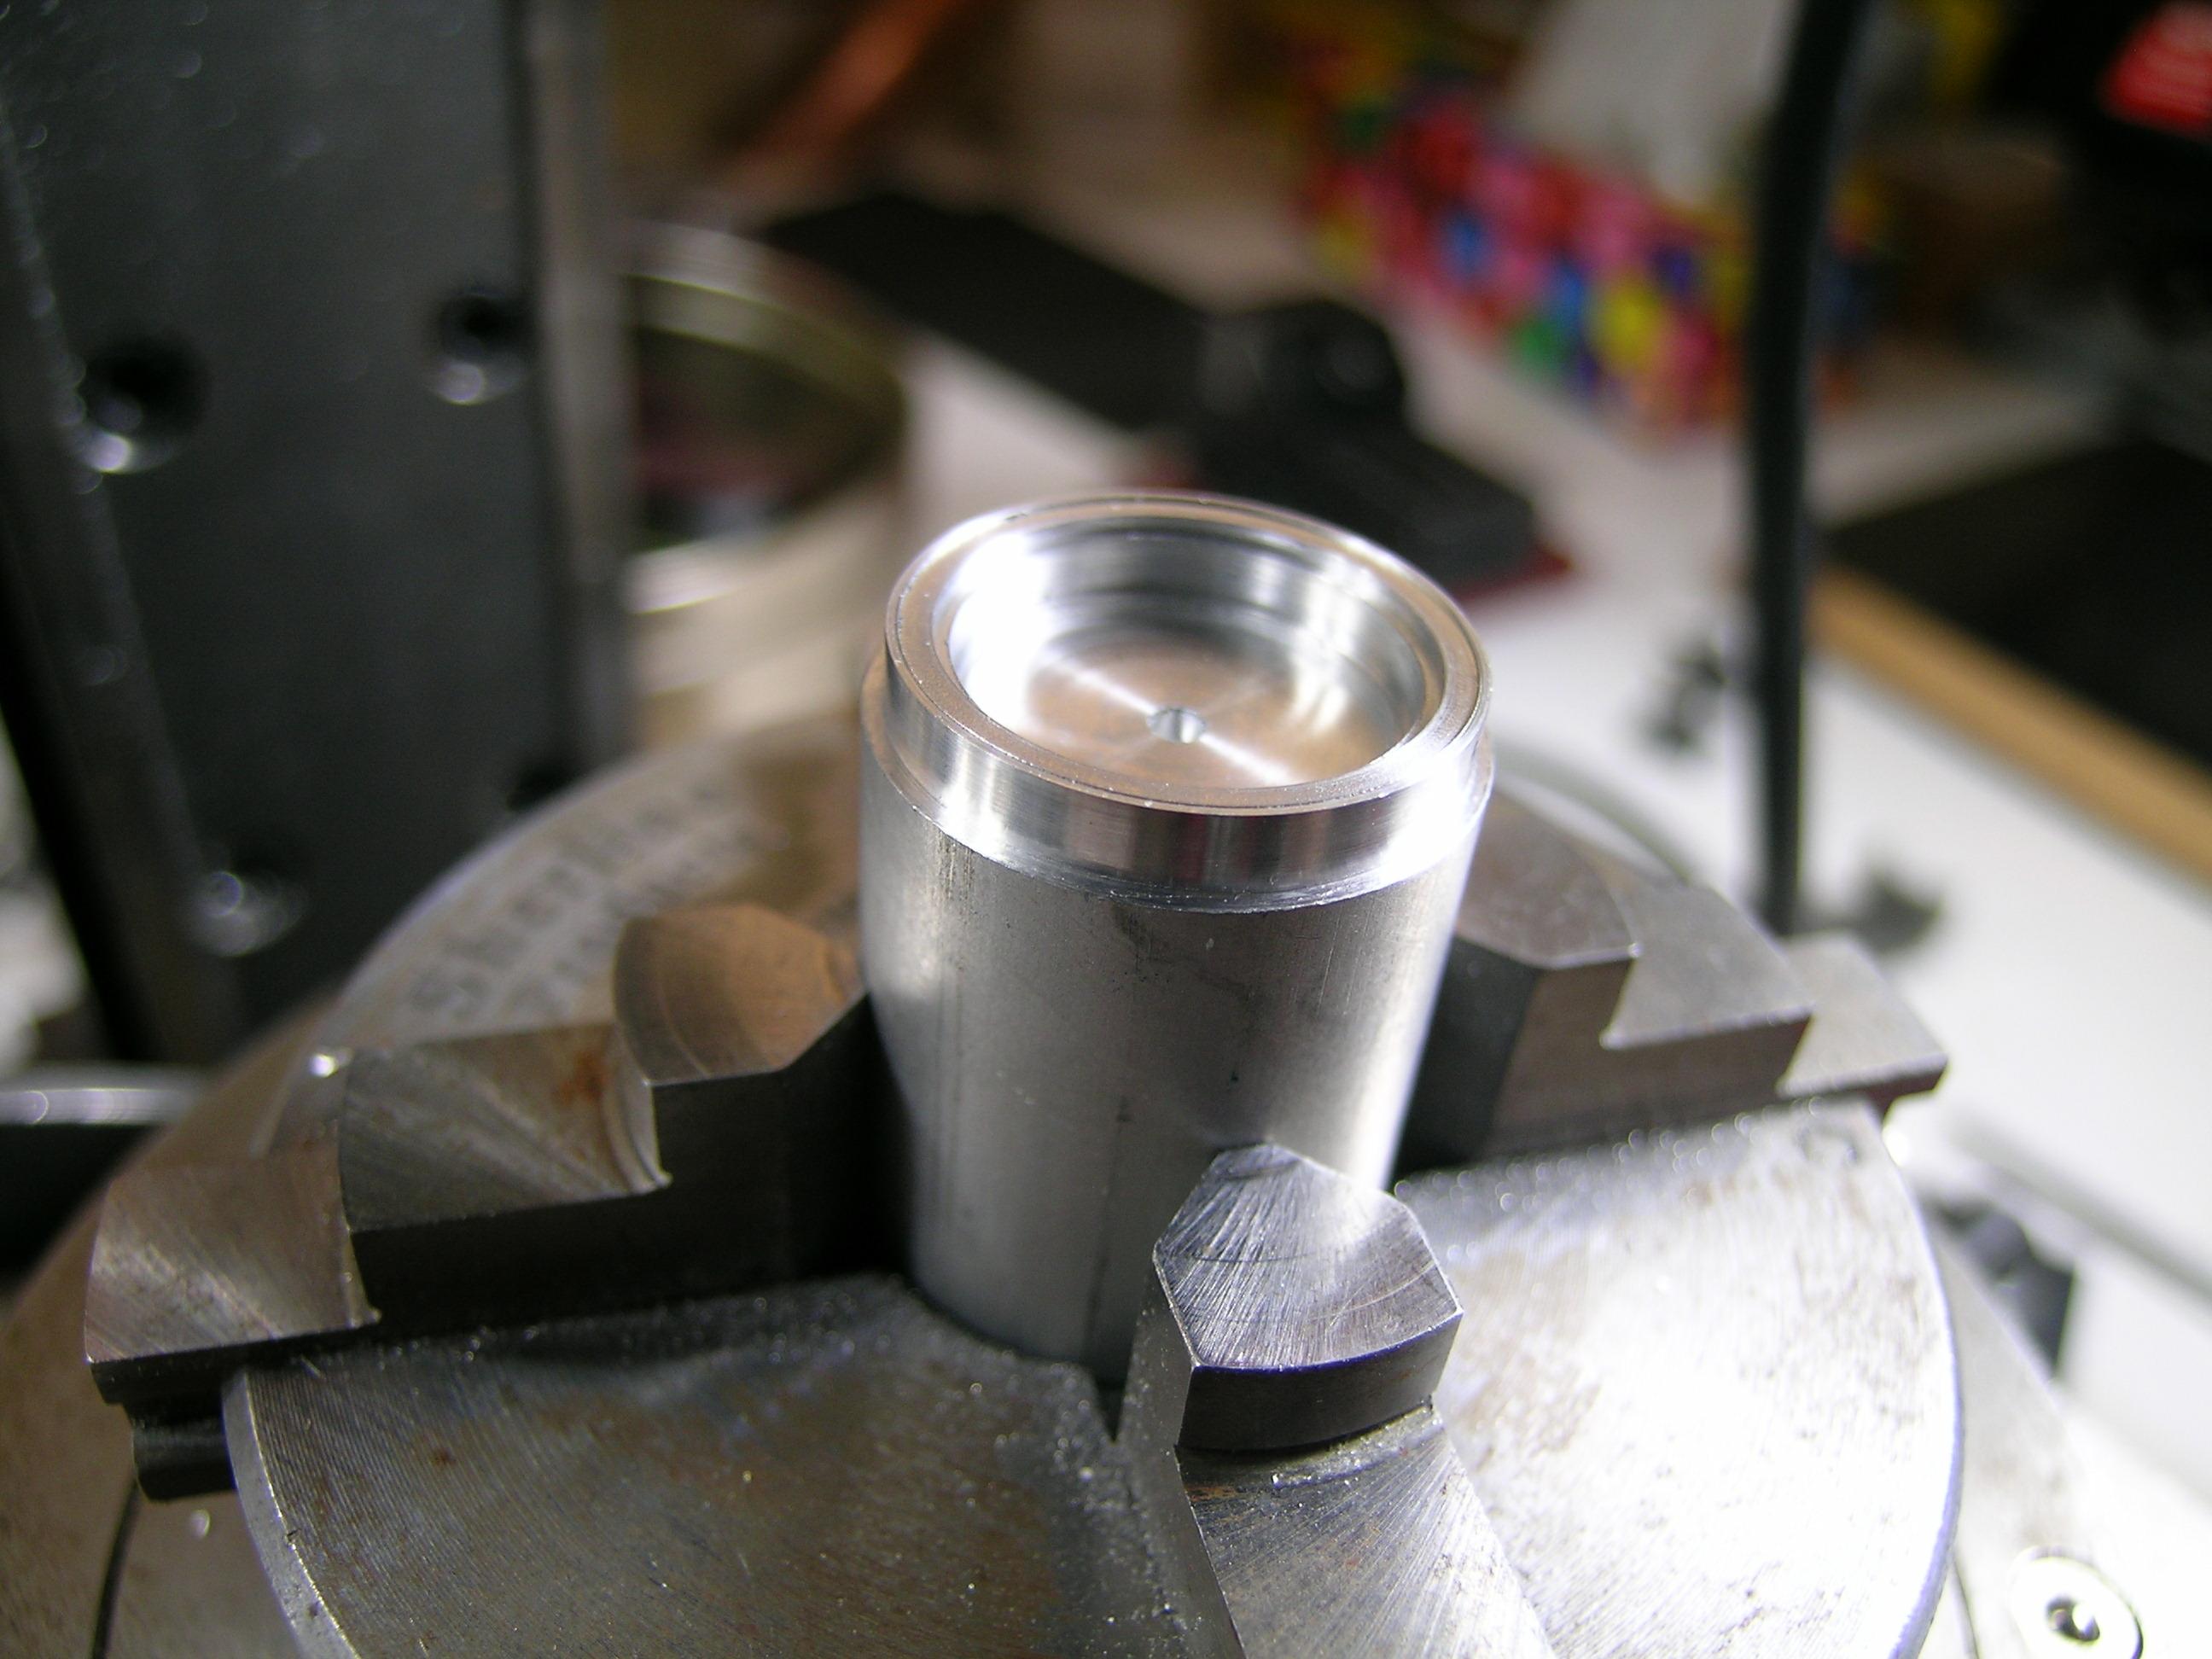
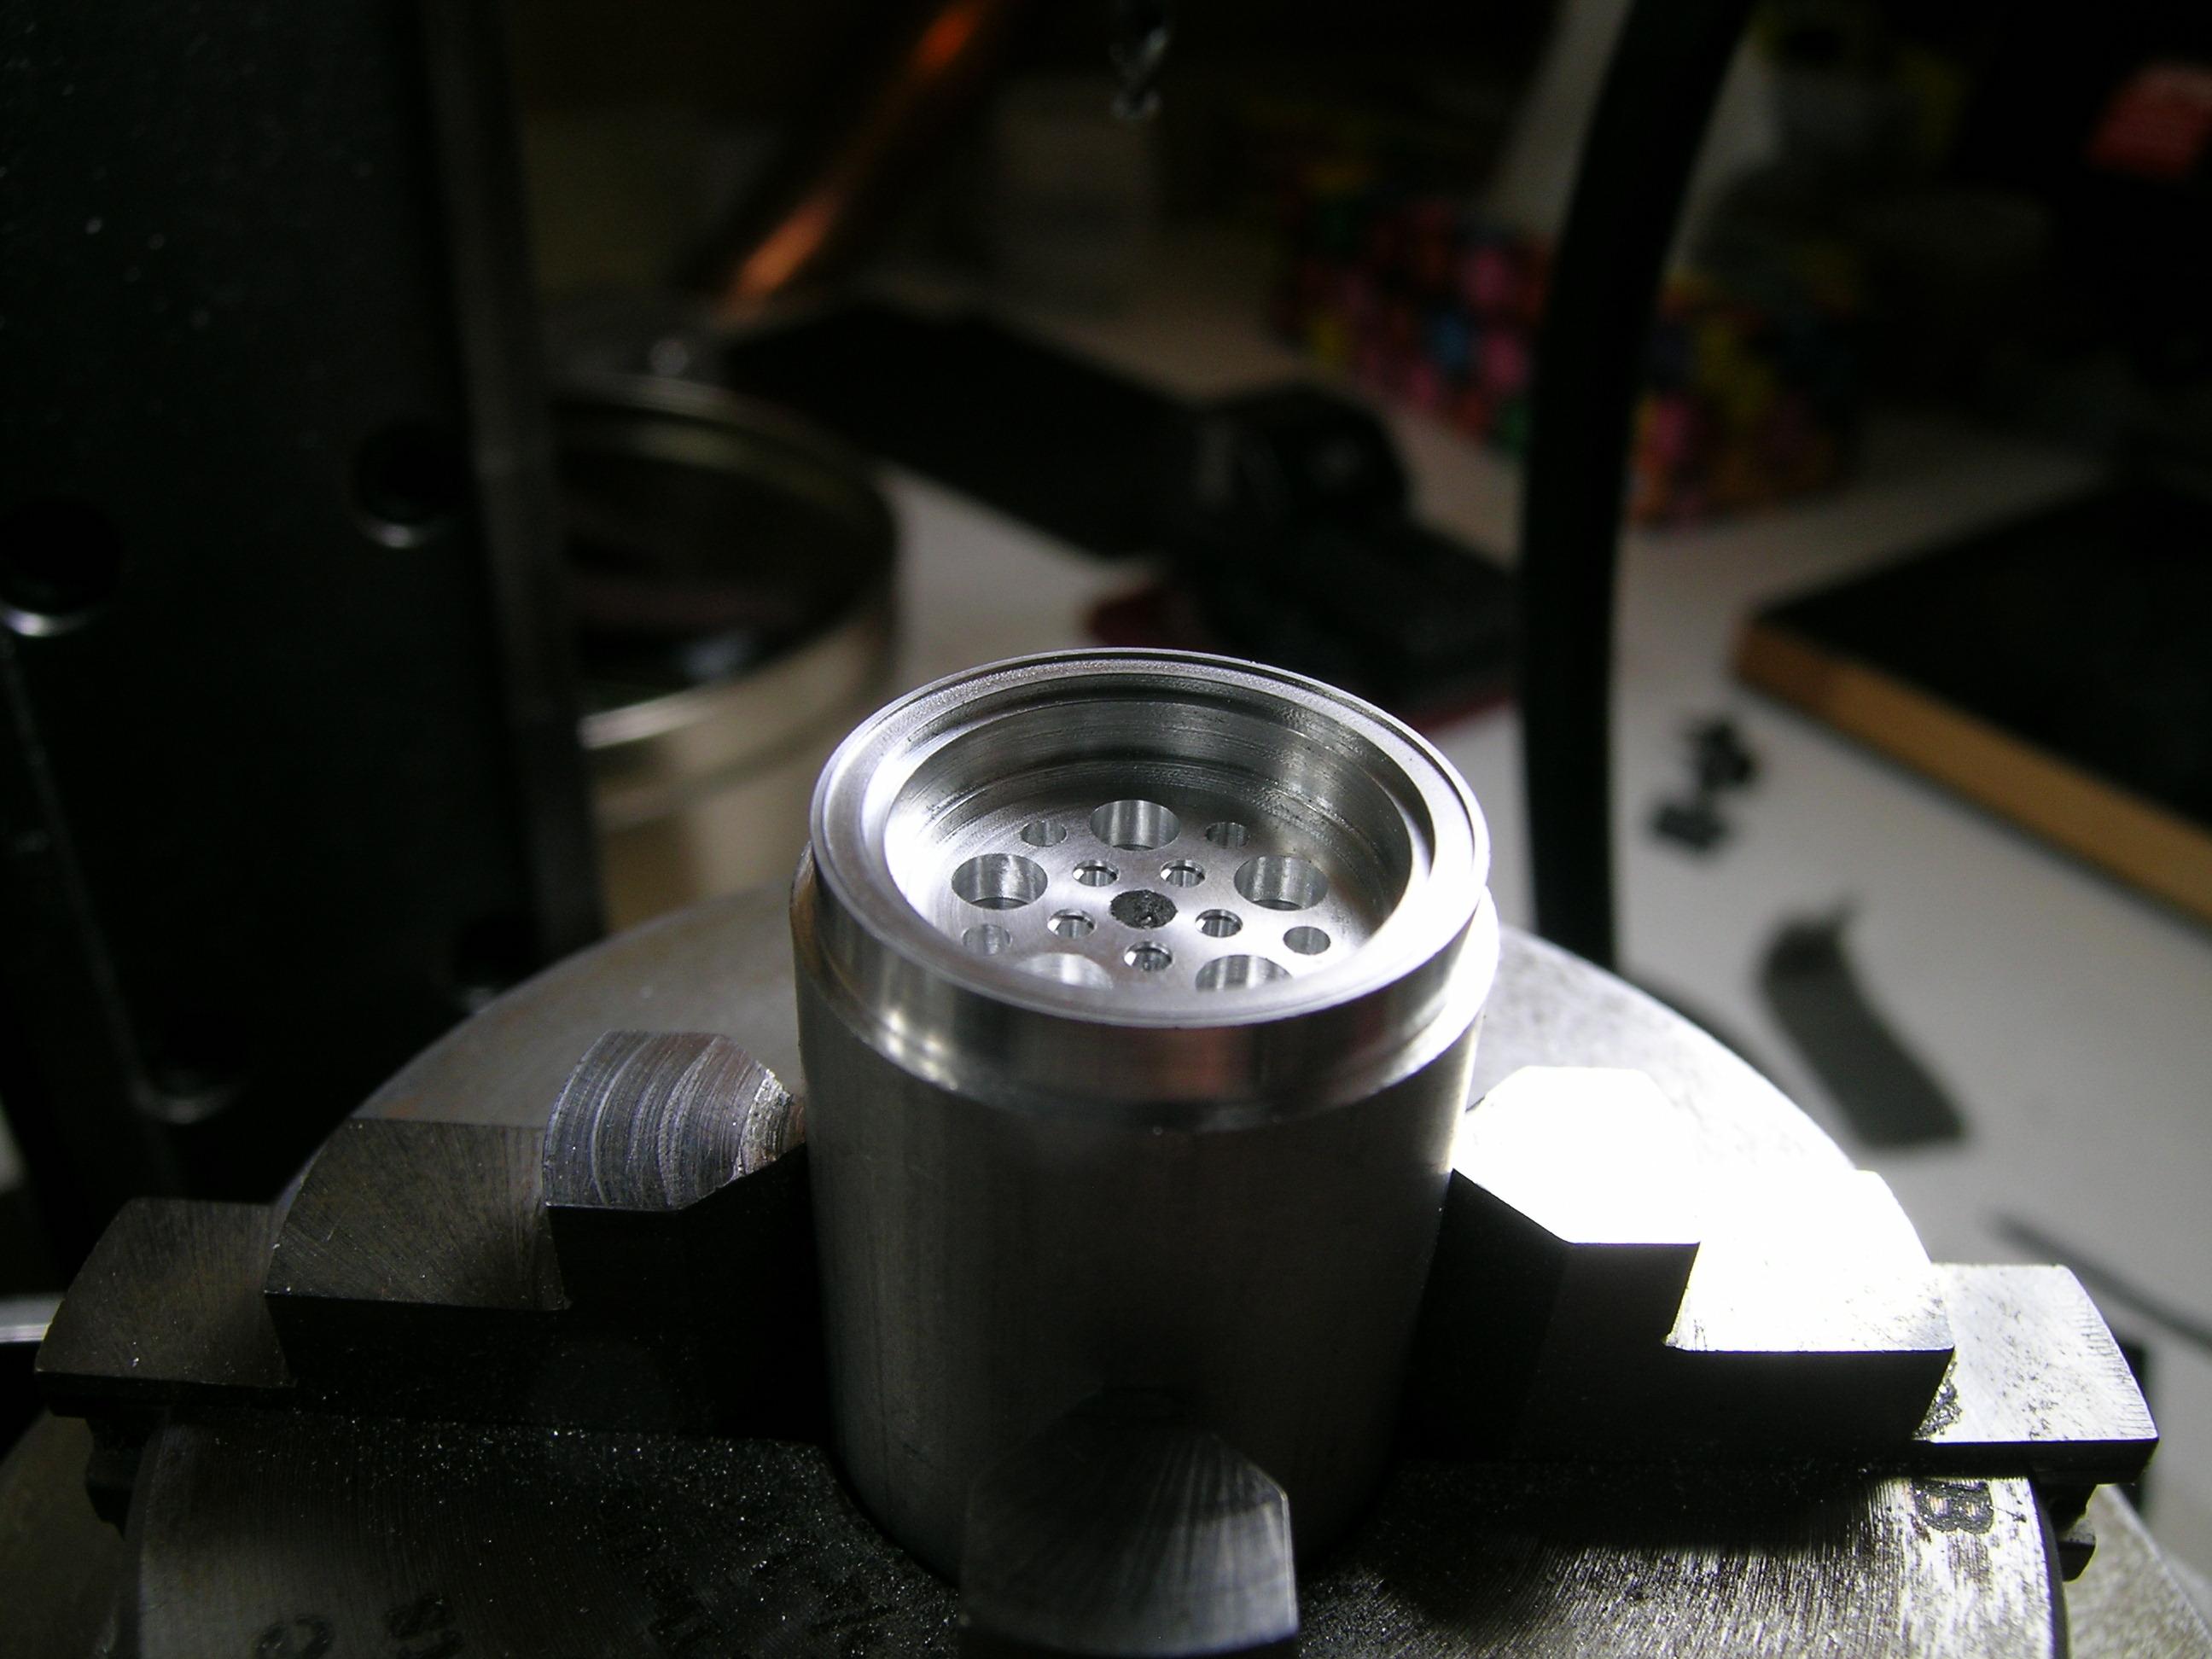
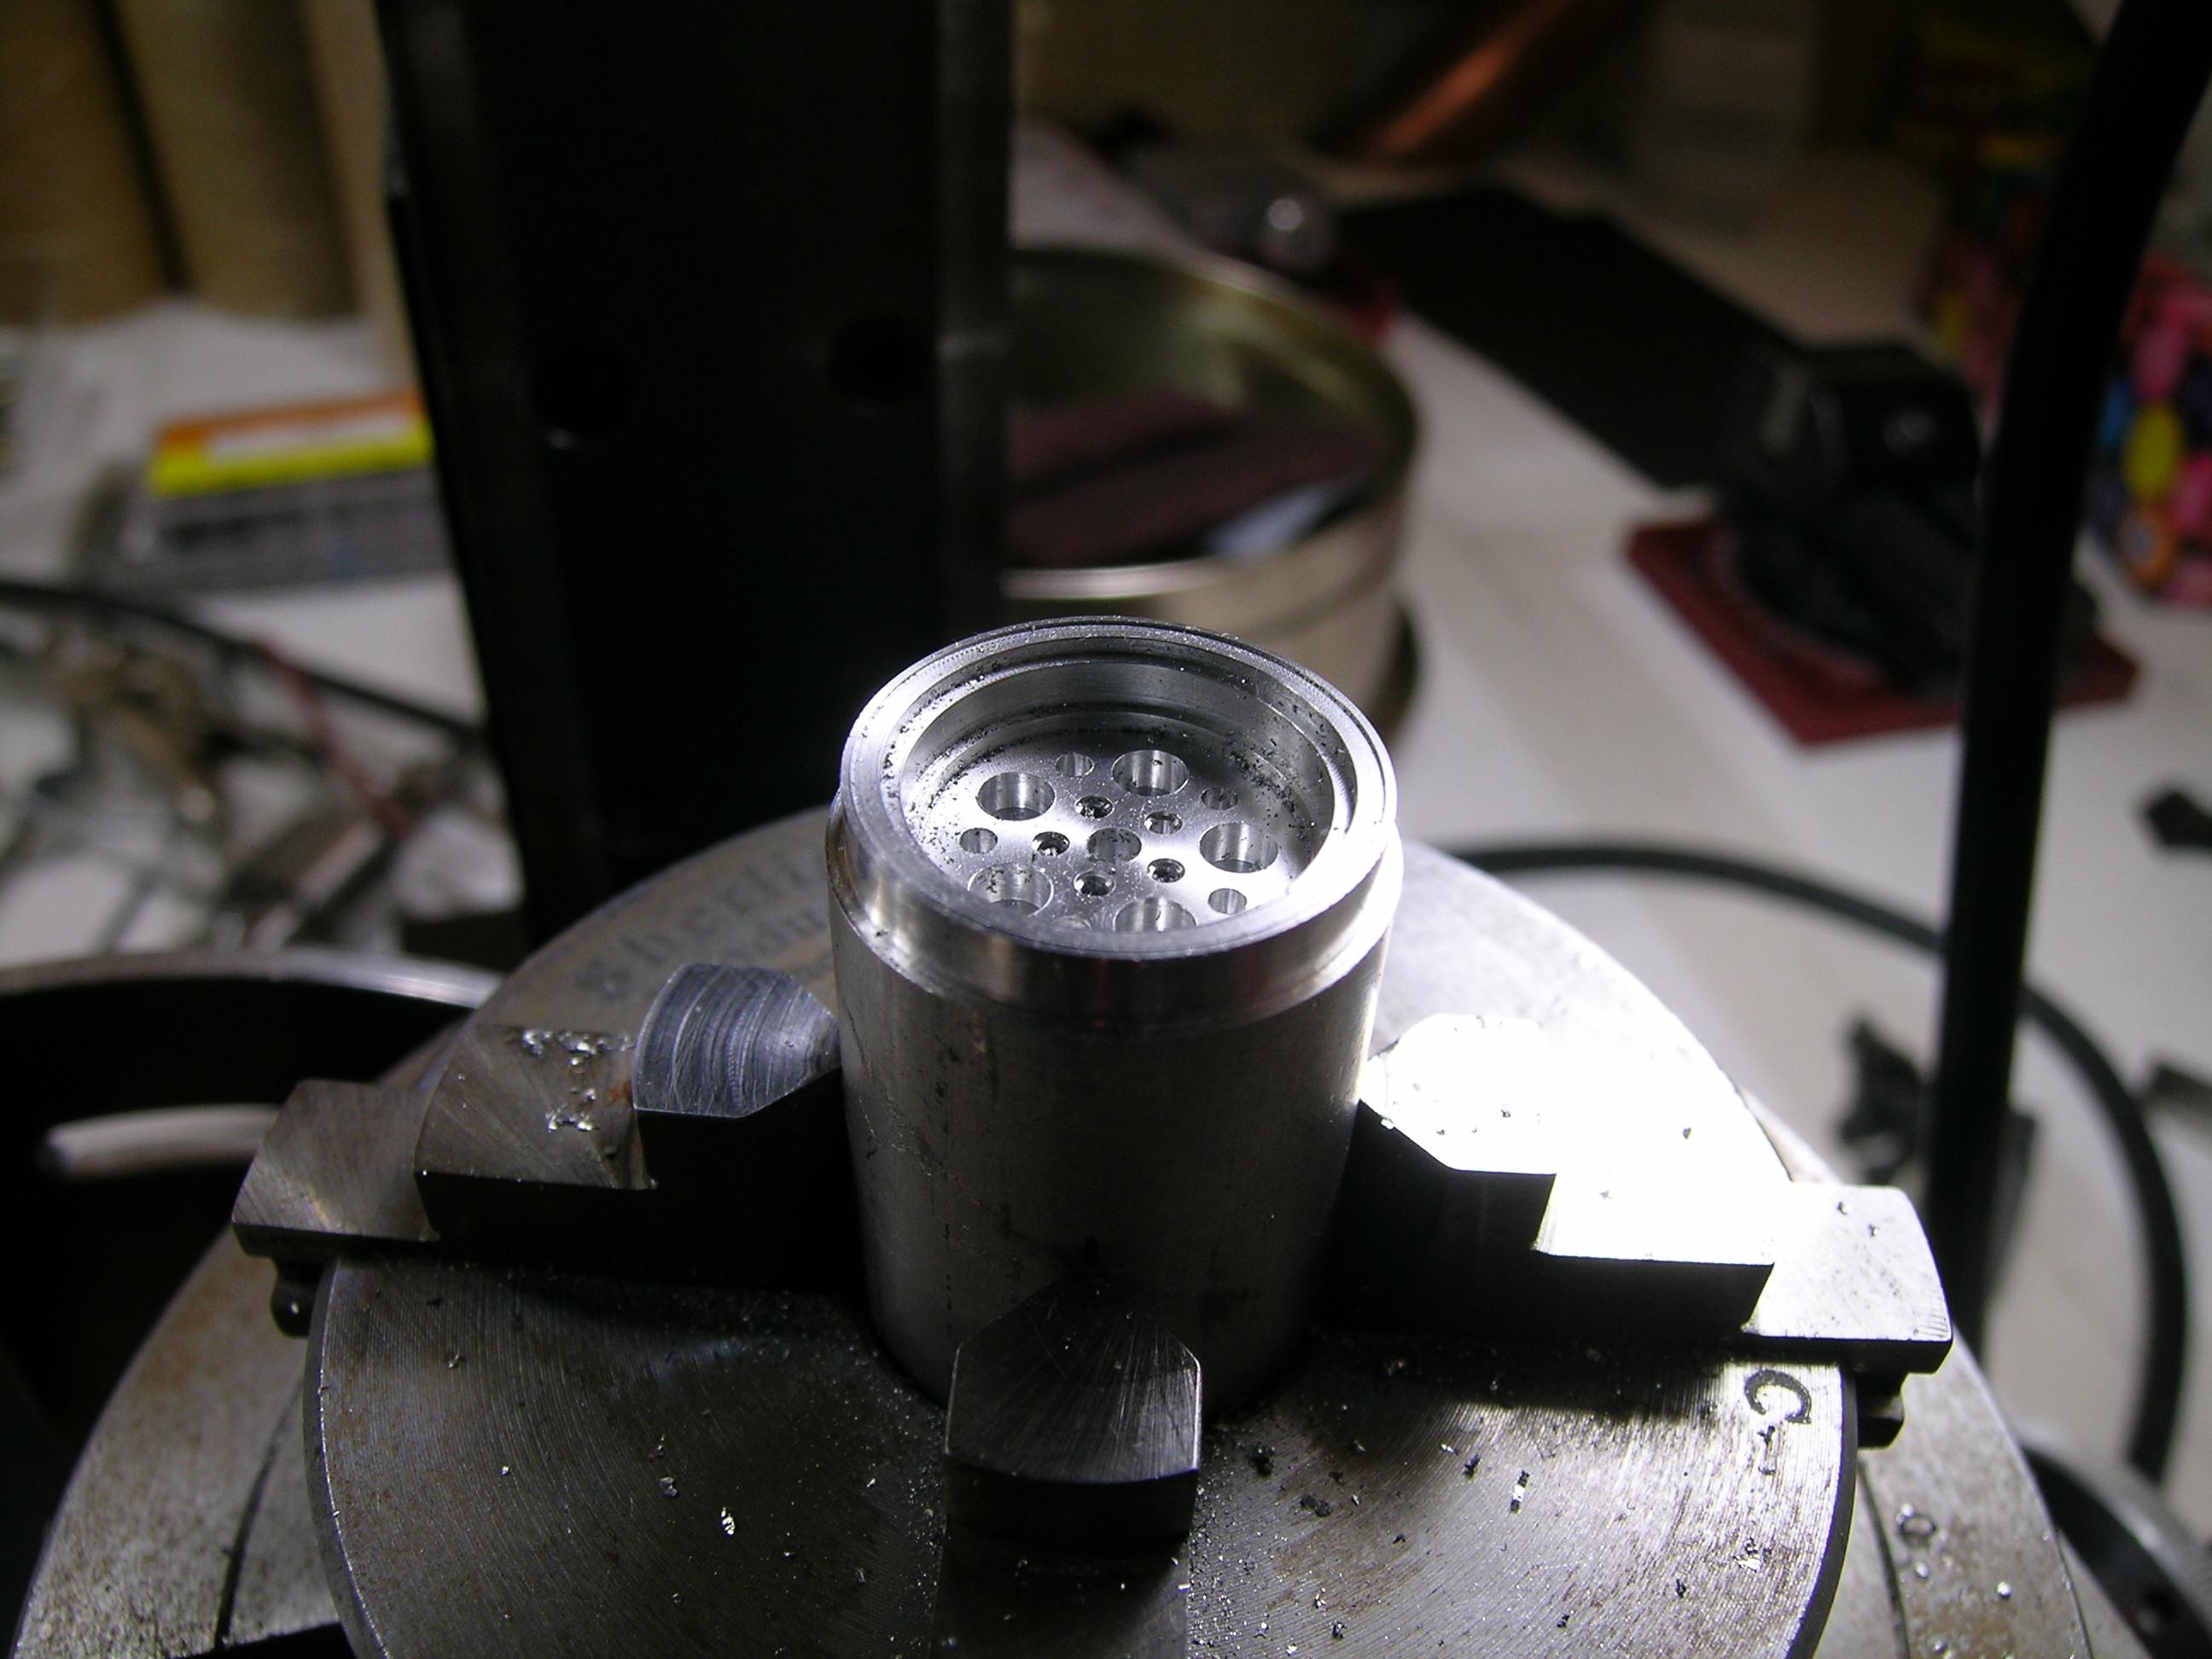
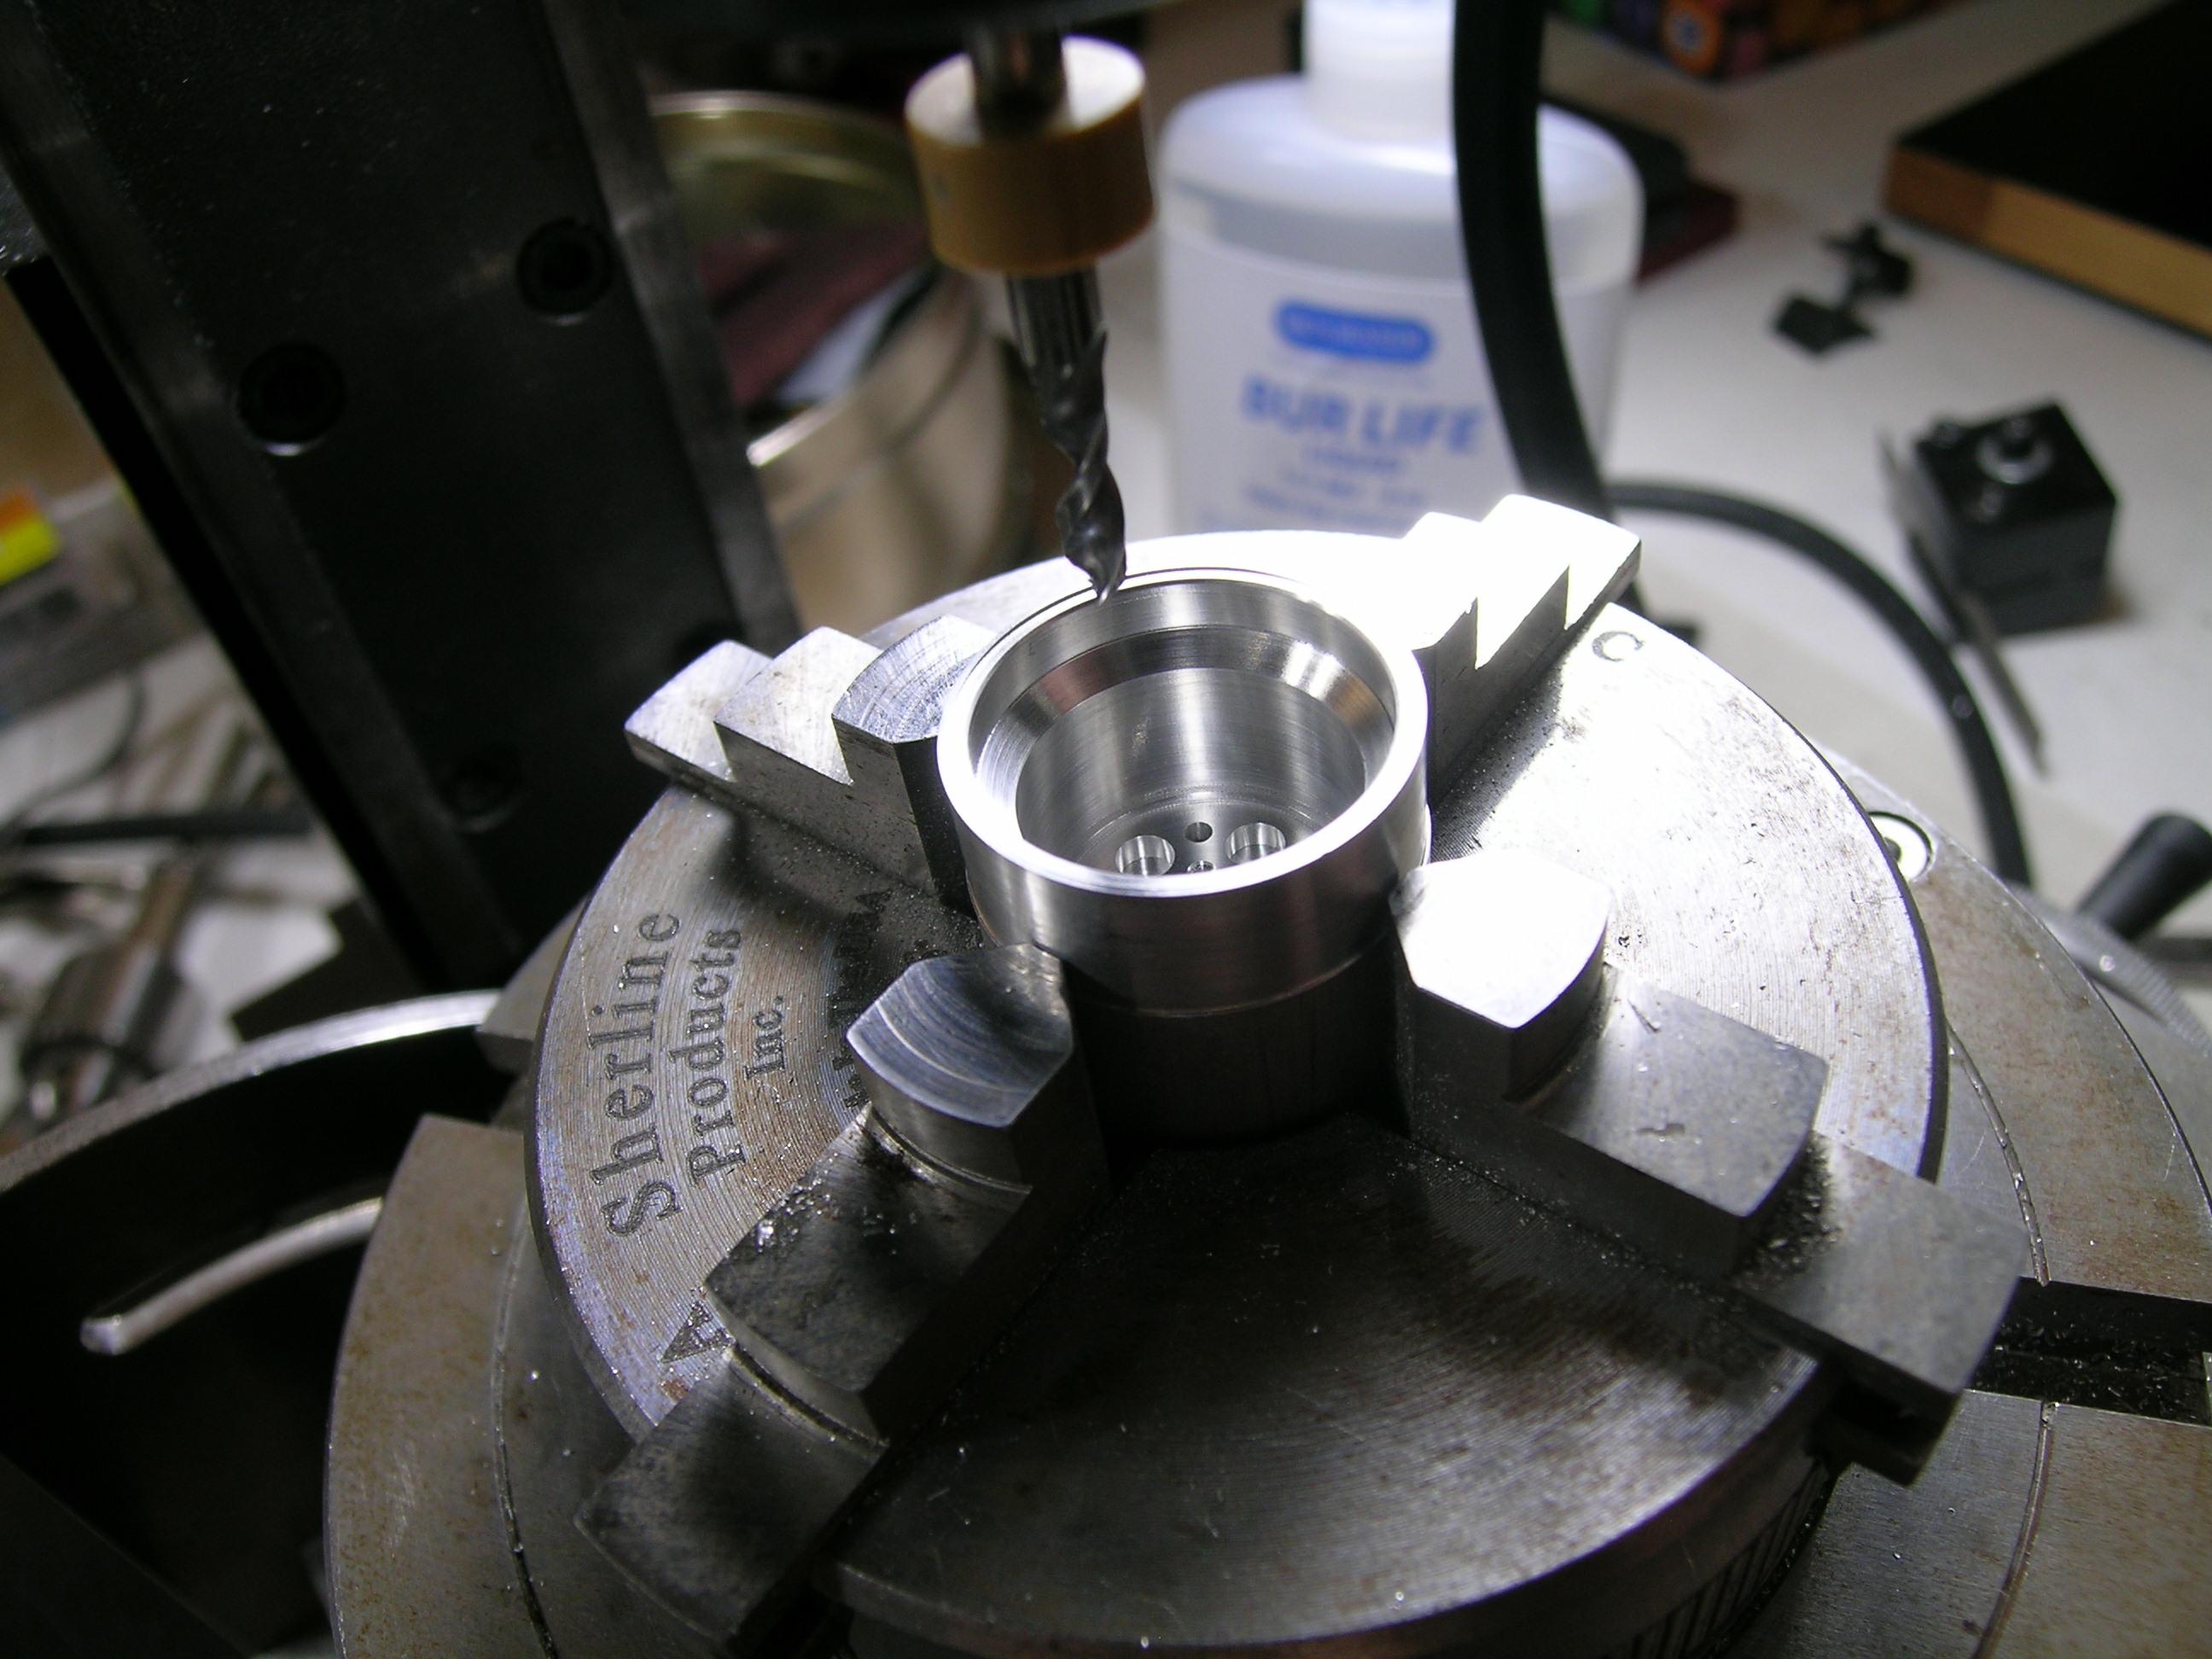
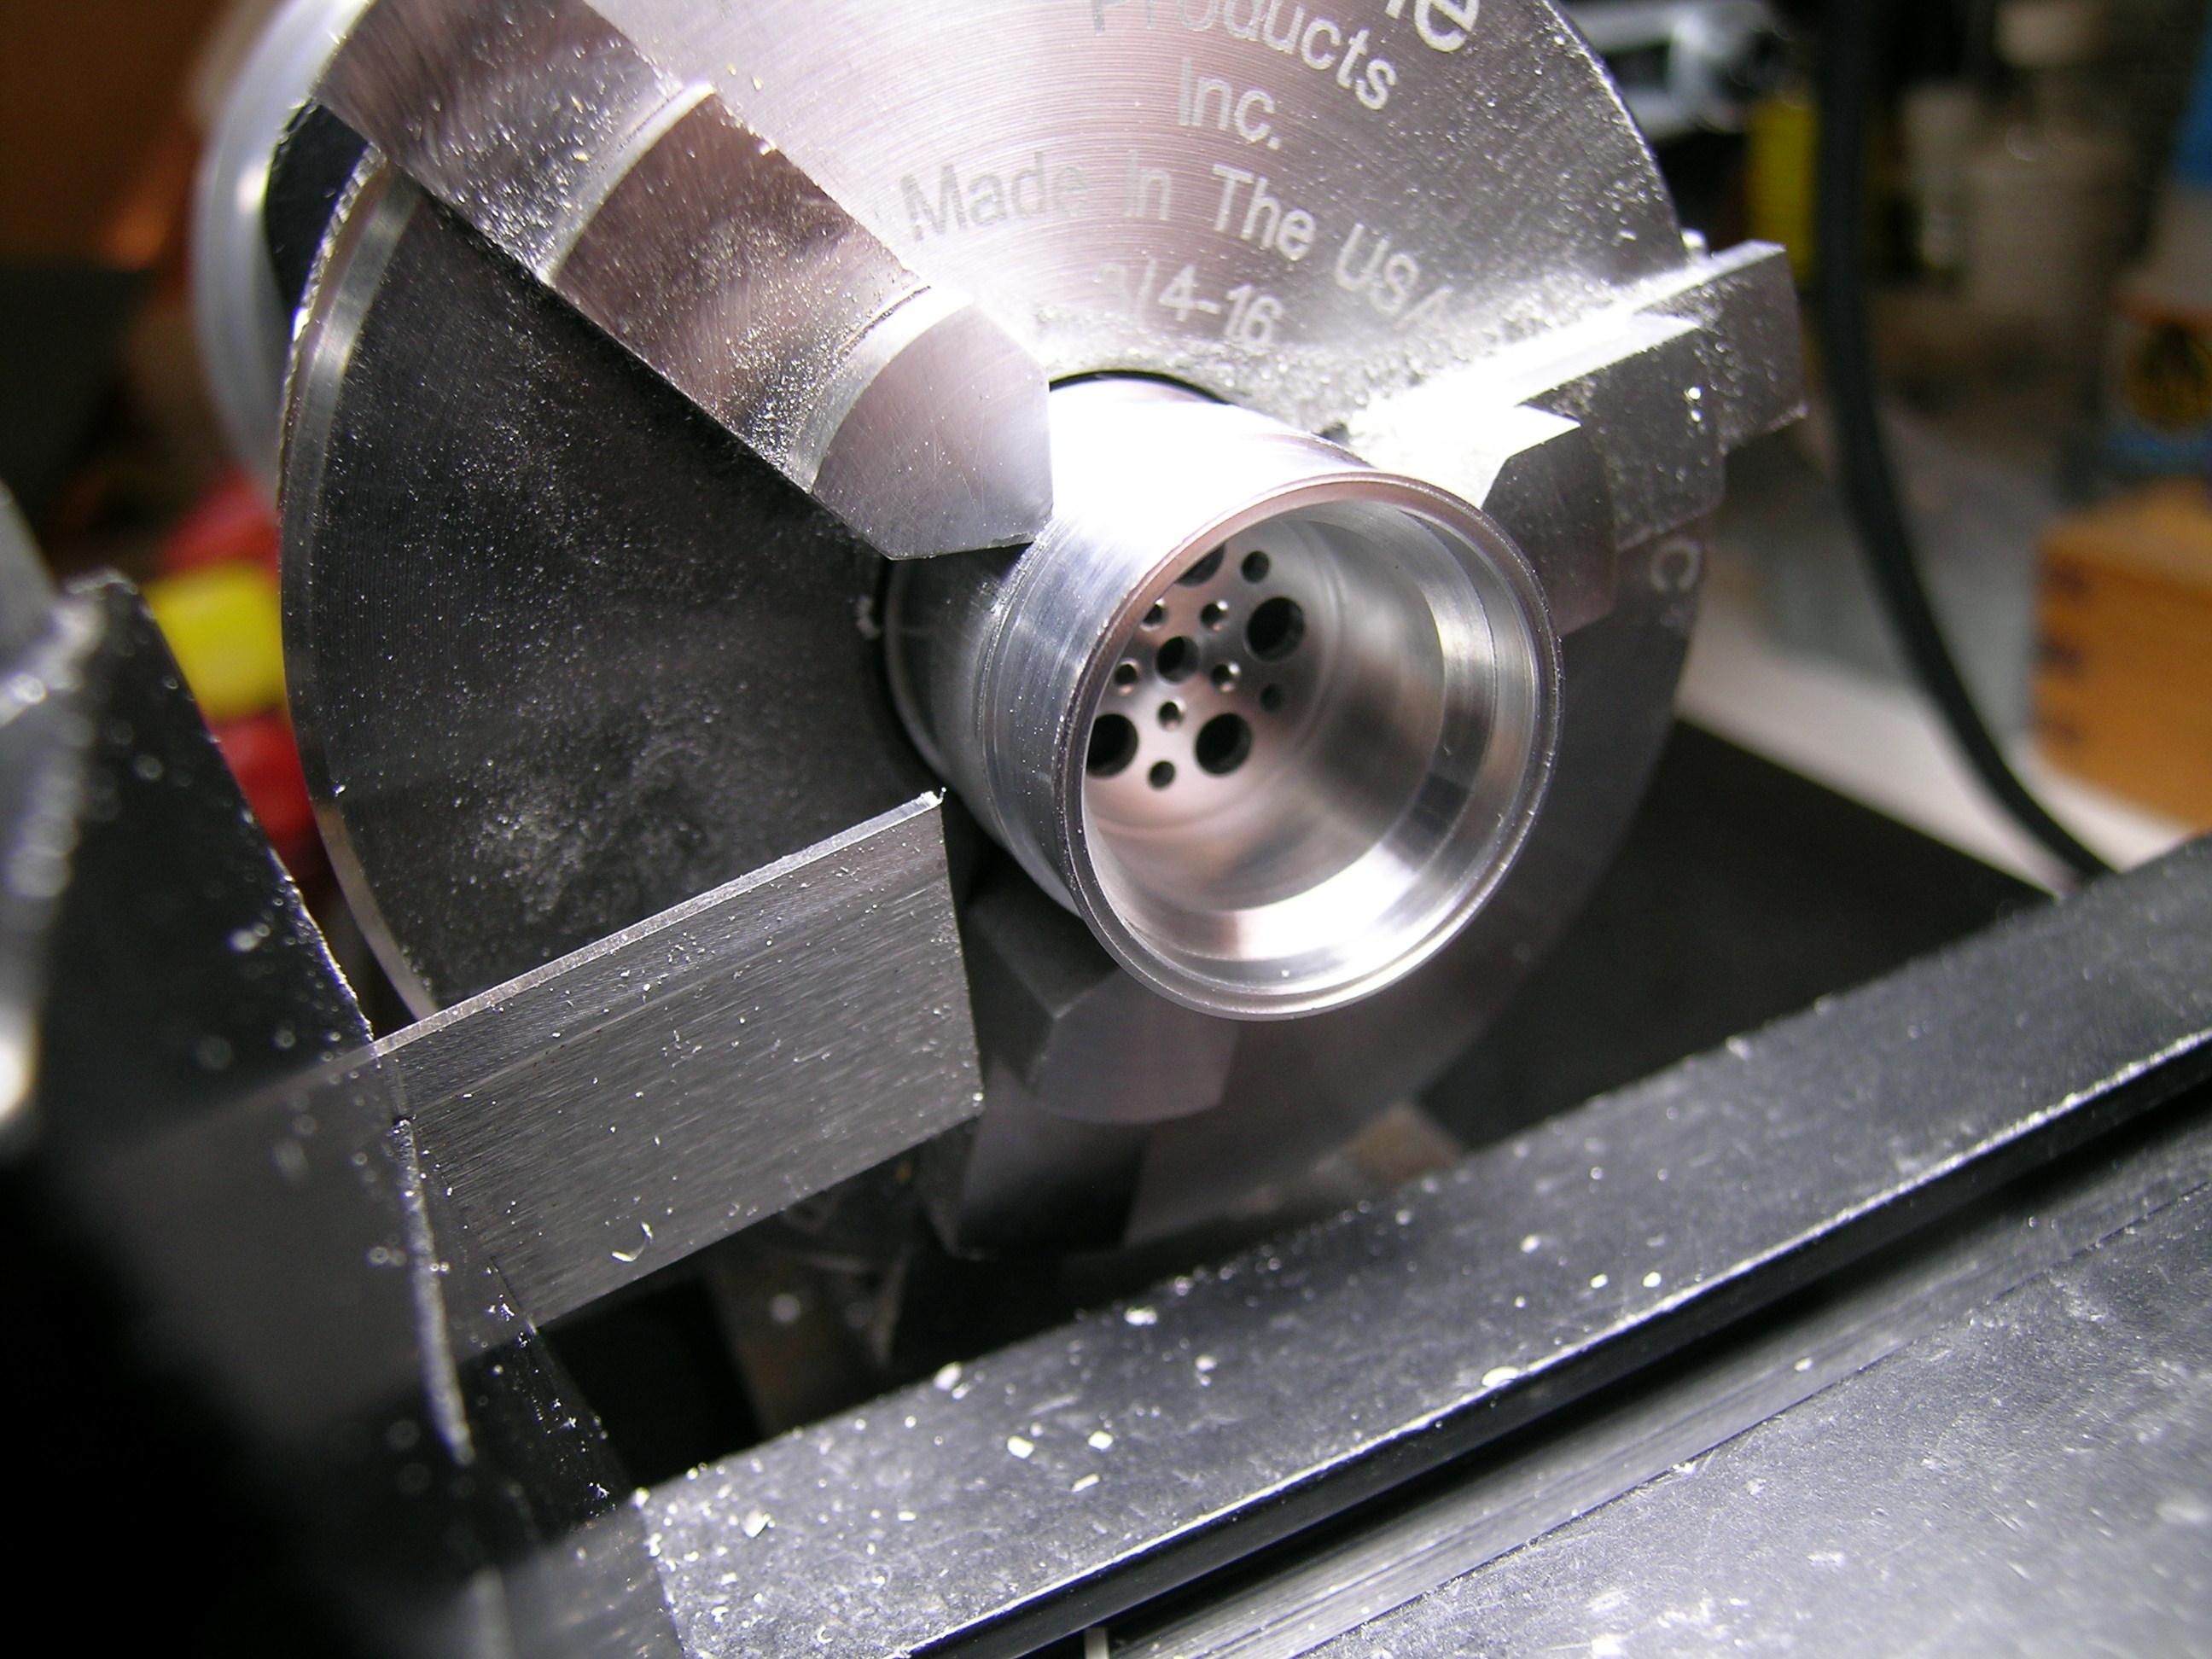
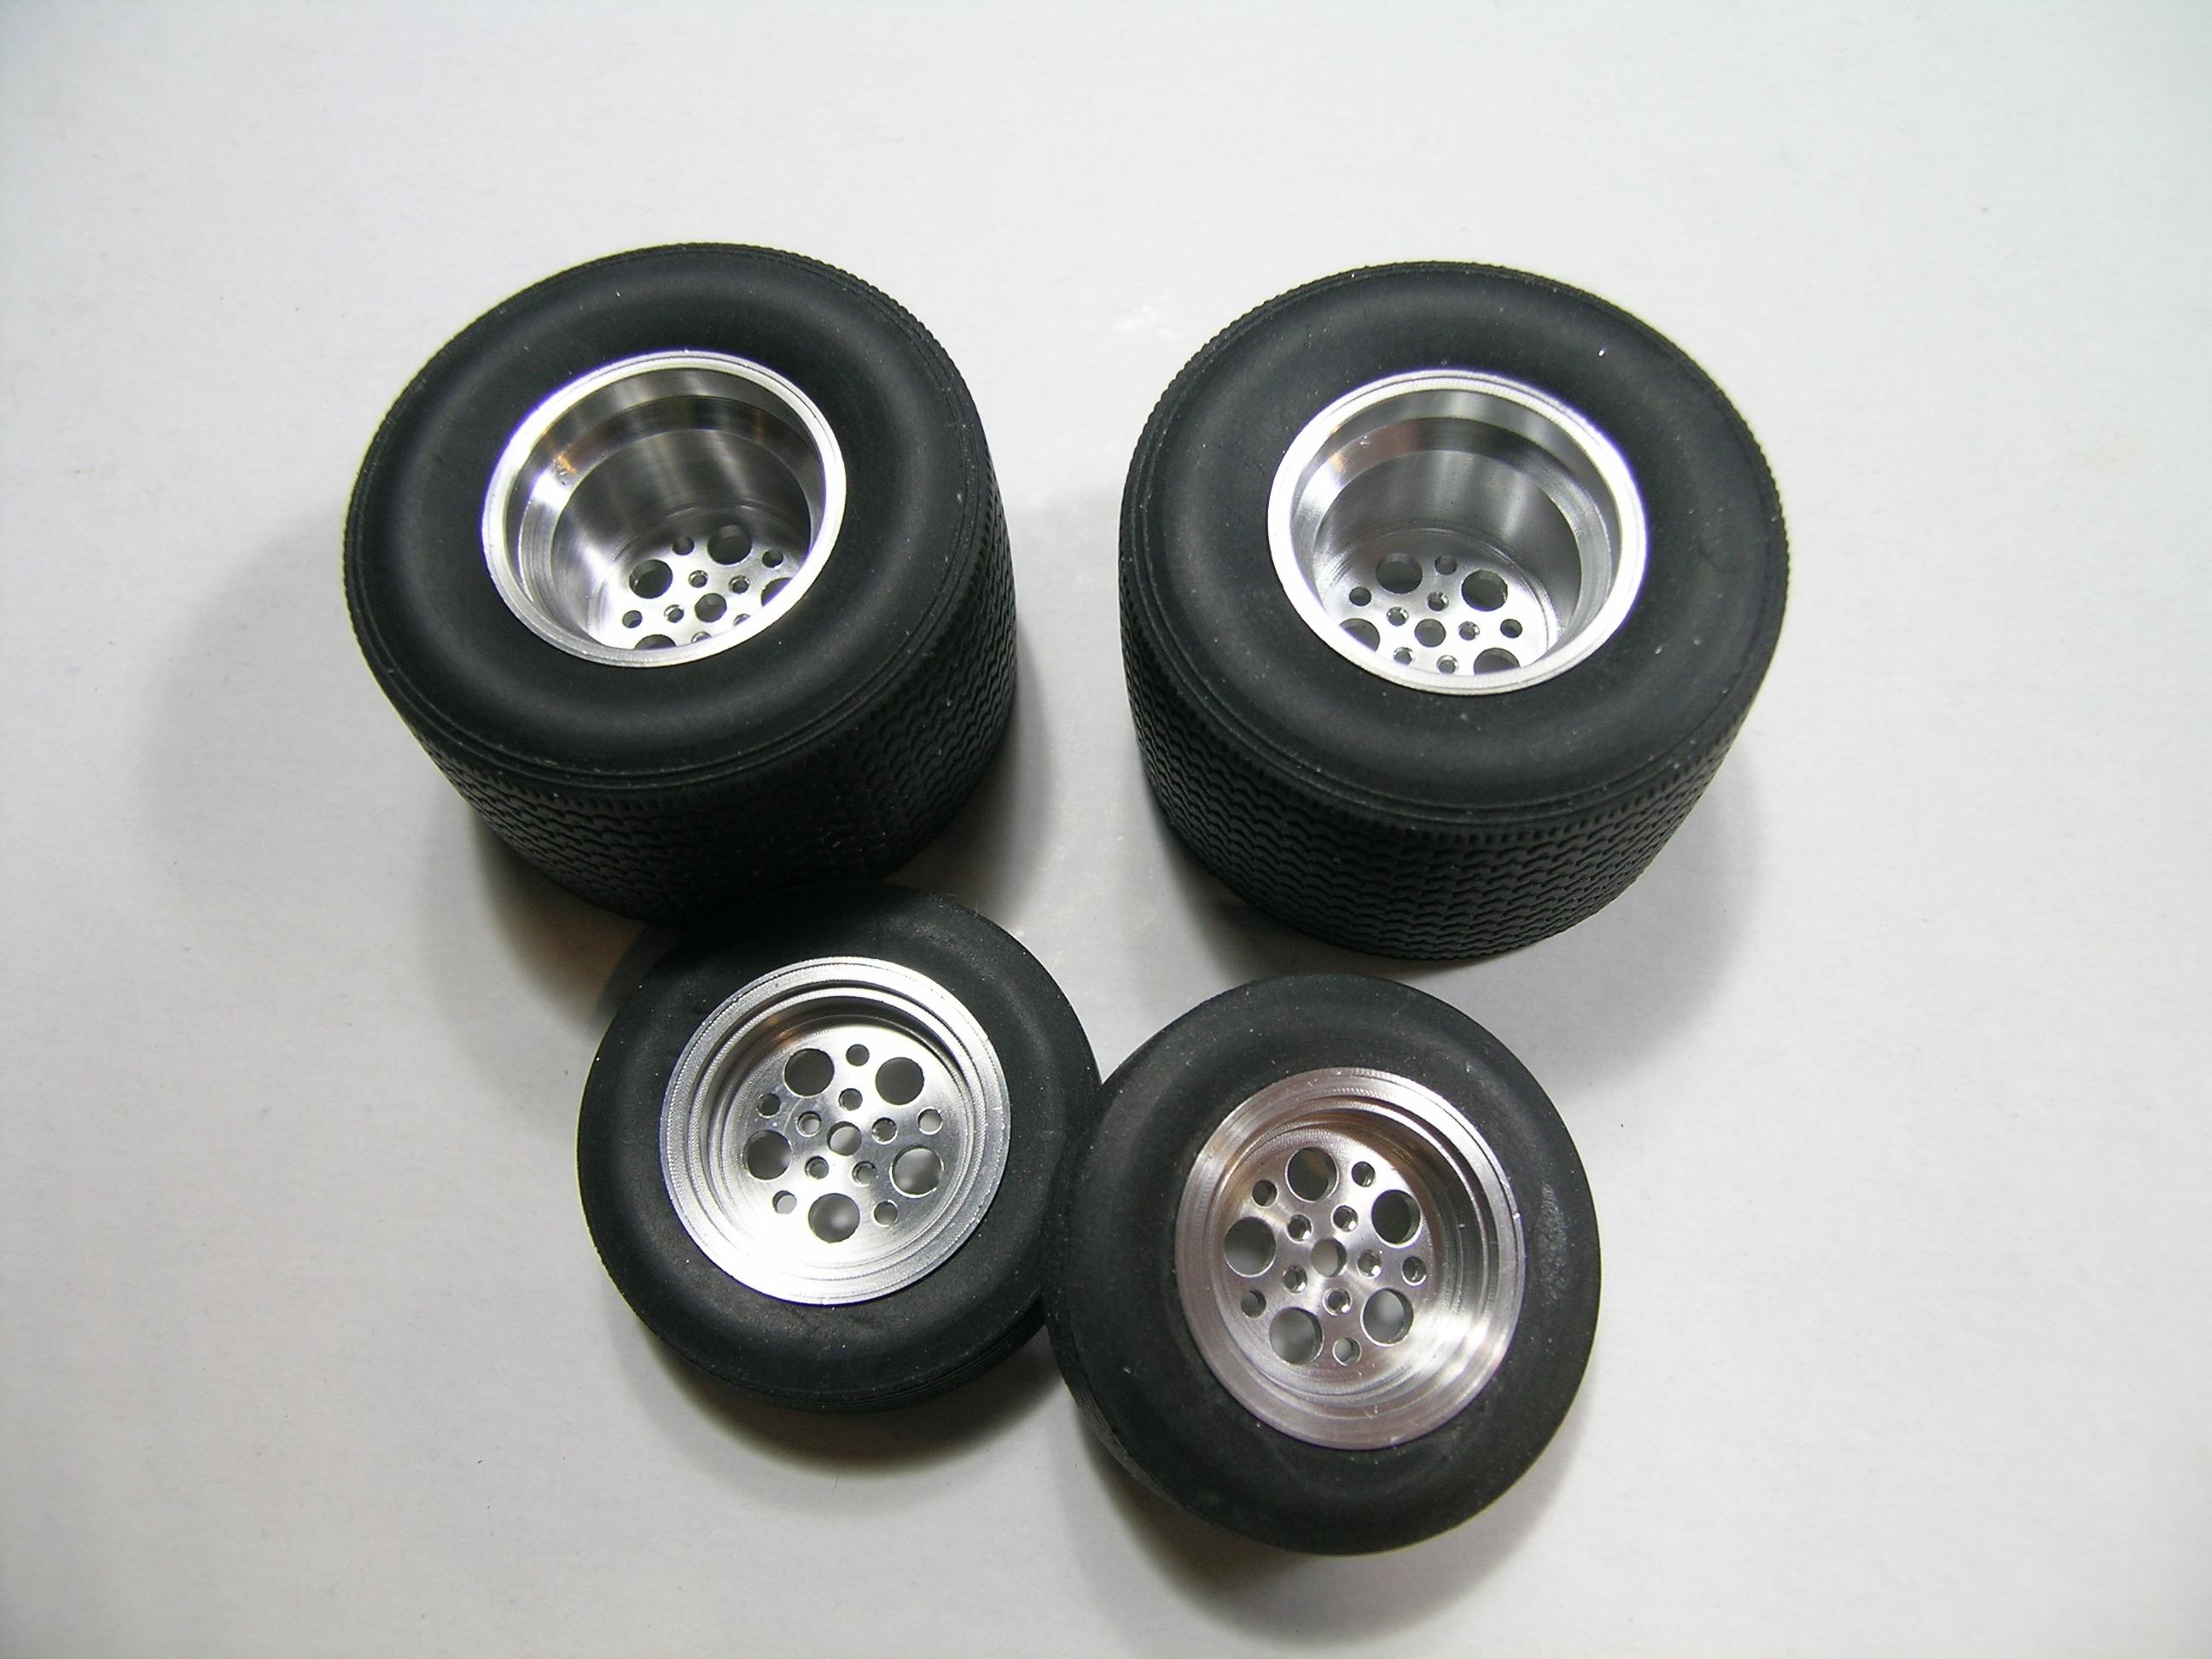
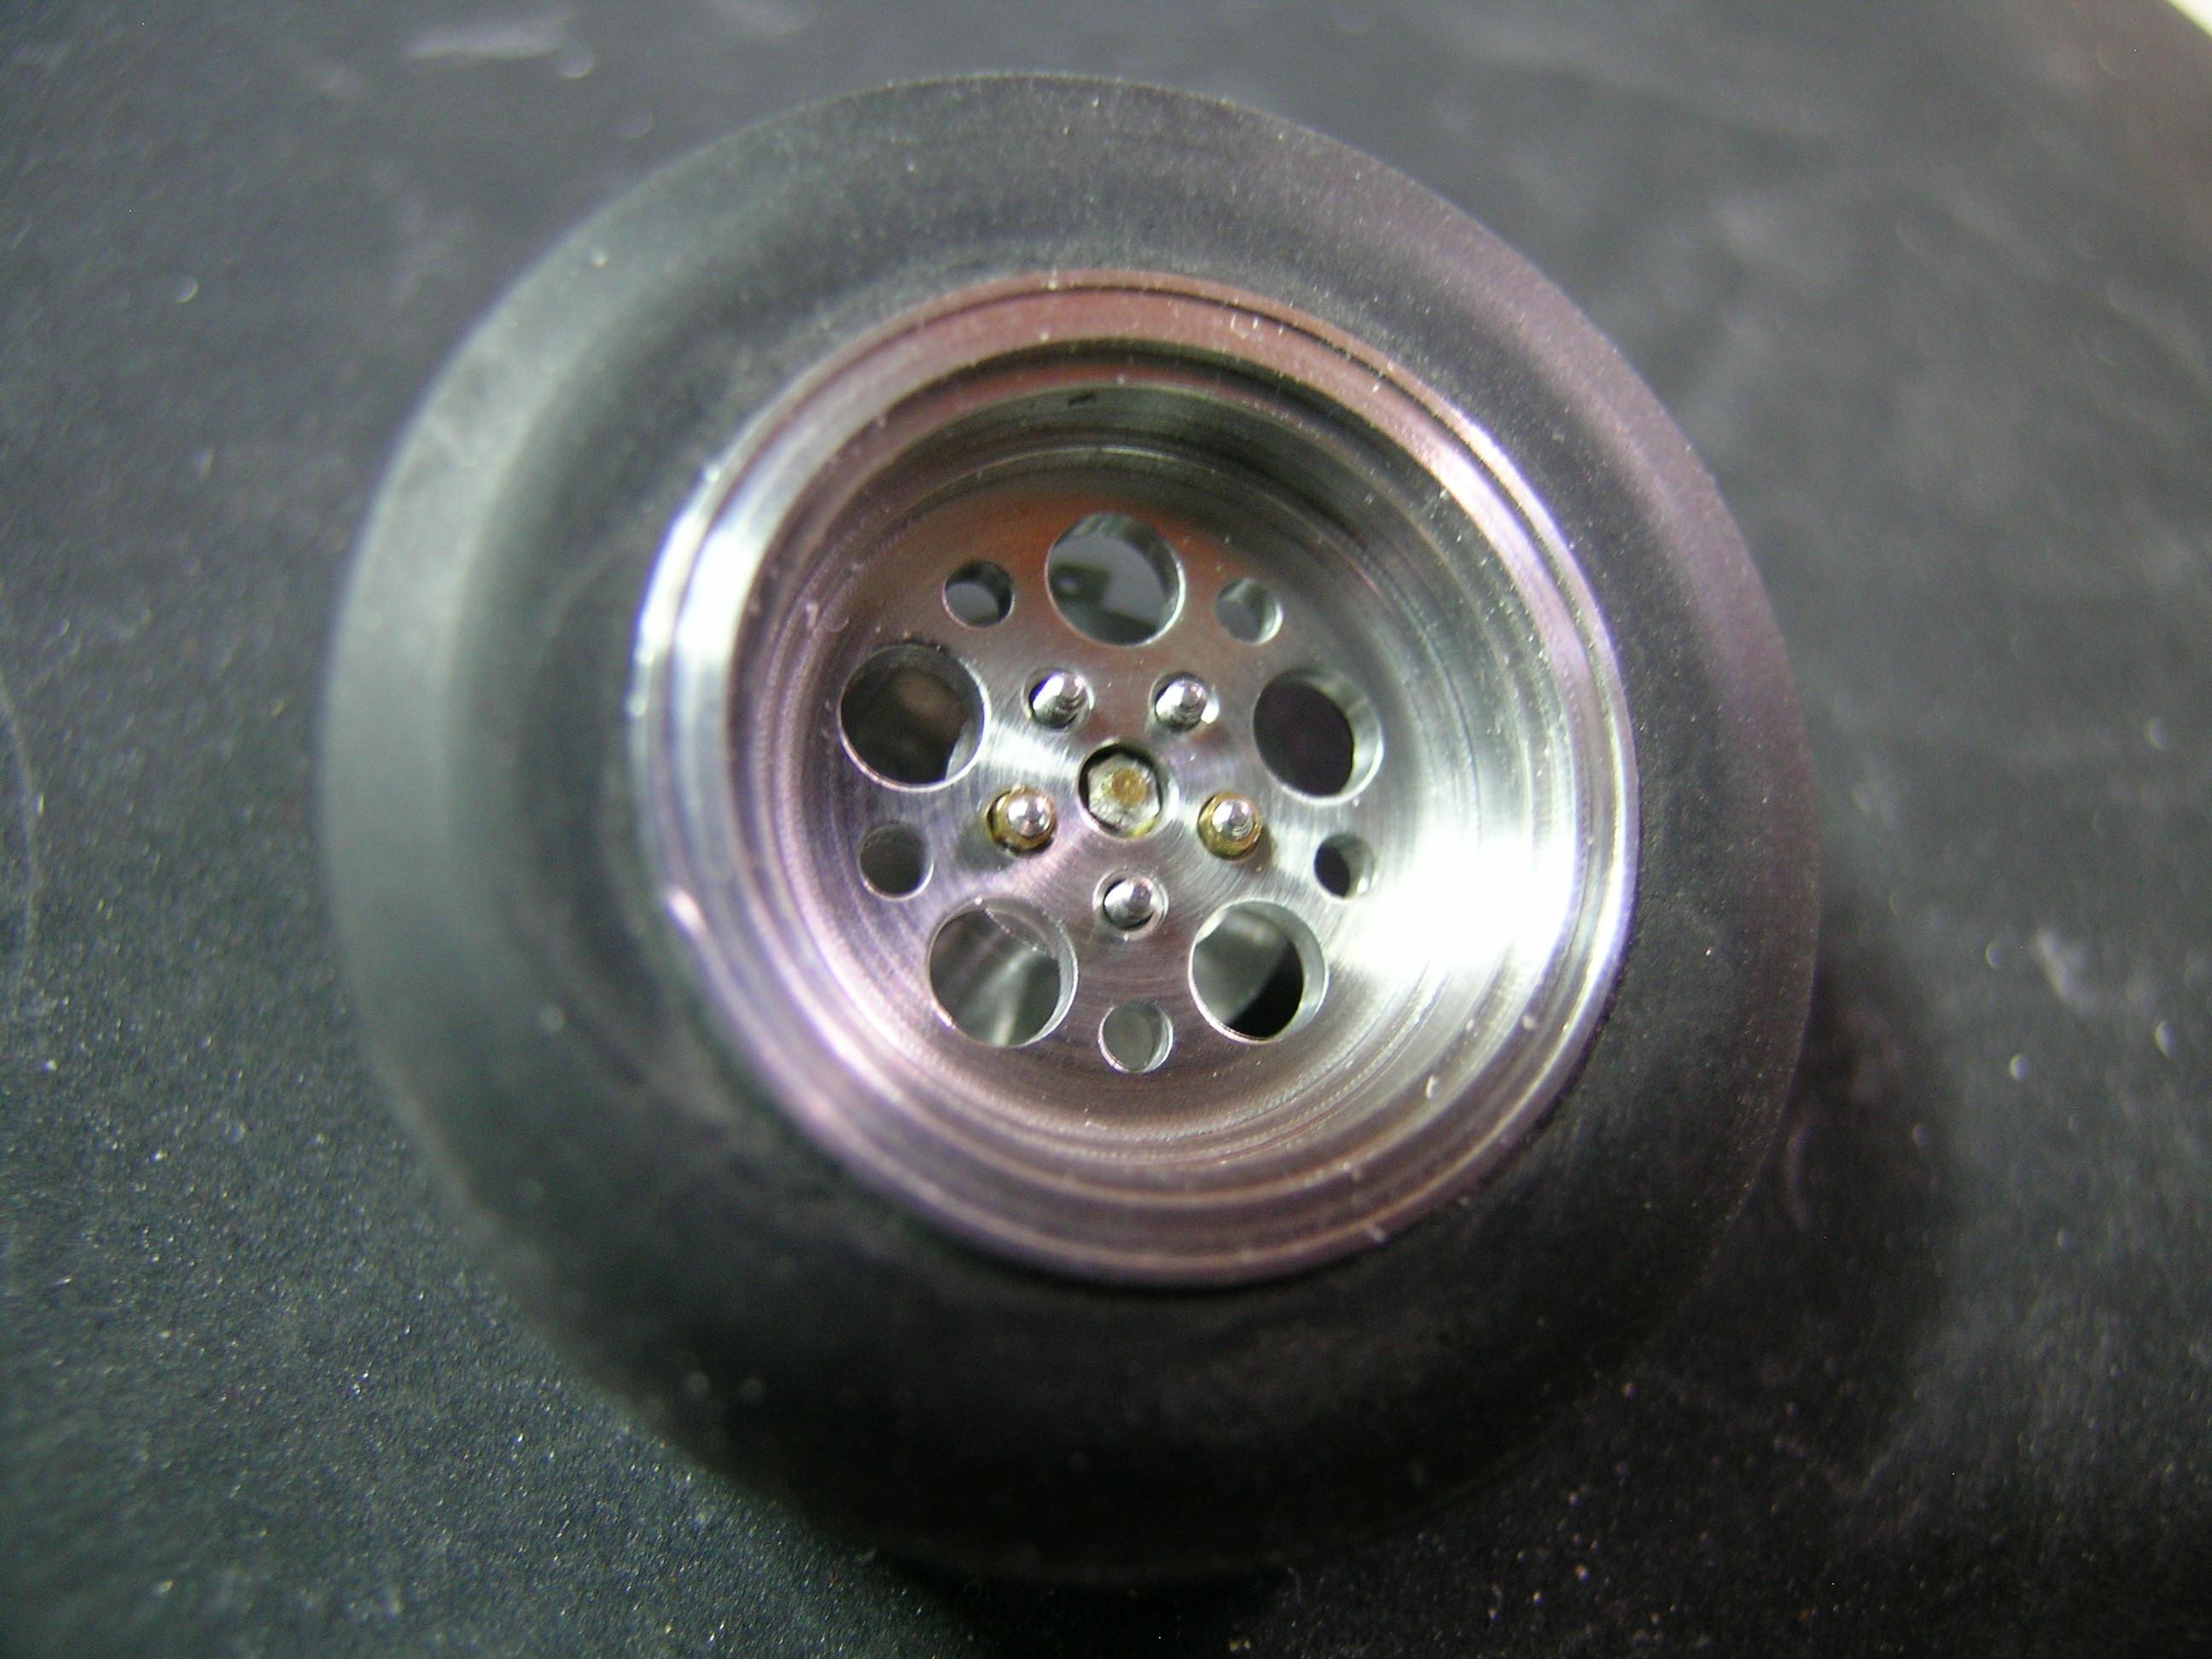
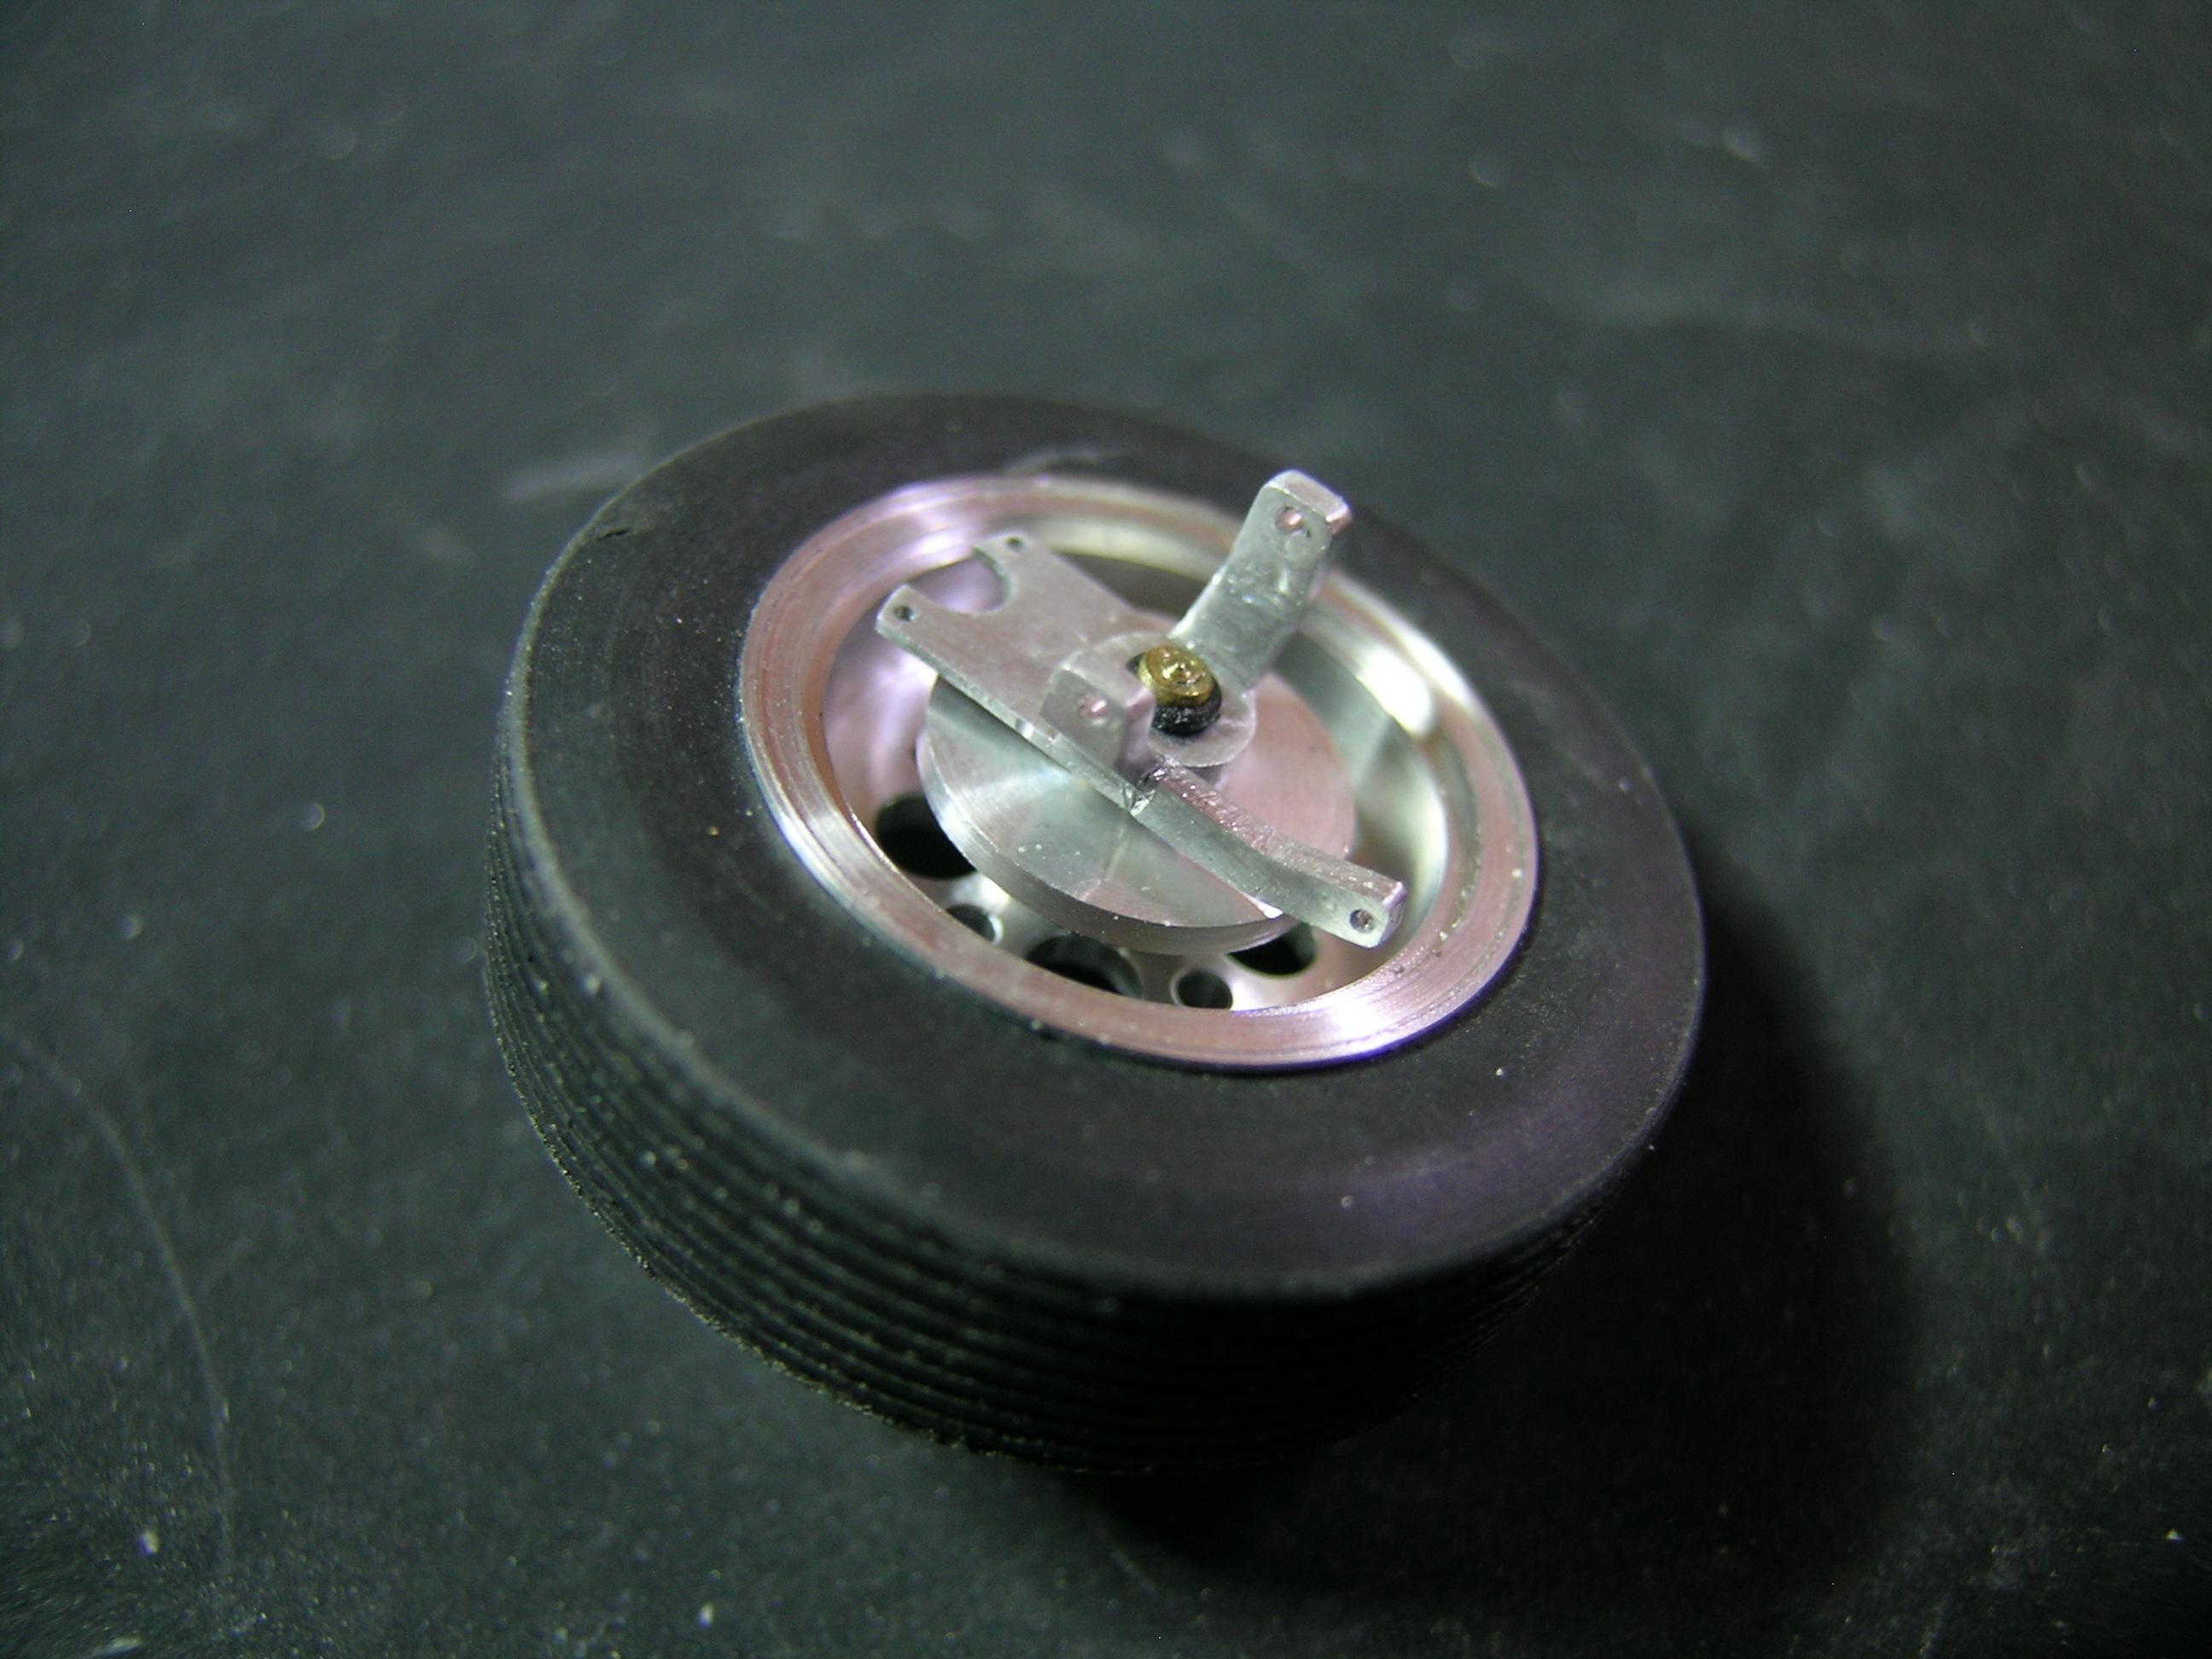
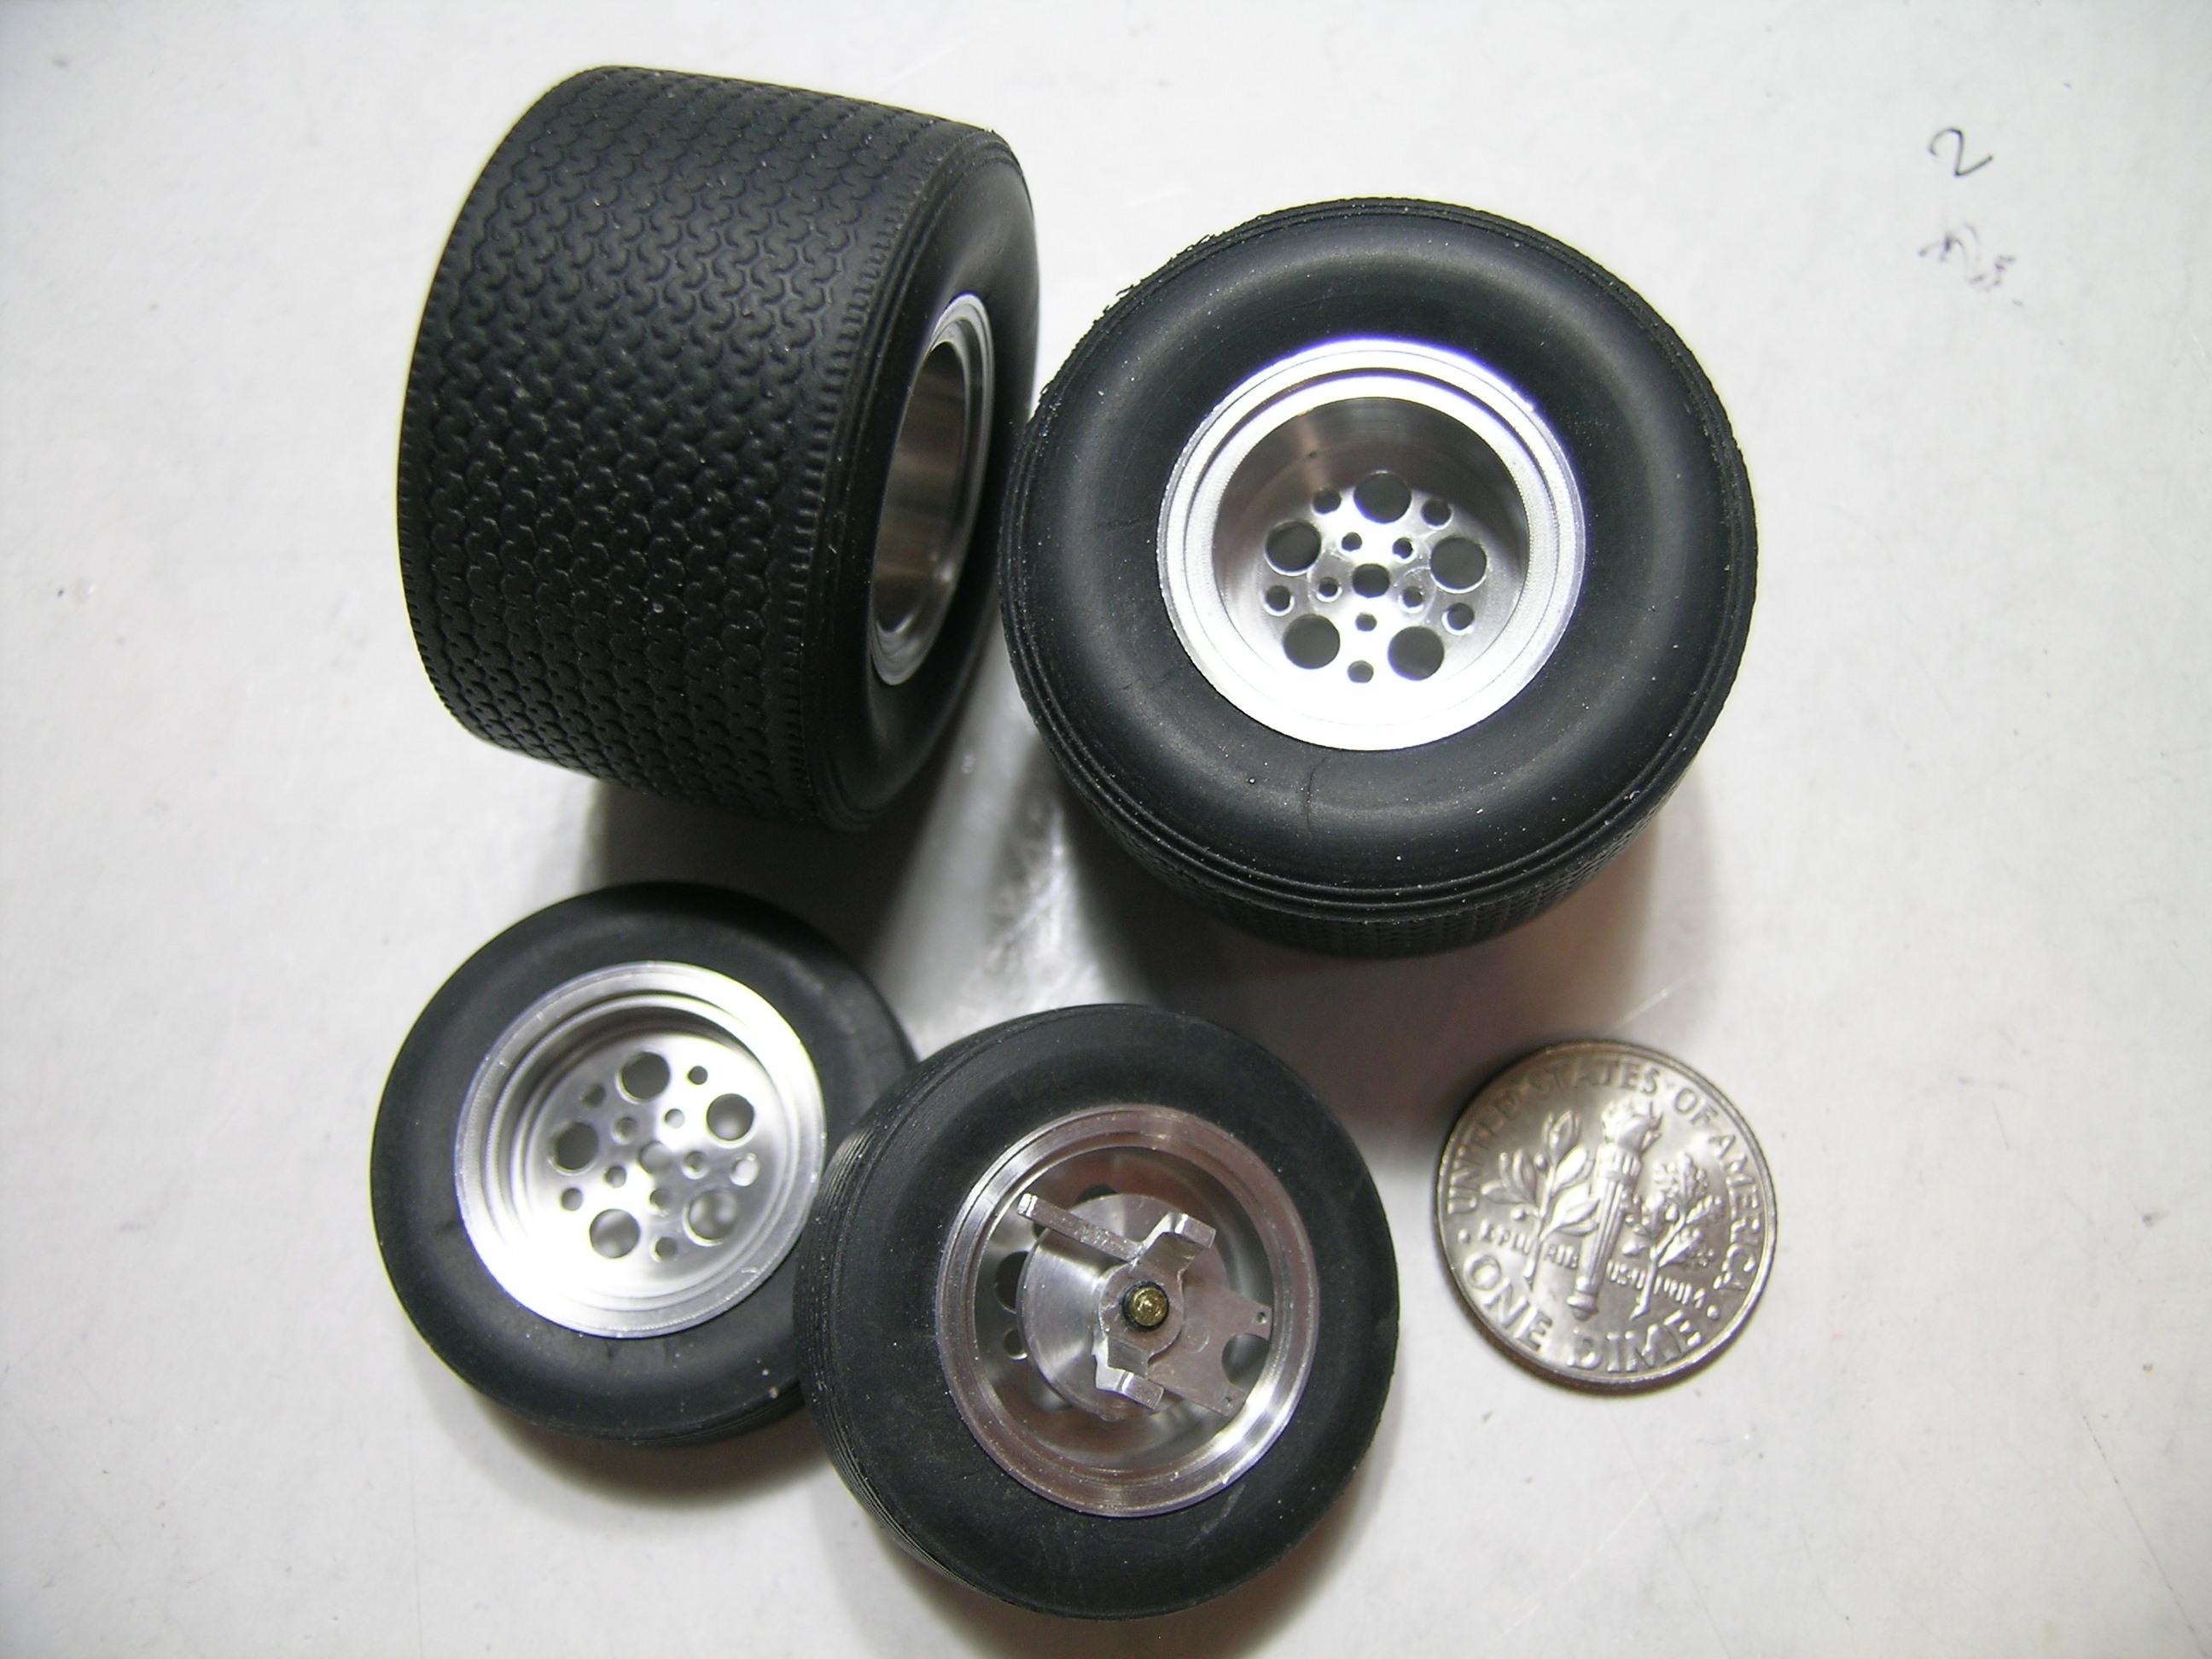
Hello All, Another small update! To progress further, I need to put some rubber under that truck so I jumped in the mag wheels fabrication. I machined some different models of wheels in the past including the slots and centerlines but I wanted something different so I came with this design. I'ts probably an already existing design but I didn't made extensive searches so they might be not existing but I would be surprised since so many designs are available on the market. Anyway they are pretty simple but I'm very happy how they look? Cheer, Francis Mag wheels in progress I did created the design using different drill bits (pretty simple design but I’m pretty happy with the result). Bolt pattern is also done and the wheels will be mounted on hubs using threaded bolts from Scale Hardware (used as studs in my concept). Front wheel different angle Back wheel in progress on milling Back wheel on the lathe chuck before cut off. Will be turned front face to the lathe in order to machine the back side. Tires mounted on wheels. I will keep them unpolished finish (looks like magnesium). Just need to add valve stems from RB Motion. Front wheel mounted temporary on hub showing a couple of brass threaded nuts from Scale Hardware (same technique for the back tires). Front wheel seen from the back showing the brake disc. Front wheels are mounted on a brass pins and spin freely. Mag wheels and tires different view showing back side (face to wheels hubs). Huge Sportsman tires for the back of the D100!!!
-
Hello Tim, Great progress on the Boss engine block, the details so far and the finish is spotless! I'm not familiar with these Ford engine but they are nice and big... I love that!!! Will be fantastic in the Maverick engine bay. Can't wait to see more magic from your hands! By the way, I found some pics for the dry sump on internet but you might have already seen them? https://www.talladegaspoilerregistry.com/2014/04/07/what-are-you-working-on-rick-and-kjell-team-up/ Cheers, Francis
-
70 Plymouth HEMI GTX 1/25 Scale
AmericanMuscleFan replied to AmericanMuscleFan's topic in WIP: Drag Racing Models
Hello again Kevin, I'm with you about Mopar, they are all good to me, even these old truck (D100) are in my tastes...LOL Mark: Sorry I oversight your first question for the alternator belt... it's a wristwatch's back cover gasket. Hope it help, Francis -
64 Dodge D100 Pickup Pro Street
AmericanMuscleFan replied to AmericanMuscleFan's topic in WIP: Drag Racing Models
Hello Pat: Thanks for visiting my threads and your kinds words! These specialty tooling are not necessary but very helpfull to create those uncommom parts. More update pics of the D100 to come by the end of the week. Cheers, Francis -
70 Plymouth HEMI GTX 1/25 Scale
AmericanMuscleFan replied to AmericanMuscleFan's topic in WIP: Drag Racing Models
Hello All, Pat: Thanks for the compliments, I always try to make parts the most realistic I can so at the end it must look like the real thing to reach my goal! Ron: Thanks for the compliment however I must admit that interiors are the areas that I hate the most to build... but I'm really happy of the results! Mark: I did use a 0.093" corner rounding end mill and finished the hard way with a small file, sand paper and a lot of elbow grease! Kevin: Thanks for visiting my thread and your good words! Unfortunately i'ts not the famous Roadrunner but it's little brother... LOL Cheers, Francis -
64 Dodge D100 Pickup Pro Street
AmericanMuscleFan replied to AmericanMuscleFan's topic in WIP: Drag Racing Models
Hello All, Brad, Gaute, Jason: Thanks for the good words and wait to see the all aluminum Hemi I'm working on! More update comming soon (body and mechanical). Cheers, Francis -
70 Plymouth HEMI GTX 1/25 Scale
AmericanMuscleFan replied to AmericanMuscleFan's topic in WIP: Drag Racing Models
Hi Kenneth, please don't quit, it supposed to motivate you and not the opposite...lol Cheers, Francis -
70 Plymouth HEMI GTX 1/25 Scale
AmericanMuscleFan replied to AmericanMuscleFan's topic in Model Cars
Dann: Thanks for the compliment! Mark: I started few years ago with zero experience.so with practice and small bites at a time you can do it too if you are patient and precise! Cheers, Francis