AmericanMuscleFan
-
Posts
3,058 -
Joined
-
Last visited
Content Type
Profiles
Forums
Events
Gallery
Everything posted by AmericanMuscleFan
-

RAM Power Wagon
AmericanMuscleFan replied to Mopar - D's topic in WIP: Model Trucks: Pickups, Vans, SUVs, Light Commercial
Great idea for the windows Dan, they look great! Did you use water to apply the tint to the original windows in the kit or did you apply it directly? -
64 Dodge D100 Pickup Pro Street
AmericanMuscleFan replied to AmericanMuscleFan's topic in WIP: Drag Racing Models
Thank you Daniel, you are a good example in this area, hard to believe all the intricate details you can create yourself my friend! Merry Christmas! -
64 Dodge D100 Pickup Pro Street
AmericanMuscleFan replied to AmericanMuscleFan's topic in WIP: Drag Racing Models
Thanks for your trust mark Pat but I couldn't find a supplier for the compression spring and o-rings so the master cylinder might have a little leak... Merry Christmas! -
64 Dodge D100 Pickup Pro Street
AmericanMuscleFan replied to AmericanMuscleFan's topic in WIP: Drag Racing Models
Thanks Marcos! These machines are rather expensive but I couldn't work without them now! Merry Christmas! -
64 Dodge D100 Pickup Pro Street
AmericanMuscleFan replied to AmericanMuscleFan's topic in WIP: Drag Racing Models
Thanks for the comment Tim! I have no choice but to agree with you... now I know that I can...! Merry Christmas! -
charlie libby 1965 mustang dragcar
AmericanMuscleFan replied to charlie libby's topic in WIP: Drag Racing Models
Superb job on the engine Charlie, the transmission is a work of art my friend! Keep doing your amazing work!!! -
That's a superb build (Super Bee...) Jason! The color is goegeous and the clear coat job is perfect. I love this body year of Super Bee with the bumpers painted like the rest of the car. Very clean build and nice attention to details! ?
-
64 Dodge D100 Pickup Pro Street
AmericanMuscleFan replied to AmericanMuscleFan's topic in WIP: Drag Racing Models
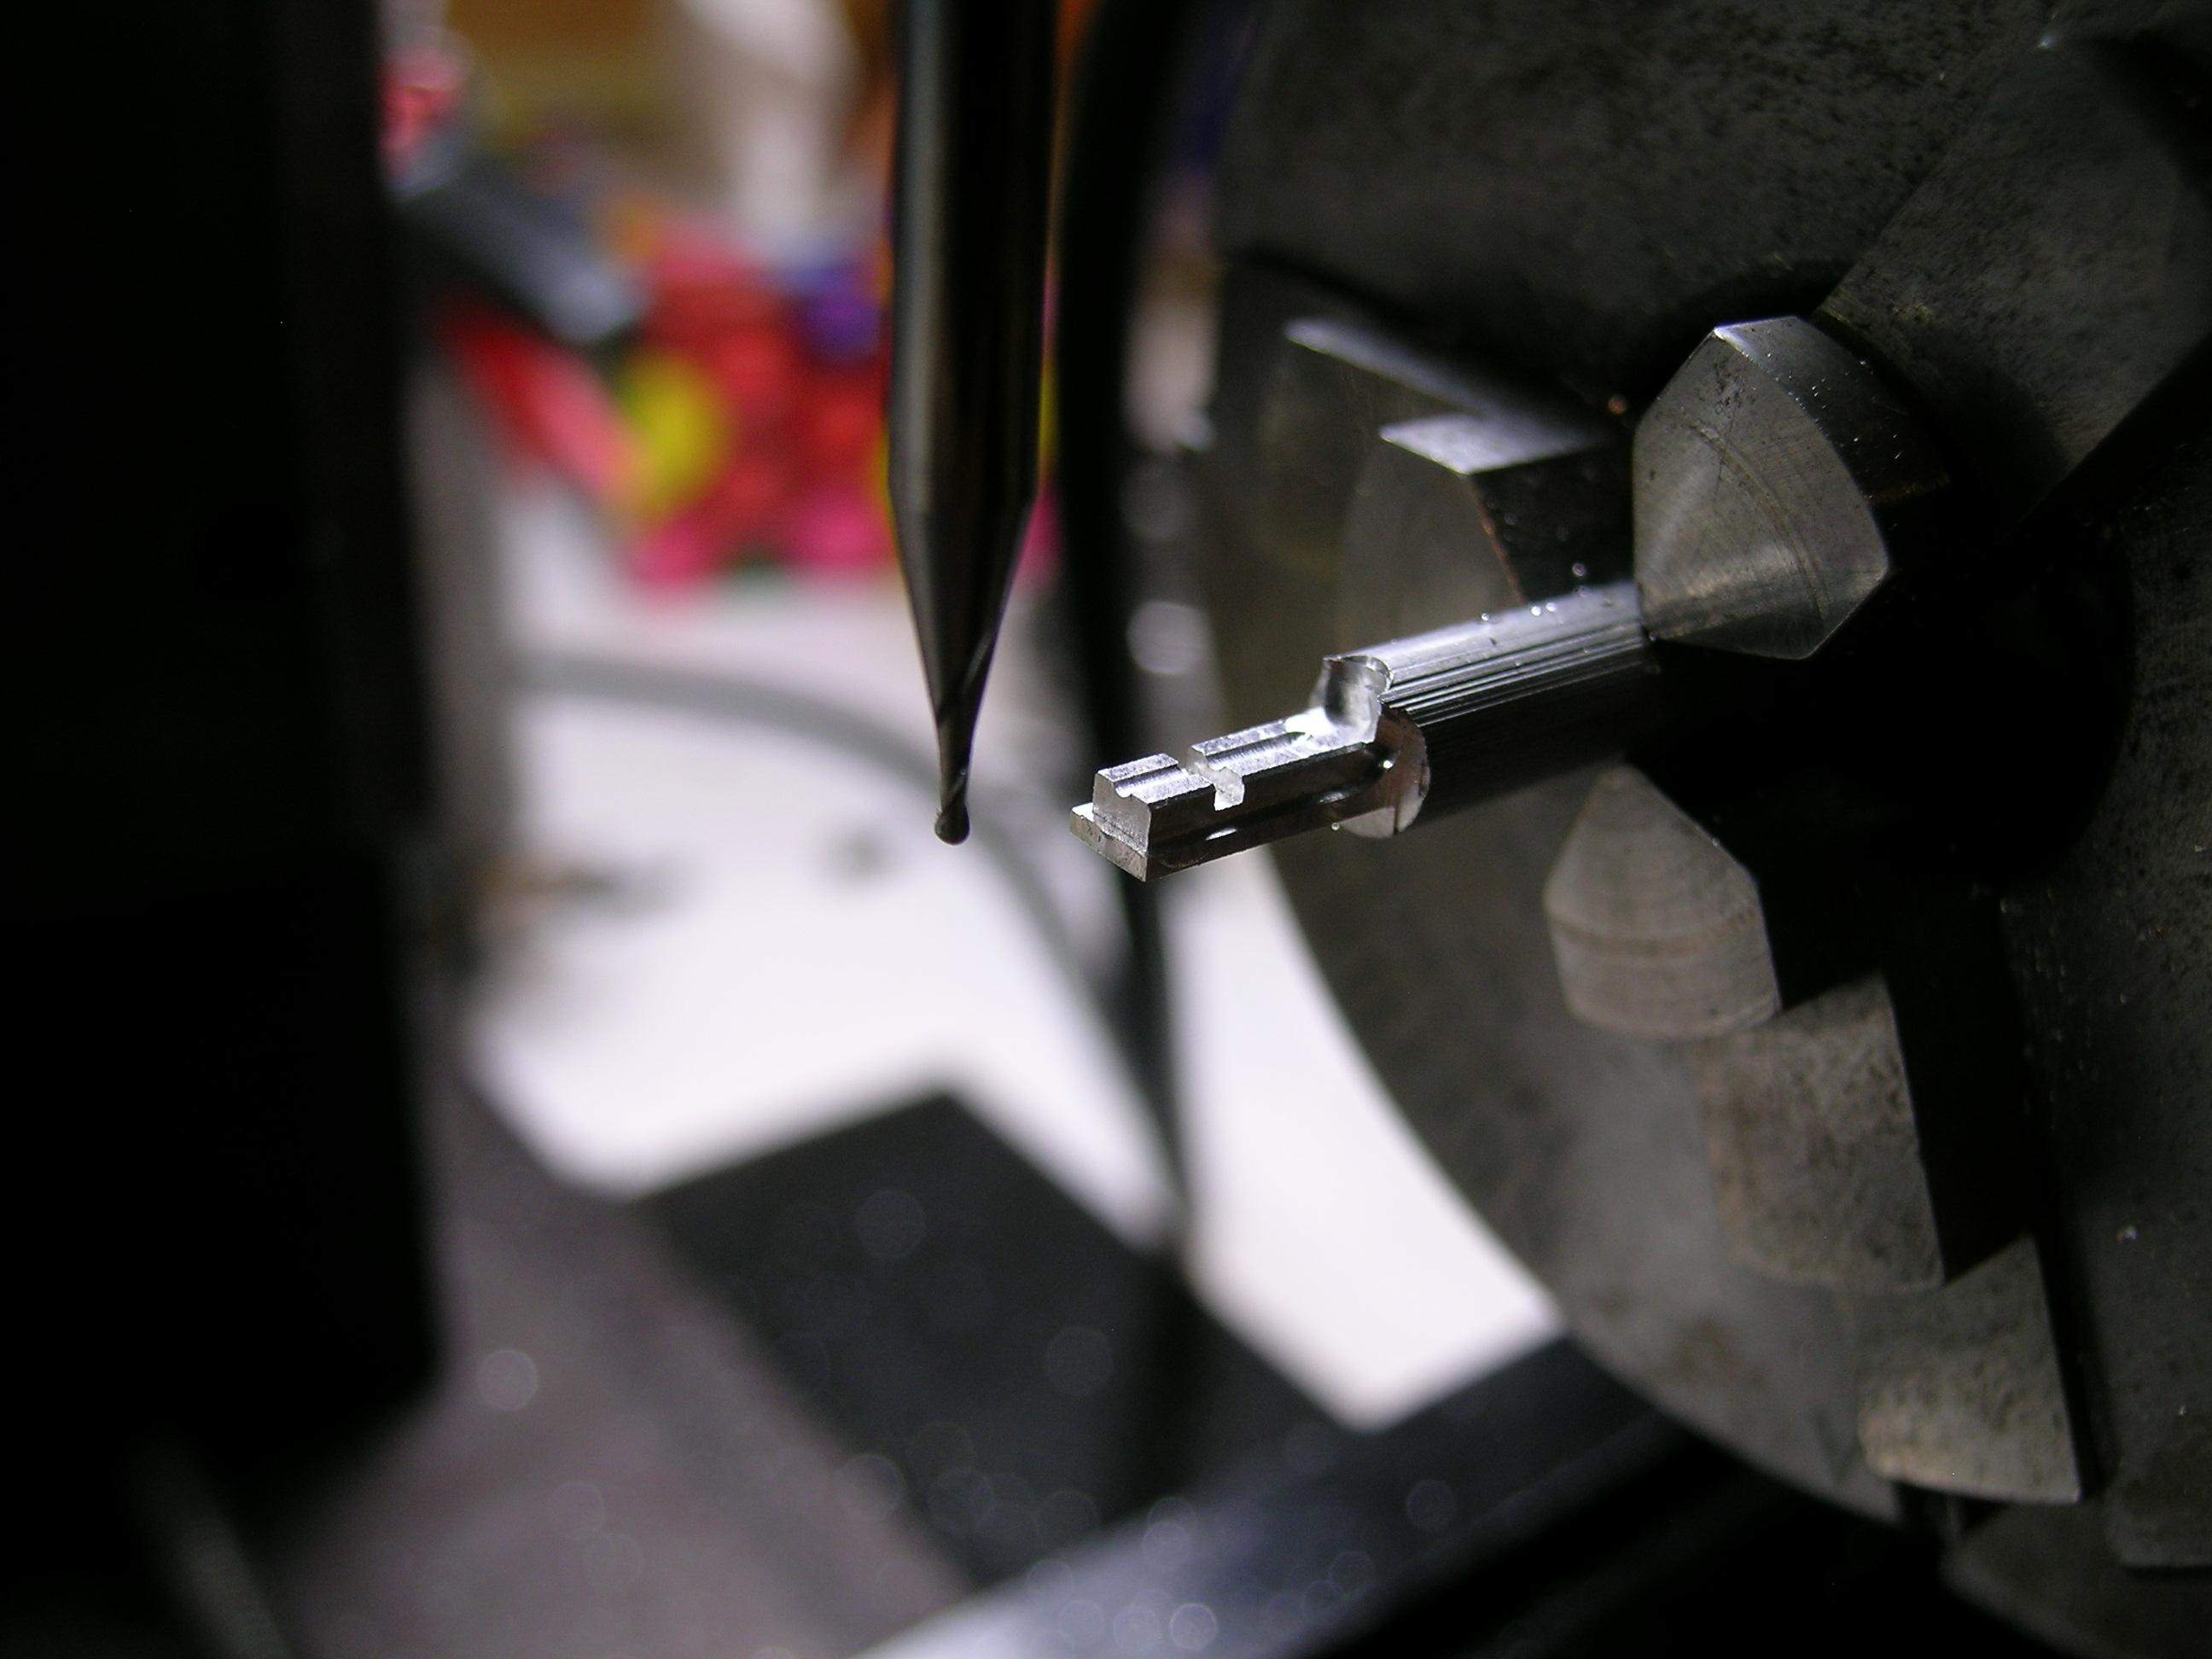
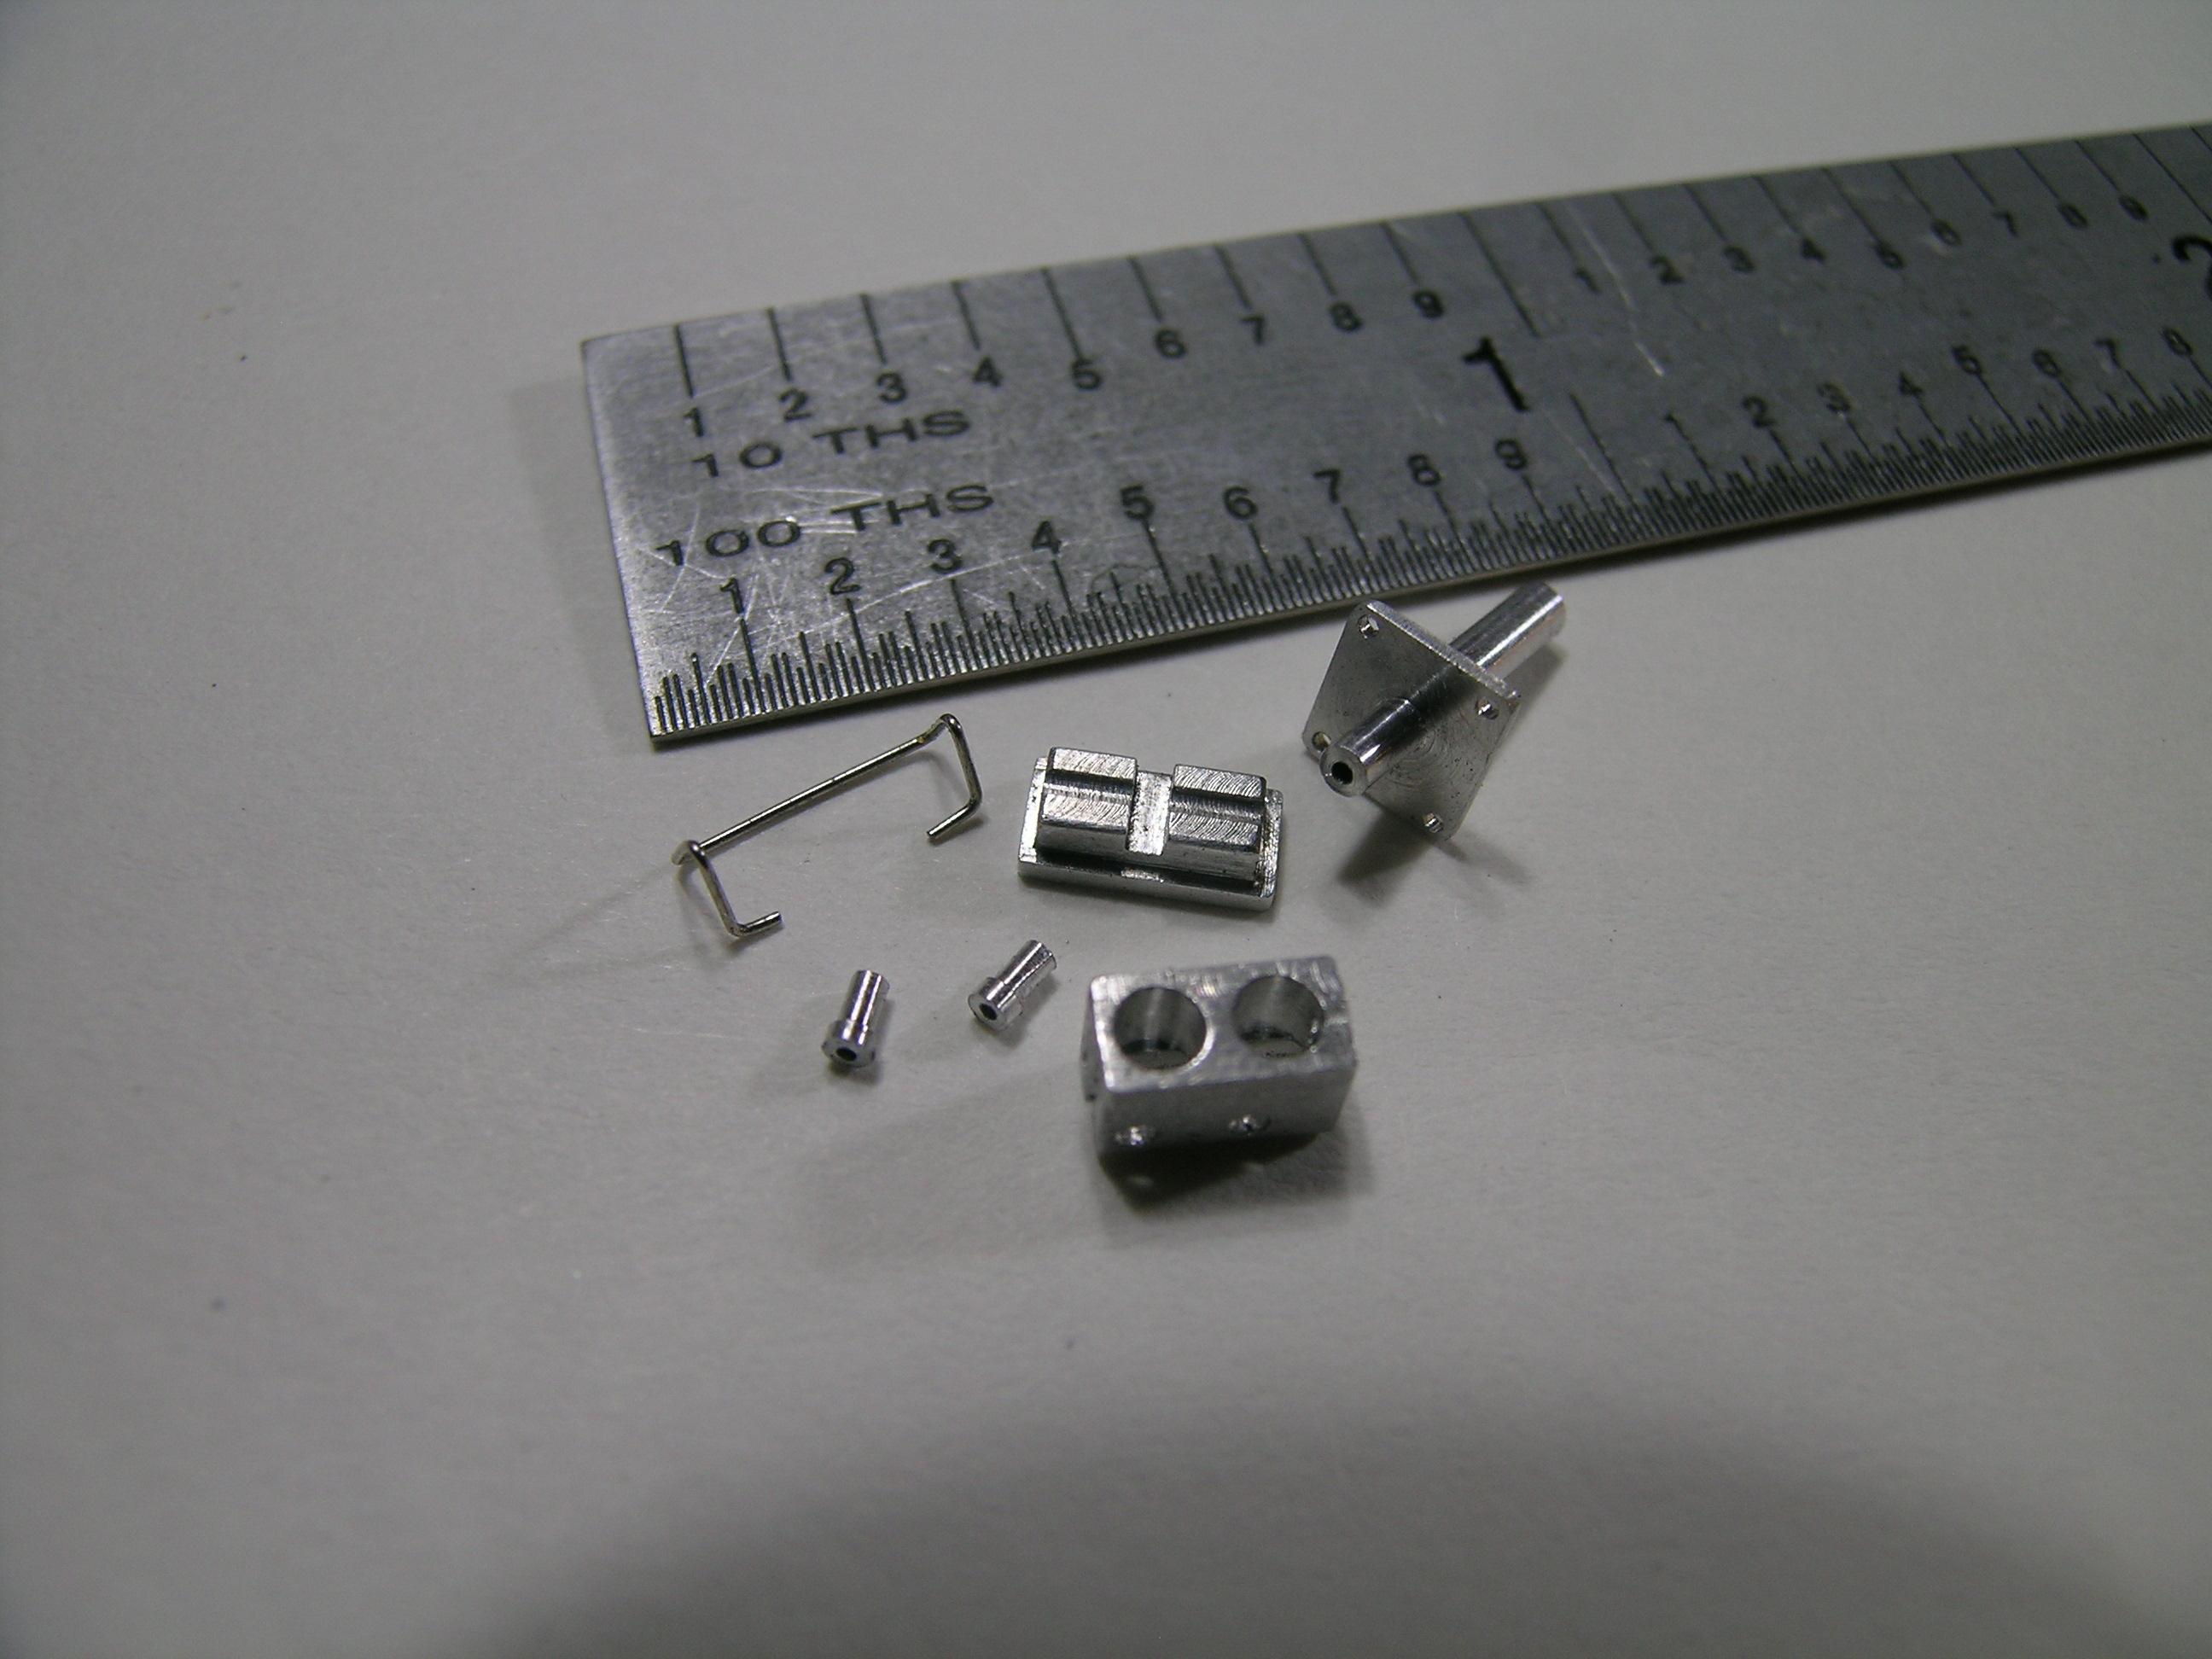
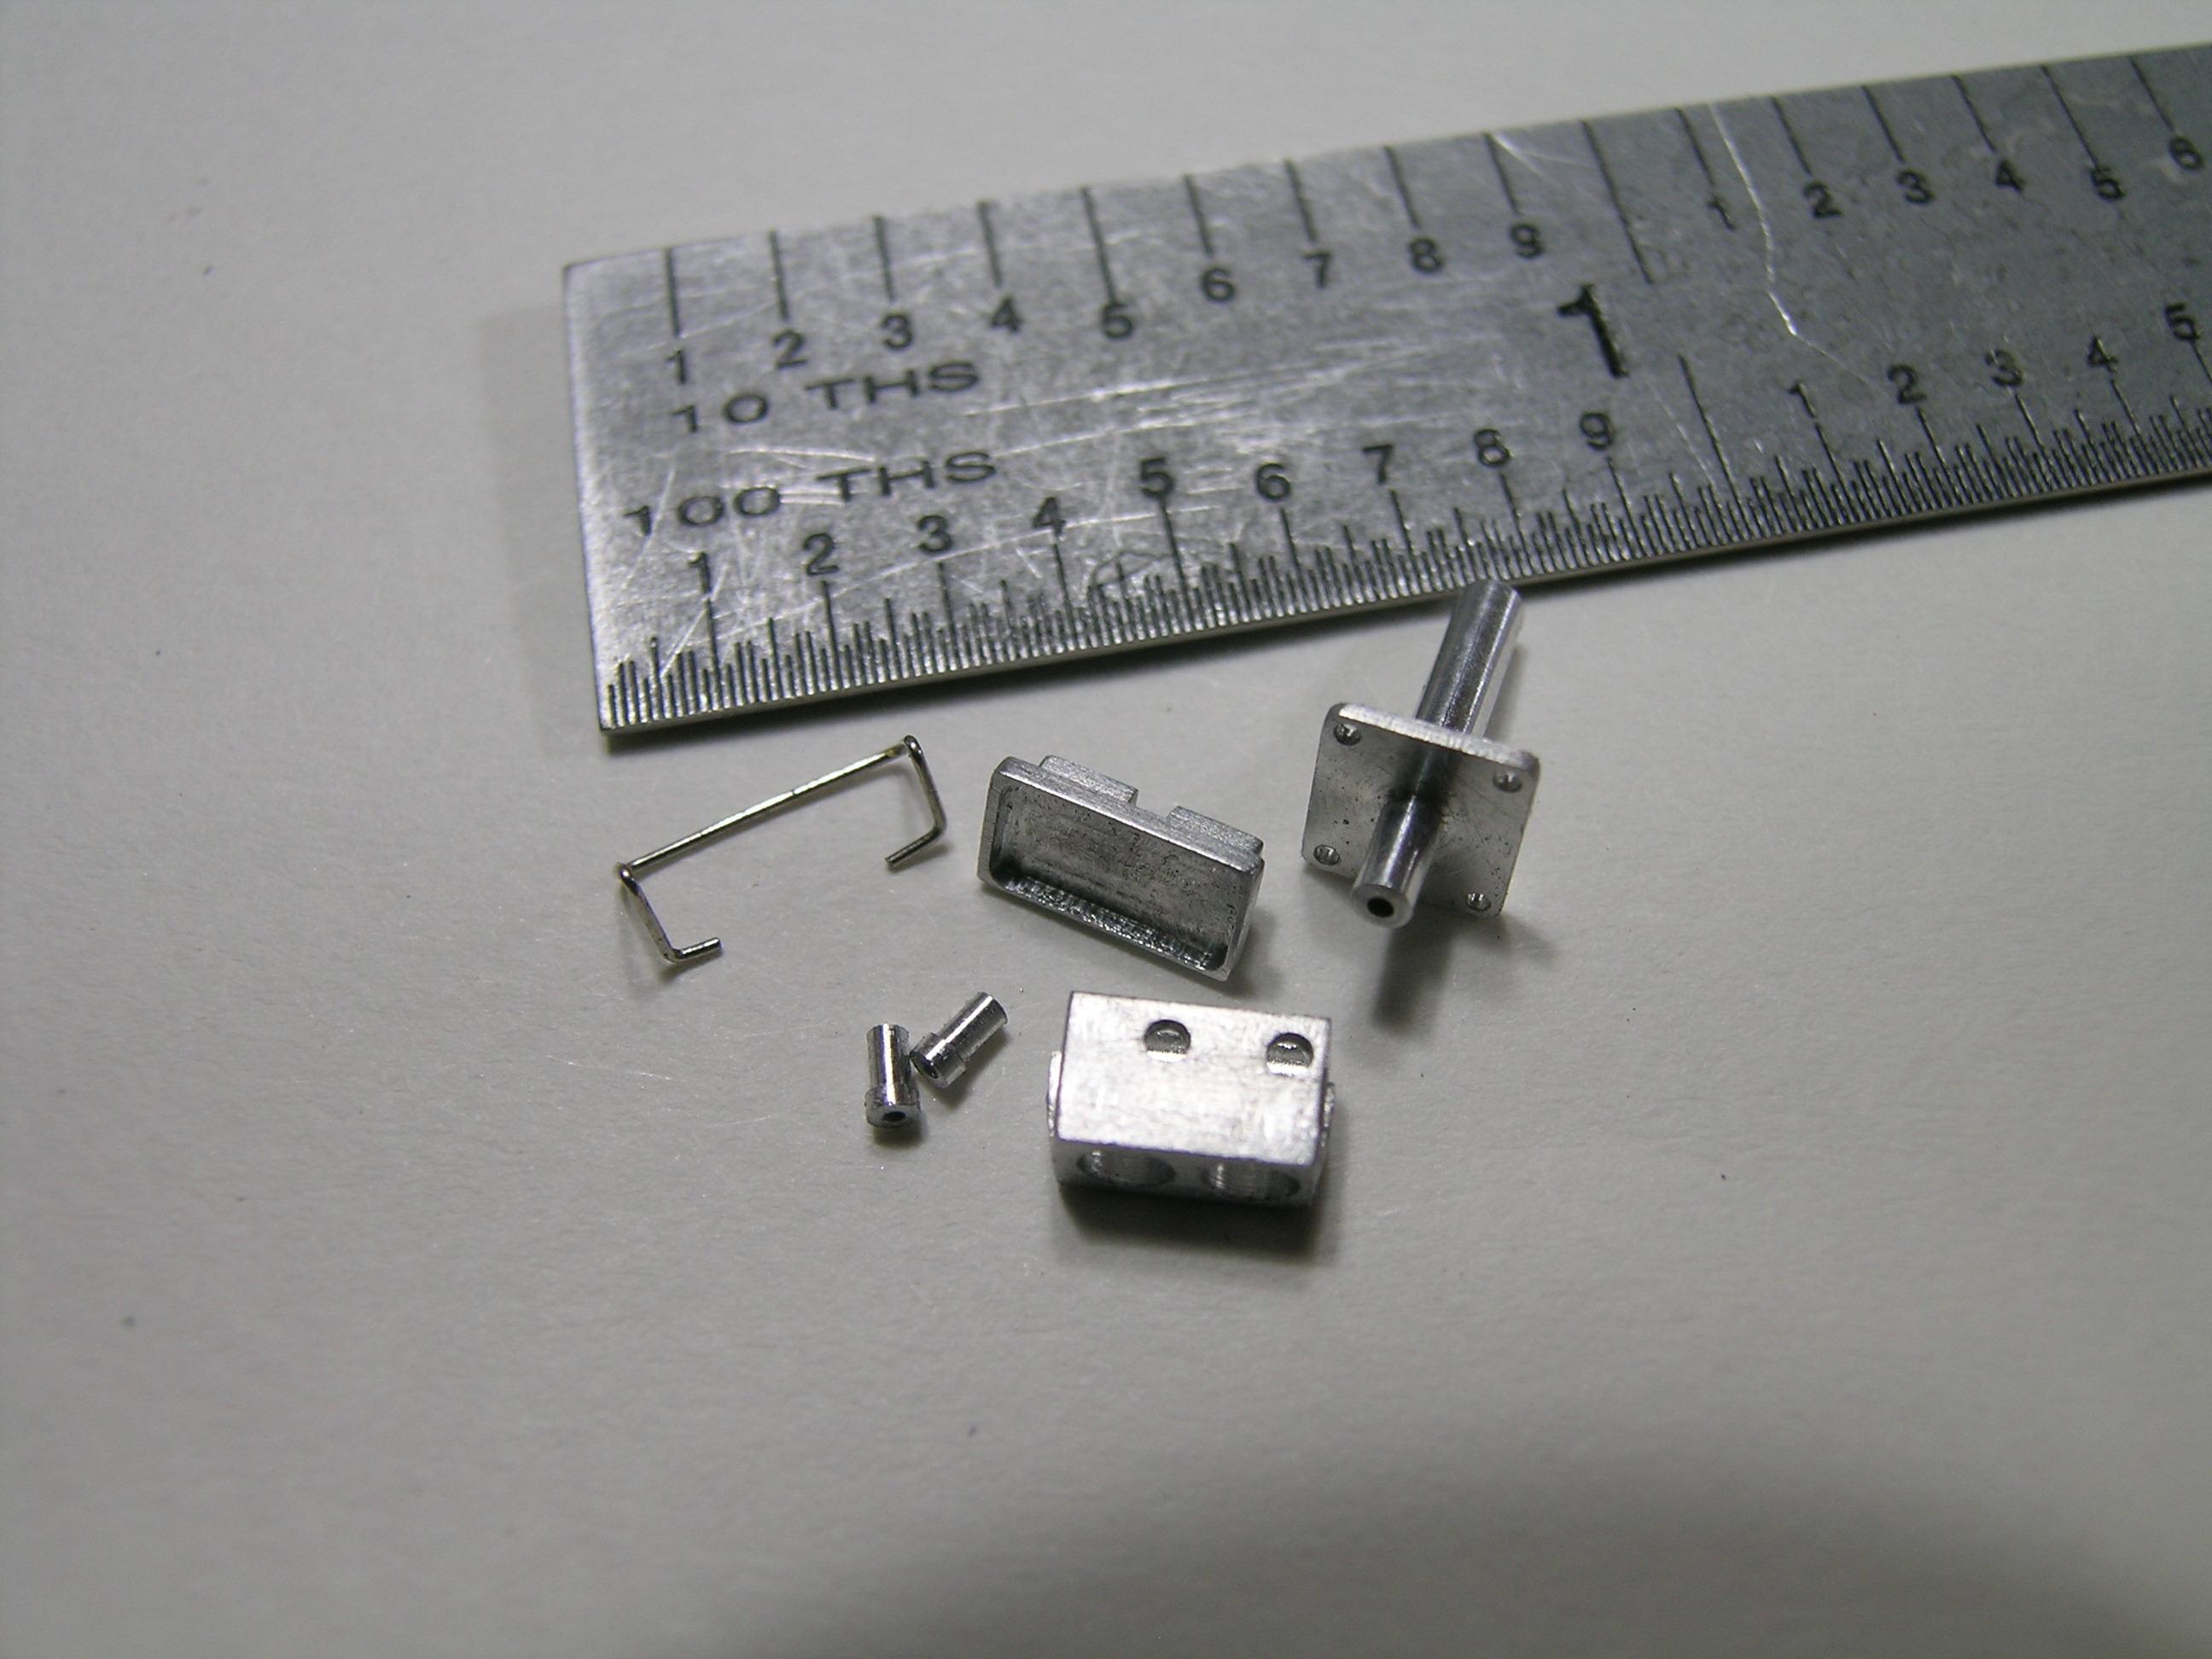
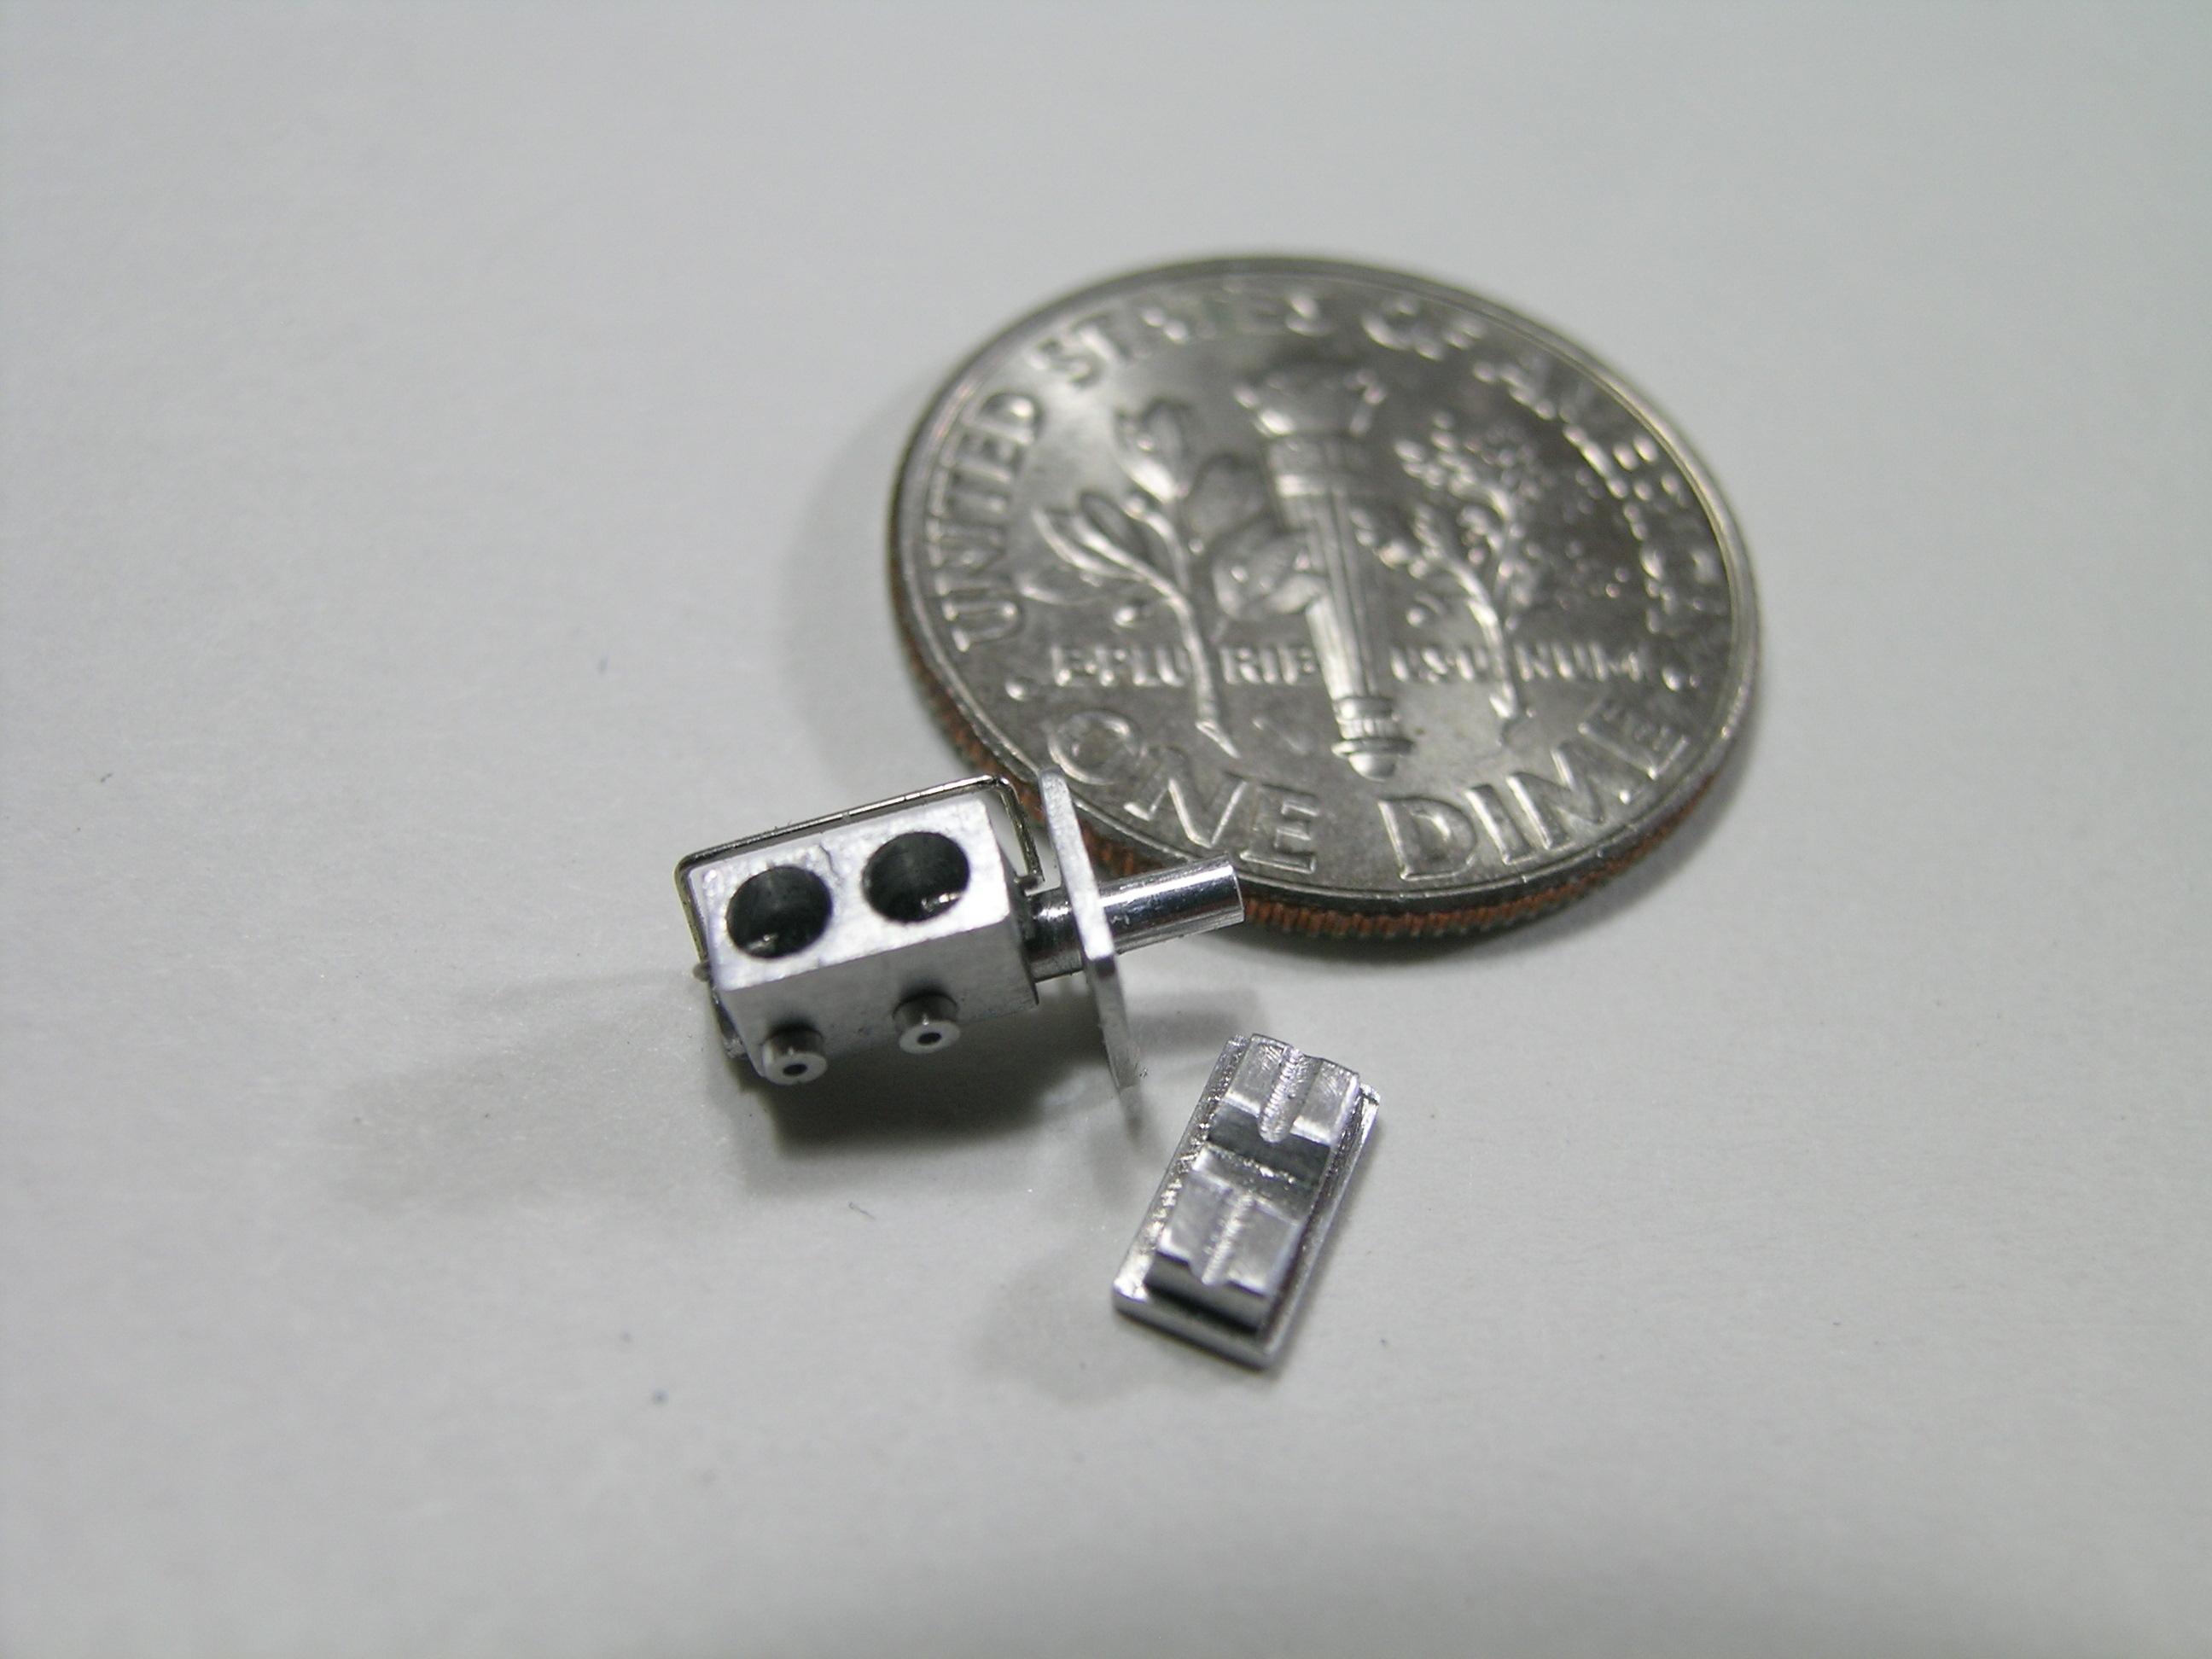
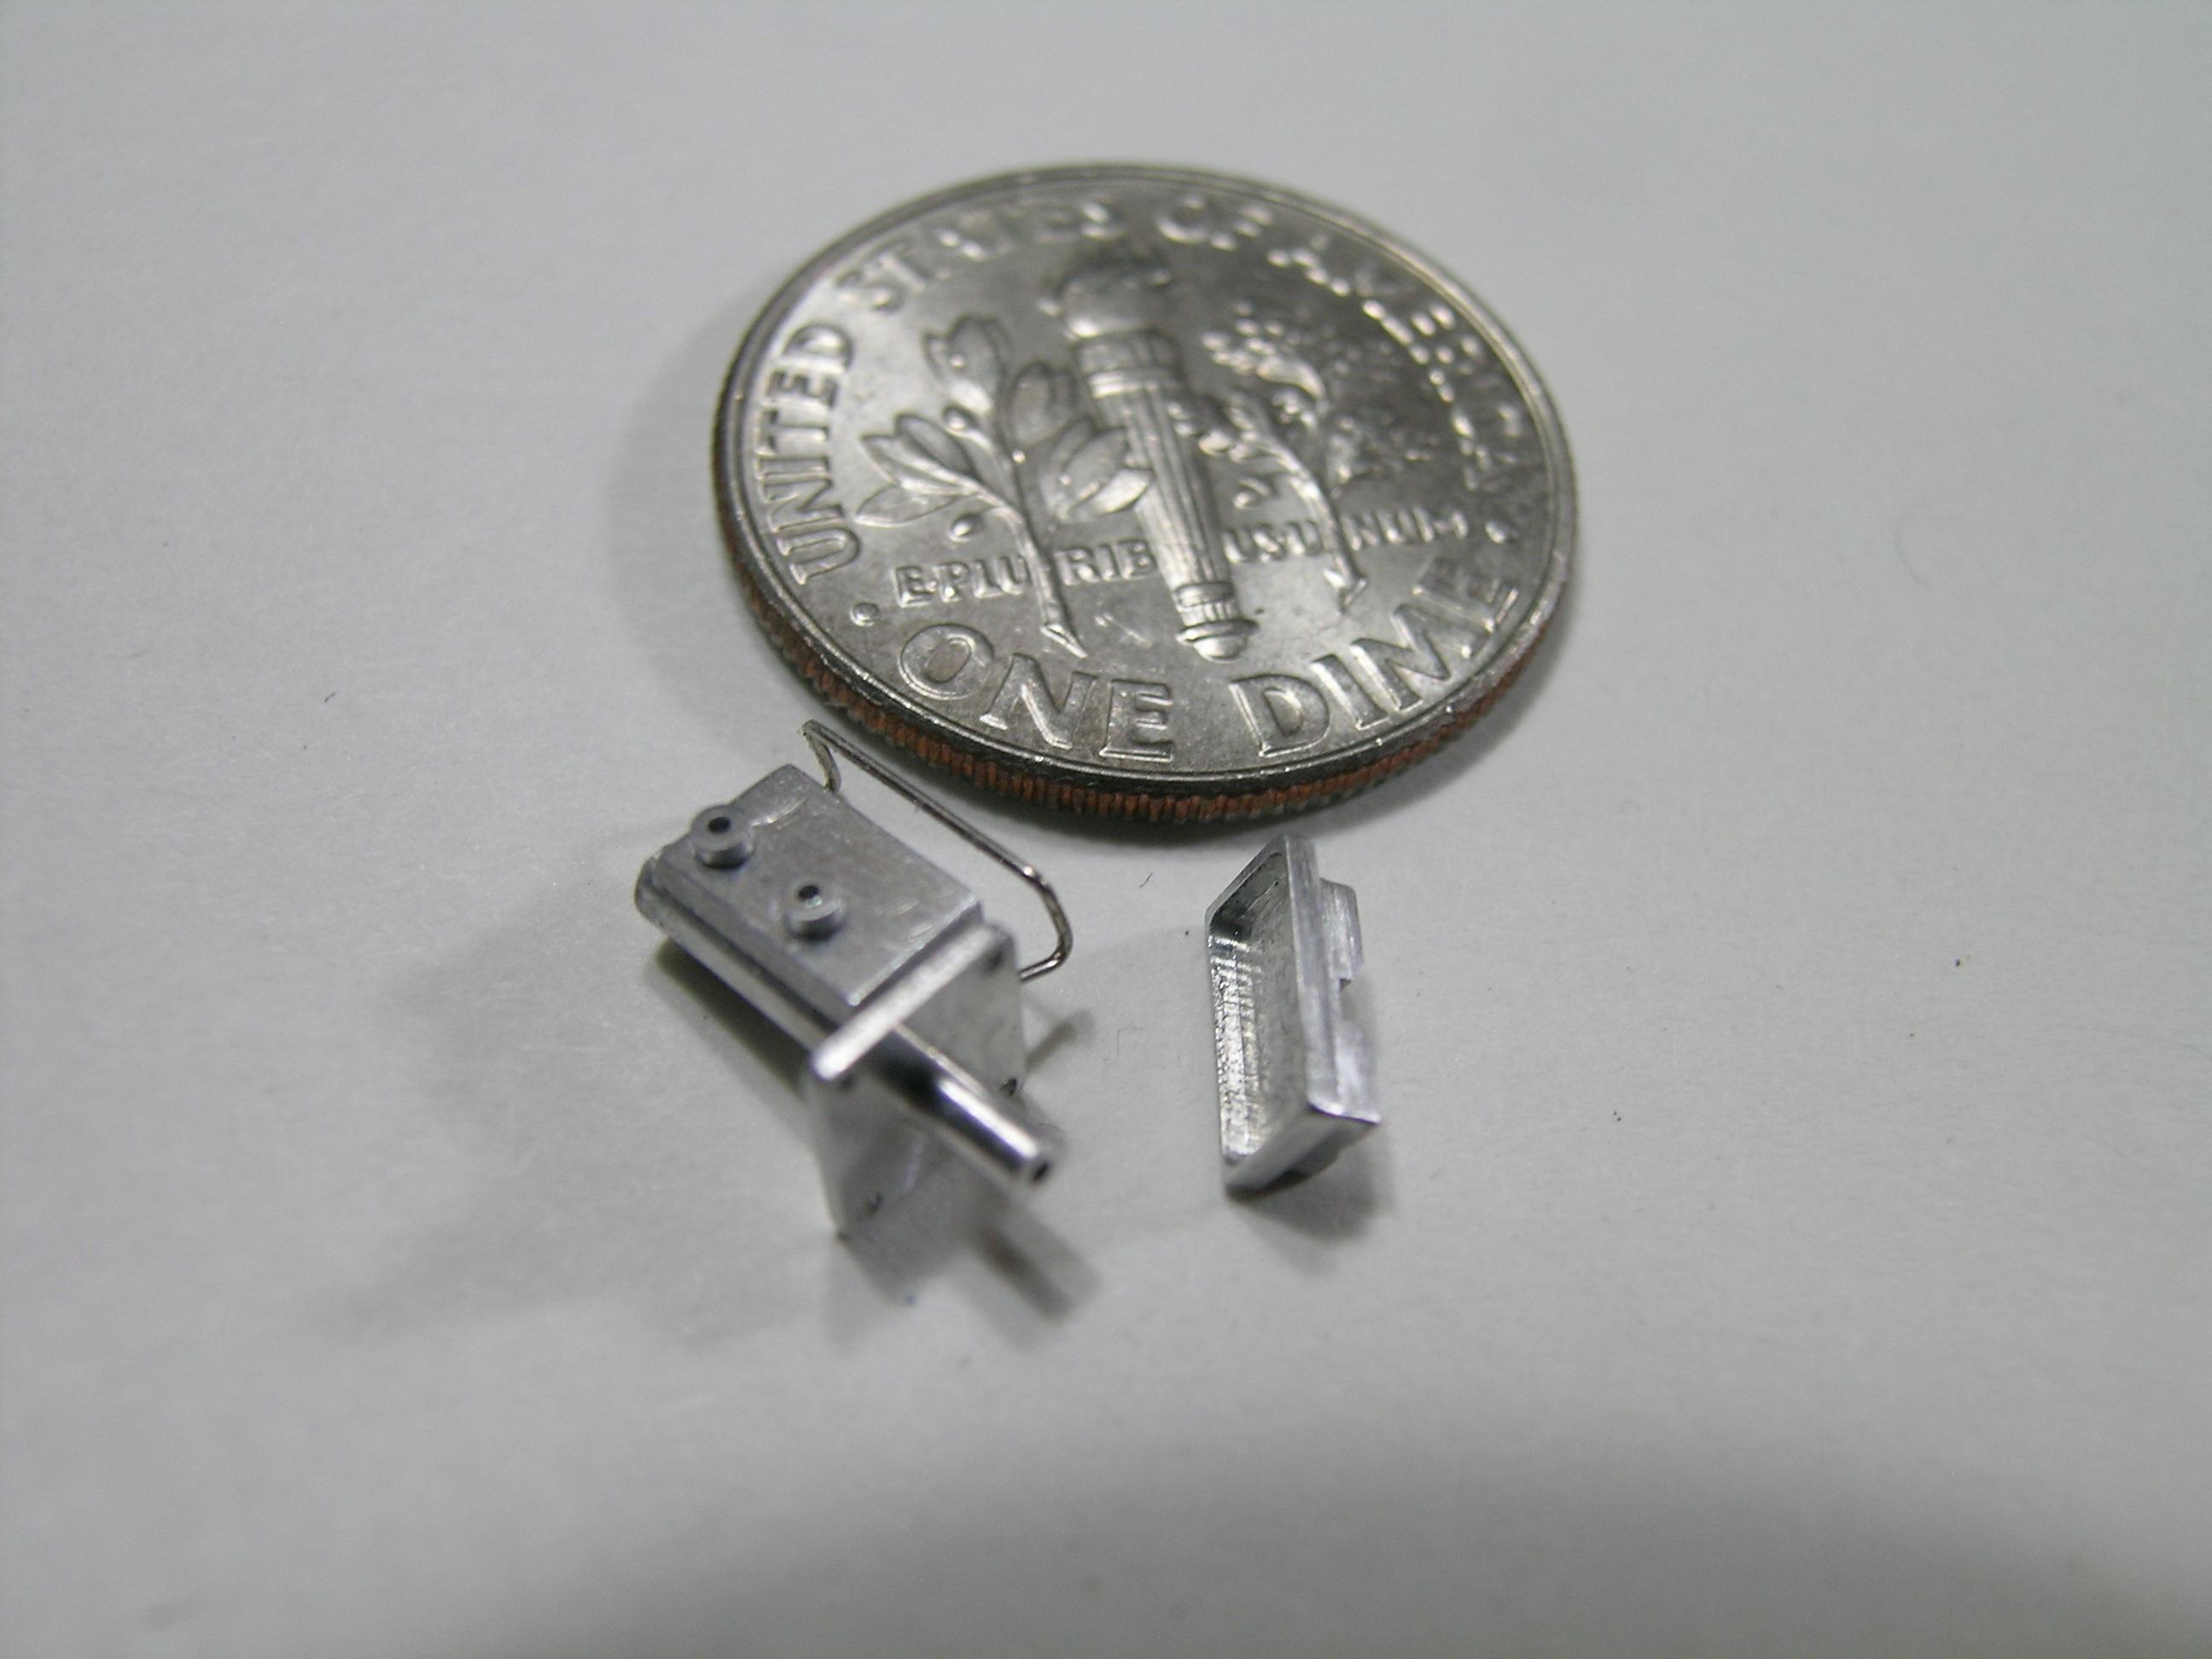
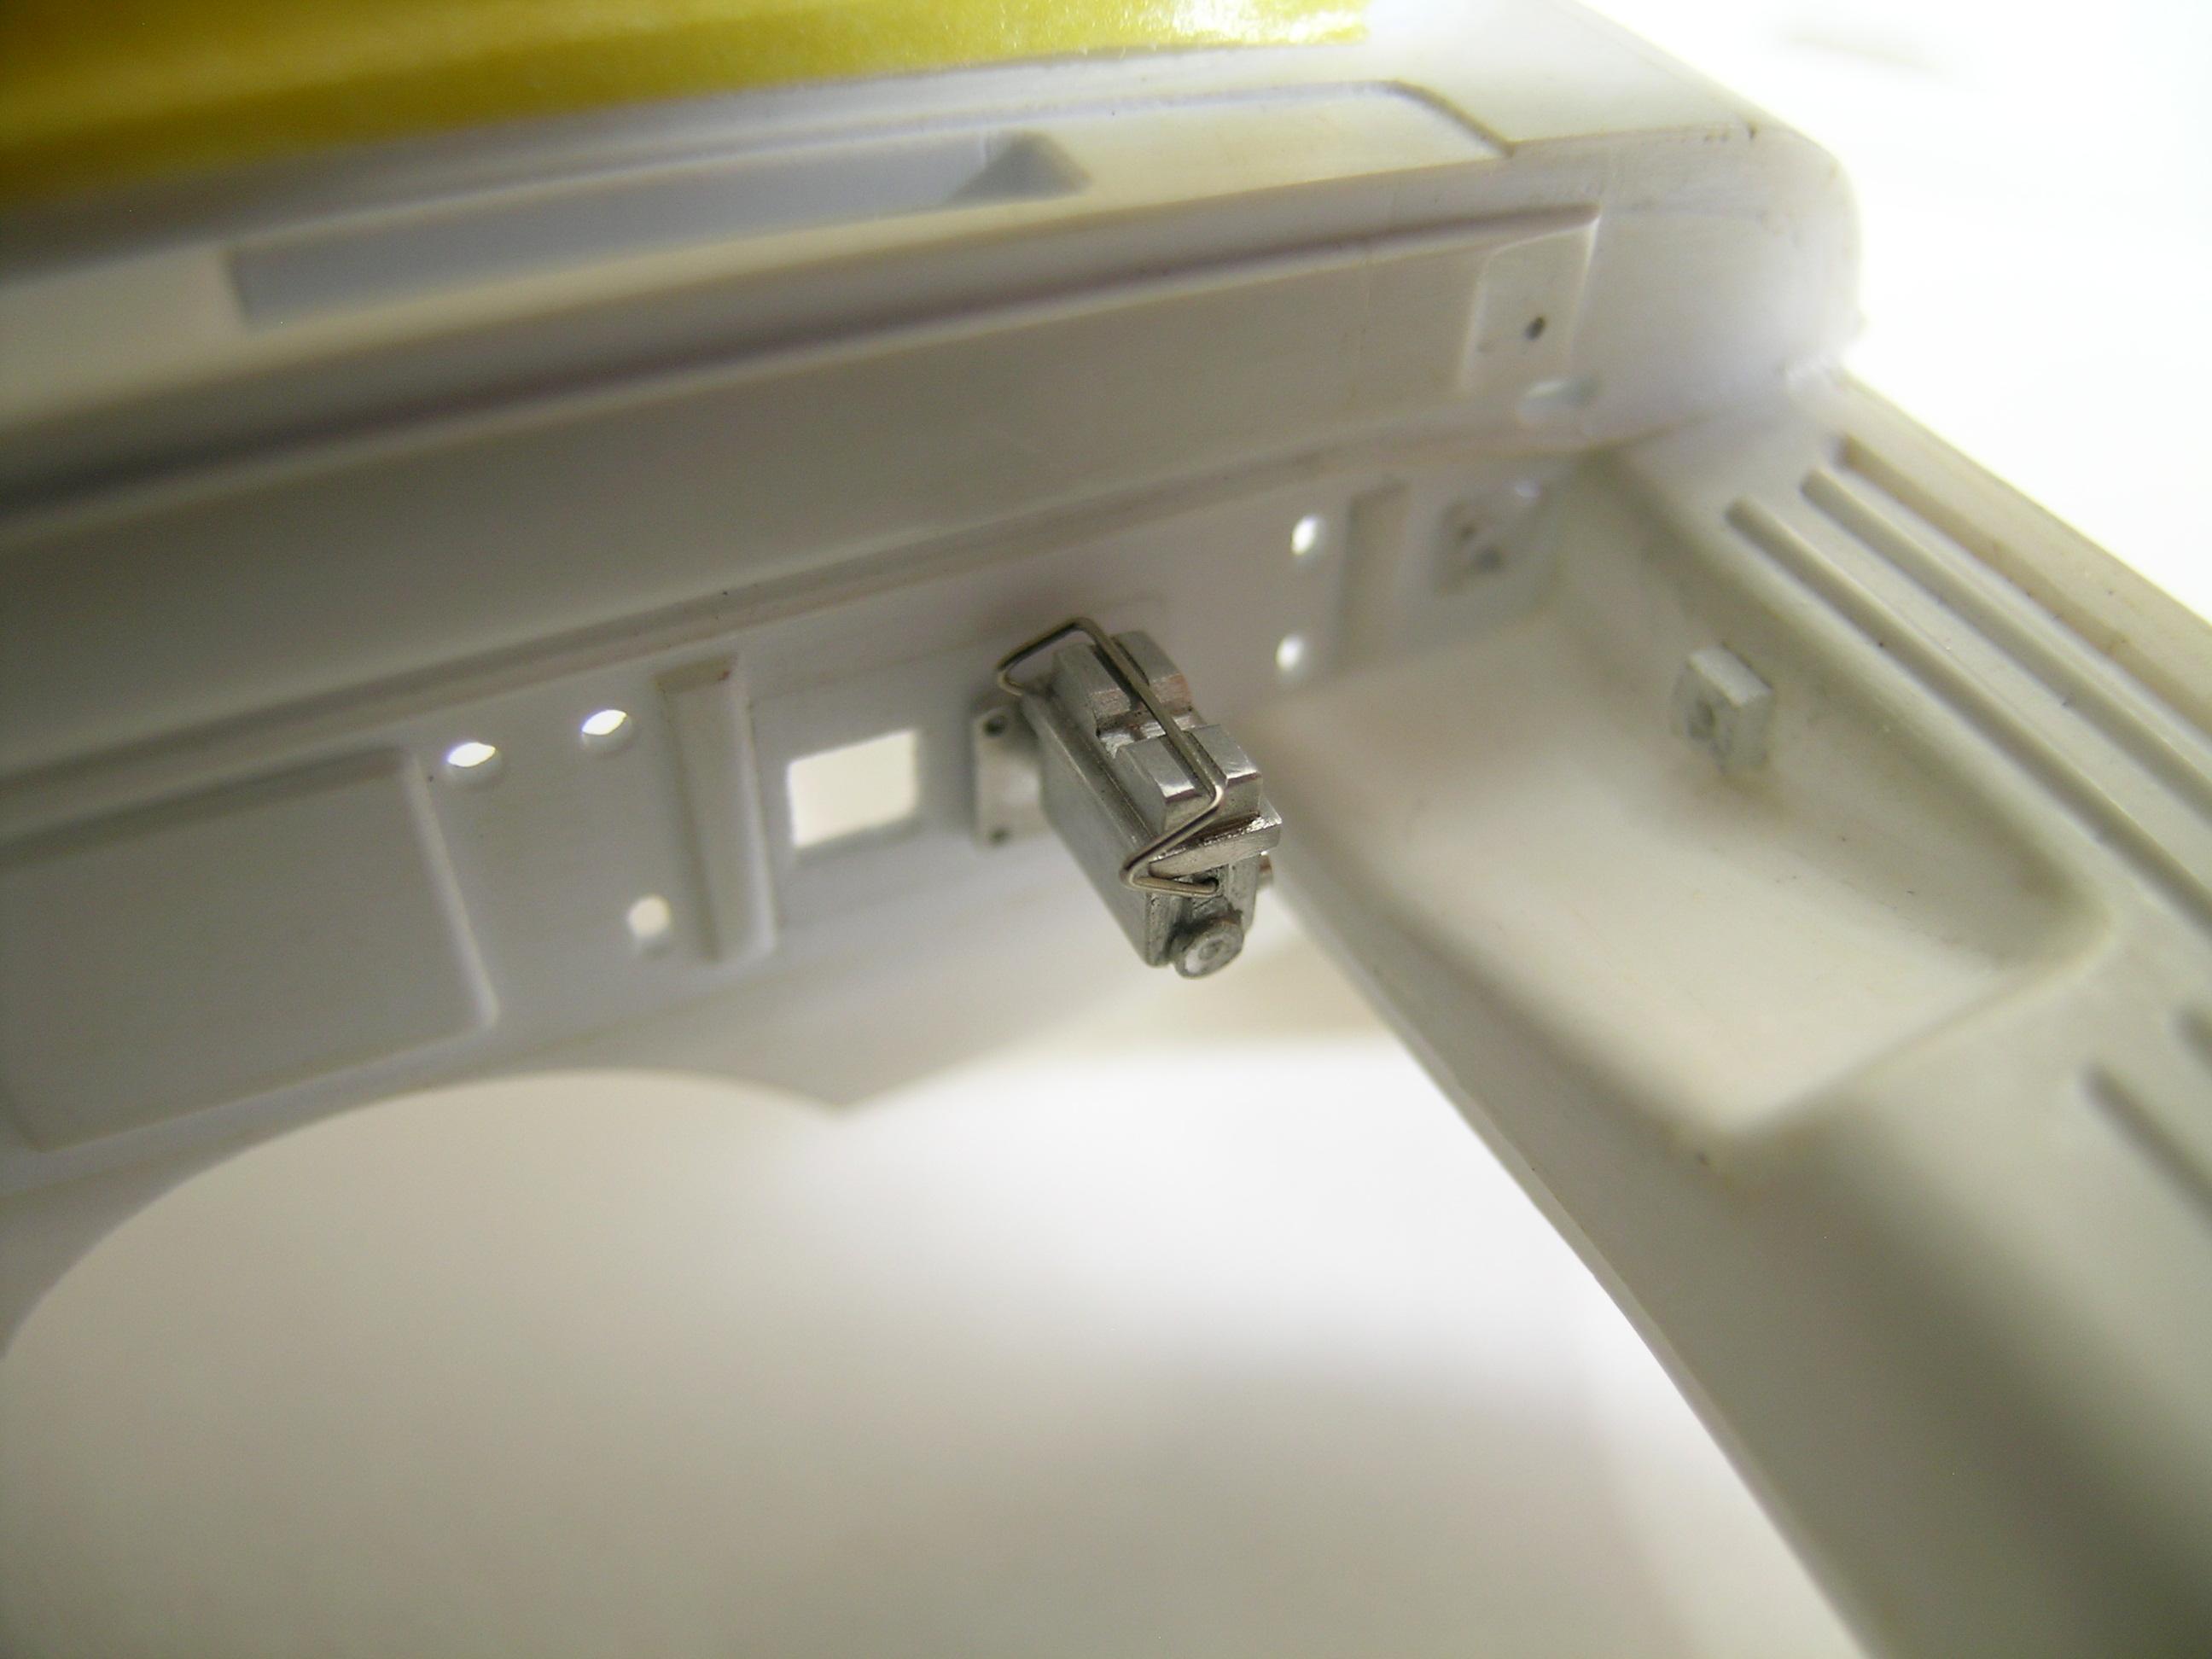
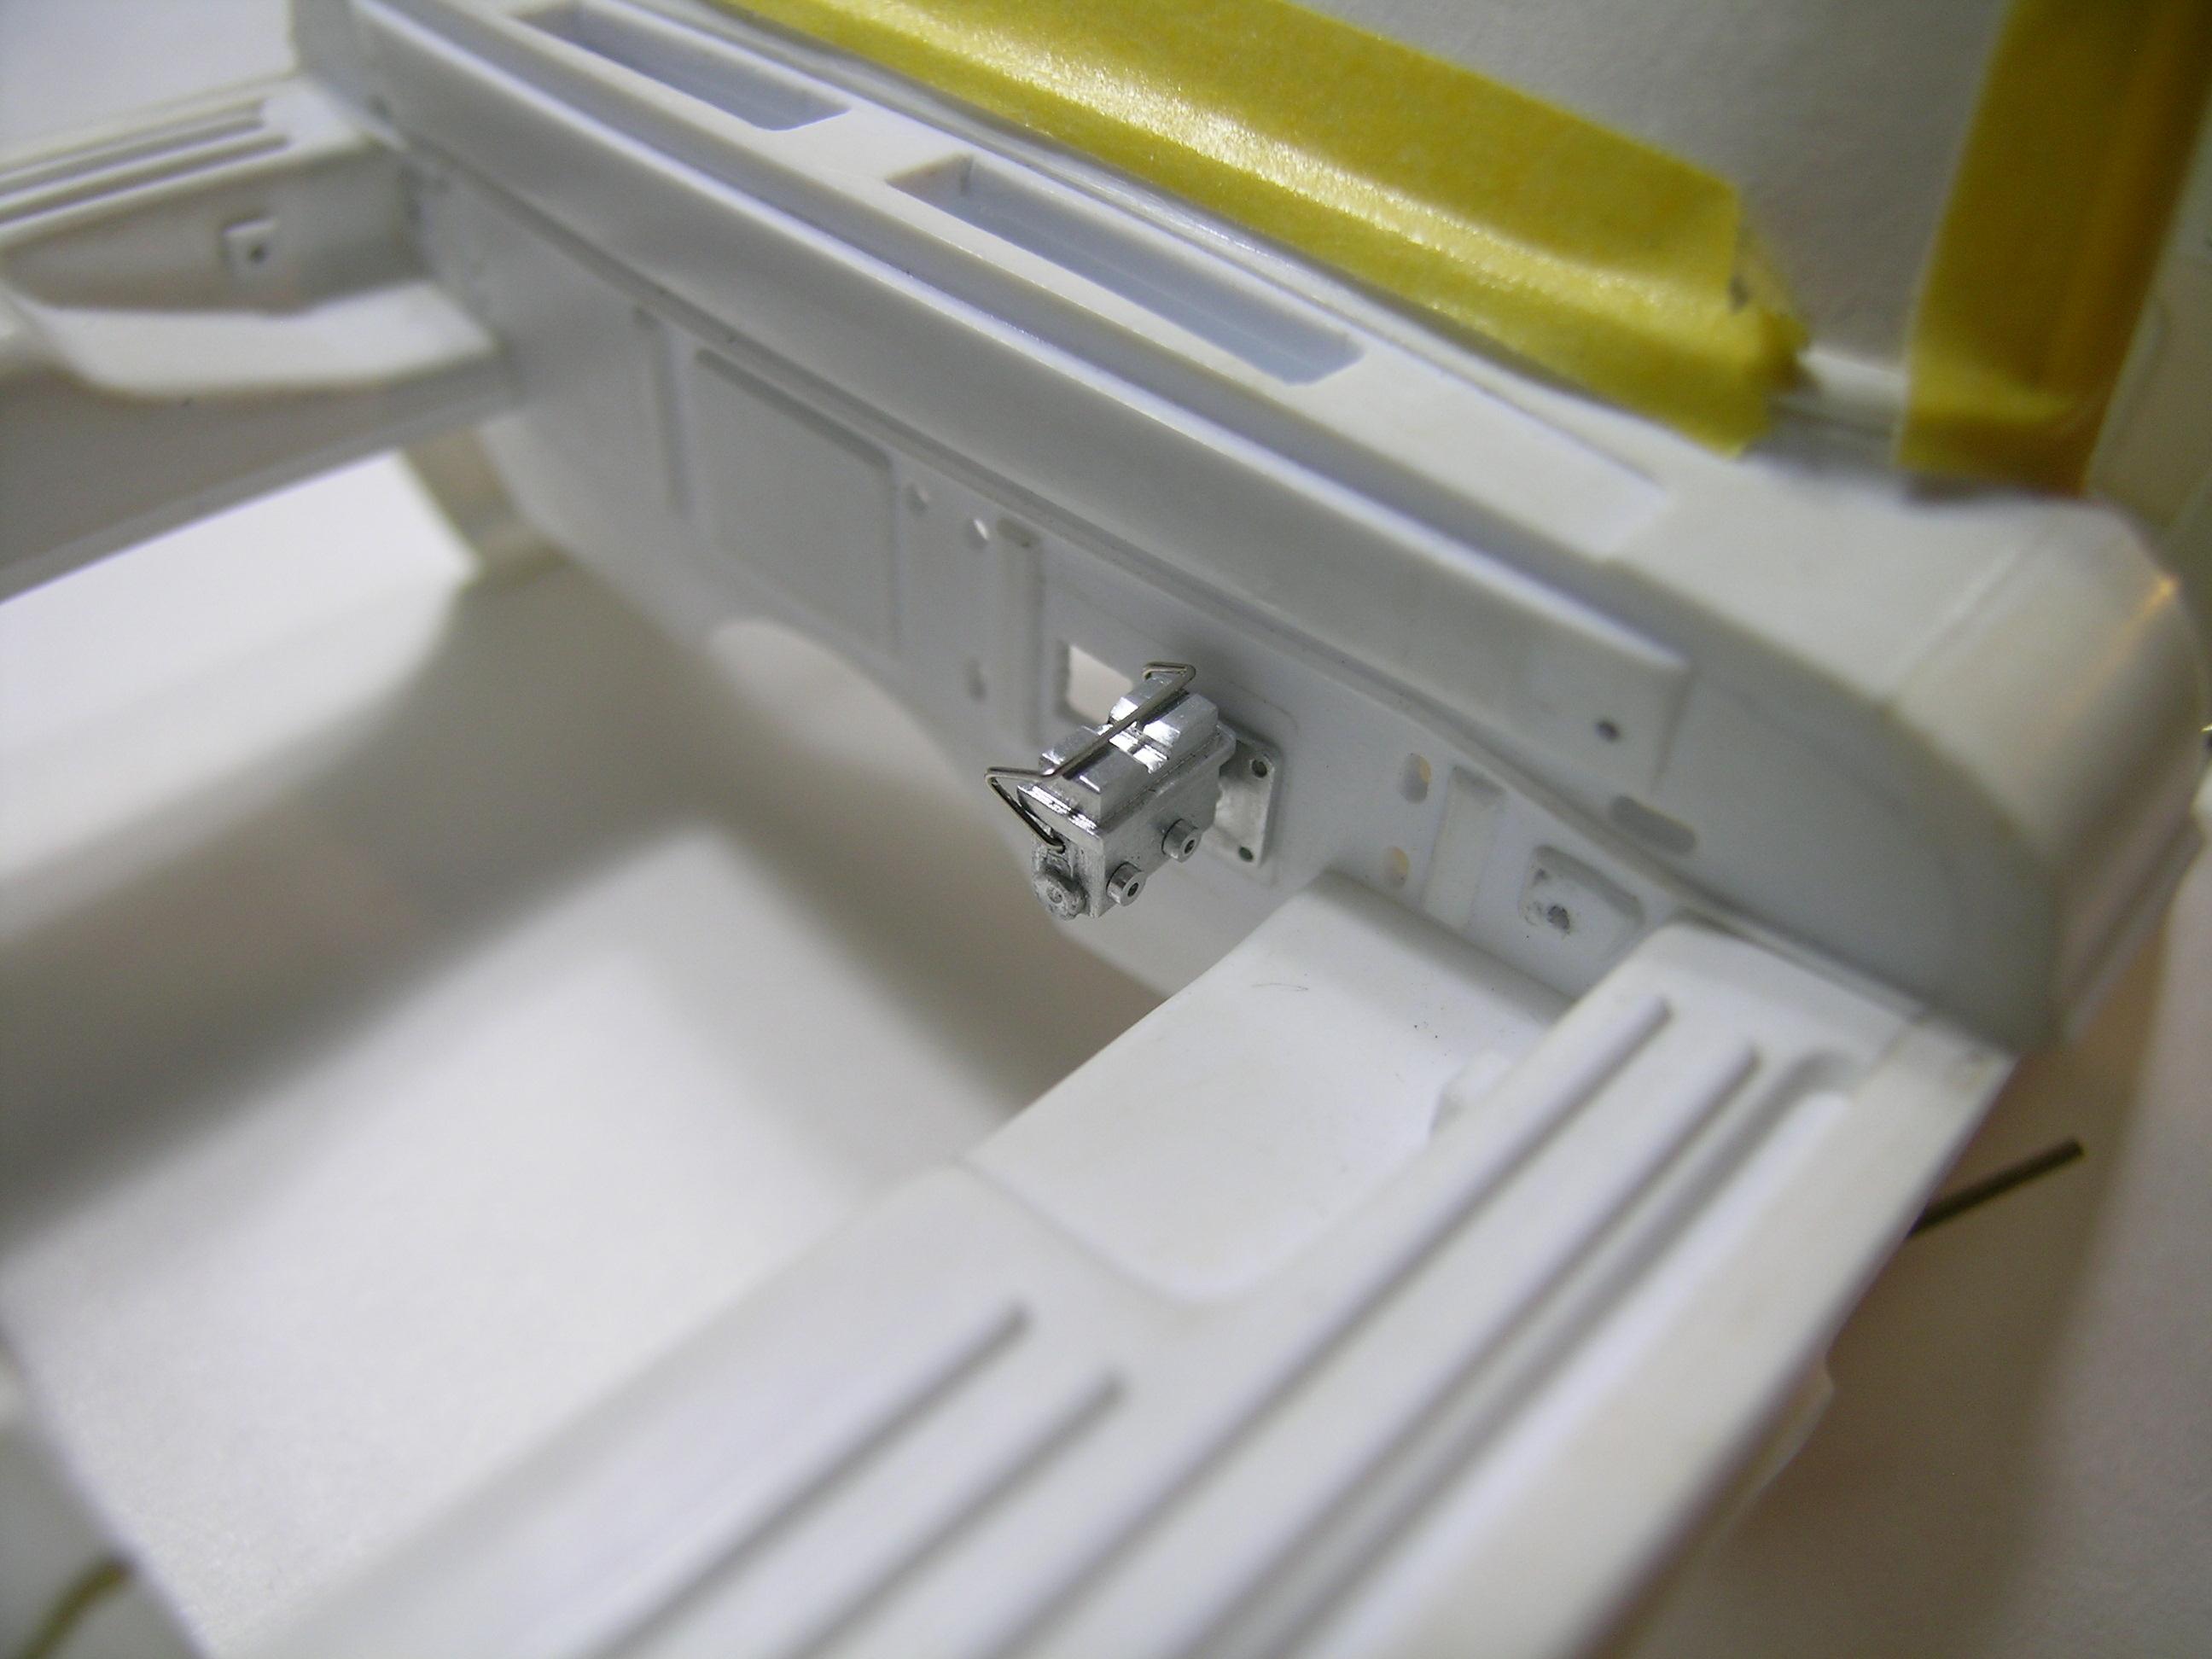
Hello everyone, Before I can progress a little further inside the cabin and its components, I was kind of forced to make a little hook under the hood. I want to make a bracket for the brake / clutch pedals in the same genre as the real truck and needed to have the exact position of the brake master cylinder before starting so I put the Sherline tooling to work. This time, I decided to try to make the cover removable even if I don't plan to expose the truck with the cover removed from the base but just as another little challenge I would say. At the very least, you now know that it is removable... Not a big step forward but another part done and another little Ziploc in the parts box! I will be back at work tomorrow morning for a short week (one day only ...) so I will try to make more progress in the next few days since the Christmas holidays seem to be rather calm this year... See you soon! Take care, Francis Master cylinder cover in the milling chuck. I used a 0.020" ball end mill for the groove. Master cylnder components. Different view. Master cylinder assembled. Different view. As you can see, I drilled the end of the cylinder and will attempt to attach the plunger to the brake pedal. Wish me luck...! In position under the hood. Different view.
-
Superb Roadrunner! Exceptional attention to detail from bumper to bumper, one of the best renditions of the real car I have ever seen! Very clean build, you can be proud of it Bob!!! ?
-
One word says it all: MASTERFUL!!! ❤️
-
64 Dodge D100 Pickup Pro Street
AmericanMuscleFan replied to AmericanMuscleFan's topic in WIP: Drag Racing Models
Hey Randy, good to see you again sir and thanks for the kind words! Rest assured that your out-of-this-world skills are an incredible source of motivation to surpass myself but I still have a long way to go before I can approach your level of perfection sir (if at all possible ...)! Take care, Francis -
64 Dodge D100 Pickup Pro Street
AmericanMuscleFan replied to AmericanMuscleFan's topic in WIP: Drag Racing Models
Thanks for the kind comments Ron! I will work hard to finish this thing before the end of the year...2021...! ? Take care, Francis -
Dodge (Color me Gone) Promod
AmericanMuscleFan replied to Tortuga Kustomz's topic in WIP: Drag Racing Models
This long wheelbase car deserves a long wheelie bar kit! Very well done and nice attention to detail Marcos! -
64 Dodge D100 Pickup Pro Street
AmericanMuscleFan replied to AmericanMuscleFan's topic in WIP: Drag Racing Models
Thanks for the comments Marcos, I love your latest project my friend, very unusual and original, I like rare birds!!! Take care, Francis -
64 Dodge D100 Pickup Pro Street
AmericanMuscleFan replied to AmericanMuscleFan's topic in WIP: Drag Racing Models
Hey Steve, thanks for the comments my friend! It was ephemeral but I wanted to know a bit about where I stood in terms of body height. I'm very happy with the rear height but I would like the front to be closer to the ground of course. I'm a bit stuck with my concept which is as close to the original as possible and drag racing mechanics. I don't want to put the engine/transmission too high as I would have to make a bigger transmission tunnel and probably have to put a snorkel on the hood as the carburetor would stick out. The HEMI I made is way bigger than the slant six or V8 usually seen in the engine bay of those old workhorses so I am not out of the wood yet... I will see what I can do when the engine will be mounted in the frame. Take care, Francis -
64 Dodge D100 Pickup Pro Street
AmericanMuscleFan replied to AmericanMuscleFan's topic in WIP: Drag Racing Models
Thanks for your comments and your feeling on my build Tim! I think (and hope) that when the brake calipers are installed, the slight friction of those will do what they are supposed to do... I still want to build this truck as a complete unit with all of its parts in place, but I might have to change plans along the way if the challenge is too much, it's just a toy after all...! Your comments are great motivation, I appreciate them! Take care, Francis -
64 Dodge D100 Pickup Pro Street
AmericanMuscleFan replied to AmericanMuscleFan's topic in WIP: Drag Racing Models
Thanks Claude, Maybe I'll still have a few tweaks to make to it, but considering the time I've invested in it and the changes I've made so far, I can say I'm pretty happy with it. I can say without a doubt that your comparison with the real one you did is certainly a mark of confidence that I appreciate considering your vast experience in the field! Take care, Francis -
What else can we expect from you Tim? The first step of the Dana cover prove it! Well done sir, I already like this!!!
-
Dodge (Color me Gone) Promod
AmericanMuscleFan replied to Tortuga Kustomz's topic in WIP: Drag Racing Models
It's definitely not a common body for a Promod car but it's super cool and different! Very mean looking car, you heading in a very interresting direction Marcos, I like that! -
64 Dodge D100 Pickup Pro Street
AmericanMuscleFan replied to AmericanMuscleFan's topic in WIP: Drag Racing Models
Thanks for the kind comments and your suggestion Tim! There are many reasons why I made the frame with styrene but the main ones are my limited experience with brass, the lack of raw material (brass seems to be as rare as gold here in my area) and the fact that I did not have reliable measurements to create the frame. I have to admit that I really enjoy working with styrene and it's easier to make changes along the way. The frame is actually very solid (certainly not as strong as if it would be brass) despite the fact that I have probably made over a dozen major modifications since the start. I don't want to bother people with updates for every change, so I haven't shown every one of these. I might have more to do by the end and it's easier to cut styrene than to do major surgery on brass... I am gaining experience with each piece made, I might be more confident to embark on this kind of adventure in a future build (if I can find the supplies) but I am old school, born with the styrene kits, so I still have a lot of respect for that and I like to call them multimedia kit! More update to come soon. Take care, Francis -
Dyno Don Maverick-1 Year Project-Finished!!
AmericanMuscleFan replied to mustang1989's topic in Drag Racing
It was a fantastic journey following you throughout this project Joe! You have shown us what dedication and hard work can do, you deserve every message of support you have received! You can be proud of yourself my friend, it's a great drag car and you did an amazing job! ?❤️ -
Beautiful pickup Jason! Superb paint job as other have mentioned! ?
-
34 Church Truck
AmericanMuscleFan replied to OldNYJim's topic in WIP: Model Trucks: Pickups, Vans, SUVs, Light Commercial
Very pretty and vibrant candy red Jim! I don't know this brand of water-based paint but is it easier to apply than lacquer? It's definitely safer on plastic, so maybe that's one of the main reasons you use it? Cleaning should be easier too! -
64 Dodge D100 Pickup Pro Street
AmericanMuscleFan replied to AmericanMuscleFan's topic in WIP: Drag Racing Models
Thanks for the comments Trevor! With all the work done so far and it continues... I won't hesitate to make any adjustments necessary (machining new spindels?) to get the look I'm looking for. However, the front fender wheels openings are higher than the ones on the bed on this truck model, so it's hard to fight the visual illusion without having to lower the front end down to the ground... Thanks again Joe! You might be right, but I still have some stuff up my sleeve for this project, so I'll do my best to keep you entertained my friend! Thank you very much Ian, I appreciate your support and your kind words, these are fuel for my gas tank! Thank you James (Rooster)! Your continued support is greatly appreciated and keeps me fully motivated to carry this project through to the finish line! Take care to all of you, Francis -
Shirley Shahan’s Hornet Pro Stock
AmericanMuscleFan replied to dragcarz's topic in WIP: Drag Racing Models
I am very sad to hear that you have been affected by Covid-19 Roger, we often think it is for others until we are personally struck. Hope you get better soon, so take a rest, the Hornet can wait! Good job so far my friend!