AmericanMuscleFan
-
Posts
3,058 -
Joined
-
Last visited
Content Type
Profiles
Forums
Events
Gallery
Everything posted by AmericanMuscleFan
-

64 Dodge D100 Pickup Pro Street
AmericanMuscleFan replied to AmericanMuscleFan's topic in WIP: Drag Racing Models
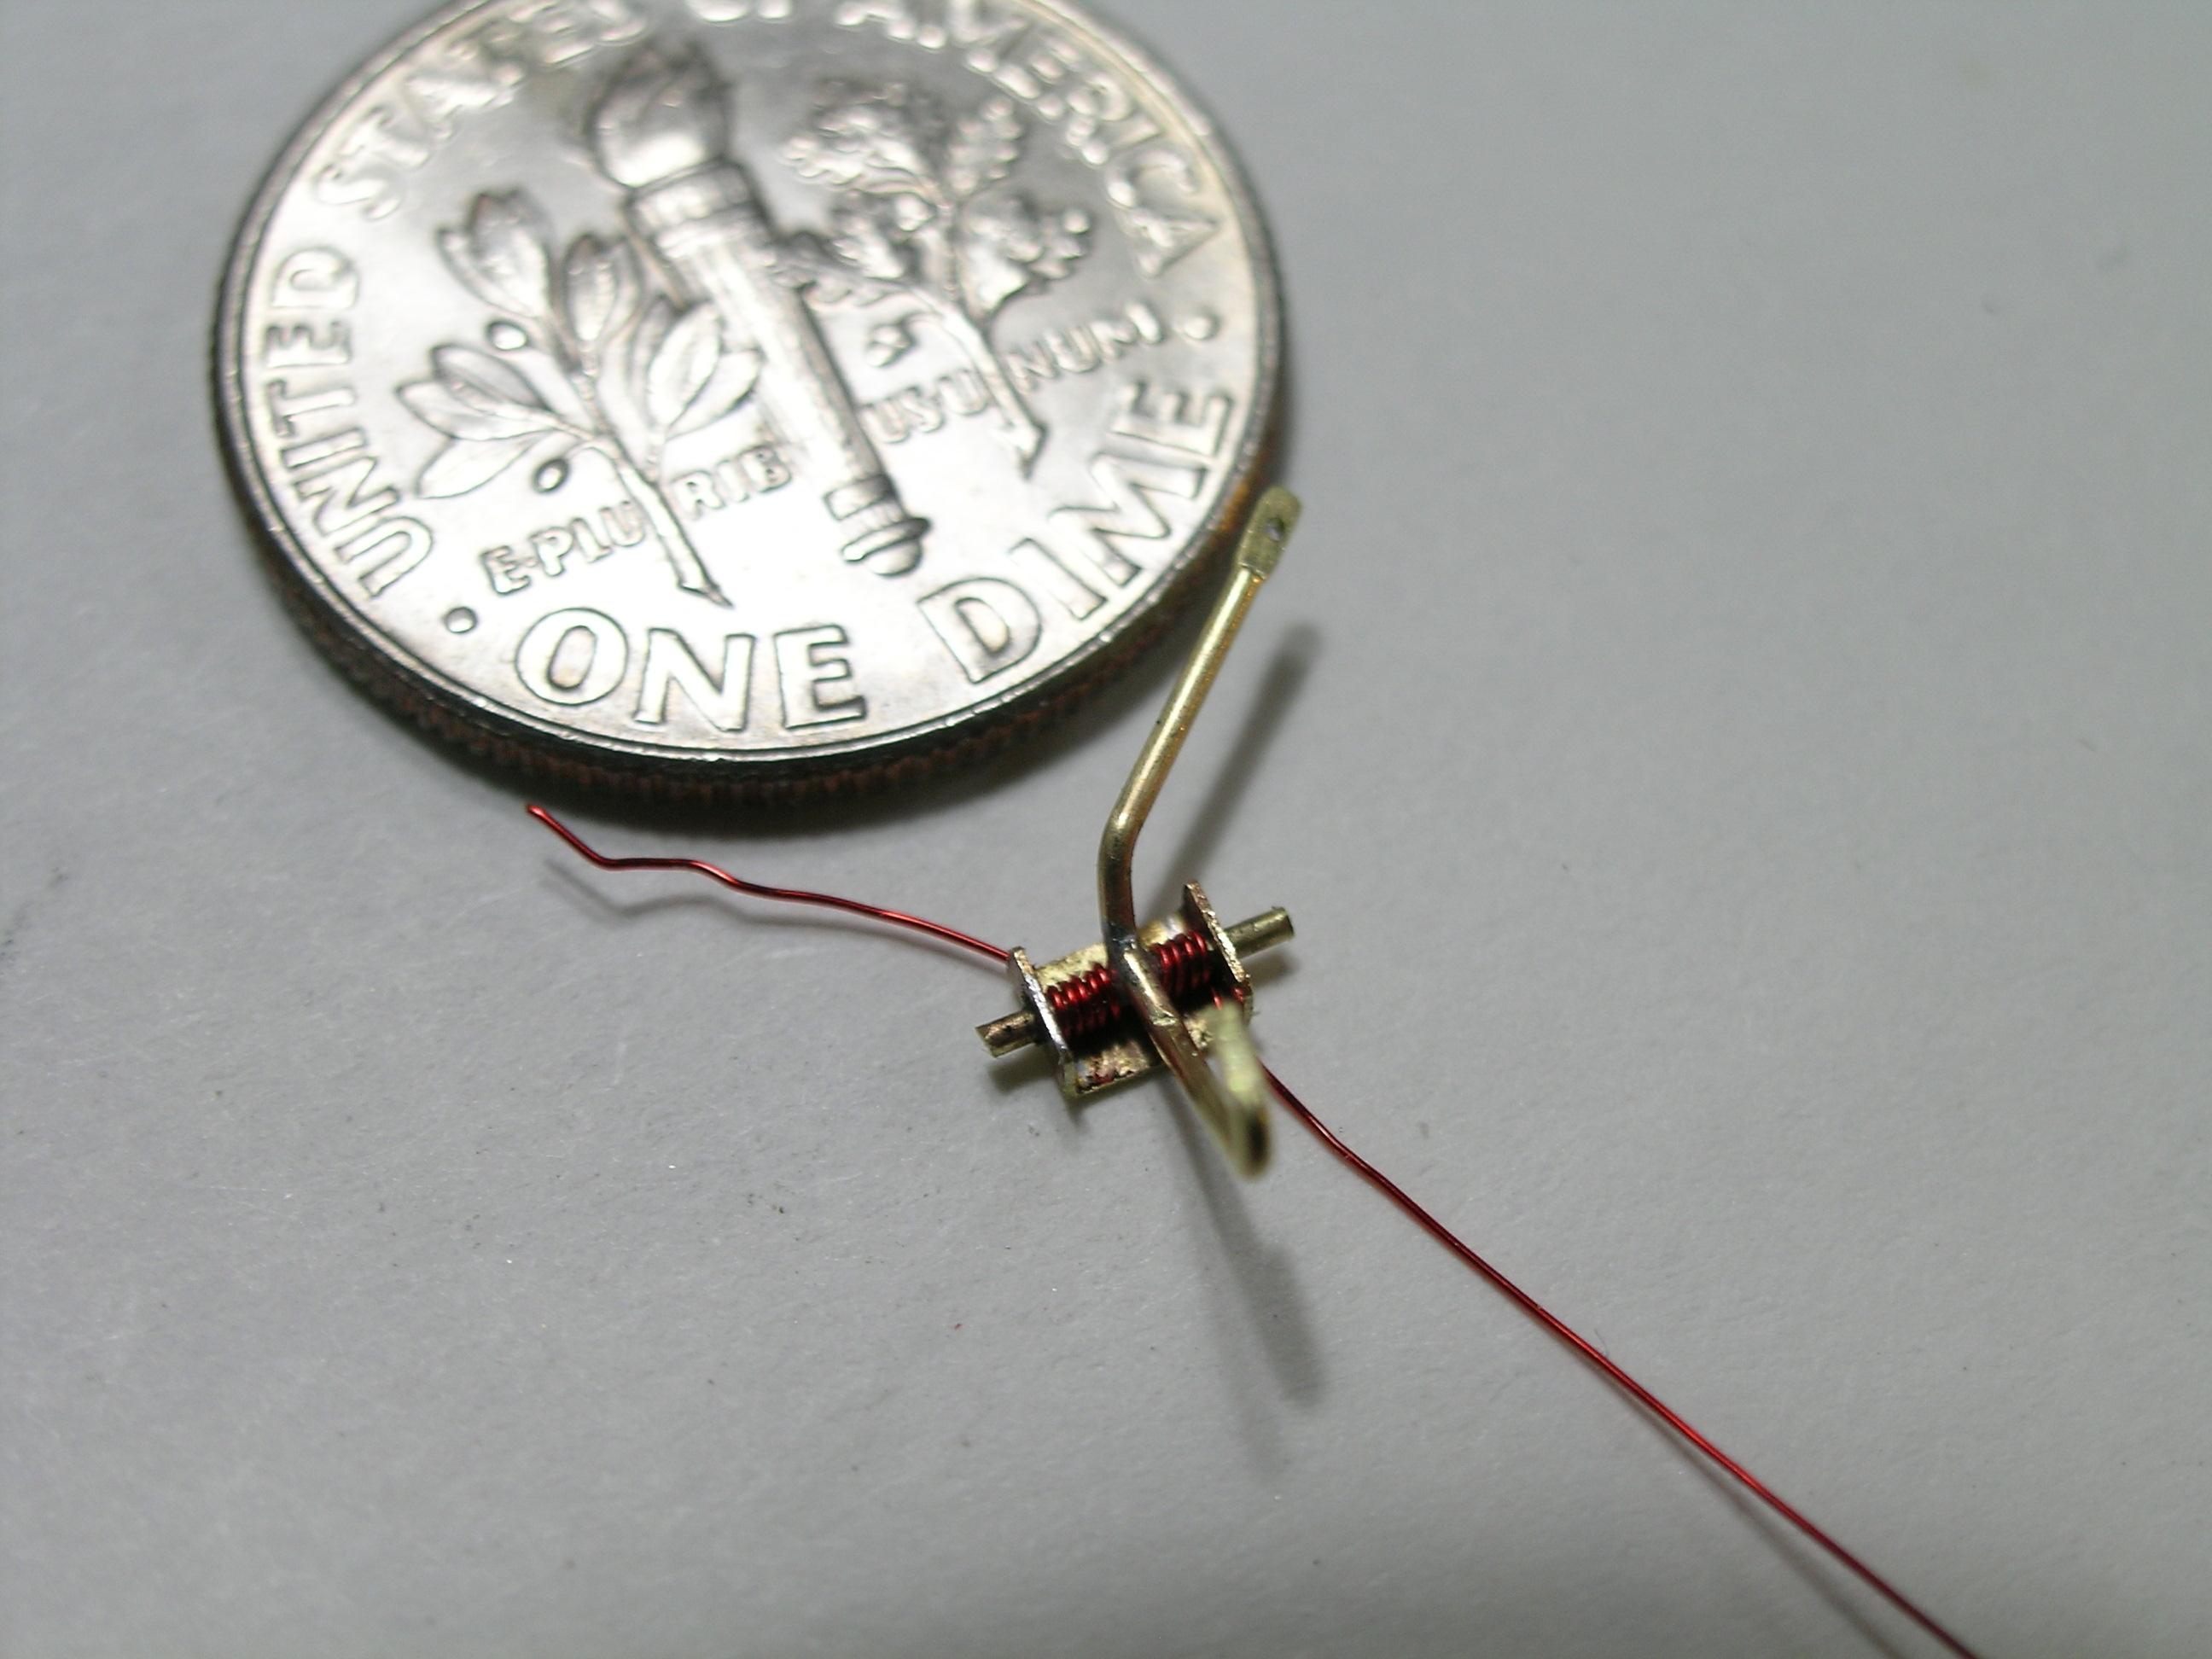
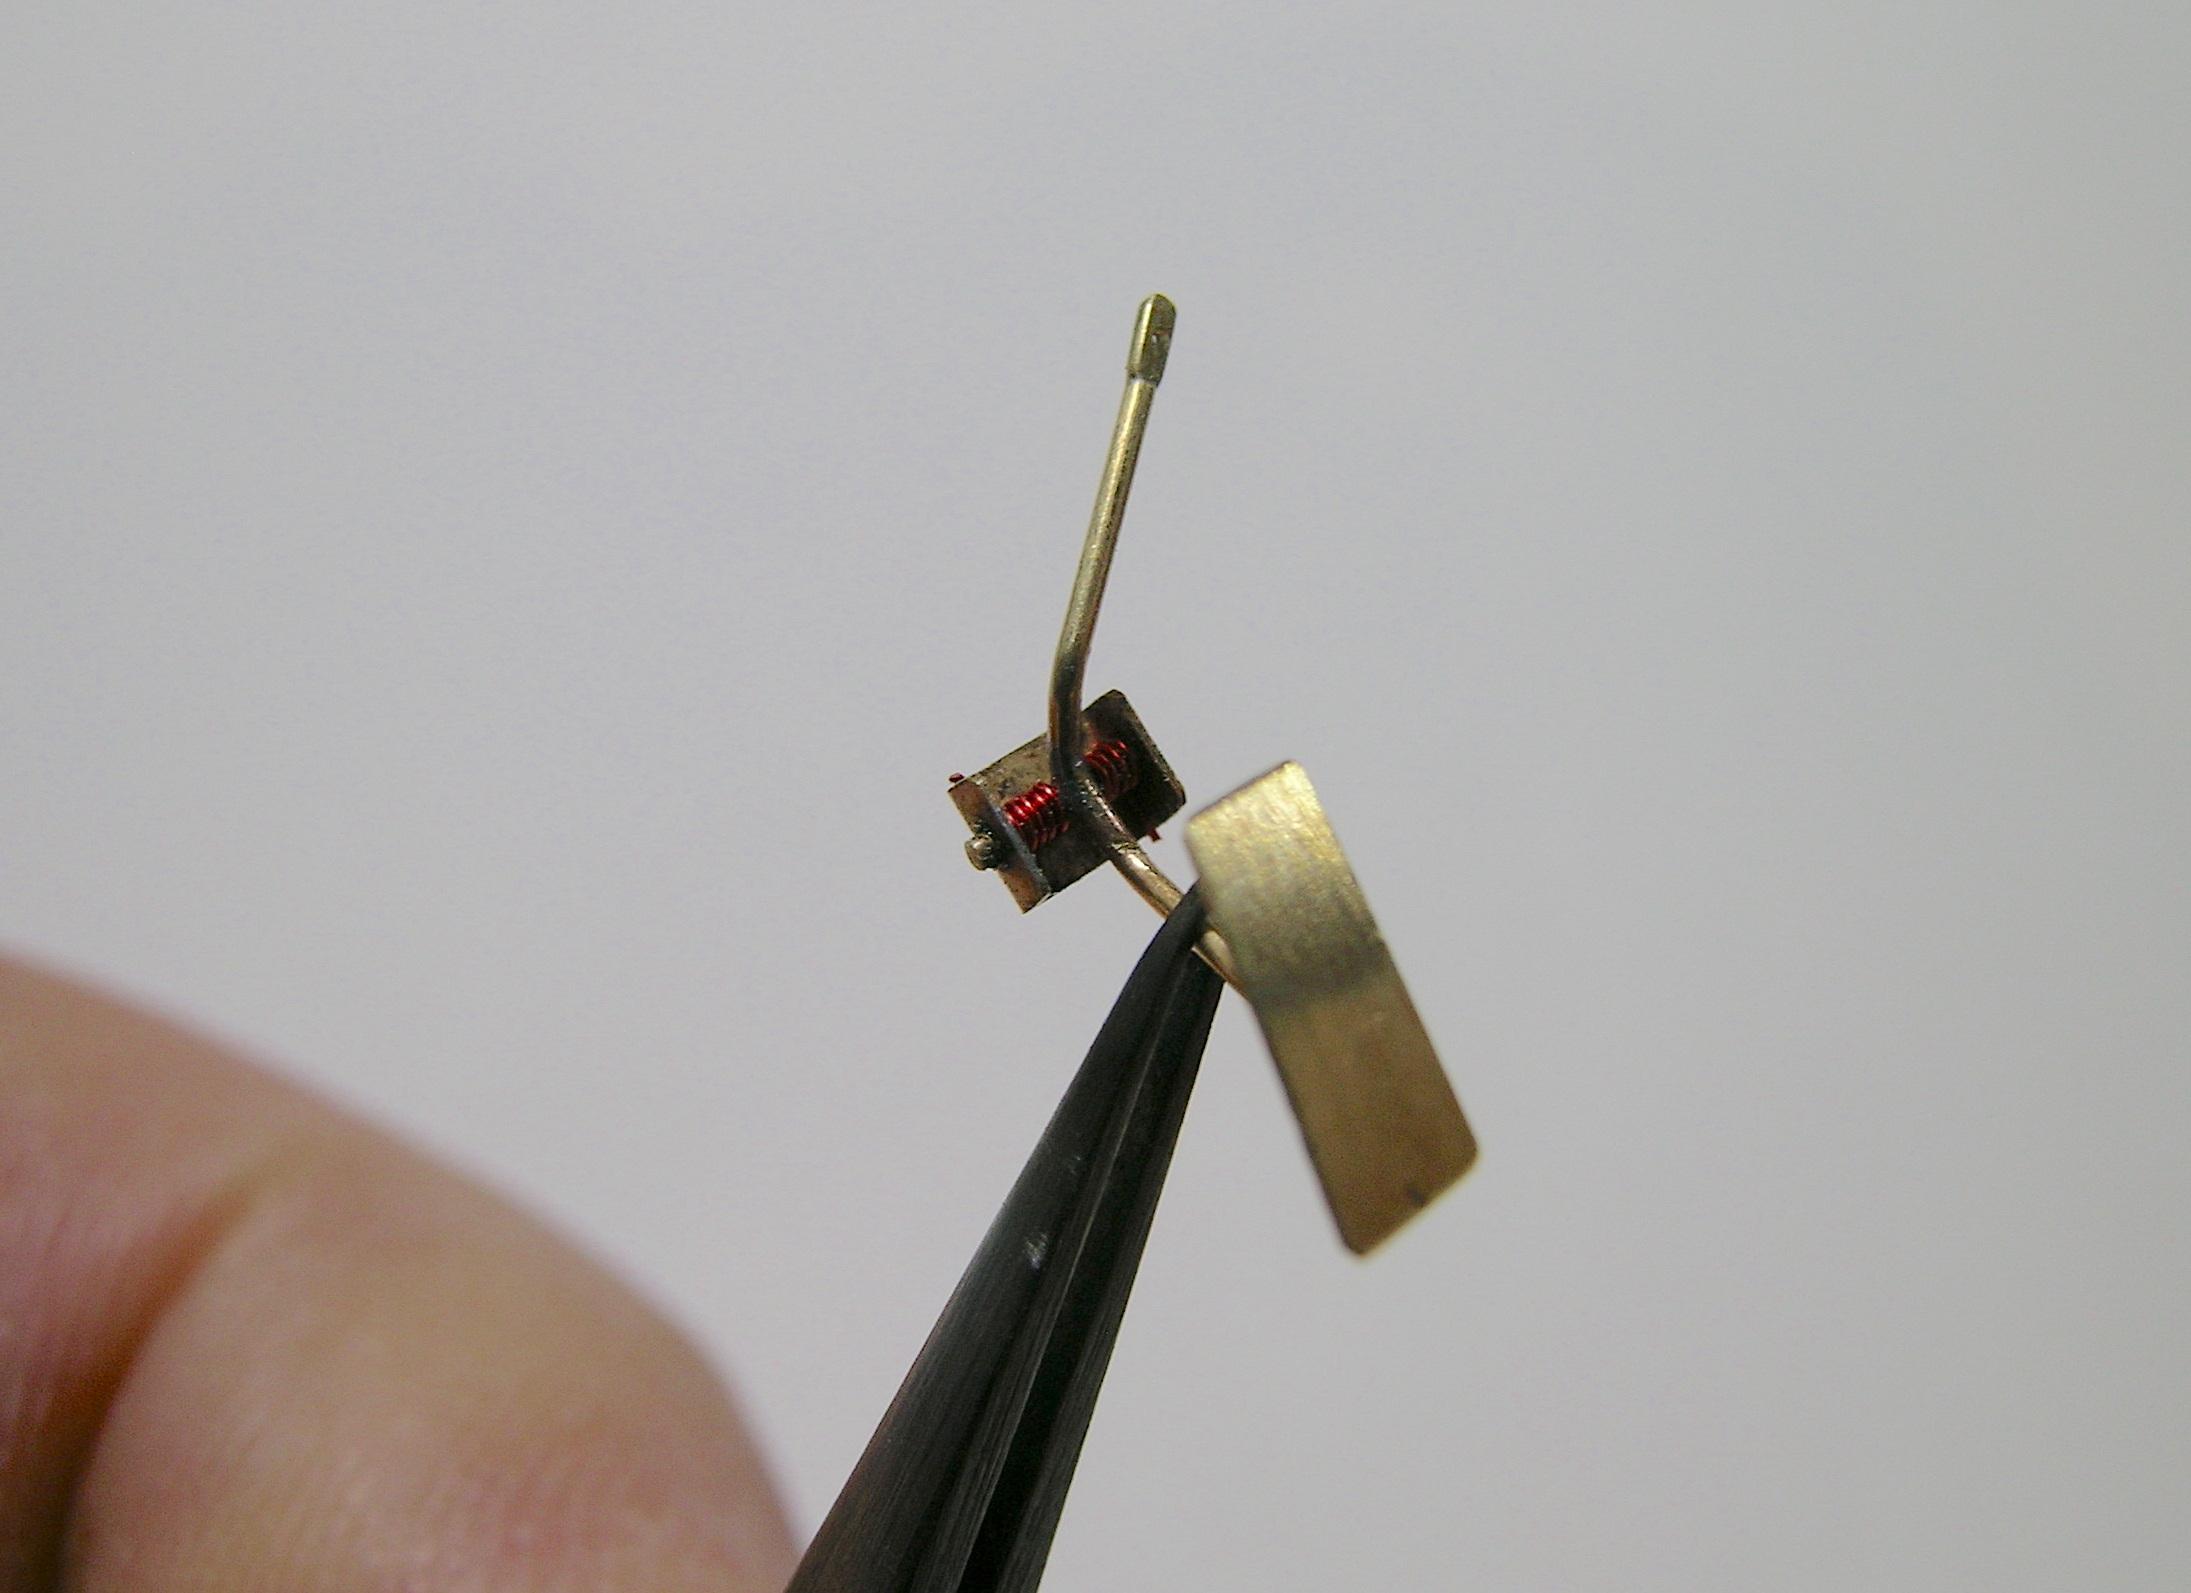
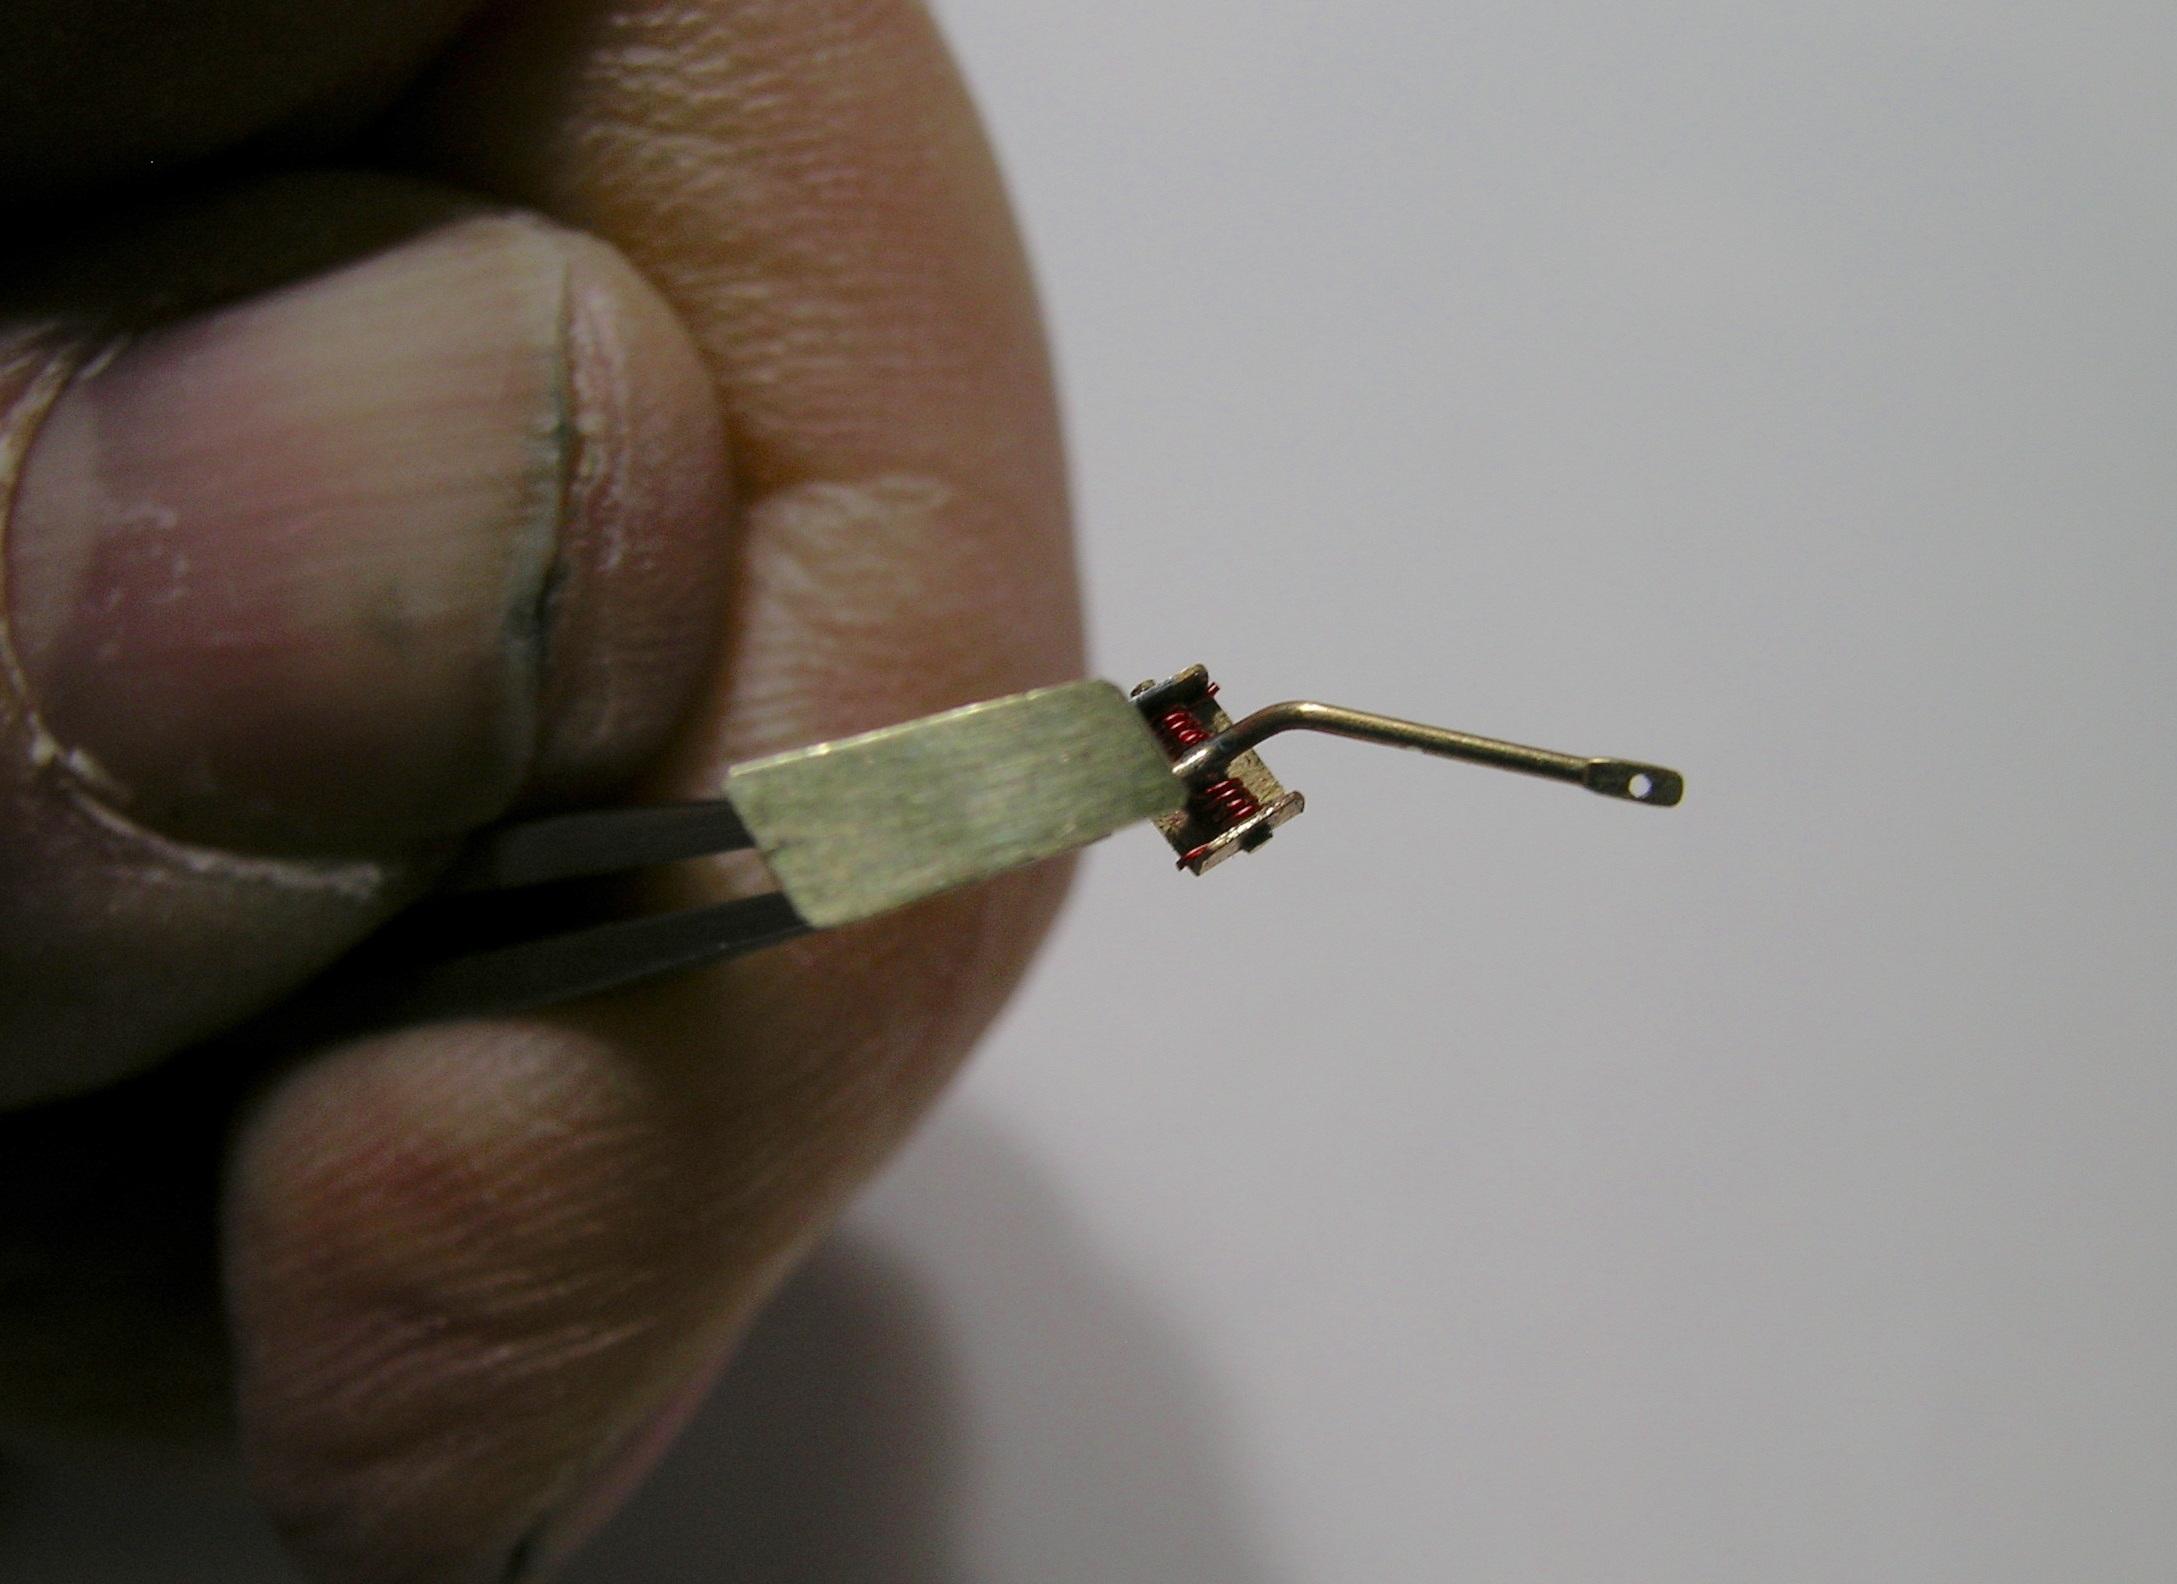
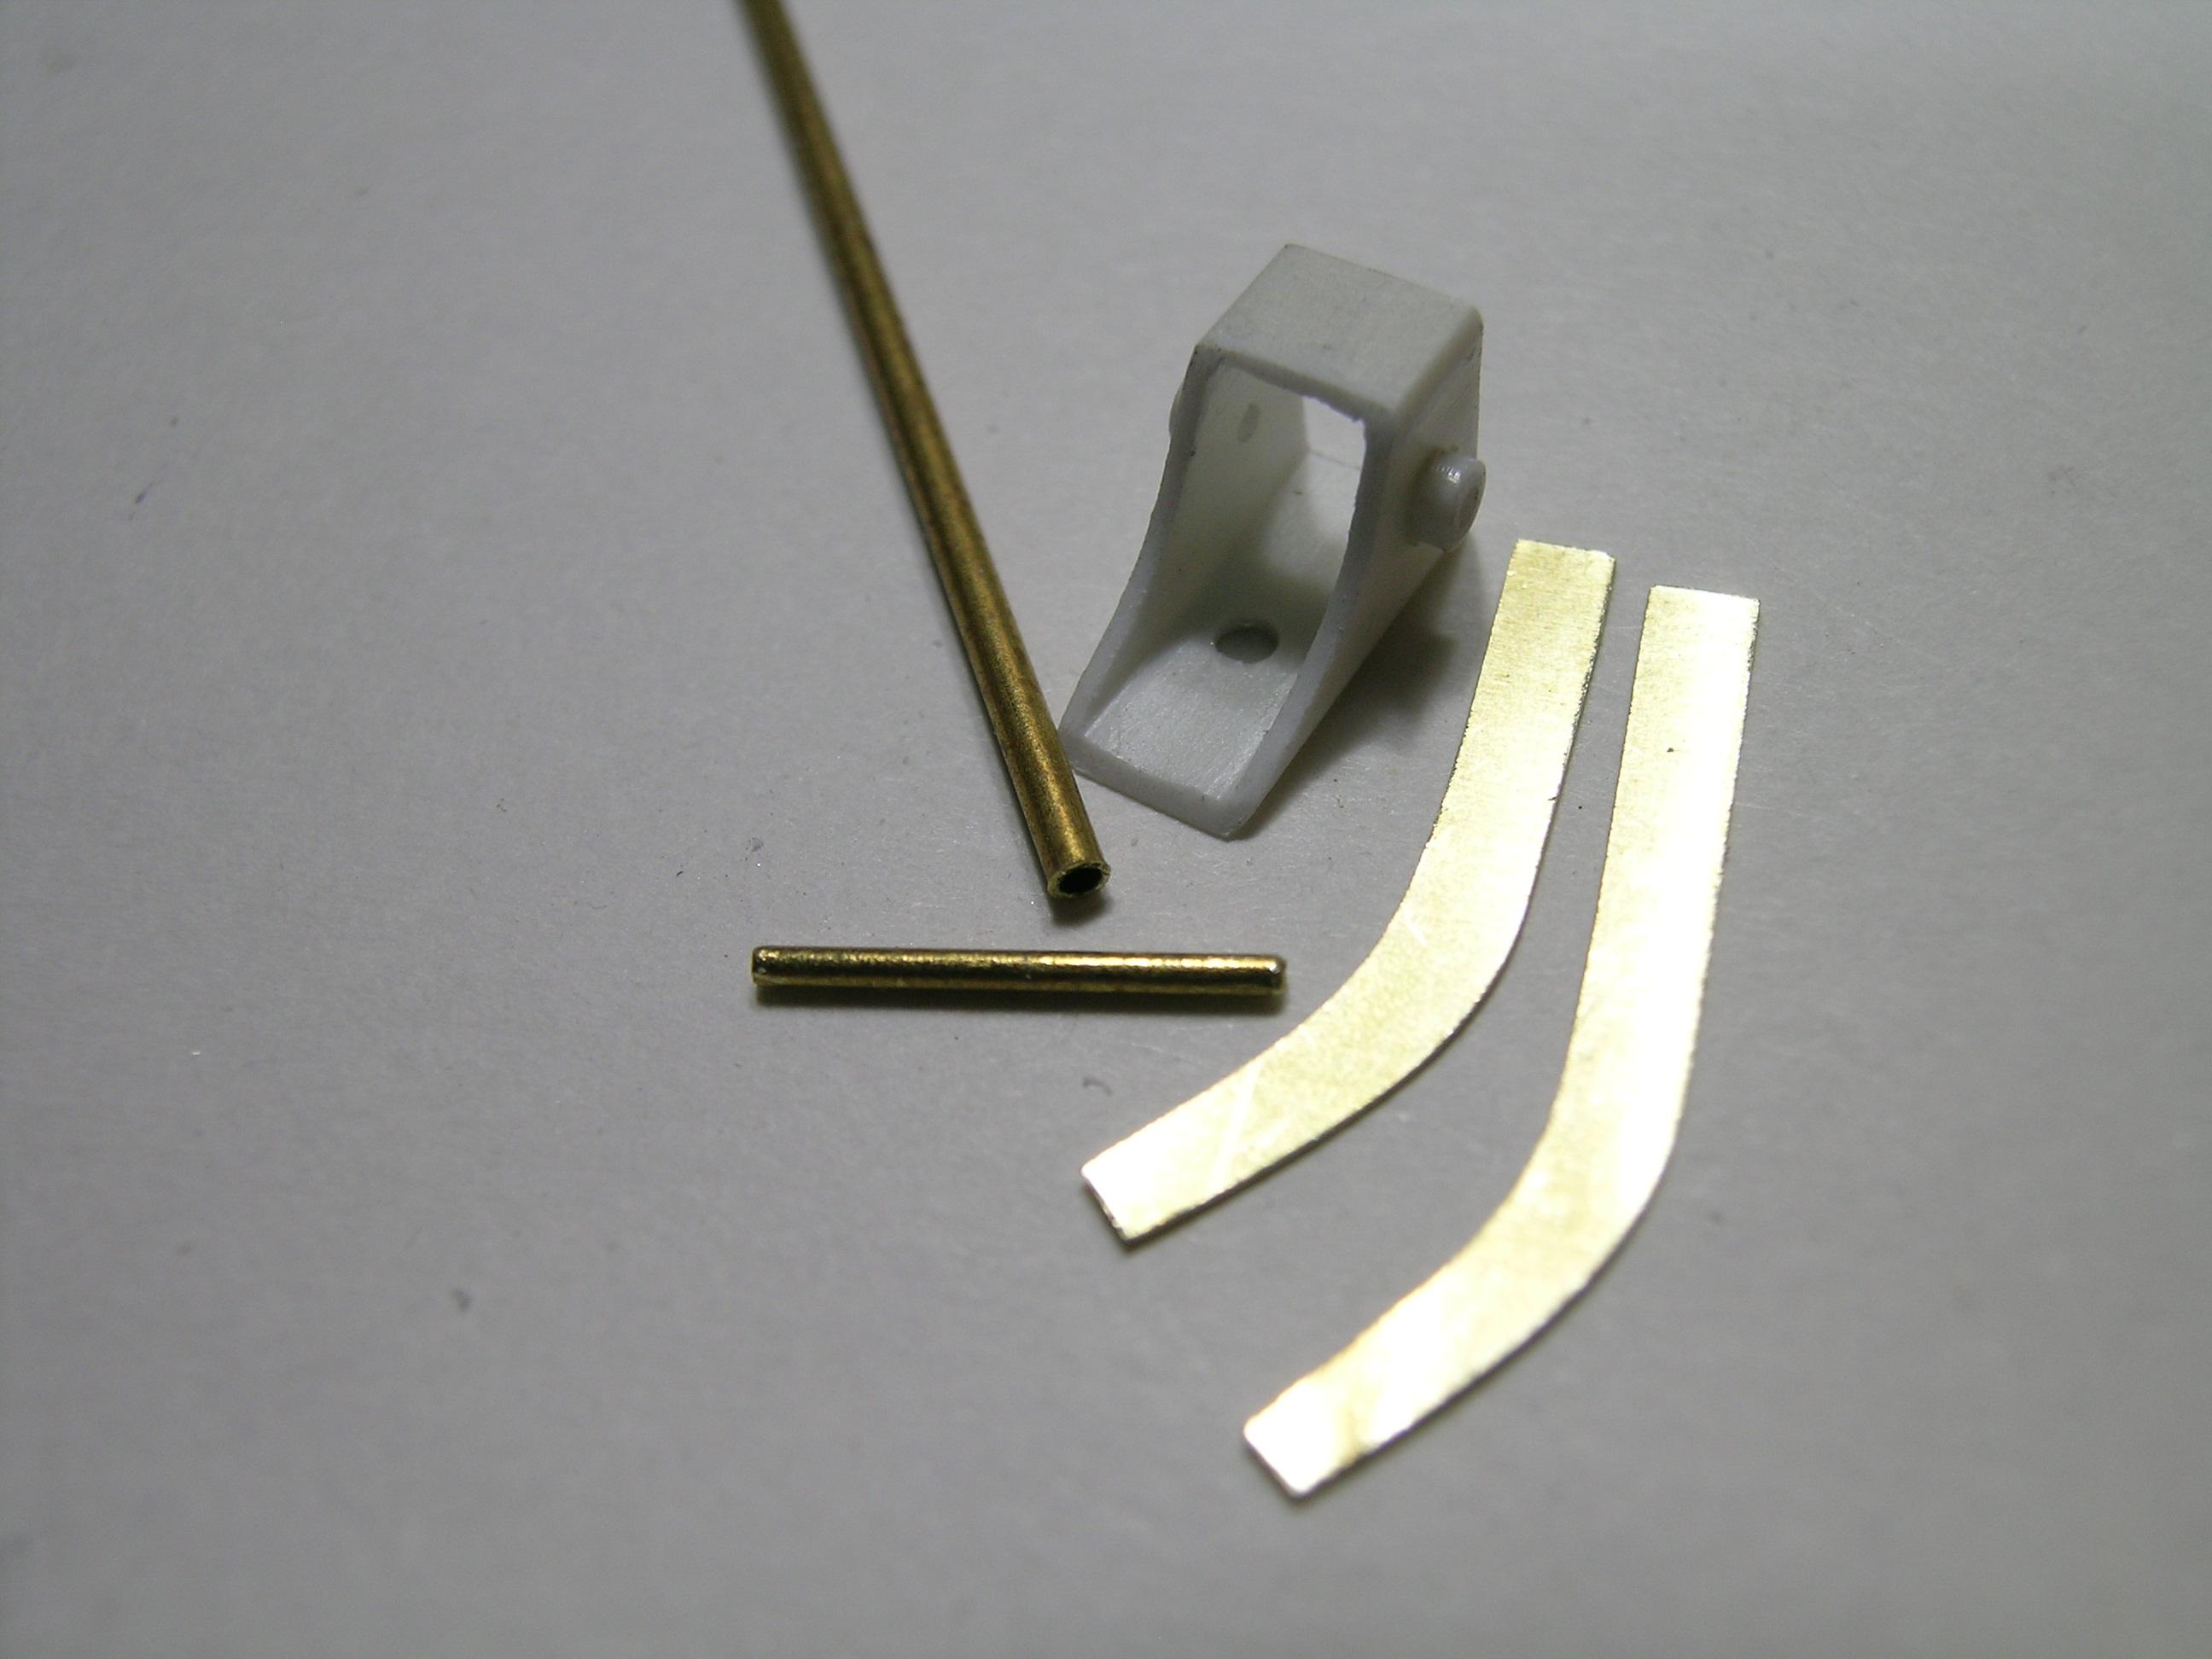
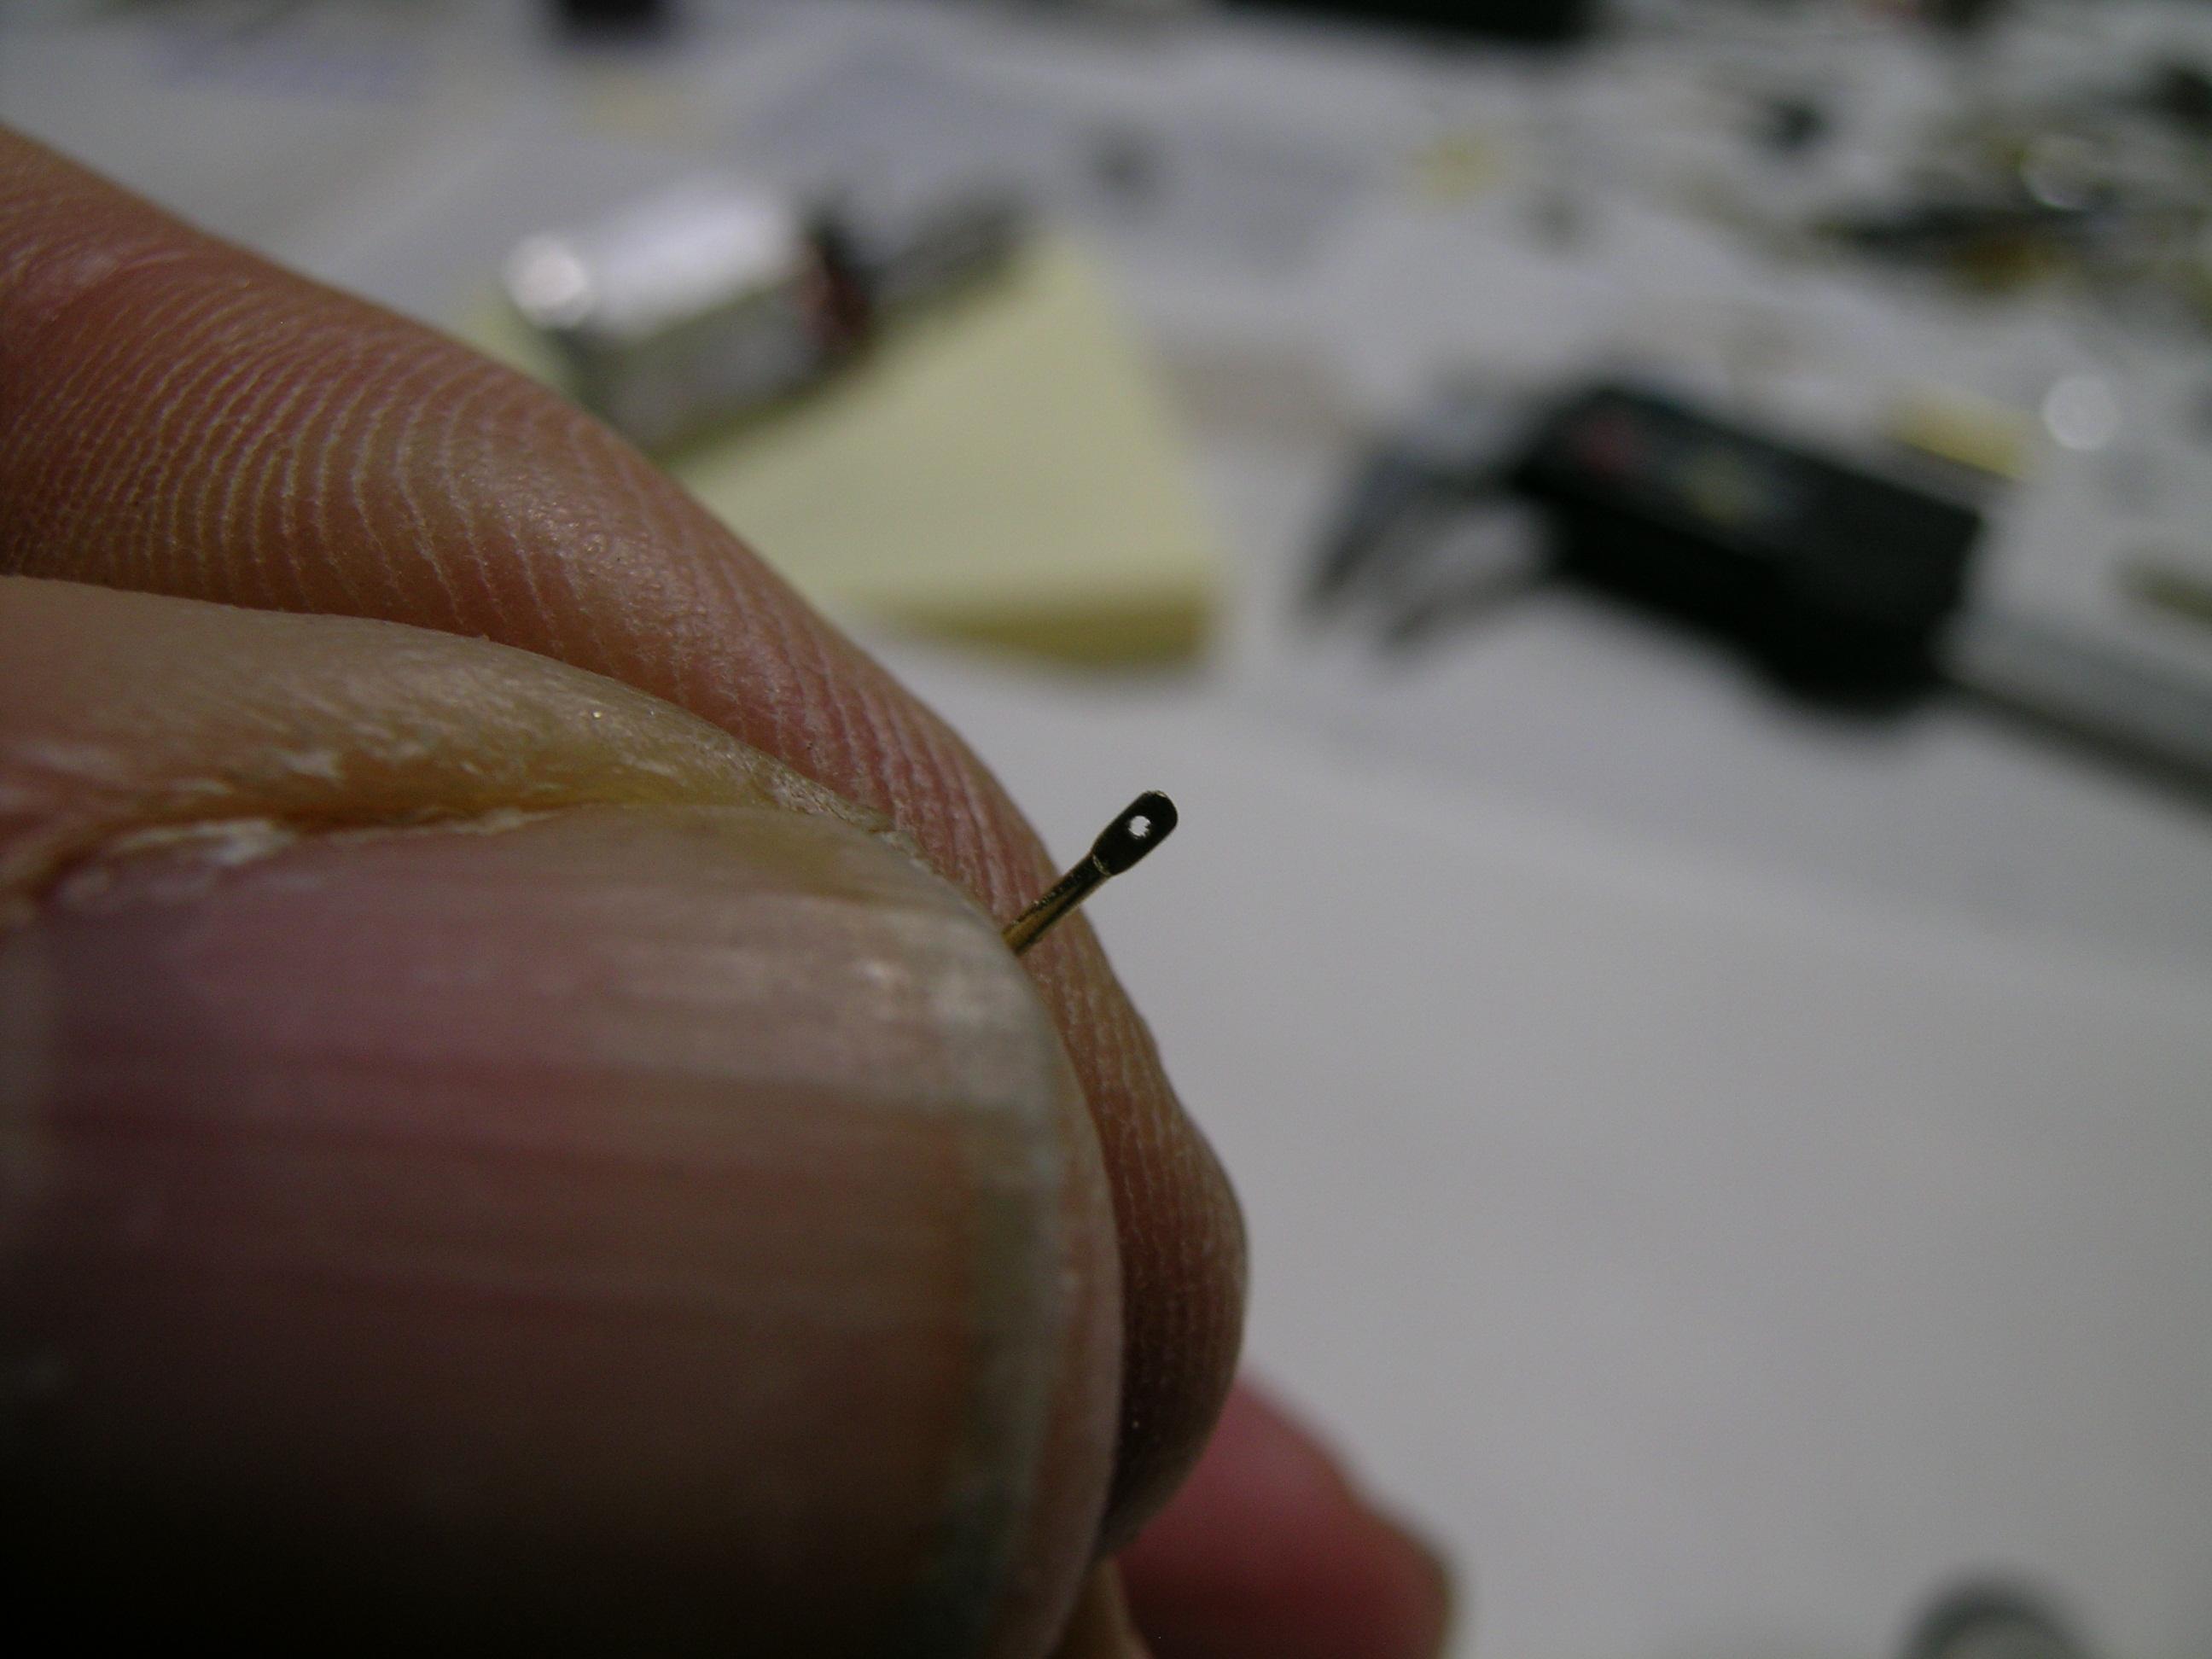
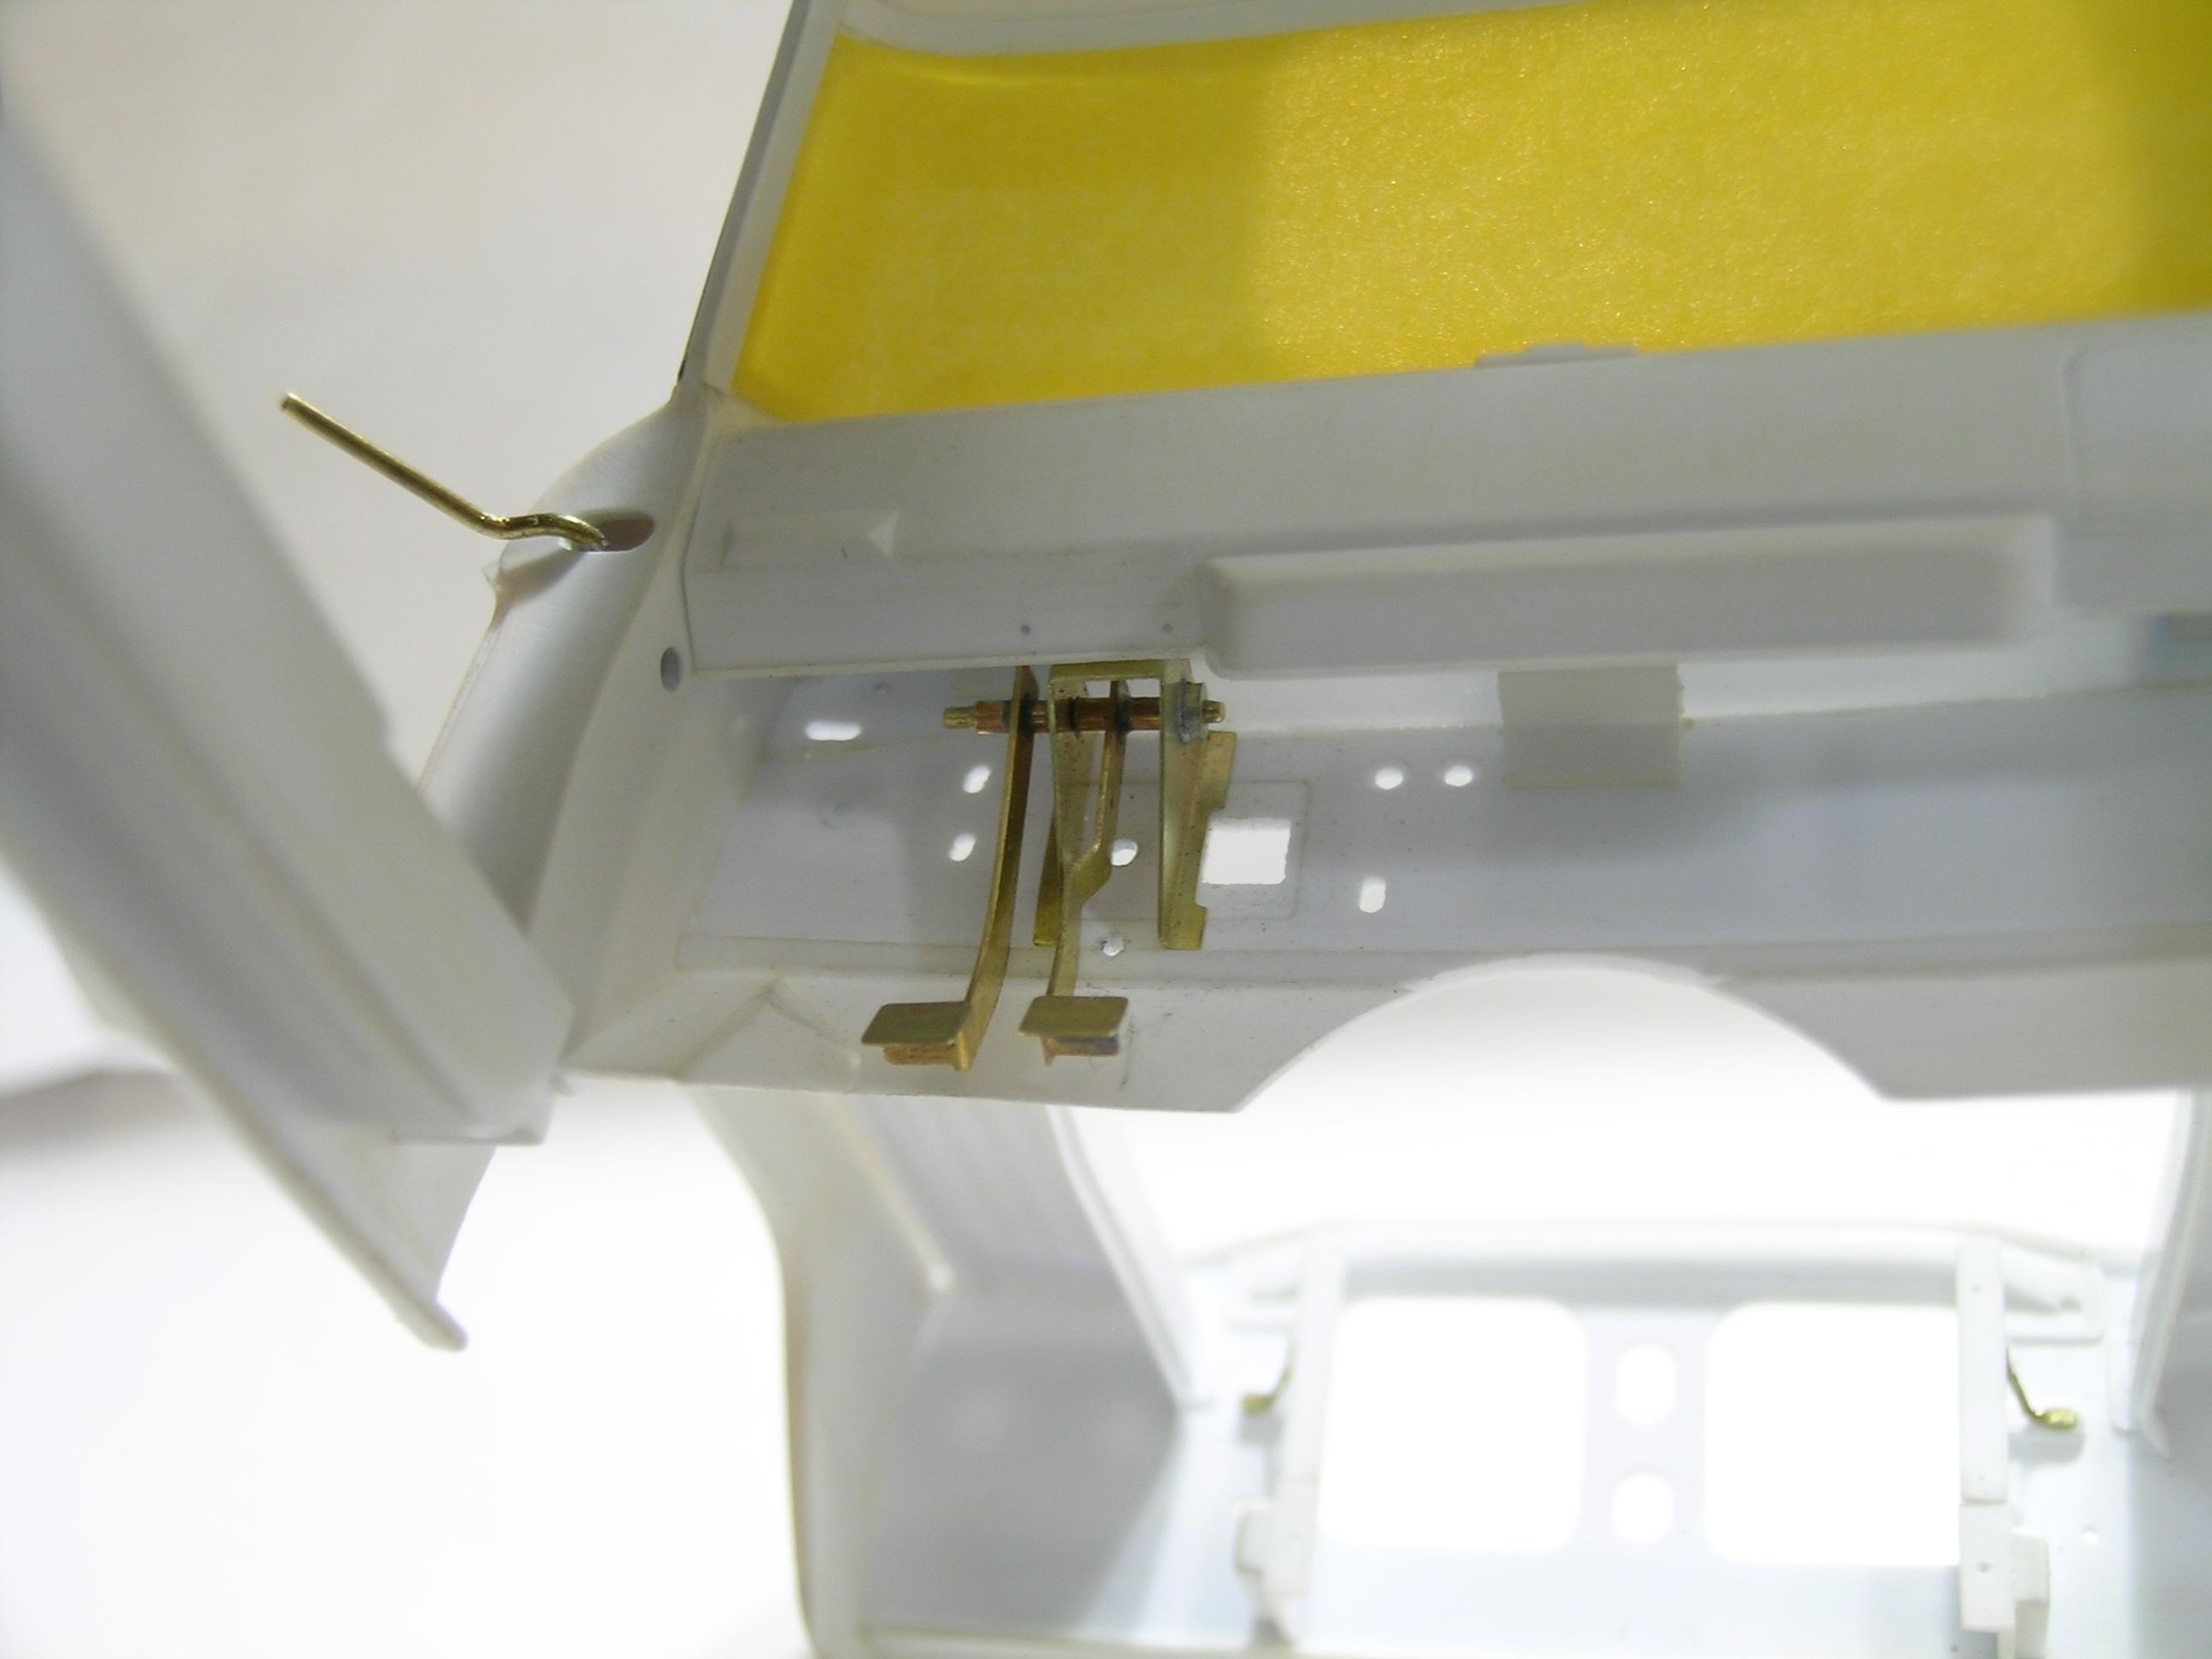
Hello everyone, I'm not used to posting other photos the day after an update but today is a special day, it's the first anniversary of this project on the forum! ? I'm not the ceremonial type but I just wanted to mark this day so I worked on the accelerator yesterday so I could upload the pictures today. I could have taken a photo with all the parts made for a year but it does not fit into the lens of the camera and I should have taken the photo from the depths of my workshop... ? Thank you all for your support and feedback over the past year, I hope to keep you on board for the rest of the trip! Take care, Francis The throttle rod measures 0.020 "and is made of 2 rods welded perpendicularly to the pivot point. I wound up a 0.005" brass wire that came from a turn signal coil, this keeps the rod in place and centered. Finished part with the footrest welded to the rod. I drilled a small hole for the throttle wire but it won't move even if the assembly is functional.
-
64 Dodge D100 Pickup Pro Street
AmericanMuscleFan replied to AmericanMuscleFan's topic in WIP: Drag Racing Models
Thanks Daniel, I can't deny it my friend and you are putting it to good use too! Thanks Tim, You can definitely take some of the credit for this change to yourself, I hope you're not too disappointed it's not the ball joints, I know it's a lot less spectacular! Thanks for the kind words Ray, I do appreciate! Thanks Jim, always a pleasure to get your support sir! Thank you Trevor, I really appreciate your comments! Take care to each of you guys, Francis -
Nice project Marcos, these small fox bodies are great race cars! Great start, you remind me of "Street Outlaws", I like that!
-
Dodge (Color me Gone) Promod
AmericanMuscleFan replied to Tortuga Kustomz's topic in WIP: Drag Racing Models
Good fabrication on the fuel valve and the suspension mounts Marcos! Before I came back to live in my current house, I also lived in an apartment (for 20 years) and my painting sessions always came in the winter so I had to do good ventilation by opening all the windows when I was done. You remind me of memories... with my toque and my winter coat in the living room! ? -
RAM Power Wagon
AmericanMuscleFan replied to Mopar - D's topic in WIP: Model Trucks: Pickups, Vans, SUVs, Light Commercial
Looking good Dan! What did you use for the hood insulation? -
34 Church Truck
AmericanMuscleFan replied to OldNYJim's topic in WIP: Model Trucks: Pickups, Vans, SUVs, Light Commercial
WOW, that bright red really "pop" Jim! Can't go wrong with red, this color is a good choice regardless of body style, but I was told it was a magnet for tickets as many red car owners tend to to have a heavy foot. Fortunately you do not intend to put a too big engine! Claude asked a good question about the Future product (I know it's acrylic) as a coating, I'm also curious what you think and your experiences with it? -
64 Dodge D100 Pickup Pro Street
AmericanMuscleFan replied to AmericanMuscleFan's topic in WIP: Drag Racing Models
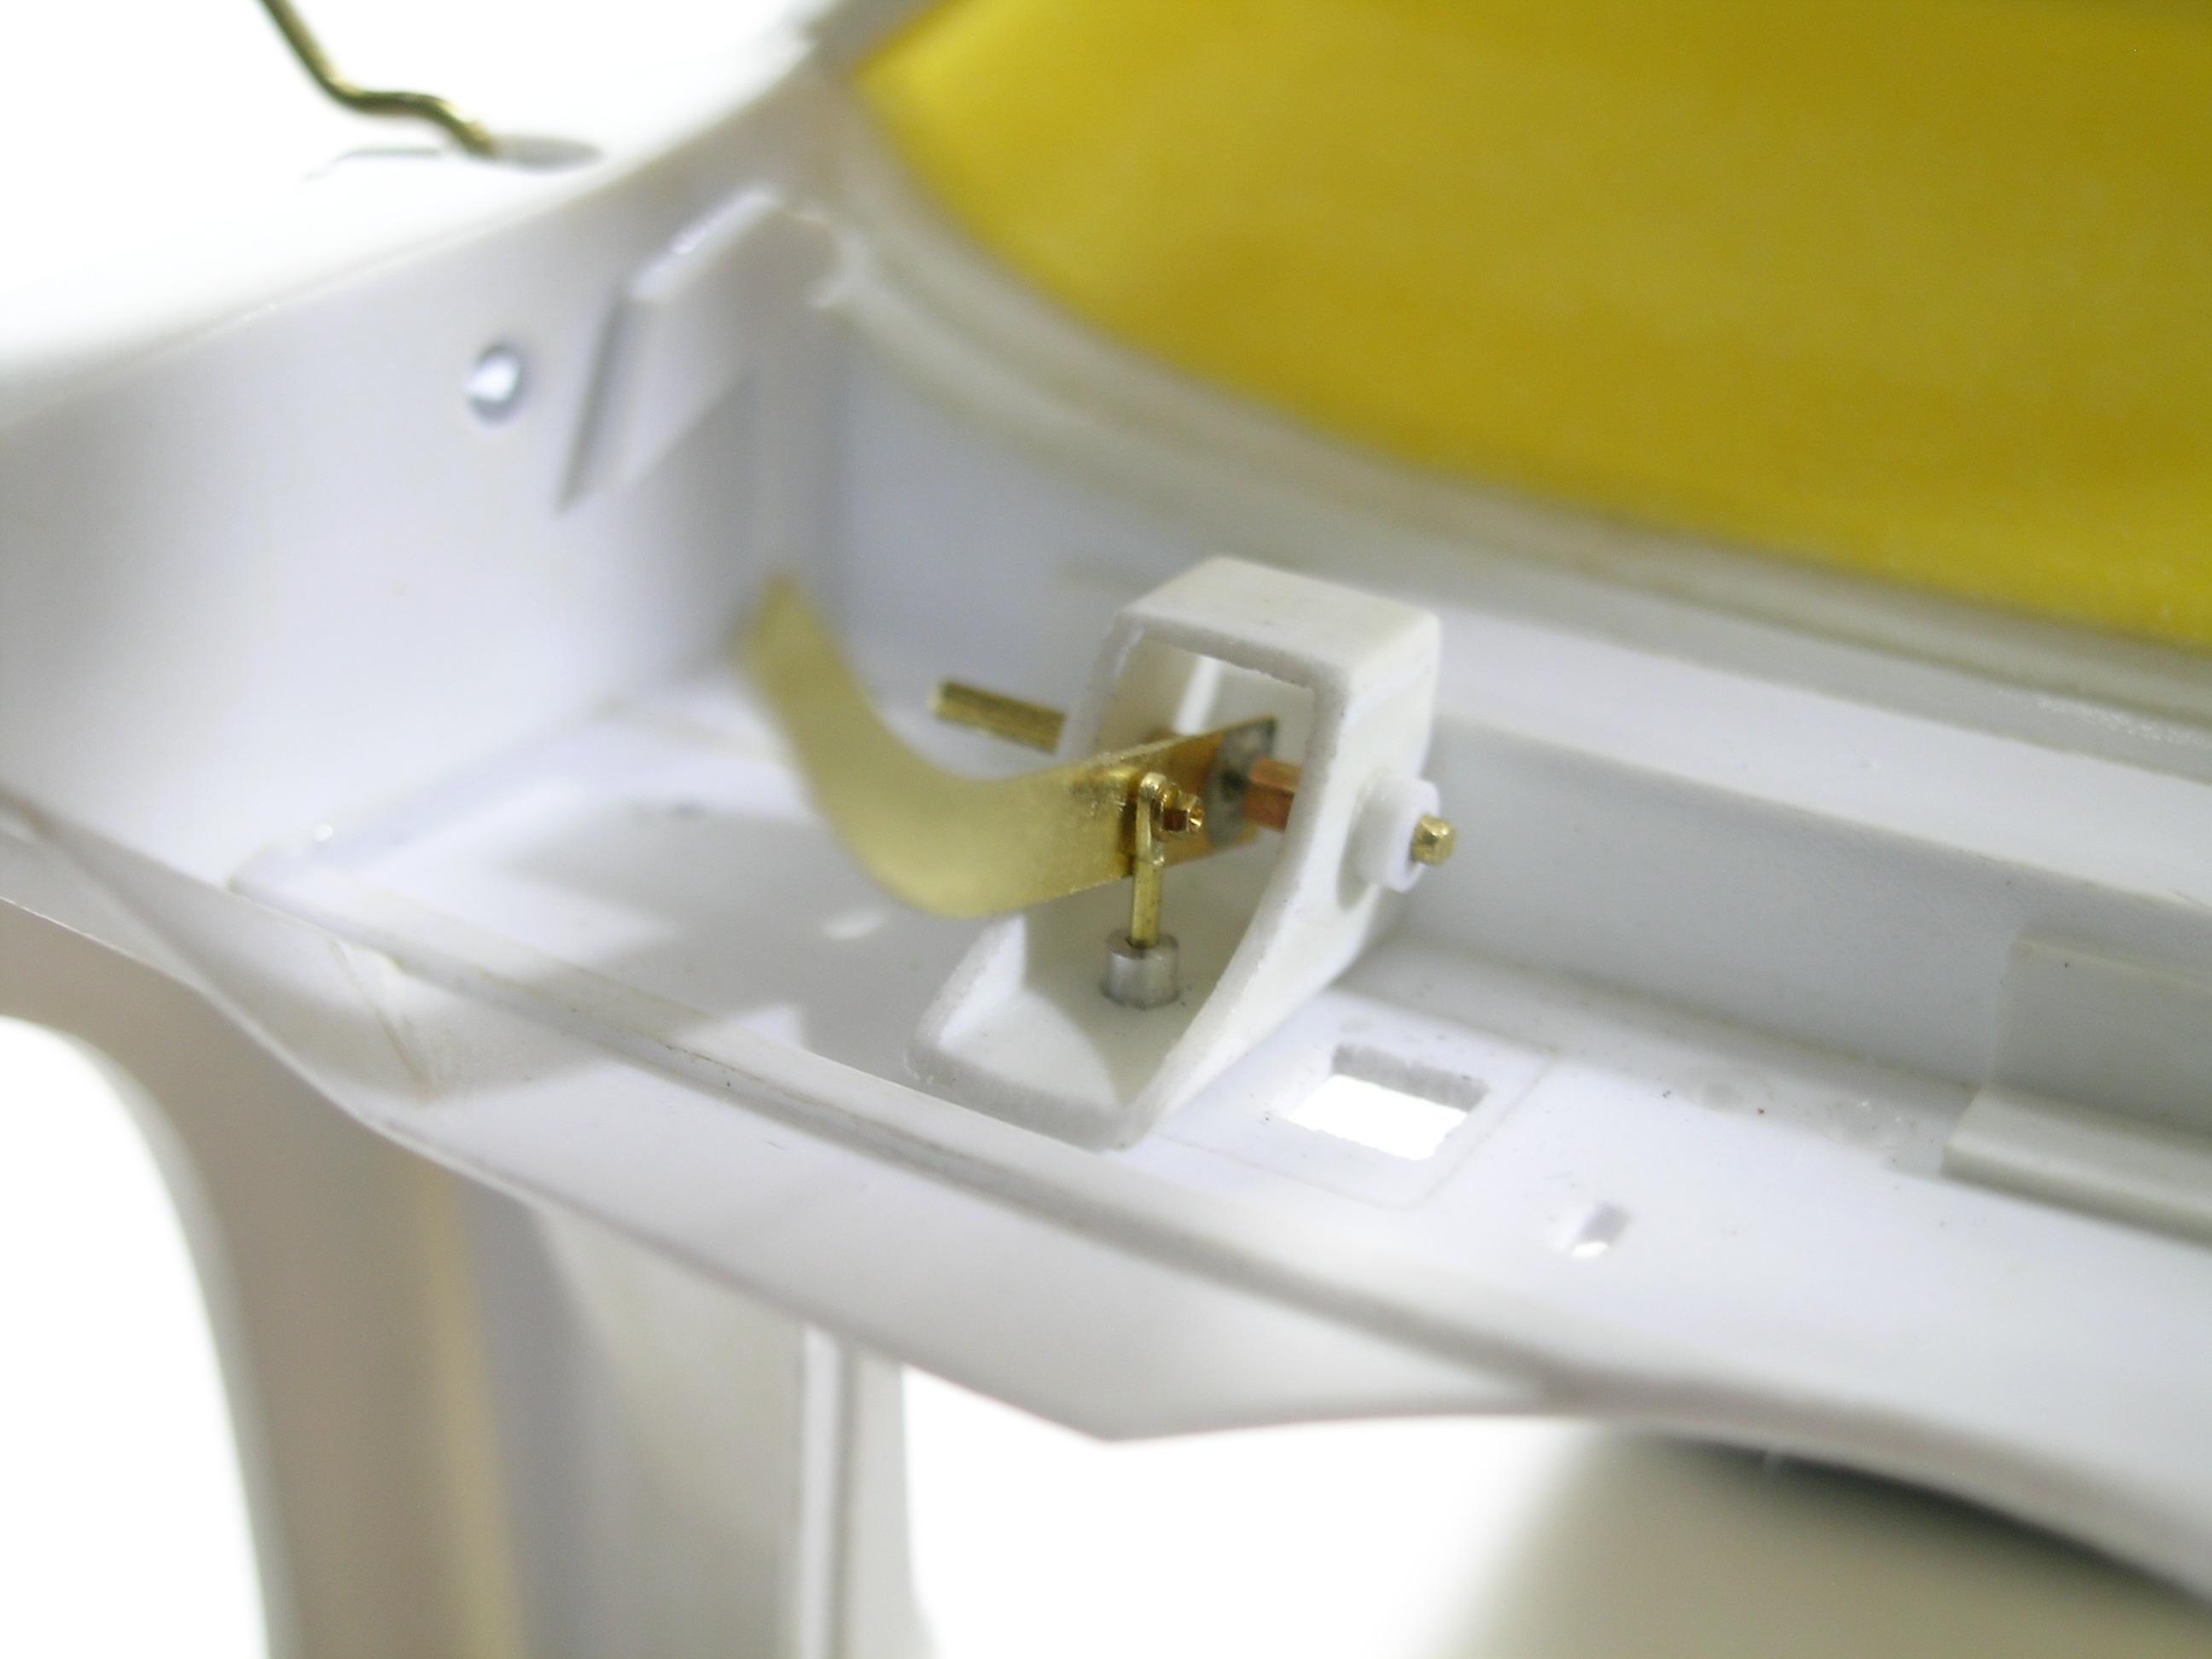
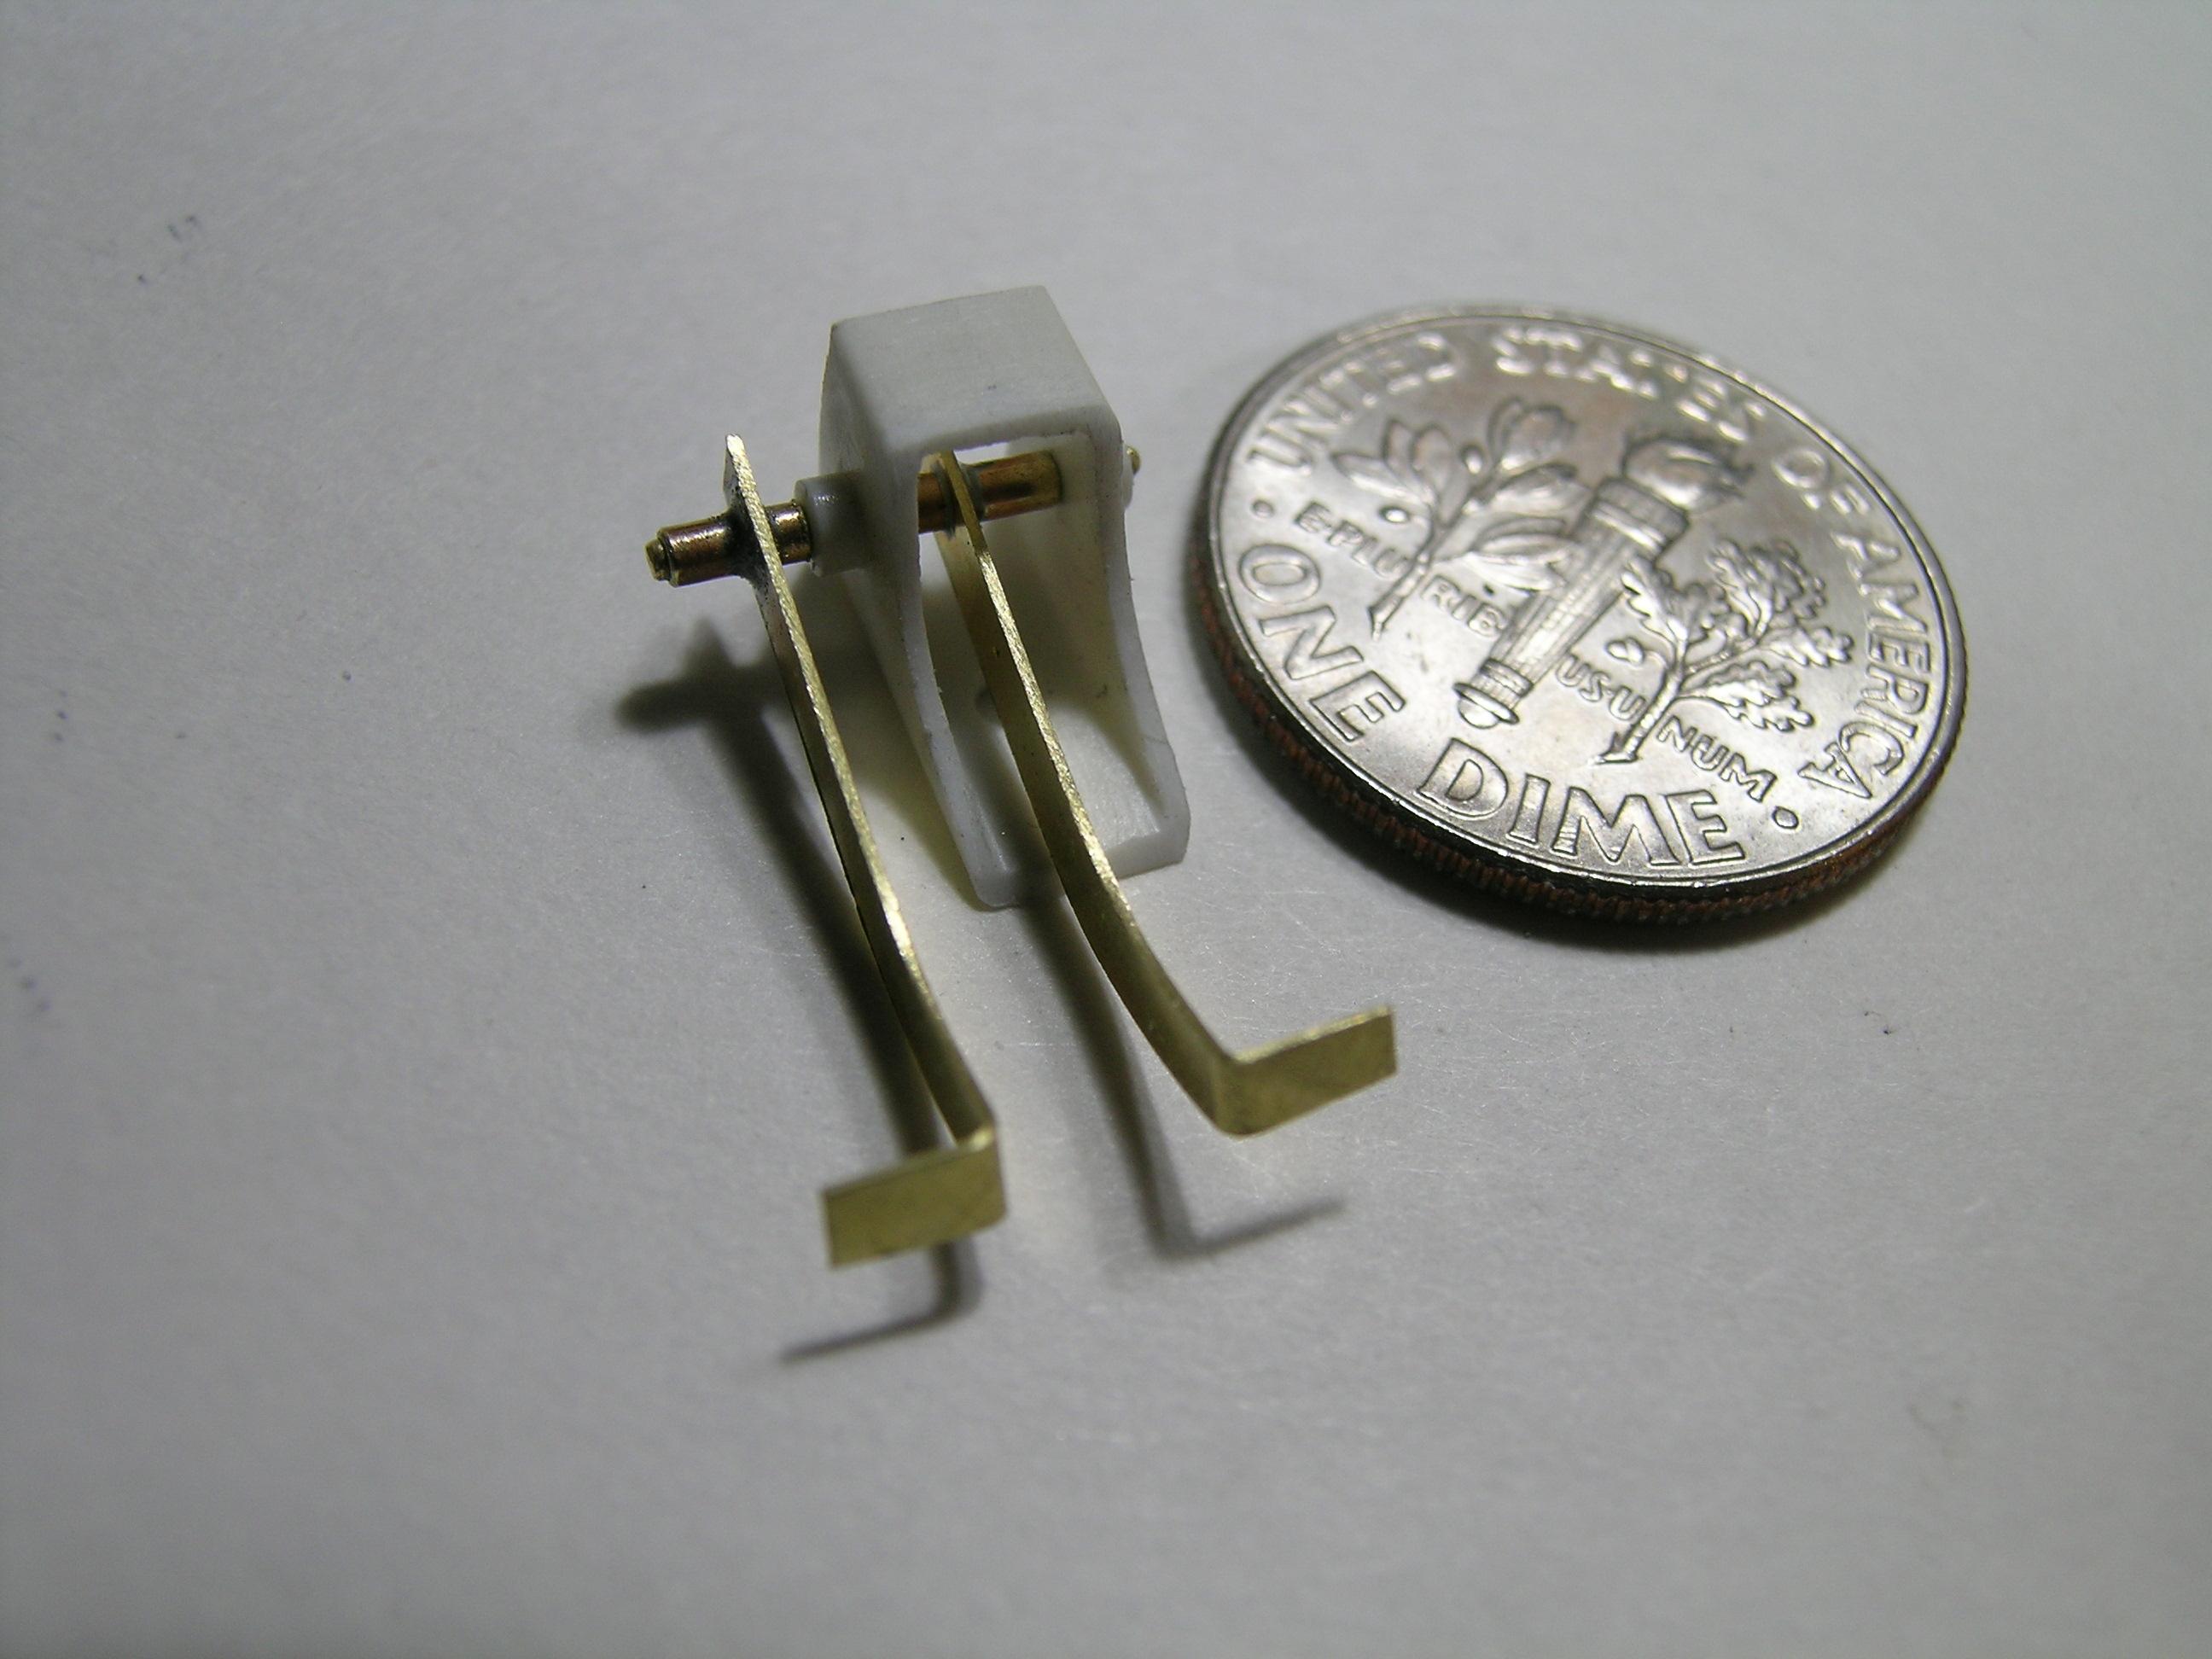
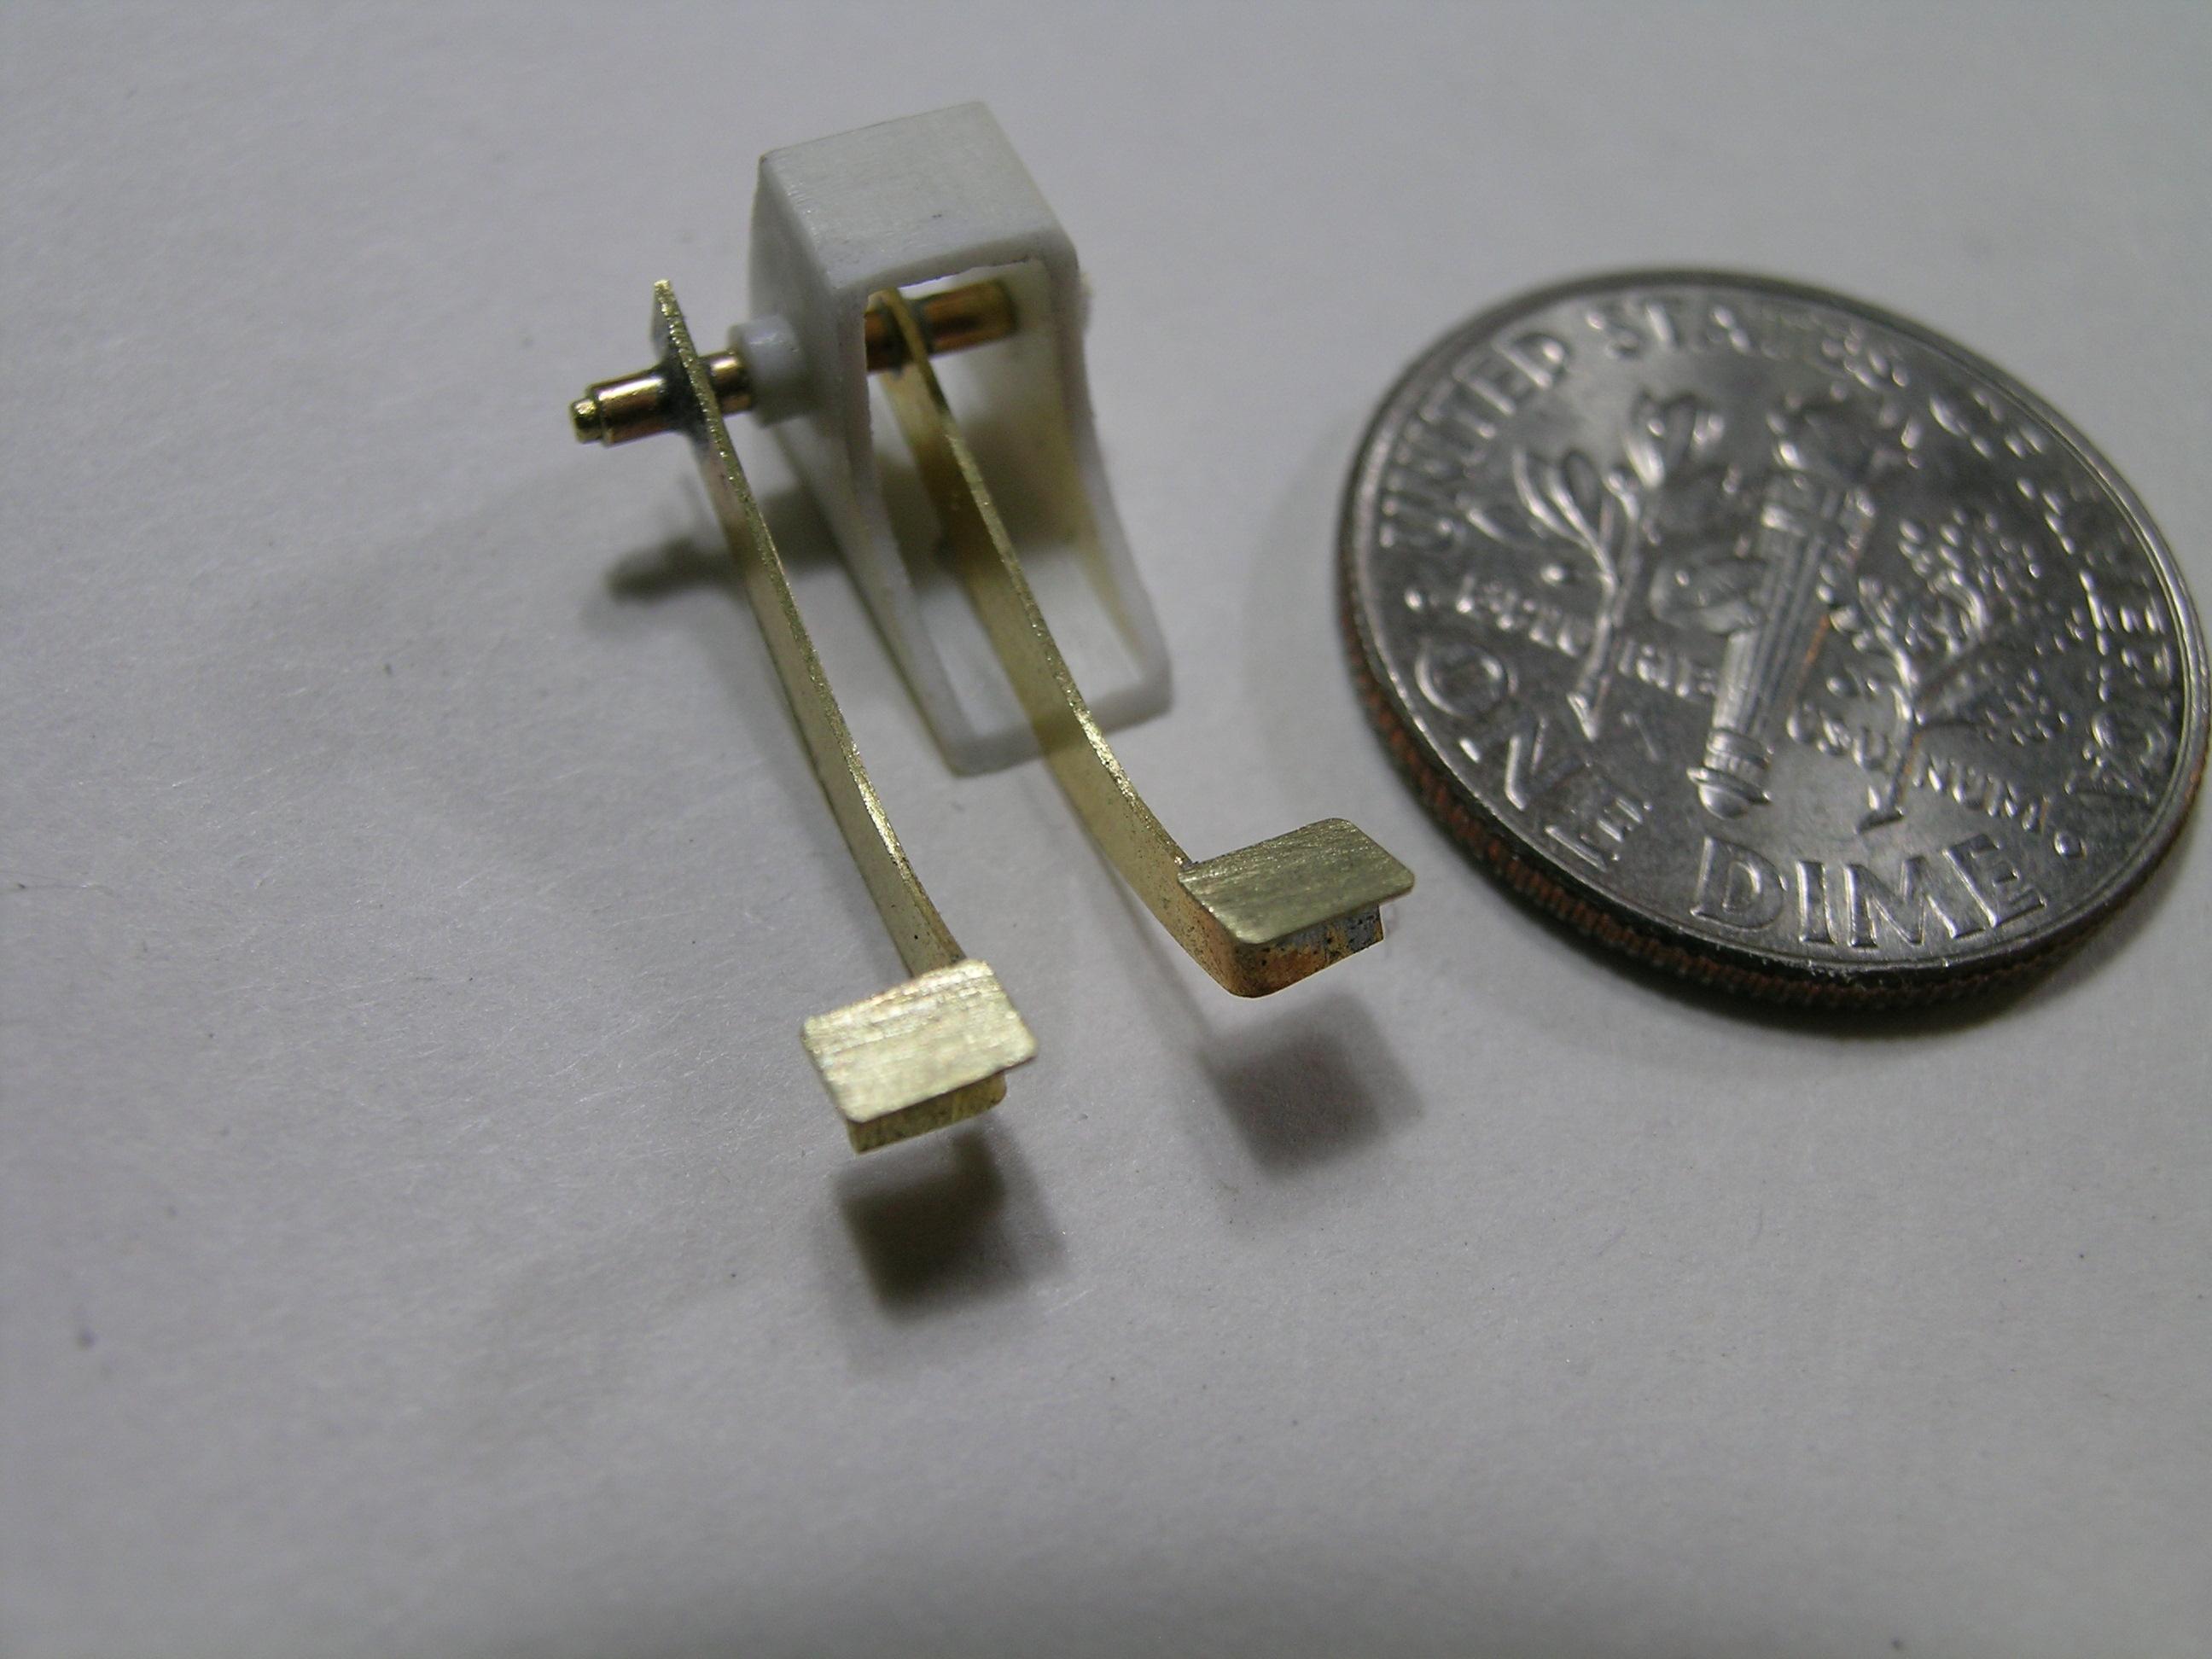
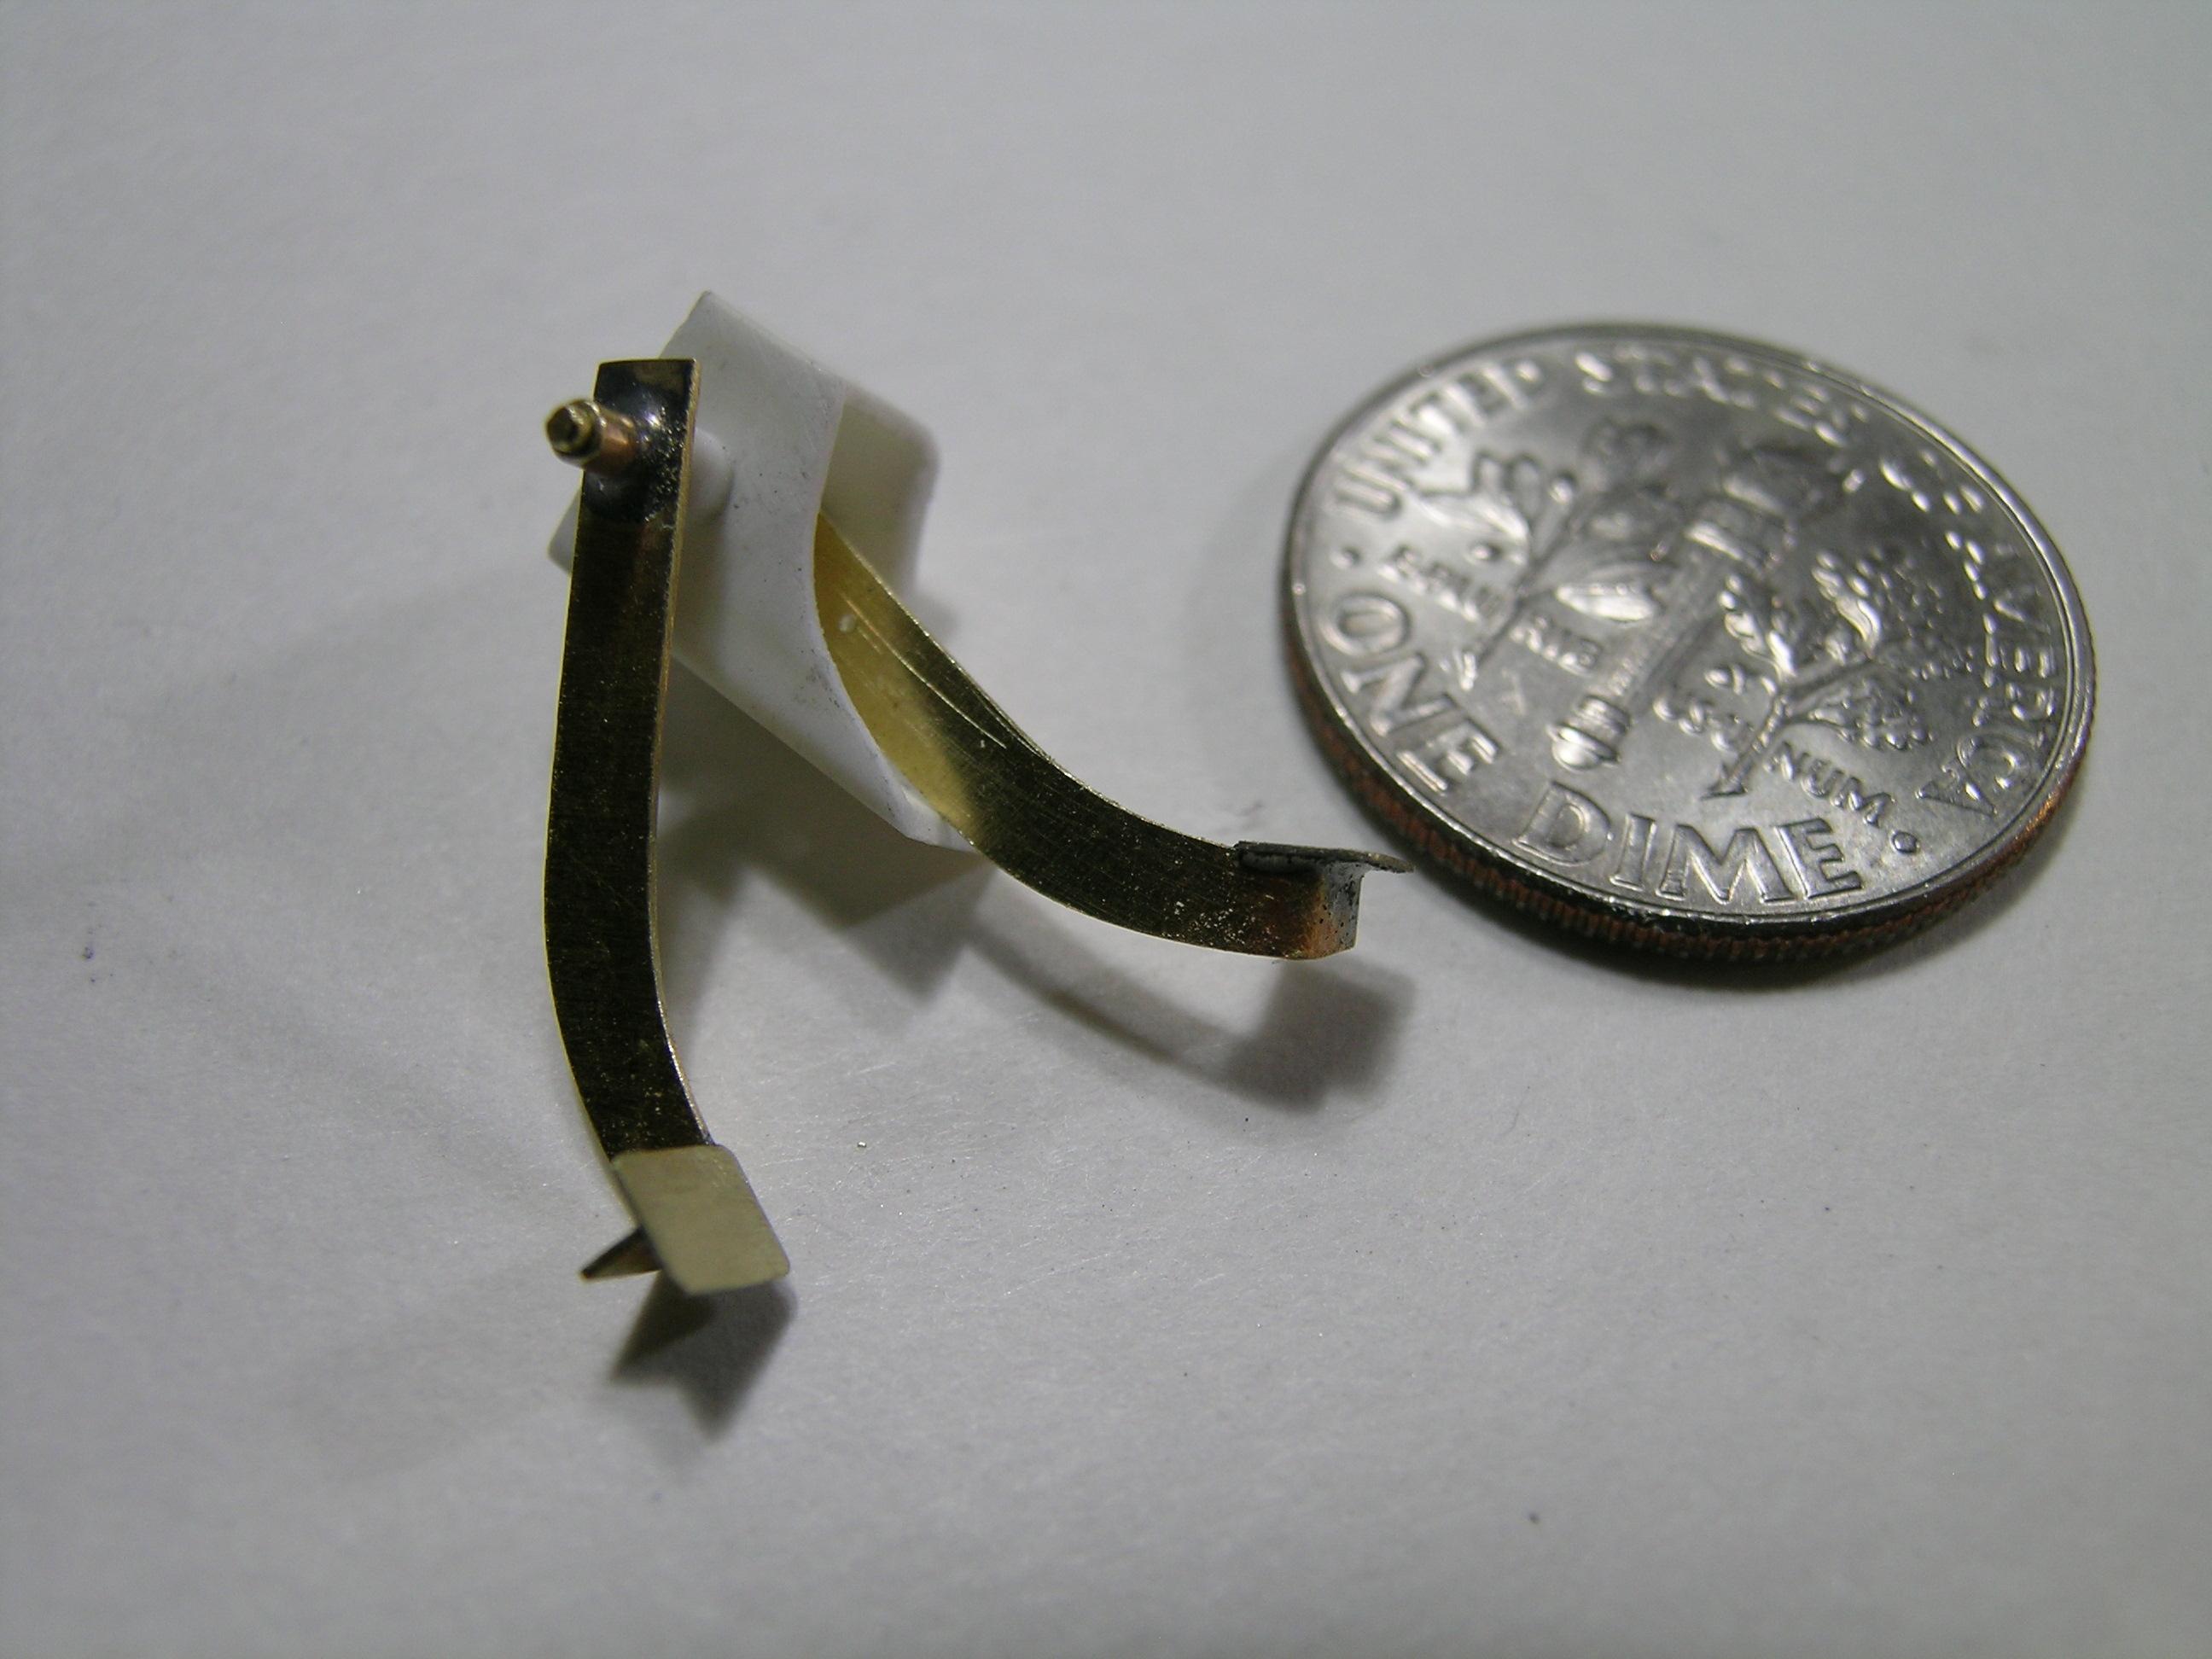
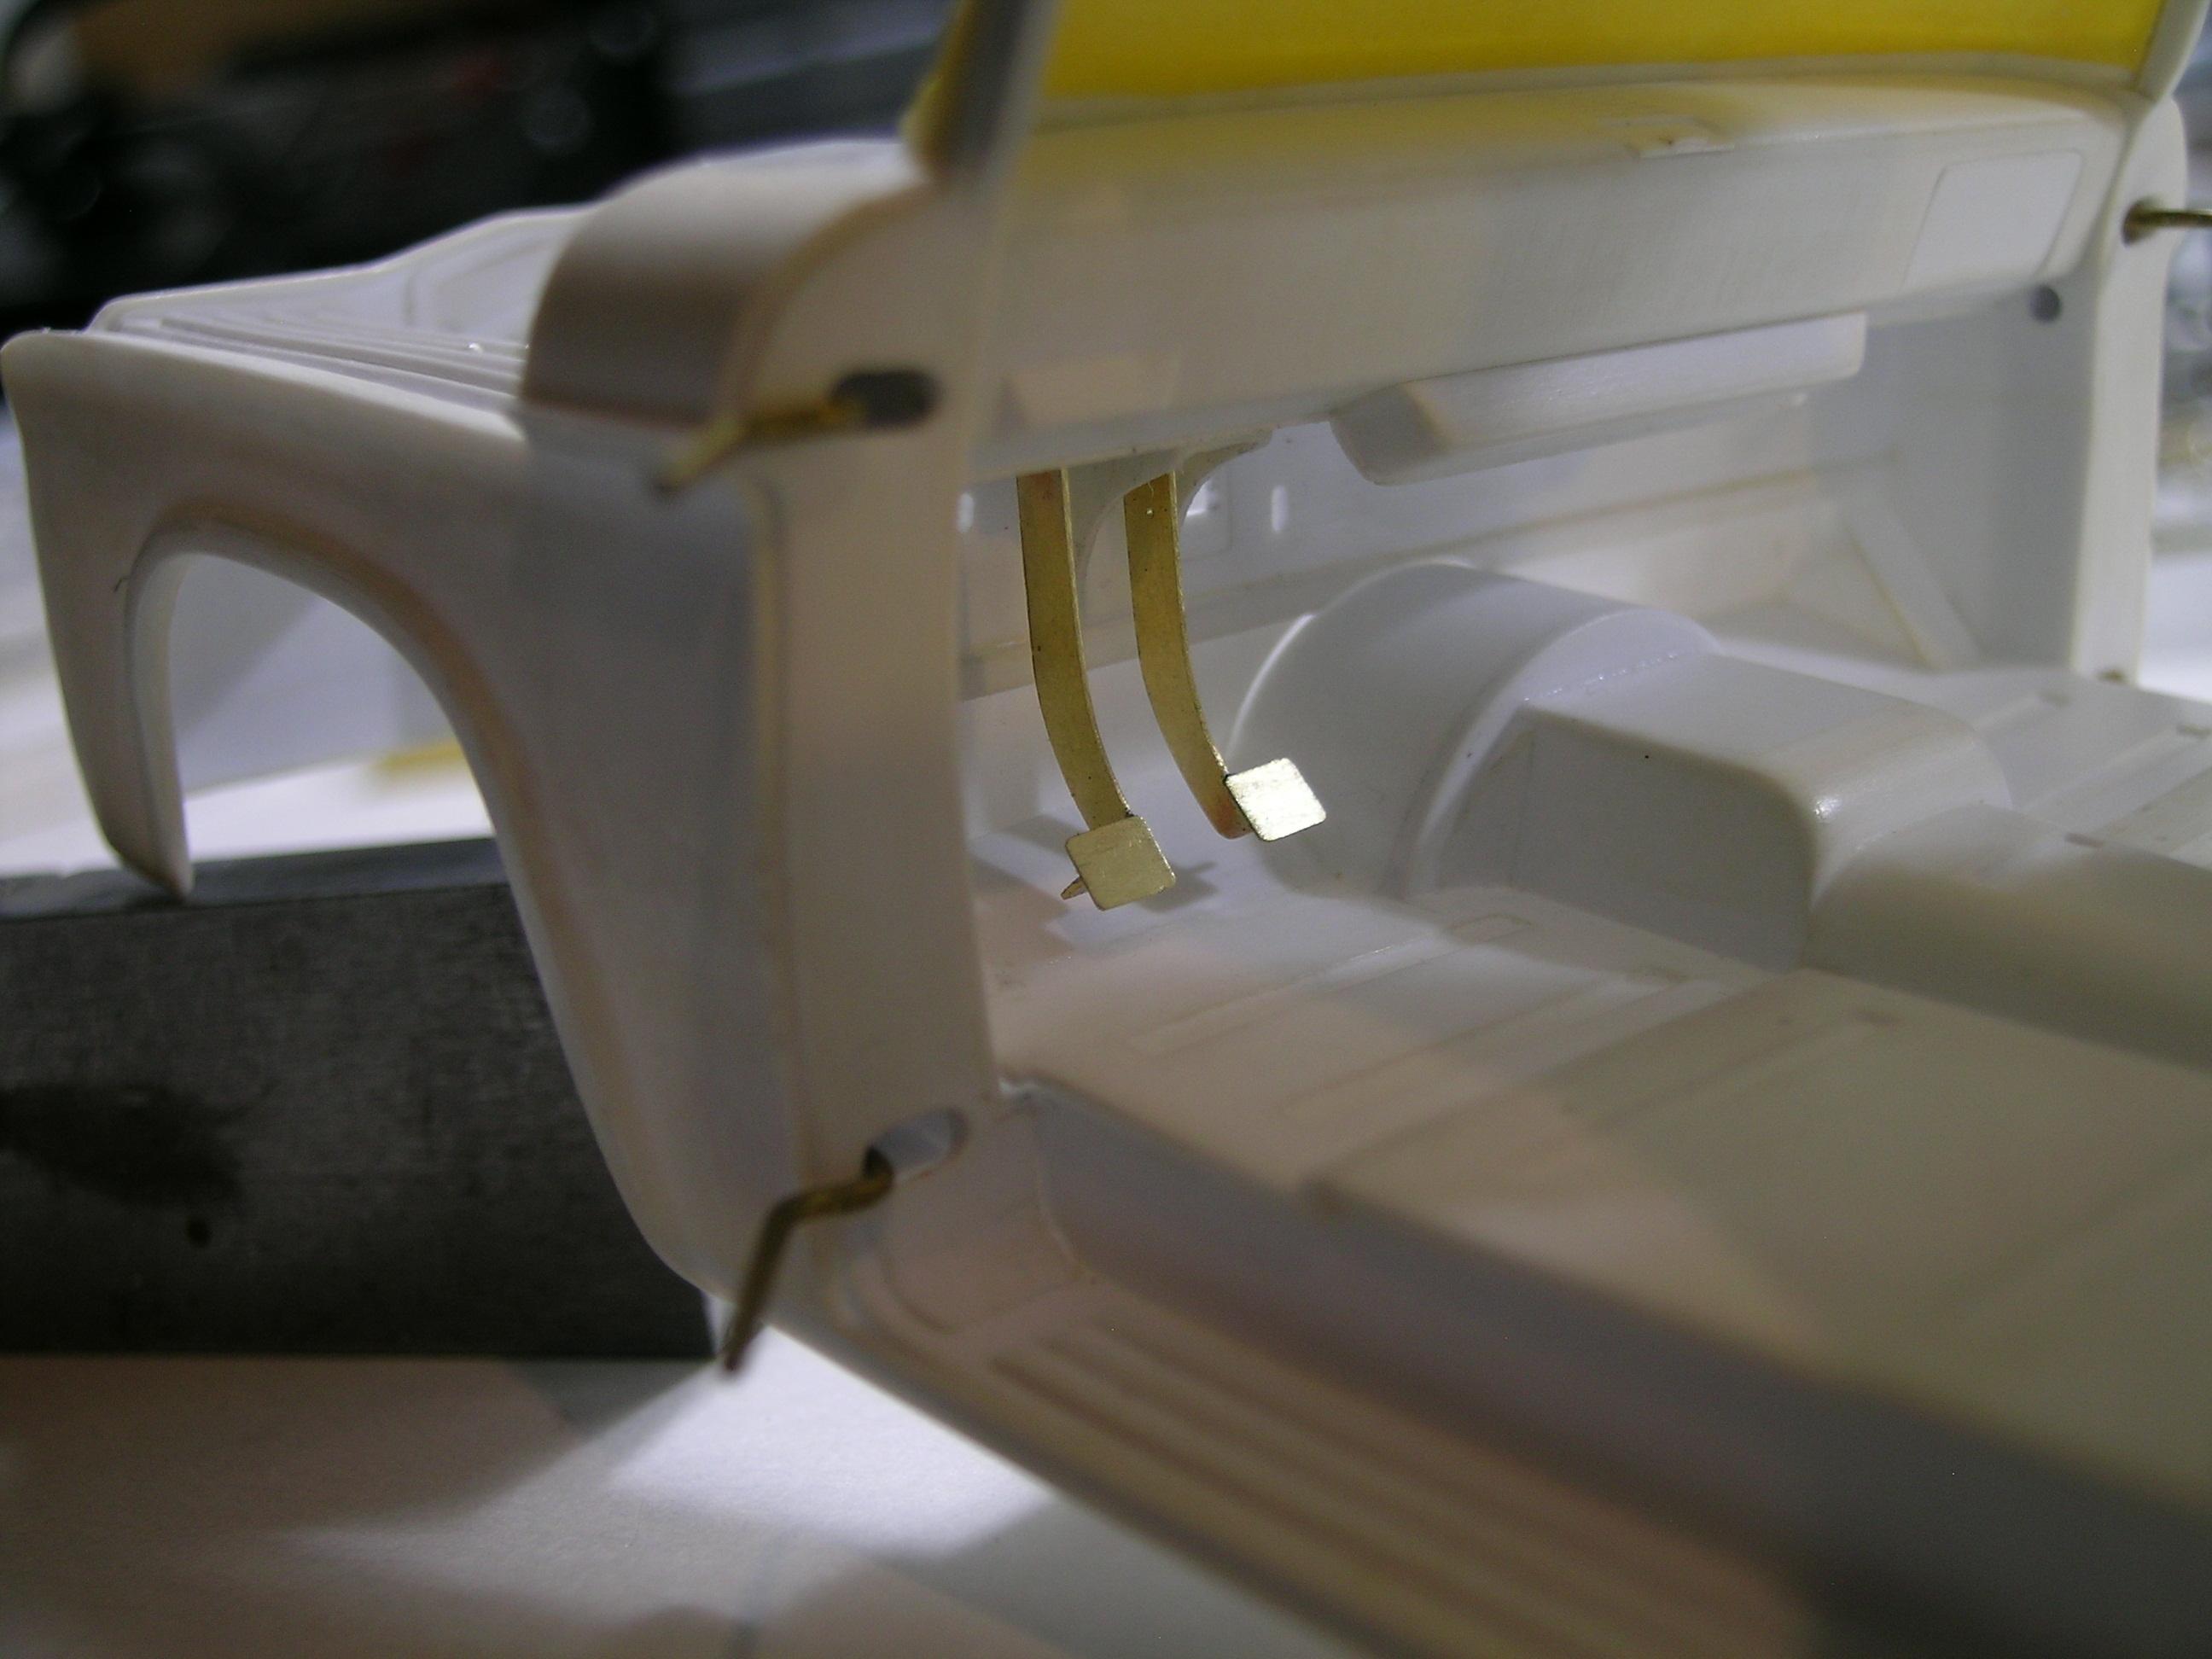
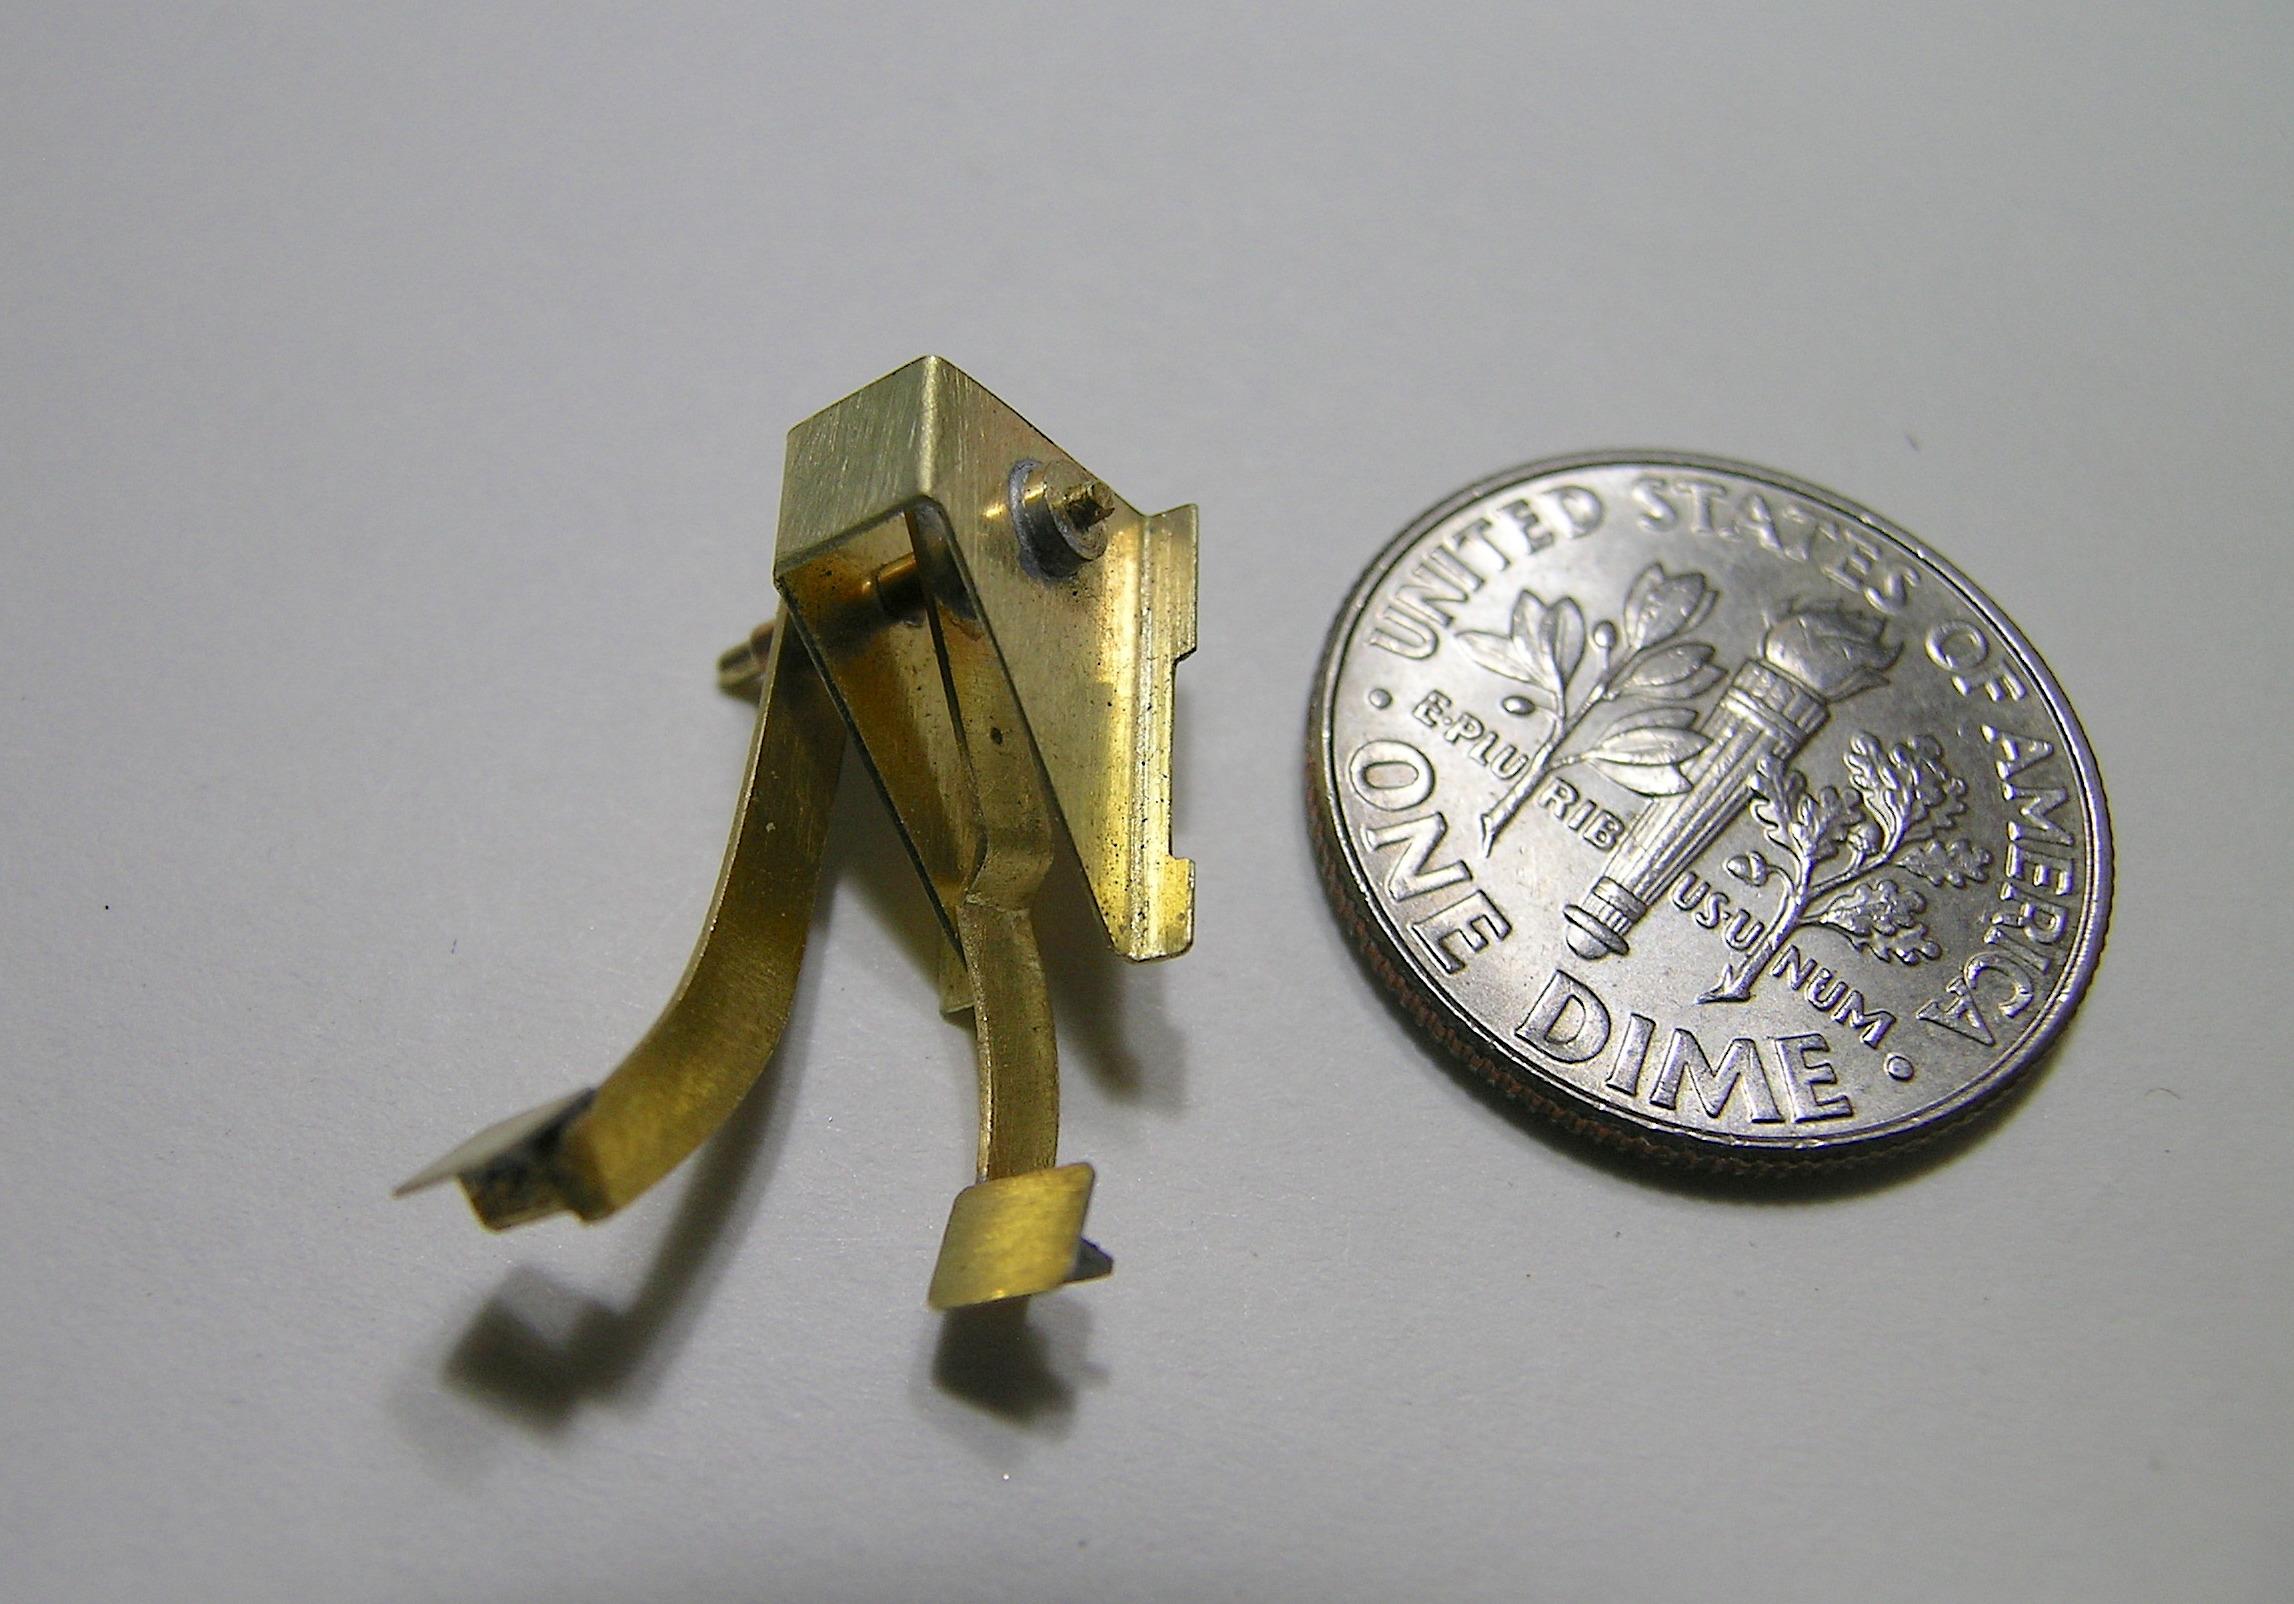
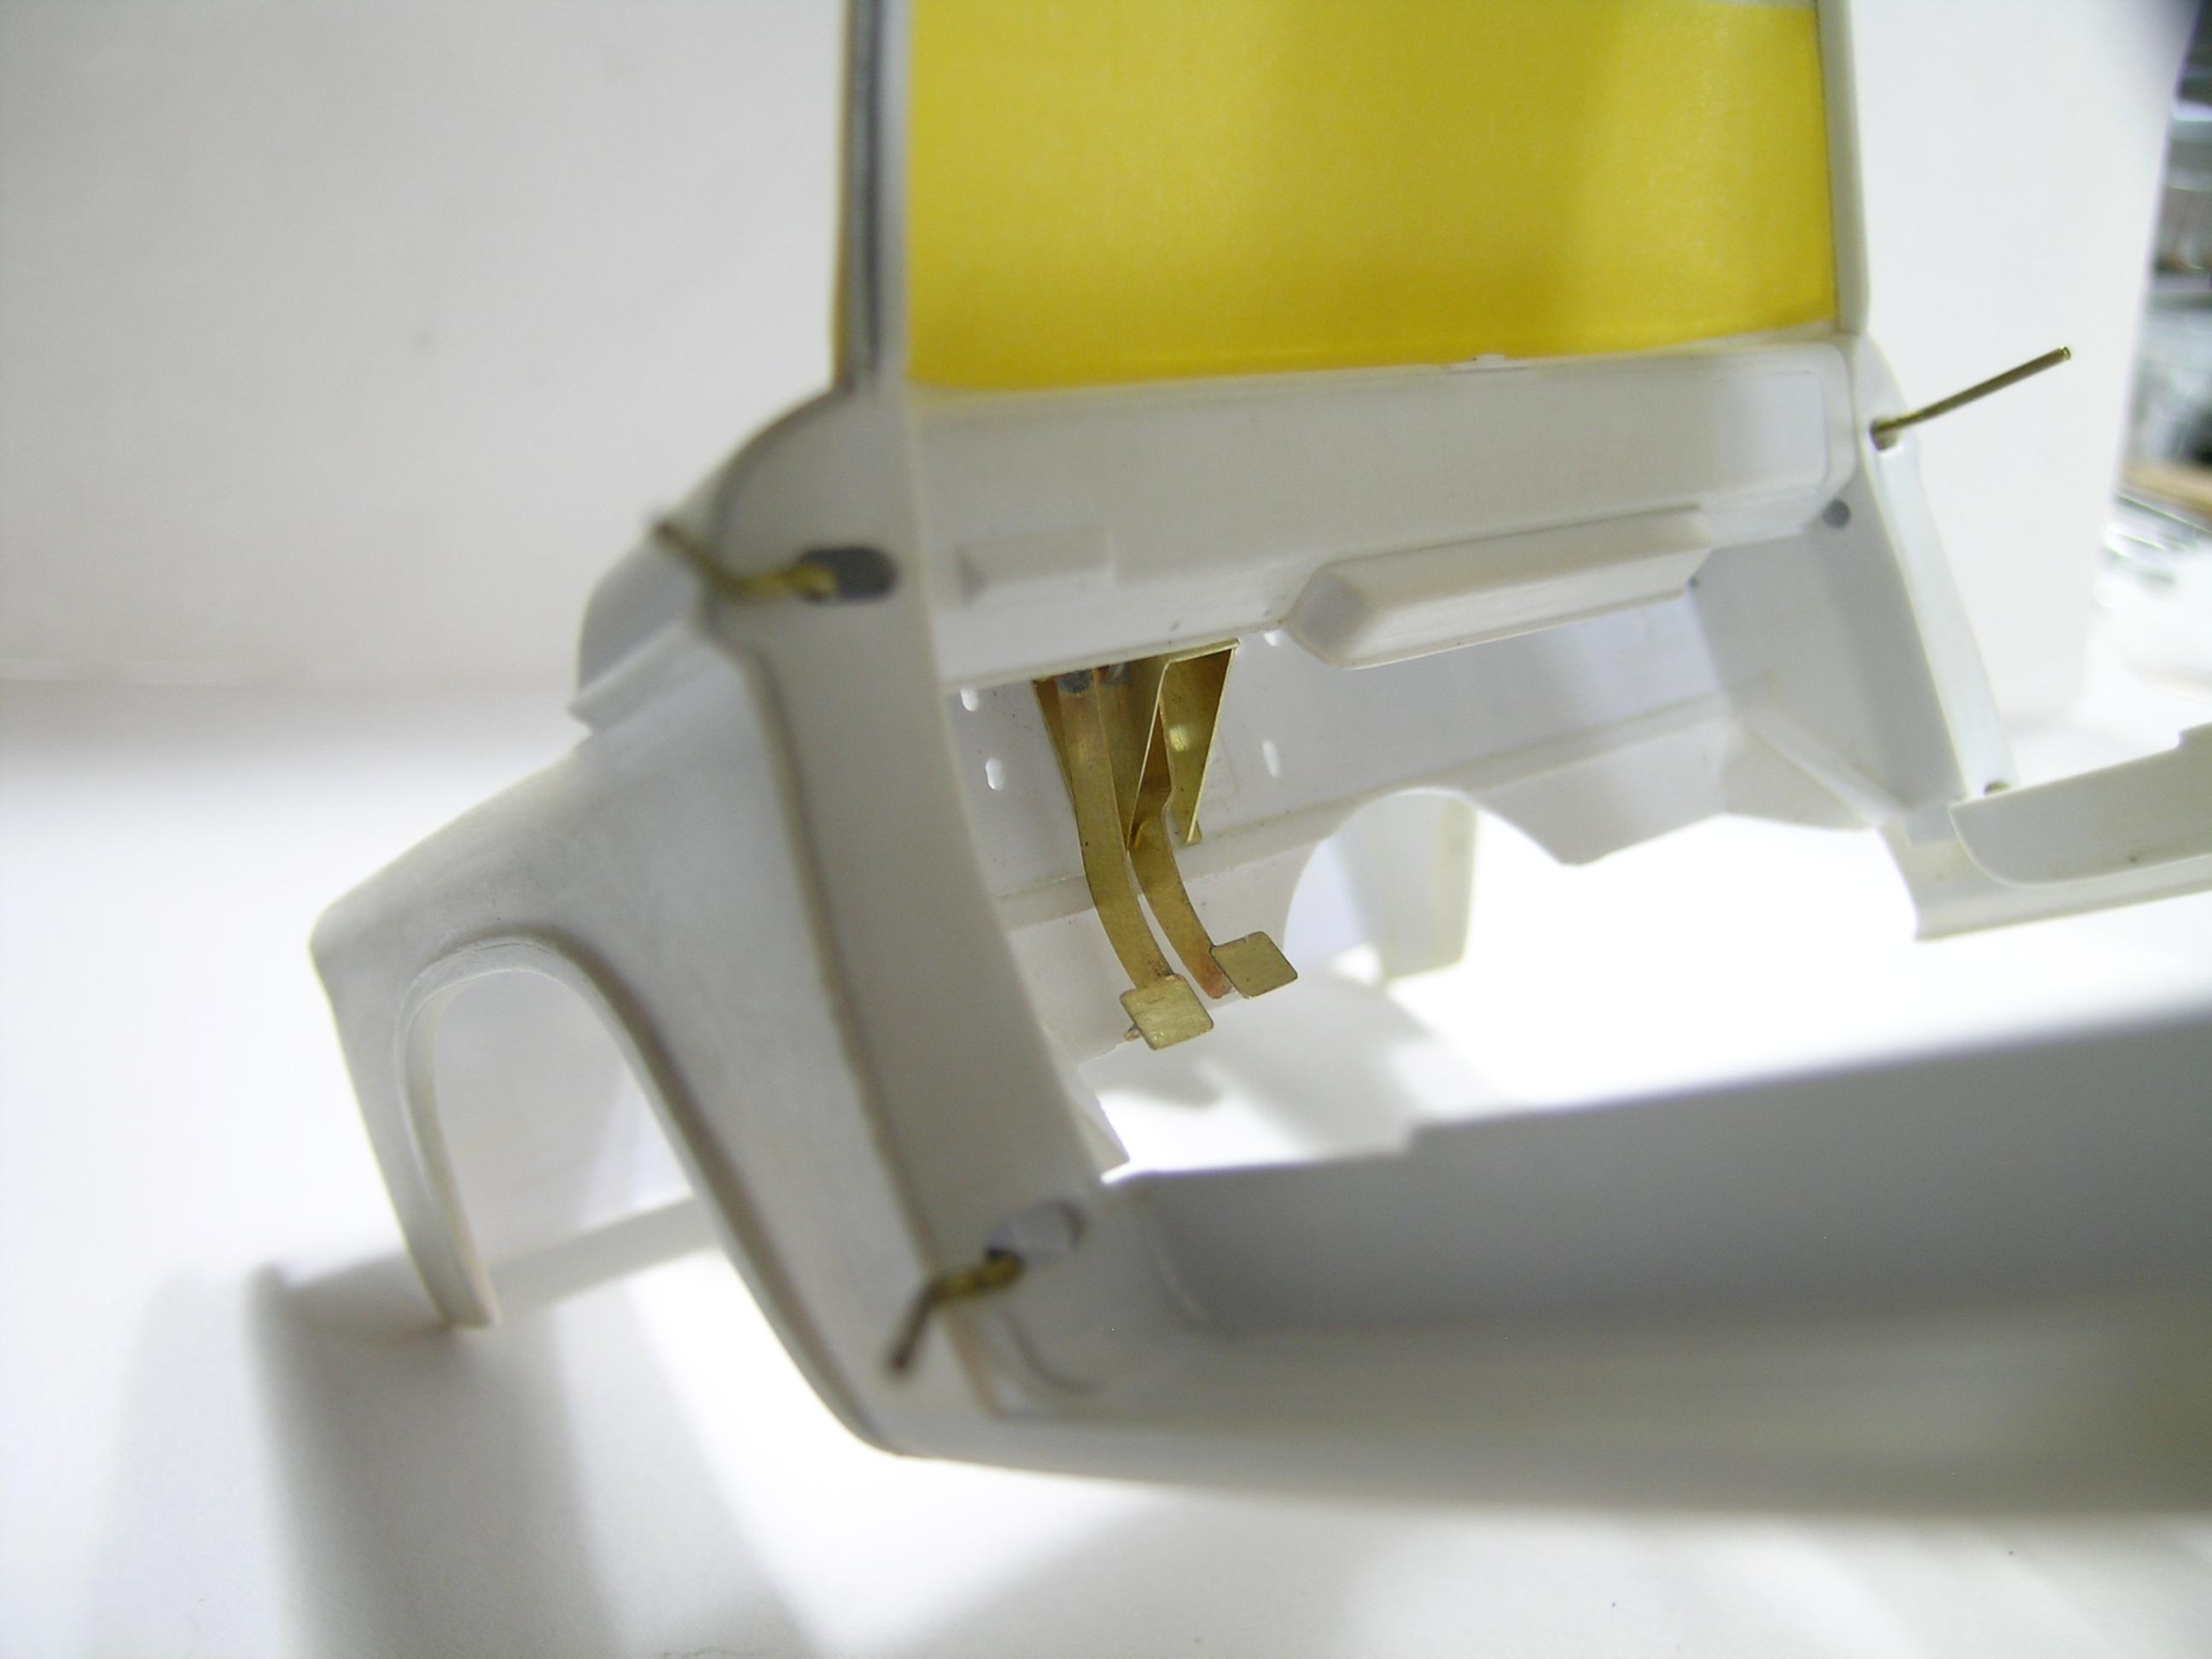
Hello everyone, With the current short Christmas break I have a bit more time ahead of me so I continue to progress with the cabin components. Today's update is for the clutch/brake pedal assembly that I chosen to make with brass. I drilled a hole in the part and welded a .046 "brass tube for the pivot point, a pin goes through them so they are sort of functional. The pedal mounting bracket was made with a rectangular piece of Evergreen styrene but will be remade afterwards (due to my remorse) with 0.005 "brass foil to be more to scale (that's what I was talkigg about Tim (foghorn62)). I am learning to work with brass and I must admit that this material brings great possibilities, I will try to use it more often. The plunger is aligned with the brake master cylinder and inserted into its hole during final assembly. I will probably stick some rubber padding on the pedals later, this will be part of the last details at the assembly process. I still have the accelerator pedal to do, this thing must also be able to move forward... Comments and questions are welcome. Happy Holidays, Francis Pedal made with 0.010" brass. The brass pin is temporary and will be replaced with a machined aluminum one. I think this is the smallest I can do. The rod is 0.020" and the hole is 0.013" hand drilled. The plunger will fit the master cylinder. Pedals folded to accommodate the footrests. Footrests welded in place. Different view. Seen from behind. A quick position test. Mounting bracket redone in brass to be more to scale... sorry I couldn't resist... I think it was worth it... what do you think? It fits like a glove and pretty close to the 1:1 part. The part will still be clearly visible when the truck is displayed with the doors open.
-
64 Dodge D100 Pickup Pro Street
AmericanMuscleFan replied to AmericanMuscleFan's topic in WIP: Drag Racing Models
Sorry Tim, you're going to be disappointed... maybe for another build! -
Hummmmmm! I don't need to tell you that's my kind of stuff... I really love these Dana rear end and you did a fantastic job on the cover Tim, can't wait to see it completed! ?
-
Good job on the fine tunning of the door Scott! Piano hinges will be a very nice addition to this already complex build, functional doors are a very nice feature that takes a lot of hard work but is definitely worth it. Thank you for this gift after Christmas my friend! ?
-
De Foosing the FD-100
AmericanMuscleFan replied to butter's topic in WIP: Model Trucks: Pickups, Vans, SUVs, Light Commercial
Superb job on these functional hinges Ron! This is something I want to do for my pickup so you sowed a seed... Amazing build sir, you have great skills! -
64 Dodge D100 Pickup Pro Street
AmericanMuscleFan replied to AmericanMuscleFan's topic in WIP: Drag Racing Models
You're probably right Tim! The next update I'm currently working on will be a good and a bad example of both what I've written. Balance is not easy to find... Check back later, a picture is worth a thousand words! Hope you don't feel too guilty... Hint, it's not on the frame... ? Take care, Francis -
64 Chevy C10
AmericanMuscleFan replied to Hmann68's topic in Model Trucks: Pickups, Vans, SUVs, Light Commercial
Very beautiful pickup Christopher, very clean build and nice color choice! I really like this era of truck as you know... Well done sir! -
Holmes 750 twin-boom wrecker
AmericanMuscleFan replied to landman's topic in WIP: Model Trucks: Big Rigs and Heavy Equipment
WOW, that's a real cool project Pat! I really love these big wreckers and I can see your on a great start! I will certainly be back to check your progress, I'm really interested and hooked... -
64 Dodge D100 Pickup Pro Street
AmericanMuscleFan replied to AmericanMuscleFan's topic in WIP: Drag Racing Models
Thanks for the comments Ian! I would probably be able to make these parts even more realistic but I have to find the balance between endless details and finish this thing before the motivation leaves me... More to come soon! Take care, Francis -
64 Dodge D100 Pickup Pro Street
AmericanMuscleFan replied to AmericanMuscleFan's topic in WIP: Drag Racing Models
Thanks for the kind words Tim, I always appreciate your support sir! As for gifts, it is as fun to give as it is to receive and I still have a lot of wrapping paper near my workbench! I would take your beautiful Maverick under my Christmas tree by the way!!! Take care, Francis -
64 Dodge D100 Pickup Pro Street
AmericanMuscleFan replied to AmericanMuscleFan's topic in WIP: Drag Racing Models
Hey Steve! Thanks for the kind words my friend. Don't worry about the frequency of your comments, it's free entry here and I accept with great humility and gratitude those I receive, they are all greatly appreciated. It would be rather difficult for me to hide that I like the presence of mind and the humor of my good friend Claude, that puts things in perspective and at the level where all this must be taken; a hobby above all else! Your new "Oldcamino" or "Caminolds" is off to a great start by the way! Take care, Francis -
WIP...62’ Chevy Impala Pro Mod...
AmericanMuscleFan replied to Dirt Demon's topic in WIP: Drag Racing Models
WOW, that's a real beast Bill! I love the color combo with that massive and powerful engine! Superb build in the making! -
1/16 SCALE A/FC NITRO FUNNY CAR
AmericanMuscleFan replied to Ian McLaren's topic in WIP: Drag Racing Models
One thing is certain, you do not take shortcuts to make your components and that is reflected in your build. All the ingredients come together for a high caliber build and I love it! Keep doing the good work Ian!!! -
I'm happy to know that the man (Jeremy) behind this business is doing better and is fully recovering from his past health issues. I'm not on FB so I wondering to know if all (or most) of the previous products listed on the Clearly Scale web site few months ago will be available again including the 2015 Revell Challenger Hellcat conversion kit?
-
1964 Dodge D200
AmericanMuscleFan replied to Chuck Most's topic in Model Trucks: Pickups, Vans, SUVs, Light Commercial
Superb build sir! Probably called by many as ugly trucks, this is simply my favorite! There is no denying it, the tastes are not to be discussed and with this HEMI it is simply wonderful! I know, I have a little something for these workhorses... The weathering work is very convincing by the way! ? -
Indy-ish Monogram Midget
AmericanMuscleFan replied to Straightliner59's topic in Other Racing: Road Racing, Salt Flat Racers
Dear Daniel, this is the catch when someone can end up delivering a model of this caliber, there is always one little detail that can be frustrating and that one constantly focuses on. This is nothing short of a very high caliber build and you have achieved details that few people can claim to have successfully accomplished! I'm jealous of your louvers and hope to have the chance to put your technique to work on one of my models one of these days. Look at it closely... I'm probably repeating myself but your twenty years of good work produced a little MASTERPIECE!!! ?❤️ -
RAM Power Wagon
AmericanMuscleFan replied to Mopar - D's topic in WIP: Model Trucks: Pickups, Vans, SUVs, Light Commercial
Thanks for the tip Dan, that makes a lot of sense because I was wondering about bubbles and creases, this stuff is already hard to put on 1: 1 cars so I can imagine on those little windows... Merry christmas! ? -
64 Dodge D100 Pickup Pro Street
AmericanMuscleFan replied to AmericanMuscleFan's topic in WIP: Drag Racing Models
Hi Claude! I'll trust you on this ... DOT-4 it will be...lol Merry Christmas, Francis Thank you very much Ron, I really appreciate your support sir! Merry Christmas, Francis Thanks again Daniel, I won't miss it so I'll go check them out and add my comments to your ALWAYS exceptional work my friend! Take care, Francis Thanks Alan! Well, I must admit that it is rather well hidden and barely visible between the flywheel and the pressure plate... The pressure plate is just the shell and it is not complete with all the components because I was running out of space ... You can see the simple designed clutch disk in this image at an earlier stage of build if you missed it... I must admit that there are starting to be quite a few pictures on this thread... lol Merry Christmas, Francis
-
This is a super cool idea Steve, you have a very active and boundless imagination my friend. The Oldsmobile looks more robust than the Chevelle (in my opinion...) and will obviously be a good candidate for your conversion, how GM hasn't thought of that...lol? Maybe you can call it "Oldcamino" but that's just a suggestion, I see you are handling the conversion very well so far! I don't want to steal Claude's punchline but it's "fun with styrene"...! ?