PHPaul
-
Posts
493 -
Joined
-
Last visited
Content Type
Profiles
Forums
Events
Gallery
Everything posted by PHPaul
-
Thanks, David. I know what you mean but for me it's not 'work' , it's therapy! I
-
Thank you!
-
Misunderstanding on both ends, I should have been clearer in my comments. All good.
-
Apologies for interjecting. By way of clarification - The Creality was a kit only in the sense that the beams for the z axis needed to be attached and aligned, the cog belts installed and some cables plugged in. I'll go away and mind my own business now.
-
"Assembling" or "building from scratch"? Assembling my Creality took less than an hour with really, REALLY cryptic instructions. Building is a whole other story.
-
Thanks, Gregory! I've been having way too much fun working on it. I add details here and there as they occur to me. I
-

64 Ford F250 4x4
PHPaul replied to bill lanfear's topic in Model Trucks: Pickups, Vans, SUVs, Light Commercial
Thank you, Bill. The resin printer explains a lot of it, I just have a PLA/ABS filament printer. -
64 Ford F250 4x4
PHPaul replied to bill lanfear's topic in Model Trucks: Pickups, Vans, SUVs, Light Commercial
Gorgeous! Can you tell us about the printer, material, software and post-print processes you used to get those magnificent prints? -
'50 Chevy 5 window
PHPaul replied to PHPaul's topic in Model Trucks: Pickups, Vans, SUVs, Light Commercial
Thanks so much for all the kind comments! Gives me the courage to try something requiring a little more modification. '66 Nova this time, I'll post in WIP when there's something worth posting. -
If you have access to a 3d printer, there are some on Thingiverse that look pretty good, tho I haven't actually printed one. Also, the open-mesh sandpaper used for sanding drywall joints might make a convincing radiator, depending on the scale.
-
Straight (not tapered) Round Files?
PHPaul replied to PHPaul's topic in Model Building Questions and Answers
1/16 would be the biggest I could use. Among other things, I want to file fishmouths into round stock for building frames and roll cages. -
Straight (not tapered) Round Files?
PHPaul replied to PHPaul's topic in Model Building Questions and Answers
Yup, I have several but that's too big for my intended use. -
Back in March of 2020, a poster mentioned finding some straight round files in sizes appropriate to modeling: See this post I PM'd him, but he hasn't posted in a long time. I've looked all over - McMaster-Carr, Amazon, Micromark, Ebay - and can't find any straight files. Tapered Swiss-pattern, yes. Straight - no. I'd REALLY like to have a set. Does anyone have a source?
-
AMT '60 Chevy pick up
PHPaul replied to Paul Hettick's topic in Model Trucks: Pickups, Vans, SUVs, Light Commercial
This appears to have wound up under the wrong heading somehow... Edit 2: Oops. Misread the thread title. Mods please delete. -
'50 Chevy 5 window
PHPaul replied to PHPaul's topic in Model Trucks: Pickups, Vans, SUVs, Light Commercial
Works for me! -
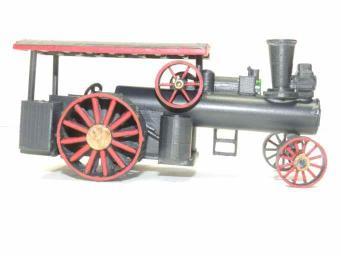
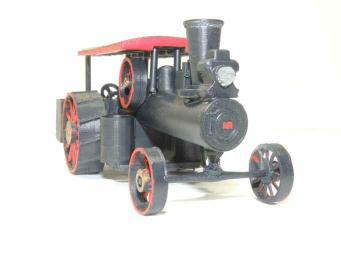
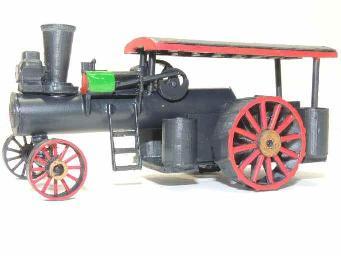
Version 2 got some scale issues fixed, some details removed and others added, and a better paint job. The original was gloss black and it looked overdone. This one is flat gunmetal, much more realistic IMHO. Still not perfect, but plenty good enough for a diorama viewed from 3 or 4 feet away.

-
The metal roofing is from Northeastern Scale Lumber. HO scale is close enough for the diorama which is actually S scale. Corrugated Metal Roofing in various scales.
-
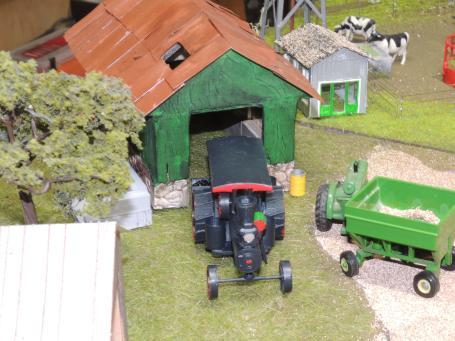
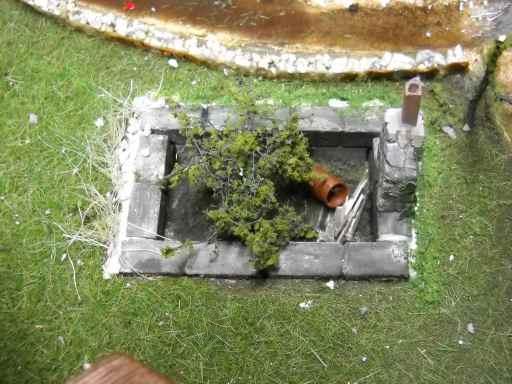
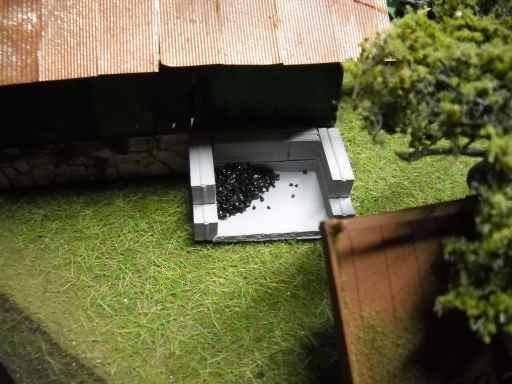
After looking at Version 1 of the steamer for a few days, I decided to start from scratch and build V2 using more 3D printed parts. I redesigned some pieces and tweaked others to correct scale issues. It's assembled and in paint now, I'll post pictures in a day or two. Meanwhile, I'm adding details here and there on the diorama. I added an abandoned cellar hole near the sawmill. My thinking is it was the original cabin on the farm from back in the 1800's. As such holes often do, it's collected some random junk. I built a dilapidated shed to park the steamer under and added a coal bin next to the shed, using Black Diamond Coal Slag blasting media as the coal.
-
Black Diamond Coal Slag blasting media makes excellent scale coal. Probably best for S (1:64) and HO scales.
-
Square body GMC
PHPaul replied to JET.'s topic in Model Trucks: Pickups, Vans, SUVs, Light Commercial
World-class weathering! I've owned a few Chevy/GMC pickups of that era and you nailed it. I saved a couple of those pictures to give me a goal for my next build. -
'50 Chevy 5 window
PHPaul replied to PHPaul's topic in Model Trucks: Pickups, Vans, SUVs, Light Commercial
Thanks, everyone. LONG way to go compared to most of the posters here, but get a little better with each project. -
MPC "Deserter" built for laughs
PHPaul replied to PHPaul's topic in Model Trucks: Pickups, Vans, SUVs, Light Commercial
Yeah, it's weird. Something happened on my website, haven't figured it out yet. I'll upload them here.
-
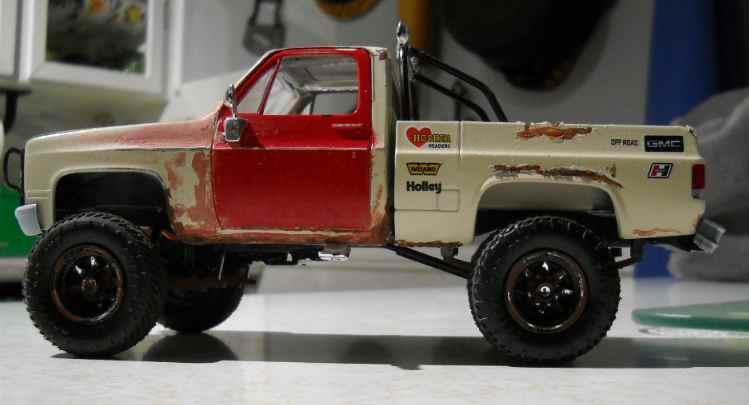
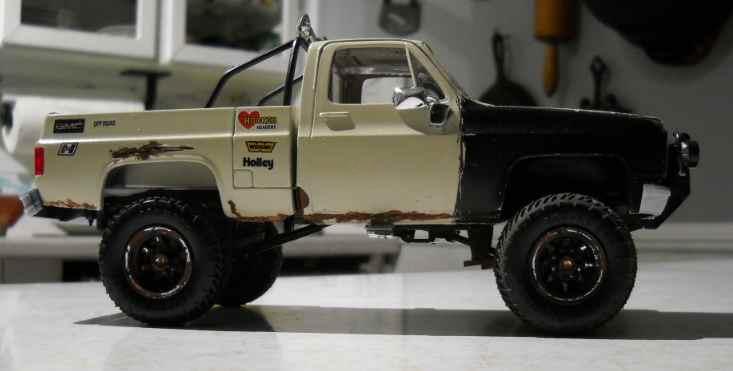
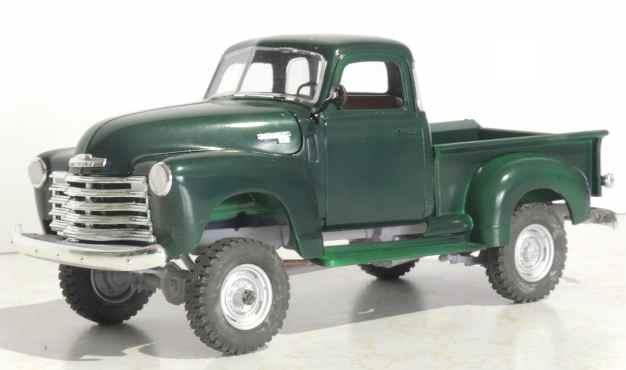
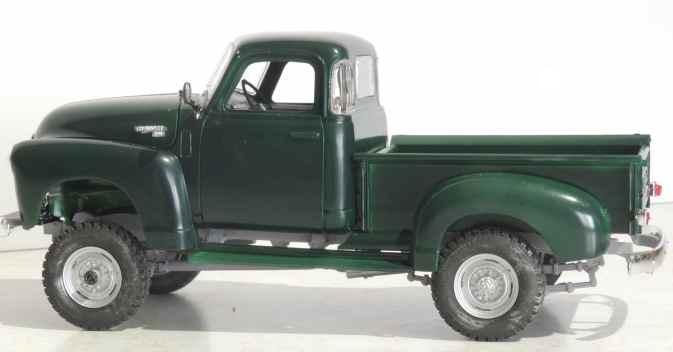
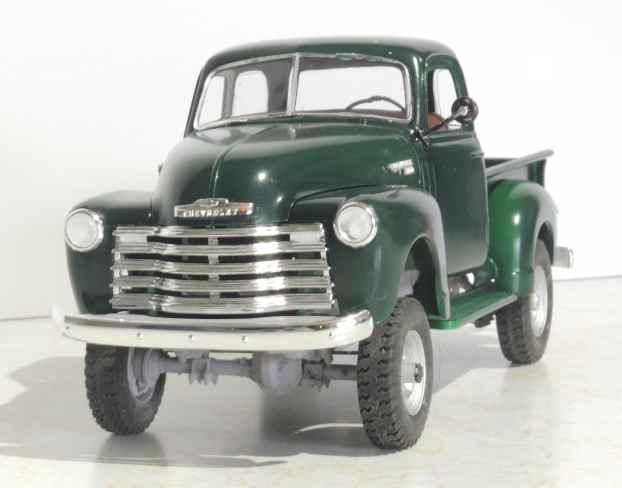
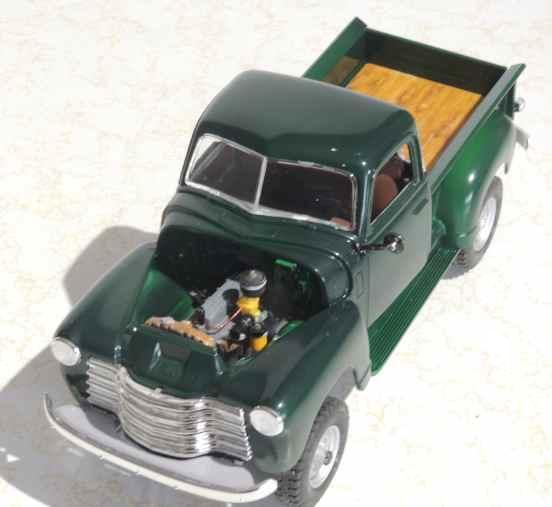
Finally finished the NEAPCO 4WD conversion on the 5 window. Fireball Model Works Ford F250 4wd kit plus wheels and tires, Model Car World laquer in Forester Green, wired and plumbed engine. I see with photographic lighting that I didn't get the paint all the same tone (not enough coats I suspect) but other than that, I'm pleased with the way it came out and learned a few things.
-
Apparently, you're familiar with the Volunteer Company I used to be part of... VERY nice work!
-
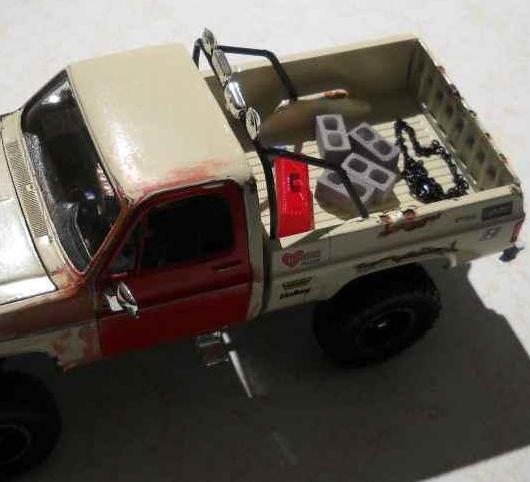
I picked up a MPC "Deserter" kit intending to use the 4WD components to build a 4WD conversion for a '50 Chevy 3100. (Details Here. ) I decided to go a little more realistic with a 4WD Kit from Fireball Model Works, so the Deserter kit just sort of sat there. Got bored and decided to build it as a redneck beater just for giggles: In addition to prototypical rust (I've owned a few Chevy trucks...) I added some scale beer cans on the floor of the cab and some junk in the bed. I finally sprung for a 3D printer and printed the concrete blocks. BTW, apologies for my earlier indiscretion. Pictures of the offending decal were left out of this post.