
.jpg.b9265433dc8c3b550370b1d0e4e4d2fc.jpg)
MarkJ
-
Posts
4,688 -
Joined
-
Last visited
Content Type
Profiles
Forums
Events
Gallery
Everything posted by MarkJ
-
.jpg.b9265433dc8c3b550370b1d0e4e4d2fc.thumb.jpg.915f5b46e3c9402eeaa6972073121c87.jpg)
1964 Ned Jarrett Ford
MarkJ replied to MarkJ's topic in WIP: Stock Cars (NASCAR, Super Stock, Late Model, etc.)
Mystery solved. I decided to look at my other models and saw the Foyt 64 firecracker winner and noticed the grey rock decal had white lettering and it was rectangular and not big and round like it had been earlier in the season. I studied the photo I made and sure enough that was it. Apparently, sometime in the summer they changed the logo to what you see. I will clean up my earlier decal and print a supplement sheet of them and just not use the Solder Seal decal.
-
Ebbro/Tamiya 1:12 1968 Matra MS11 F1
MarkJ replied to Nacho Z's topic in WIP: Other Racing: Road Racing, Land Speed Racers
Sounds good. Looking forward to more updates. -
1964 Ned Jarrett Ford
MarkJ replied to MarkJ's topic in WIP: Stock Cars (NASCAR, Super Stock, Late Model, etc.)
Yes, go figure. I'm thinking teams were already getting away from the exhaust through frame deal even before Nascar mandated it. I guess Ned's team decided to wait till they were forced to. My main deal now is finding that mystery decal second from the front on the front fender on the finish line black and white photo. I keep enhancing the photo and right now it looks like a rectangular decal longer then tall with white lettering like maybe a firestone decal, but I can't find any cars from the 64 season with a firestone decal on their front fender. I haven't given up yet. If you'd like to take a stab at it, feel free to see what you can come up with. -
1964 Ned Jarrett Ford
MarkJ replied to MarkJ's topic in WIP: Stock Cars (NASCAR, Super Stock, Late Model, etc.)
Thanks, Emre. I appreciate your interest in the build. I'm learning a lot too. I always thought the Dixie 400 was in the fall. -
1964 Ned Jarrett Ford
MarkJ replied to MarkJ's topic in WIP: Stock Cars (NASCAR, Super Stock, Late Model, etc.)
Bill, the Dixie 400 was just 2 weeks after the 600 so they probably had not come to their findings about the exhaust through the frame contributing to Fireball's injuries from the crash. I'm thinking that was not enough time to change the rule yet. So that explains why Ned's Dixie 400 car still had the exhaust through the frame and the body. I don't think the picture above is from the Firecracker 400 because where Daytona is written, the track is banked and the car in that photo is on a flat straightaway, like Atlanta had at that time. So that blue car above is probably from the Dixie 400. The caption on the photo said it was when I found it. -
1964 Ned Jarrett Ford
MarkJ replied to MarkJ's topic in WIP: Stock Cars (NASCAR, Super Stock, Late Model, etc.)
Thanks Bill. That sure helps clear things up a lot. Let me see if the 600 was after the Dixie 400. -
1964 Ned Jarrett Ford
MarkJ replied to MarkJ's topic in WIP: Stock Cars (NASCAR, Super Stock, Late Model, etc.)
Pierre, you know, I thought the same thing and I have a picture of Ned's 64 Ford at The Daytona 500 and it had pipes under the body, but the Dixie car picture definitely showed them back through the body again, so I don't know what is going on with the rules that year. Below is the side of the Dixie car. No pipes under the car and black holes under the door where the pipe came through the body. Go figure. You can also see very small 410 H.P. on the hood and the discrepancy of the decal placement compared to the black and white photo at the finish line. The photo below shows the Autolite on the door but the other one has it on the fender. The micro precision decal is on the door below but on the fender in the black and white photo. Both ref pictures show the car with the primed left front wheel. Suddenly I notice it looks like Daytona is on the wall below so maybe that's a firecracker 400 picture. The primed wheel might be a coincidence. The races were held less than a month apart so I'm sticking with the decals I made and the placement on the black and white picture. still not sure what the second from the front decal on the fender is on the black and white picture. You can see the black and white photo better on the blown-up photo I have with the wip picture above.
-
Ebbro/Tamiya 1:12 1968 Matra MS11 F1
MarkJ replied to Nacho Z's topic in WIP: Other Racing: Road Racing, Land Speed Racers
Great idea for exposing the yellow on the heads. I'll be continuing to watch this fine build. -
1964 Ned Jarrett Ford
MarkJ replied to MarkJ's topic in WIP: Stock Cars (NASCAR, Super Stock, Late Model, etc.)
Got the rear panel done. At the beginning of the season this car had the chrome rear panel and full taillights on it. By the time the Dixie 400 ran in June, everything was gone replaced by sheet metal. I wanted to do this car because this was the first non-short track win of his career. He followed this up with the 65 Southern 500 and that was his last non short track win of his career. He was like Rex White, a short track king. Rex only had one non short track win in his career, The Dixie 400 in 1962. Just a couple of fun facts I thought you guys might be interested to hear. I think the only thing left to do on the body is the wheel openings. I'm not even going to try to widen out the quarter panel sheet metal that was done to these cars. One other thing my ref pictures show is that the exhaust comes through the frame and the body on this car, so those ports will have to be added under the doors.
-
Mike, your story reminds me of the time my dad's friend Bob Mungle showed up from Florida with a brand new 1965 Shelby Mustang GT 350. They had just finished Nasa Road 1 and he took me on a mind-blowing ride from Seabrook to Webster and back again at 10 at night when absolutely no one was on the road but us. I doubt if we got below 80 on the whole trip, and back then the only cops were probably at home asleep. They had to pry my fingers off the dash to ger me out of the car. After that trip my dream car was a Mustang Shelby GT 350 but I could never find or afford one. My dad did buy a 67 plain jane Mustang with a 289 and 3 on the floor transmission that I could drive after I got my license, when I turned 16. That was a fun car but nothing like that Shelby Bob had. I did end up getting a 1968 427 Corvette convertible for $1995.00 in 1972. It had a lot of things wrong with it and it was brute of a car to drive. It too was mind blowing fast but you could hardly stop the thing.
-
Looking good, Mike. Thats the car everybody in the early 70's wanted, but none of us could afford it. It was supposed to be the affordable Porsche. $8600 back then was still a pretty hefty price. I bought a brand new 1973 Dodge Charger SE and it was $3995.00. That was with the 400 2barrel, but you could get a 440 for $4500.00. I couldn't come up with the extra cash to get one of those.
-
1964 Ned Jarrett Ford
MarkJ replied to MarkJ's topic in WIP: Stock Cars (NASCAR, Super Stock, Late Model, etc.)
Sounds good. I will see if I can find it. -
1964 Ned Jarrett Ford
MarkJ replied to MarkJ's topic in WIP: Stock Cars (NASCAR, Super Stock, Late Model, etc.)
Thanks, Mike. I appreciate your interest in the build. Have you got anything going on or have you recently posted anything? -
1964 Ned Jarrett Ford
MarkJ replied to MarkJ's topic in WIP: Stock Cars (NASCAR, Super Stock, Late Model, etc.)
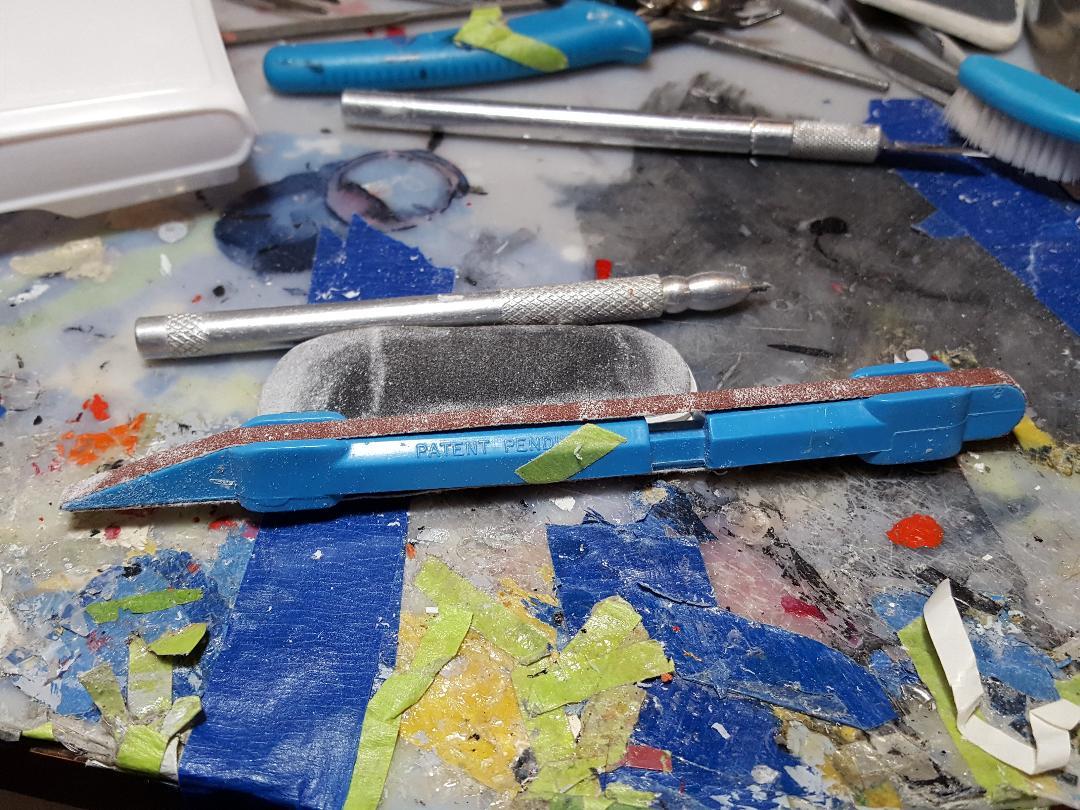
Thanks, Pierre. I think you will really like the belted sanding stick. The pointed end works really good with tight spots where a regular sanding stick does no good. You will find out the first time you use it. You can buy different grit belts for it too. Micro Mark sells them if you can't find one from your favorite suppliers, but really everyone should offer them. I need to do the rear taillight panel. That's going to take a little detail work. One of those ref pictures I sent you has a pretty good view of it. -
1964 Ned Jarrett Ford
MarkJ replied to MarkJ's topic in WIP: Stock Cars (NASCAR, Super Stock, Late Model, etc.)
Yes, Ricky it did. On both sides. I made short work of it with my trusty belted sanding stick. Those mold lines look awful if not removed. This is just like the kit I used a few years ago to do the Tom Pistone 64 Ford. I think they just reboxed it with a smaller box. Thanks for your input.
-
1964 Ned Jarrett Ford
MarkJ replied to MarkJ's topic in WIP: Stock Cars (NASCAR, Super Stock, Late Model, etc.)
Thanks, Stephen . I appreciate your interest in the build. -
1964 Ned Jarrett Ford
MarkJ replied to MarkJ's topic in WIP: Stock Cars (NASCAR, Super Stock, Late Model, etc.)
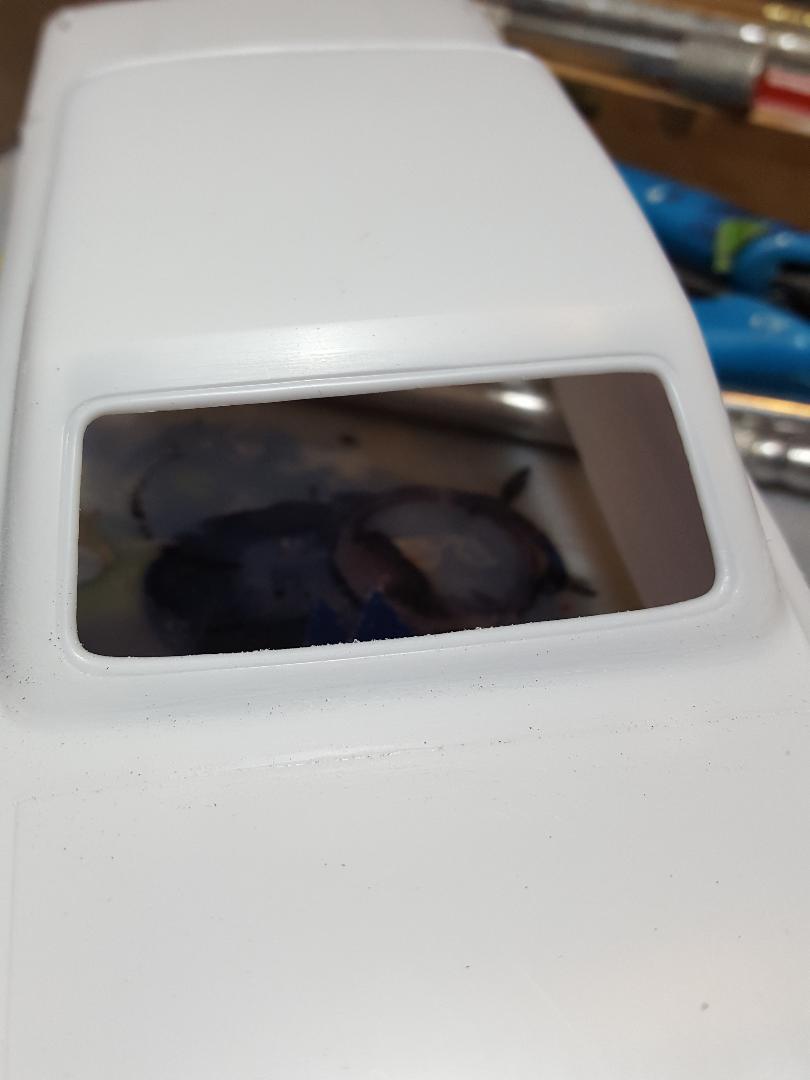
Got the other side done and removed the wiper blades. This car is good because the wiper blades don't extend over the vent grille. The tools shown are what I've been talking about to remove the moldings and other things. The one picture of the back glass area is to show where the hardest molding to remove is. At the base of the roof where it meets the panel in front of the trunk. The scribe tool is necessary to reinstall the door opening lines when you remove the moldings that go across the door to the front fender and quarter panel.
-
1964 Ned Jarrett Ford
MarkJ replied to MarkJ's topic in WIP: Stock Cars (NASCAR, Super Stock, Late Model, etc.)
No, I used a belted sanding stick and a flat sanding oval looking thing. I am no good with a dremel and if it gets away from you, you get a gouge you have to repair with putty, and that's extra work I don't need, and would not look that good anyway. i only use a dremel for big jobs that I can't mess up anything if I slip up. This is one job you don't need to rush. And it's necessary. Have you ever seen a nice model with excellent paint and great decals that the guy was too lazy to remove the trim unless it's supposed to be there like some emblems and moldings are left on some race cars. Really not a good thing at all. The early 64 Fords at the beginning of the season had full tailights and the chrome moldings around them. this car was campaigned in June and by then, all the trim and the taillights had been removed. -
1964 Ned Jarrett Ford
MarkJ replied to MarkJ's topic in WIP: Stock Cars (NASCAR, Super Stock, Late Model, etc.)
Thanks, Gerald. I appreciate your interest in the build. -
1964 Ned Jarrett Ford
MarkJ replied to MarkJ's topic in WIP: Stock Cars (NASCAR, Super Stock, Late Model, etc.)
Started removing the mouldings. Its pain staking work because most of it is done with a belted sanding stick as to not remove too much material and have to go back and repair the damage with putty. Thats what a dremel tool can do to you. The hardest moulding to remove was where the roof meets the panel in front of the trunk. Very tricky.
-
1964 Ned Jarrett Ford
MarkJ replied to MarkJ's topic in WIP: Stock Cars (NASCAR, Super Stock, Late Model, etc.)
Thanks, Jason and Pierre. This is going to be the most basic build I can come up with trying to stay away from any unnecessary detail work. -
1964 Ned Jarrett Ford
MarkJ replied to MarkJ's topic in WIP: Stock Cars (NASCAR, Super Stock, Late Model, etc.)
The decal sheets and sizing the decals to see if they were right before the final printing. I'm using ink jet decals for the color decals this time. They appear to be crisper on the sheet then the laser decals were. The all-white decals have to stay laser.
-
The kit.
-
Thanks, Randy. I really appreciate your input.
-
Well, you never know. I change my mind quite often, so I might be wipping again. The next build will be much easier. The hood is molded shut and the exhaust is molded into the chassis, so the only detail work will be removing the trim and do a race car tub, which means roll cage. I might try decal shoulder harness hardware. making those little buckles and tensioners is a pain.


.jpg.959205f56ed95660f9c949684ed869e6.jpg)
.jpg.713bb484ccf2a05b1ce06db5429c1351.jpg)
.jpg.295e5cf003fb01d563e2b03559cbe721.jpg)
.jpg.f7f21d7739c9eca340d30468ec9d6ed7.jpg)
.jpg.4fe6b177f2545d568c42e3b67287729f.jpg)


.jpg.996dc6f450043fd49adbc746656ea0f2.jpg)
.jpg.336ff3a98c8beee47e28d56c1730197a.jpg)
.jpg.8b880350d537200a06d7376b2ce8a2ac.jpg)