.jpg.b9265433dc8c3b550370b1d0e4e4d2fc.jpg)
MarkJ
-
Posts
4,688 -
Joined
-
Last visited
Content Type
Profiles
Forums
Events
Gallery
Everything posted by MarkJ
-
.jpg.b9265433dc8c3b550370b1d0e4e4d2fc.thumb.jpg.915f5b46e3c9402eeaa6972073121c87.jpg) Wow, Pierre. what a stunning outcome of a fabulous build. The best I've ever seen of this model in paint, chassis, engine, stance. I could go on and on. I believe this is your best results ever. the photography with the shots of the real car is also very ingenious. Let's the viewer know what the actual car looked like. Almost seems like you took the 1:1 car and shrunk it down to 1/24 scale. Again, congrats on such a wonderful achievement.
Wow, Pierre. what a stunning outcome of a fabulous build. The best I've ever seen of this model in paint, chassis, engine, stance. I could go on and on. I believe this is your best results ever. the photography with the shots of the real car is also very ingenious. Let's the viewer know what the actual car looked like. Almost seems like you took the 1:1 car and shrunk it down to 1/24 scale. Again, congrats on such a wonderful achievement. -
Thanks, Mike. Next one will not be detailed. More of a test bed for no brush marks and ink jet decals, mixed in with the laser white decal backgrounds.
-
1966 Mercury Comet
MarkJ replied to MarkJ's topic in WIP: Stock Cars (NASCAR, Super Stock, Late Model, etc.)
Thanks, Mike. It's under 1966 Darlington Southern 500 winner. click the link below -
Wow, Pierre. She looks perfect. Can't wait for all the other final shots from every angle. If you had not mentioned brush painting, nobody, I mean nobody would have a clue it was brush painted. You keep giving me inspiration that I can finally get a paint job like this one. I'm never giving up on the quest.
-
Tim, you have the airbrush, rattle can mastered, so there is no need for you to use anything else. Your paint work is always excellent
-
Thanks, Tim, I have never had good success with airbrush or rattle cans and the toxicity issues forces me outside to deal with the heat and humidity and junk falling out of the trees on my builds. not to mention orange peel issues, run issues, dulling out paint issues, mostly caused by humidity and the cleanup of the airbrush after the paint session. The cleanup with brush painting is in my kitchen sink with dawn dishwashing detergent. Can't get any easier than that. I just need to figure out how to get the paint to flow better to completely eliminate the brush marks, so I don't have to polish as much. Pierre has found the secret, but I'm still working on it.
-
Thank you so much, Stephen. I really appreciate your interest in the build and your kind words as well. I think I might forego the wip process next build and just take a few wip pictures to post along with the finished pictures. Kind of like what Henrik does when he posts his finished photos. Just a thought right now.
-
Thanks, guys. The brush painting is still a work in progress. I need to figure out a way to get the paint to flow easier, so it has time to flatten out the brush strokes before they dry. Maybe more thinner or maybe add some retarder. If I could get it to act like future, that I also put on with a brush, I would be where I would want to be. More experimenting on the next build. I have decided that I need to print the color decals as ink jet. the small contingency laser decals are just not crisp looking at all with this laser printer. The white underlay decals work just fine. Sometimes you have to double up on them like I did on the quarter panels and doors. the hood 405 decals looked about the same doubled or not. Sure, am glad they came out with the Ghost White toner cartridge.
-
Here is the best ref picture I found of the real Southern 500 car.

-
1966 Mercury Comet
MarkJ replied to MarkJ's topic in WIP: Stock Cars (NASCAR, Super Stock, Late Model, etc.)
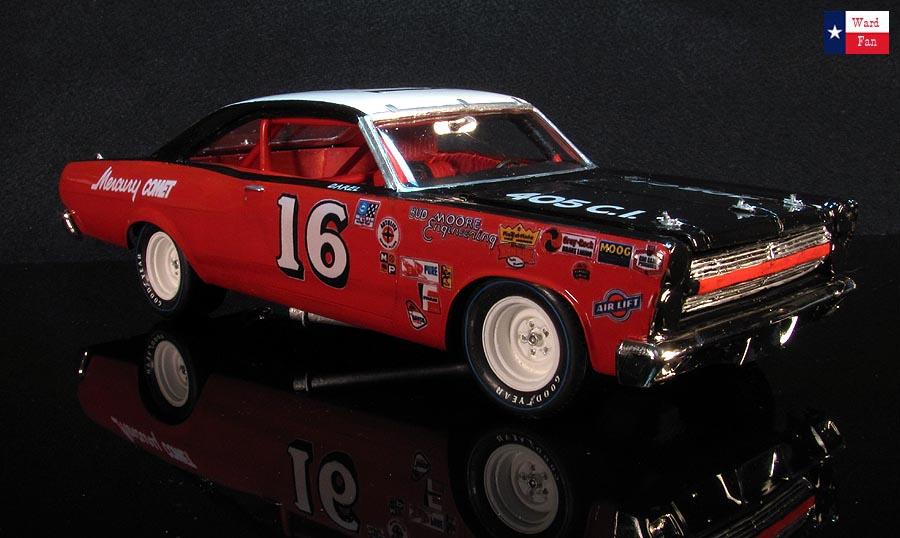
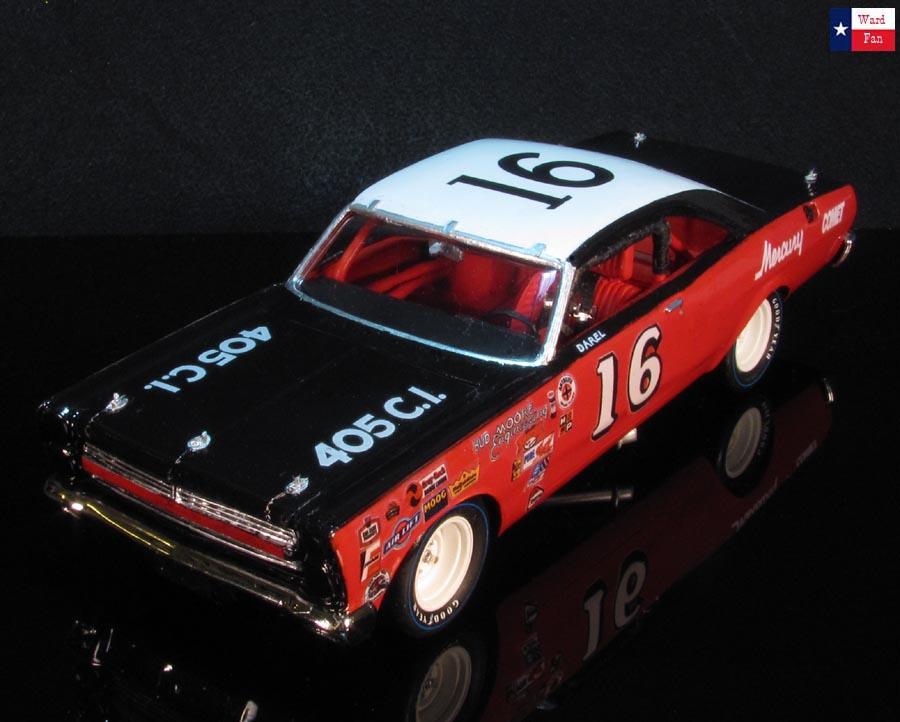
Finished and final pictures posted in Nascar under glass forum in this web site.
-
Started this back in February. I always wanted to build this model but could never find a kit. I decided I would have to take an AMT 1967 Mercury Comet Cyclone and make it somewhat look like a 1966. Finally finished it after much trying and trying again to get it somewhat right. It took 186.5 total hours to build. That includes the 36.5 I used to create and print the laser decals. Its brush painted using Vallejo acrylic paint in the little bottles.
-
Good plan. You don't need to touch it. Just get those decals on, and the future, and that baby is really going to be through the roof Awesome looking. Cant wait.
-
Pierre, My gosh, that body turned out amazingly. No one would ever guess in a million years that you brush painted this baby. It looks better than most spray-painted models I've seen. The interior looks great too. I just can't get over the results you got with the body. Its through the roof impressive.
-
Whoa, that's a long time. But I bet the weather is spectacular up there right now and you want to take advantage of it. I'd be doing the same thing if I were you. The weather down here is the worst we get all year . Thats why we have retractable roof stadiums. It's for the heat and mainly the humidity, which makes the heat unlivable. Our Fall, winter and springs are pretty good though, usually.
-
Pierre, if that 1:1 Grand Sport in the ref pictures is your target then you have it right. I would go ahead and complete this baby. It's going to be awesome.
-
1966 Mercury Comet
MarkJ replied to MarkJ's topic in WIP: Stock Cars (NASCAR, Super Stock, Late Model, etc.)
Wow, Bill. Thanks for the info on parafilm. It did a fine job on your excellent hauler build. Do you have a link or can you tell me where you purchased it. As you can tell I'm yet to find a good masking system. -
Totally agree with the one coat of future at the end to seal the decals. I'm really going to try harder to get thinner coats and less viscosity on my next build.
-
1966 Mercury Comet
MarkJ replied to MarkJ's topic in WIP: Stock Cars (NASCAR, Super Stock, Late Model, etc.)
Thanks, Pierre. all I lack is installing the hood and trunk pins, which on this car the ferrules are oval shaped. Why, I don't know. Then I need to future the decal sheets, something I should have done earlier than this. Then I need to decal the model and finally future the model. I see a lot of glaring mistakes that I won't share, but overall, from a distance, I think it will be an okay build. Especially since It's not what it says it is on the box. Watch AMT release a 66 comet as a round 2 kit with nascar goodies in it. -
Pierre, the fine and finish tamiya sounds like a good way to polish the clear after the sanding. The compound is much more forgiving then the sandpaper. Will you finish it up finally with some future after the polishing? That hood looks amazing like the body as far as no brush marks. I wish I could get those kinds of results with a brush.
-
Wow, that color looks perfect and like you said no brush marks. Did you use more reducer? Polishing will be tough with all those nooks and crannys. Have you thought about using one of the polishing compounds out there?
-
Pierre, whatever you choose for your mix, I'm sure it will look awesome.
-
Great links. Thanks for those. The car you posted seems lighter in color then the photo of the car in the link. But you know it's the same car, so how does one choose what to use? Thats a great shot of the interior in the link.
-
Liked the way you fixed that fender flare and I'm glad the #005 car I did, did not have any louvers in the hood bubble. I guess they were added after the Nassau races.
-
1966 Mercury Comet
MarkJ replied to MarkJ's topic in WIP: Stock Cars (NASCAR, Super Stock, Late Model, etc.)
Thanks, Tim and Pierre. Just got through putting the blue streak decals on the tires. Talk about a scary process. You're trying to get this tiny blue circular decal in a ridge on the tire. somehow, I got all 4 tires done without trashing the decals. One of those hold your breath and pray jobs. -
1966 Mercury Comet
MarkJ replied to MarkJ's topic in WIP: Stock Cars (NASCAR, Super Stock, Late Model, etc.)
No more wips. I finally attached the Body to the frame so just a few more things to do. I'm not going to do some of the detailing under the hood I had originally planned. I just want to finish this thing and move on to the next project, which will have the hood shut and a molded chassis with exhausts removed. I don't want to use my 60 Ford kit as a donor for the chassis. It's going to be a simple build. As they like to say, a shelfer.