Elmer Fudd
-
Posts
82 -
Joined
-
Last visited
Content Type
Profiles
Forums
Events
Gallery
Everything posted by Elmer Fudd
-
You're welcome, Chief! Hope you get as much enjoyment out of it that i did ?
-
I propose a Win-Win solution: Ad Nauseum is a browser extension that clicks on every ad that it finds on every website that you visit. But you NEVER see the ads that it clicks on. So in one way, it acts like an adblocker. But it also punishes advertisers by making them pay Google or whoever for pushing their ads. My desktop box is 12 years old, the memory maxxed out at 8GB, not ever upgrading from Win7 Pro. I ran Ad Nauseum for 3 or 4 months and ultimately couldn't handle the way it slowed my old computer down but do remember that in 2 or 3 weeks it had clicked 10,000 ads which i never had to see. That was great fun! If your device can handle the drag on resources it might be worth consideration. https://adnauseam.io/ *IS* available on Chrome. Click on the Chrome logo at the linked page. In the meantime, i'm with Painted Black.
-

Goodyear tire source question
Elmer Fudd replied to Elmer Fudd's topic in Model Building Questions and Answers
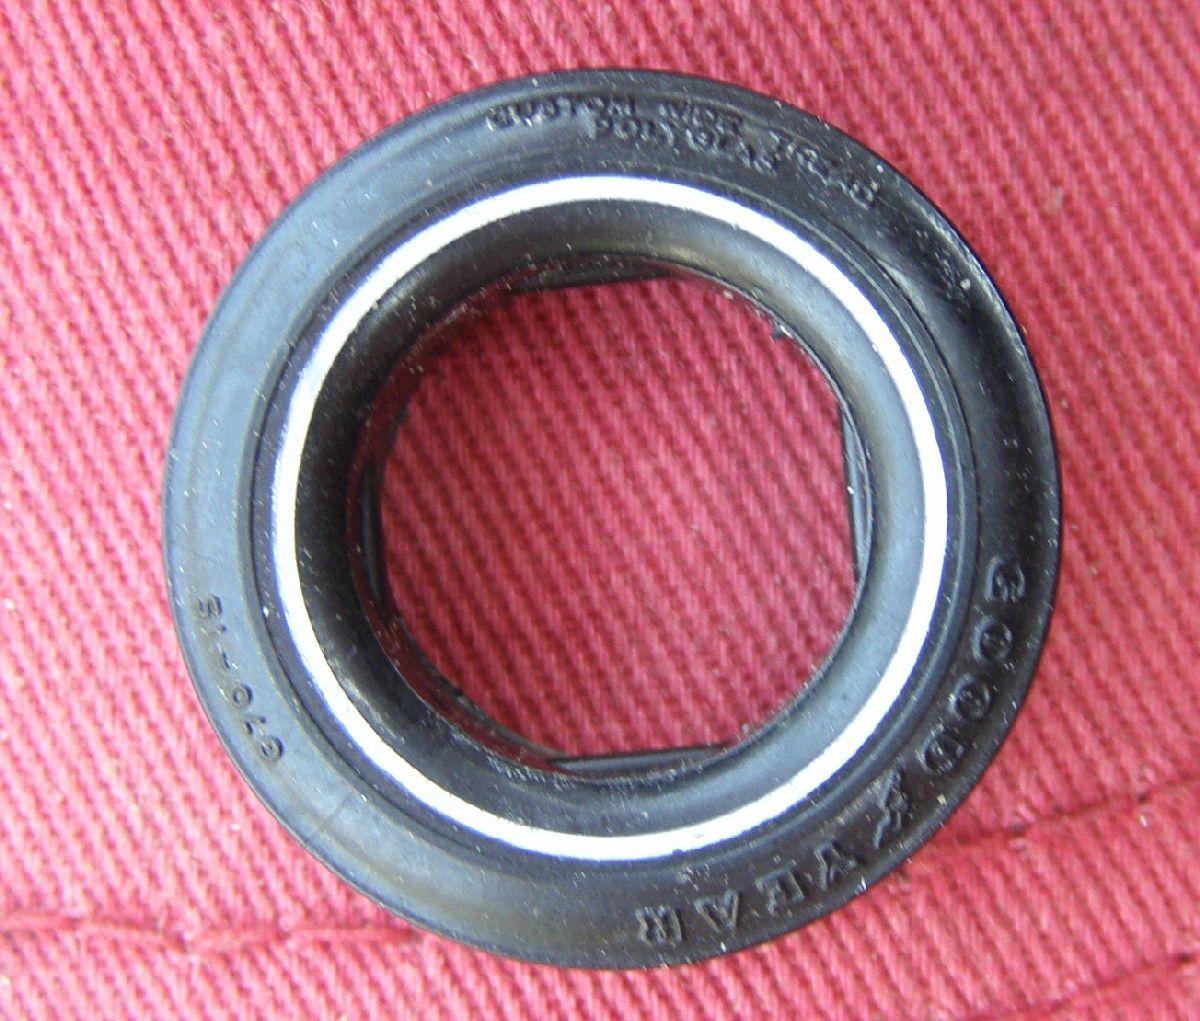
Thanks, Jack! i never would've guessed. May have to just go with the Speedway tires but might try haunting the eBay tire sales for awhile. -
This is a 1/25 scale Goodyear Custom Wide Tread Polyglas tire in G70-15. It very closely resembles the MPC 1968 ½-up Goodyear Speedway Wide Tread tires. It even has the little steps in the I.D. just like the Speedway Wide Treads. But the tread on this one is wider. This tire landed here in a box of junk. What kits did it come from, please?

-
For future reference it might be helpful to remember that ALL 1967-72 SS396 Camaros came with a blacked-out taillight panel which designated them as Big-Block Camaros. COPO orders were obviously excluded. Nice work. Boss!
-
Had Roberta Flack on the mind but yours will work, too. Stay safe!
-
That is exceedingly cool! You can see where you restored the wheelhouse moldings - SUPERB! A very cool kit that will never be seen again!
-
I reckon that you Guardian Angel intervened. You dodged a high-speed projectile. This lathe was a POS. See the video.
-
Ordered a current-model 1/25 car kit from an eBay Seller with over 50,000 feedbacks and presumably a brick & mortar store. Shipping was Free. It arrived today, not in a shipping box but in a bubble envelope, shipped First Class. The box was slightly crushed but no more than i see others come through after they were packed to withstand an atom bomb test. At least it was replaceable if it had been punted around before it got here. It's probably cheaper for him to replace damaged product than to pay double for Priority Mail with $50 free insurance. Rant over !
-
It took only a couple minutes to find an unboxing and review of this exact same model on youtube. (60w mini lathe unboxing) It was a little shocking to see that the overall length of the machine was about the same length as the reviewer's hand. It was sitting on one of those green mats with 1" squares. It looked to be 9-10" long. The review speaks for itself. The comments below the video were brutal. In closing, the Chinese distributor for this lathe probably became a millionaire because of this product alone.
-
Of course, this sucks. But i know of no 1977-79 Novas with a regular vinyl top. Landau tops, Yes. But regular vinyl tops, 1977-79? No? Just Landau tops. I would know. I still have a few parked here at the farm. It don't matter, it's a model car. Models ARE NOT miniature replicas. Please build as you see fit!
-
That's no surprise. If you can find a picture of a real 1977-79 Nova with a regular vinyl top and not the Landau top, i would be thrilled to see it.
-
It looks like the grille opening in the body needs to be moved higher. You may want to check the fit of the hood, first, in case the whole header panel needs to be cut away and moved higher.
-
Yep, You 're a fan of MPC Gen 3 Corvettes. Great pictures, Boss! The MPC kits from 50 years ago had their faults but IMHO, still better than the AMT or Revell productions. As for me, i prefer to build from junk, because i can. No offense to anyone who sees this. That said, i am humbled by your generous offer to make more seats for me. I needed 8 seats and found 8 usable. Then, after investing a little time in making the 8 right, i found 2 more which will be a cushion of sorts if 8 pieces do not make the finish line. i want to believe that i planned okay but if i run short i will be sure to write you! Thanks again for being so helpful and gracious!
-
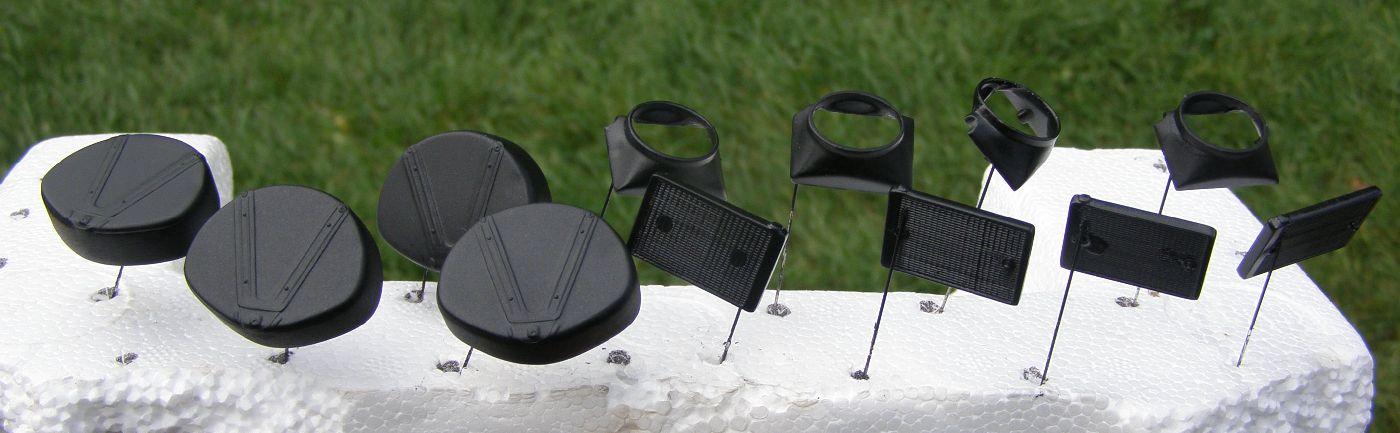
It was time to gather up some seats. 1970-74 seats are kinda hard to come by because so many had the racing seat belts welded to the upholstery patterns. One pair is gonna be 2 seats made from four. Two others need to have divots on the bottom edges fixed where part of the seat stayed on the interior floor when the seats were pried out. Got to fix 'em if they're fixable. The divot fix comes from heating up a piece of sprue with the micro butane torch then pressing the softened sprue onto the divot. After it cools it is removed then glued into place. All of the seats are having posts stuck onto the underside for gluing to the interior floor. It's just too messy to try to glue seat bottom edges to floors. So again, the 1/4" round piece of sprue had one end heated with the torch and pressed into the domed surface under the seat while using a thumb on the other side of the seat bottom as a heat sink to keep from distorting the seat. It sticks just enough to cut off most of the surplus with the hot knife. Then the stubby is picked off the seat and glued into place using a pencil mark on the stub that points to the front edge of the seat. Later the stub will be worked down to level with the bottom edges of the seat and a .020" thick piece of styrene glued to the stub to slightly elevate the seat for a good bond when it is glued to the floor. Similarly, styrene posts were added to the chassis to allow the spare tire carrier to be glued to a post rather than the poorly designed attaching points provided by MPC. The square posts were made from MPC Corvette chassis frame rails, filed flat on one side and glued together. The spare carrier that was windowed with the hot knife will serve as a gage when working down the posts to fit the spare tire covers. But the wrong side of the cover got windowed so another carrier will be called upon to make the ultimate sacrifice. That about does it!
-
Very Nice Work, Dear !
-
The headlight treatment is reminiscent of the 1954 Buick Wildcat II. Very Cool!
-
I am so sad to read your post, Slusher. May the God of your choice keep you safe!
-
Well, sir............it takes some self-control to stop spraying when the clear looks a little wavy. But after 2 light coats and another fairly wet coat you need to wait a few minutes for it to level out. Then move your subject to a dust-free environment. Practice makes perfect. Best to practice on a piece of junk because 2-part urethane resists the weather AND cutting & polishing.
-
Hello, Men. It was a 2-part (catalyzed) automotive clear urethane over Duplicolor lacquer touchup spray in the discontinued small cans. Over the past 25 years several different brands were used here. Sometimes it was leftover material from spraying clear on a real car. Other times it was some cheap stuff that came from the painter's supply store. Regardless of the brand, they ALL came out glossy like this with zero buffing. From reading, it appears that the only difference between brands is the advertised durability against outdoors weather and UV from the sun. Since the model cars are living the good life inside the house, durability is not a concern. 2-part urethane is tack-free in 1 hour. So after topcoating with clear they were moved to a room in the house where the air is still. Final answer: it's unknown what brand was used here but (apologies) it was not 2K. The painter is too cheap to spring for a well-known name although he did use the PPG system on the kid's drunken and foolish off-road excursion and resultant consequences. Y'all have a great Holiday Weekend!
-
Mission Impossible - American Graffiti cop car from a wreck
Elmer Fudd replied to alan barton's topic in WIP: Model Cars
It's always uplifting to see someone with more ambition than me. You go for it, Boss! -
I have a few, but am not going to be a board hog. MPC 1970 Corvette made from a 1971 or 1972 molding. Marlboro Maroon is the Chevy color name.
-
Revell Garlits 1/16 Scale Dragster done-FINALLY
Elmer Fudd replied to sflam123's topic in Drag Racing
Looks Great! Might have to put that one on the to-do list! -
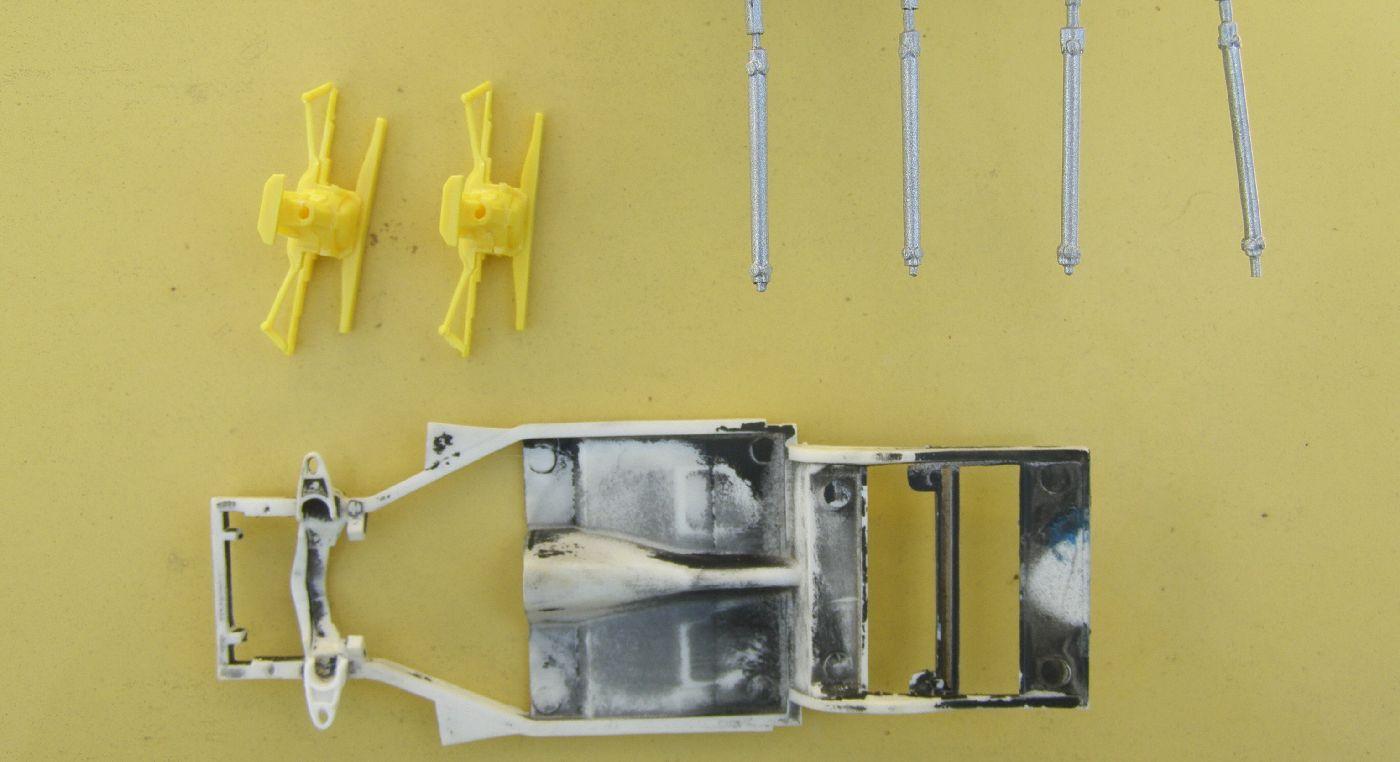
Here we go again: Spare Tire Covers, Radiators and Shrouds. The Spare Covers painted 2 wet coats of flat black then immediately dusted from a distance with Semi-Flat black to impart a little more interesting surface. The Covers all have this weird depression to the upper right of the Vee that must've been in the wooden master when they traced it. Could see it when the parts were being cleaned up for paint. No point in trying to fix it. The radiators are glossiest here and the shrouds are a velvety Semi-Flat black made by 2 wet coats of flat black soon followed by one wet coat of Semi-Flat black. Was looking for rear suspension pieces yesterday and may have to sacrifice another unbuilt to the cause. Also looking at an unsanctioned revision of the assembly sequence in the rear suspension in order to make everything more secure. There's just too many loose parts to glue, mount and hold all at the same time the way MPC suggested it. Too much potential for a gluey mess that would create a major setback. The trailing arms also need to be pinned to be safe, it seems. Carry on, ya'lls! One last mini-update for today.... Found some spray paint among the hoard that nicely mimics cold-rolled steel so the driveshafts got cleaned up, 2 had a 1/16 holed drilled in one end for a replacement locating pin, and then painted. Debugged a couple differential housings and stuck them together. Still need to piece together 2 more. Then replaced the left control arm on this early front spring chassis. About 1/2 of the prebuilt spring chassis are just too gluey to save. This one was pretty barren of glue so the remnants of the broken control arm buzzed off level to the top of the frame rail then a replacement cut off a gluebombed chassis below the horseshoe. After the mating surfaces were squared up they were stuck together and it took a good 15 minutes to work the arm into final position. It's position within 1/64 of an inch of the other side and level with the other side. Hope it was all worth it !
-
'62 Chrysler Newport rabbit hole (they multiply)
Elmer Fudd replied to ChrisBcritter's topic in WIP: Model Cars
The 2Bbl carb in the MPC Chevy Monza kits might be passable. It has a round air cleaner surface and a squarish front float bowl. It looks like it would need a base (throttle) plate added and maybe a little more material on the underside of the shallow float bowl. The AMT Monza has a primitive 4Bbl carb which never came on a stock Monza.
.jpg.8767f94a005735dbac73f421ca2f7bd0.jpg)
.JPG.1fb8589817206a2a2378e524815c59c4.JPG)