Pierre Rivard
-
Posts
2,579 -
Joined
-
Last visited
Content Type
Profiles
Forums
Events
Gallery
Everything posted by Pierre Rivard
-
1962 Rolls Royce Silver Cloud II by Minicraft Models: WIP
Pierre Rivard replied to David G.'s topic in WIP: Model Cars
Beauty David. All the burled walnut trim is very convincing. -
Thanks Mark, the small volume producers (resin cast, 3D print, detailing components) are bringing the bulk of the new stuff to the hobby so it is critical that we promote their amazing work. Thanks John. I don't have an airbrush so I could only use the techniques doable with a brush but it was enough to get finishes that feel fairly realistic. I will definitely try this again someday.
-
Wow Mario, what a gorgeous build. Patiently working off all that trim really paid off. The model as you built it combined with the diorama and that color...looks so real I feel transported back to the seventies. In the sixties american cars were brash, beautiful, dominant but it changed in the seventies as all these wonderful small, nimble import sports cars showed up in growing numbers. BMW2002, 240Z, RX7, TR6, X-19, 914, 924, Capri...those were the days. OK Scotty, please beam me back. Thanks for the time capsule Mr Tondreau!
-
I feel your pain Andy. I went through a similar scenario working out the exhaust pipes on my 8C. Felt like a dog chasing his tail. Lots of work but you'll end up routing it the way it should be. Are the parts very brittle on your's. I kept breaking up the engine outlets despite heating up the parts.
-
Hi John. Hard to make a fair comparison as this is my first resin kit. I found it more challenging than working with styrene but definitely manageable. The body is awesome and the metal wires acting as fender brackets are very well engineered. The laced wheels are very nice but had lots of pits in the rims and tire sidewalls. Chassis is a one piece mould and not very good but workable. The engine is basic but turned out nice because I did a lot of upgrading. Overall I like the kit but it does have some issues. I think Fernando's newer designs have addressed these issues. I'll definitely build more FPPM kits in the future. The subjects are so interesting.
-
It looks very very nice Phil. You've made the kit tires work, which I was not able to. You have paid attention to the specifics of this car at that race (oil coolers, hood louvers etc) which beautifully captures a moment in history. Congratulations on mastering this difficult kit.
-
Nissan r 390 GT Tamiya
Pierre Rivard replied to happy grumpy's topic in Other Racing: Road Racing, Salt Flat Racers
Beautiful build Mario. The black and red livery really pops. I love the various metal tones and finishes you applied to the engine side. Bravo! -
Thanks Tim. I think it is mostly due to the weathering. Period pictures indicated that paint was not glossy and cars were spitting a lot of oil. Reproducing that with brown washes and dark pigments has worked really good. Definitely something I will do again. Merci Mario. I surprised myself with this weathering experiment. Nothing fancy, just done with brushes. I got a bit lucky there. Thanks Rich. I sent Fernando the pictures with a thank you note for producing pre-war race car kits. His posting on his facebook page is icing on the cake. Thank you Philippe, a first pre-war race car build for me. I very much enjoyed it.
-
Thank you Pat, support much appreciated!
-
1968/69 Porsche 908 Longtail
Pierre Rivard replied to Rich Chernosky's topic in Other Racing: Road Racing, Salt Flat Racers
Stunningly beautiful Rich. Fit and finish are impeccable and the low and aggressive stance convey speed in a most impressive way. The wipers alone are a work of art. Man this build is absolutely gorgeous! -
Congratulations Phil. Your GS looks formidable. Rich with detailing and a paint finish that has the perfect 60's race car look.
-
Superb result. Most impressive is the finish on all the "brass" components. Very lifelike!
-
Box Art Favorites
Pierre Rivard replied to Zippi's topic in General Automotive Talk (Trucks and Cars)
I love the art work on Fernando Pinto kits.
-
I second Helmut's review. These look fantastic and are very easy to paint. I have 5 sets and starting work on my first Ferrari with these. At least as good as PE replacements quite reasonably priced. I highly recommend them.
-
Nice to see Jason's wheels & tires on a finished model. You gave new life to an old kit and Jason's parts are a definite upgrade for these nice Ferraris. Thanks for sharing it Helmut. We never tire of seeing cars from your GTO stable.
-
This is seriously good scale modeling!
-
PM sent
-
Little Alfa has taken center stage as every new model does...until it is replaced by the flavor of the moment. Reception committee has been a bit reserved but everybody is behaving.
-
Thank you Helmut for the constant support. I had my doubts along the way but it came out better than expected. Moving on to a Fujimi GTO! Thanks JC, very kind coming from a master like you. Thanks Chris, support much appreciated I doubt that Phillip but I am proud of the result I have achieved Blood, sweat, tears, anxiety, tears (again), luck, luck, relief... Ooh so we'll have another Barchetta on a bench. Go for it man, give Andy a run for his money. Detailing battle!
-
Ebbro Brabham F2
Pierre Rivard replied to Andrew McD's topic in Other Racing: Road Racing, Salt Flat Racers
Very nice build Andrew. These Ebbro kits look to me well designed. -
Louis you present amazing builds and this one deserves a good spot in your stable. You have given the engine a huge boost in realism where others would simply substitute it for an aftermarket piece. Wonderful and inspirational model building. What source have you used for the tires and wheels? Gunze Sangyo?
-
Merci Claude, I am happy with the way it came out. For this subject I like it better than the shiny new look. Thanks Hanjo. I used your work on Alfas as inspiration. You bet! I almost quit on it but now happy I did not give up the fight. Thanks Donato, it came out better than expected. Thank you sir. I shared the weathering technique in the w.i.p. and it was pretty easy to do. Jasu washes and pigments applied with brushes. Thanks Jason, very kind of you Thanks Jim, it was a fun build...in the end. Thanks Rich. Taking it slow with a OOB 250 GTO for my next project.... but for sure another pre-war race car in the future Fernando is still around pumping out new kits. I thought this would be my first and last resin build but I am now feeling much better about it. More Pinto kits in my future no doubt. He produces some kits of very interesting period race cars. You should try one. So do I Garry. Race cars from the thirties to the sixties are my favorite.
-
Porsche RS60
Pierre Rivard replied to afx's topic in WIP: Other Racing: Road Racing, Land Speed Racers
The chassis may not be the perfect replica as you say but nevertheless it looks awesome. What you have done will make the cockpit opening look very much like the real thing. -
Thanks for the kind comments guys. Here is the link to the presentation under glass
-
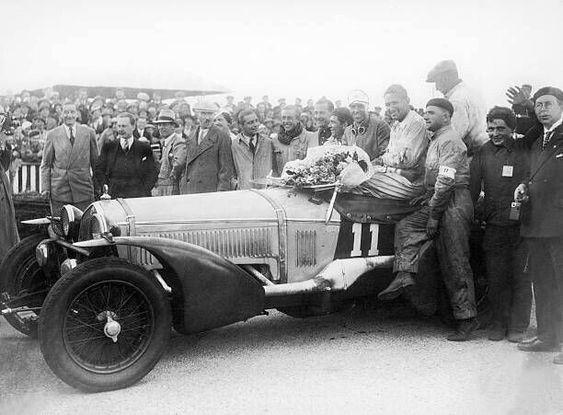
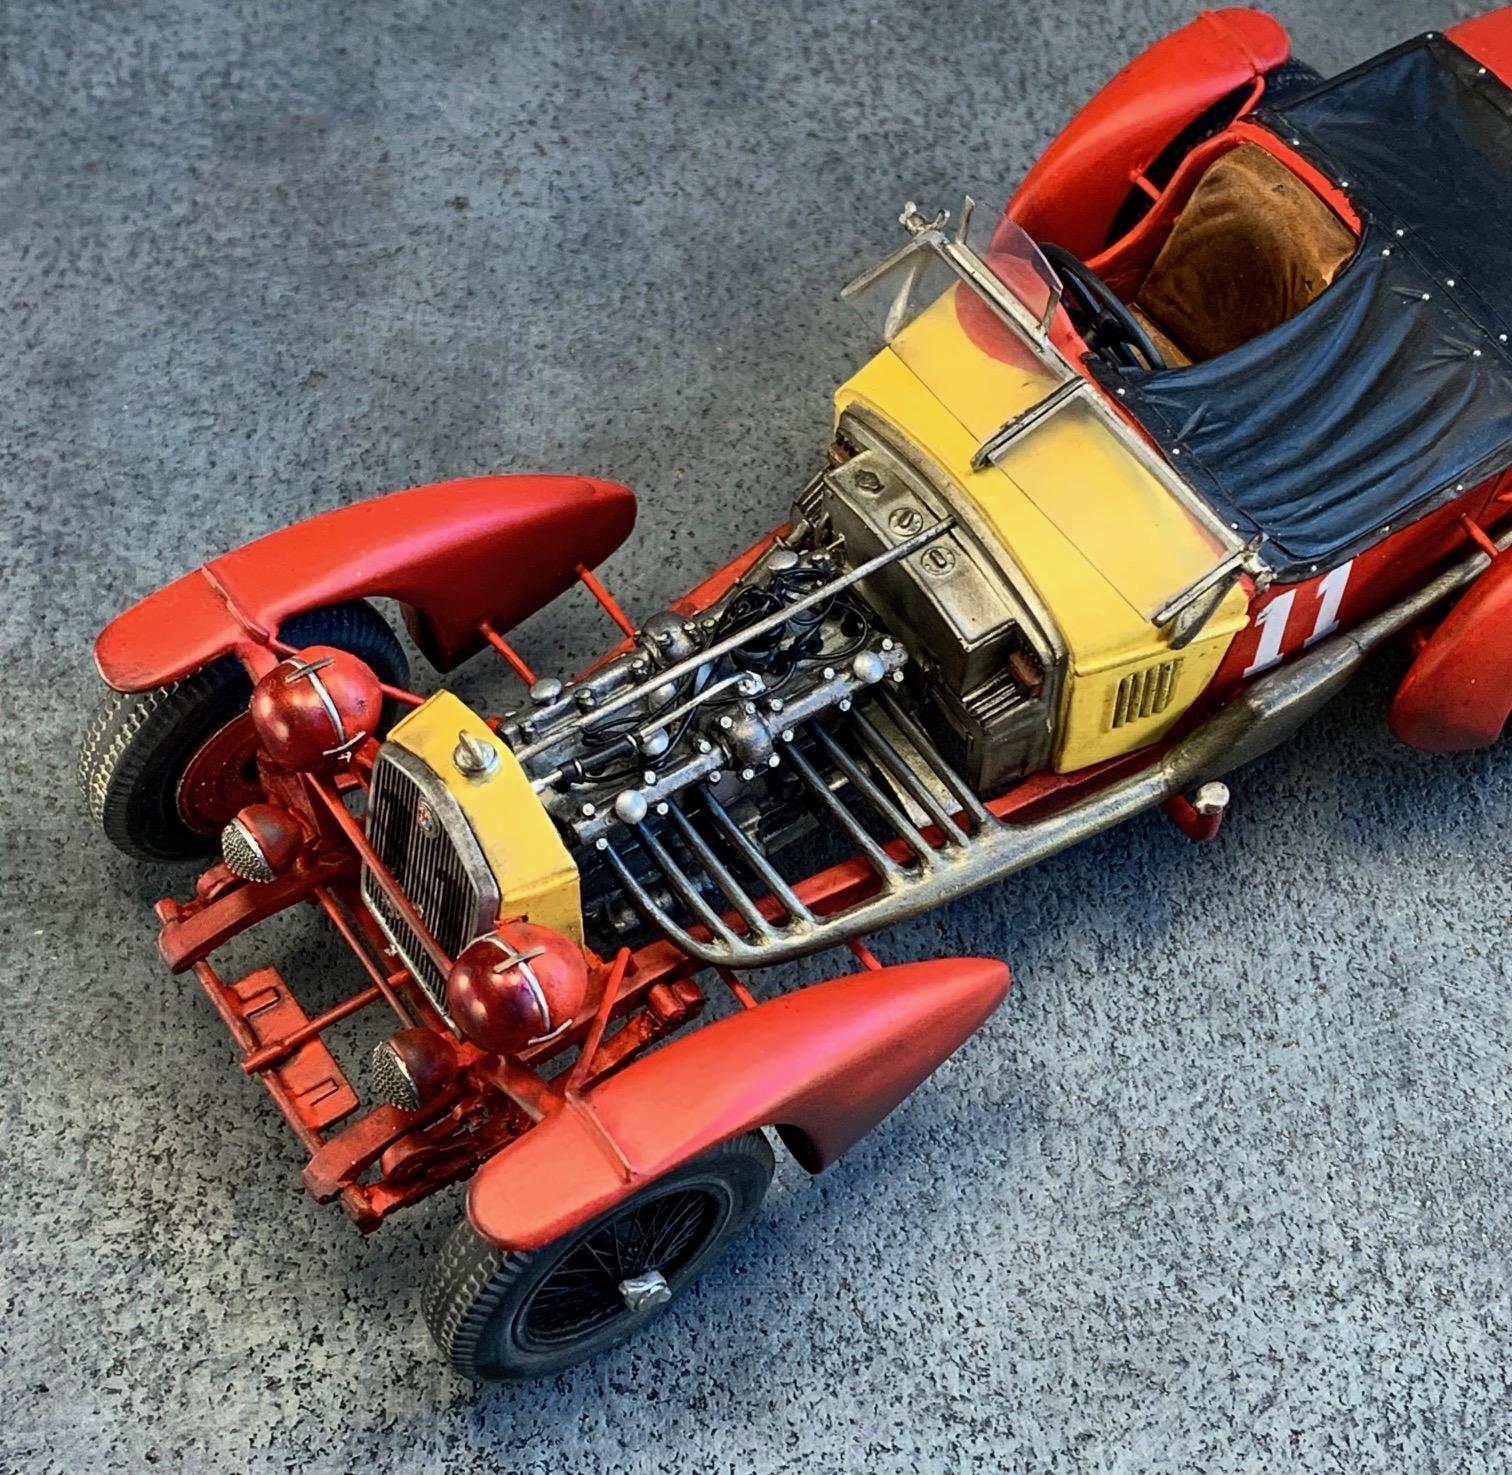
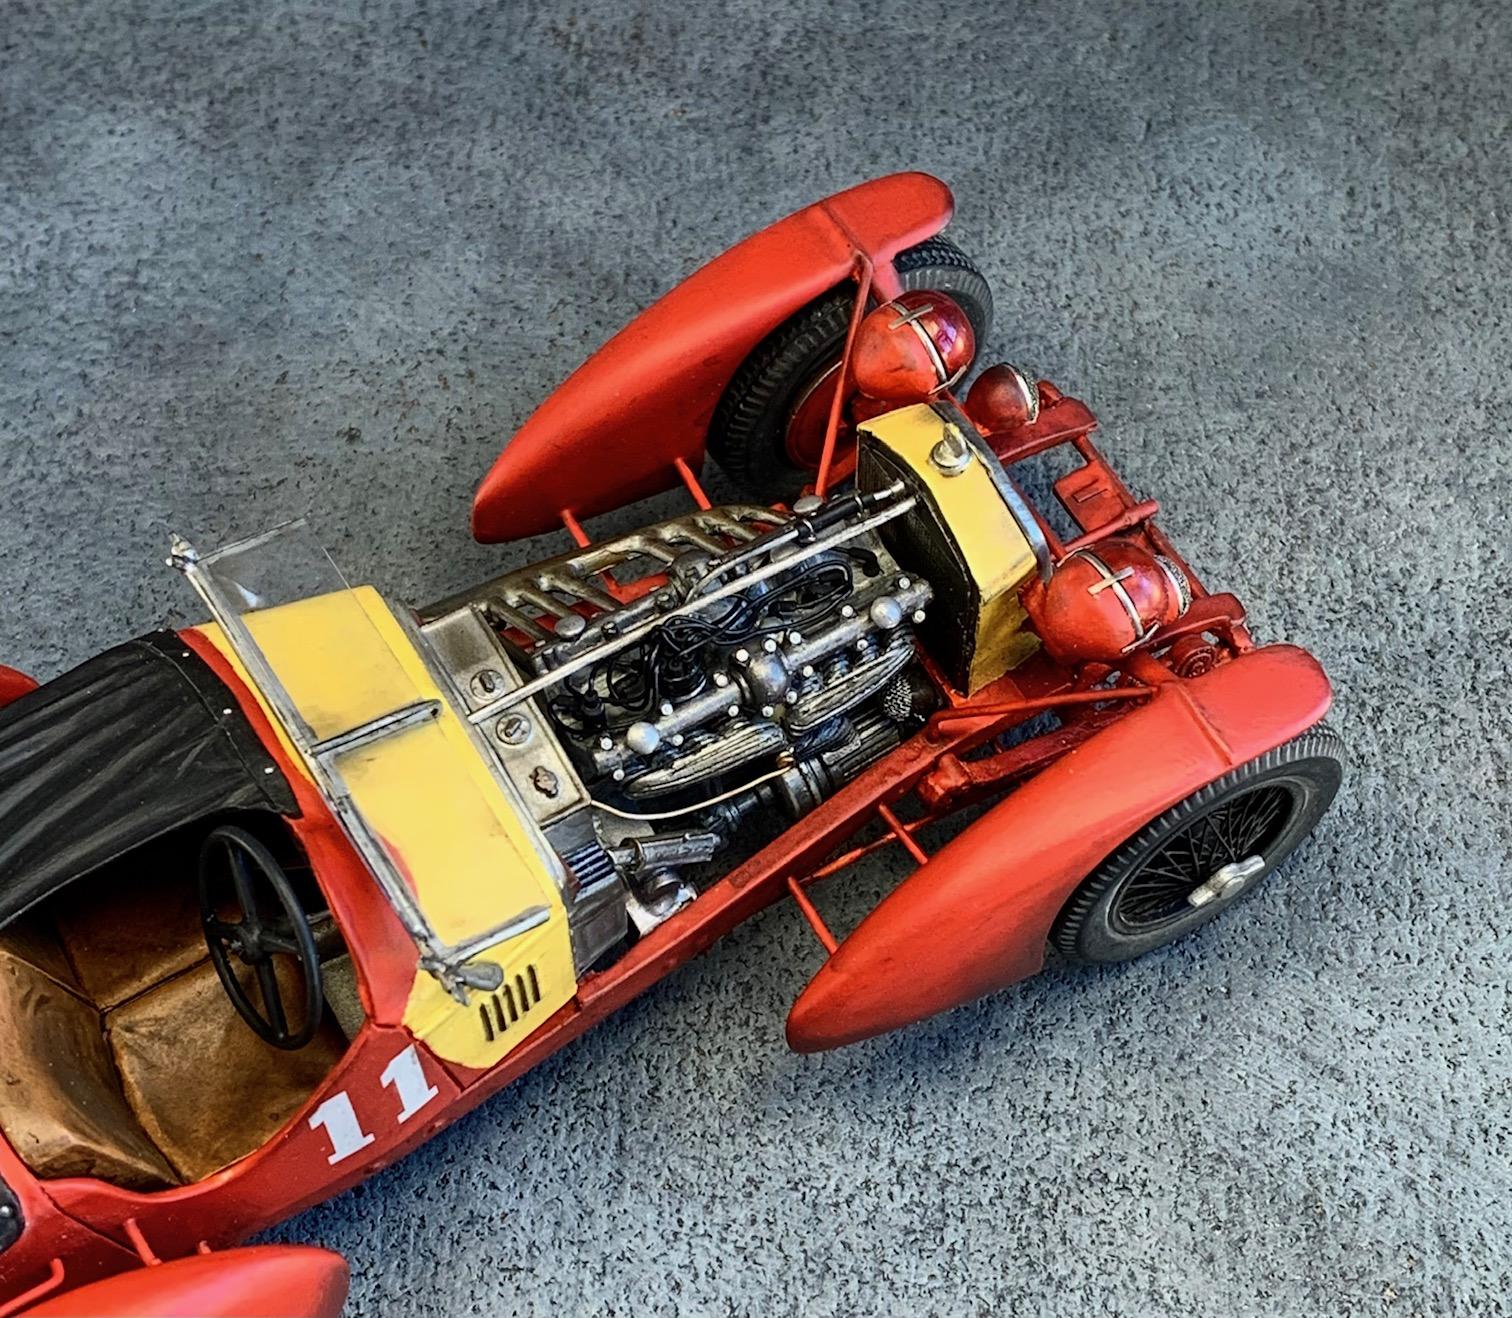
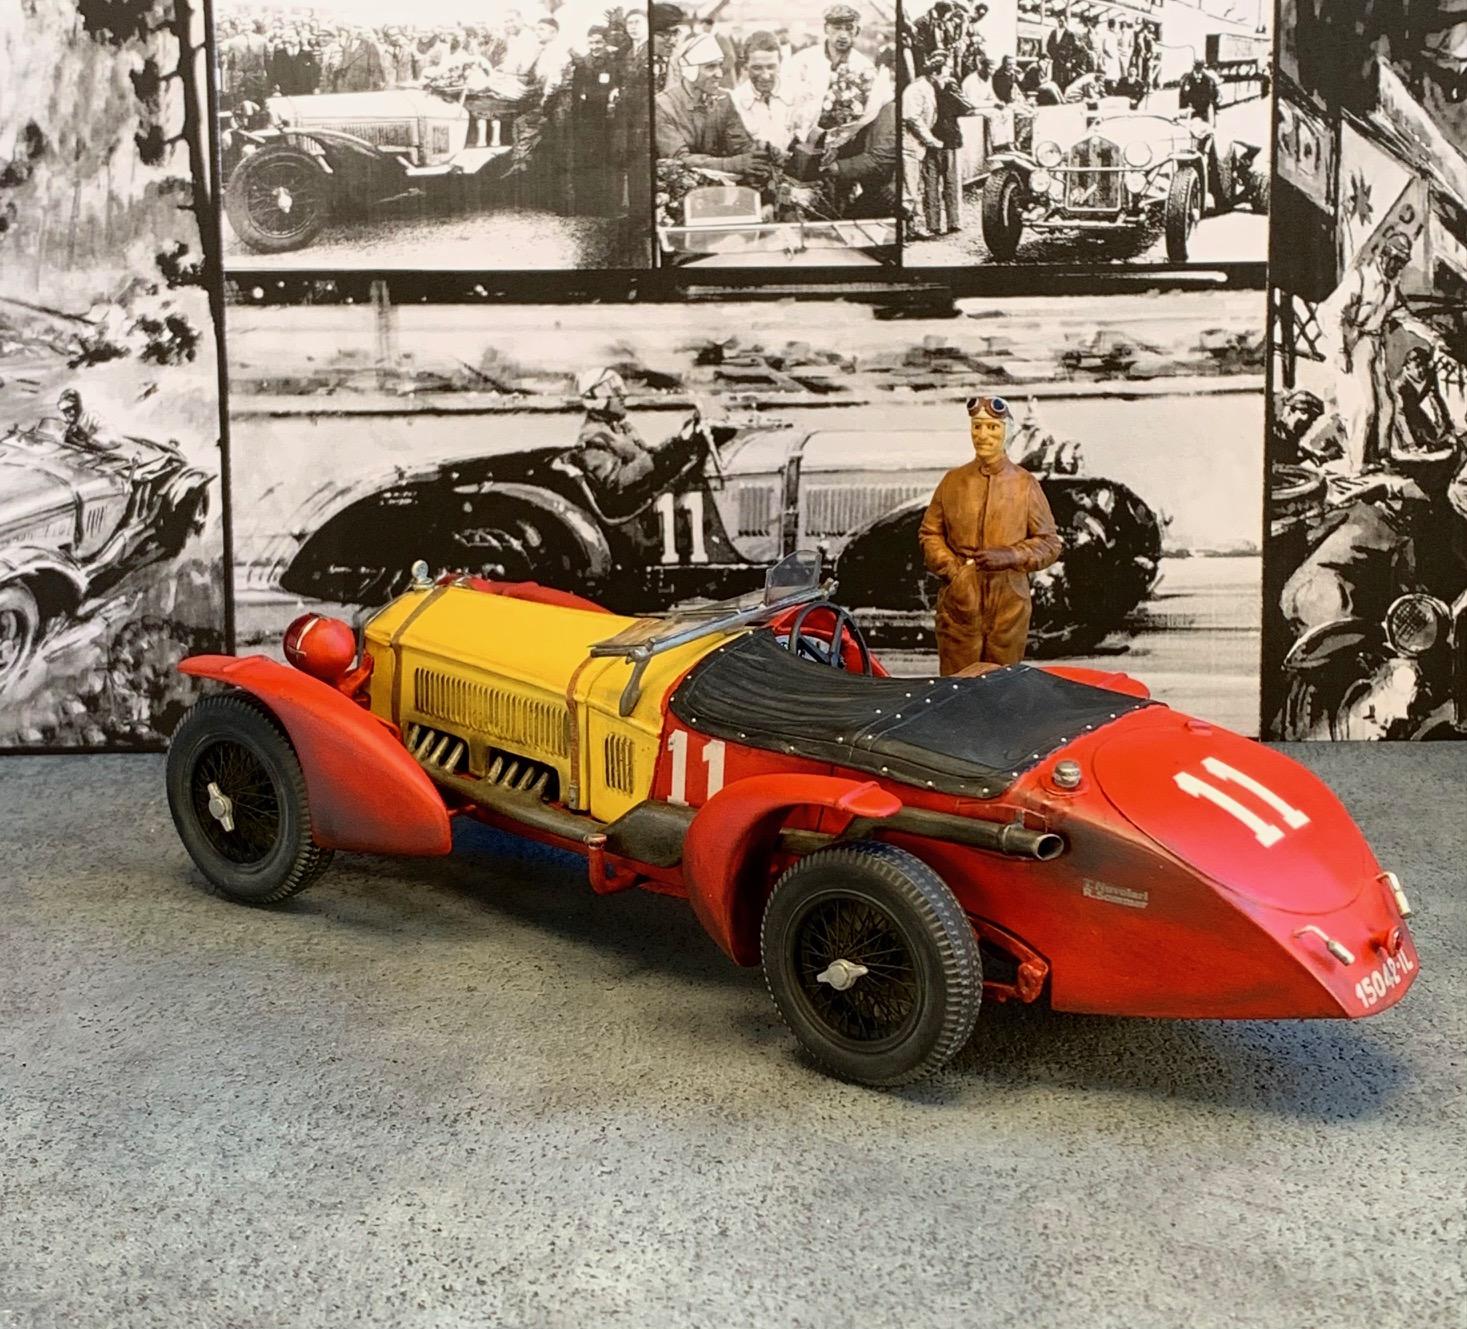
The 1933 Lemans winner driven by Tazio Nuvolari and Raymond Sommer. A Mille Miglia version of the 8C adapted as a 4 seater to meet Le mans specifications hence the MM-LM denomination. Definitely the faster duo in this race yet the win did not come easily due to unscheduled maintenance stops for brakes, radiator leaks and fuel tank leaks requiring them to regain the lead multiple times and eventually winning with a slim 9 second margin. Built from a Fernando Pinto resin kit. The body shape was very good and smooth. The chassis is a basic one part affair and the engine rather basic but some upgrading and detailing made it pretty good in the end. I also made my own hood straps as replacement of the resin pieces supplied with the kit. Other than that it was pretty much OOB. Unsure of the finish I could achieve I decided on a matte & race weathered look instead. Tamiya fine primer, AK and Vallejo acrylic colors, Tamiya flat clear and Vallejo washes and pigments for weathering. Overall a good first experience building a resin kit.
- 50 replies
-
- 12
-