BK9300
-
Posts
1,993 -
Joined
-
Last visited
Content Type
Profiles
Forums
Events
Gallery
Everything posted by BK9300
-

Mack AC Dump Truck with Pneumatic Tires
BK9300 replied to Pete68's topic in WIP: Model Trucks: Big Rigs and Heavy Equipment
Very cool, old timer of a truck, Lee! -
Marvel's Hydra coupe 1/12 scale full scratch build
BK9300 replied to François's topic in WIP: Model Cars
Looks great, François. How do you find the strength of your frame rails given their length? -
Western Star 4900 FA plow truck
BK9300 replied to BK9300's topic in WIP: Model Trucks: Big Rigs and Heavy Equipment
Thanks, Lee, and all the best to you in 2025! -
1941 Willy's Pickup
BK9300 replied to Zippi's topic in WIP: Model Trucks: Pickups, Vans, SUVs, Light Commercial
Great colour for your build! Scary to imagine the handling of a real pickup like this with the power you have planned for up front! -
Very well done, excellent craftsmanship and very in depth knowledge about the construction of a NASCAR car!
-
Western Star 4900 FA plow truck
BK9300 replied to BK9300's topic in WIP: Model Trucks: Big Rigs and Heavy Equipment
And a Happy New Year to you too - hope its a great 2025! -
Western Star 4900 FA plow truck
BK9300 replied to BK9300's topic in WIP: Model Trucks: Big Rigs and Heavy Equipment
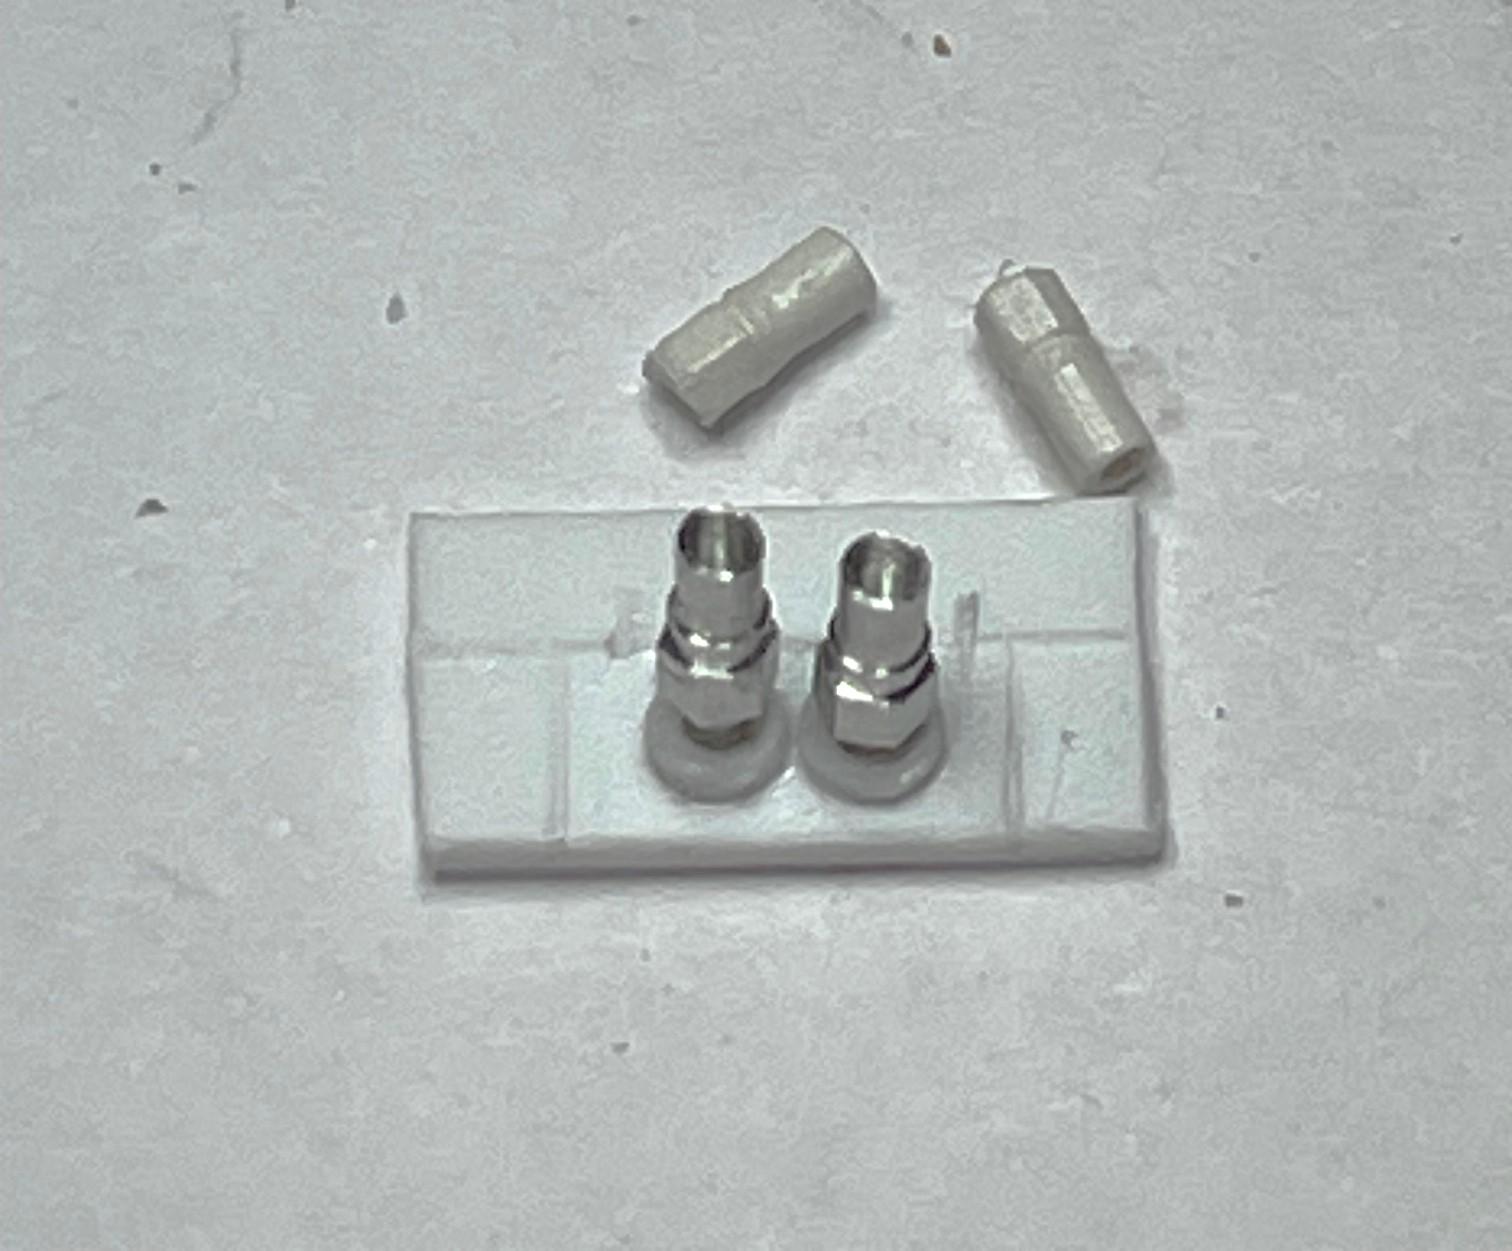
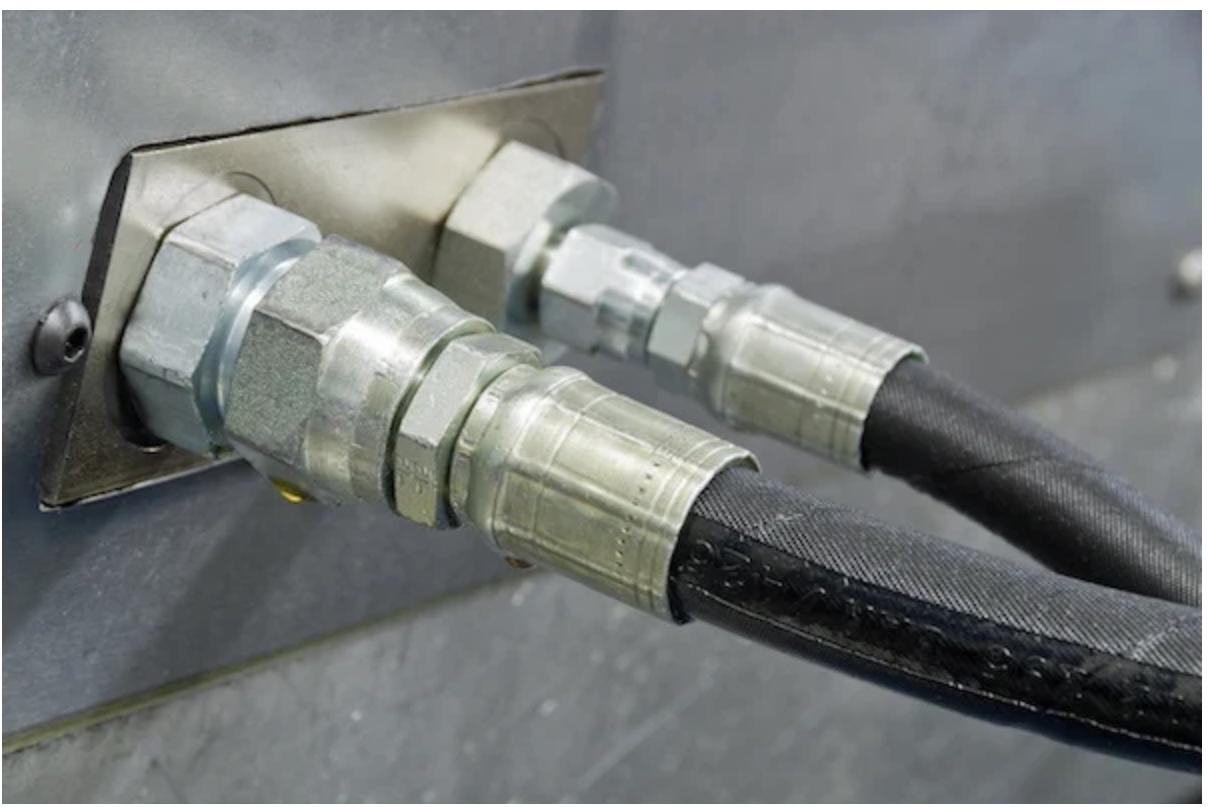
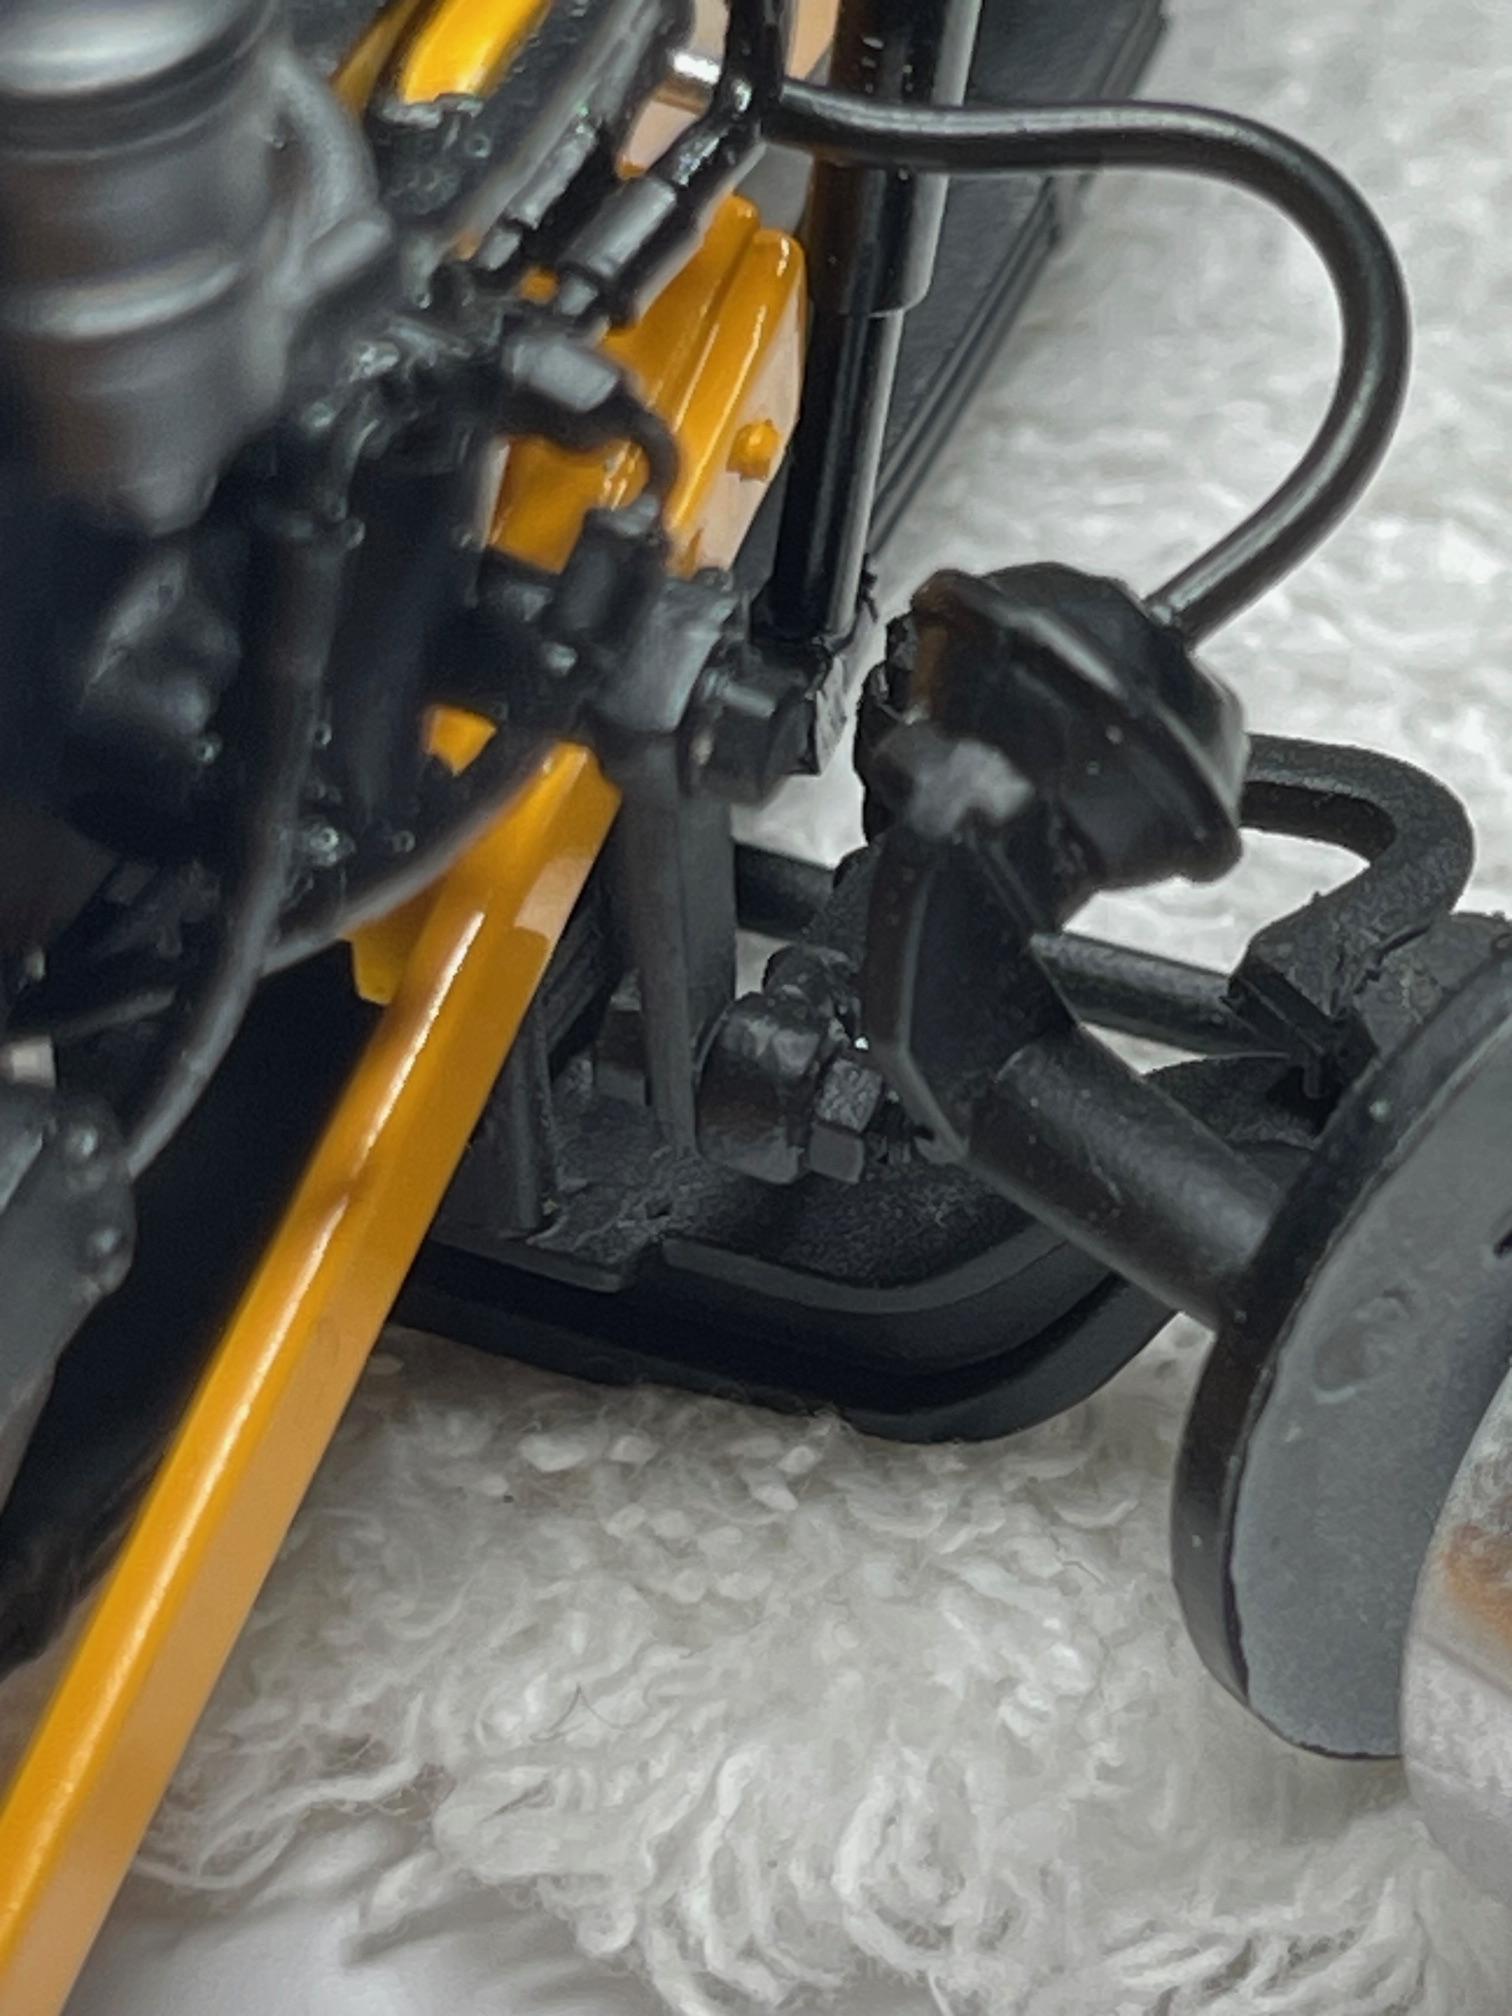
I mentioned a few posts back that I had/needed to make a change with the hydraulic lines to the front plow lift cylinder. I messed up a when originally laying out and running all the lines from the valve manifold - the lines running to the front plow were too big for scale and just didn't look ok coming through the front bumper. The lines I have attached to the cylinder now are a better look for scale, but now I have two different size lines to match up. I learned from Craig, a Mechanical Supervisor at YRB, that the company now uses bulkhead fittings to get through the bumper assembly, and Jeff was able to find a confirming picture of this as well. My 'story' is that a new practice was incorporated into an older front bumper assembly that was already in inventory when the truck was built! Last couple pics of 2024! - Sample bulkhead fitting I need to fashion: started on the bulkhead fitting - the scribed lines indicate the size of part of the existing bumper opening and the rest of the material will be a flange to CA glue the fitting plate to the back of the bumper Happy New Year, everyone, and all the best in 2025!
-
Mercedes Benz SSK
BK9300 replied to Pierre Rivard's topic in WIP: Other Racing: Road Racing, Land Speed Racers
Fabulous work, Pierre! -
1/43 1971 Peterbilt 359 Watkins Motor Lines
BK9300 replied to Pete68's topic in Model Trucks: Big Rigs and Heavy Equipment
Looks great, Lee - looking forward to seeing it paired up with your trailer! -
Very fine work on this, with all your modifications and add-ons. The wheels look great and the natural light sure makes your colour choice pop - great looking car!
-
Stout is a good description - a 'no-nonsense' truck - looking good, Lee.
-
Western Star 4900 FA plow truck
BK9300 replied to BK9300's topic in WIP: Model Trucks: Big Rigs and Heavy Equipment
Thanks, Lee - it was another one of my ‘do-overs’ before it looked good! -
Western Star 4900 FA plow truck
BK9300 replied to BK9300's topic in WIP: Model Trucks: Big Rigs and Heavy Equipment
Appreciate you looking in - thanks, Ken! -
Western Star 4900 FA plow truck
BK9300 replied to BK9300's topic in WIP: Model Trucks: Big Rigs and Heavy Equipment
Thanks, Jeff - getting harder to add the smaller details, though, as this build gets closer to the end! -
So much detail you’re adding to your engine! Where did you find the ‘brass’ fittings for your injector lines - they are incredibly small!
-
You come up with endless variations on hiding your battery/wiring - well done!
-
Western Star 4900 FA plow truck
BK9300 replied to BK9300's topic in WIP: Model Trucks: Big Rigs and Heavy Equipment
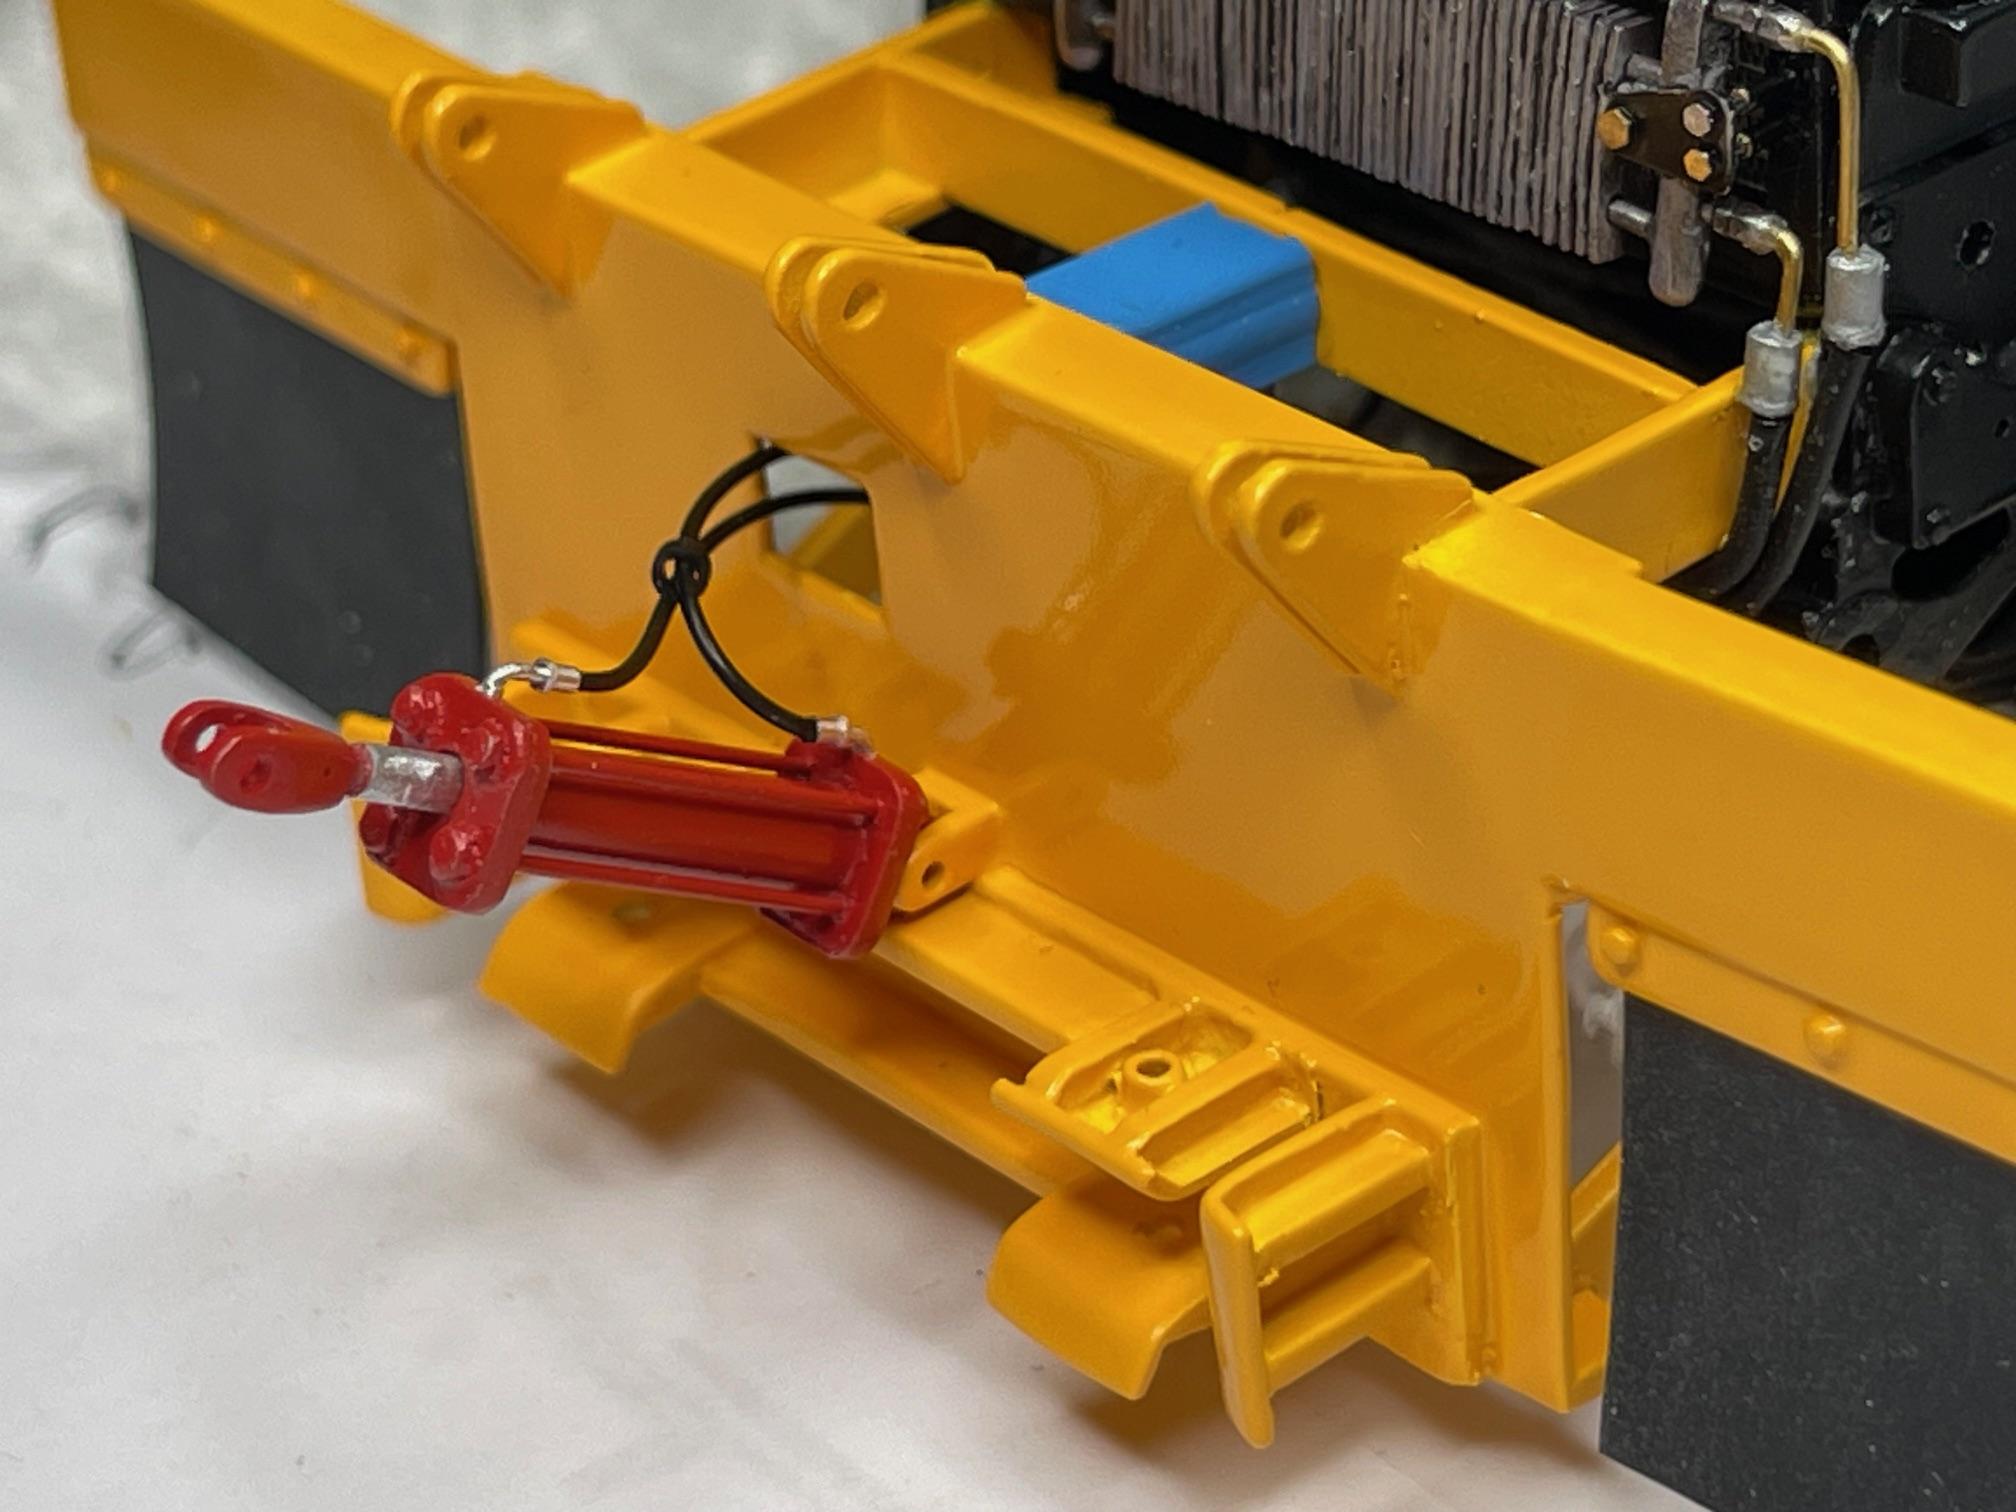
Still one more thing to do before the truck gets up on its tires and that is to hook up the front plow lift cylinder. Managed to get the fittings and lines attached, and had to make a change there, too. Didn't mount the cylinder in place yet, but did get a couple pics of it in place for time being. Had made the lift cylinder some time ago, but needed to add fittings for hydraulic hoses - fittings are from R & B Motion Hoses attached - A couple mock up pics of lift cylinder in place, temporarily (need to change the oversize band holding hoses together) Should be more tomorrow - take care!
-
Build of IH Pumper
BK9300 replied to Chariots of Fire's topic in WIP: Model Trucks: Big Rigs and Heavy Equipment
It sure would help for me to acquire this skill - great info, Charles - good idea for a build thread! -
Marvel's Hydra coupe 1/12 scale full scratch build
BK9300 replied to François's topic in WIP: Model Cars
Very impressive, François, wonderful engineering! -
Western Star 4900 FA plow truck
BK9300 replied to BK9300's topic in WIP: Model Trucks: Big Rigs and Heavy Equipment
I appreciate the generous comments, Lee! Out of box or detailed build, I’ve listened to you and others talk with easy familiarity, and with authority, about trucks and your experiences with them in your lives. You, and all the others care a great deal about them and your builds show that. I’ve never operated a truck, but do have a different knowledge about them and sure have admired them most of my life. Contributing what I can to a great topic (trucks!) and hobby along the way! -
Western Star 4900 FA plow truck
BK9300 replied to BK9300's topic in WIP: Model Trucks: Big Rigs and Heavy Equipment
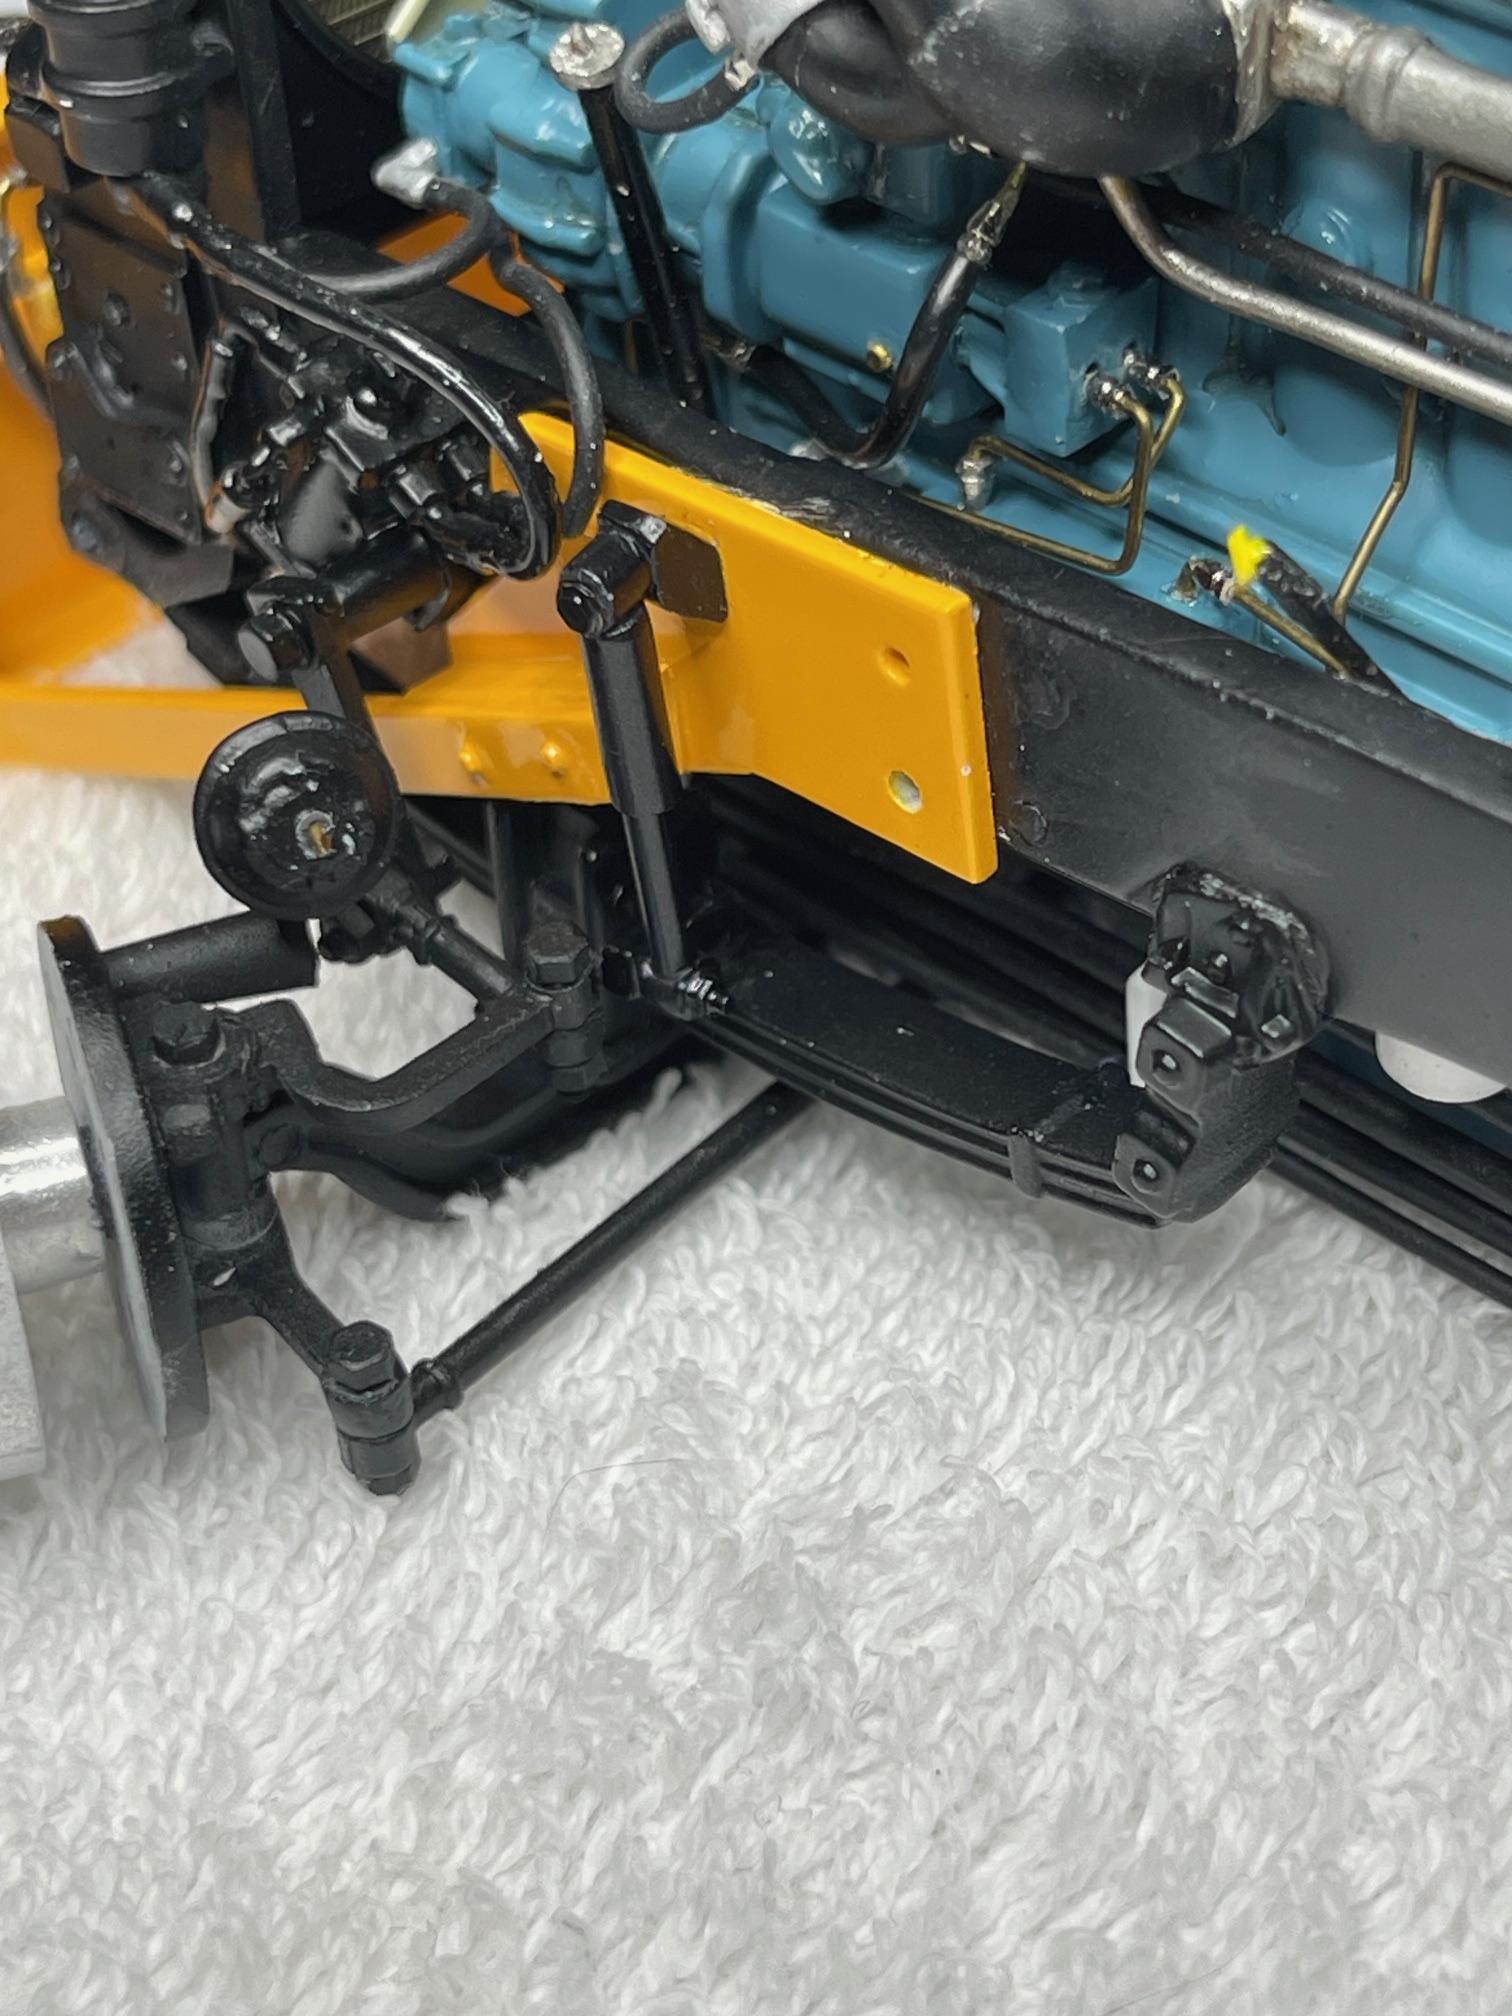
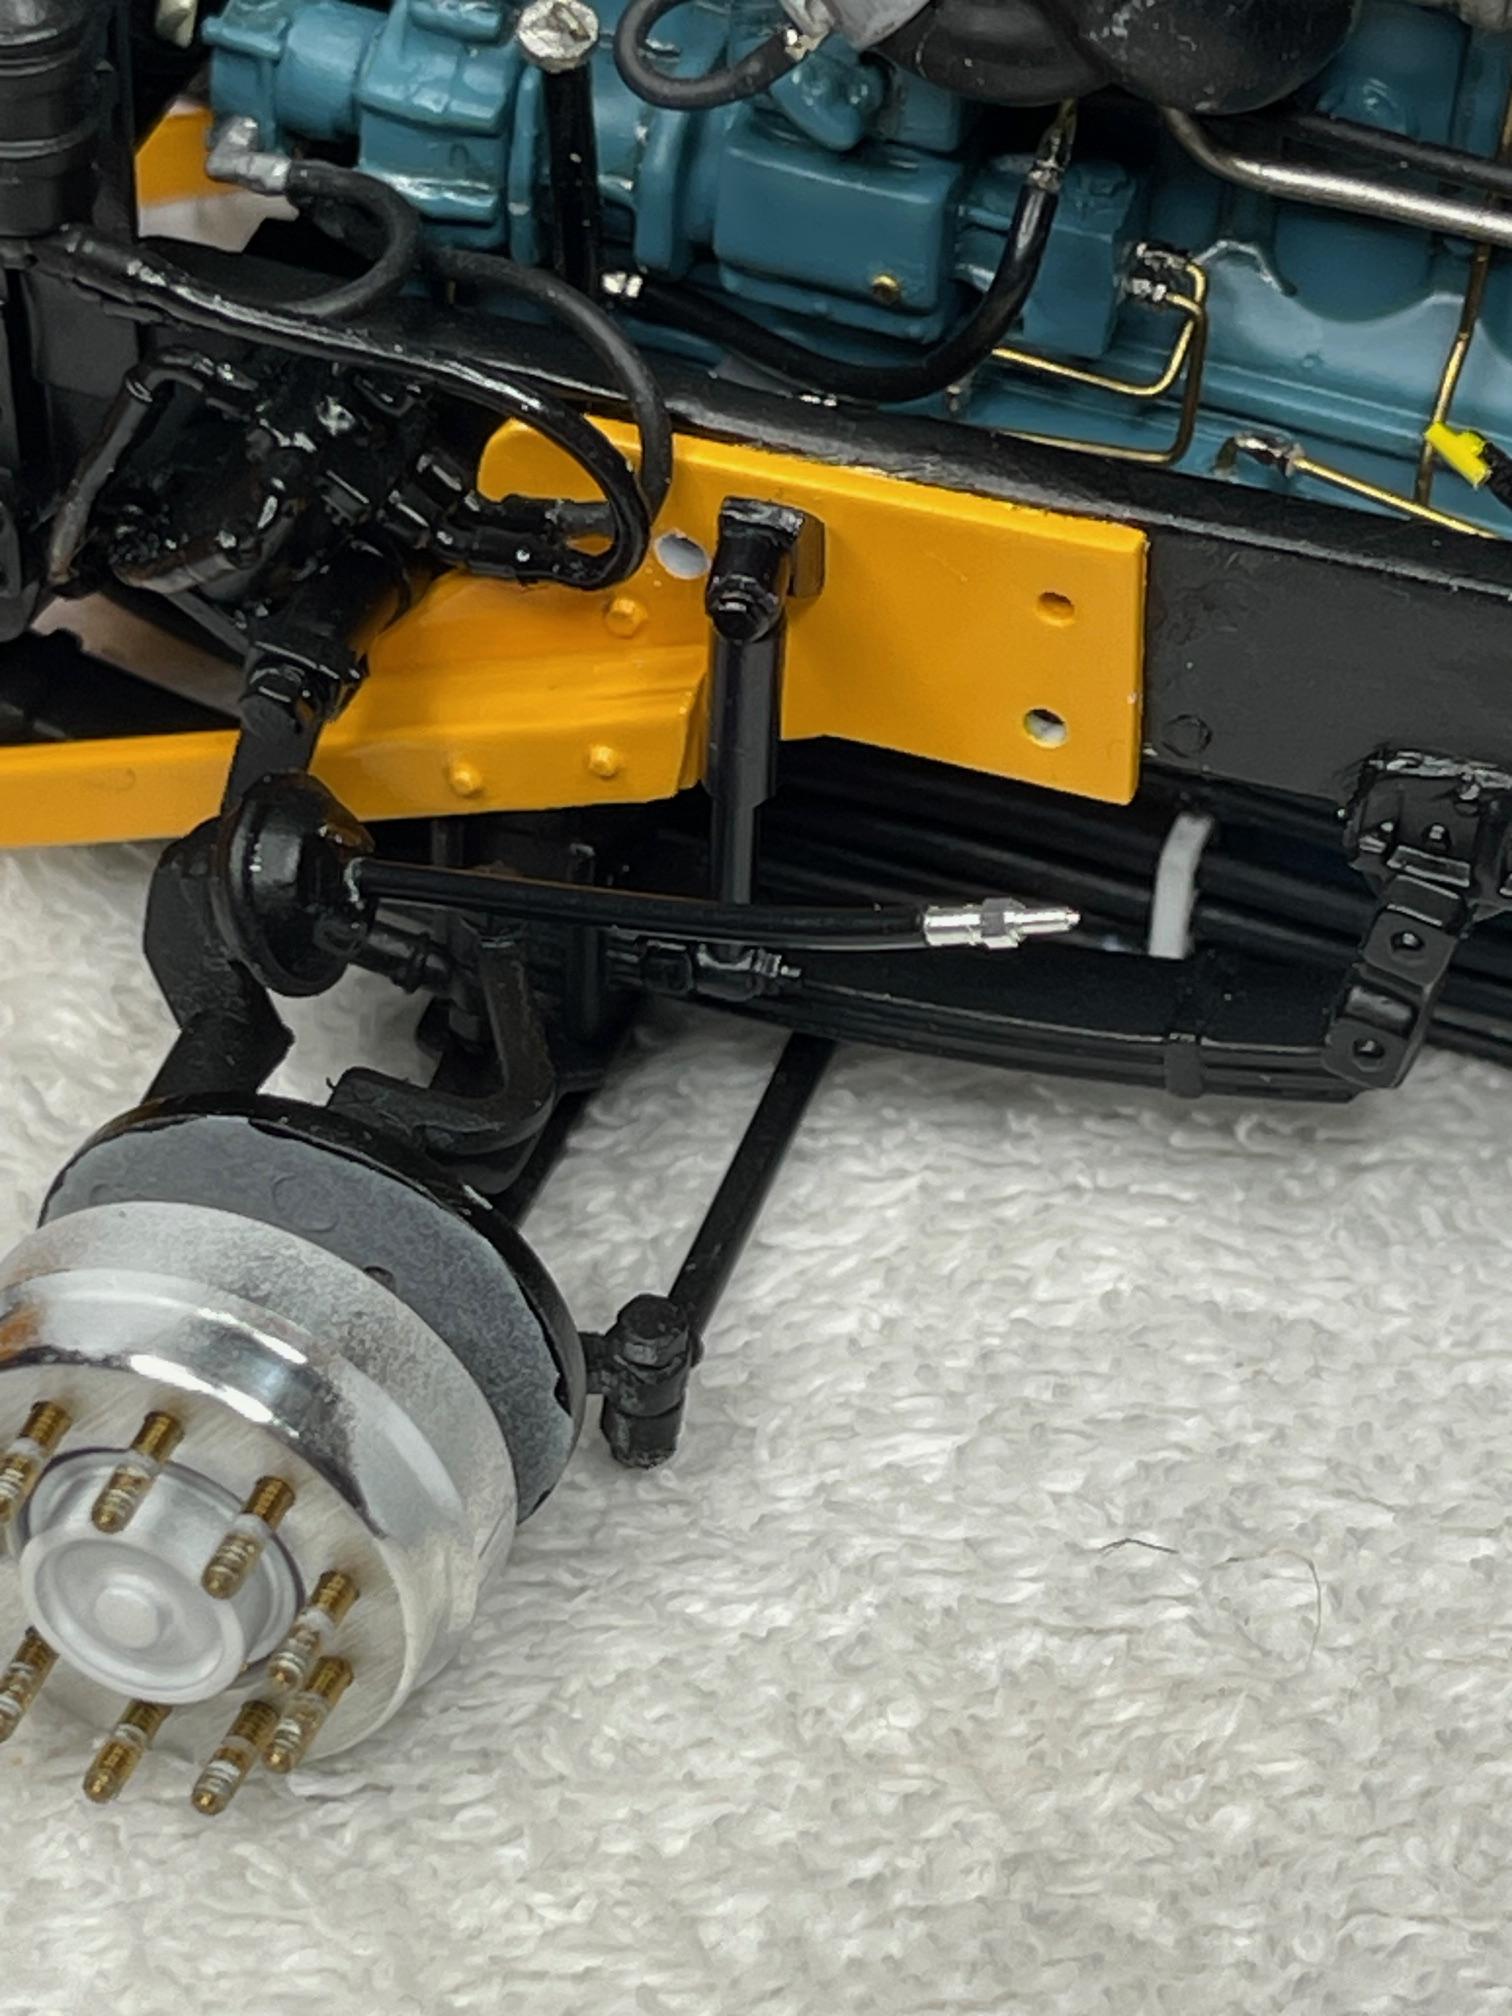
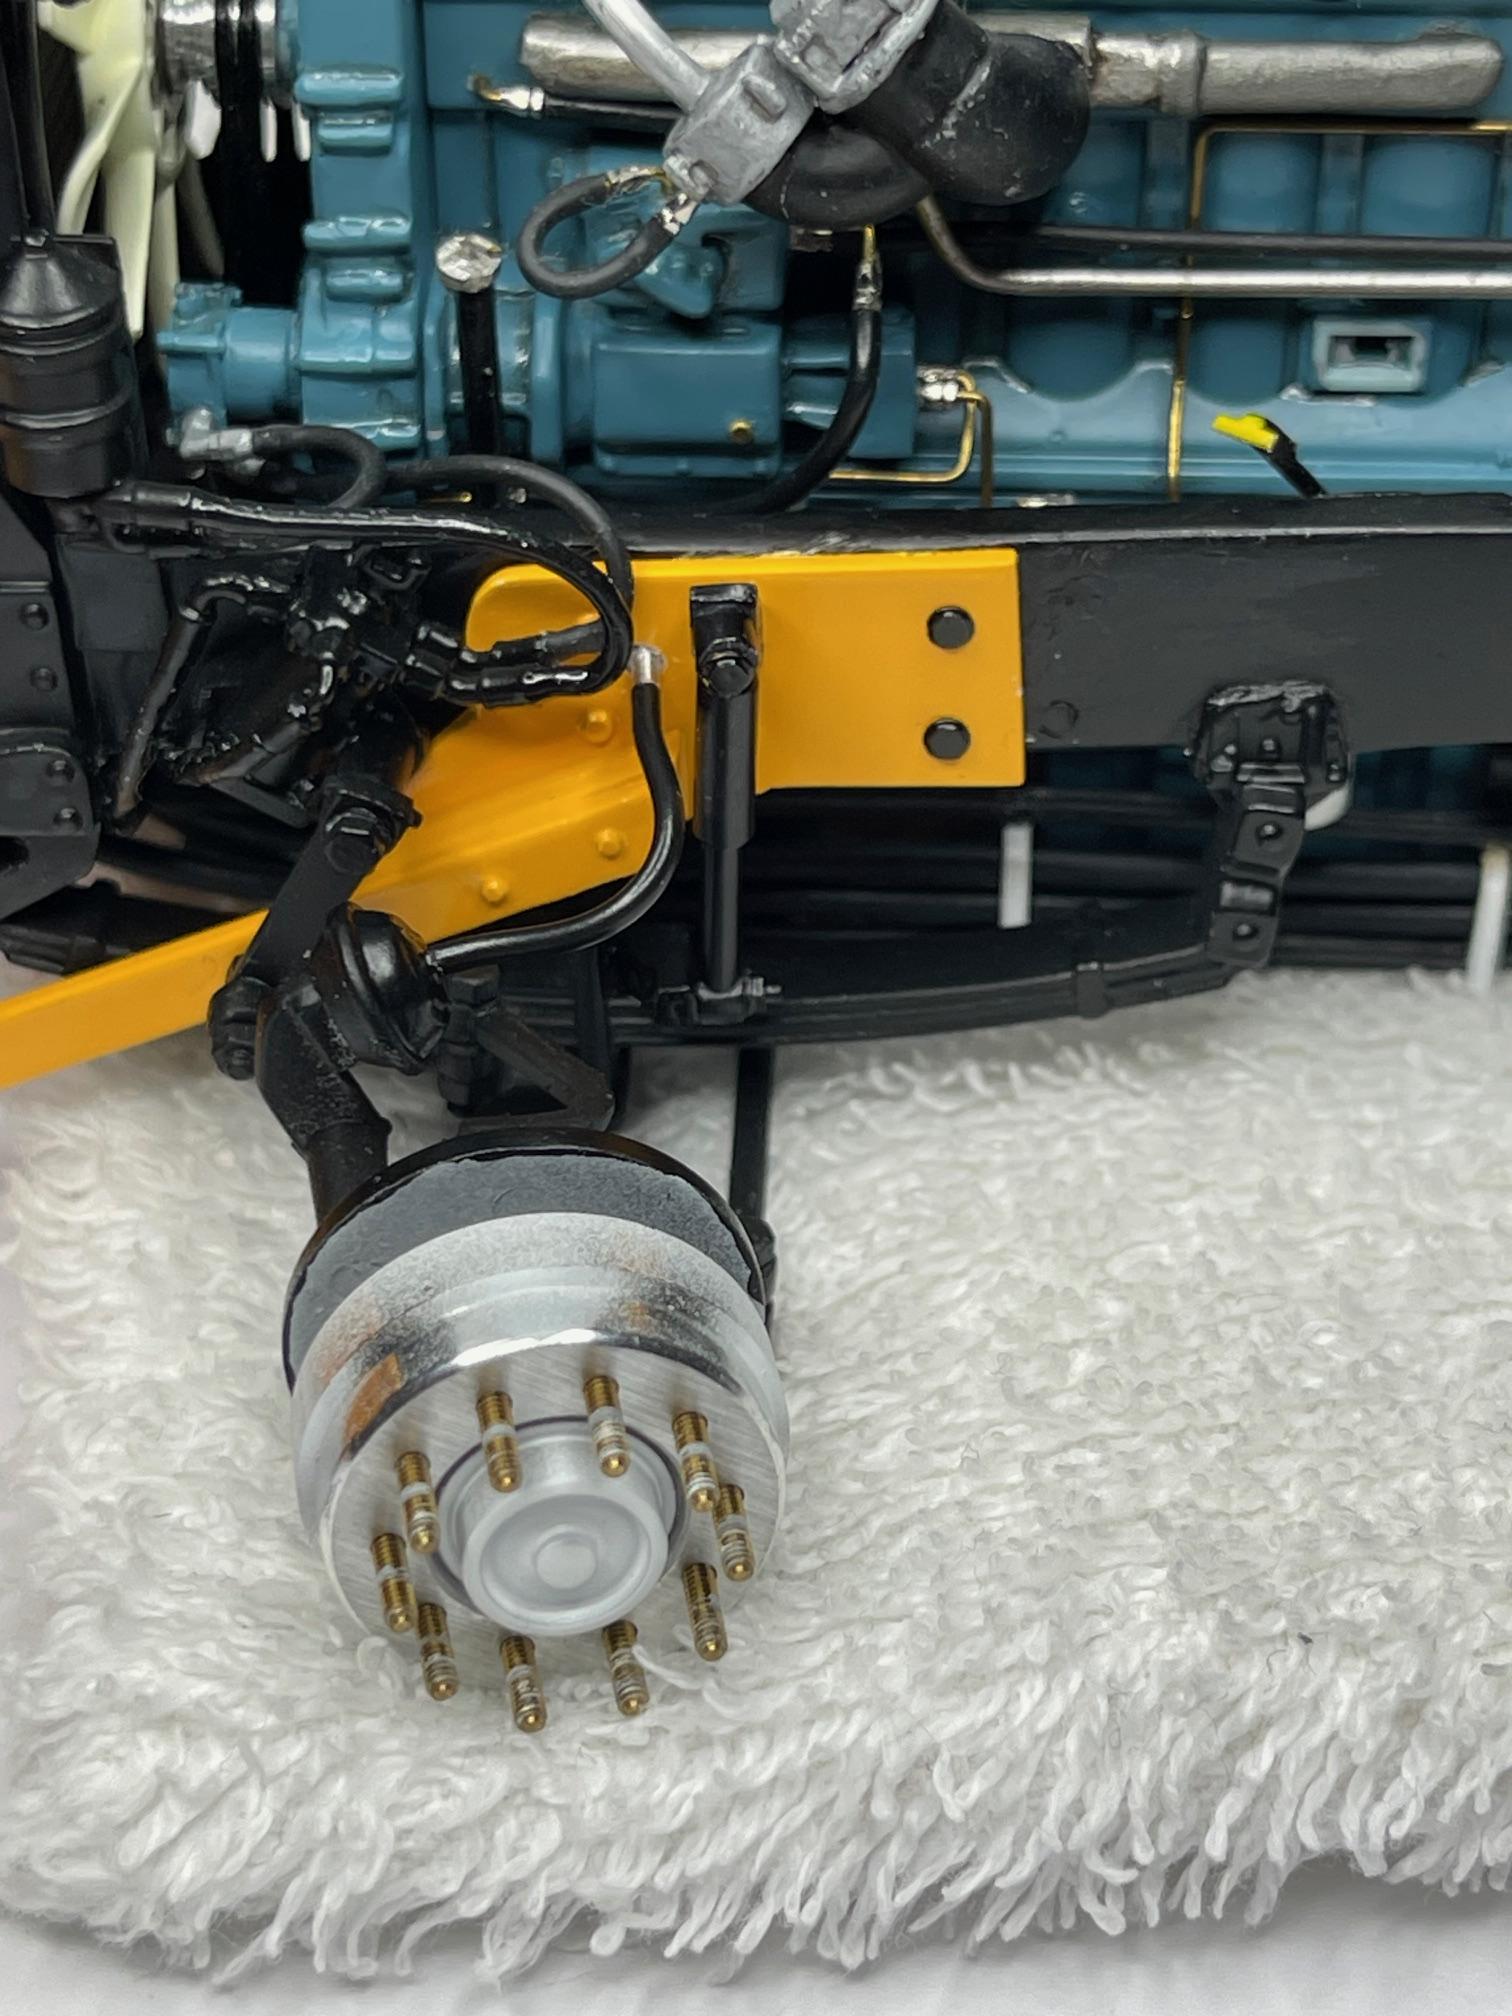
Some more time in at the bench today, carrying on with the front shocks and pass through, brake pot air lines. Front shock(s) and mounts glued in place, with PE bolt heads/ends used to add detail Hose attached to brake pot and to fitting; pass through hole drilled in bracket and frame Pass through fitting(s) glued in place; PE bolt heads added to front plow support bracket Better view of poseable steering linkages Bit hard to tell through all the black paint, but steering arm linkage just passes by lower shock mount, thankfully Thought I would have a roller this past week, but didn't happen - it will for sure early next week! As always, your comments are appreciated!
-
Western Star 4900 FA plow truck
BK9300 replied to BK9300's topic in WIP: Model Trucks: Big Rigs and Heavy Equipment
Thanks very much, Lee, and glad you stopped by - always lots going on! To be fair, about the hubs and wheels, I got them from Jim Russell at M & R Wheels - good selection of machined wheels, hubs, brake drums and might even do a custom set if you're willing to wait in line! I'd include a link to the web page, but I get an error when I try - easy enough to Google them, though. -
Western Star 4900 FA plow truck
BK9300 replied to BK9300's topic in WIP: Model Trucks: Big Rigs and Heavy Equipment
Thanks Jeff, and I appreciate the back and forth about most appropriate solution for this and thanks for the better pic! -
You’re a hard man to keep to, Lee - lots of interesting trucks in your collection!
-
Those decals would have not been easy, over all that ribbing - dead straight and all tucked in along the edges - perfect!