BK9300
-
Posts
1,991 -
Joined
-
Last visited
Content Type
Profiles
Forums
Events
Gallery
Everything posted by BK9300
-
A final great add to your transporter load! Looking forward to your latest transporter build.
-
Welcome to the forum, Ingo! Beautiful work.
-

Mercedes Benz SSK
BK9300 replied to Pierre Rivard's topic in WIP: Other Racing: Road Racing, Land Speed Racers
That looks so cool, Pierre; awesome detailing! I like the layout diagram, too - nothing works better than knowing in advance what it is you need to make. Pleasure to follow along. -
Western Star 4900 FA plow truck
BK9300 replied to BK9300's topic in WIP: Model Trucks: Big Rigs and Heavy Equipment
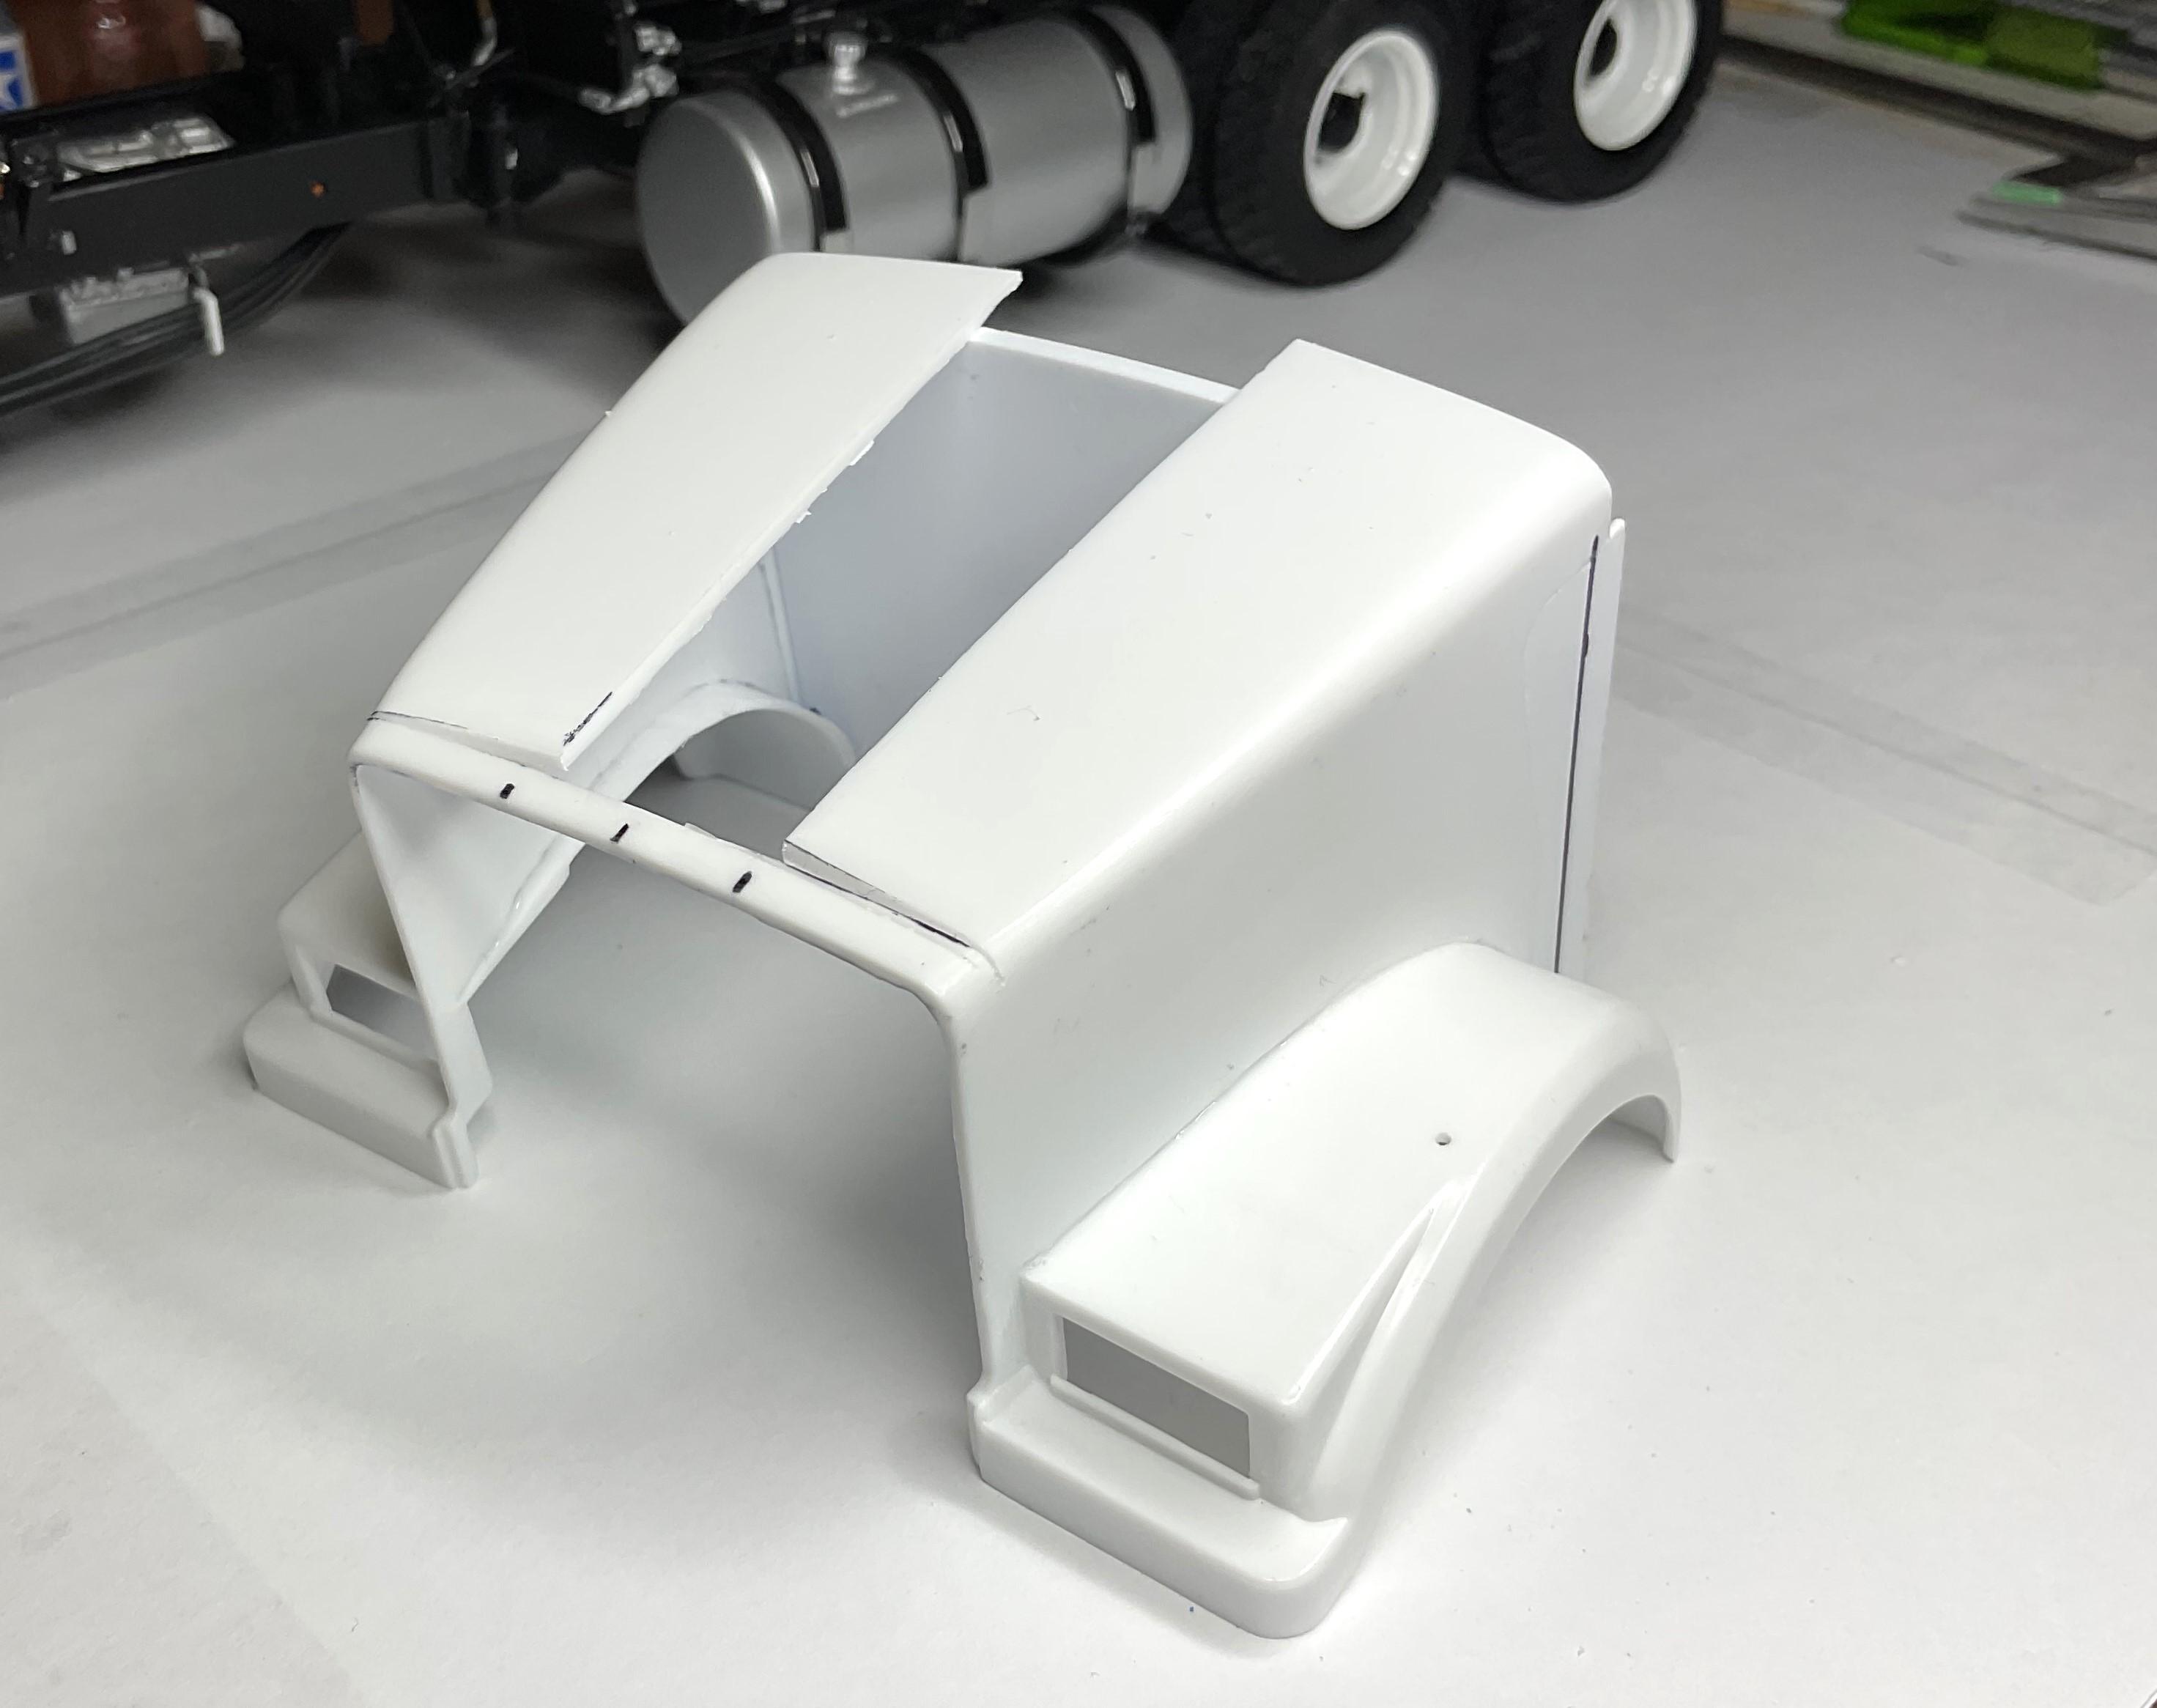
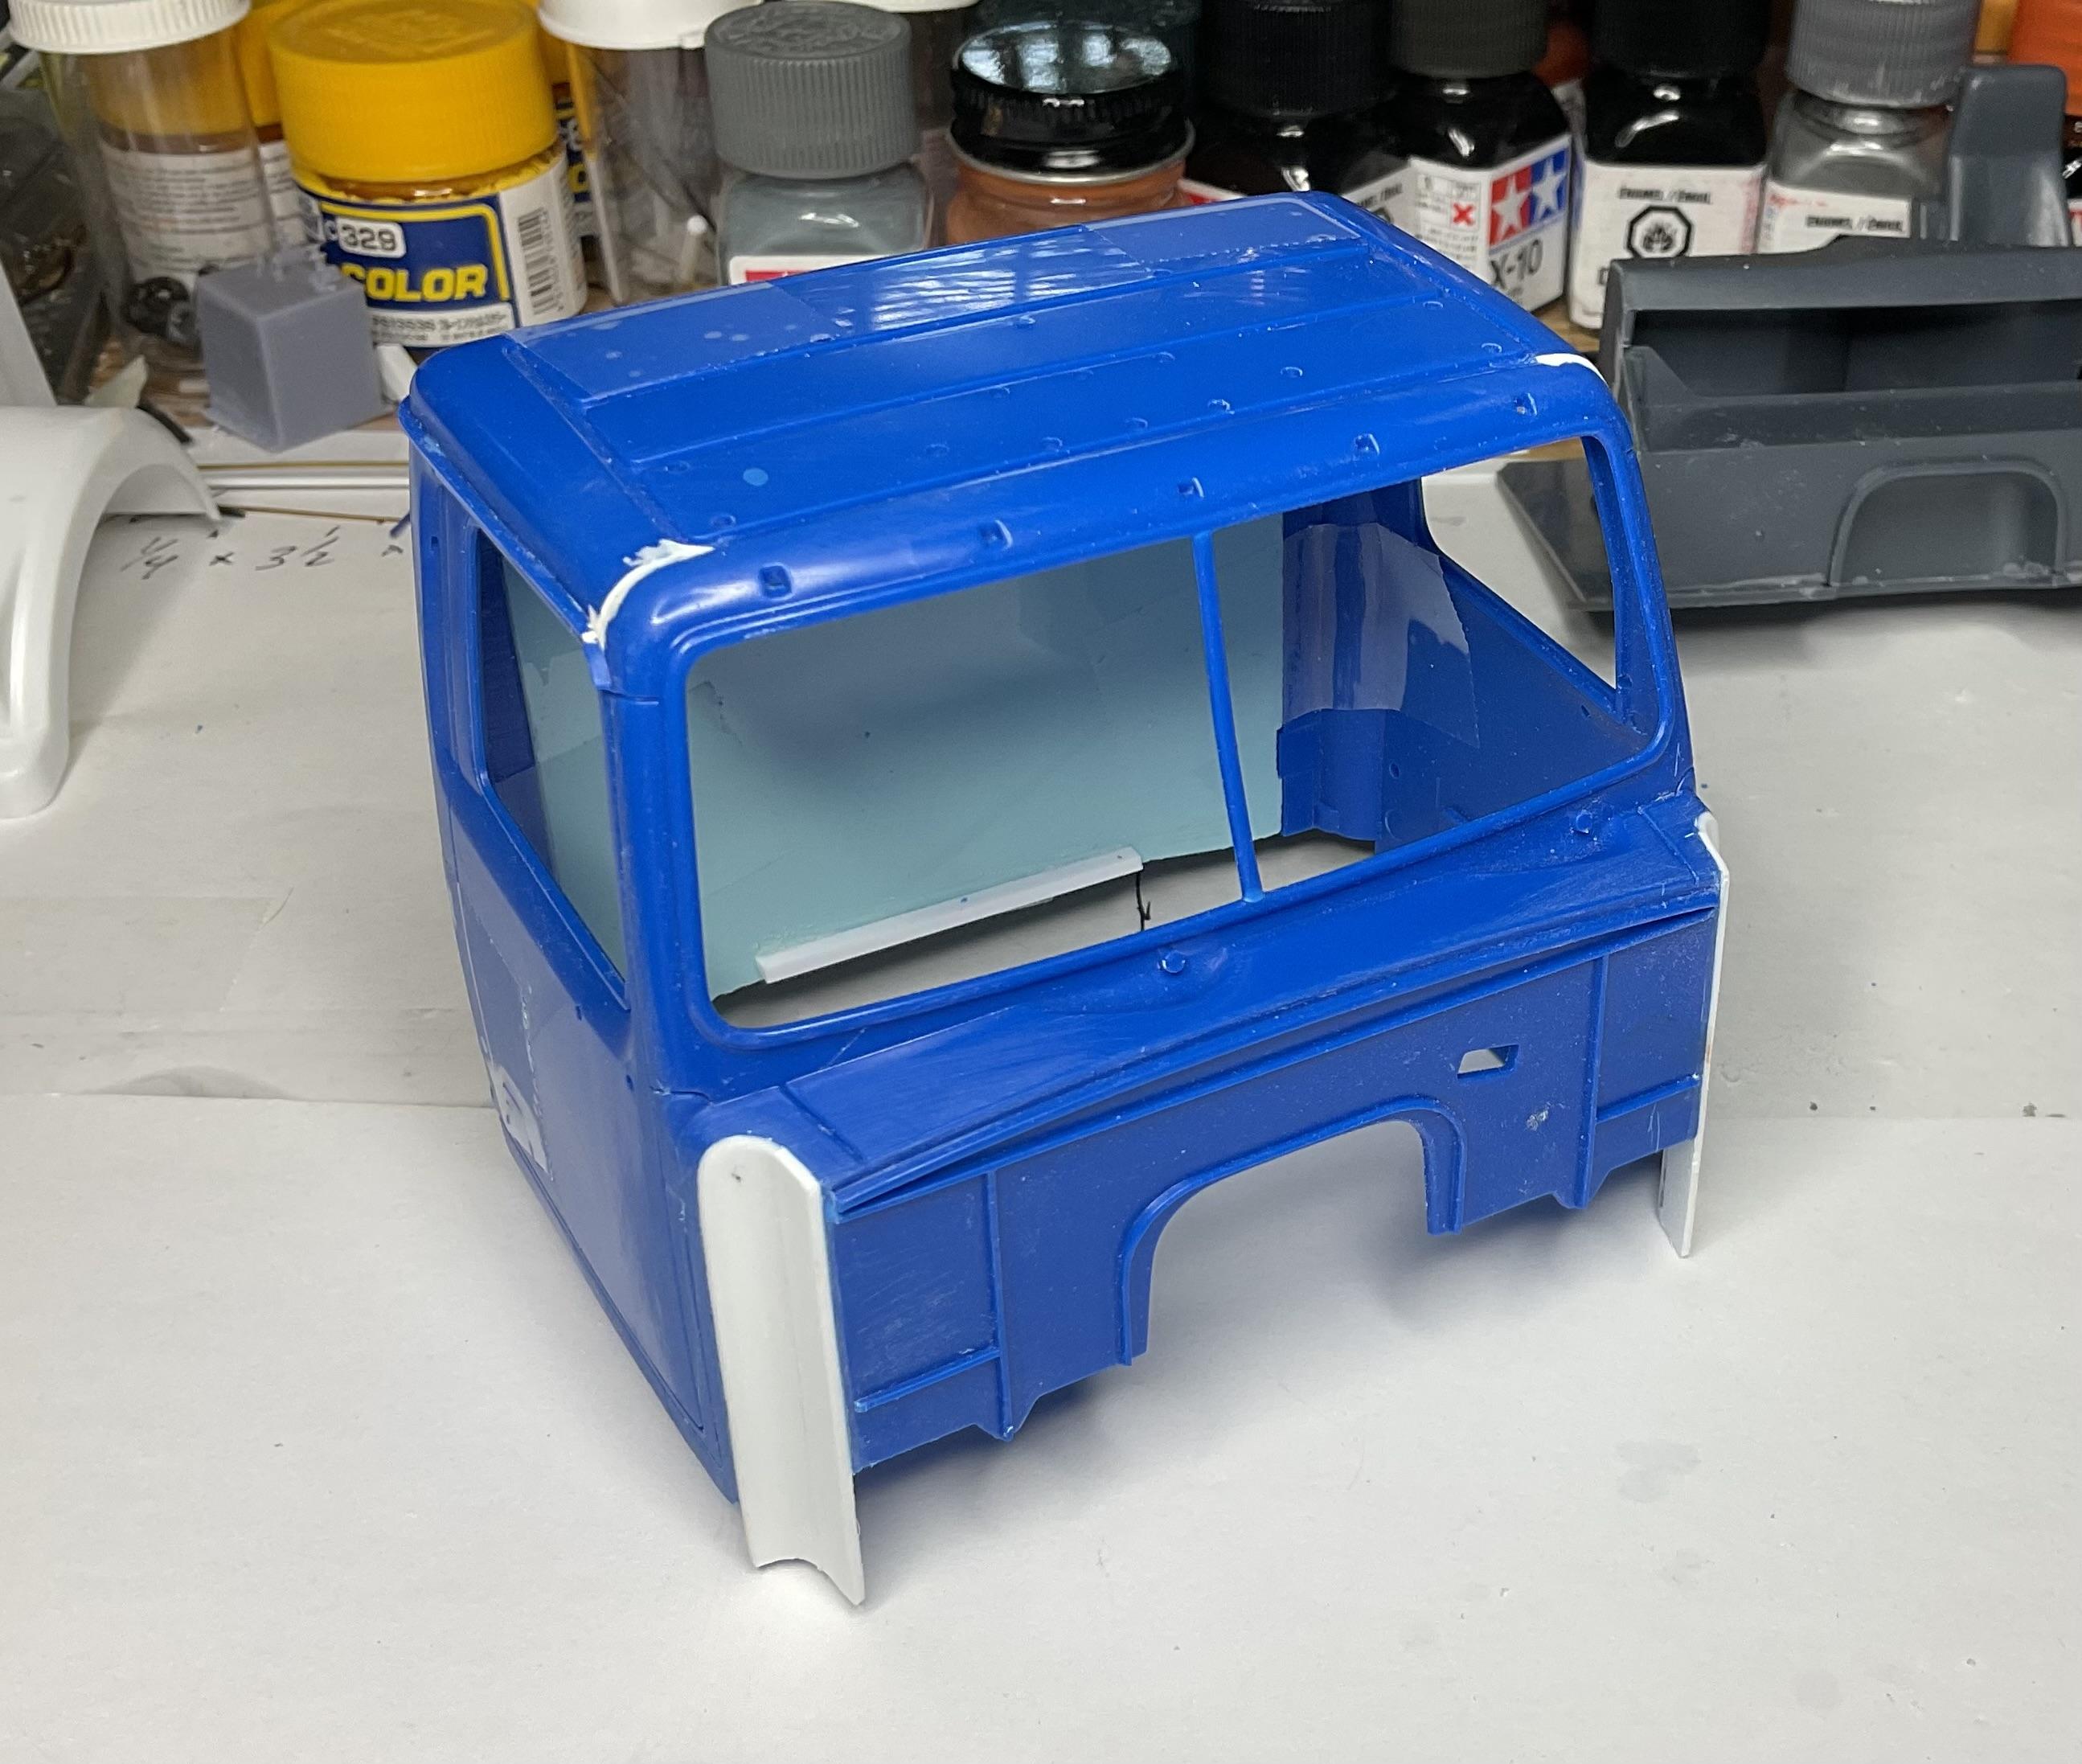
Progress being made on the hood - thankfully, things are going back together without too much of a struggle, but a good bit to go yet. Side panels have been glued back in their new position on the fenders - started to mark out the cut line at the back edge of the hood. I also have a 2mm thick profile piece temporarily glued in place to help keep the fenders lined up while the glue sets. Thankfully, there won't be too much putty work need on the fenders - not the same for the top of the hood! Similar to previous pic, but this angle shows better an unexpected benefit from doing the widening at the back of the hood - it will allow for an inner fender very similar to a real WS hood Used hood - may have a go at the inner support brace as well Will carry on with putting the top of hood back together tomorrow!
-
Lee, you're moving right along - I've never heard the expression, 'grass burner' referring to the exhaust, but makes sense! Did your salt spreader spot come with the kit? Great progress, overall!
-
STITCHES
BK9300 replied to TopherMcGinnis's topic in WIP: Model Trucks: Pickups, Vans, SUVs, Light Commercial
Said it awhile ago, but sure like the look of your pickup, and great colour - hope the show goes well! -
FDNY Wrecker
BK9300 replied to Scott Eriksen's topic in WIP: Model Trucks: Big Rigs and Heavy Equipment
Good to hear! I have a Hiab or Palfinger crane in my future as well. Is that 2 stage pump, from the Century parts manual, normally bolted to a crossmember with a connecting shaft to the PTO, to better accommodate the fittings on both sides of the pump? -
FDNY Wrecker
BK9300 replied to Scott Eriksen's topic in WIP: Model Trucks: Big Rigs and Heavy Equipment
Scott, I missed this post - I'm guessing the page rolled over to a new one before I looked again - your engine detailing looks awesome and decals look great! I can just see the pin in the end of your hydraulic pump waiting for a hose to be attached. Looks like the PTO/pump fit in there well. -
I agree! Very good interior - like I said before, like all the detail painting you do.
-
FDNY Wrecker
BK9300 replied to Scott Eriksen's topic in WIP: Model Trucks: Big Rigs and Heavy Equipment
Those are some crazy detailed pictures! Would need to be a mechanic like you to understand what everything is for, but sure looks awesome! Wonder who their modeller is? Imagine trying to paint all that! -
Western Star 4900 FA plow truck
BK9300 replied to BK9300's topic in WIP: Model Trucks: Big Rigs and Heavy Equipment
Thanks, Francis, I appreciate it! Have been able to use paper templates made from my 3D model to make parts for most of the scratch built items - sure helped with keeping everything in proportion.. And yes, lots of styrene, with a well stocked hobby store about half an hour away if I run low! -
1962 Corvette street/strip build (replica)
BK9300 replied to keviiin86's topic in WIP: Drag Racing Models
Beautiful car your dad owned - this will be a great build, I’m sure. -
Western Star 4900 FA plow truck
BK9300 replied to BK9300's topic in WIP: Model Trucks: Big Rigs and Heavy Equipment
Thanks, Jeff - coming along but it’s nerve wracking while sawing away on a good hood! -
Western Star 4900 FA plow truck
BK9300 replied to BK9300's topic in WIP: Model Trucks: Big Rigs and Heavy Equipment
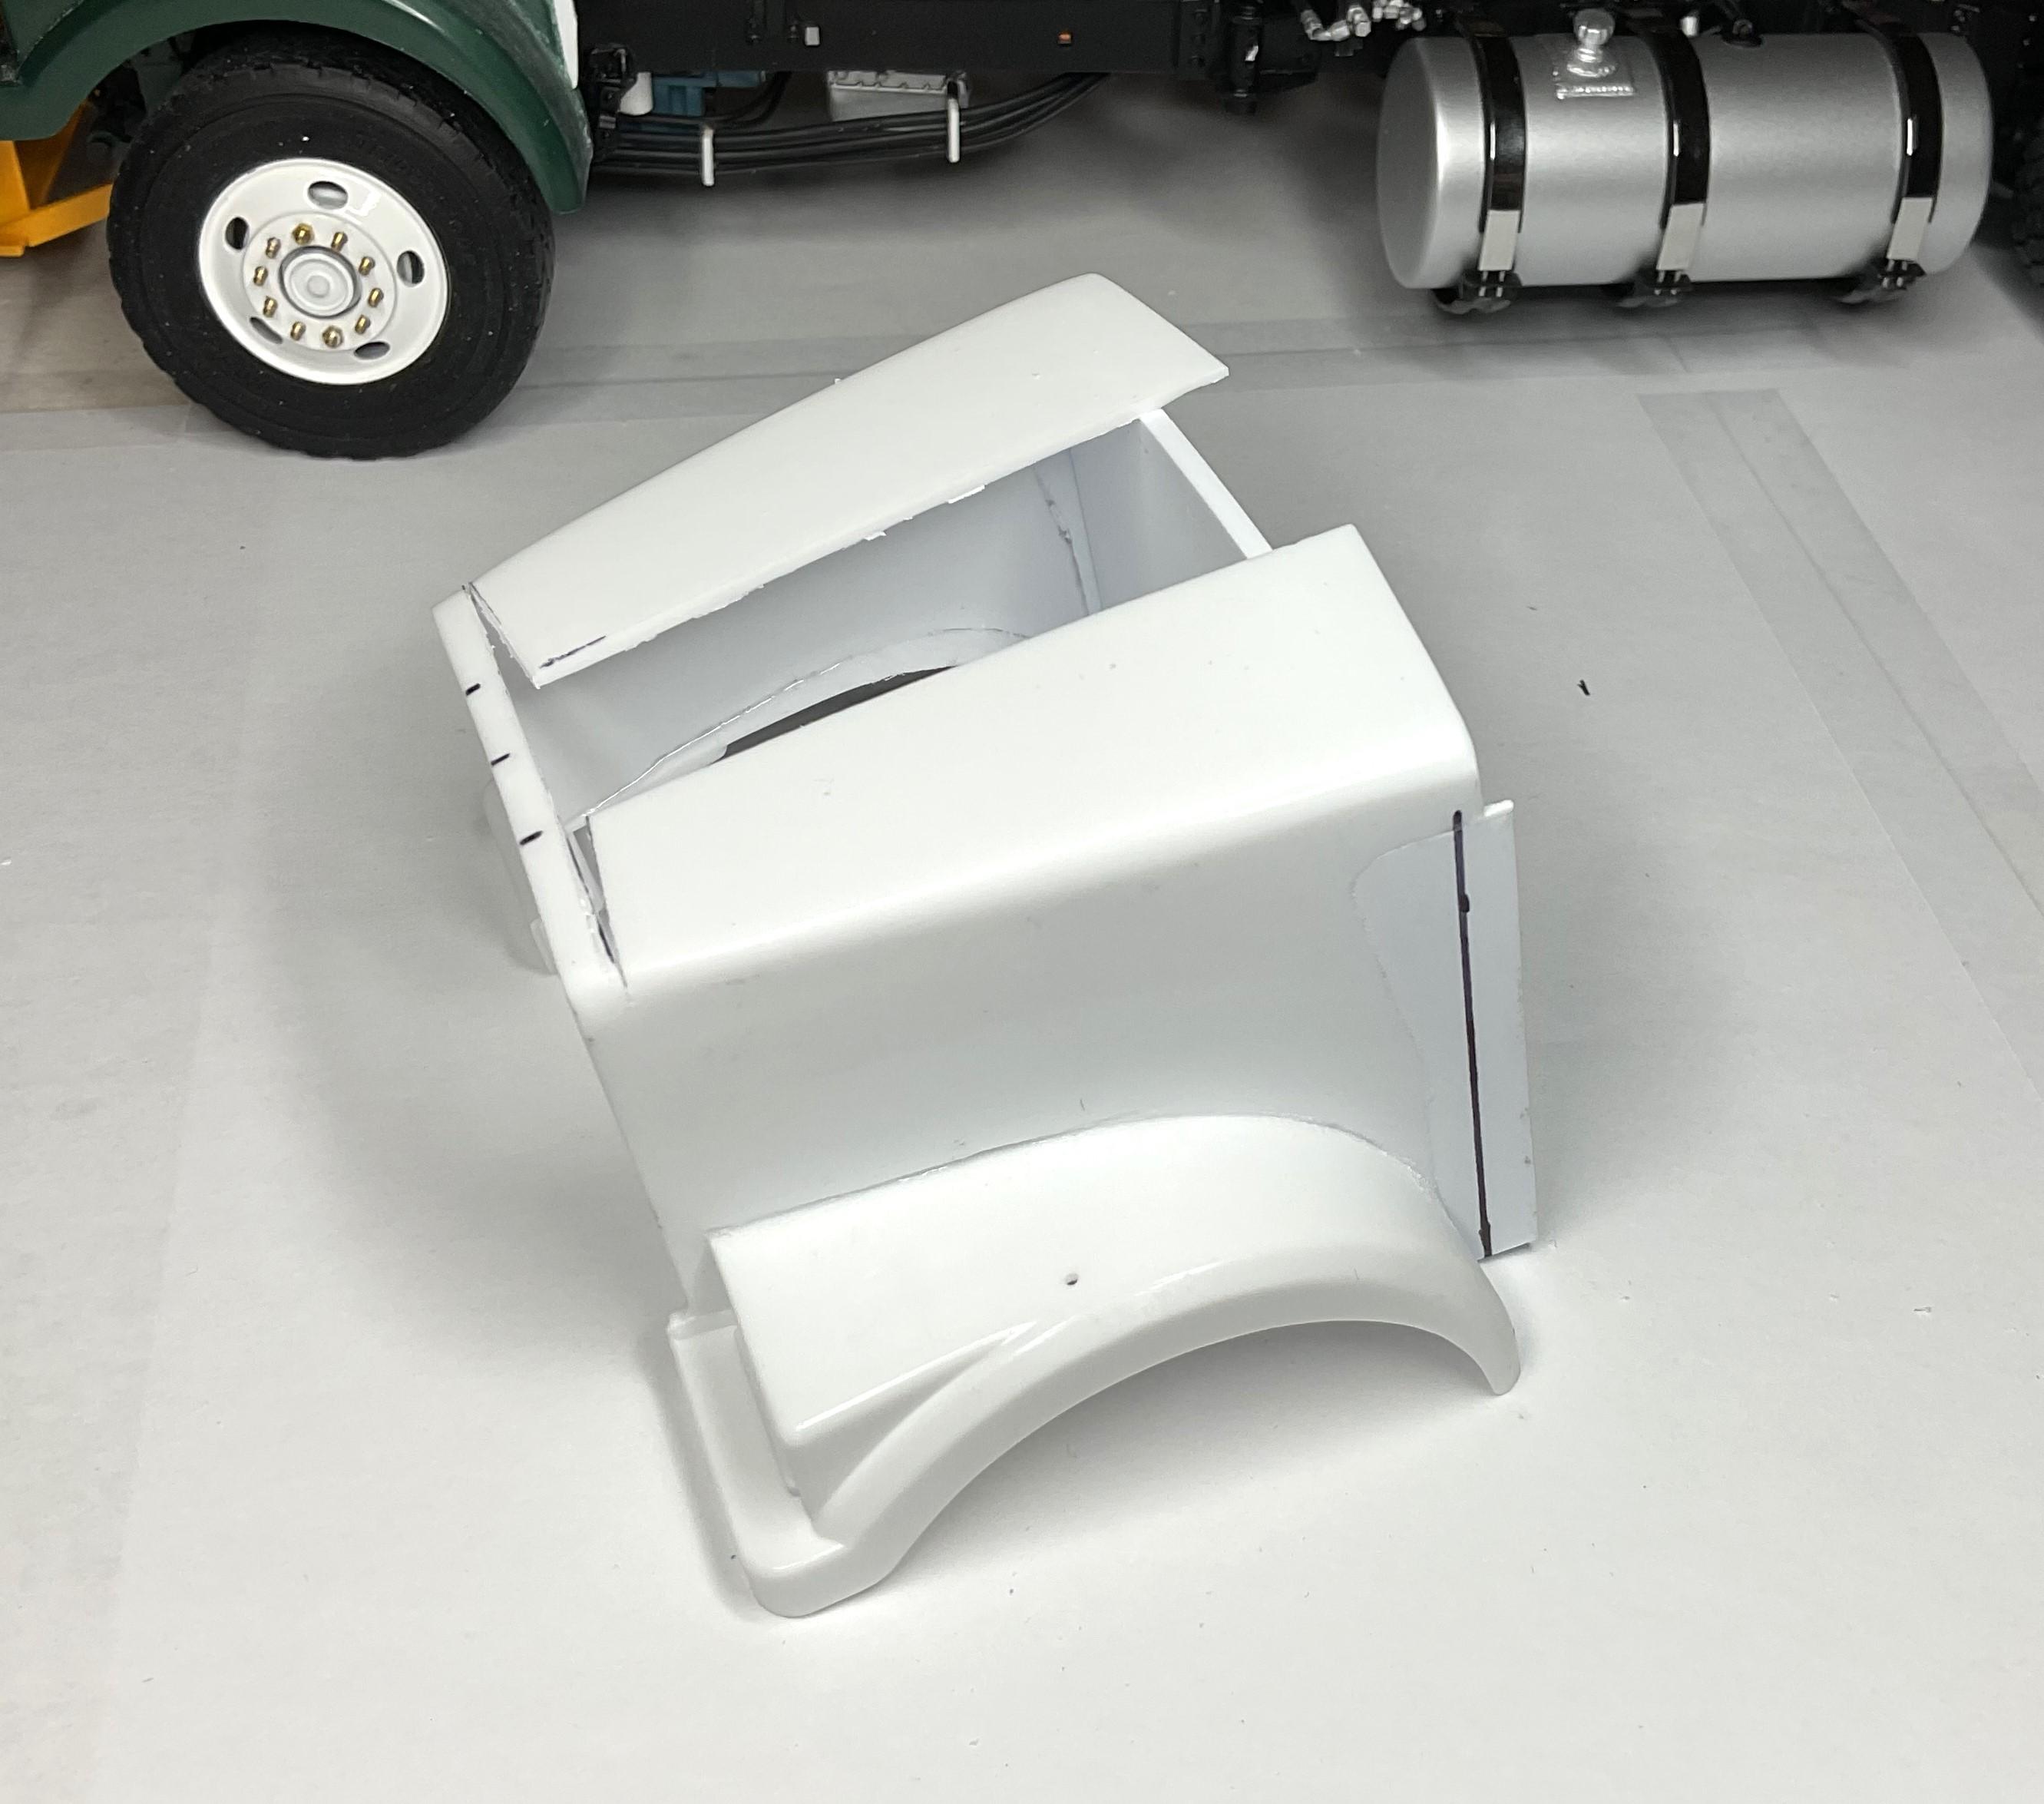
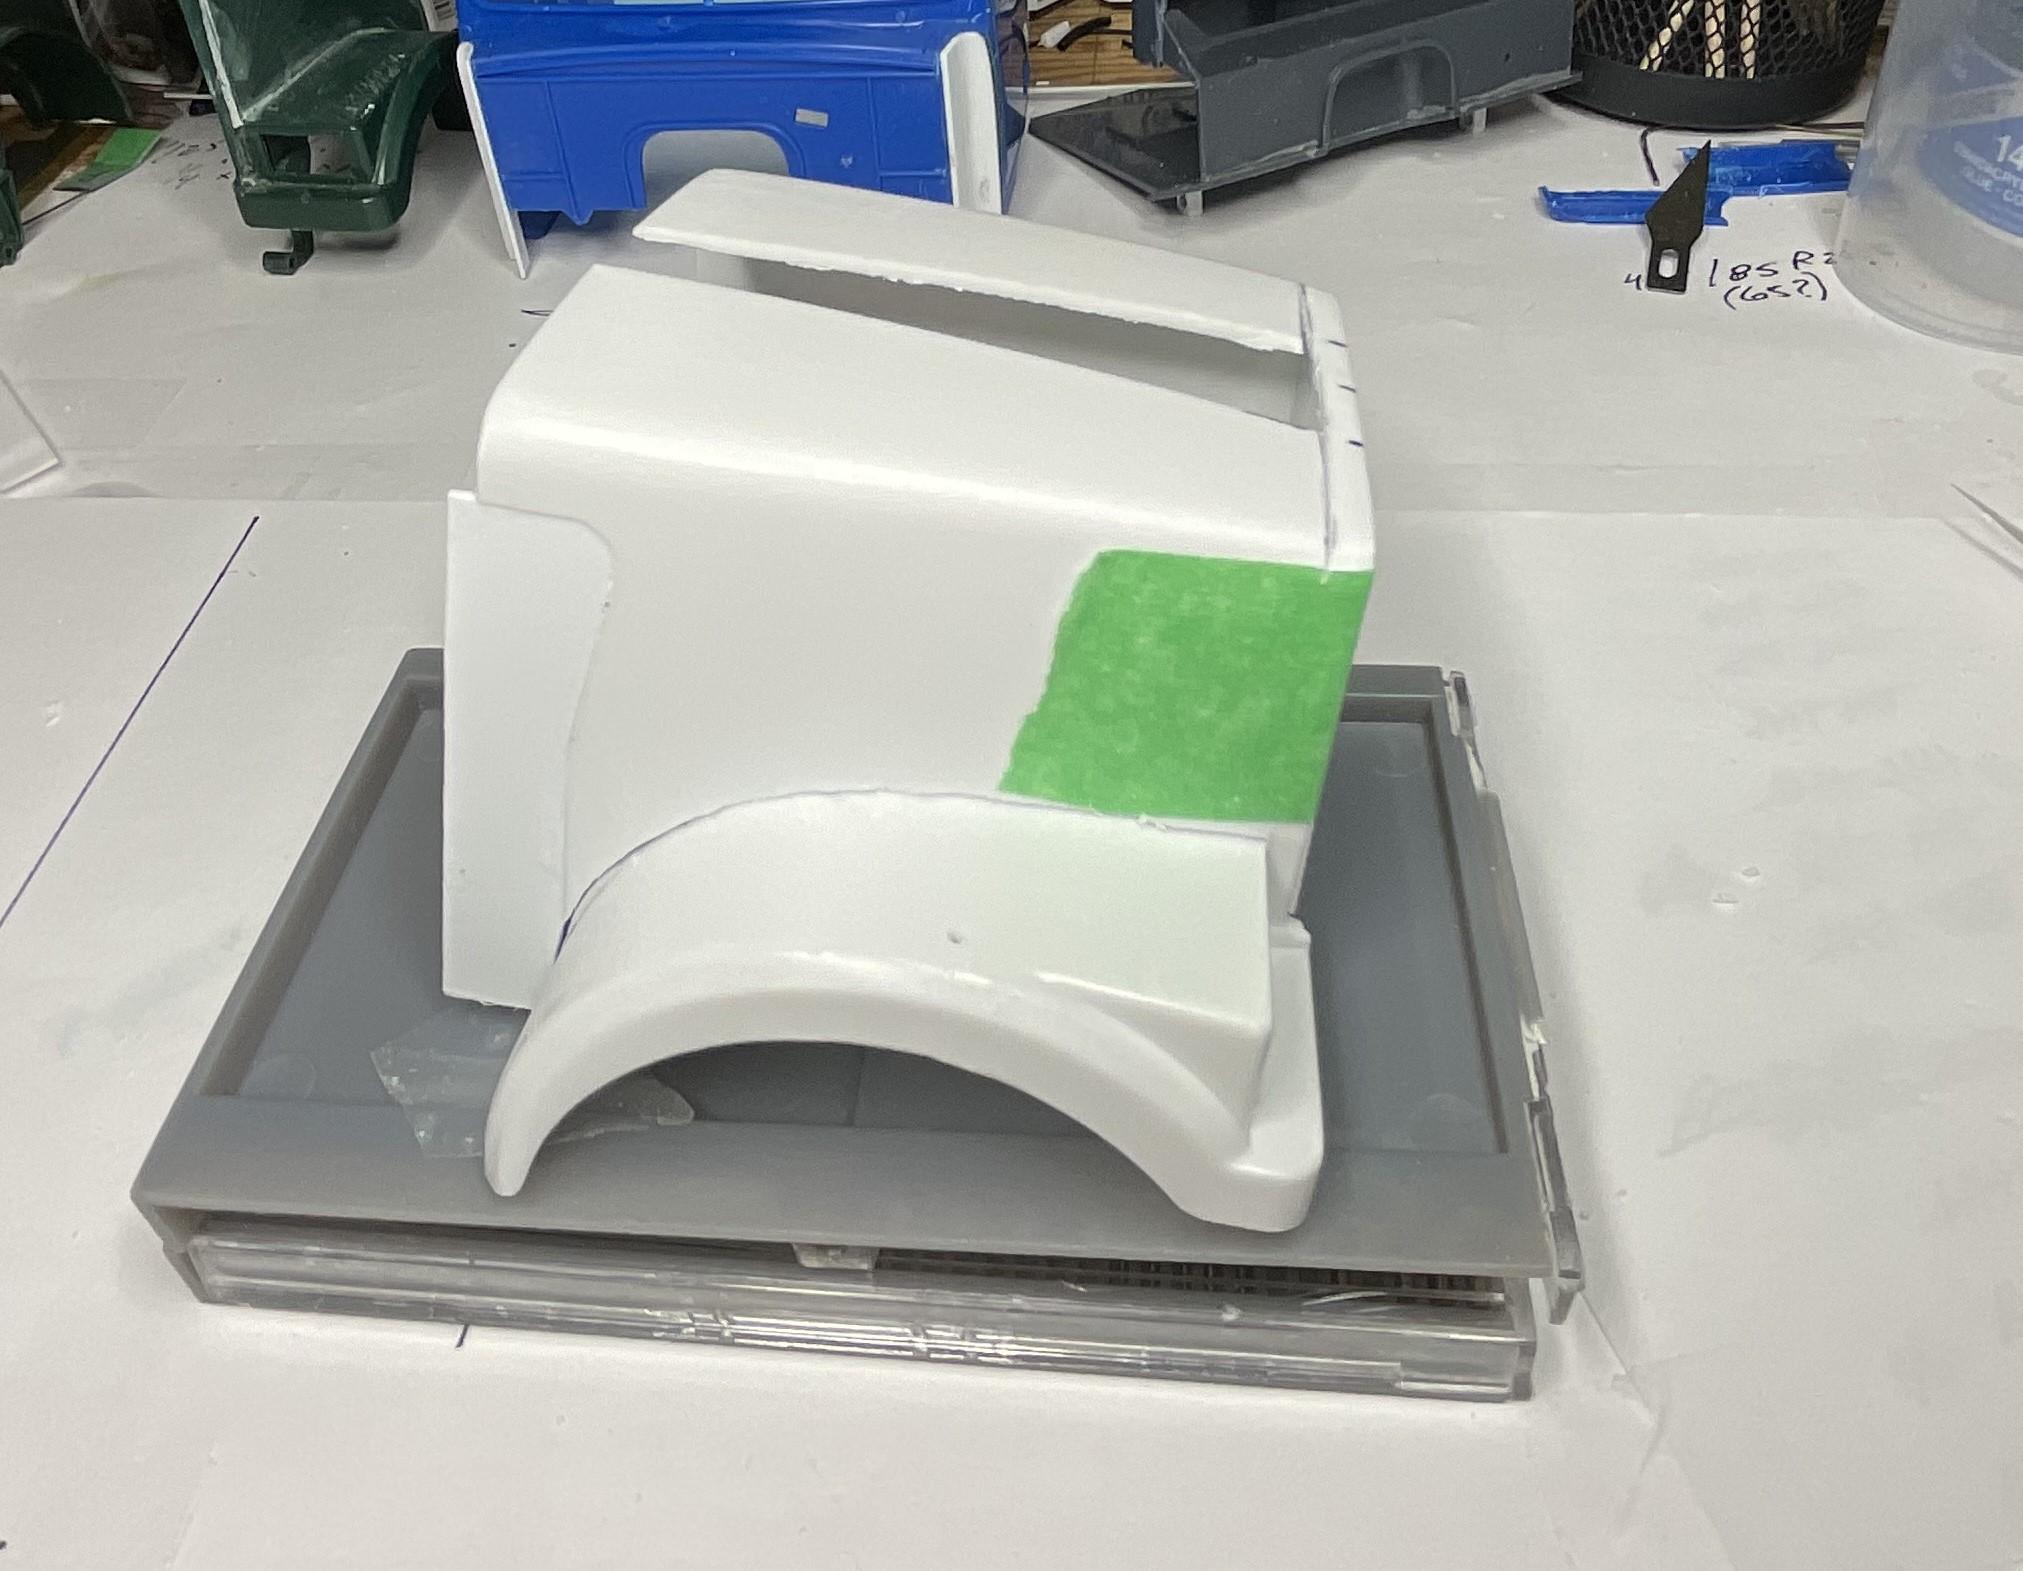
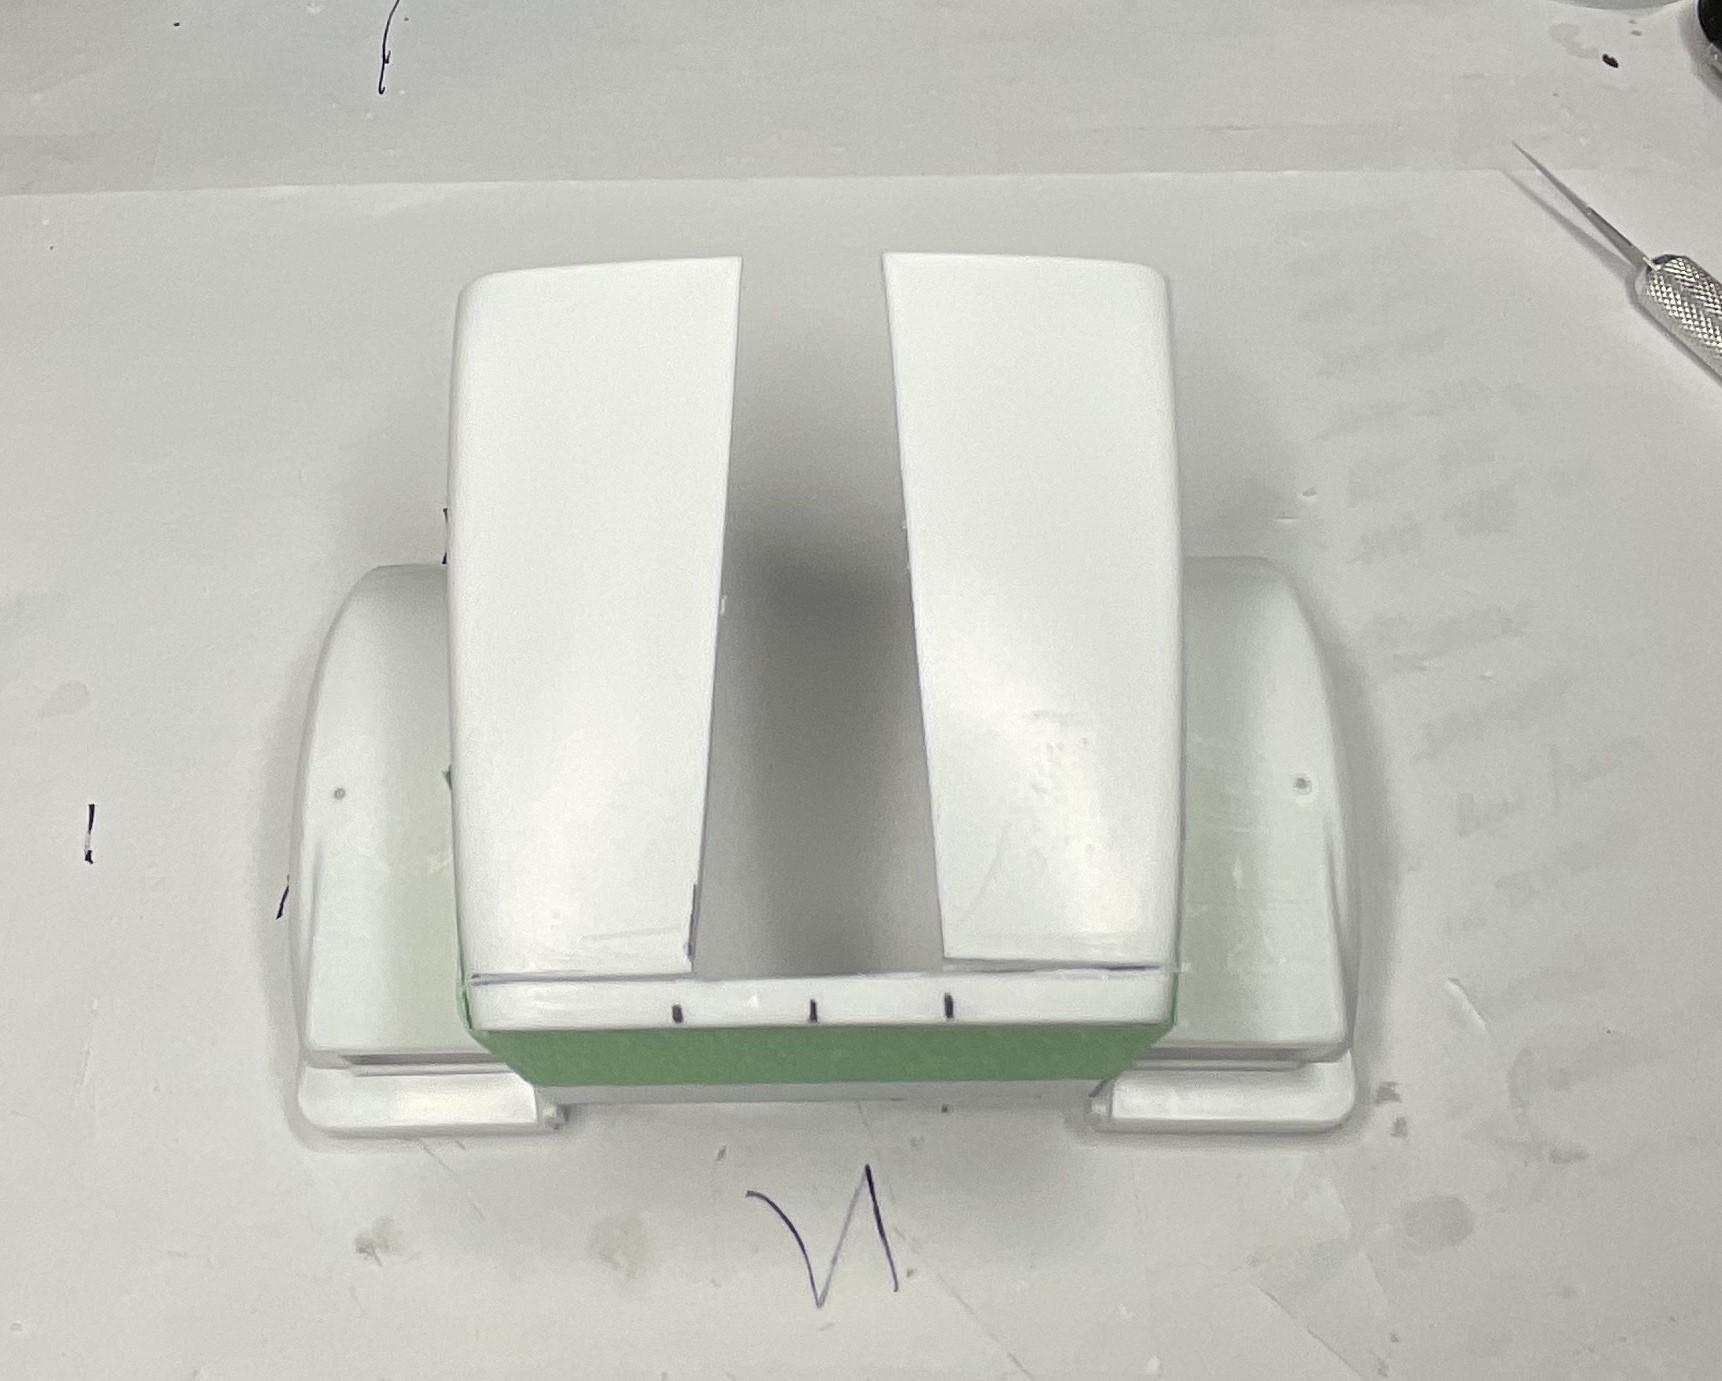
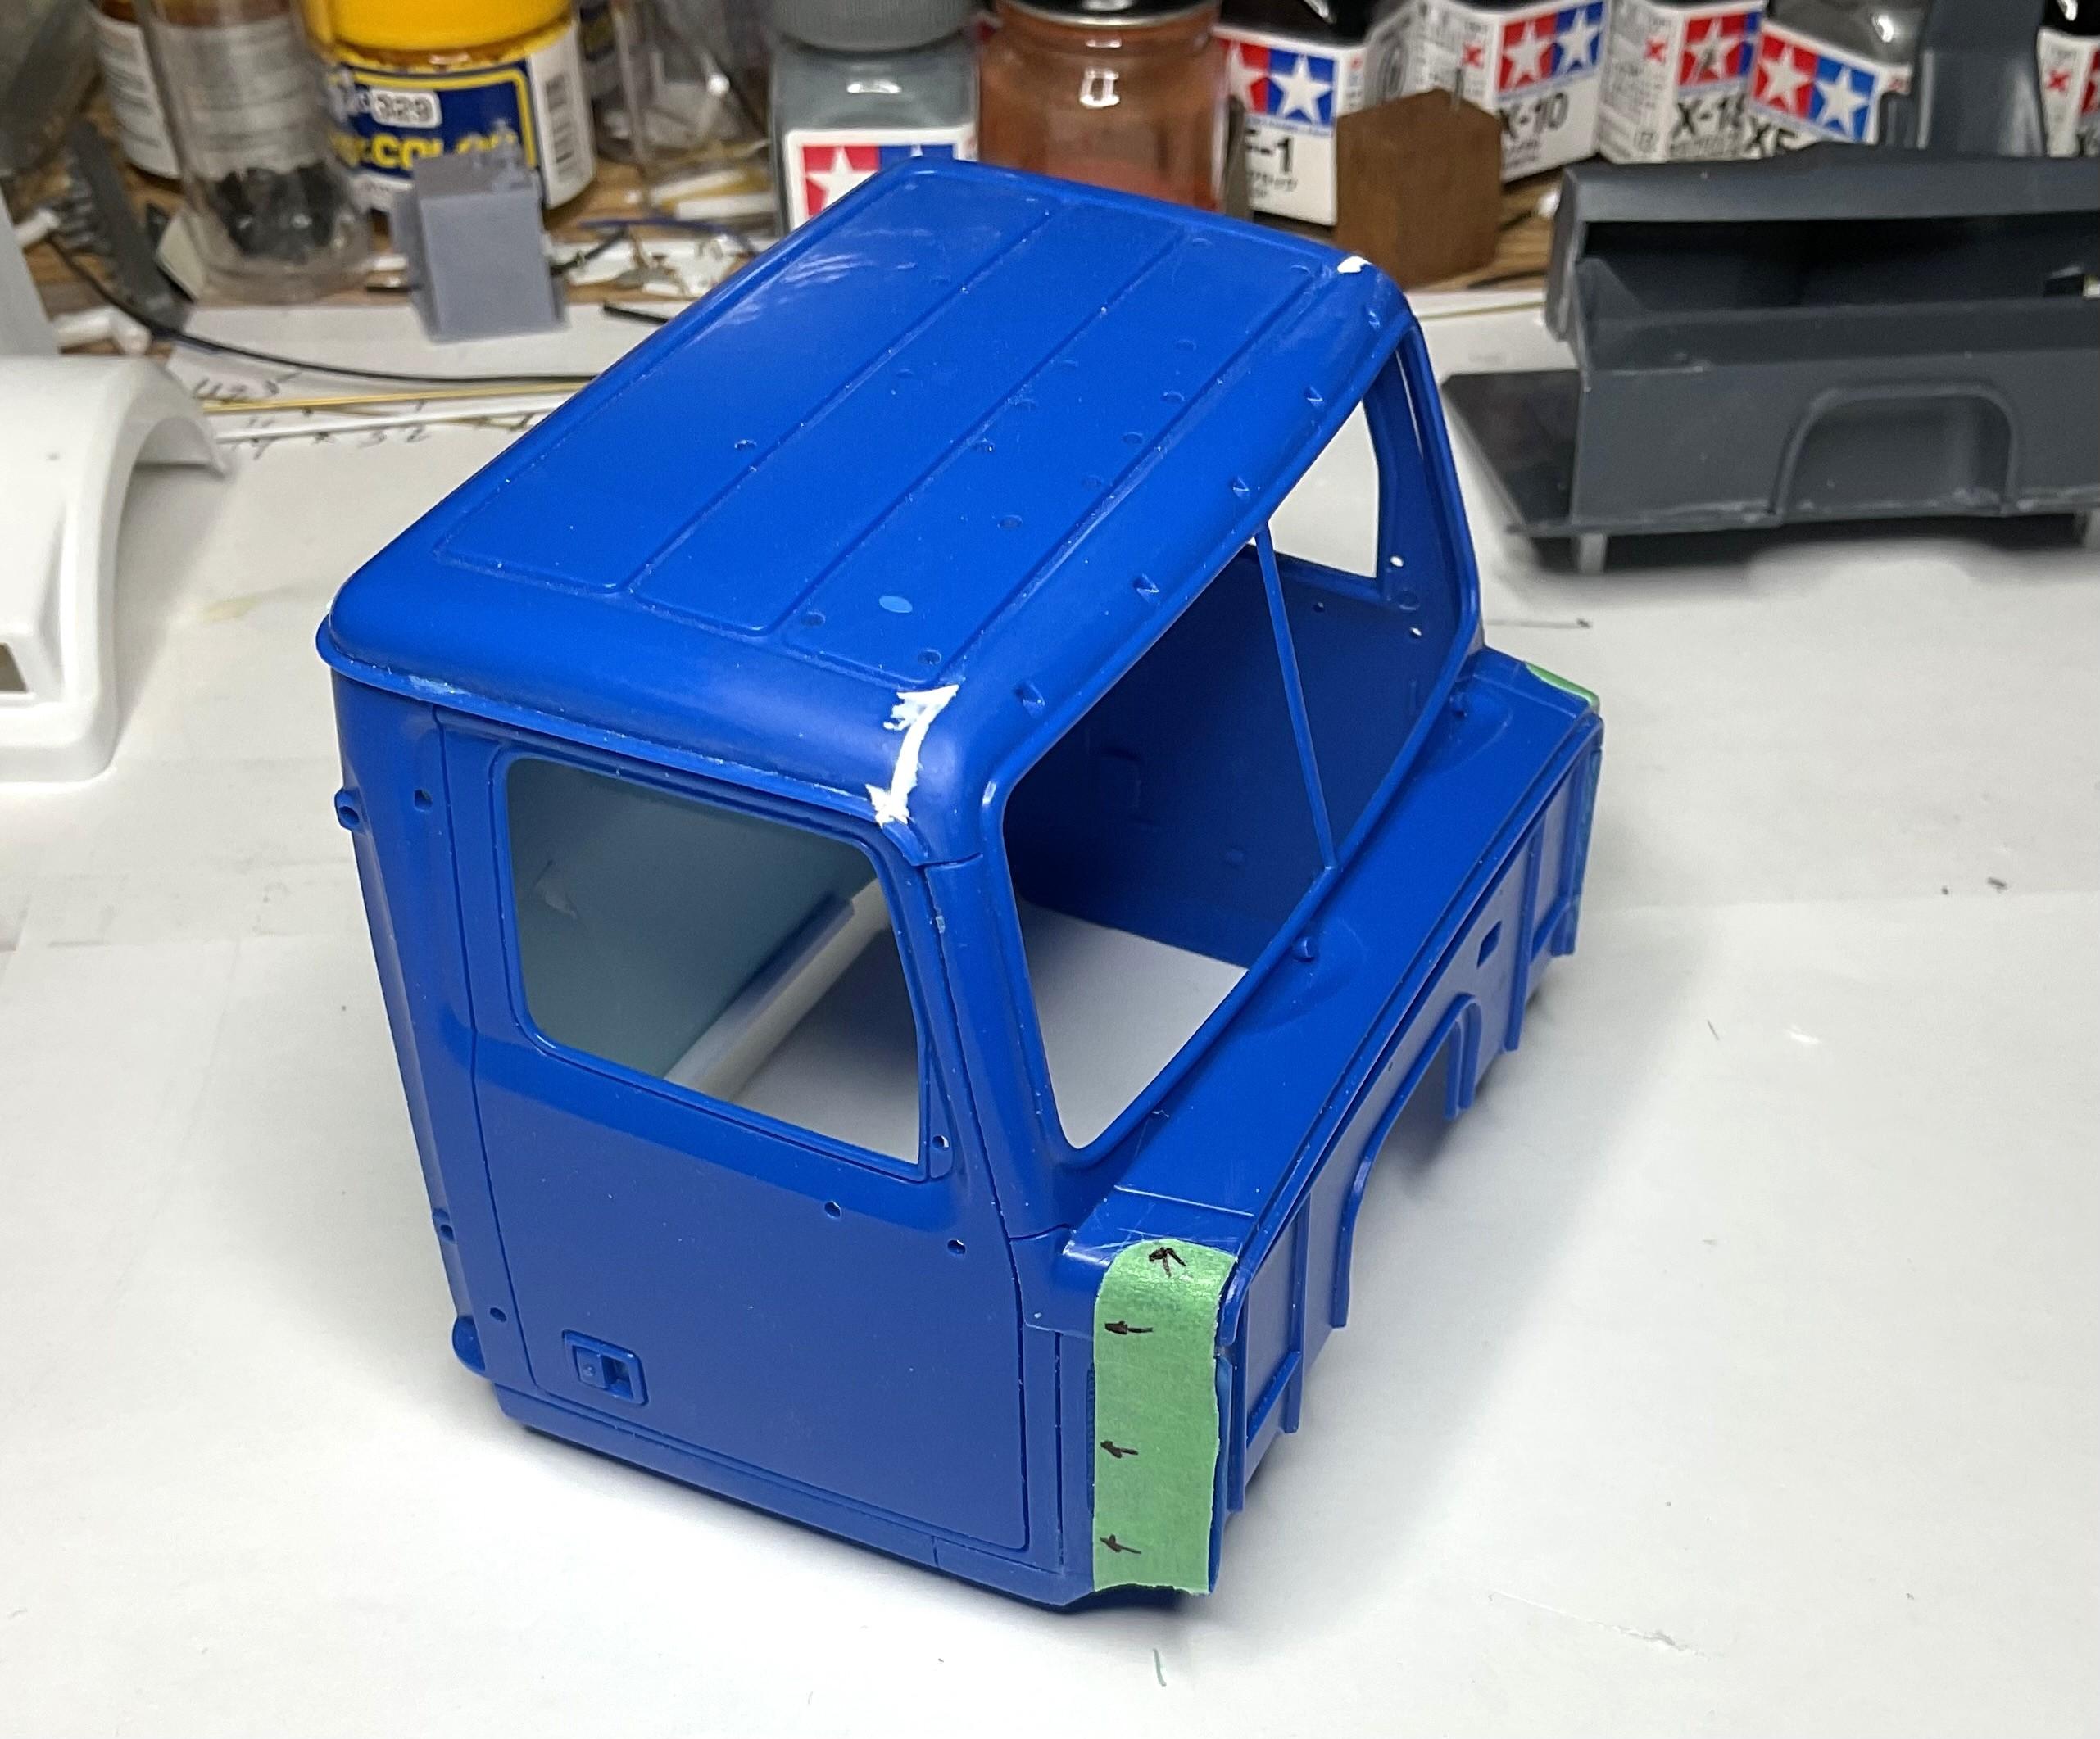
Finished making the cuts on the hood and gently bent the hood halves apart, and taped them down fairly close to their final position. A few repeat looking pics, but after all the cutting. Cuts made where fenders meet side panels, a wedge cut out of top and a relief line cut across top, front edge Fenders separated and taped down to desired width. The entire back edge of the hood will need to be cut approximately along the line defined by the blue tape Very close, not perfect, to the look/width of this year of 4900FA. It remains for me to do a decent job of gluing it all back together strong enough to put up with the puttying and sanding that will be needed to finish it off properly You can see better in this pic the need for the relief line across the top, front of the hood, to allow for the front edge of the hood halves to pull away when the back edge was spread apart. Happy with where the hood is at for now - still have to work on keeping the slight curvature of the back edge of the hood. May need to make a little styrene jig, with the needed curve, to set the hood on while filler styrene is glued in place. Hopefully, I can get this looking pretty good in the next few days. Take care!
-
Really like how you put together the control tower, Lee - looks like it should have been part of the kit - great stuff!
-
Western Star 4900 FA plow truck
BK9300 replied to BK9300's topic in WIP: Model Trucks: Big Rigs and Heavy Equipment
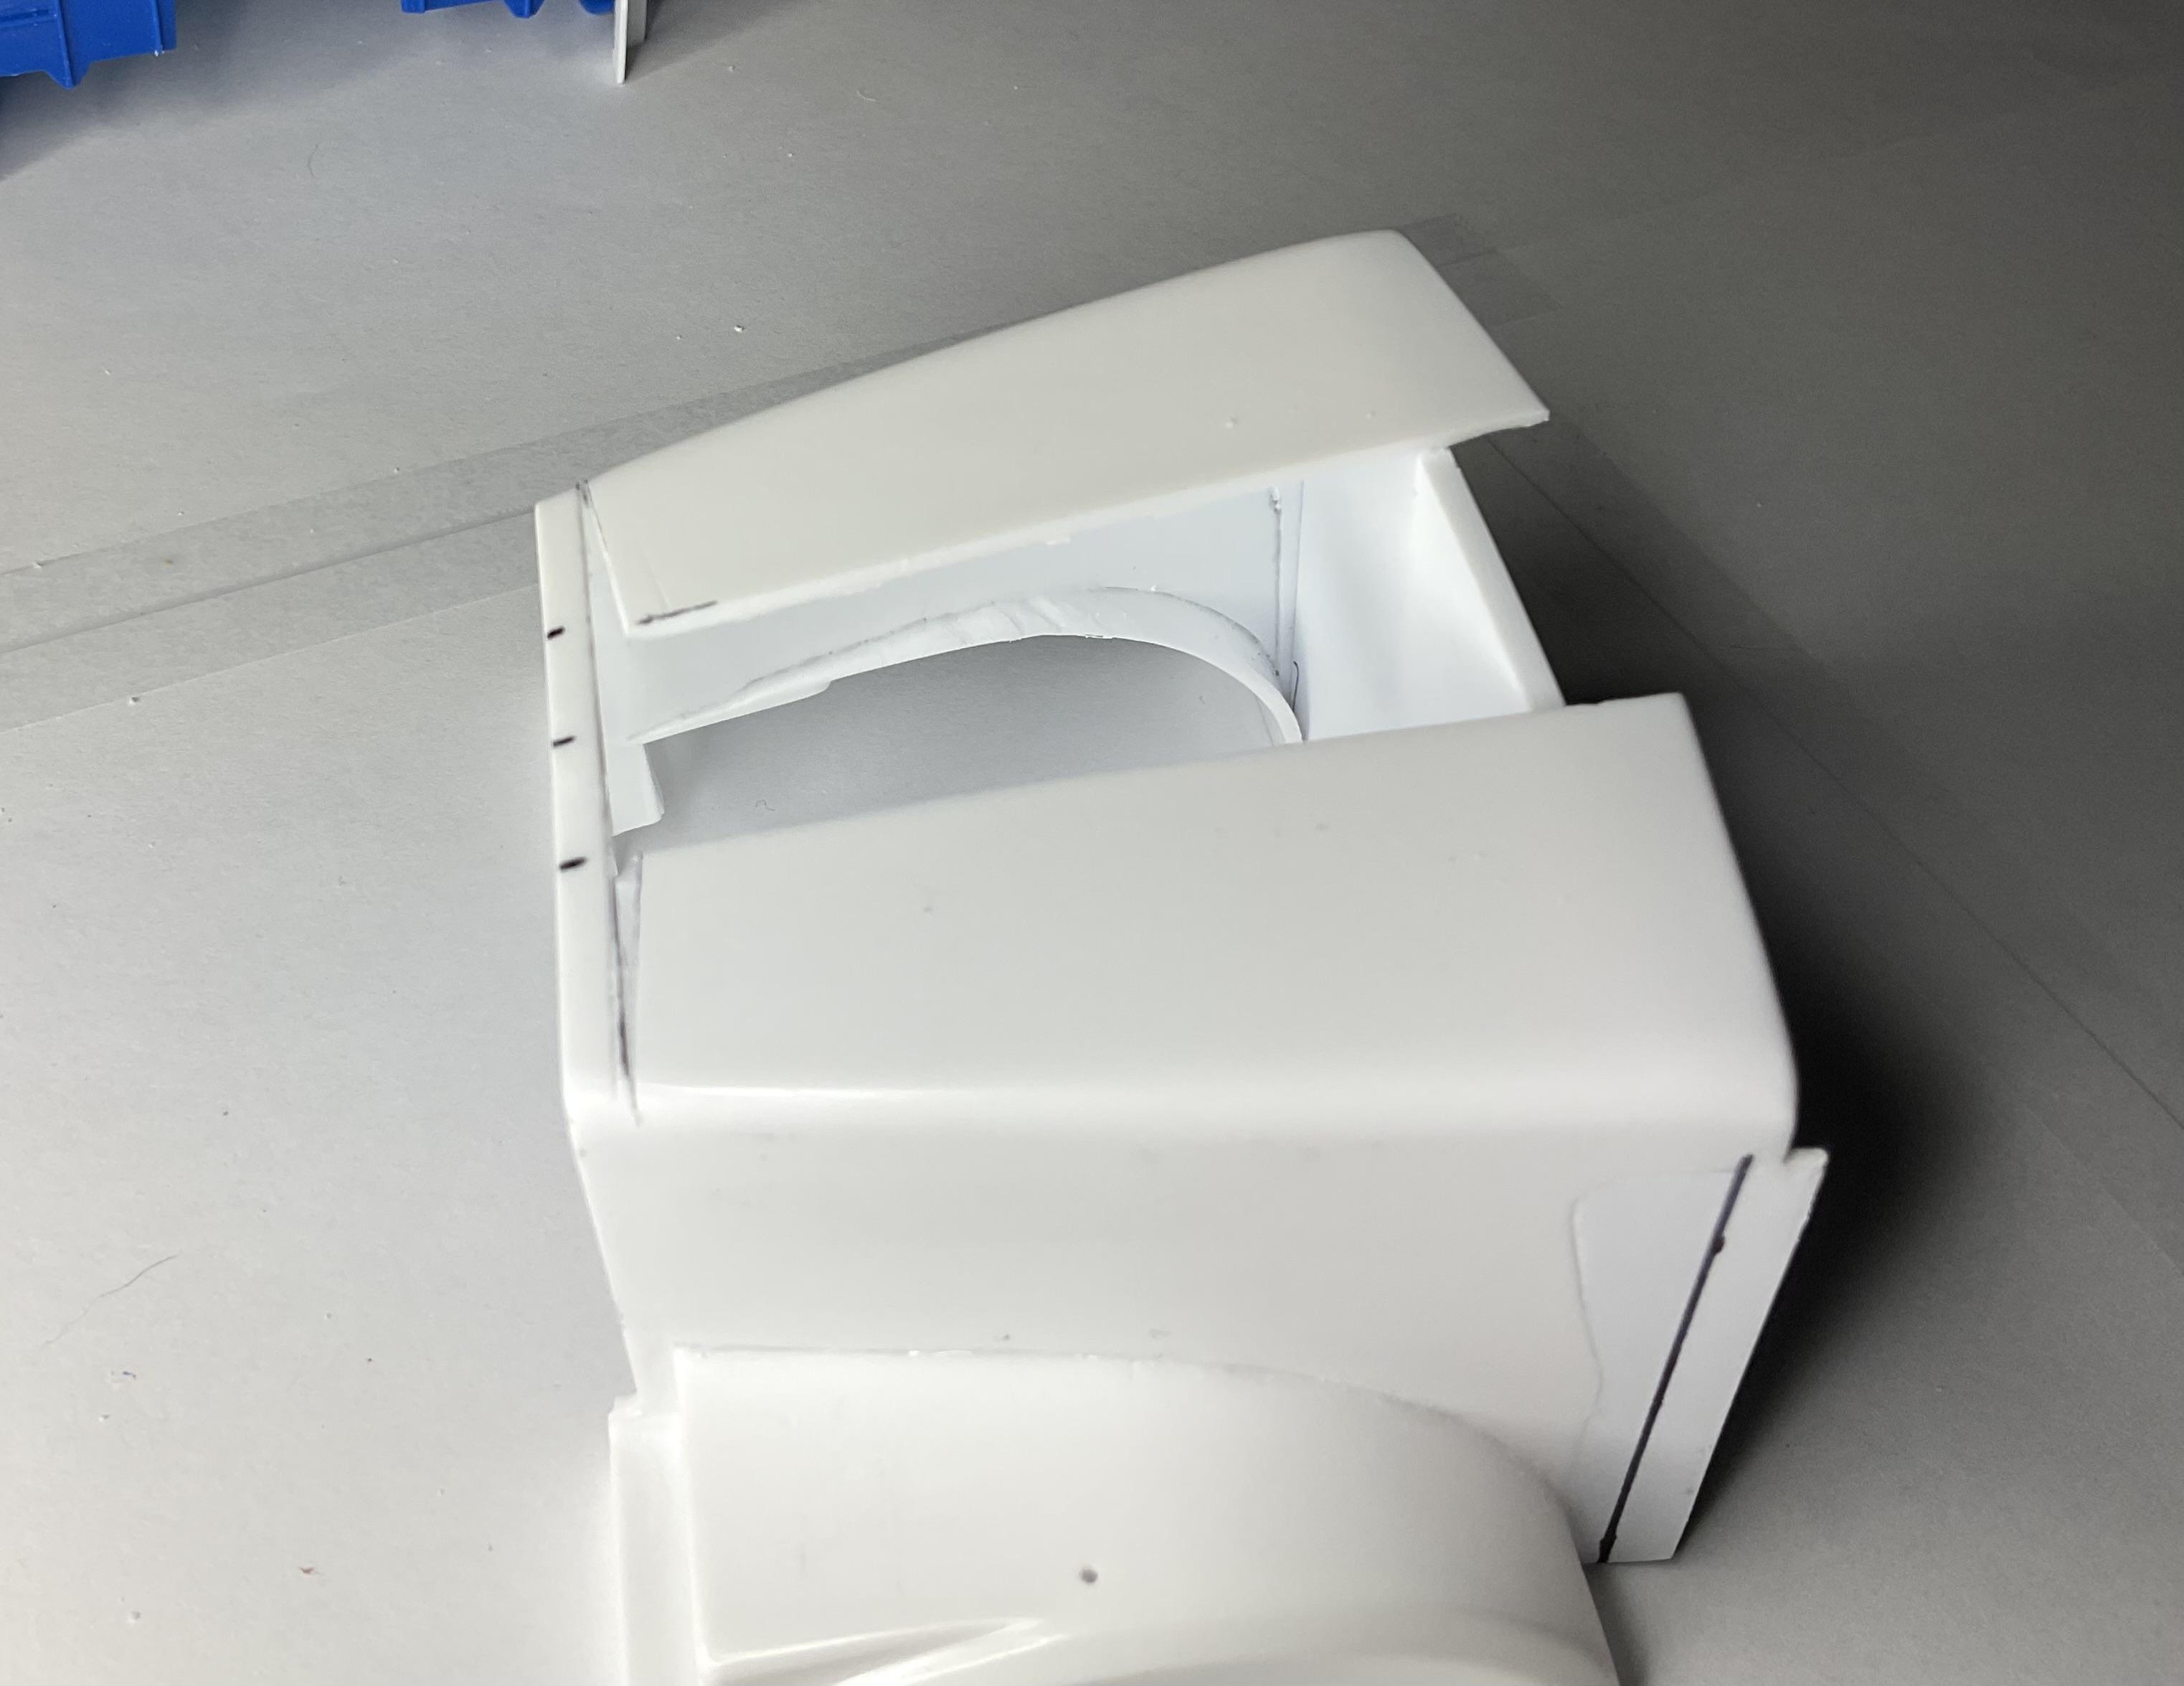
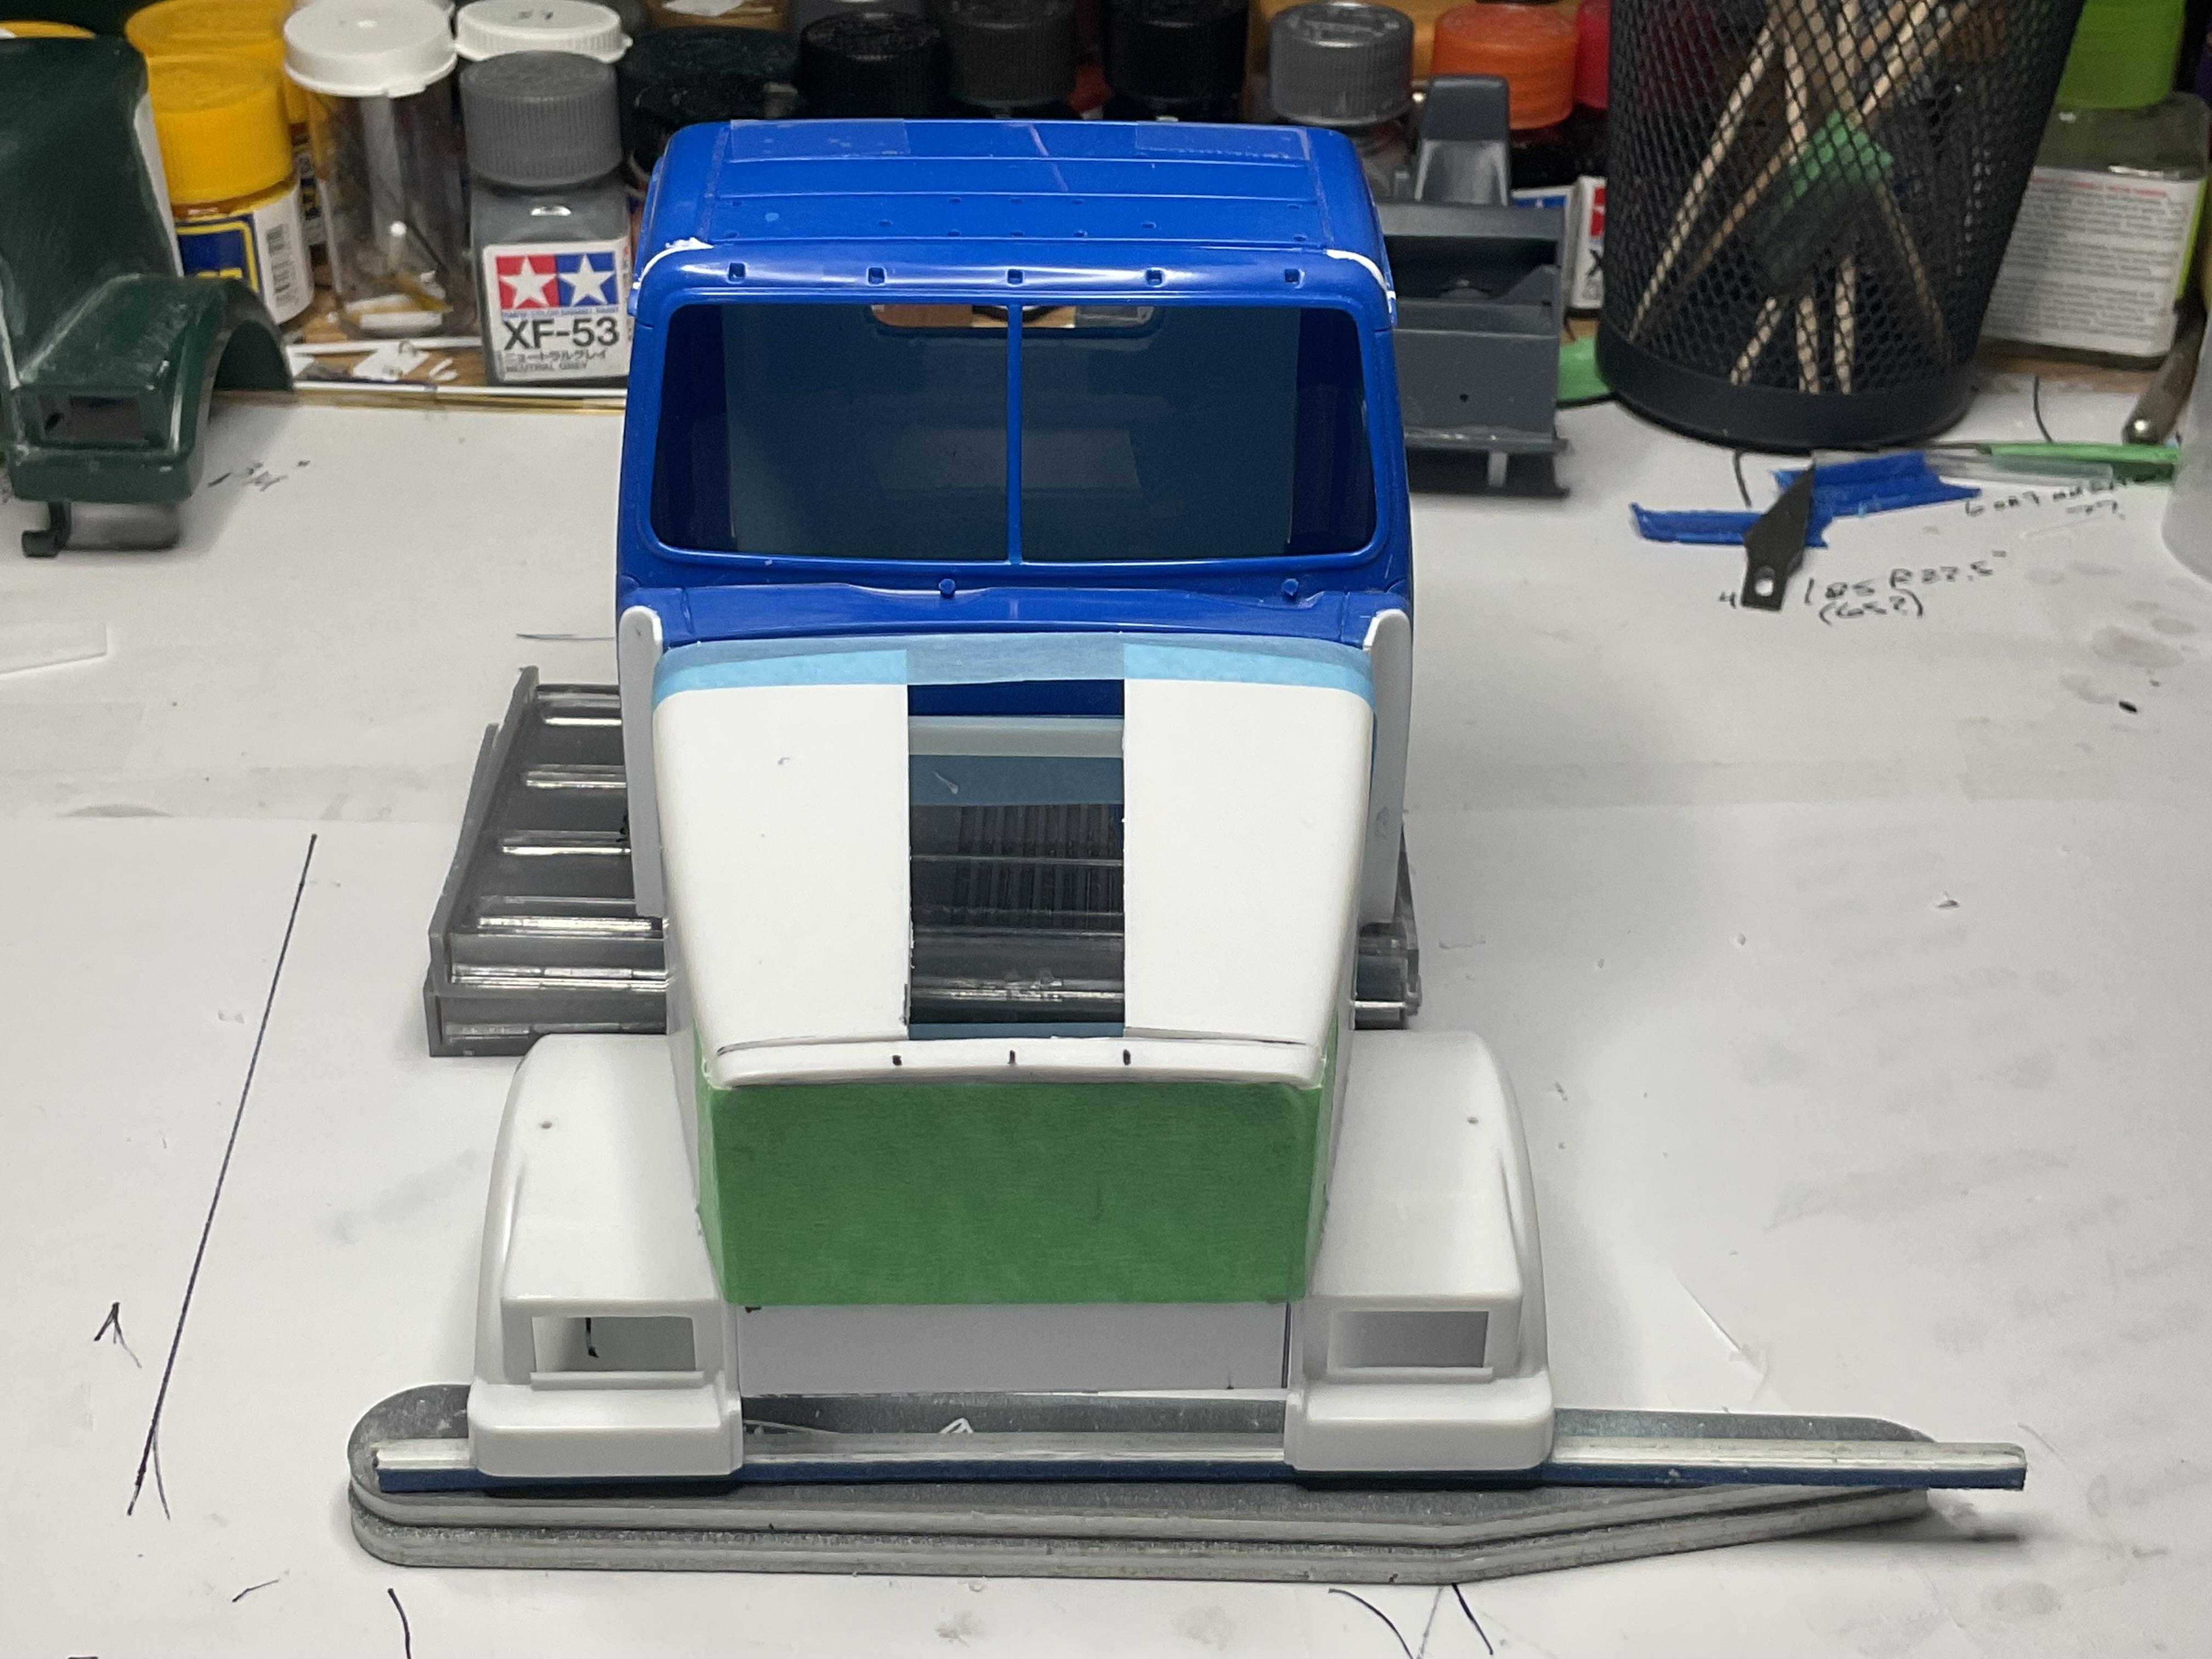
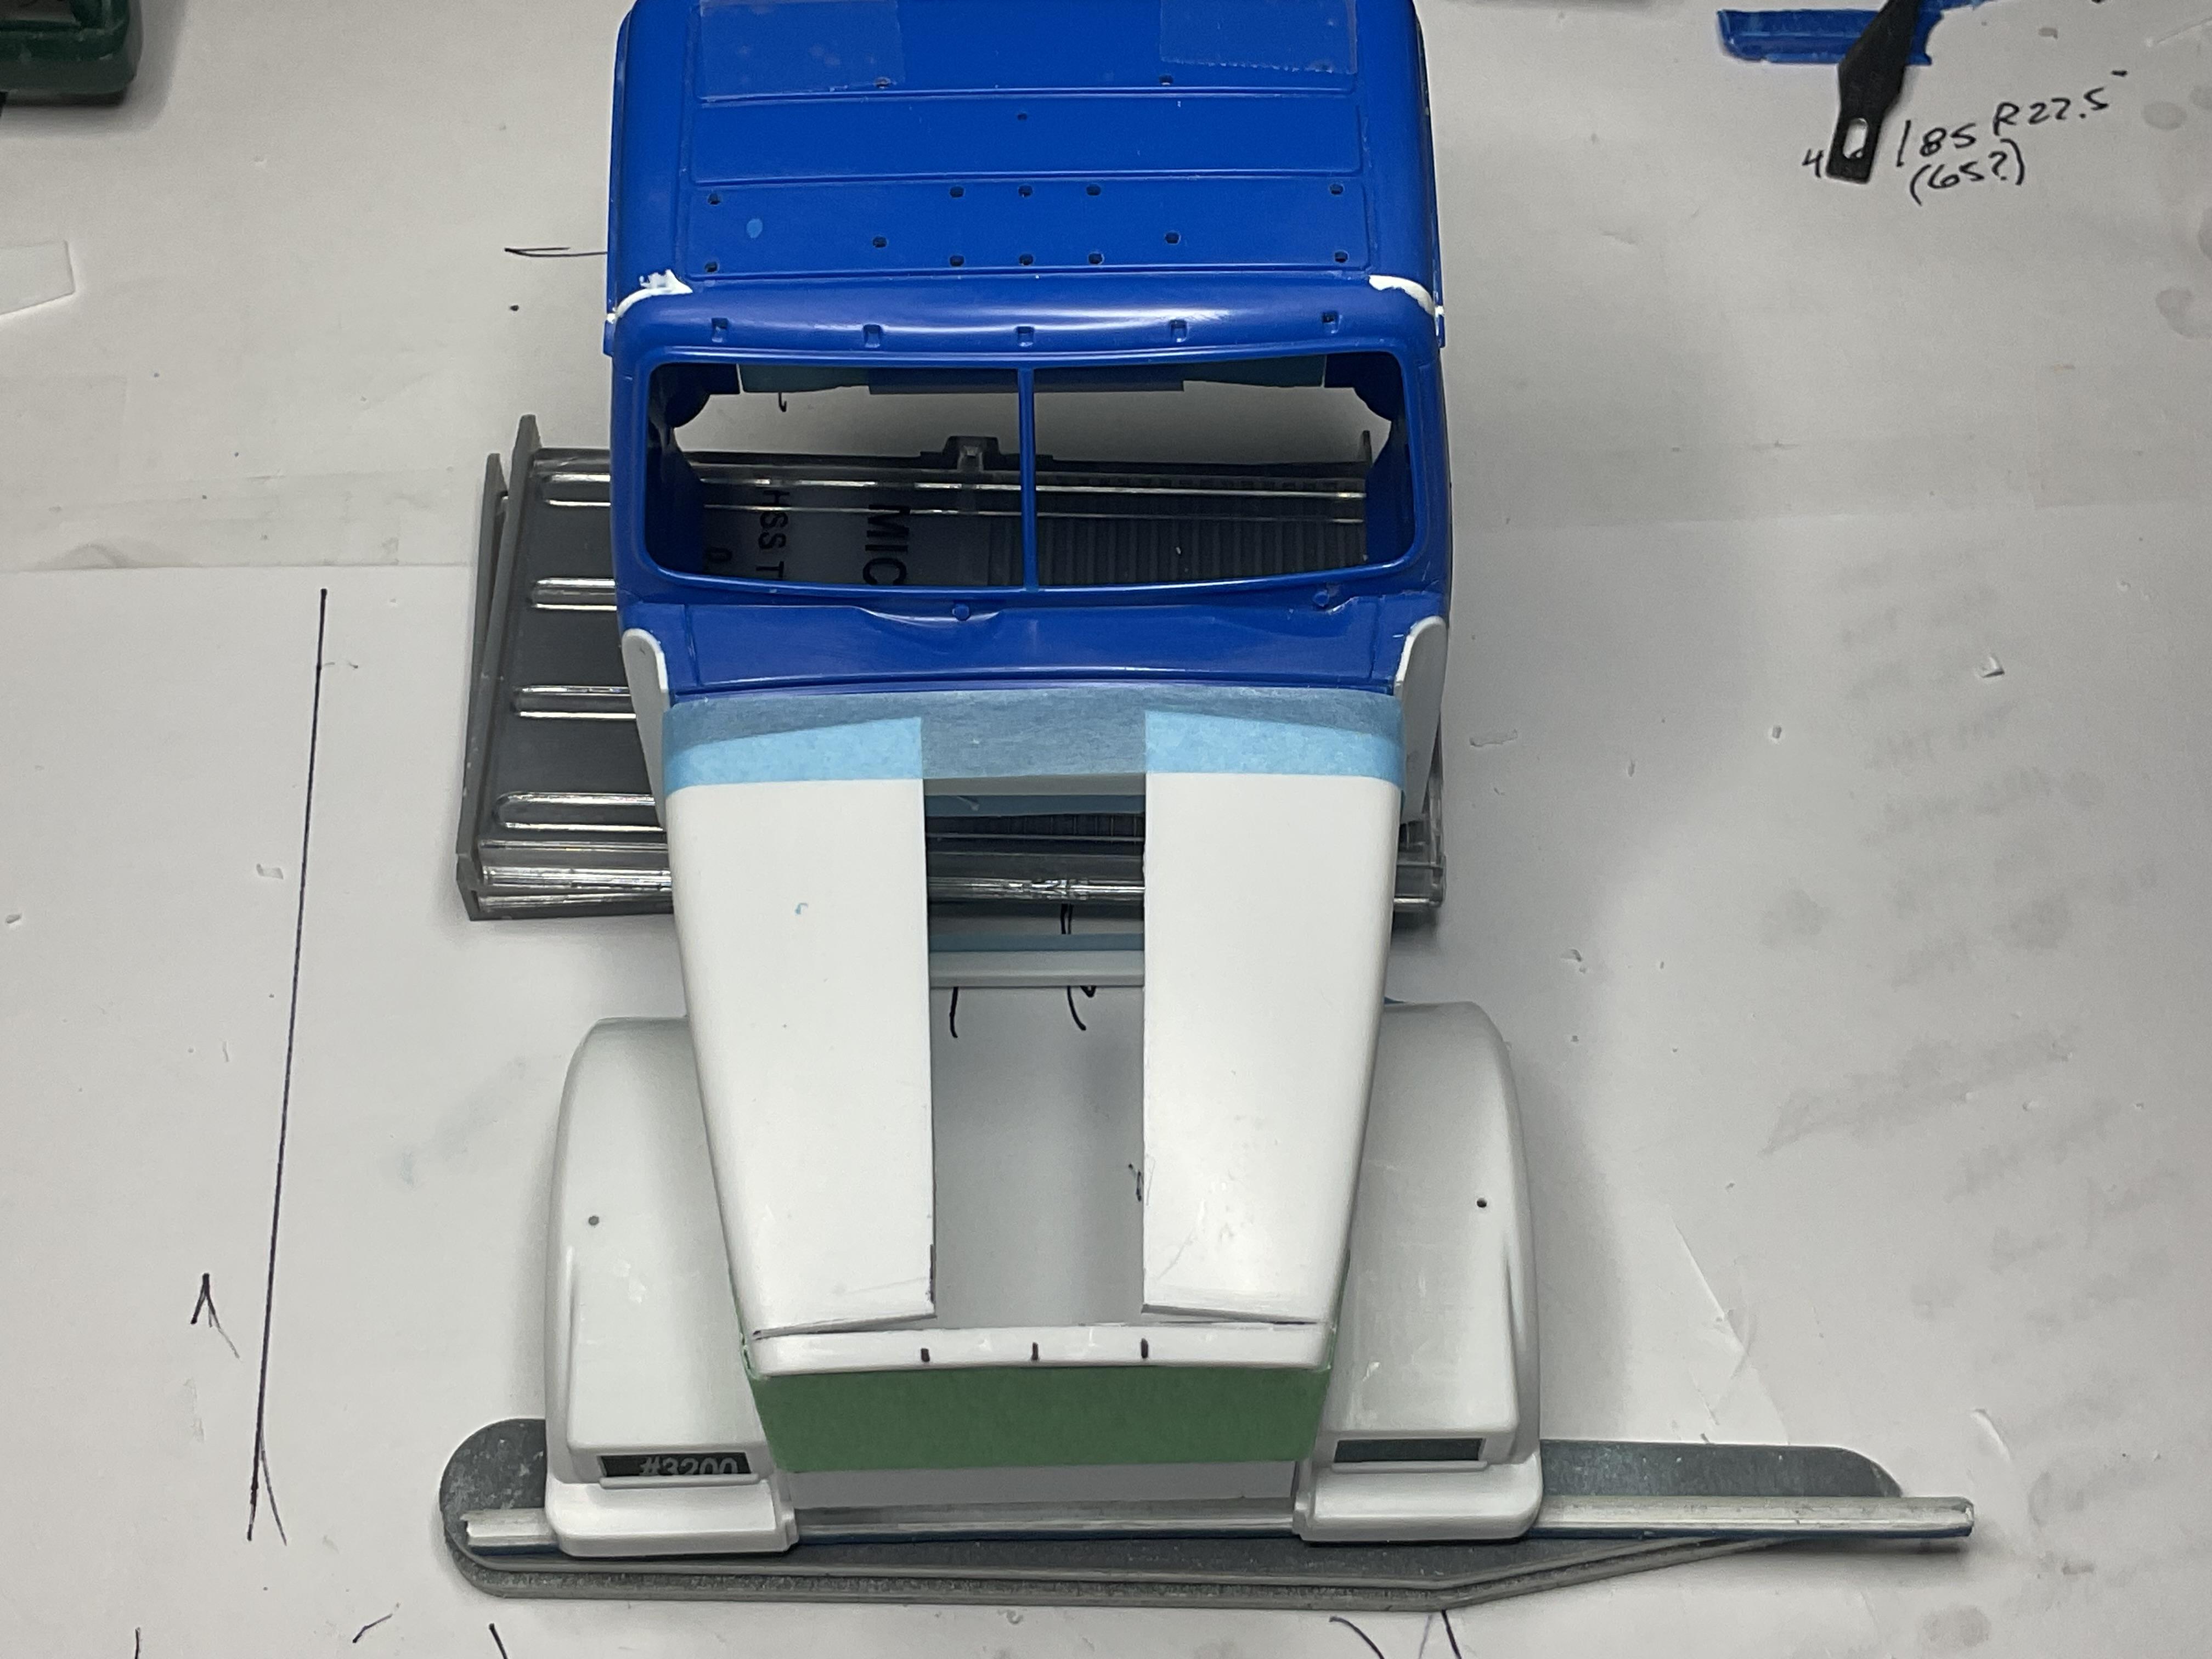
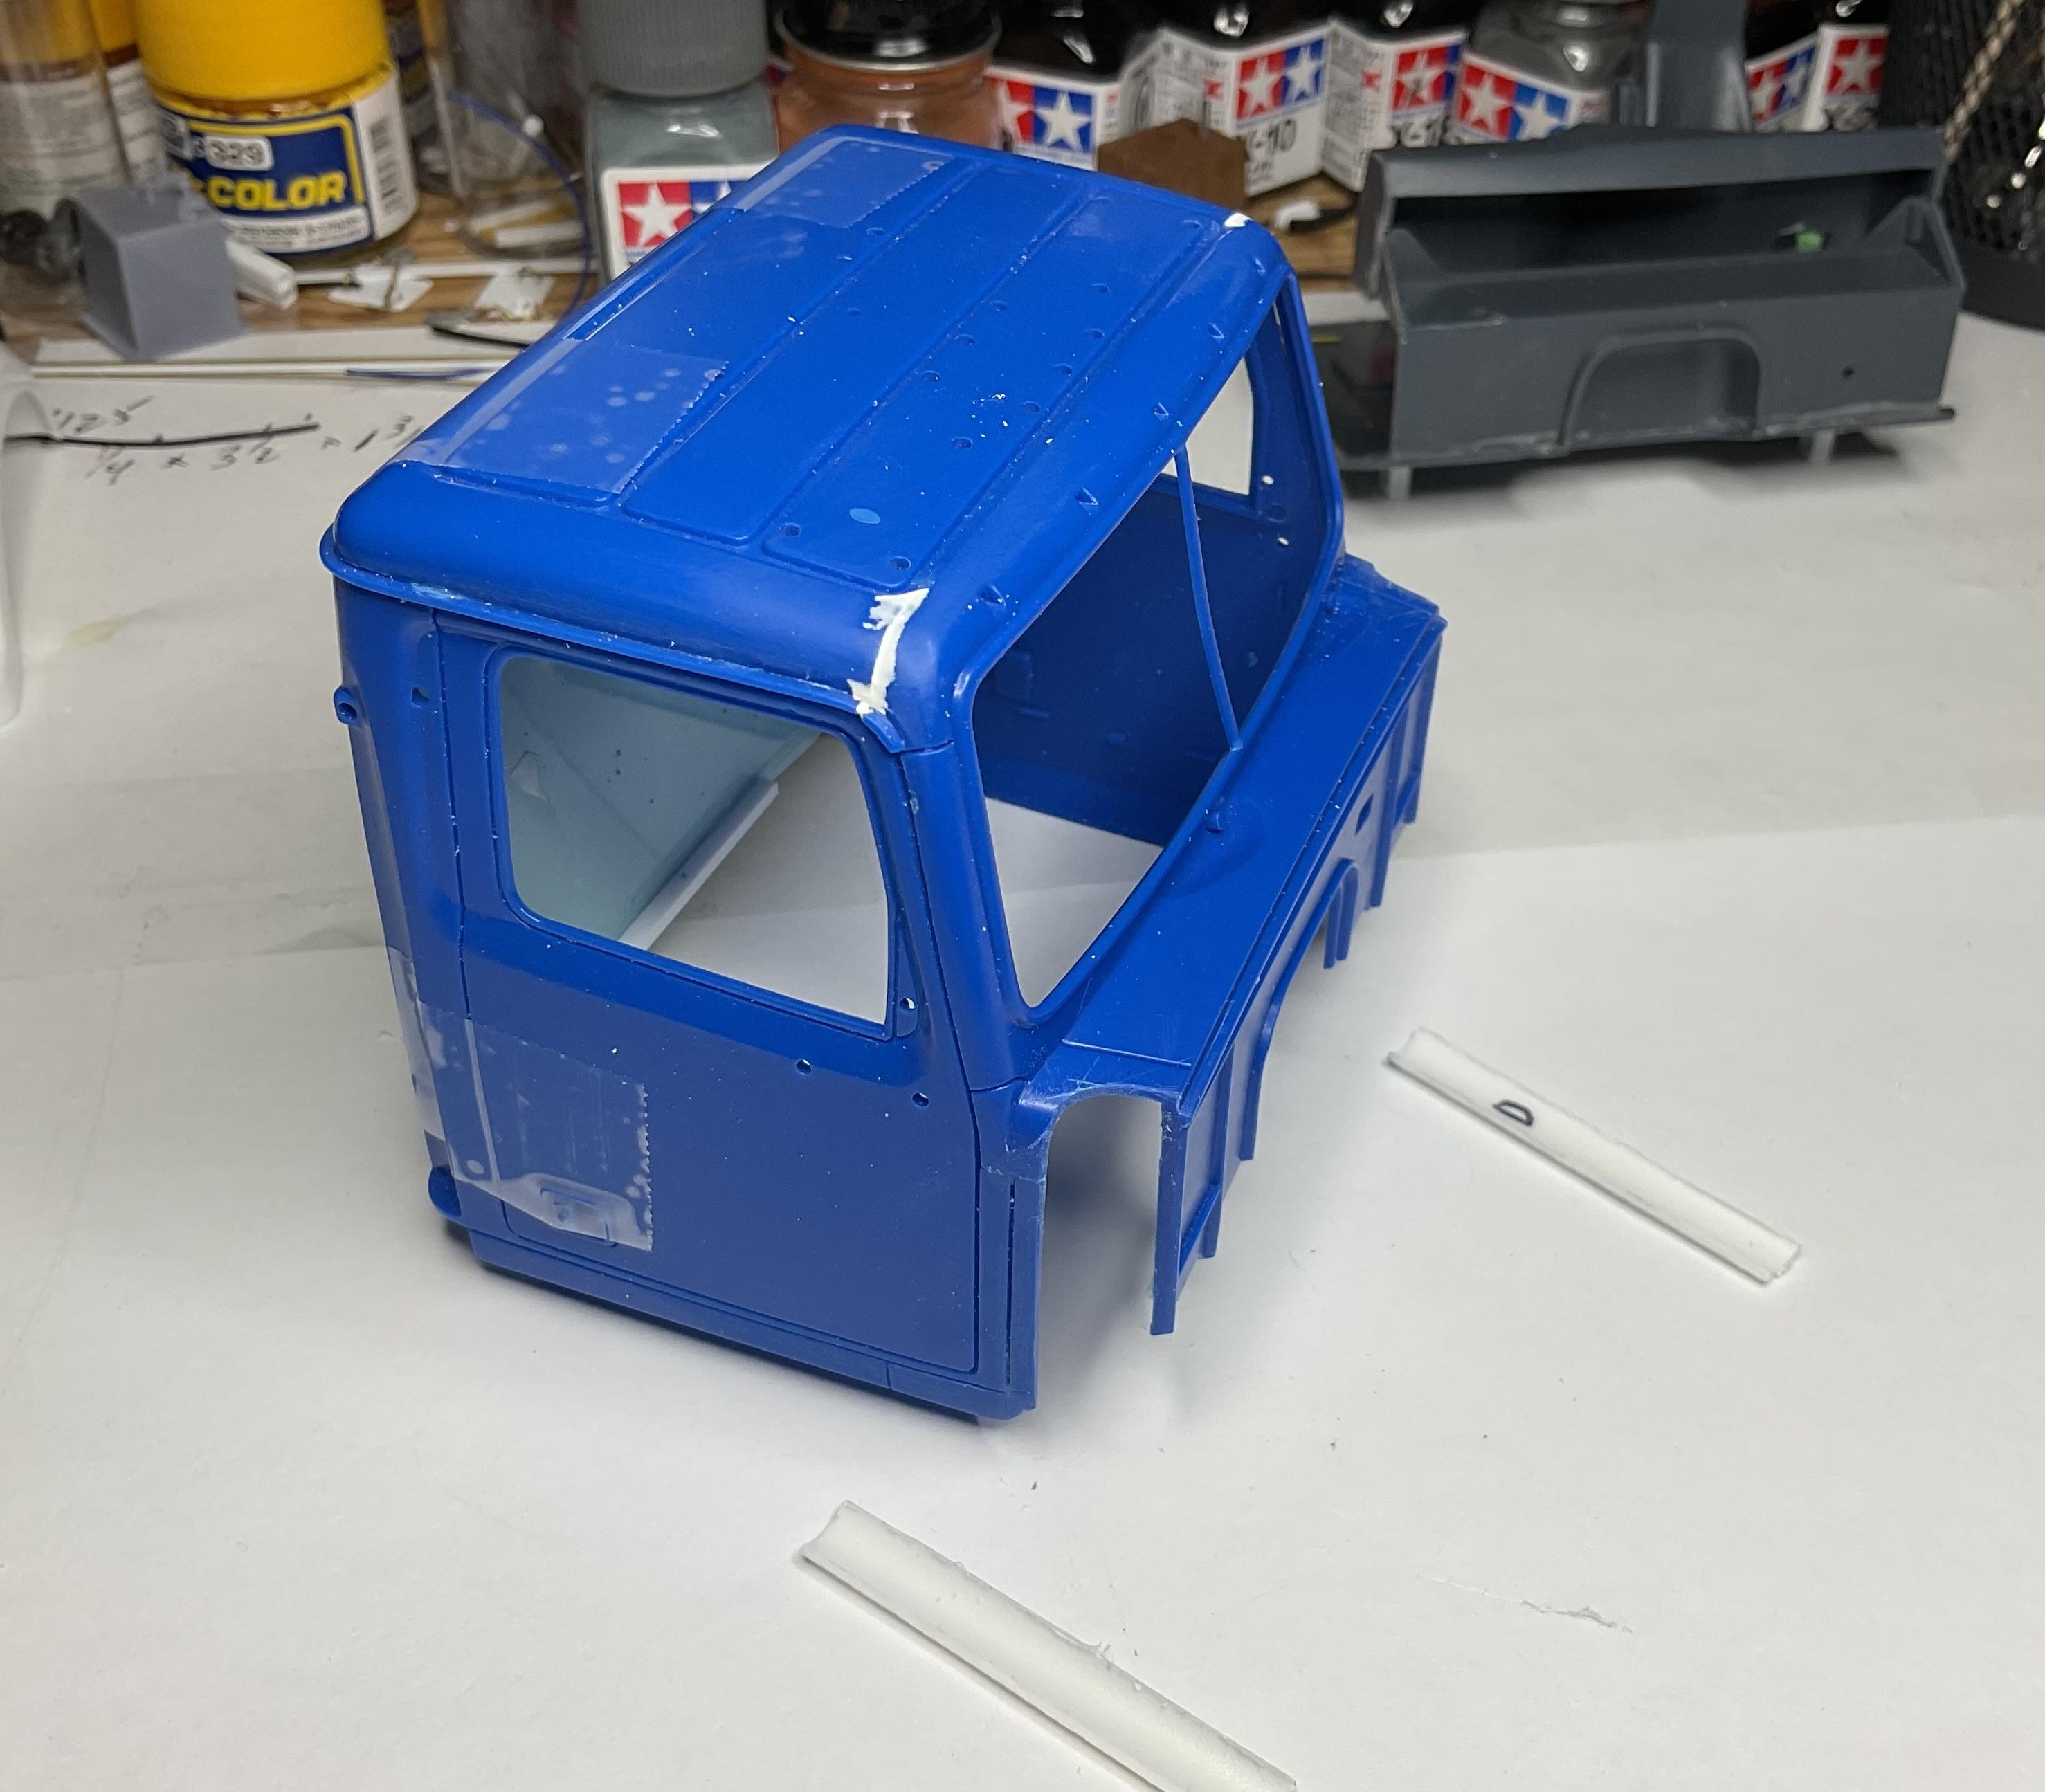
Have some of the modifications to the cab roughed in and initial shaping done - more to do along bottom aprons of cab, to tie into the added styrene. Also managed to finish off the lift arm's chain brackets and added lengths of chain to the push frame clevises that will be hooked into those brackets. Redefined area to be cut out, with painter's tape Initial cuts made on both sides Styrene filler pieces glued in and rough shaped - now I have a definite side to side width to work to when widening the back end of the hood. More styrene strips to add along bottom edge of cab, to tie into these styrene modifications Chain lengths added to clevises - was a chore to close the connecting links once they were slipped onto the clevises! Couple mock up pics of lift chains temporarily in place and connected to lift arm - will do a final length adjustment once plow is in place permanently Going to carry on with the cab modifications and hopefully, make some cuts on the hood today as well - thanks!
-
Build of IH Pumper
BK9300 replied to Chariots of Fire's topic in WIP: Model Trucks: Big Rigs and Heavy Equipment
Lots of good information, Charles - thanks for all the earlier pics on your casting process, as well. -
Kenworth aerodyne cabover
BK9300 replied to Bronzekeg's topic in WIP: Model Trucks: Big Rigs and Heavy Equipment
Great progress, Ken - looking forward to seeing how you do your door jambs. -
Lots of quality scratch building going on here - looks very good, Dennis!
-
Western Star 4900 FA plow truck
BK9300 replied to BK9300's topic in WIP: Model Trucks: Big Rigs and Heavy Equipment
Francis, thanks for your very kind words - 18 pages, so far, is a lot to endure in one sitting! To be fair, work on this truck had been going on for about a year and a half before I started posting, so I’m much less quick than it would seem. And about ‘jewelry’, I would refer everyone to your machined parts in your Demon and Dodge D100 builds! Thanks again. -
I like the combo colour on your wheels, Lee - nice touch for this truck!
-
’72 Dodge Demon Drag Racer 1/25 scale
BK9300 replied to AmericanMuscleFan's topic in WIP: Drag Racing Models
Francis, you made mention about an artist - comparatively, then, ‘old world master’ is a fitting description of what we’re seeing here! Again, such a pleasure to observe (and learn from). -
Your engine looks spectacular, Daniel - can’t imagine, fully, how difficult it must have been to loop your tether cord through each eyelet!
-
FDNY Wrecker
BK9300 replied to Scott Eriksen's topic in WIP: Model Trucks: Big Rigs and Heavy Equipment
Wrecker boom looking very impressive, Scott, and like Lee said, decals really sets off the cab and wrecker body. All the plumbing looks great, too. -
Motor looks good in that gray, Lee - good choice.