BK9300
-
Posts
1,991 -
Joined
-
Last visited
Content Type
Profiles
Forums
Events
Gallery
Everything posted by BK9300
-

ALF Industrial Pumper
BK9300 replied to Firebuilder's topic in WIP: Model Trucks: Big Rigs and Heavy Equipment
Wow - going to be an impressive looking truck! -
Western Star 4900 FA plow truck
BK9300 replied to BK9300's topic in WIP: Model Trucks: Big Rigs and Heavy Equipment
Thanks, Scott - made me laugh! The resin fittings I am using are Top Studio, purchased from different suppliers, and they are very fragile! Early on, after breaking too many, made the decision to drill out the fittings and replace the tube portion with brass rod - maybe there’s a better process, but haven’t found it yet! The aluminum fittings used on the bulkhead fitting are from R&B Motion and are described as AN fittings, but they look the part that I needed. Thanks again for the compliment! The magnifying desk lamp sure came in handy doing this work!
-
Revell's Auto Transport Trailer: WIP
BK9300 replied to David G.'s topic in WIP: Model Trucks: Big Rigs and Heavy Equipment
David, given the thoroughness you bring to all your other builds, this project will turn out great! I’ve never seen the kit up close - are the upper, individual sections height adjustable? -
I agree about the tape - great idea! Need to keep that in mind for future builds.
-
Marvel's Hydra coupe 1/12 scale full scratch build
BK9300 replied to François's topic in WIP: Model Cars
Very impressive, as always, François! -
Western Star 4900 FA plow truck
BK9300 replied to BK9300's topic in WIP: Model Trucks: Big Rigs and Heavy Equipment
Yes, even more so once I get the cab and hood on - guess I've taken so long with that because I'm reluctant to do the cutting and modifications to cab and hood I need to do to make it look more like a 4900 FA. -
Western Star 4900 FA plow truck
BK9300 replied to BK9300's topic in WIP: Model Trucks: Big Rigs and Heavy Equipment
Thanks, Jeff! -
Western Star 4900 FA plow truck
BK9300 replied to BK9300's topic in WIP: Model Trucks: Big Rigs and Heavy Equipment
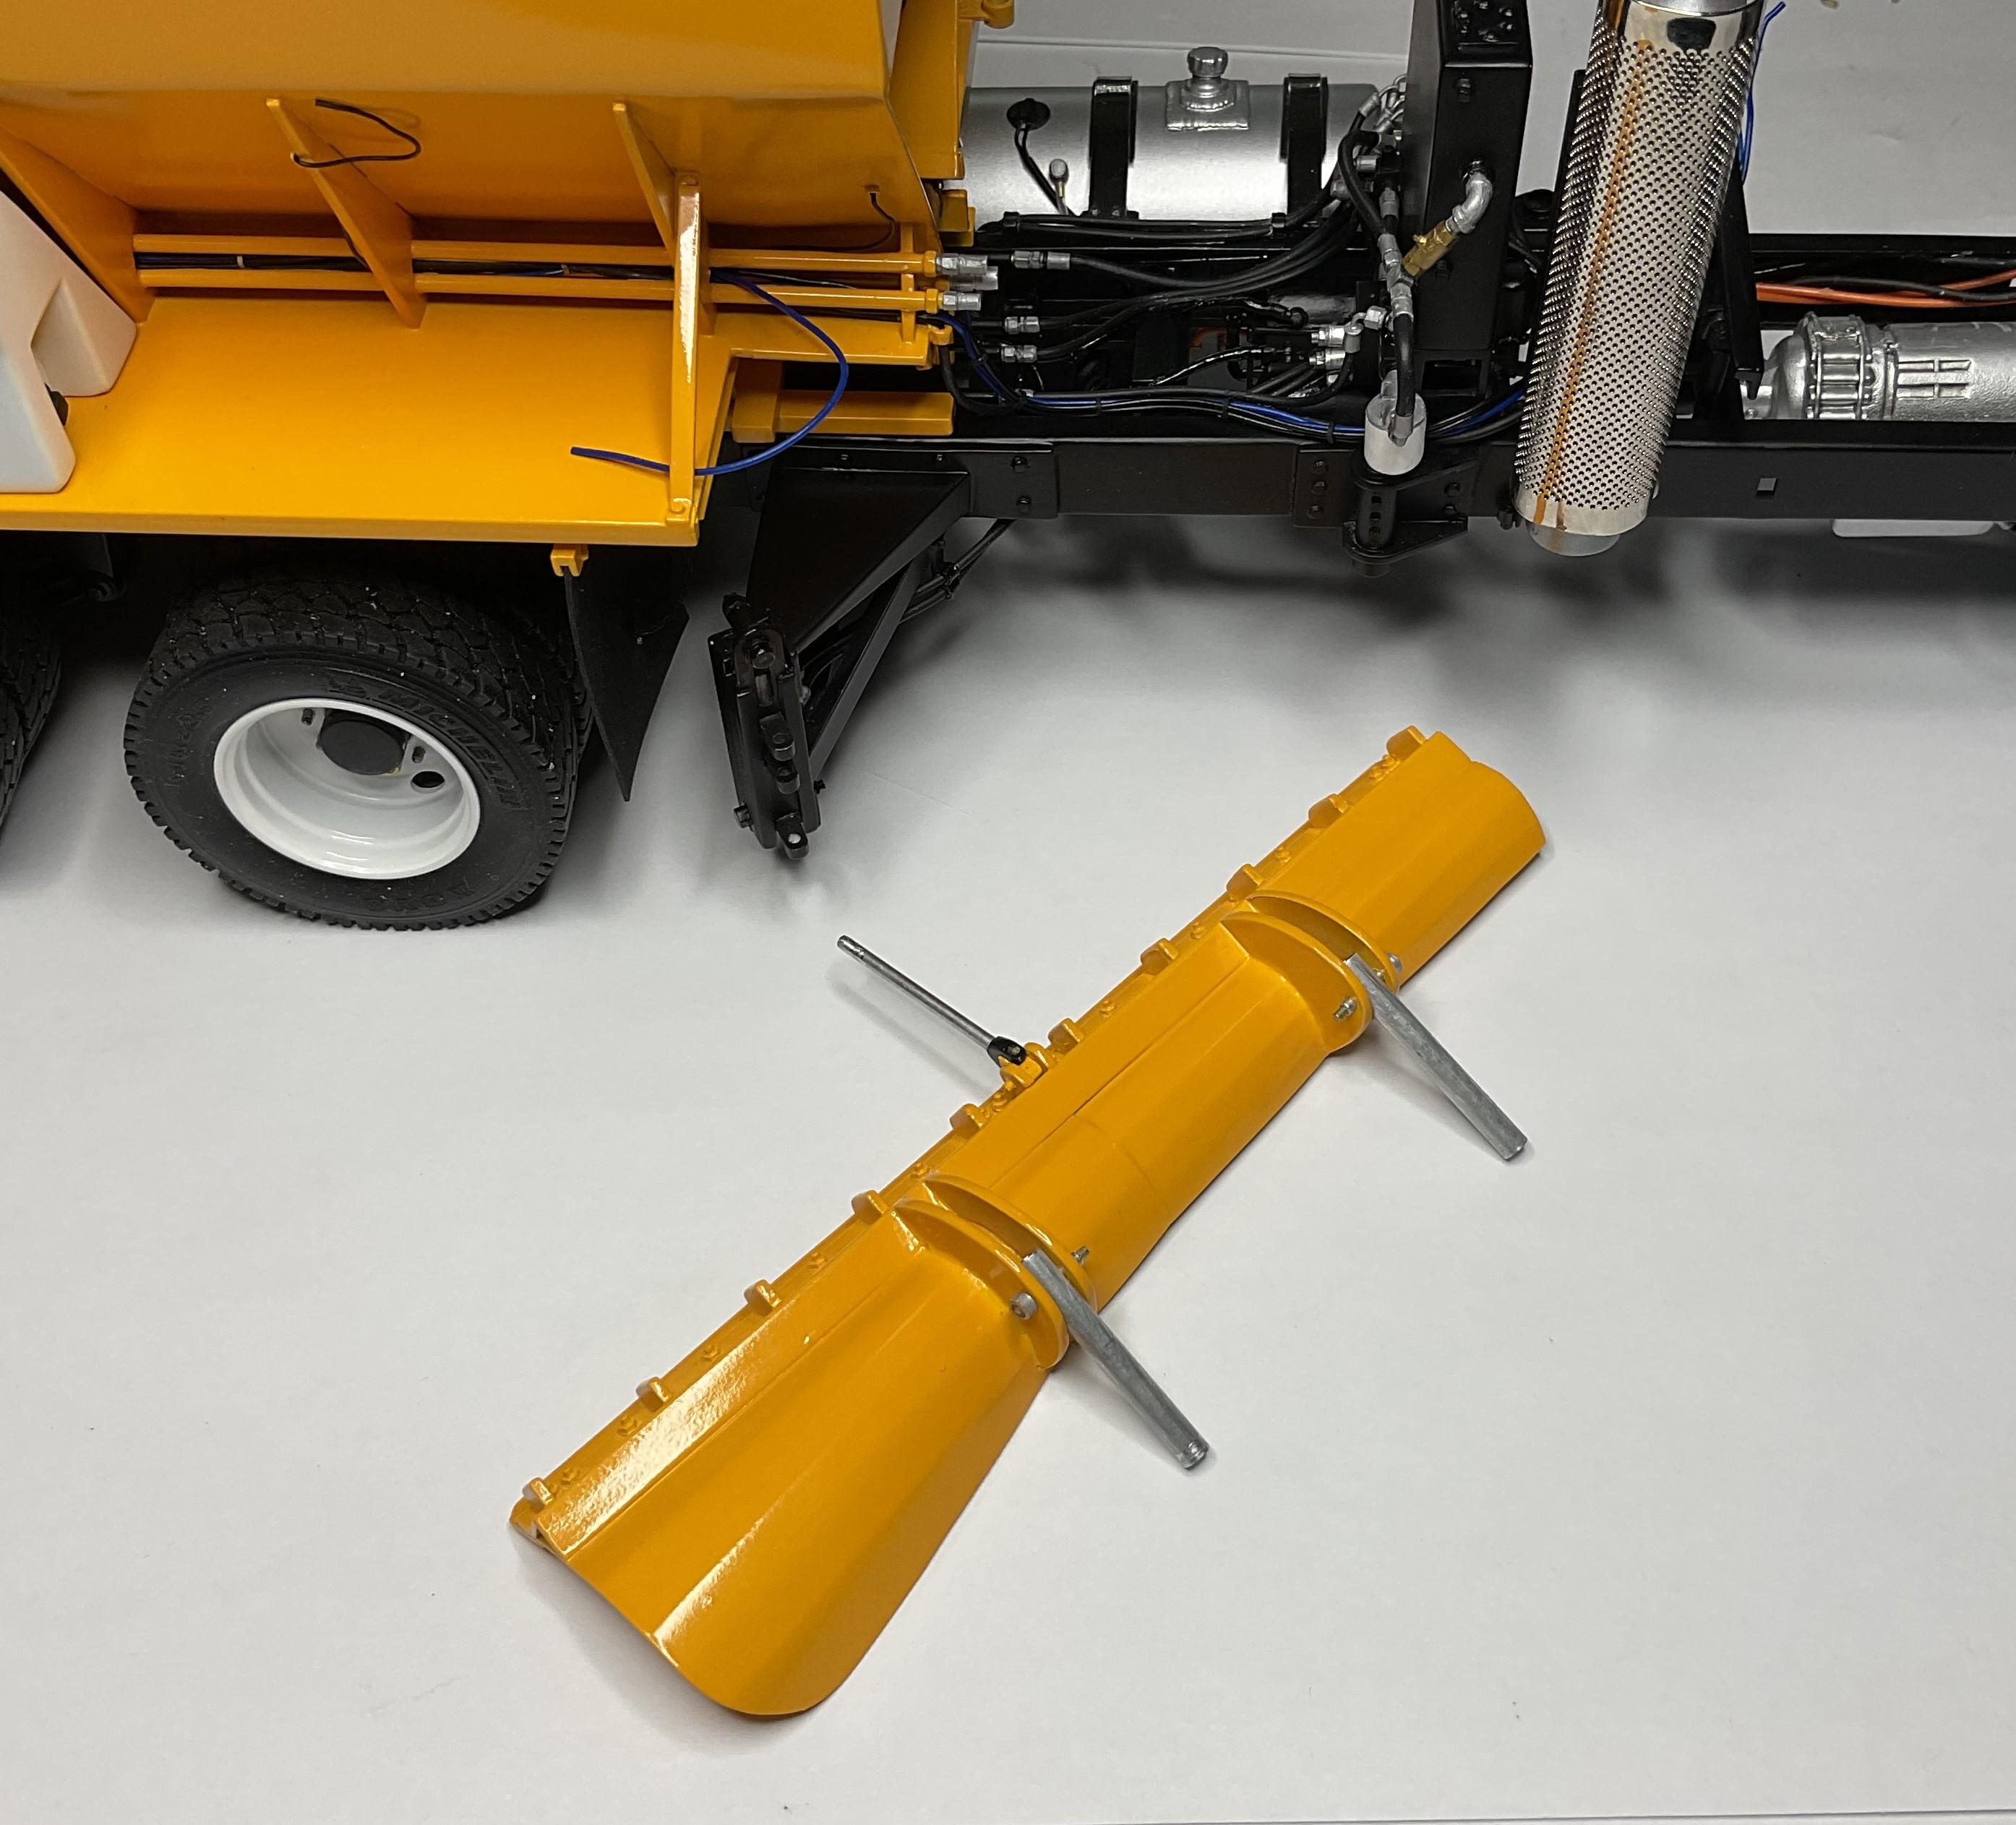
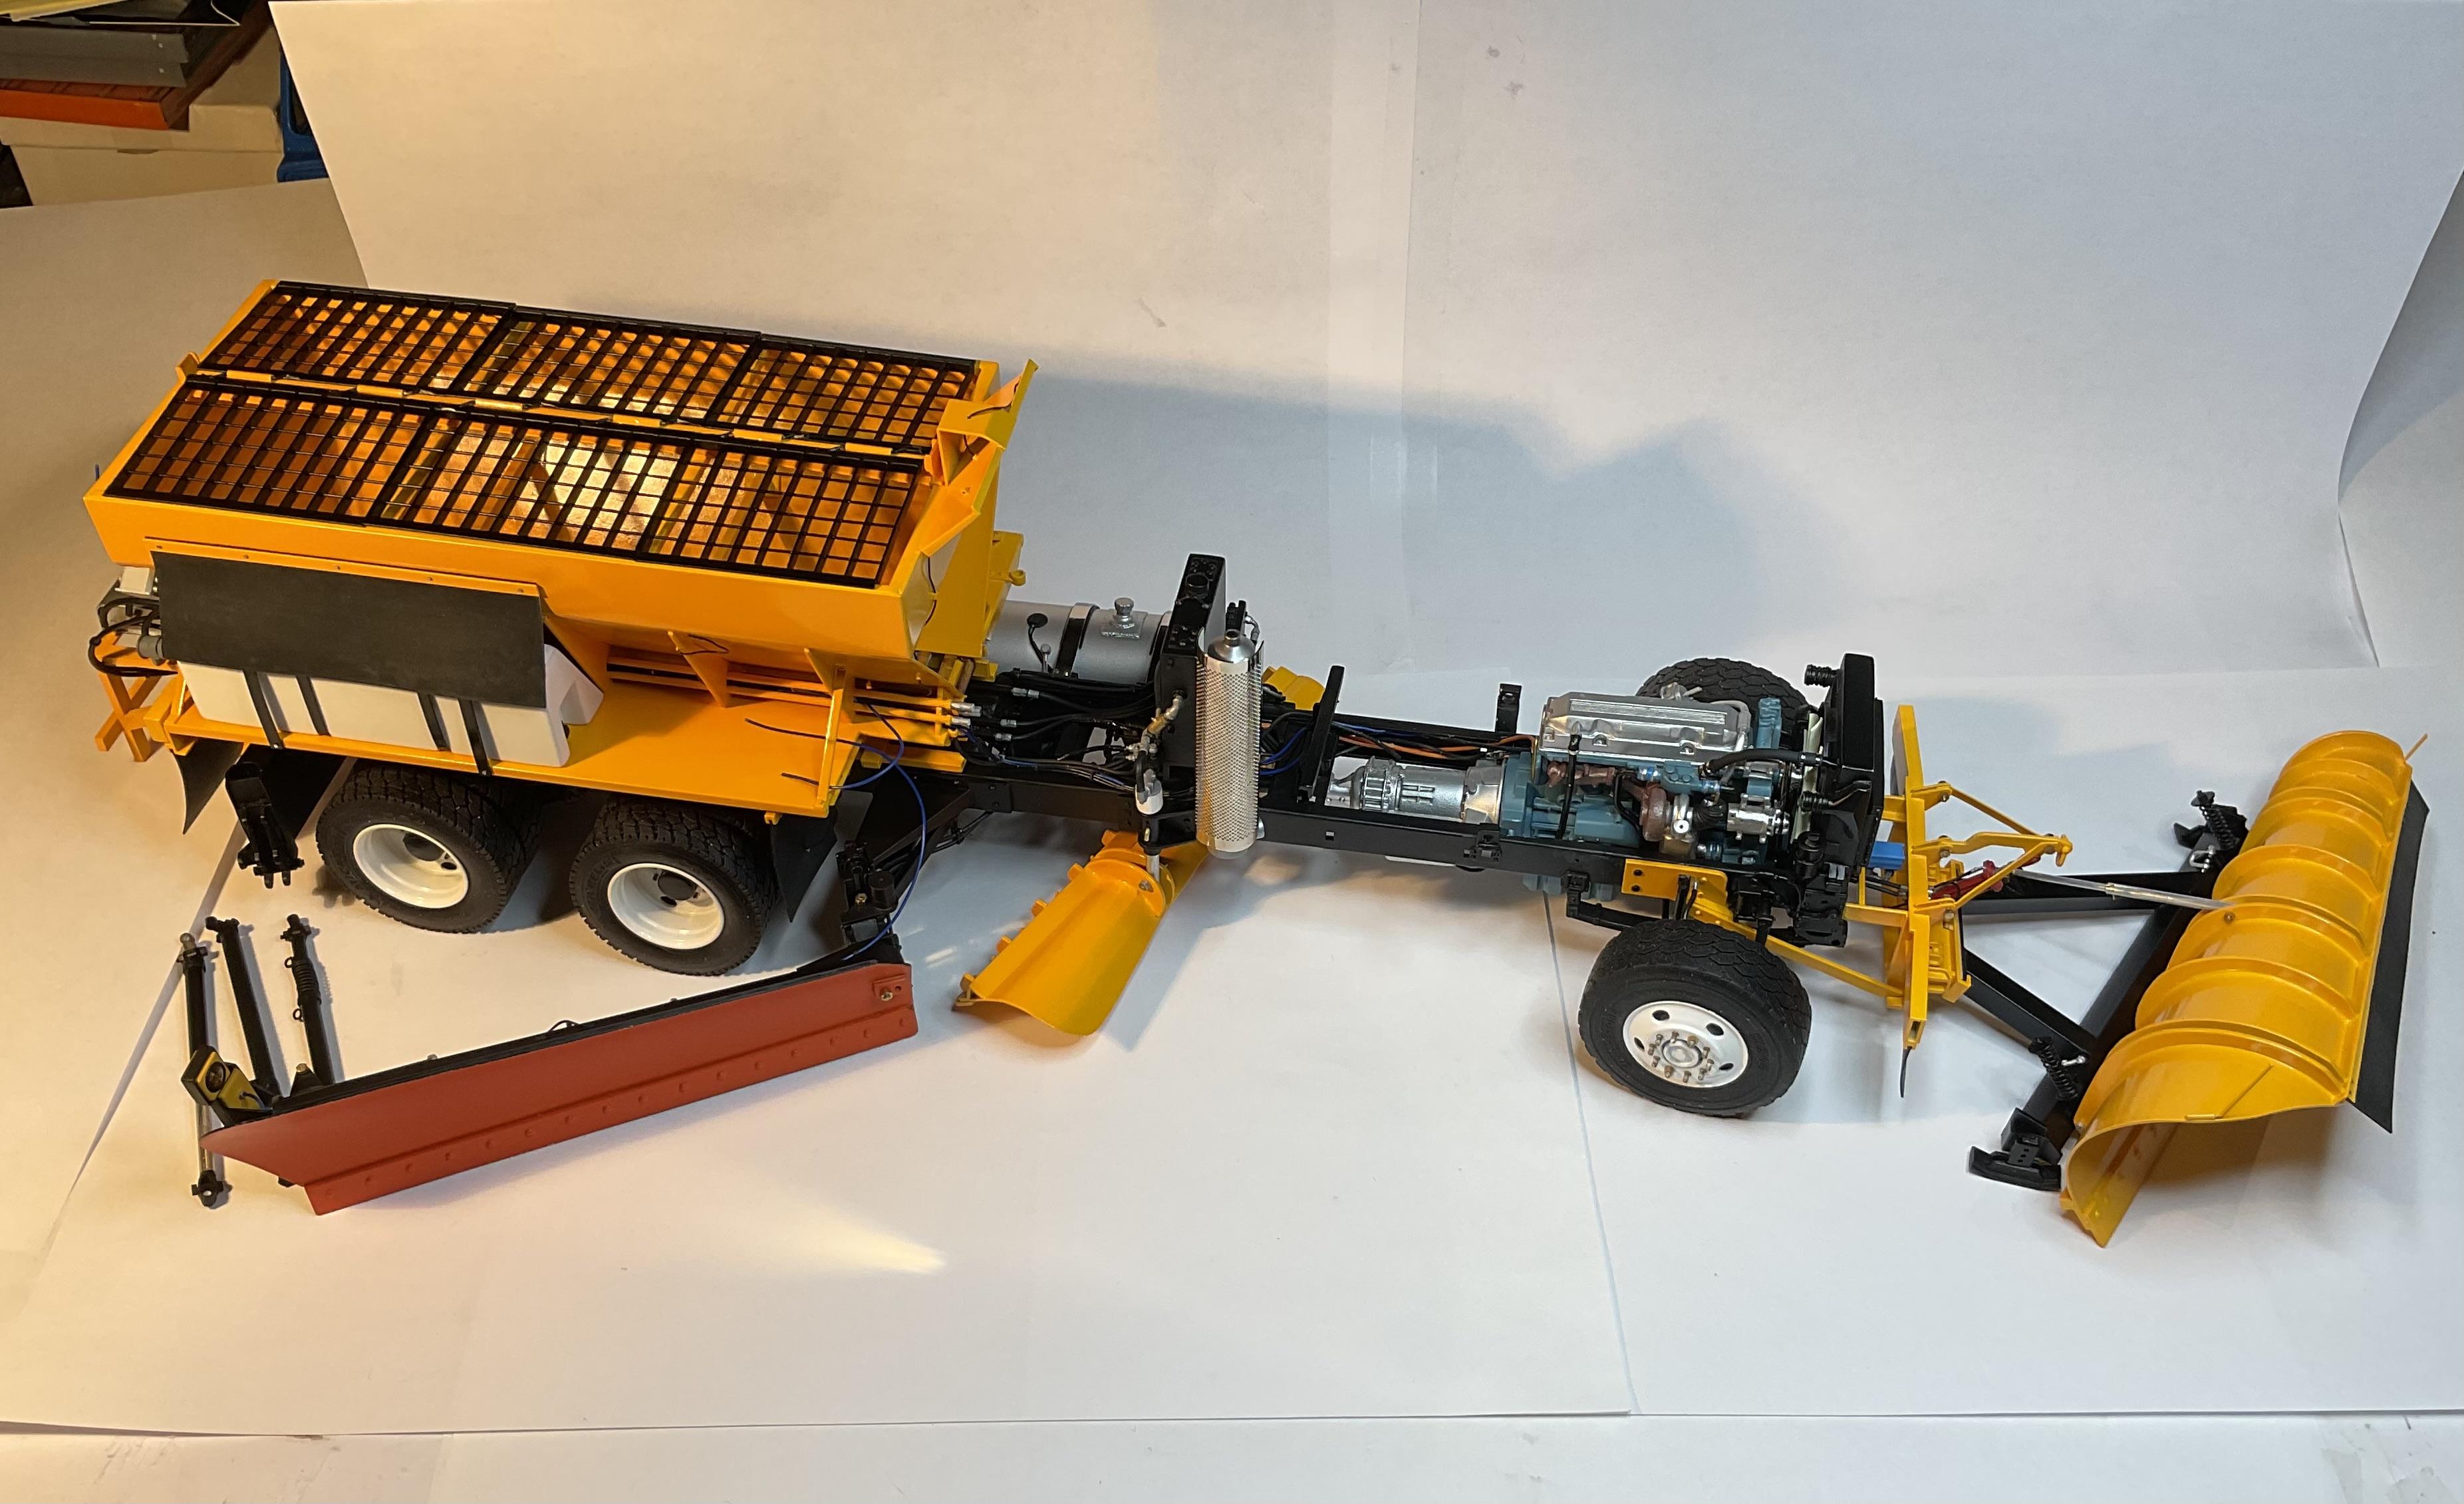
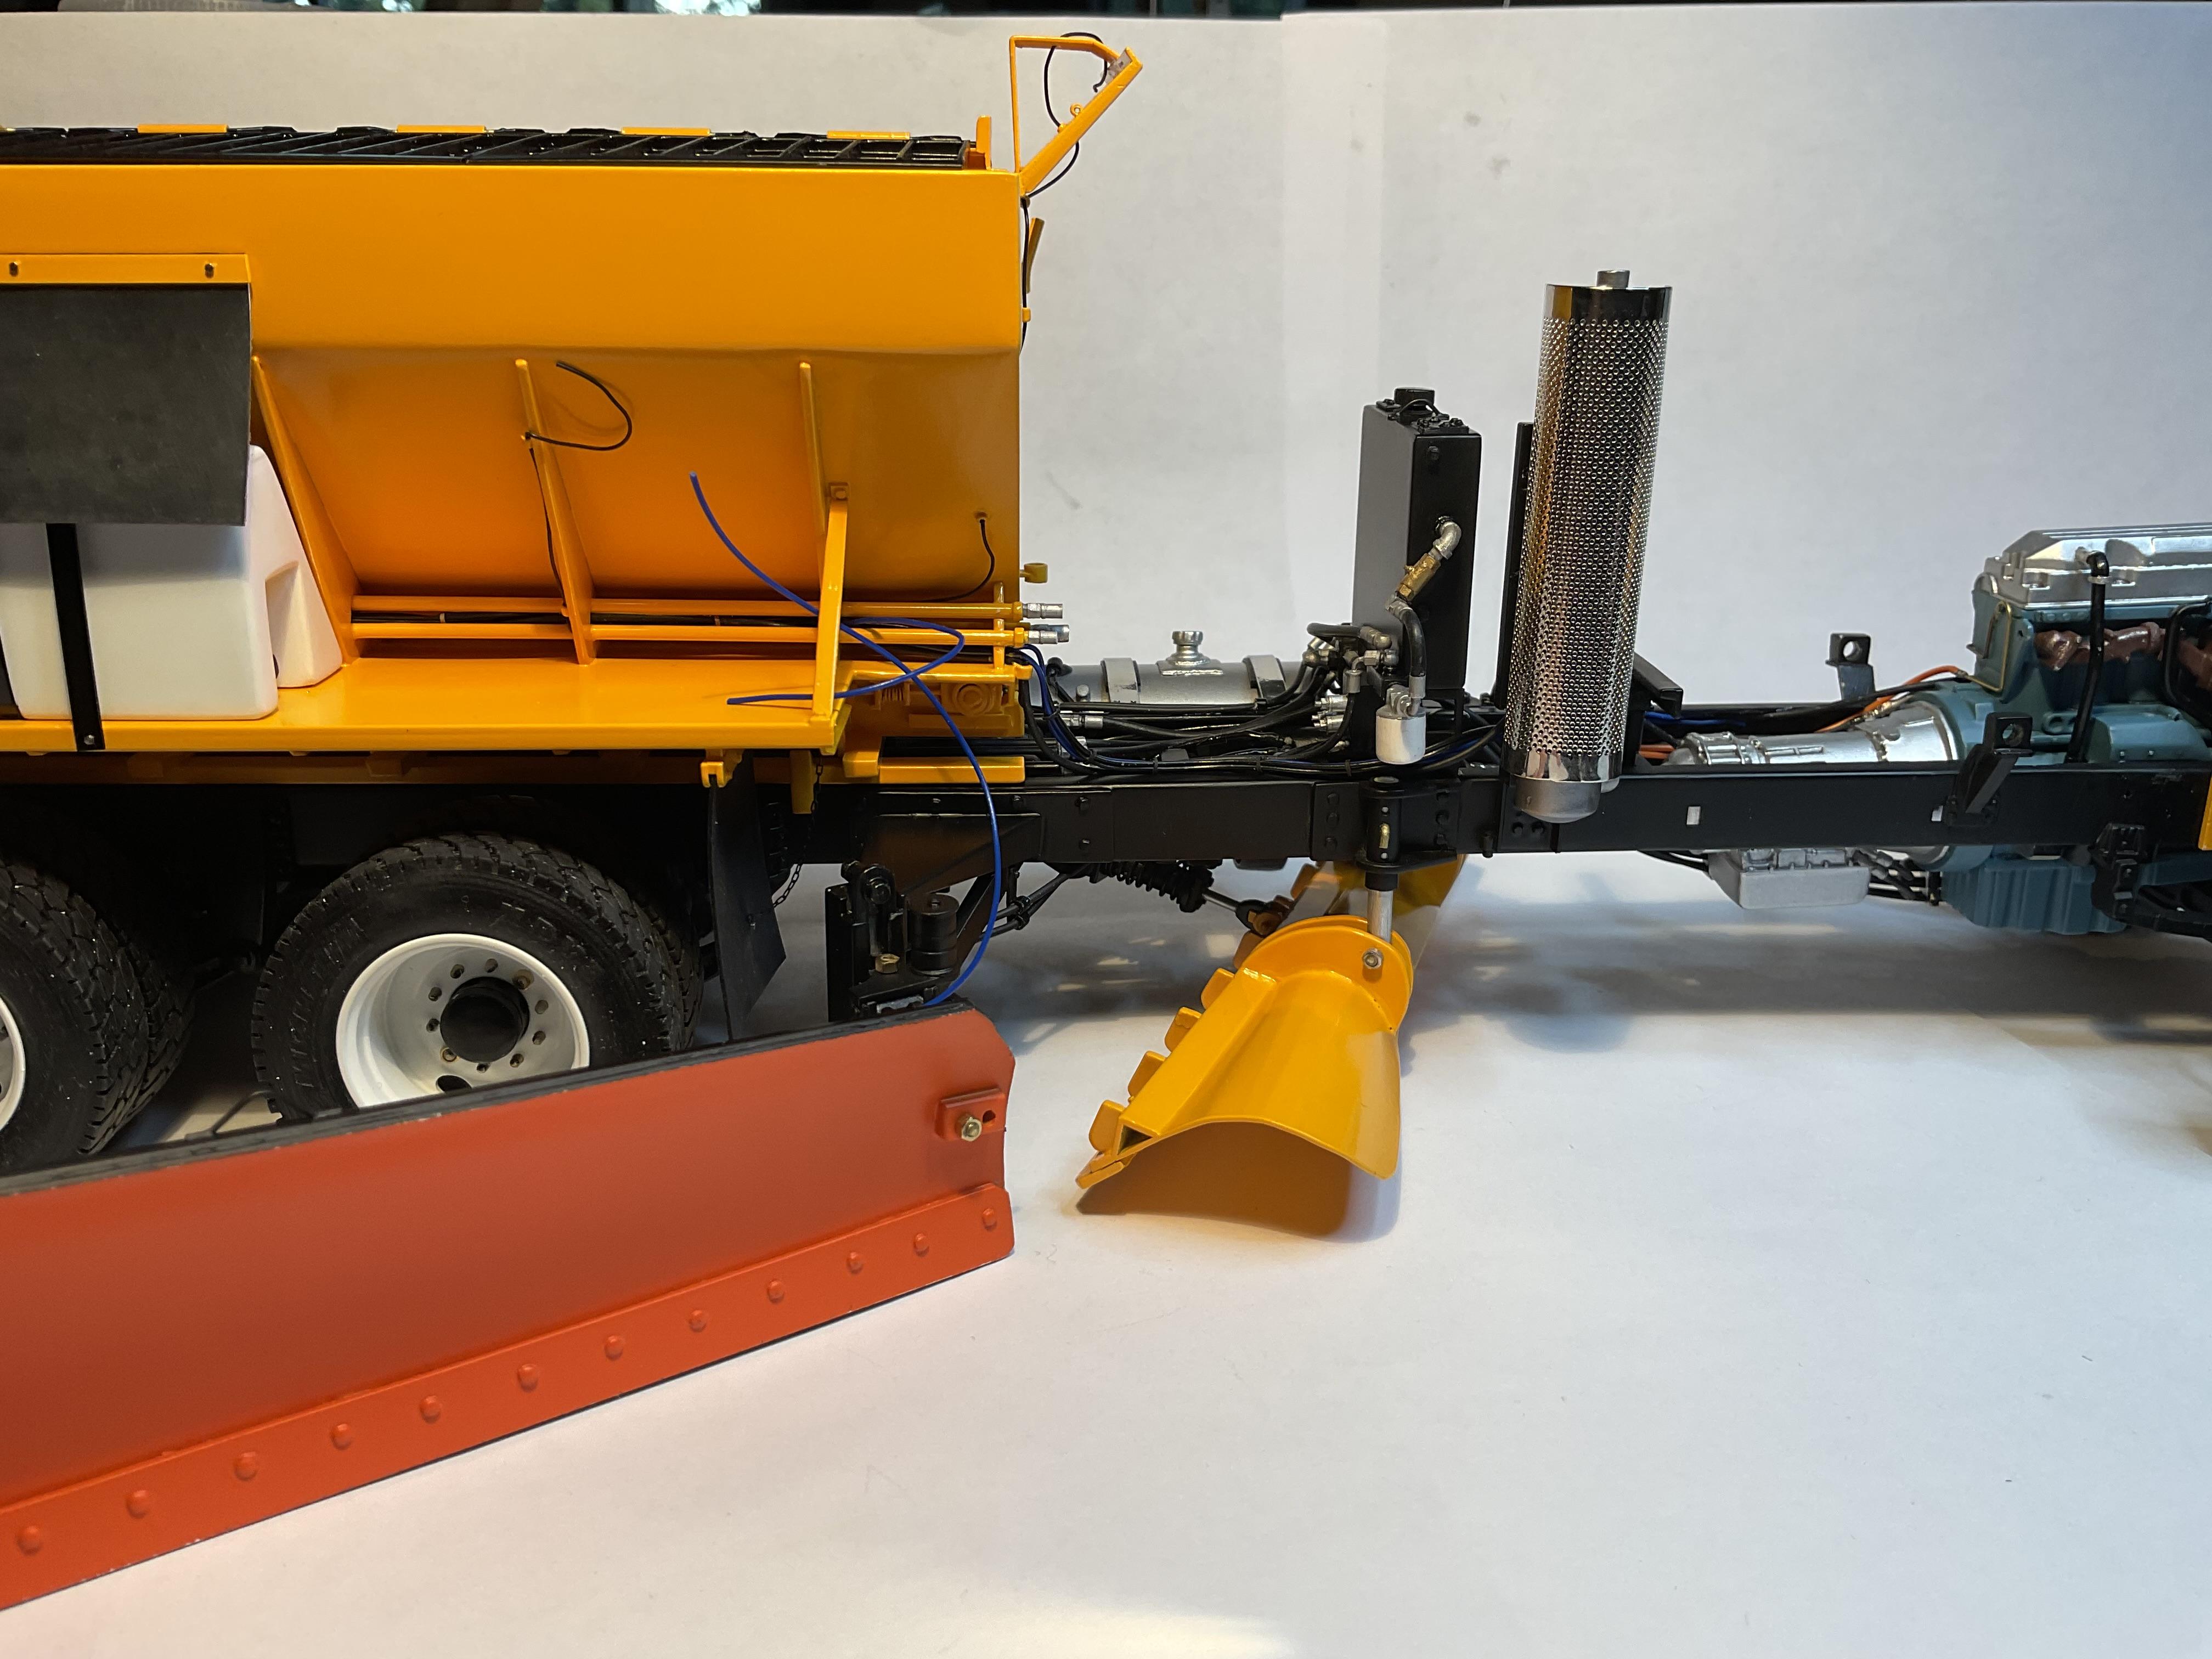
So, motivated by having the sander back on the truck, I carried on this afternoon with some re-assembly of the other two plows. Everything had to go together differently than when first built, because now it was difficult to turn truck upside down. It all turned out good, after about three hours of fussing, and its going to be a long truck - 23" from the back of the sander frame to the leading tip of the front plow. Exciting moment to see it all (mostly) together! Got the the adjustable pins and part of lift cylinder back on the underbody Had to remove sander again and precariously perch the truck on its side to install the underbody's pins in the sleeves on side of truck frame Looks real close to being done but still lots to do on engine, hood and cab; didn't put push arms and cylinder on wing plow, because paint tends to easily come off the aluminum tubes - she's long! Two different lights used here so, not great result, but you get the overall look! (may need to re-do lift cylinder ram - not that happy with looking at it in this pic - a bit out of proportion?) Have to get the sander decals on and figure out how to take the sander body off in the future, but still another good day - thanks for having a look.
-
Western Star Classic heavy haul
BK9300 replied to Biggu's topic in WIP: Model Trucks: Big Rigs and Heavy Equipment
Engine looks good, Jeff and I noticed your posable steering - did you modify the kit linkages? -
Western Star 4900 FA plow truck
BK9300 replied to BK9300's topic in WIP: Model Trucks: Big Rigs and Heavy Equipment
Lee, the fitting turned out to be a real life solution for a problem in my model - just would have been a lot easier to do before I put the bumper on the truck! -
Western Star 4900 FA plow truck
BK9300 replied to BK9300's topic in WIP: Model Trucks: Big Rigs and Heavy Equipment
Thanks, Steve - very pleasing to get to it to that point! -
Western Star 4900 FA plow truck
BK9300 replied to BK9300's topic in WIP: Model Trucks: Big Rigs and Heavy Equipment
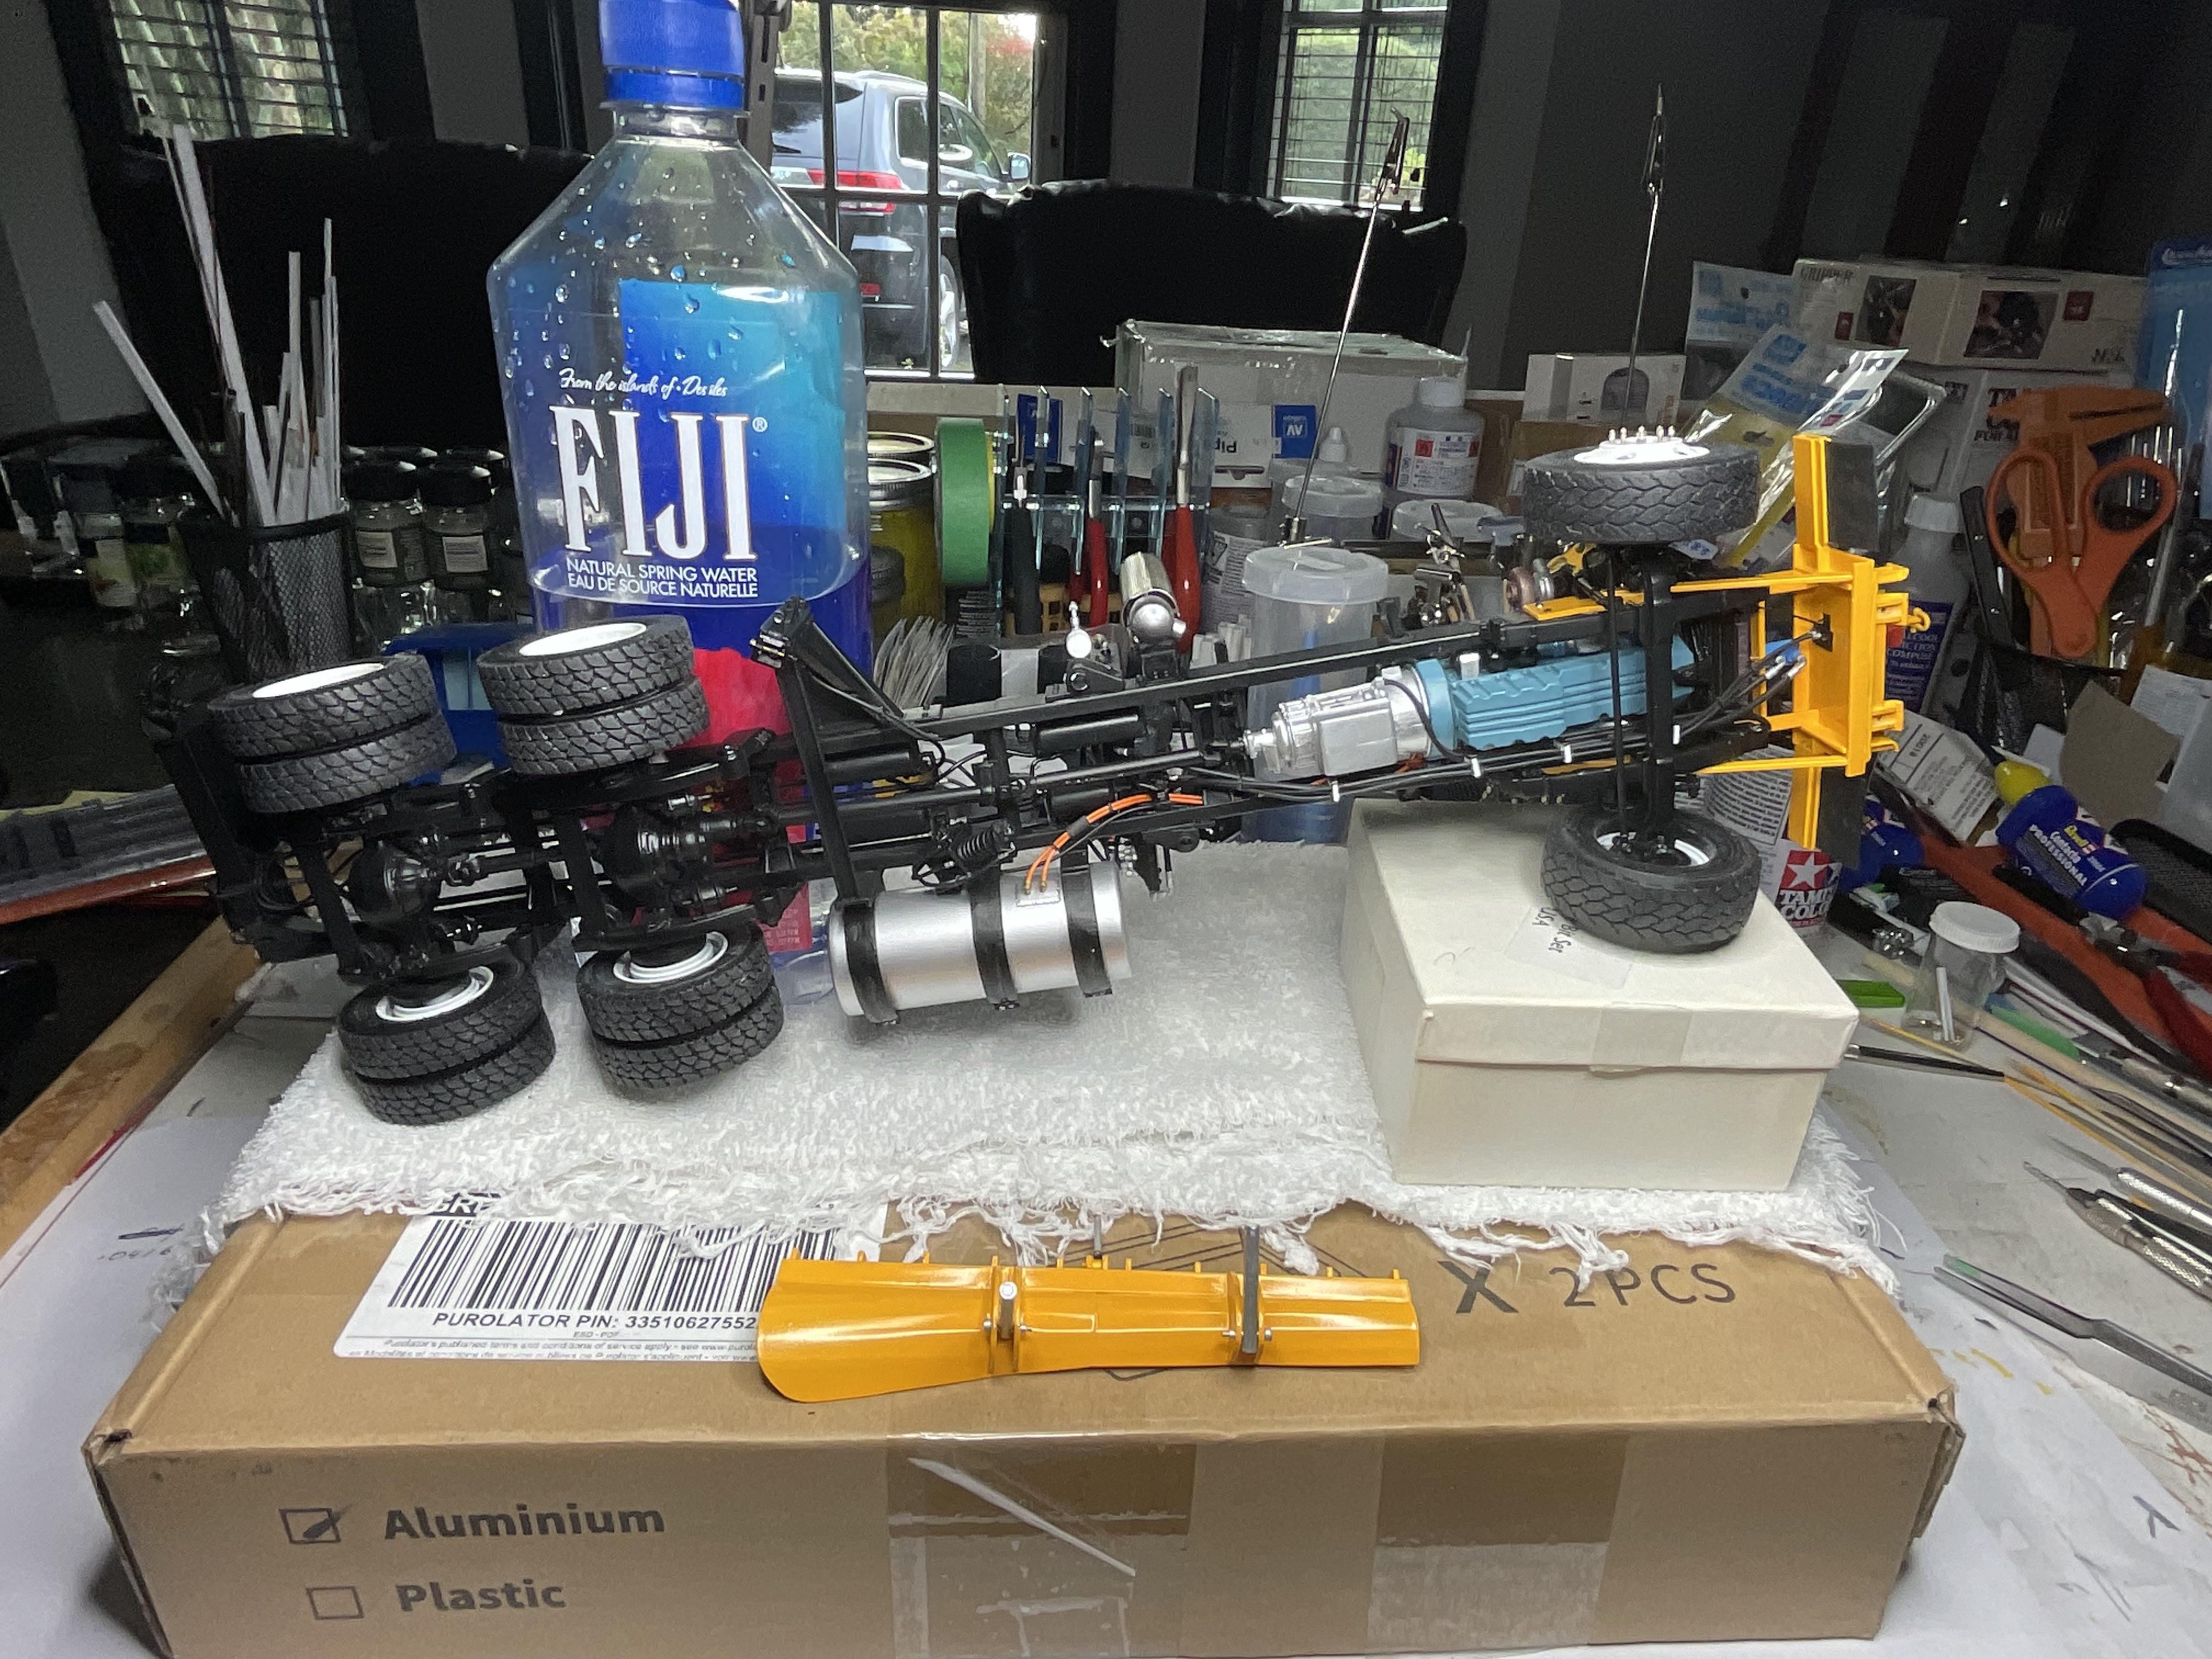
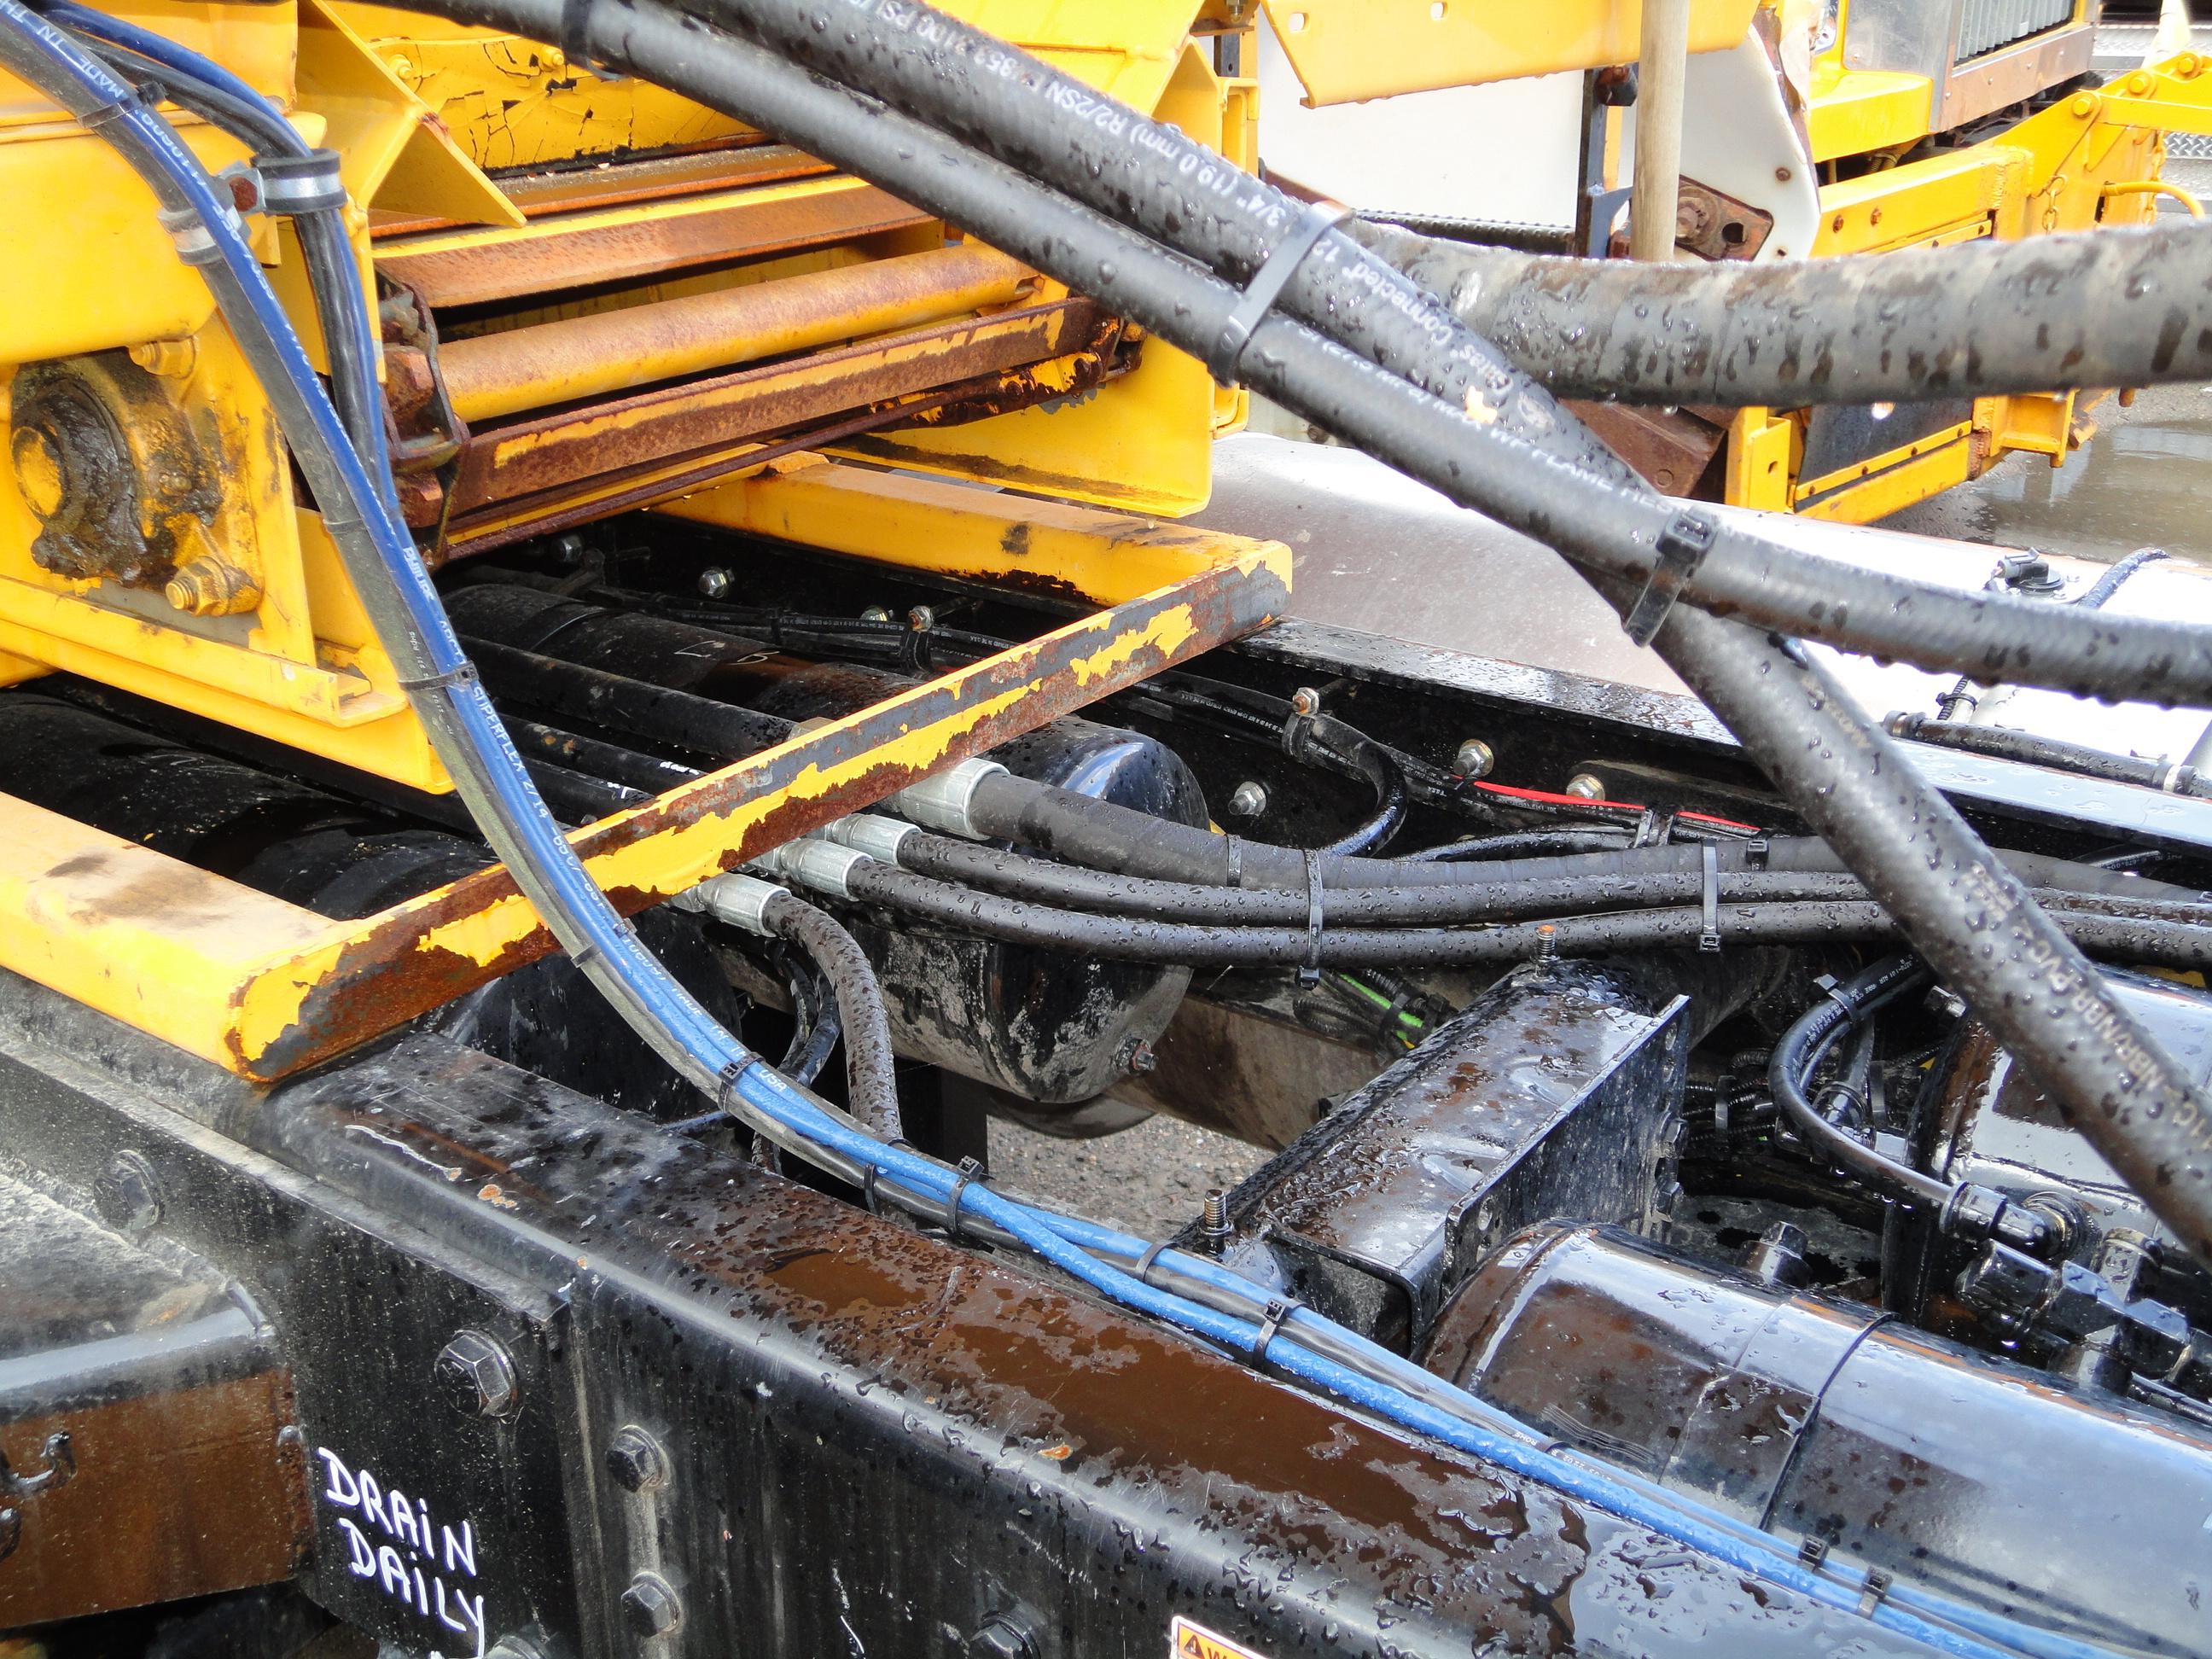
Got a bit side-tracked today - had wanted to get onto the front lift cylinder today, but found I still needed a small part to finish off. Then I took a couple pics and realized that a lot of little paint touchups are going to be needed from handling the frame. Started doing a few paint touchups, then got distracted by trying out some acrylic black wash on the fittings underneath the sander, to see if it improved the look of the fittings - I think it did, a bit. Then, got distracted even further by starting on tidying up the wiring at the front of the sander. I finally got back to doing a temporary assembly of the front plow - without lift chains, yet, and, of course, took more pics! Couple things going on here - a picture like this has been posted before, but now that the frame is off the rotisserie, I could finally complete the hydraulic hose run through the rear cross member, and 'plug' it until needed for summer dump box duties! Also applied some of the acrylic black wash to the hose fittings - although only slightly better than before, there is a definite improvement in the detail visible in the fittings Some wash applied to connector lids and hose fittings on wing plow's rear mount Decided to tidy up the sander wiring a bit, because I need to figure out how make it so the sander can be removed from the truck in the future, if need be, just like it can on the real truck. Made little rubber wafers to gather the wiring together This is a real truck's wiring at the same location - I don't yet have these final three hydraulic lines in place on the model yet Has a similar look to the real truck . . Finally back to the front lift cylinder and temporary assembly of lift group - need one more bit of Albion tubing to finish attaching the hydraulic lines to the bulkhead fitting Mocked up front plow - two mounting pins for the push frame to attach to the bumper need to be made. Again, the fasteners in the pic might be replaced by slightly smaller ones. Still got a bit more on the go for the rest of the afternoon and might post again later today - thanks!
-
Western Star Classic heavy haul
BK9300 replied to Biggu's topic in WIP: Model Trucks: Big Rigs and Heavy Equipment
Good idea! That company does make good parts - I just got an order from them, too and looks like good quality. -
Ford LS Rescue truck
BK9300 replied to gotnitro?'s topic in WIP: Model Trucks: Big Rigs and Heavy Equipment
What would you think about making the hinge point for the hood at the bottom edge of the hood and lower edge of your frame rail extension? Just make the notches for hinge in your frame extension low enough on the end of the rail to match up with the bottom edge of your hood. Might need to round off the bottom corners of your frame extension, but should be able to make it work. That way, the hood could tilt forward and not by affected by frame. Don't know what it would be like in real life, but I'm sure you could make the hinge hidden from view and get your hood to tilt ok. -
Western Star 4900 FA plow truck
BK9300 replied to BK9300's topic in WIP: Model Trucks: Big Rigs and Heavy Equipment
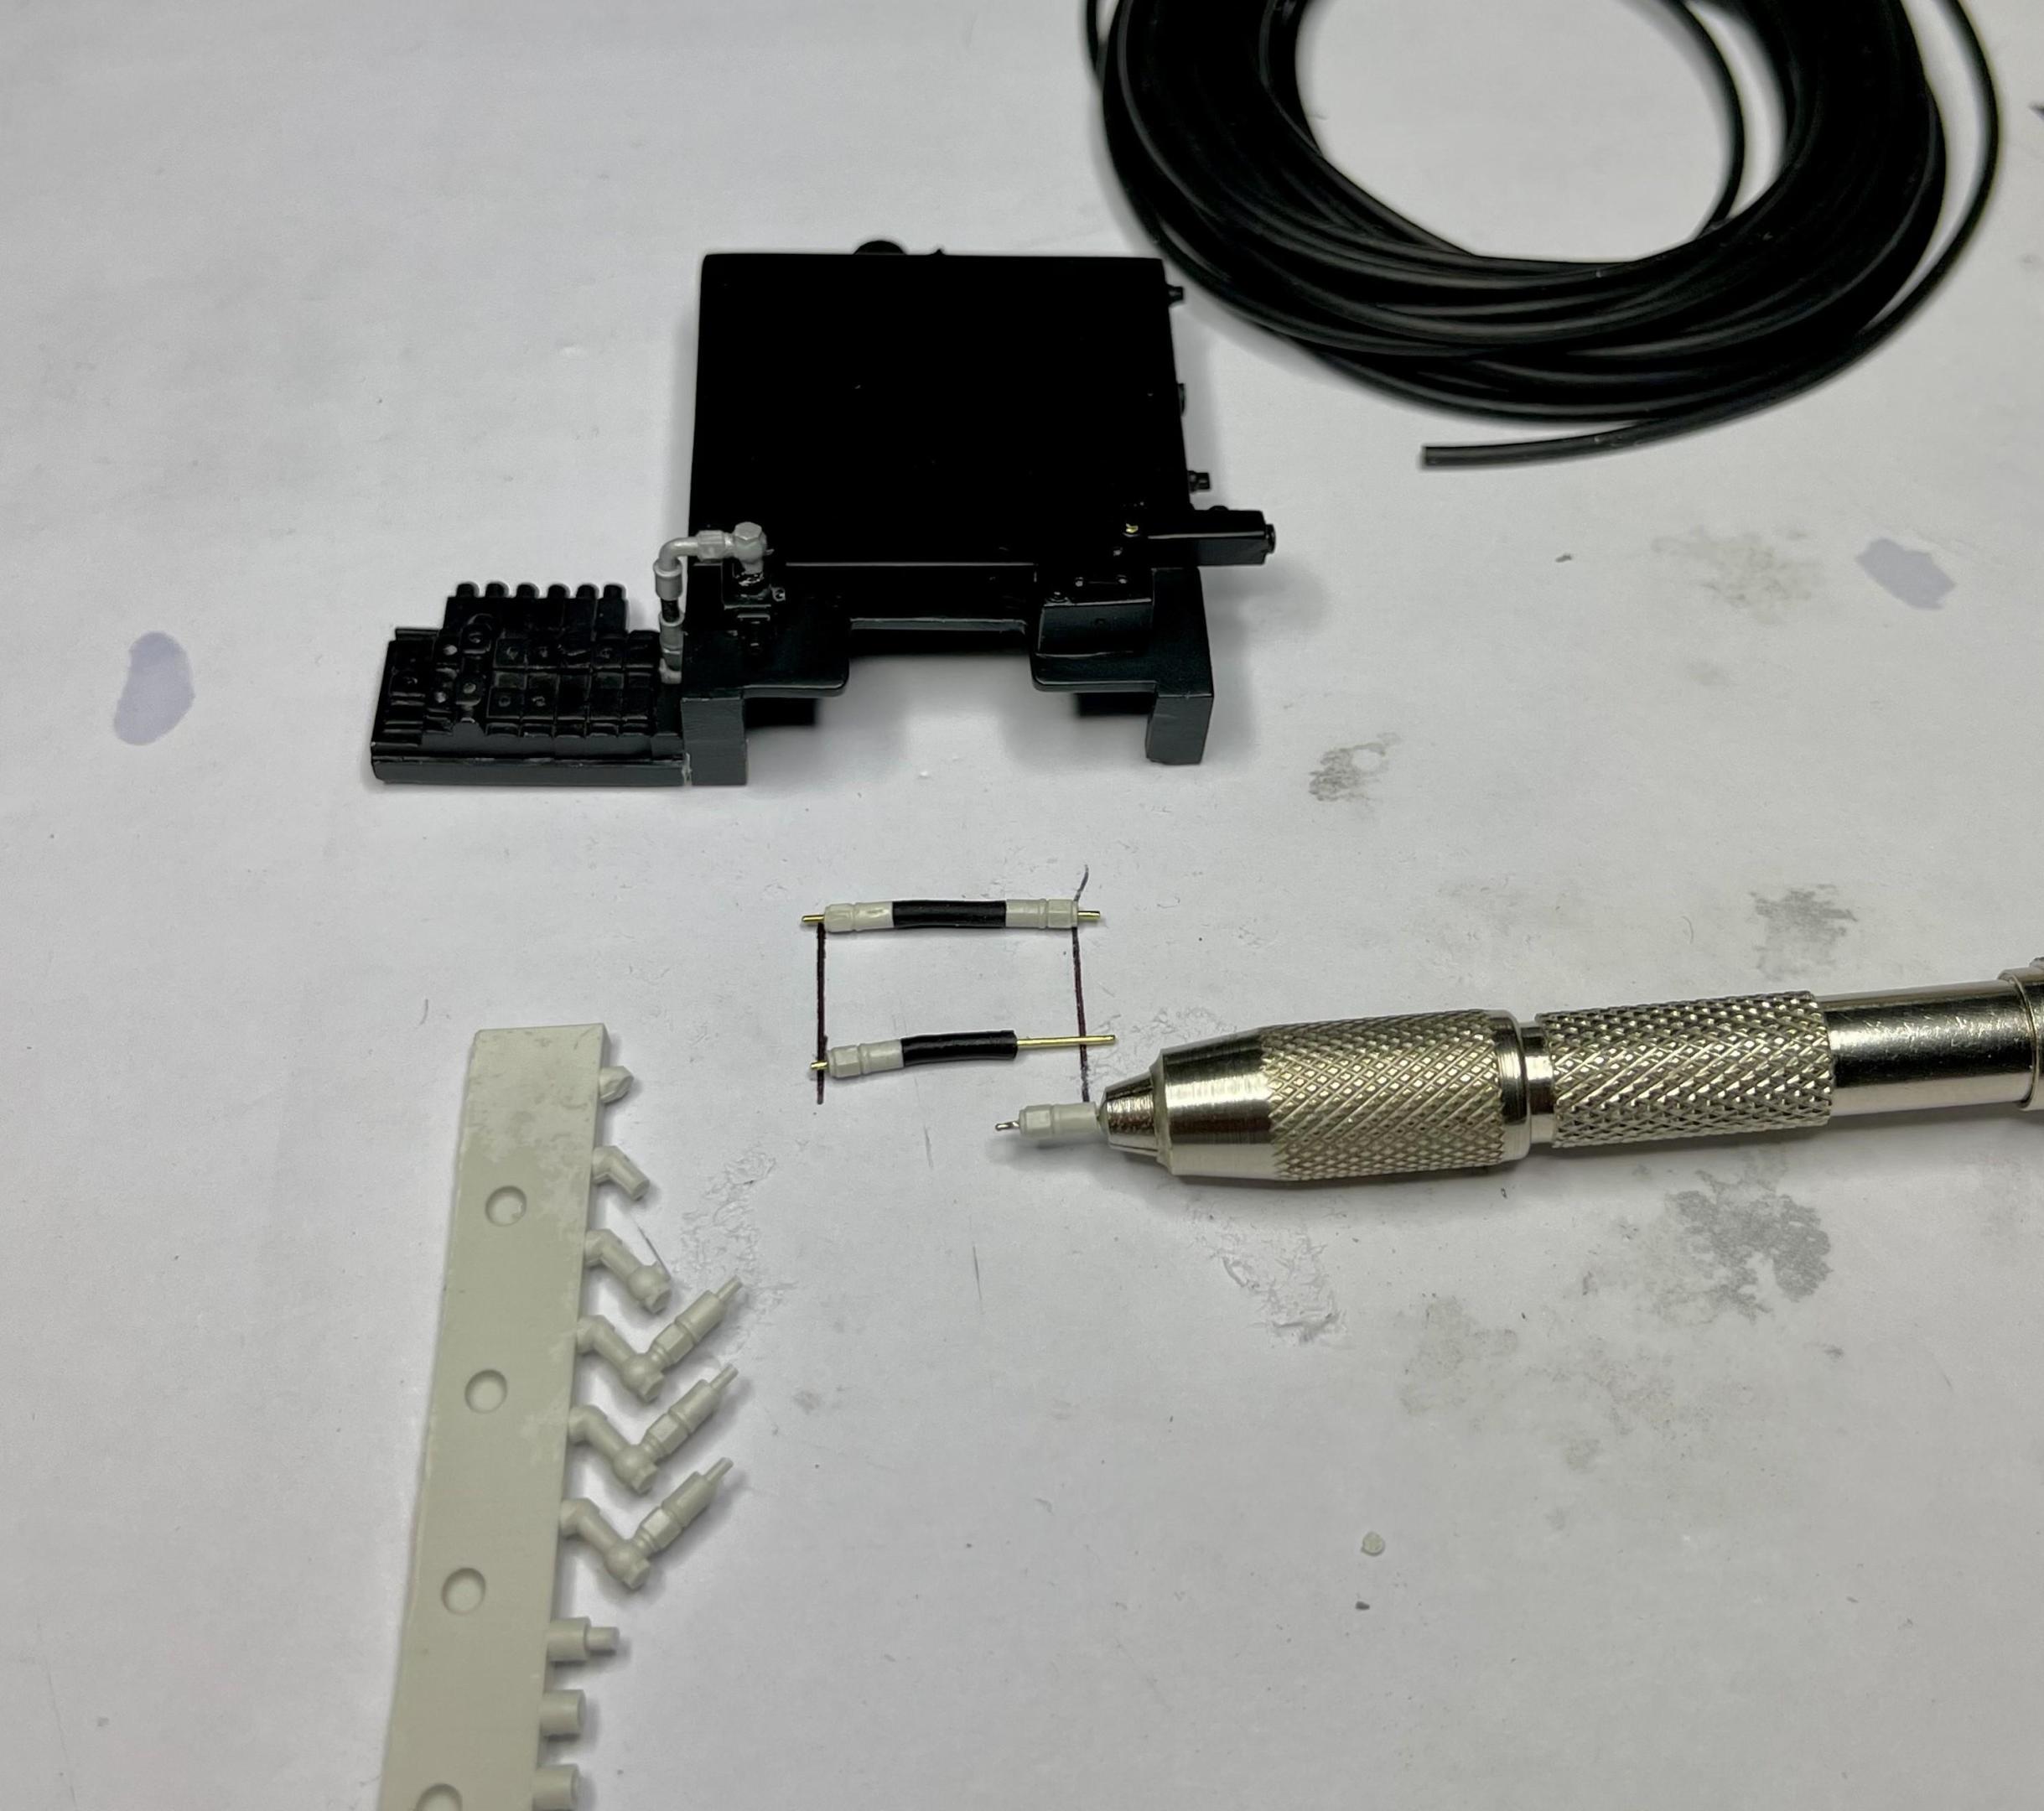
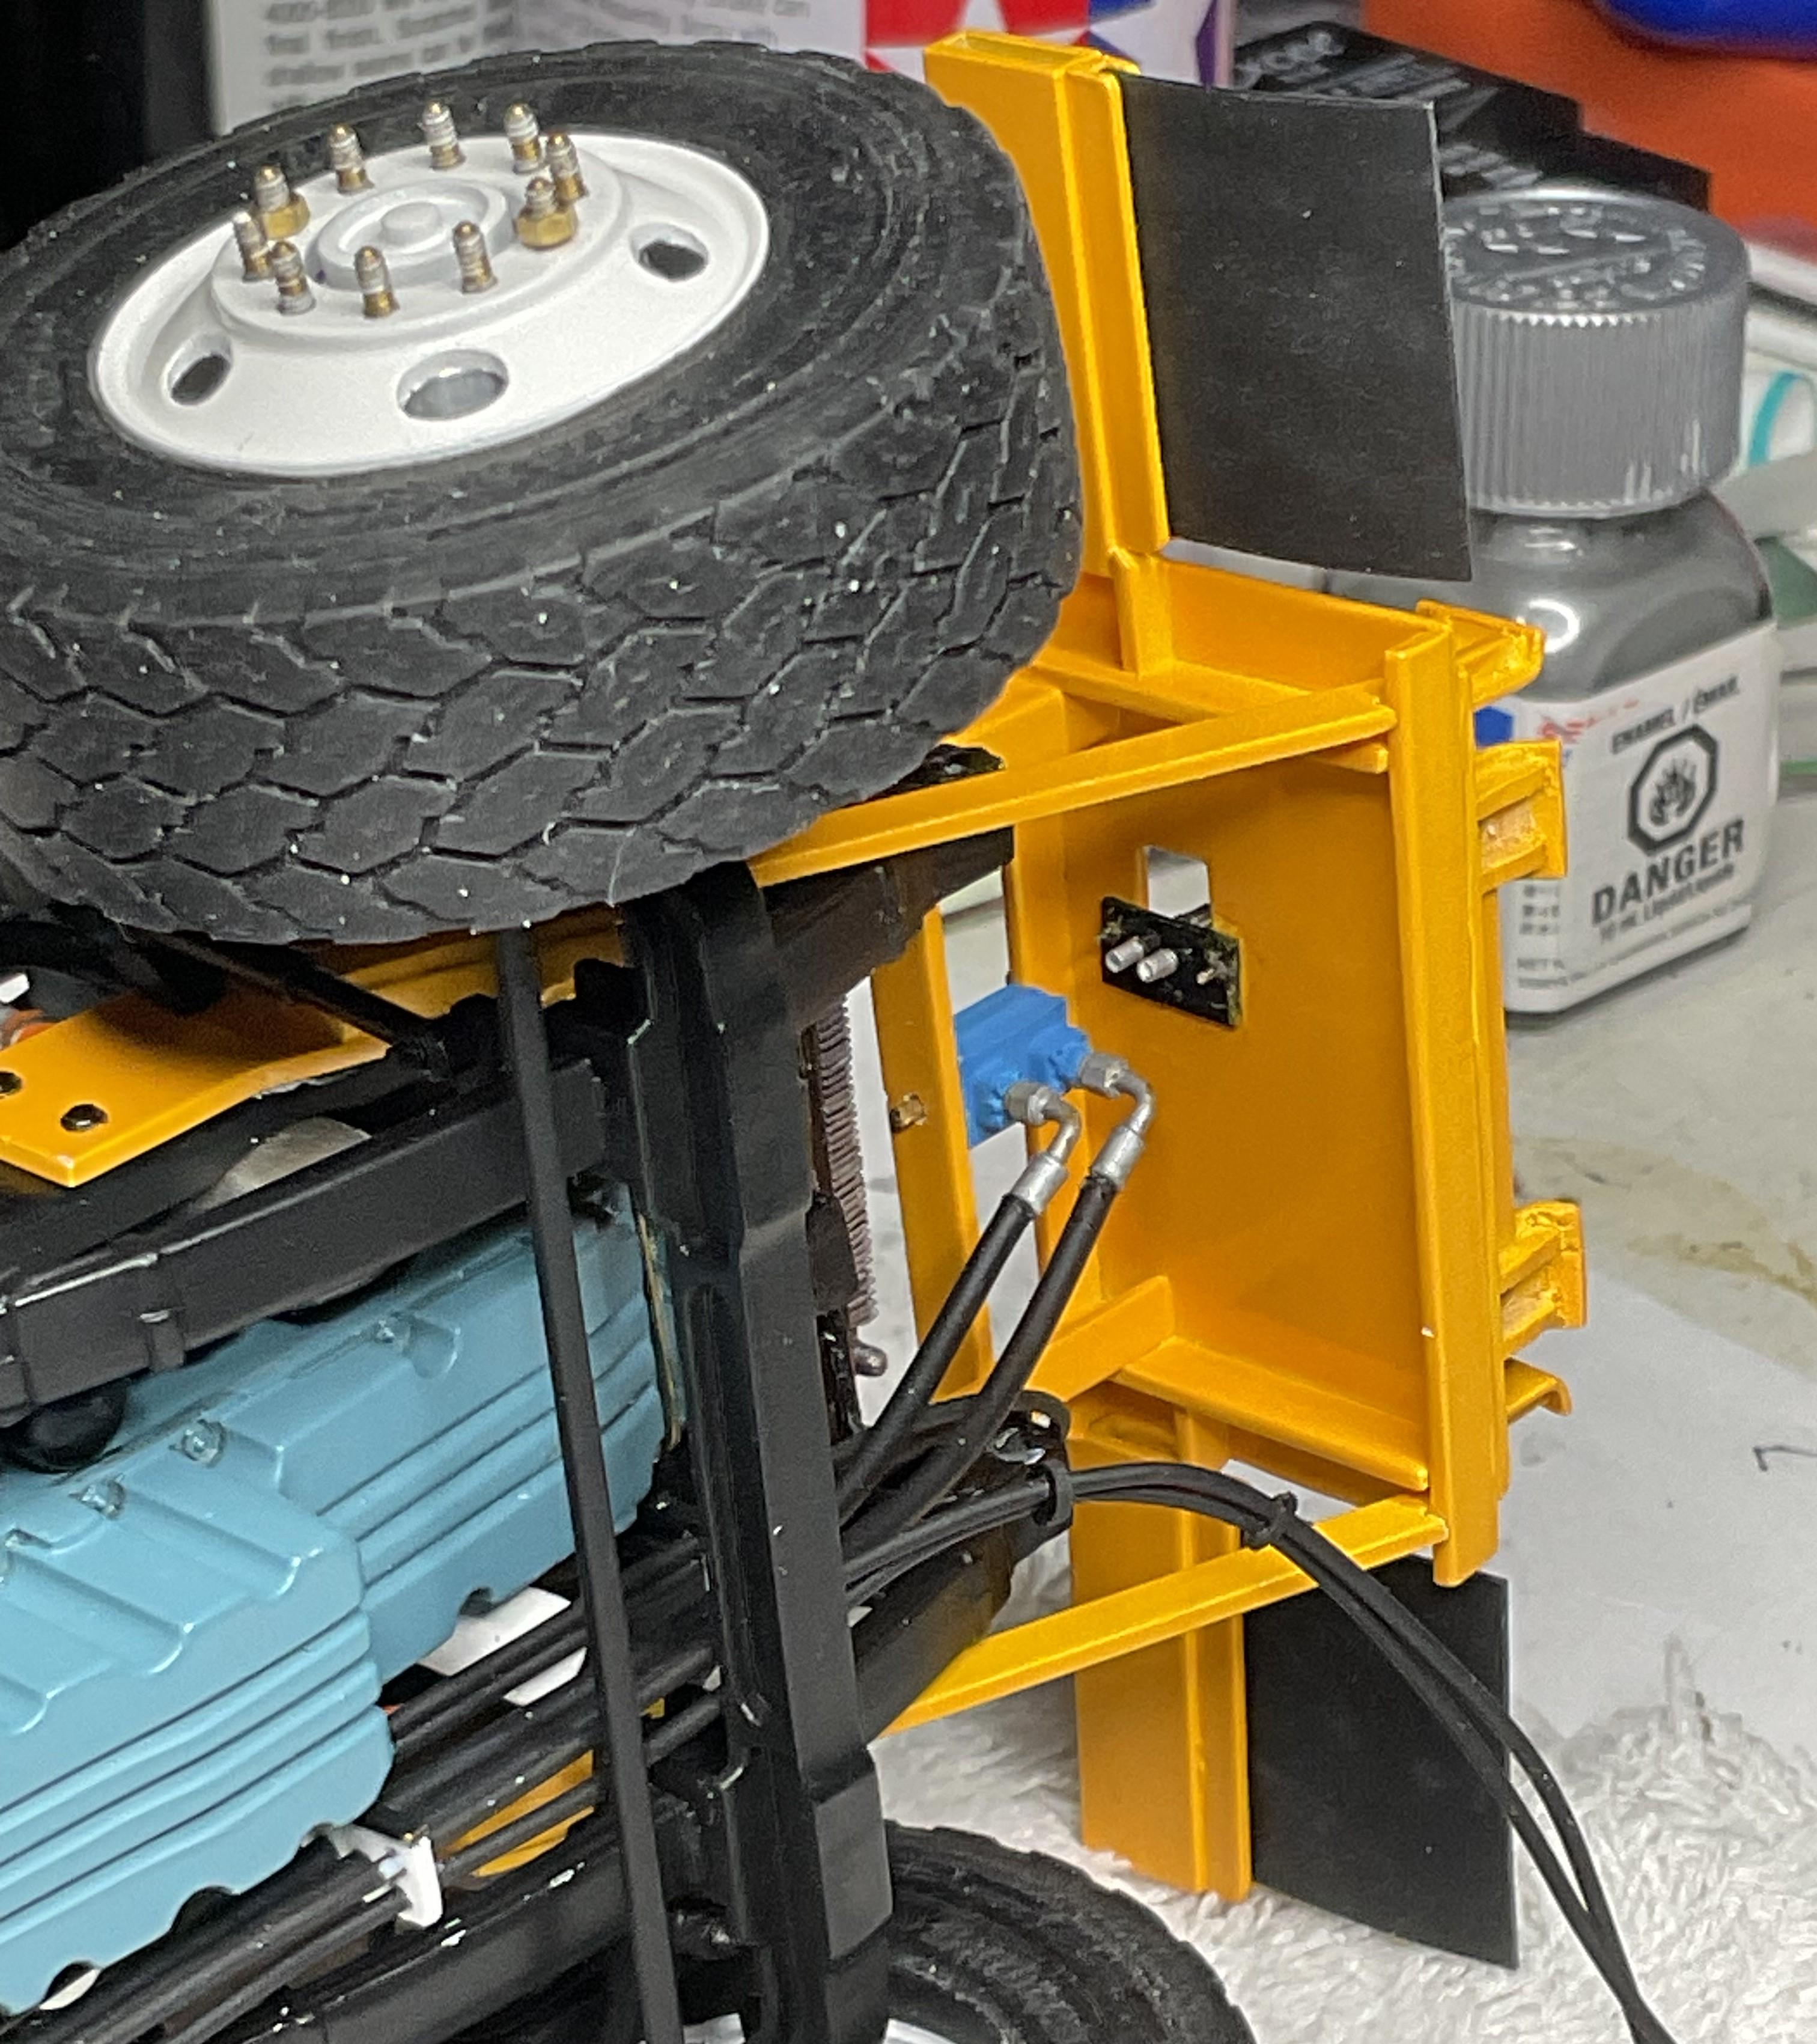
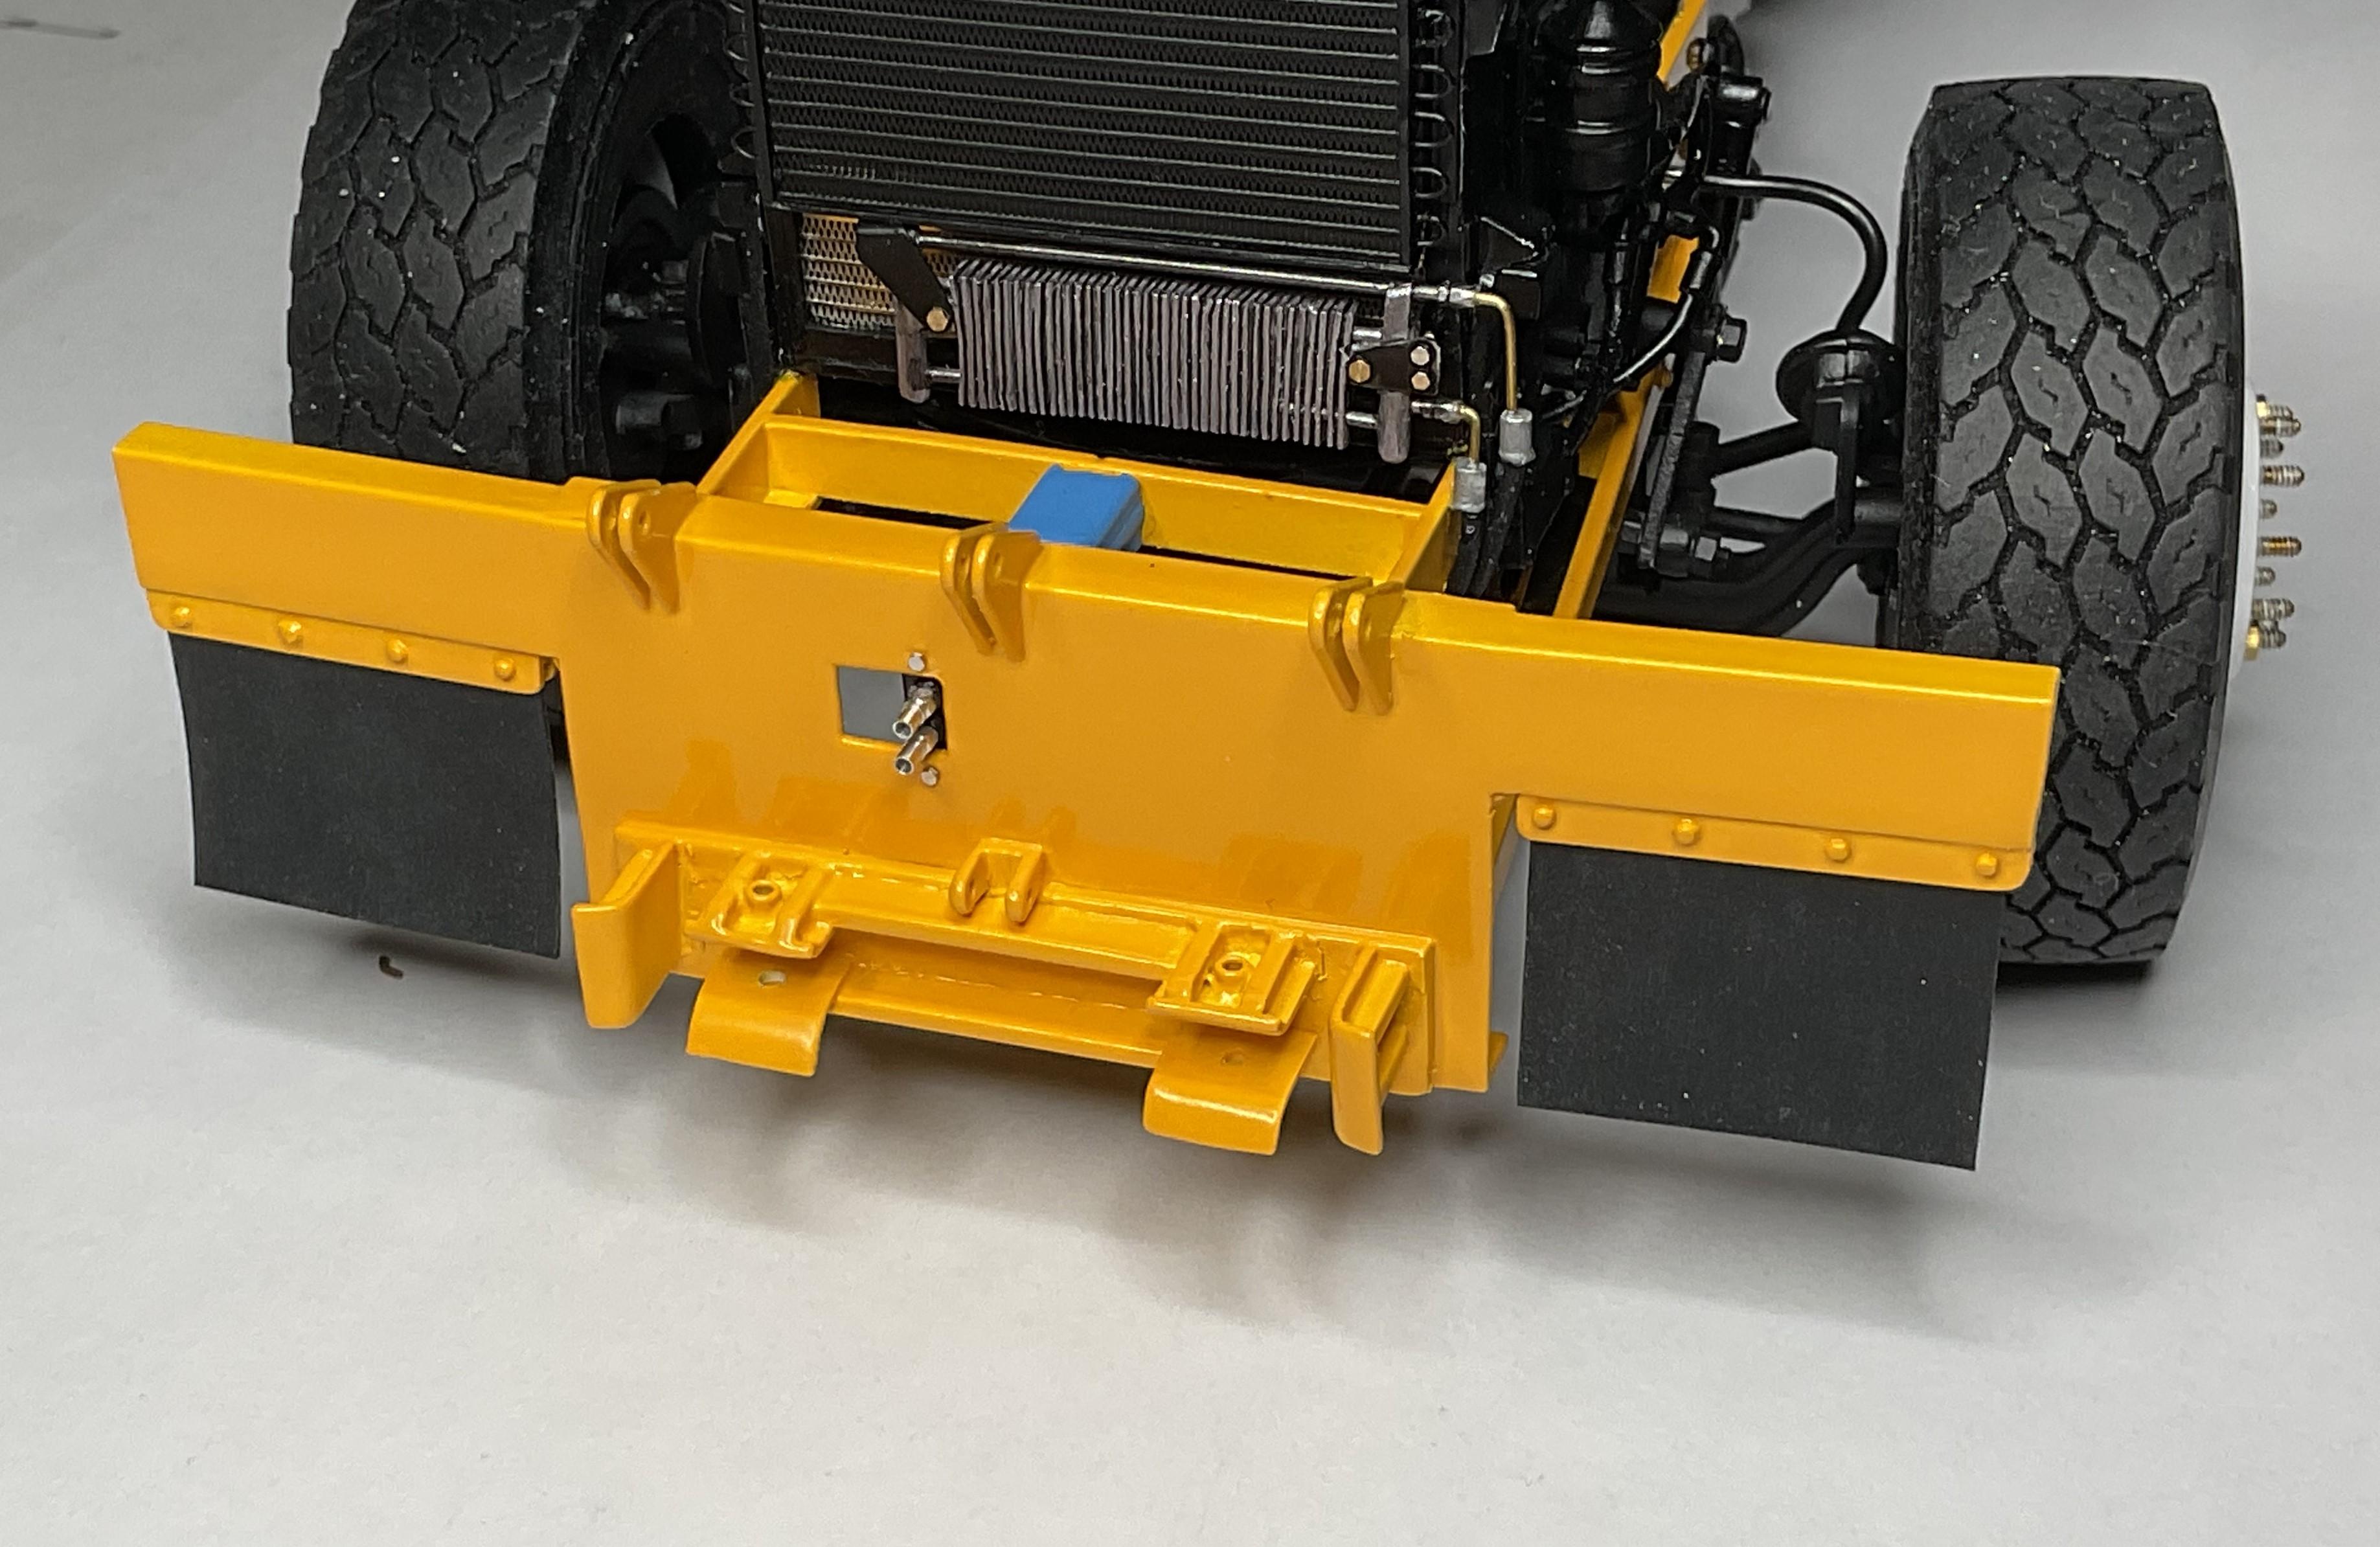
Managed a bit more today - little job, but big frustration! (another note to self for future builds - plan better - hook up hoses to fittings before you can't get to fittings!) - got the bulkhead fitting set in place and the lift cylinder hose runs hooked up on the back side of the fitting. Fitting CA glued and pinned with Top Studio Hex rivets - touch up paint from CA glue melting paint needs to be done Hoses attached, 'bolts’ also epoxied so should never dislodge; minor touch up paint done as well Bulkhead fitting from front, ready for hoses from lift cylinder once its in place Not much today, but still carrying on - see what happens tomorrow! Take care.
-
Kenworth aerodyne cabover
BK9300 replied to Bronzekeg's topic in WIP: Model Trucks: Big Rigs and Heavy Equipment
Great work on the exhaust and intake piping, Ken - a challenge to get all those sections of pipe to place nice together! -
Going to look good all plumbed up and painted, Ron.
-
Maybe you could pose it with the box up - with safety blocks/braces or similar in place, like some repairs were under way, and still be able to show off the plumbing?
-
Western Star 4900 FA plow truck
BK9300 replied to BK9300's topic in WIP: Model Trucks: Big Rigs and Heavy Equipment
Gary, thanks for taking the time to have another look, and I always appreciate your comments! (hoping to see more from your Autocar soon, too!) -
Hey, Jeff - good progress! Will you need to sleeve the box hinges with aluminum tubing to make the dump box tilt smoothly?
-
Build of IH Pumper
BK9300 replied to Chariots of Fire's topic in WIP: Model Trucks: Big Rigs and Heavy Equipment
Your decals always turn out well with the system you have in place - good asset to have in your toolbox! -
'64 Chevy C30
BK9300 replied to dodgefever's topic in WIP: Model Trucks: Pickups, Vans, SUVs, Light Commercial
Thanks for this - I've been using Sketchup, but I don't have a lot of success with organic shapes either! -
Gilmore Petrol Willys: a phantom 41 Willys sedan-delivery creation
BK9300 replied to Claude Thibodeau's topic in Model Cars
Such a cool and innovative build! Your interior texture looks very rich and I agree about the underhood tin work - show car quality finish all around! -
Build of IH Pumper
BK9300 replied to Chariots of Fire's topic in WIP: Model Trucks: Big Rigs and Heavy Equipment
Might just be my end, Charles, but can’t view this pic? -
Western Star 4900 FA plow truck
BK9300 replied to BK9300's topic in WIP: Model Trucks: Big Rigs and Heavy Equipment
Thanks very much, Ken - been an adventure getting all the bits in place!