cifenet
-
Posts
856 -
Joined
-
Last visited
Content Type
Profiles
Forums
Events
Gallery
Everything posted by cifenet
-
Fabulous job!
-
Fantastic! And the engine room details are superb!
-
Unique subject and I like the idea turning this into a delivery vehicle. Very convincing build, great work!
-

Chevy C65 3 Car Transporter
cifenet replied to StakerAlloys8's topic in Model Trucks: Big Rigs and Heavy Equipment
This is an Interesting subject! And fun too! Great work finishing and setting it up with loaded cars. Adding the tarp is a nice touch. -
Cross Country Hauler 359
cifenet replied to Rbray47's topic in Model Trucks: Big Rigs and Heavy Equipment
Again, just gorgeous finish on this. Looks just perfect! The single exhaust setup is special also. Clean paint work and the color scheme using three different colors works very well here. 👍 -
Fantastic work! The truck is looking superb here. I also like all the additional details you have implemented throughout. I think the kit has some shortcomings, but your build shows off how awesome it can turn out.
-
California Hauler 289
cifenet replied to Rbray47's topic in Model Trucks: Big Rigs and Heavy Equipment
Excellent finish and I like the idea of turning this into short base. Again, clean build with proper finish overall. Thanks for sharing this work with us! -
Very nice build and high quality craftsmanship showing off here! You have done a great job making this kit, I really like this GMC.
-
Beautiful work, and COE setup is unique on this. I plan to build this wrecker someday and I can tell it isn’t an easy task. Good job!
-
M543 Wrecker in 1/35 scale
cifenet replied to Warren D's topic in Model Trucks: Big Rigs and Heavy Equipment
Nice details on the wrecker build, good work! -
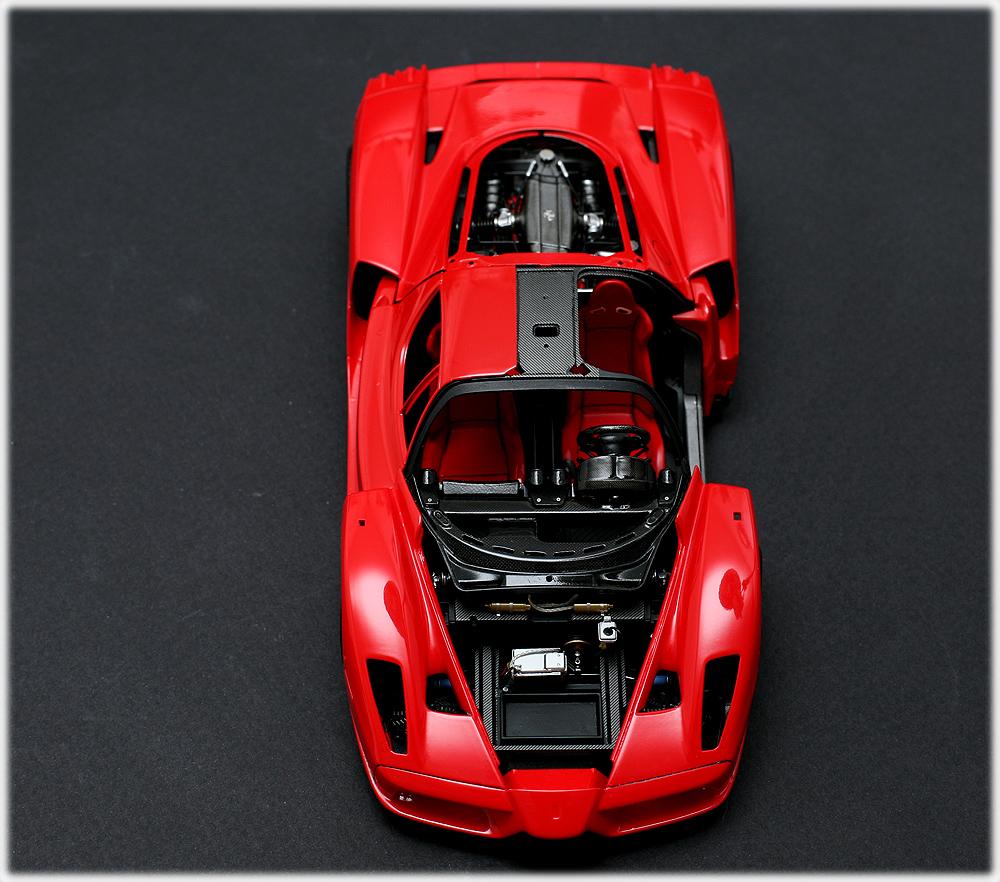
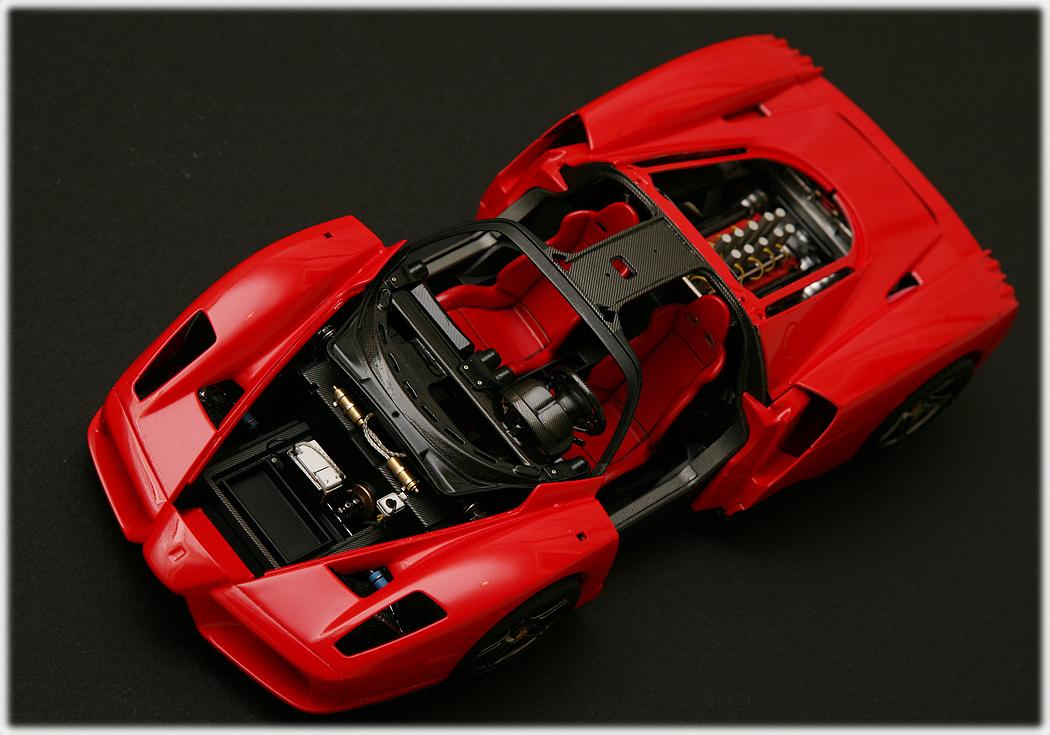
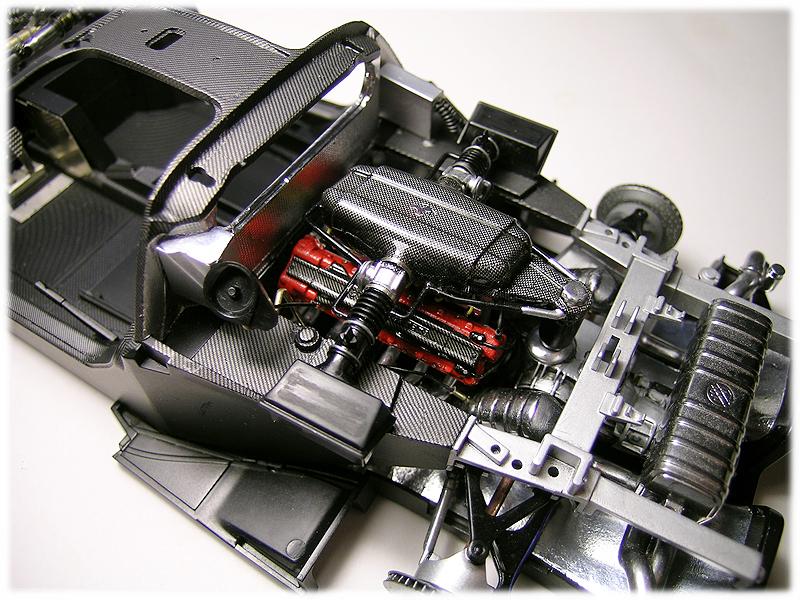
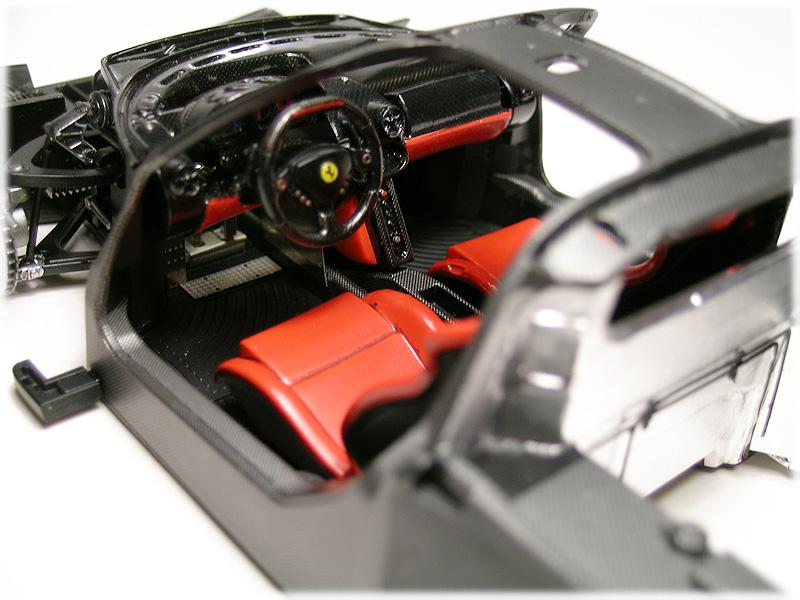
I built this kit using a combination of Scale Motorsports detail set and Crazy Modeler detail set. And the kit was finished with several carbon fiber decal sheets from multiple aftermarket companies with various scratch built components. The biggest challenge was to cut out the front hood and detailing the inside by adding the battery, front suspension parts, and other cooling components. The wheels were painted with Alclad paint and sealed with acrylic clear to protect the metal finish. The kit is a typical Tamiya quality where everything fits perfect. I really enjoy building this one and I think this build took about 70-80 hours total. If I were to build it again, I would like to try it building in yellow next time! And various photos on details:

- 25 replies
-
- 12
-

-
What a fantastic result! The entire setup is looking quite good! Good work~
-
Ah gotcha, they look good. Will check them out. Thanks, Jeff!
-
Your attention to details is top notch in this build. I really like the texture on the engine wiring hoses. Do you mind informing where you sourced them?
-
Mack B-61 Dump Body
cifenet replied to Scott Eriksen's topic in WIP: Model Trucks: Big Rigs and Heavy Equipment
Very nice work so far on this interesting subject! -
Western Star 4900 FA plow truck
cifenet replied to BK9300's topic in WIP: Model Trucks: Big Rigs and Heavy Equipment
Brian, Great process and I can already see the truck taking its shape to be massively beautiful at the end. Good work~ -
Build this over the weekend as a "quick, easy, out of box, no frills, see how it goes" type of build. This was an easy kit for me and went quite well. It was also my first trailer build and I did not try to do any fancy stuff. Built it out of box except I ended up adding some brake hoses and marker lights receive lens covers (clear resin). The only major problem I faced was the ride height where I had to raise the height of the rear trailer wheels so that this trailer sits parallel when attached to a truck. I double checked instructions to see if I miss anything obvious, but couldn't figure out why I was having the ride height issue (I tried multiple trucks to confirm that the trailer was sitting too low). Things I liked: Easy build and the overall fit is decent Made no effort to correct or improve, but the final kit still turned out to be nice. When attached, turns your truck into something "more" meaningful. It is big! Things I didn't like: The ride height had to be corrected. Painting was somewhat of an issue as my spray booth was too small for the trailer. Decals were very thick and all of my decal softener solutions wouldn't work. Need bigger space to display Next time, I might try to get a different set of fleet decals to make things more interesting.
-
80ish Autocar DK-64 HH tractor.
cifenet replied to ShakyCraftsman's topic in WIP: Model Trucks: Big Rigs and Heavy Equipment
Looking good with hood operation! Nice work ~ -
Western Star 4900 FA plow truck
cifenet replied to BK9300's topic in WIP: Model Trucks: Big Rigs and Heavy Equipment
Brian, You don’t need those PE parts, I know you could have scratch built better ones yourself for sure. 😉 See how people start demanding more?? Haha. Nonetheless, just awesome details you are putting into this plow. Somehow I am hoping you keep track of how many hours you spent building this vehicle. It would be an interesting information when you finish the build; it should give us some idea on the effort and time required to produce this type of quality work~ -
Perfect! I mean everything is perfect!! You have done an incredible work finishing this model, I really enjoyed looking at these photos.
-
1/25 Chevy Nova Salt Rat
cifenet replied to Pierre Rivard's topic in Other Racing: Road Racing, Salt Flat Racers
Great model and nice photography work! I really like how it turned out! -
1955 Chrysler 300 - stock build with lighting
cifenet replied to Andy Oldenburg's topic in Model Cars
Fabulous work, I like the details on the bash and the engine bay. Great execution making the car look simply gorgeous! -
You have produced a fantastic model, everything faithfully reproduced with quality. The car is pleasure to look at. Bravo!
-
Splendid result! Beautifully done and amazing finish work, the body shine is just top notch! Good job!
-
'71 Boss Mustang with widebody kit and LED lighting...
cifenet replied to SpikeSchumacher's topic in Model Cars
What a nice finish and incredible work adding the body kit. It is a real beauty. I like the color choices with orange accents also. With all the custom work, the car is turning into something very special and unique. Great work~ 👍