cifenet
-
Posts
856 -
Joined
-
Last visited
Content Type
Profiles
Forums
Events
Gallery
Everything posted by cifenet
-

KW 86 inch Aerodyne
cifenet replied to k100's topic in WIP: Model Trucks: Big Rigs and Heavy Equipment
What a great progress, I can already see the truck coming out to be fantastic! -
Resto Rod Autocar
cifenet replied to Gary Chastain's topic in WIP: Model Trucks: Big Rigs and Heavy Equipment
Nice tip on mandrel bend! The pipes came out great! -
Western Star Classic heavy haul
cifenet replied to Biggu's topic in WIP: Model Trucks: Big Rigs and Heavy Equipment
Just fantastic result you made! Looks super special with all the custom additions you have put together. You should be proud for making this one, nice build indeed! -
Spencer Ol' School W900A.
cifenet replied to freightshaker2's topic in Model Trucks: Big Rigs and Heavy Equipment
Super sweet! You have replicated this truck and captured the required characteristics very well! Great effort and high quality build! 👍 -
KW 10 wheel dump
cifenet replied to leafsprings2's topic in Model Trucks: Big Rigs and Heavy Equipment
Great looking dump truck! It came out wry smooth! The color is eye catching too and I like all the small details around the truck. Good work! -
IH Emeryville with Flatbed
cifenet replied to DRIPTROIT 71's topic in Model Trucks: Big Rigs and Heavy Equipment
Gorgeous work, there is something about yellow trucks! The chrome accents and yellow color combination make this truck pleasant to look at. The matching trailer setup makes this build stand out even more. -
White Freightliner
cifenet replied to Bronzekeg's topic in Model Trucks: Big Rigs and Heavy Equipment
Definitely a cool build, the truck has many features that you managed to modify nicely! For one, the door opening is very cool as well as the extended back! -
Quite unique and fresh! Clean work and interesting concept!
-
Resto Rod Autocar
cifenet replied to Gary Chastain's topic in WIP: Model Trucks: Big Rigs and Heavy Equipment
Nice fine work, Gary. Your grille is looking mighty clean and shining (lately, I am obsessed with grille) too! -
Revell's Auto Transport Trailer: WIP
cifenet replied to David G.'s topic in WIP: Model Trucks: Big Rigs and Heavy Equipment
The trailer with matching color is a good idea, looks more professional paired with Pete! -
Western Star Classic heavy haul
cifenet replied to Biggu's topic in WIP: Model Trucks: Big Rigs and Heavy Equipment
You got that "mean" and "tough" look going now on the truck and its stance look very proper, Jeff. White wheels, the black frame with various chrome parts, and the red body, all looking first-class. And the winch setup looks authentic, nice touch! -
Western Star 4900 FA plow truck
cifenet replied to BK9300's topic in WIP: Model Trucks: Big Rigs and Heavy Equipment
Love the fine details and focusing for accuracy on the subject you are building, Brian! I see that windshield divider is a clean break which is a good thing. I have seen badly crushed/warped pillars, not an easy repair. -
Hey Brian, thanks for checking in~ Unfortunately, I don't have the perseverance that you have with your build, I find myself losing motivation to complete lately. I am at the point where I need to get this built done one way or another, I hope it does end soon and with a decent quality... 😔 Thank you, Jeff! I see you are making a great progress now with Western Star! Keep it up, your truck is beautiful! Landon, I hope that grille can be corrected with the cover trim, but you know I am actually trying to hide a problem, not fixing it... 😃 Thanks again for checking it out. Appreciated your support! Tommy, I really appreciate your knowledge/info on various topics including the wheels/tires. I think this is where I was short sighted. Håkan was trying to point this out this before also, I just didn't think about the rim size, tubeless vs tube, locking ring type, and such. I don't have the Freightliner kit yet, but I plan to build it someday so I will definitely check it out and compare the size in future. Now I know what to look for if I want a larger set. I must confess though, I envy some of the quality truck builders here, they have extensive spare part bin where they can find pretty much anything they like to replace. All seem to have various sets of different wheels/tires, exhaust stacks, different engines (does that means some trucks were built without the engines so they can have spare?), etc. I am hoping I could build like that someday~
-
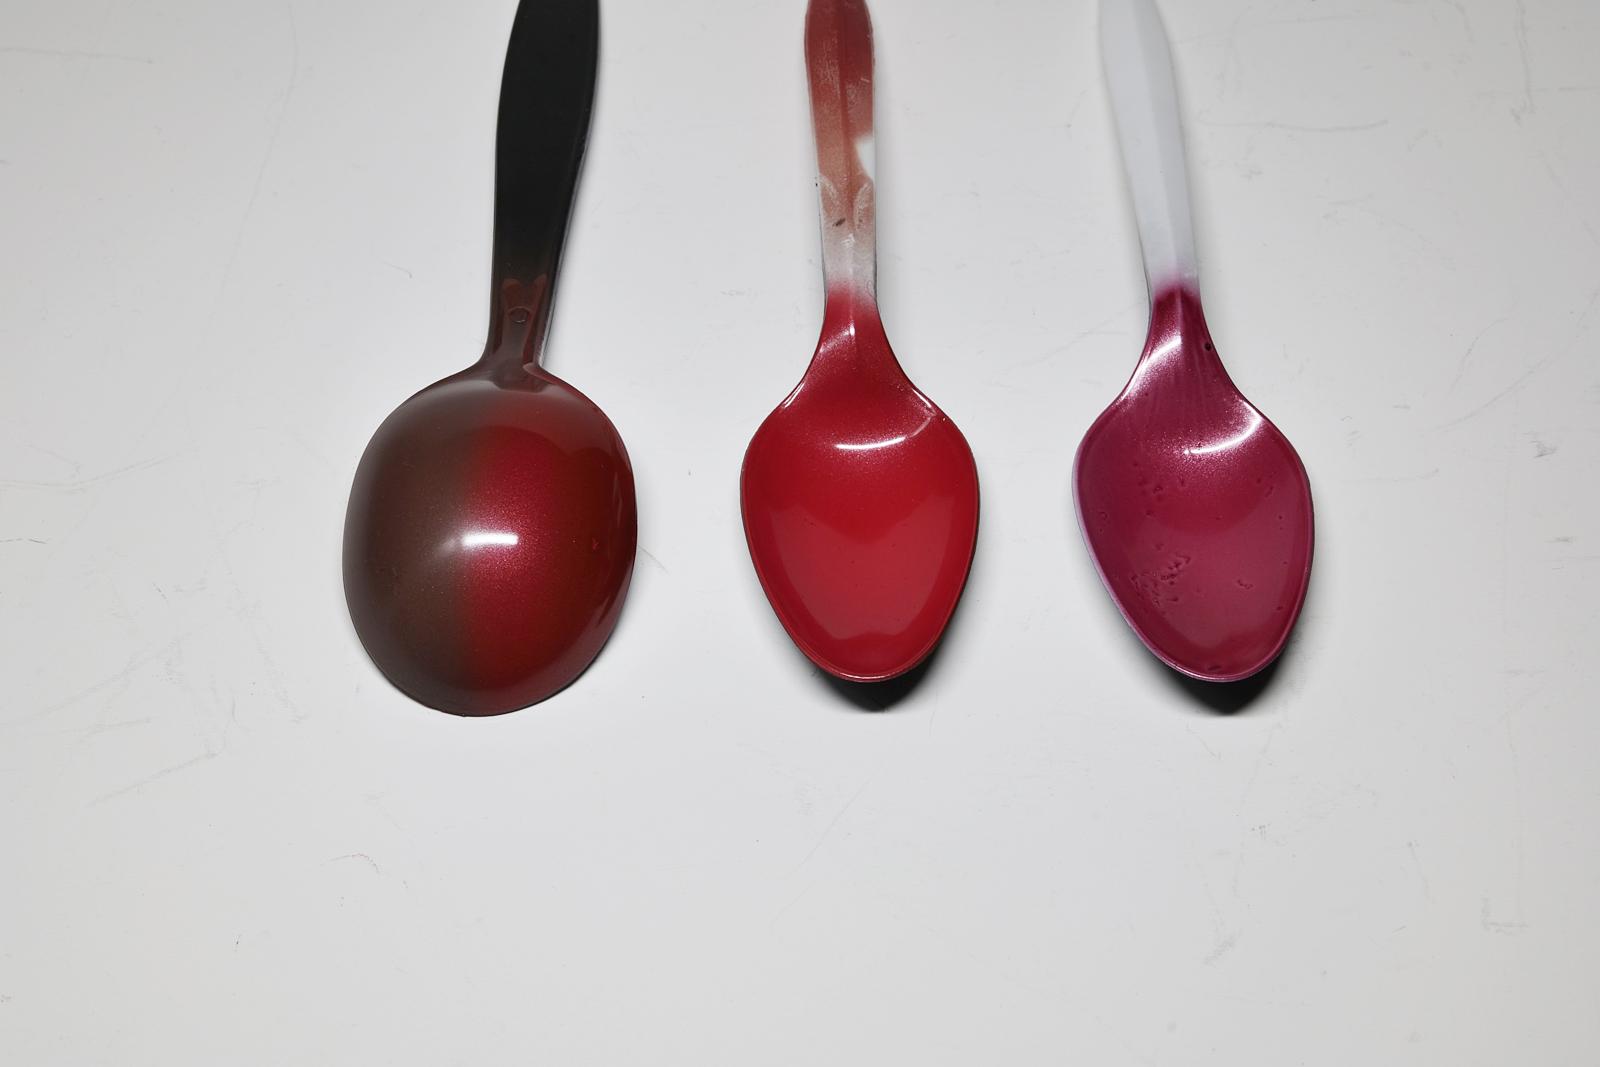
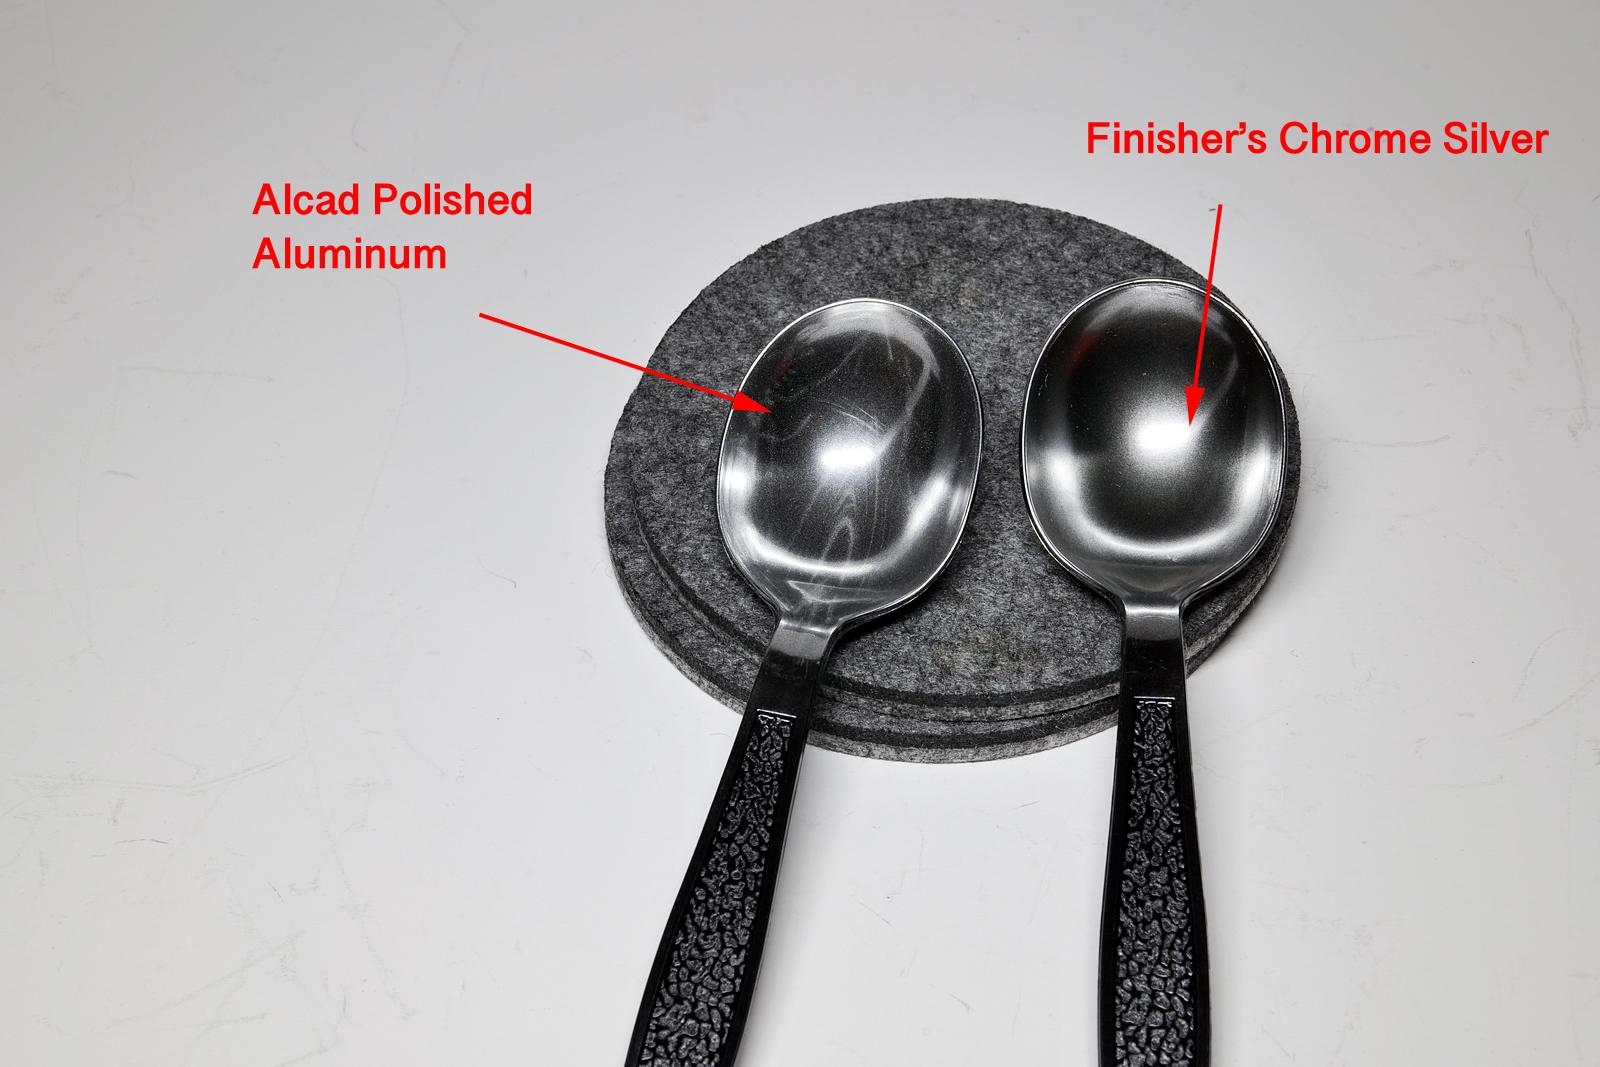
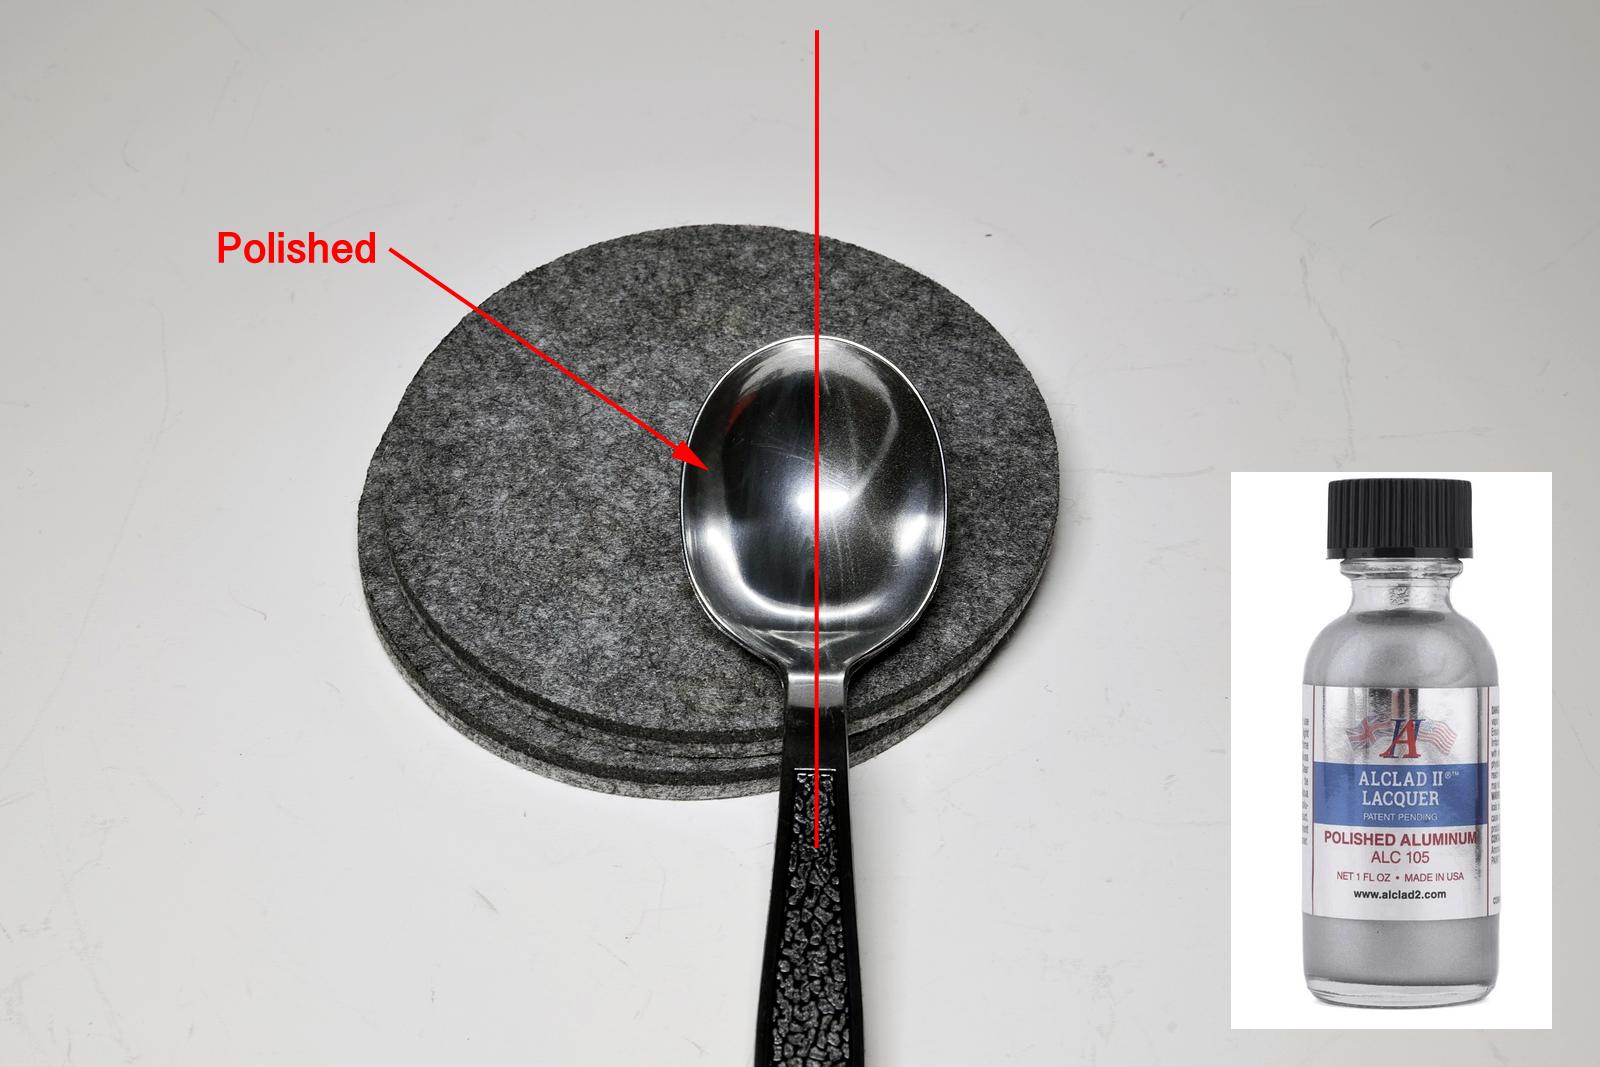
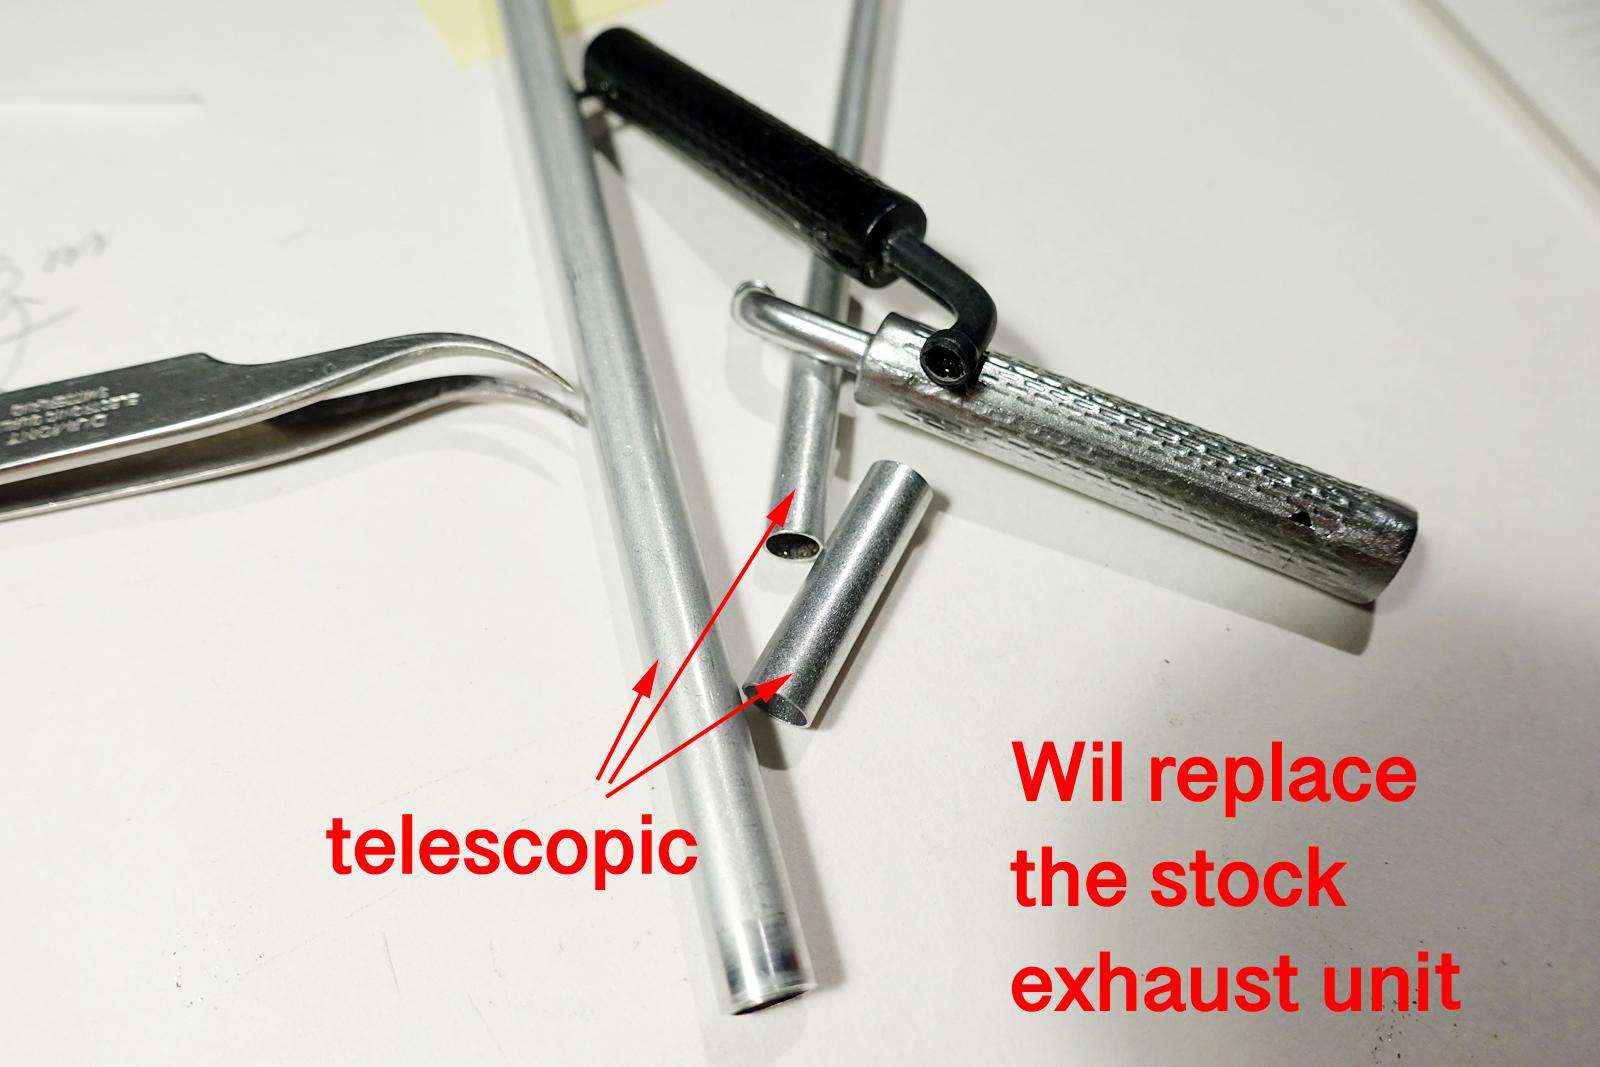
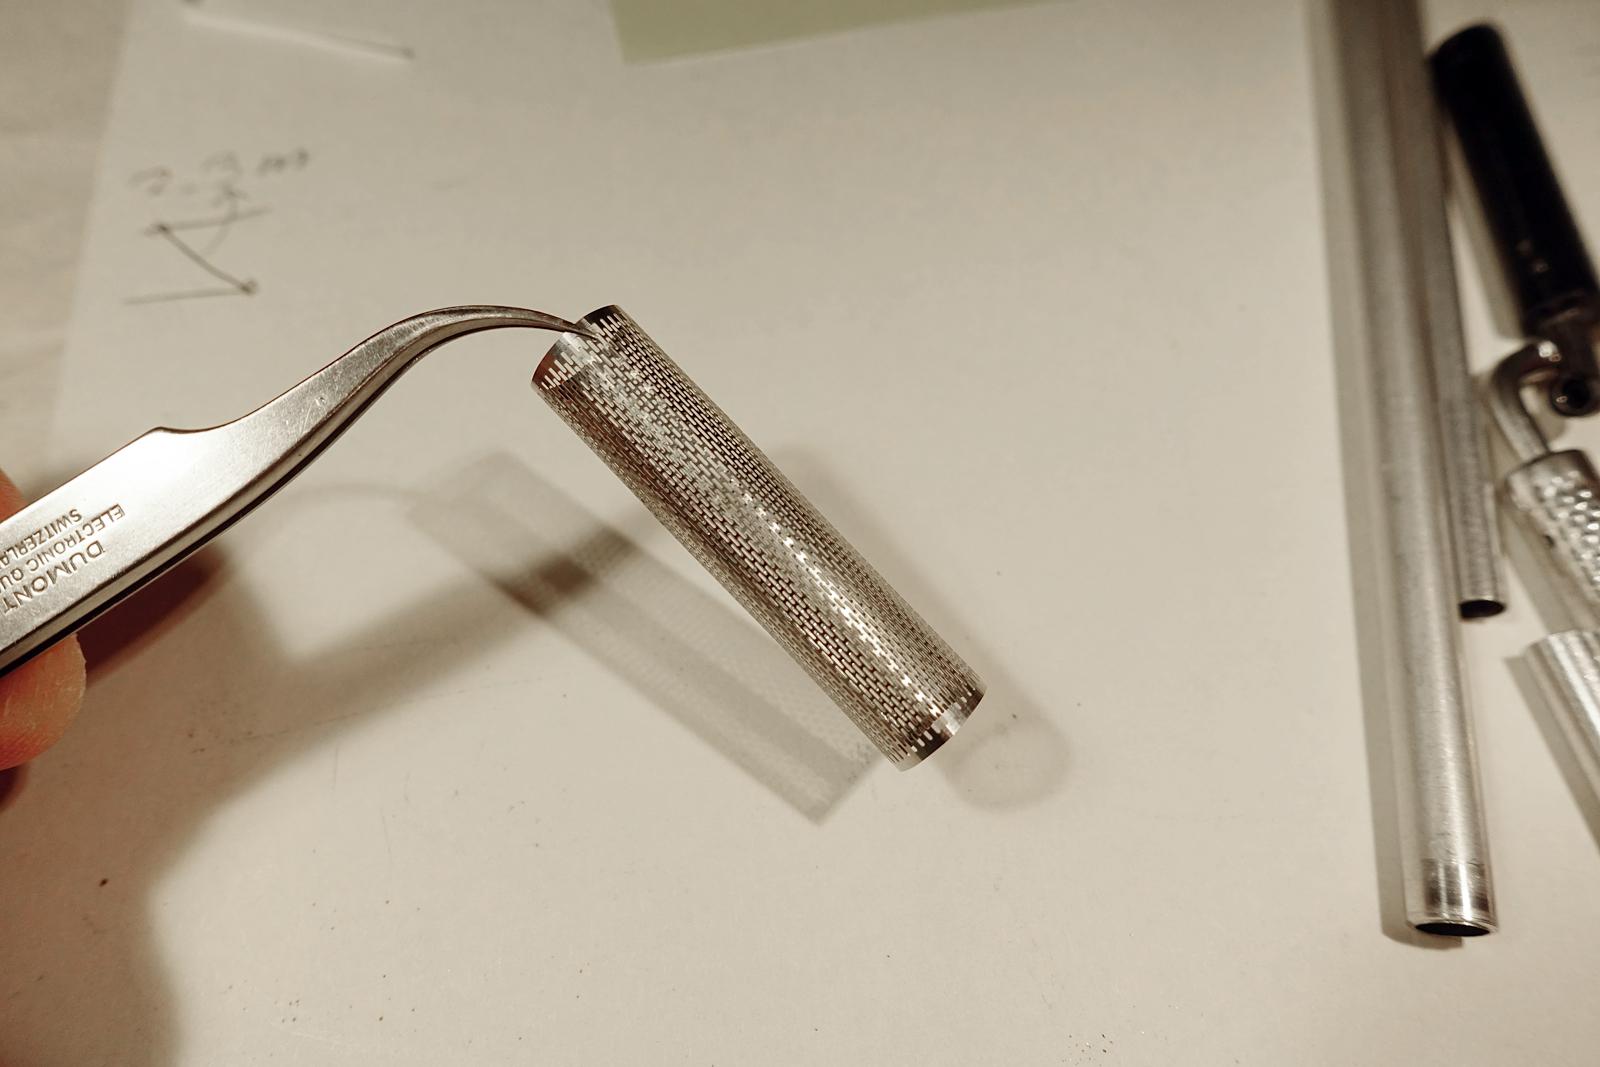
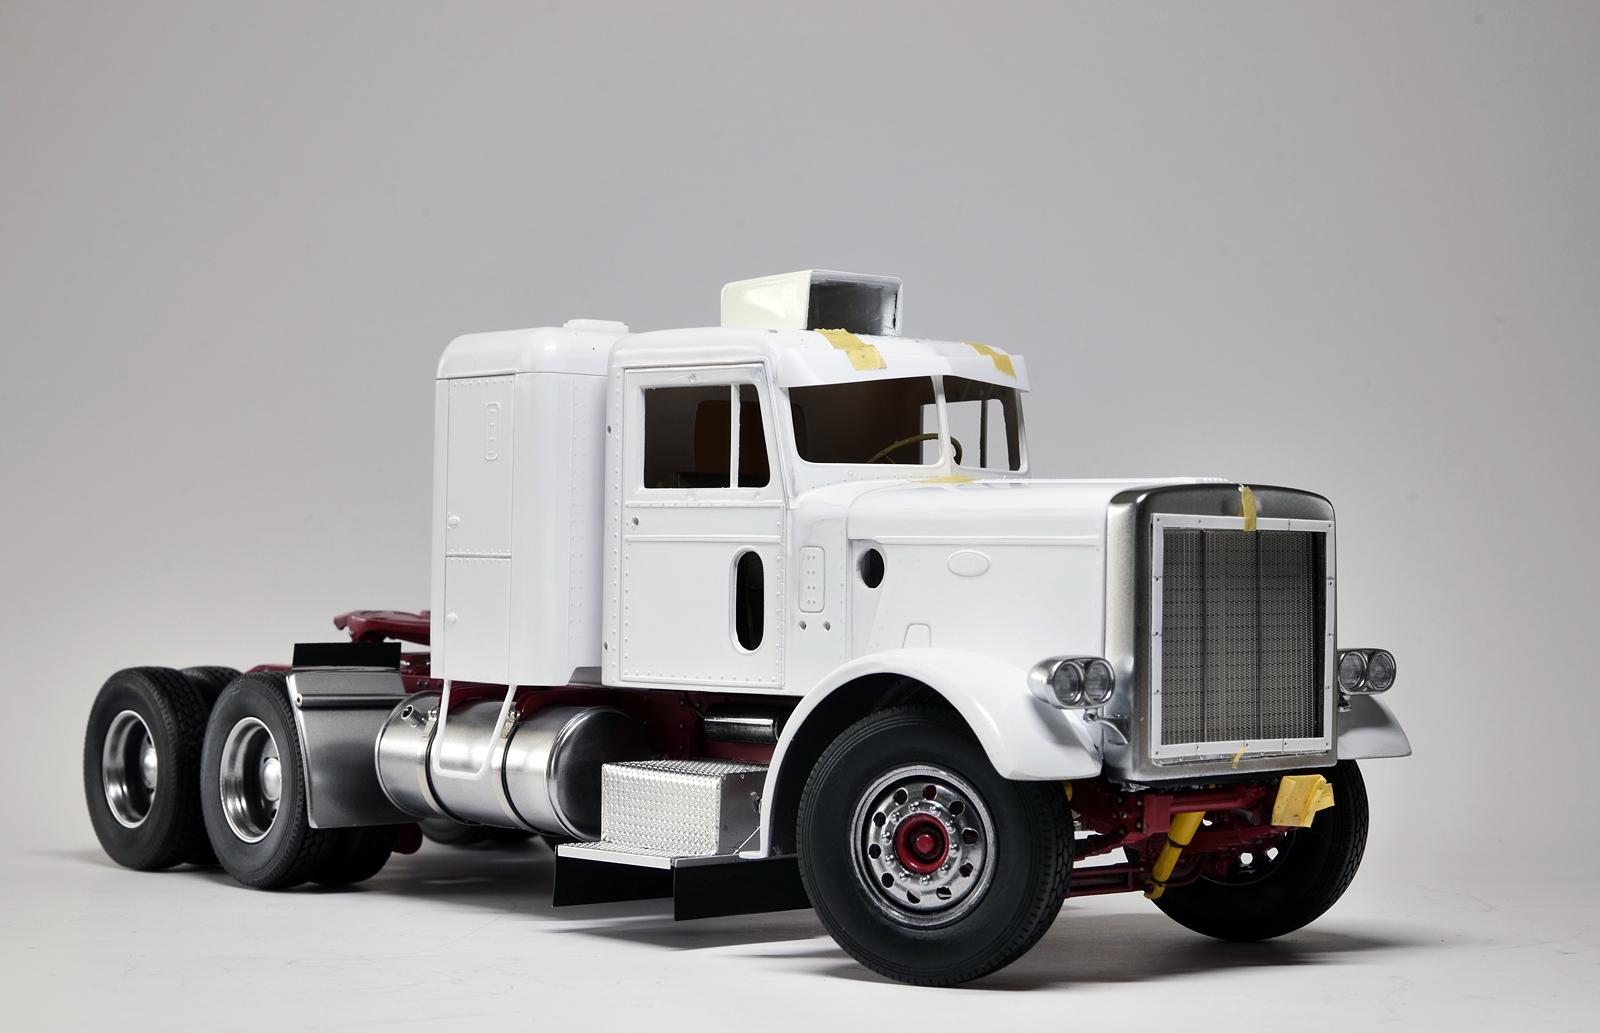
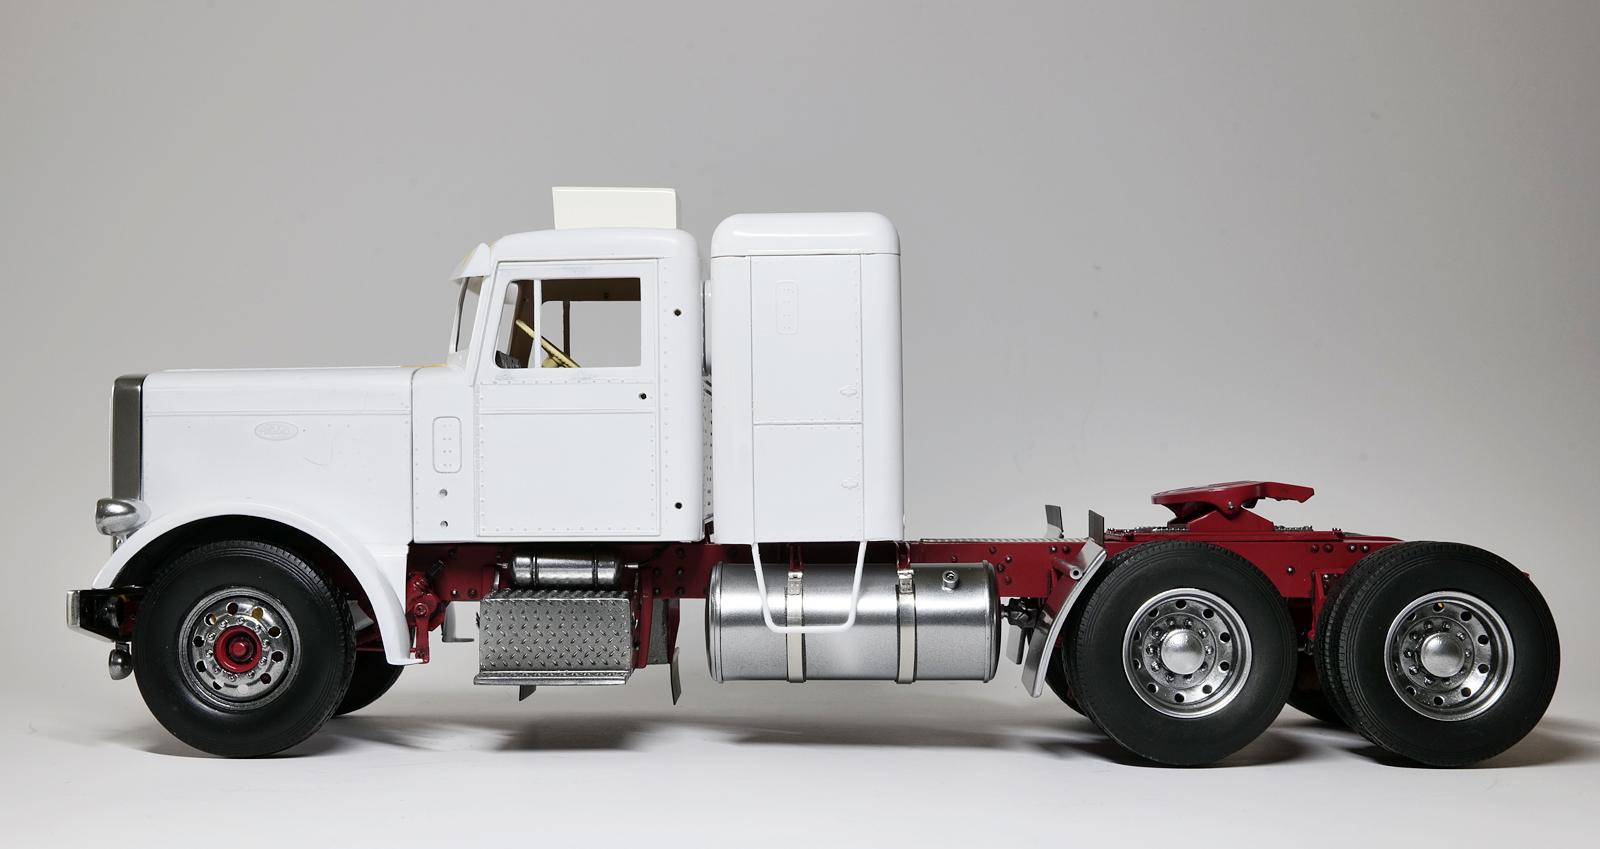
Found some time this weekend and made more progress. I paused for a week getting away from modeling (scale) activities and now I seem to lose interest and motivation. This happens often, but I really do not want this build to stall now... I haven't decide which color I want to paint the truck, but I envision this would be some kind of two tone paint job (white and something else). For the color, I started with white base coat first. This is an initial coat, I will probably add two more additional coats. I used a panel scriber to enhance the depth of door edge lines and I am happy how they came out. Then I started to experiment "the other color" that will make up the "two" tone paint scheme. Ever after spending a couple of hours mixing and painting, I still haven't decide which color I would want to use. This whole situation is both tough and disappointing for me. Lately, I found myself struggling to paint metallic finishes and I wanted to go back to basic and see what I am doing wrong (my grille was an example of bad paint work). At the end, I think I found out my problem and it wasn't what I was doing wrong; the main problem was how I was storing some of the metallic paints. I had several pre-mixed bottles from last year and I think they became "bad". As soon as I started to paint with fresh bottles, I was able to lay down decent paint layers. While I am on the topic of metallic finish, these are my two favorite metallic paints: Alcad Polished Aluminum and Finisher's Chrome Silver. These paints require some preconditions to be laid out nicely, but they do bring out good finishes! You can polish this paint by rubbing the surface lightly too. And I use Tamiya's X-22 to protect the surface (only loses slight shine) from rubbing off. My focus has shifted to assembling the exhaust pipes and I decided to build my own using various aluminum tubes. Having telescopic pipes, I can actually build the size (radius) I needed quite easily. For the heat shield, I will be relying on this photo-etched part. I just need to figure out how I am going to attach all of these to the truck... I am still bothered by the grille especially where I added photo-etched trim piece around the opening. Then I saw certain trucks use these attachments to block the grille opening to operate during the cold/windy winter months. Maybe I can make this one to hide the messy trim piece, so I began making my prototype. Here is how I am thinking the front grille is going to look. Convincing enough for me for now, but I may just scrap it later.... Lastly, it doesn't show (shouldn't), but I added two brass rods in the middle of the chassis to prevent the truck's frame being sagging. Luckily, the truck's frame doesn't sag anymore and it seems to help putting the real wheels down flat. I still haven't done anything for the front wheels yet though. My next task is going to be painting small parts and this is where the process becomes tedious/boring...

-
AMT Exterior Post Doubles Vans
cifenet replied to Bren's topic in WIP: Model Trucks: Big Rigs and Heavy Equipment
Beautiful weathering with realism! To be honest, I don’t think I have the necessary courage to weather like that. -
KW Aerodyne
cifenet replied to TopherMcGinnis's topic in WIP: Model Trucks: Big Rigs and Heavy Equipment
This must be one massive truck, I don’t think I have seen this one being built here. Is Metal Glow means “glow in the dark”? -
Resto Rod Autocar
cifenet replied to Gary Chastain's topic in WIP: Model Trucks: Big Rigs and Heavy Equipment
You got yourself a beautiful truck, Gary!! -
Good to see the work getting done layer by layer, and it surely involves some extensive building activities!
-
Mack Superliner
cifenet replied to Jürgen M.'s topic in WIP: Model Trucks: Big Rigs and Heavy Equipment
Excellent work!!! -
Western Star Classic heavy haul
cifenet replied to Biggu's topic in WIP: Model Trucks: Big Rigs and Heavy Equipment
You have been busy making good progress! Coming out great so far and the detailing/paint work is superb! Keep up the good work, Jeff~ -
Haha, thanks for the support on the topic of having a messy desk. I know for sure I wasn’t alone on this, but I just didn’t know how to widely it is affecting others. 😄 Thanks for the compliment, I am flattered by your positive comment! Regarding the wheels/tires, they were actually 3D printed by me, but I got the original work in STL file from an online 3D community place a couple of years ago. I just modified to fit 1/25th scale and the ratio I wanted to have for the trucks I am building.
-
Spencer Ol' School W900A.
cifenet replied to freightshaker2's topic in Model Trucks: Big Rigs and Heavy Equipment
What an excellent 1/25th scale precision/reproduction truck you have constructed here! Nice work, and I know it isn’t easy making it look this good! 👍 -
Mack Superliner
cifenet replied to Jürgen M.'s topic in WIP: Model Trucks: Big Rigs and Heavy Equipment
Fantastic job, Jürgen! You are manufacturing these trucks like a well operated factory would! Fast and reliable at the same time. Looking very proper and I actually like the bright yellow paint job too. -
Ol' School A Model
cifenet replied to freightshaker2's topic in WIP: Model Trucks: Big Rigs and Heavy Equipment
Awesome job on this, you captured very well on your how this truck should look! -
Resto Rod Autocar
cifenet replied to Gary Chastain's topic in WIP: Model Trucks: Big Rigs and Heavy Equipment
Thanks for the info on the nail art item. I can already see several applications that can improve our hobby! The dash is looking good and fits well too. Good looking truck with smooth paint job. I think you are almost ready to deliver this truck from its factory!