cifenet
-
Posts
856 -
Joined
-
Last visited
Content Type
Profiles
Forums
Events
Gallery
Everything posted by cifenet
-

Peterbilt 378 Aerodyne Sleeper
cifenet replied to TruckerAL's topic in Model Trucks: Big Rigs and Heavy Equipment
Hey Alex, you did good, really good on this one. Incredible finishes all around as if everything is how it should be. All of the metal finishes are top notch, too! I am working on door surrounds to give polished stainless look, your came out excellent! I really enjoyed watching all of your photos. Nice! -
Superb! And the realism is at its best!
-
You did a nice job cutting this clean. Very clean!
-
Awesome build! Really nice job on this! Interesting to know that the car has an engine fitting issue, but glad to hear you corrected it. And I agree, the yellow is gorgeous!
-
1/25 Revell Peterbilt 359
cifenet replied to cifenet's topic in WIP: Model Trucks: Big Rigs and Heavy Equipment
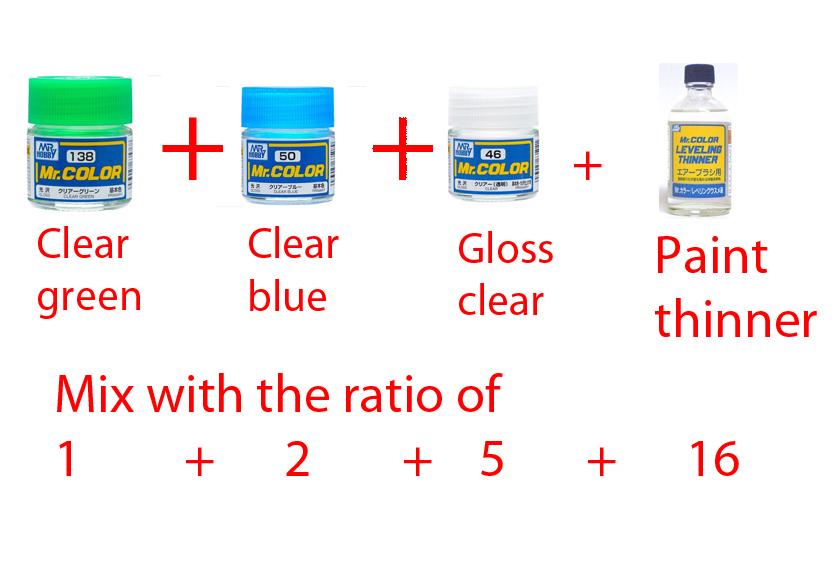
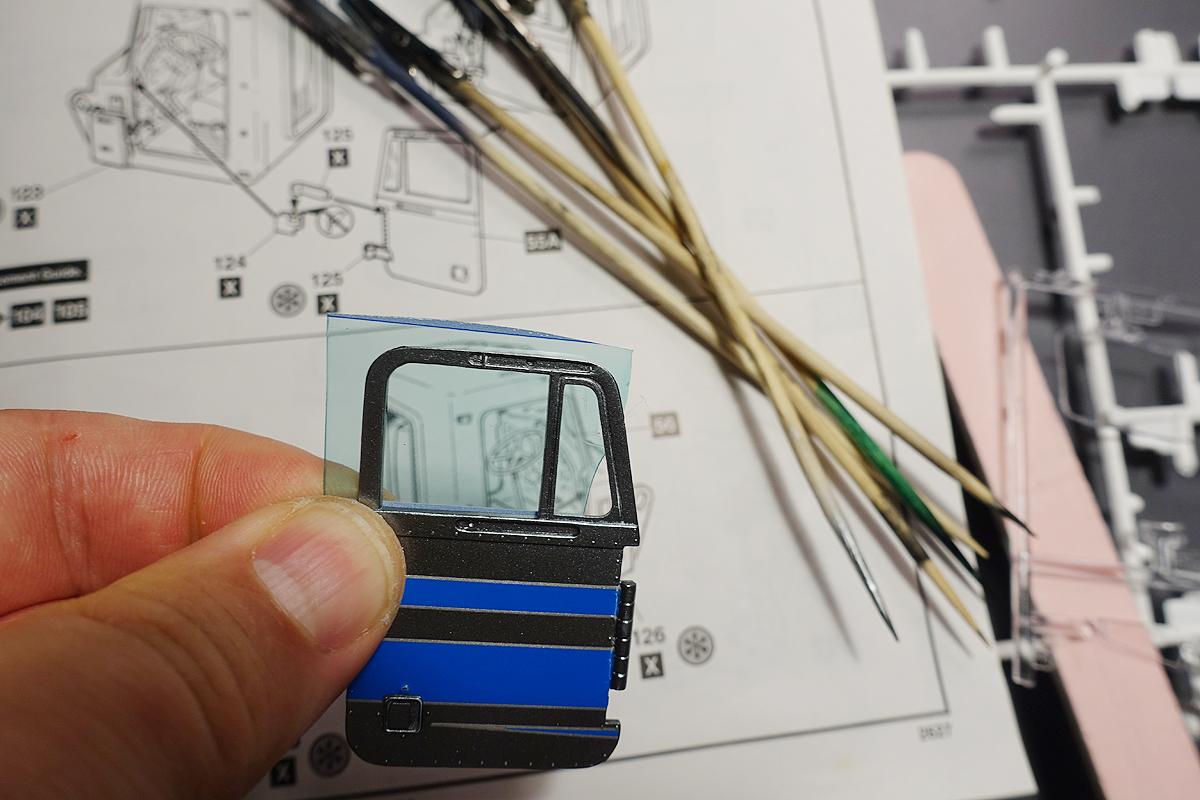
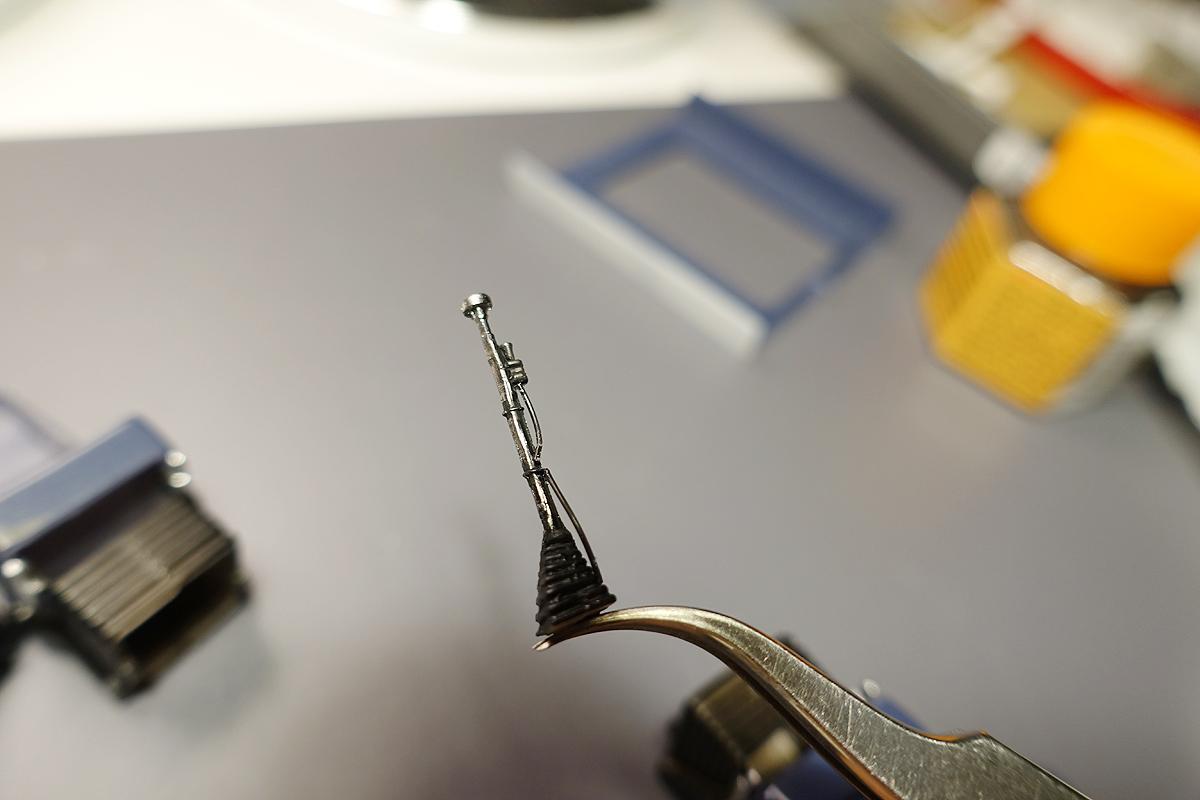
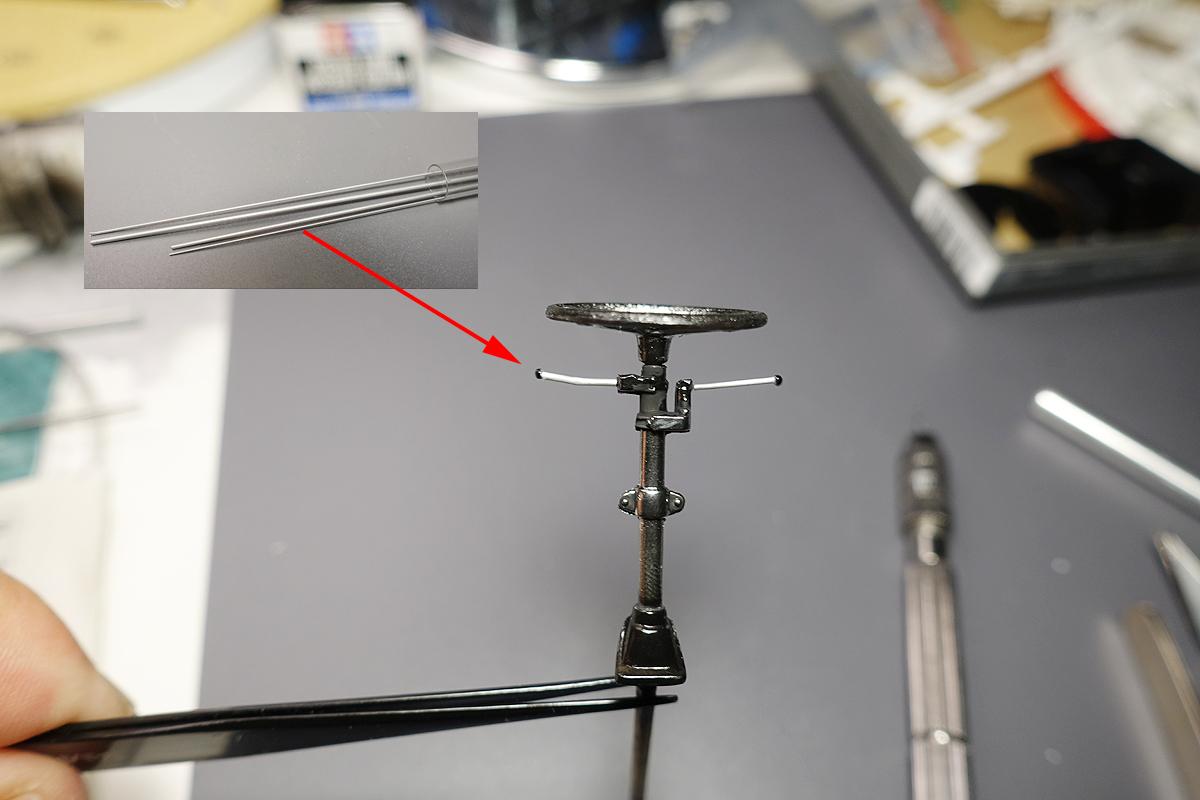
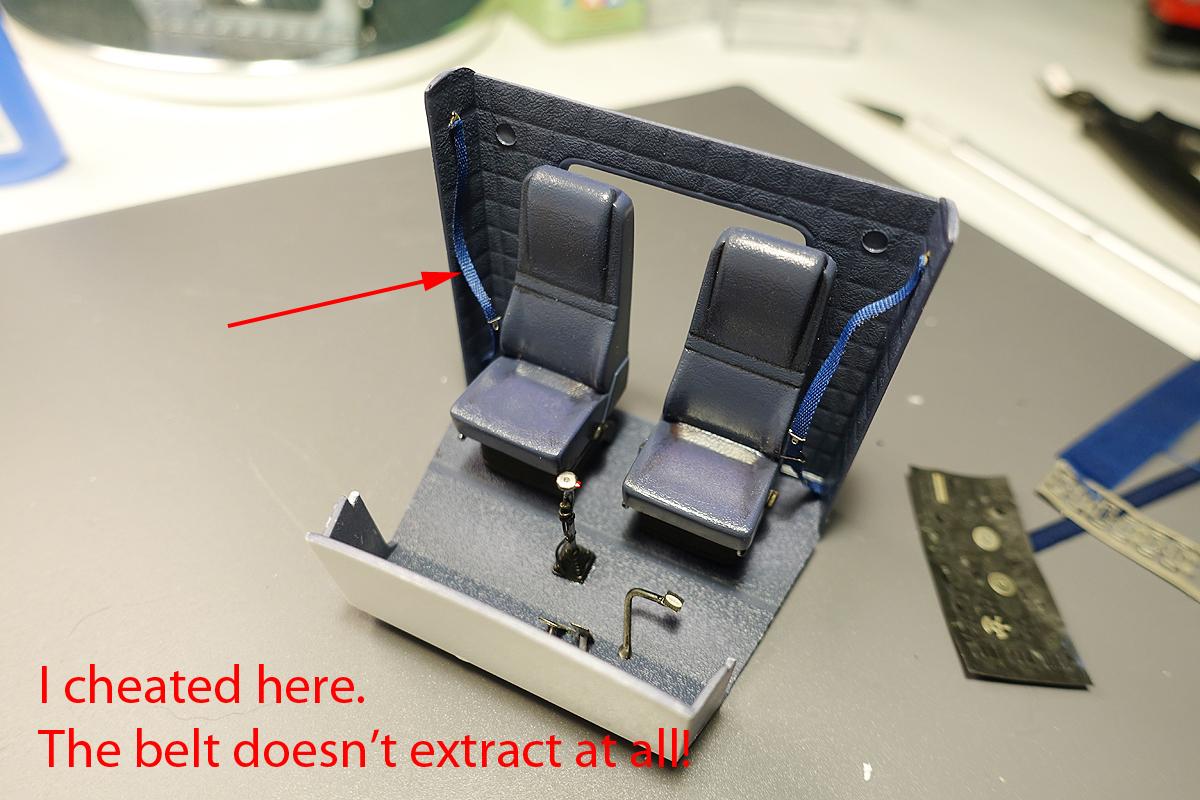
Rusty shared a helpful link about "tinting windows" above and I also started to experiment for my application. This is definitely a useful technique for building fighter jets or automotive kits where tinting clear parts is desired. The funny thing is, I have done tinting before, but I just totally forgot how. The difference may be that I used acrylic paints before and now I was trying to figure this out using lacquer based paints. Luckily, I am documenting the procedures here, I won't need to remember this "how-to" again. The challenge was to have tinted windows without windows losing transparency (or without becoming foggy). After a couple of trial and error sessions, I was able to achieve what I wanted and it was rather easy. It really came down to my paint mixture and by adding additional gloss clear on top of green/blue clear, things started to look better. I found my testing materials! This is the mixture I used for my application using Mr. Color lacquer paints. The problem of fogging windows went away as soon as I started adding gloss clear into the mix. The regular blue tint was rather boring, and this is why I have both clear green and clear blue in the mix. I have my thinner ratio rather high and this allows me to apply multiple light coats to achieve the shade I want. My second try was successful! As most of the Revell kits, this truck doesn't come with side windows. I like the look of having the door windows rolled up as shown here, I will have to find a way to make this work. These are the actual front windshield parts and the tinting looks quite good to my eyes. I don't know why, I am still struggling to complete the painting of visor. All kind of blemishes showing up and now the paint is all wrinkled. I will strip the paint and try it again. The interior work continued as well and I wanted to add small details without spending too much effort. For the instrument panel, there are 3 ways (that I can think of) to build for this kit: 1. Paint everything including gauges, dials, buttons, lights, etc. 2. Apply decals which is included. If using decals, I would sand off the face to make the panel surface flat. 3. Use aftermarket parts. I elected the option #3 and purchased an interior detail P/E set from czechtruckmodel.com. It took roughly 10 days to arrive from Czechia to USA. I used most of the P/E parts except one part which is to replace steering wheel spokes. The kit has a four spoke wheel and the P/E part is for a three spoke steering wheel. And the size didn't match either. Hmmm. The wood grain/color is too red for my taste, but the overall look is quite good. I applied UV resin clear to add realism on gauge dials. I have purple interior now! While the paint was getting dried, I completed the work of detailing dashboard. Didn't want to go too crazy, but I added various things just enough to improve the feel. My shiny purple seats are debatable, but my feeling is that they do stand out. I also wanted to add seatbelts and I think they were anchored to the wall. I found some left over materials to build two seatbelts including anchors and buckle clips. I just want enough details to show off when doors are opened, but if you examine the belts, they don't look like they extract and retract! Also the location of the speakers are incorrect, they should be where the upper anchors are at, but placing them at the above location works out nicely. I will be painting the door surroundings to give polished stainless look and this is how I am able to mask the curves. I will get the paint session going soon. Looks like I still have many steps to go, I am hoping to mount the doors next! Thanks for following so far!
-
1/25 Revell Peterbilt 359
cifenet replied to cifenet's topic in WIP: Model Trucks: Big Rigs and Heavy Equipment
Yeah, here in states, they use sodium chloride everywhere for de-icing including highways. Steel components won't survive for sure. I would think putting them in a glove compartment makes more sense to me, just like how we keep wheel lock keys! I hope this build "diary" isn't too boring, I really do not know the general audience yet. I really need to complete this soon. Thanks for your interest in this, Gary! -
Dodge Cabover
cifenet replied to Repstock's topic in WIP: Model Trucks: Big Rigs and Heavy Equipment
Talking about repetitive work requiring extreme patience! Small details do speak volumes here! -
Revell Peterbilt 359 'Black Magic'
cifenet replied to XYHARRY's topic in Model Trucks: Big Rigs and Heavy Equipment
First, thanks for sharing this. I can’t believe you started this back in 80s. Really nice job on the kit, I know it does require some effort to finish since it has a decent level of detail parts. The color is quite wild and I like it. The blanket looks cool, I see what you did there. Overall, this one is super cool looking truck. -
This one is good looking Chevy, Steve! Nice job on custom decals also, they look right at home. The 2 hole rear wheels look sweet and I like what you did with license plates where you lined up all at the bottom. Many small touches made up the truck look very convincing!
-
Ok, once decals go on, things are looking much better! 1:43 scale has its charm and your build is showing off these small and yet fine details very nicely.
-
Love the color and progress so far! Never knew nail polishing color can be this good! I built the same kit some years ago and I enjoyed building it. Keep up the good work!
-
1/25 Revell Peterbilt 359
cifenet replied to cifenet's topic in WIP: Model Trucks: Big Rigs and Heavy Equipment
Much appreciated for your kind words and support! And thank you very much for the thread discussing the subject I want- tinting the windows! It has some excellent information! I have been also experimenting the tinting part and the technique I am trying is to thin the paint three four times than usual and then make multiple passes to gradually adding the shade. And lastly, I was also not a huge fan of trucks in general as of March of this year. But since then, I am on third build of trucks. Just like that. -
AMT/Italeri Ford LTL9000
cifenet replied to TruckerAL's topic in Model Trucks: Big Rigs and Heavy Equipment
How are you building these so fast and so good!? I know you just introduced a couple of trucks last week which were also fantastic! I really like this one, the overall finish is top notch and I like what you did with the frame. The glossy red finish fits perfect. I always thought semi gloss or flat finish would look better for the frame, but this really looks superb. And all of the upgrade pieces do make the truck look quite special including the exhaust pipe ends spitting outwards! Nice job~ -
1/87 GMC Crackerbox A&H Truck Lines
cifenet replied to Pete68's topic in Model Trucks: Big Rigs and Heavy Equipment
It looks very good, but we want more photos! -
1/25 Revell Peterbilt 359
cifenet replied to cifenet's topic in WIP: Model Trucks: Big Rigs and Heavy Equipment
Thanks Daniel! It has been very fun build using all kinds of metallic finishes. Lots of chrome on this truck, I really want it to be be shiny at the end! Let's see if I can pull it off! Thanks Haken for detailed info on brake chambers, I actually did not know that they store the bolt within the chamber. Having said that, I really wanted to add that cage bolt piece to enhance the look and having it really makes the brake chamber sophisticated. I suppose you can still have these cage bolts in the truck considering it is getting the brake components serviced during the maintenance check at a dealer. Ha! -
Nicely done! Great engine details as well!
-
This is as awesome as it can be! Amazing details and finish! Thanks for sharing.
-
1/25 Revell Peterbilt 359
cifenet replied to cifenet's topic in WIP: Model Trucks: Big Rigs and Heavy Equipment
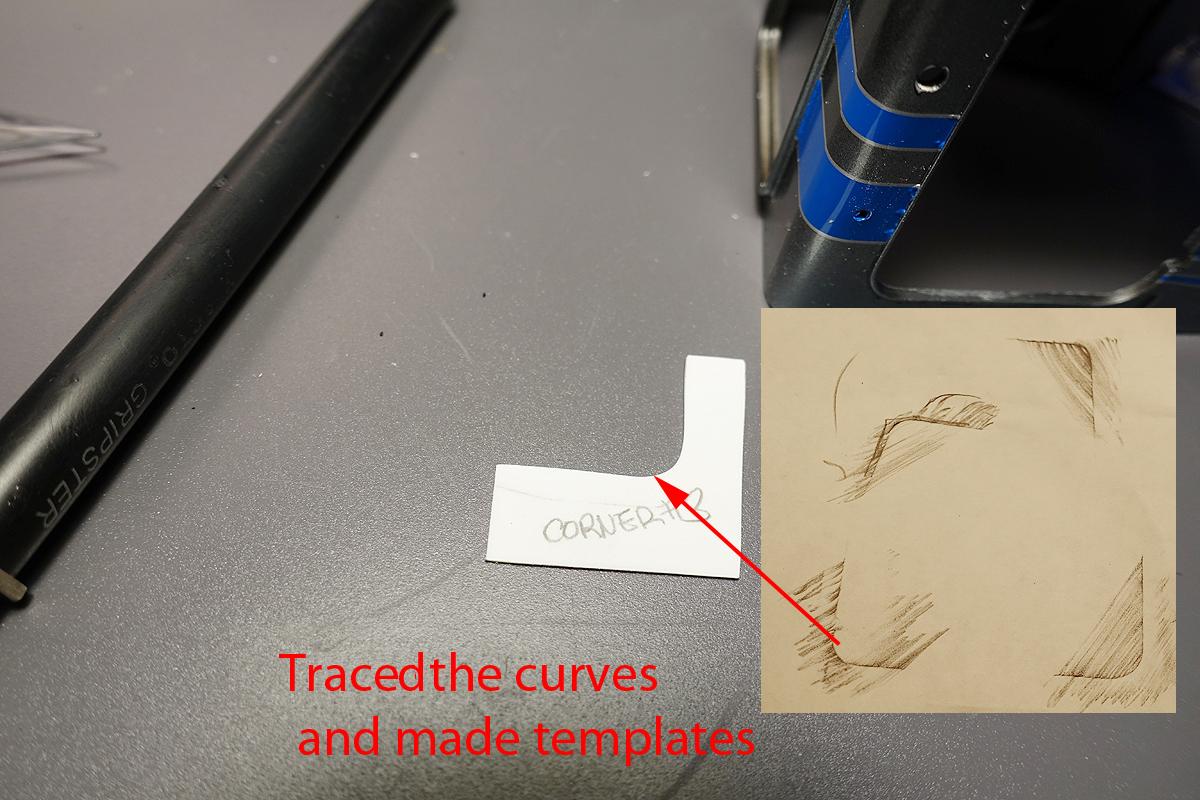
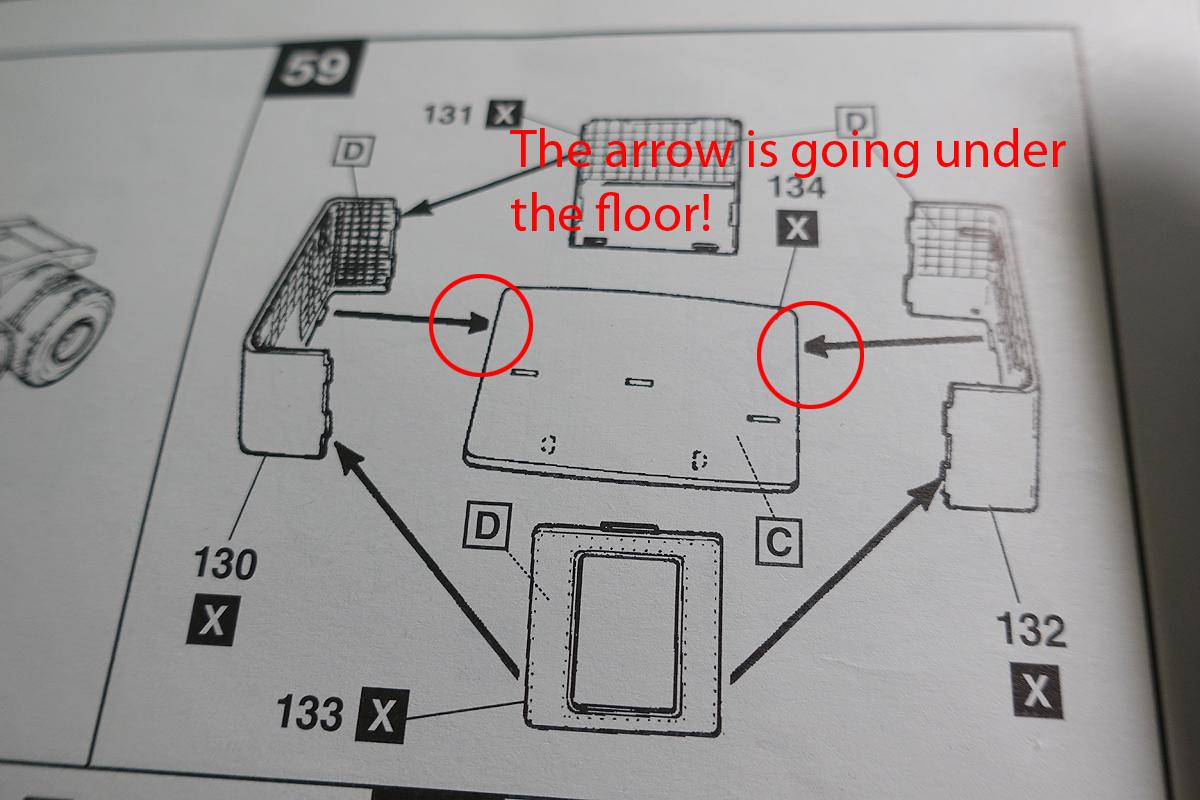
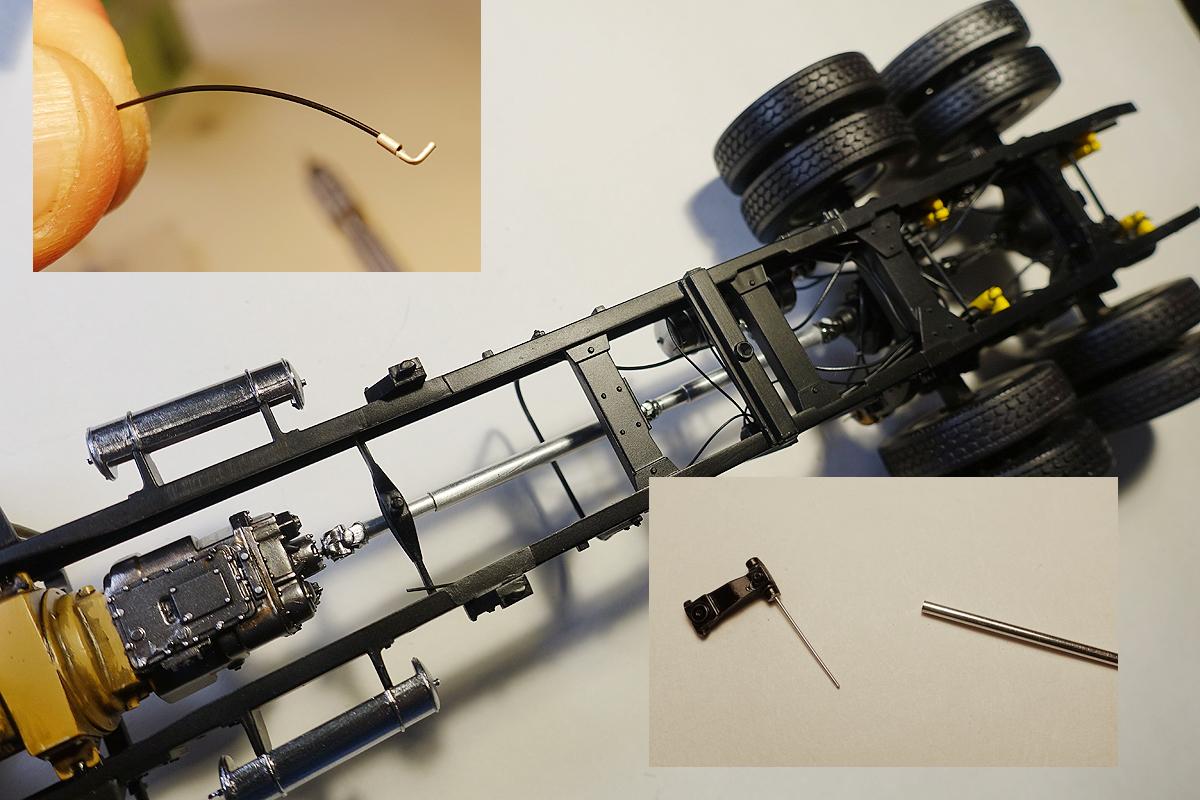
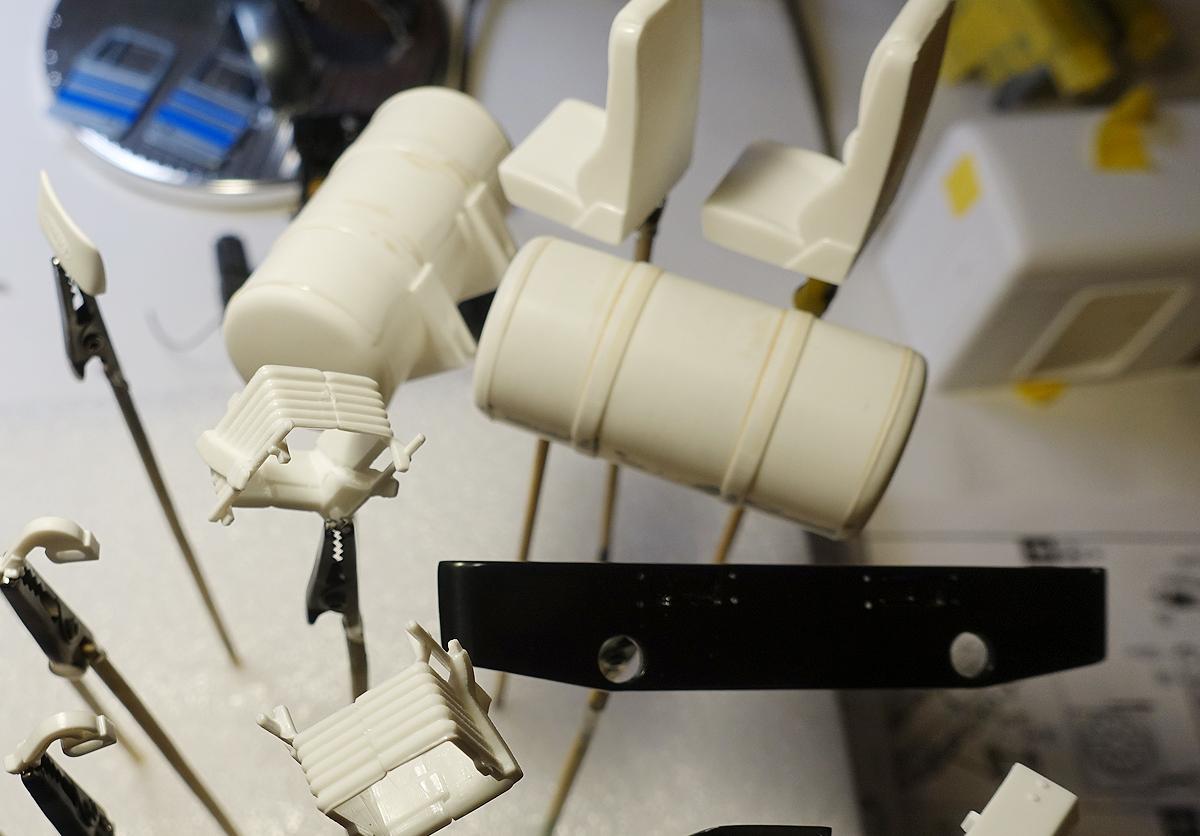
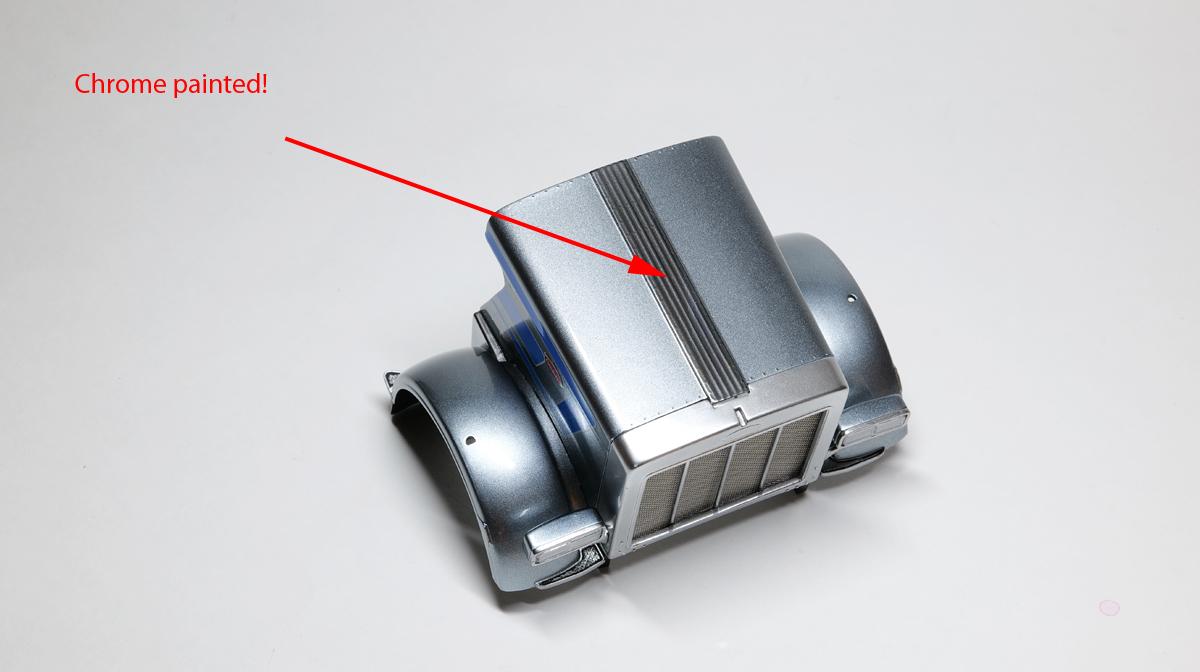
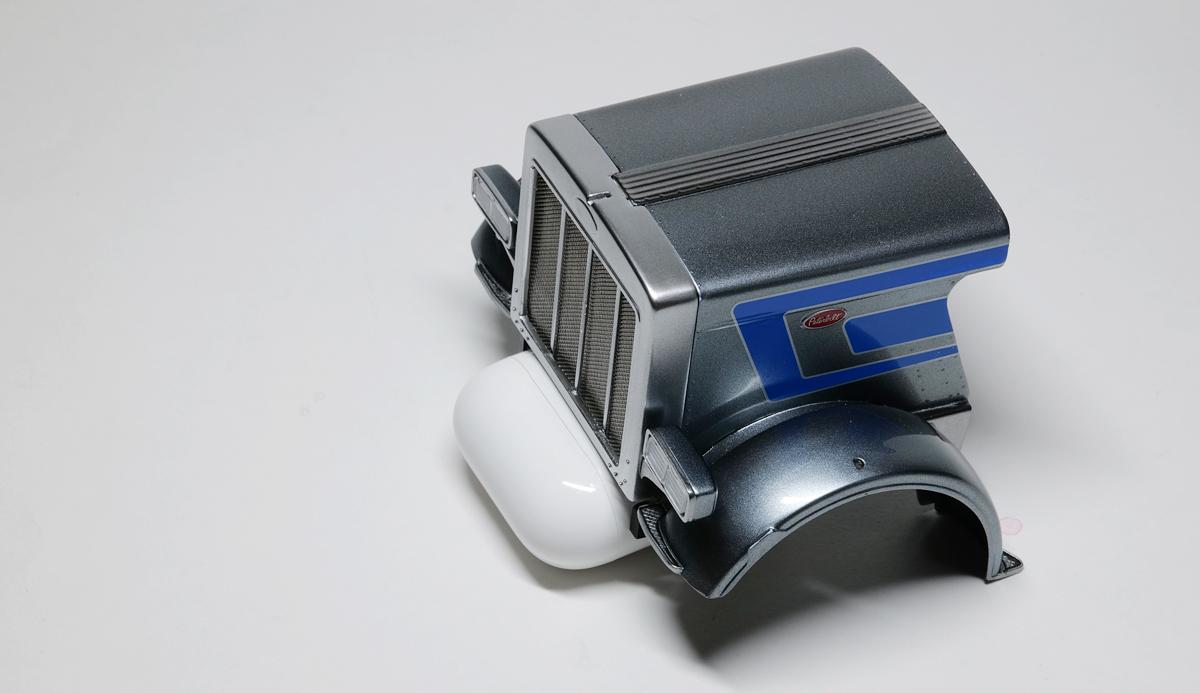
Slow iteration this time, but still made some forward progress. As a typical build takes weeks, I like to clean my work bench between build sessions. And I must have accidentally threw this piece in the trash. There are 2 x part number 125, and I can only locate one. Luckily, I think I can scratch build this part by using a thin plastic strip and a round plastic tube. Now, more about the cab mounting on Revell's Peterbilt 359: As far as the instructions are concerned, the part 15 and part 16 need to be mounted at a same level so they are parallel in terms of height. My cab mounts on top of these and if there is any slight deviation from the correct the mounting position, the cab will not sit straight. And after carefully studying the cab assembly step yet again, I noticed that the arrows are going under the floor part "134" (see circles). So this does indicate that those mounting tabs need to go under! The instructions were indeed correct, it just that I didn't interpret it correctly. I started the polishing process as I make progress in painting. Polishing silver based color is tricky where gloss clear coat is almost necessary. And another downside of applying clear coat on top of silver metallic is that clear on silver metallic color doesn't show off its shine well. Sometimes, it is possible to damage base paint during the polishing process. Usually the paint on the edge gets polished away and requires retouching. I am masking off the good area here so I can repaint the exposed edges only. I de-chrome the wheel covers. Then applied gloss black to reveal ugly scratches. I began the process to correct this by sanding off the top surface. After some corrective actions, the painted chrome came out satisfactory for me. The wheel covers occupy large space on the back of truck, I wanted these parts to look great. Now it is time to replace the main driveshaft with aluminum tubing parts. It is all about cutting the universal joint ends and replacing the middle shafts. I also spent some time making small parts that may (or may not) improve overall frame details. Also I had a choice to make. I think the black windshield molding is what the factory uses, but it just looks super cool to have shiny trims around. As usual, a black gloss coat is applied and I chromed it. This paint is from Mr. Hobby and it is an acrylic paint. This is one of my best clear red paints where I hand paint many things with it including red brake lights. I was surprised that Revell did not include any "clear" parts for rear tail lights. And this entire bumper is molded in one piece. I began painting the tails lights using Mr. Hobby clear red. I used UV curing clear resin to mimic the light covers. I think this method is quite effective. I picked my interior color for the truck. I didn't want the usual offering, but I wanted to look slightly "fancy" and special. I mixed these two colors and produced something off purple. It may turn out to be ugly at the end, but let' see how it goes! My next step is to get things moving with the seats and fuel tanks. The frame details are also almost done as well. Thanks again for following!
-
1/25 Revell Peterbilt 359
cifenet replied to cifenet's topic in WIP: Model Trucks: Big Rigs and Heavy Equipment
That is good to hear! I know this method is also economical comparing the cost of similar P/E grille parts. -
Impressive implementation! Keep up the good work!
-
Piece by piece, you are systematically connecting all the dots here! It looks like everything came straight out from the kit. But they are not! And is that how inner side of wheels are in this kit? That is some wild design!
-
Dodge Cabover
cifenet replied to Repstock's topic in WIP: Model Trucks: Big Rigs and Heavy Equipment
Fantastic work you got going and great job with rivets. I hope the damage isn’t extensive, but I know how these things happen and we all need to regroup and push forward. -
1/25 Revell Peterbilt 359
cifenet replied to cifenet's topic in WIP: Model Trucks: Big Rigs and Heavy Equipment
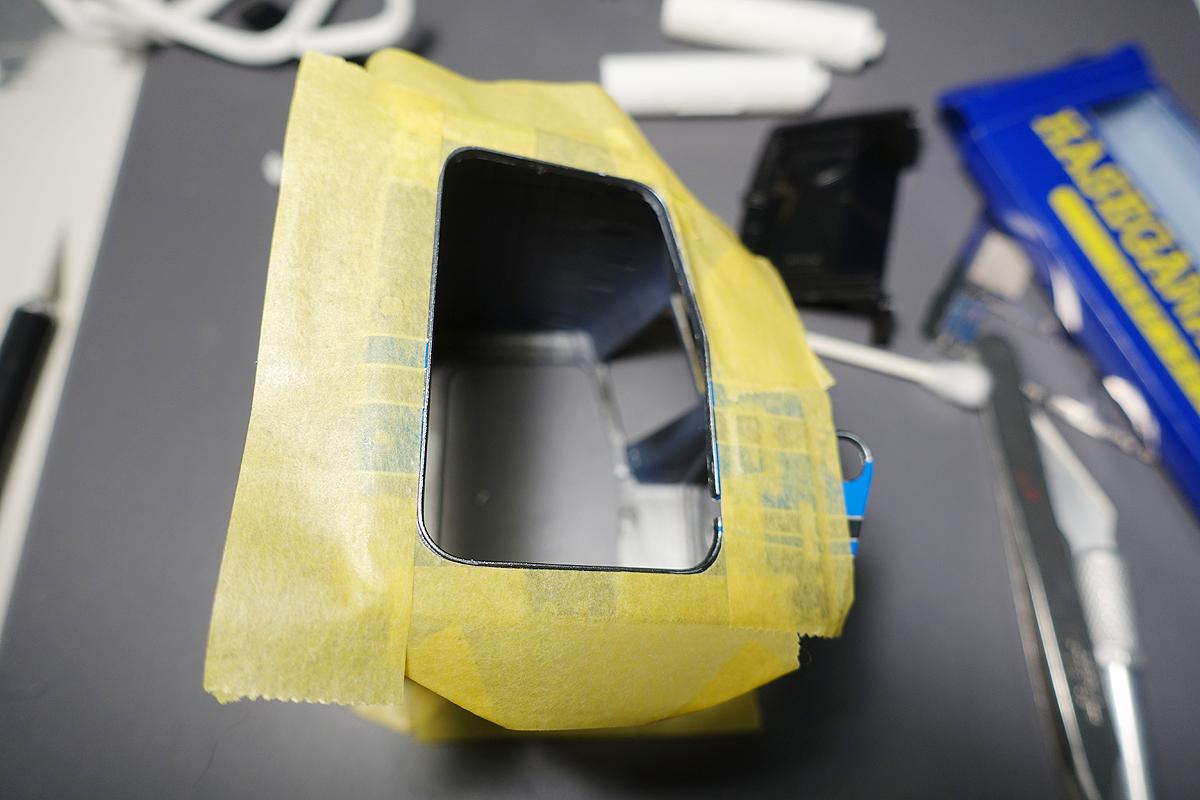
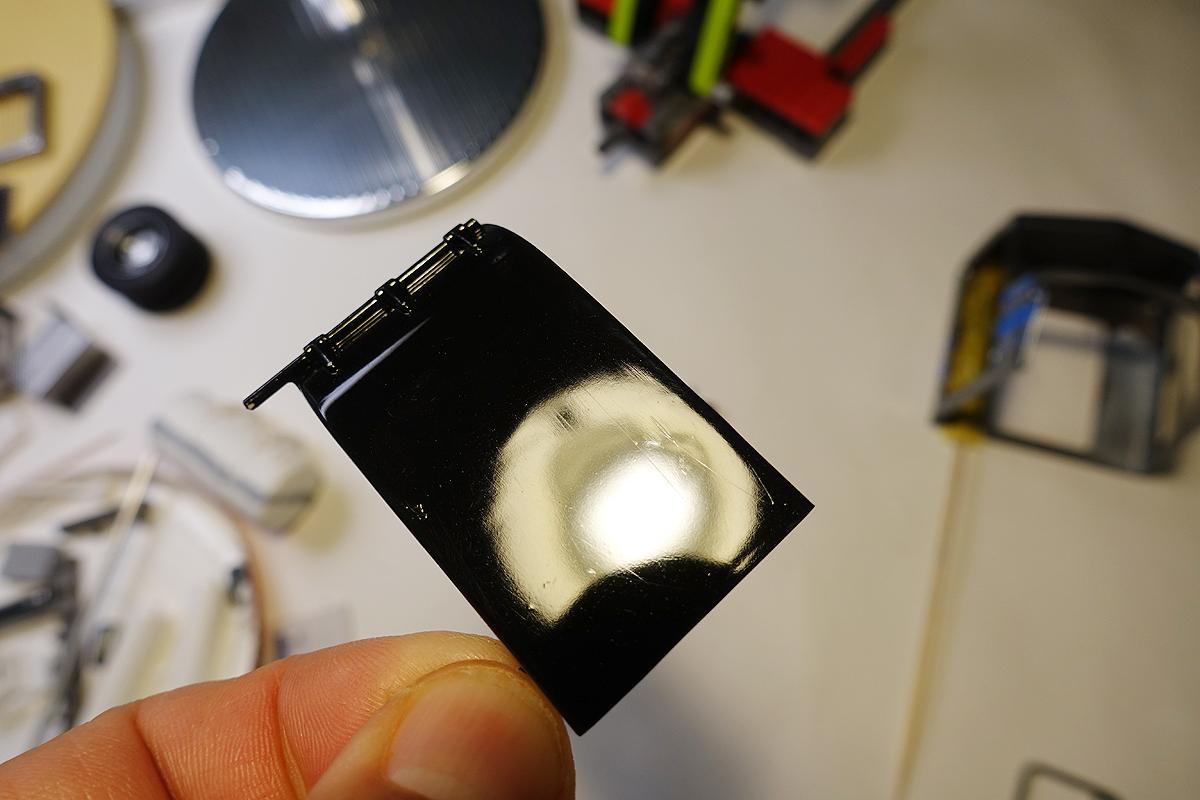
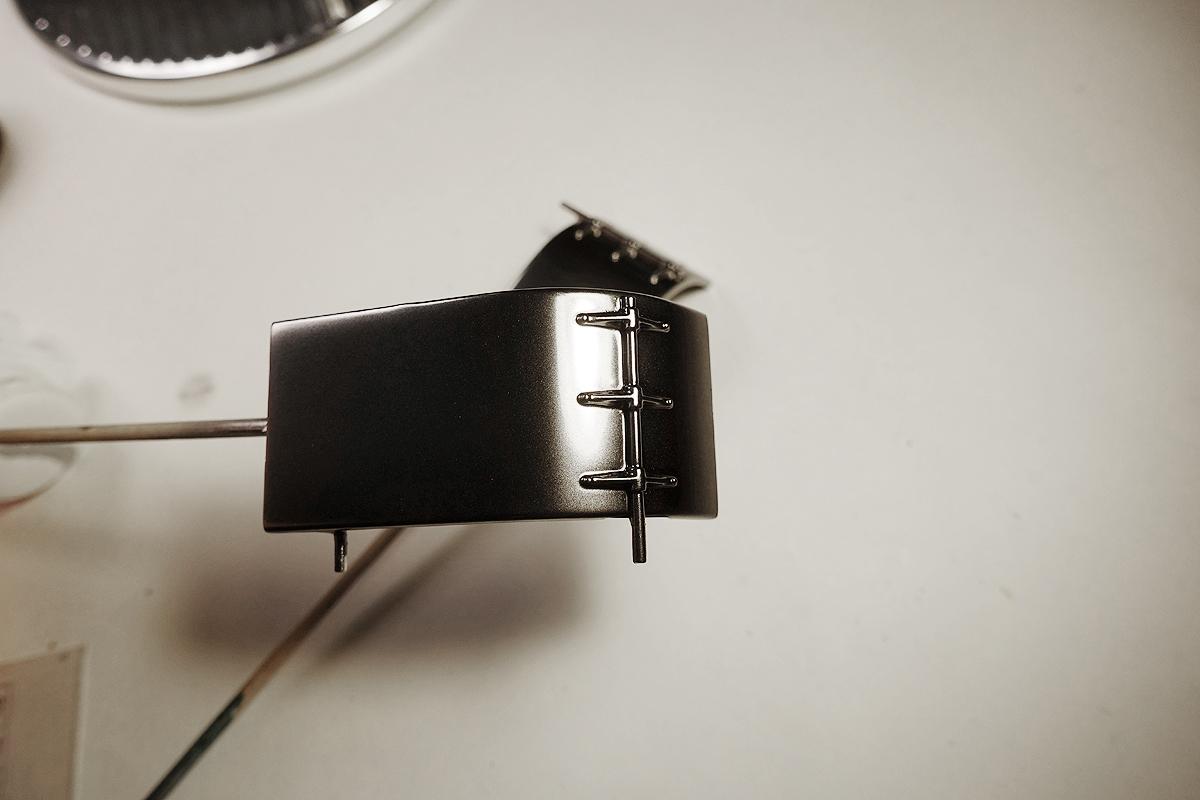
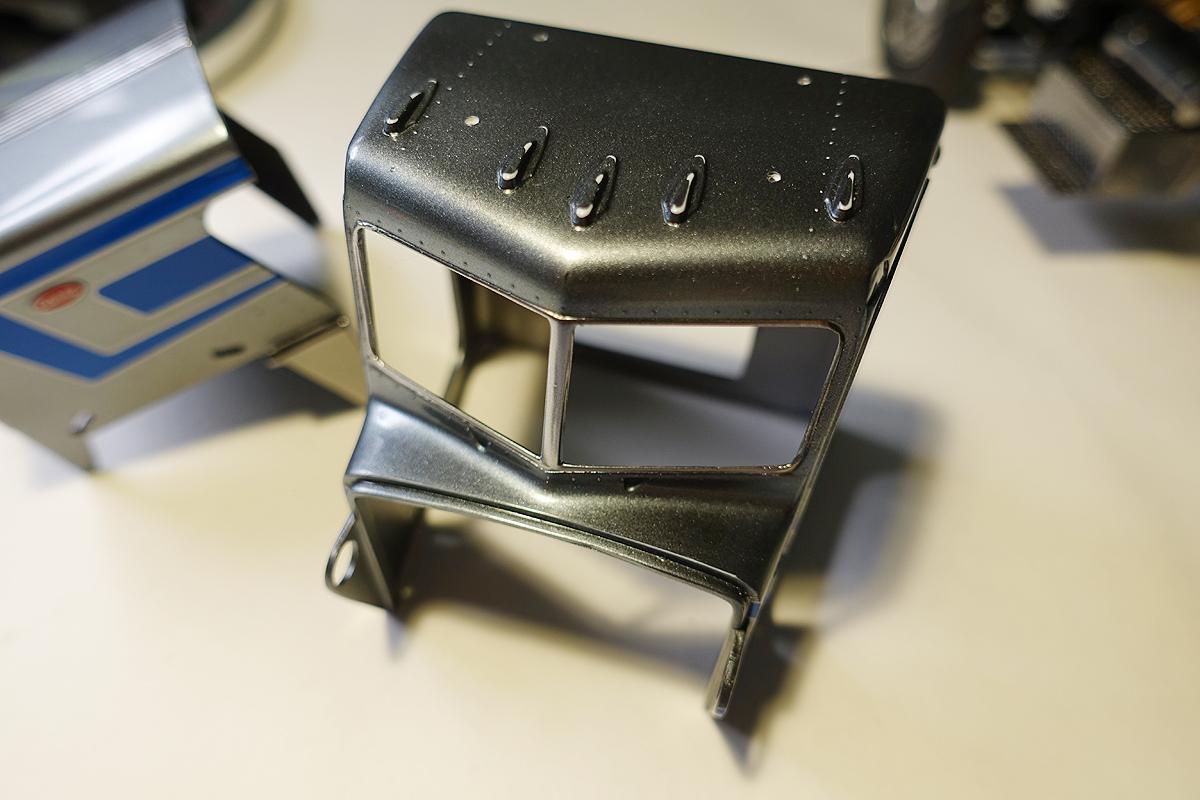
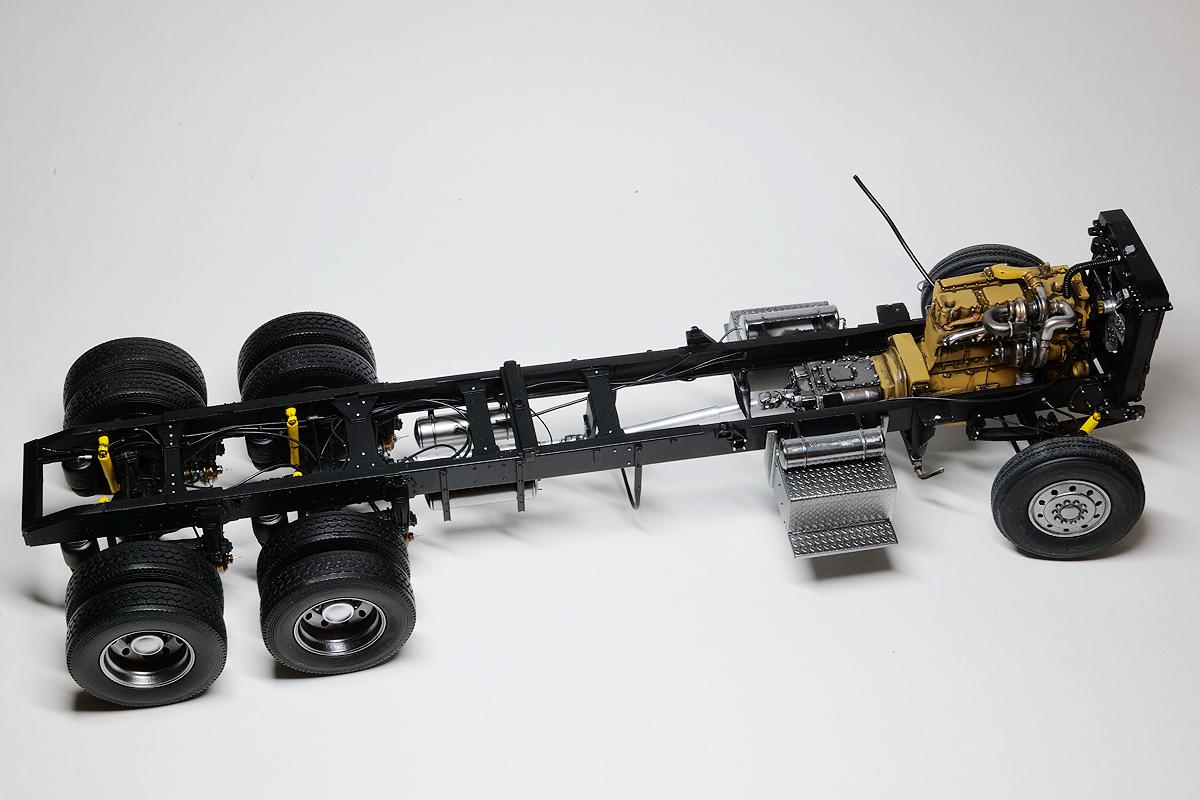
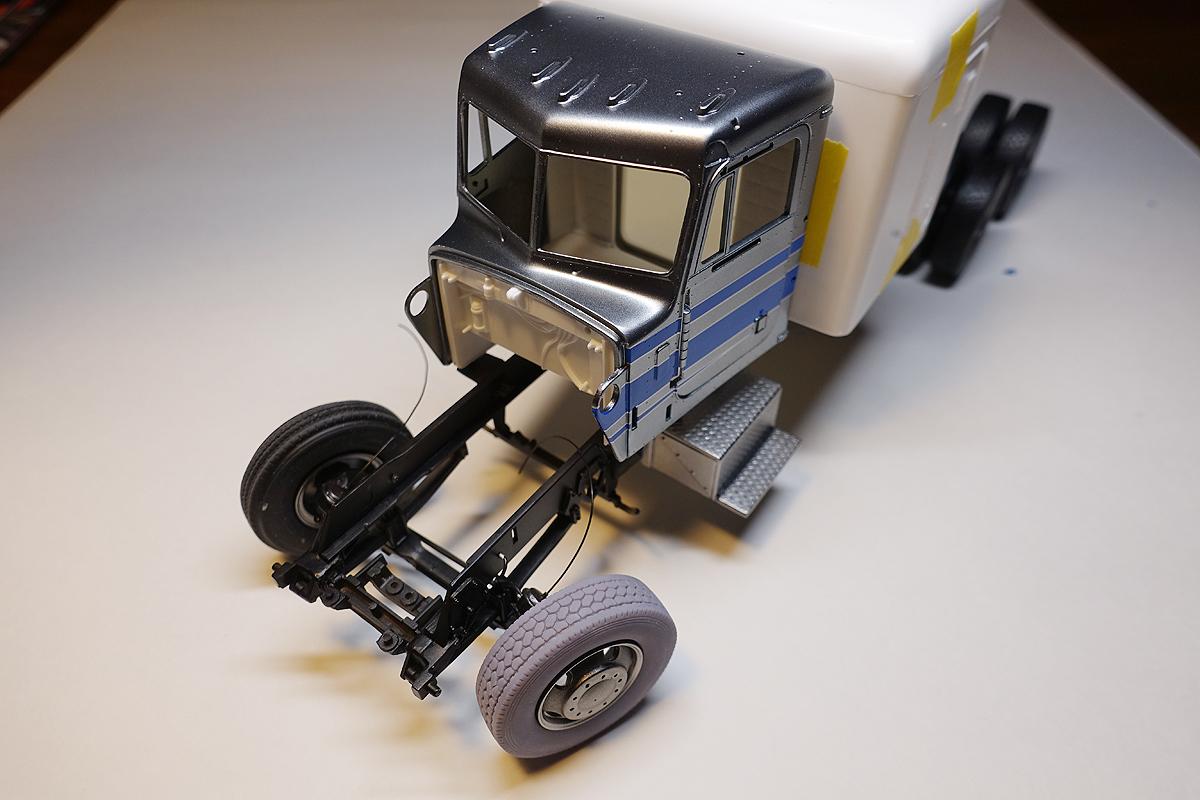
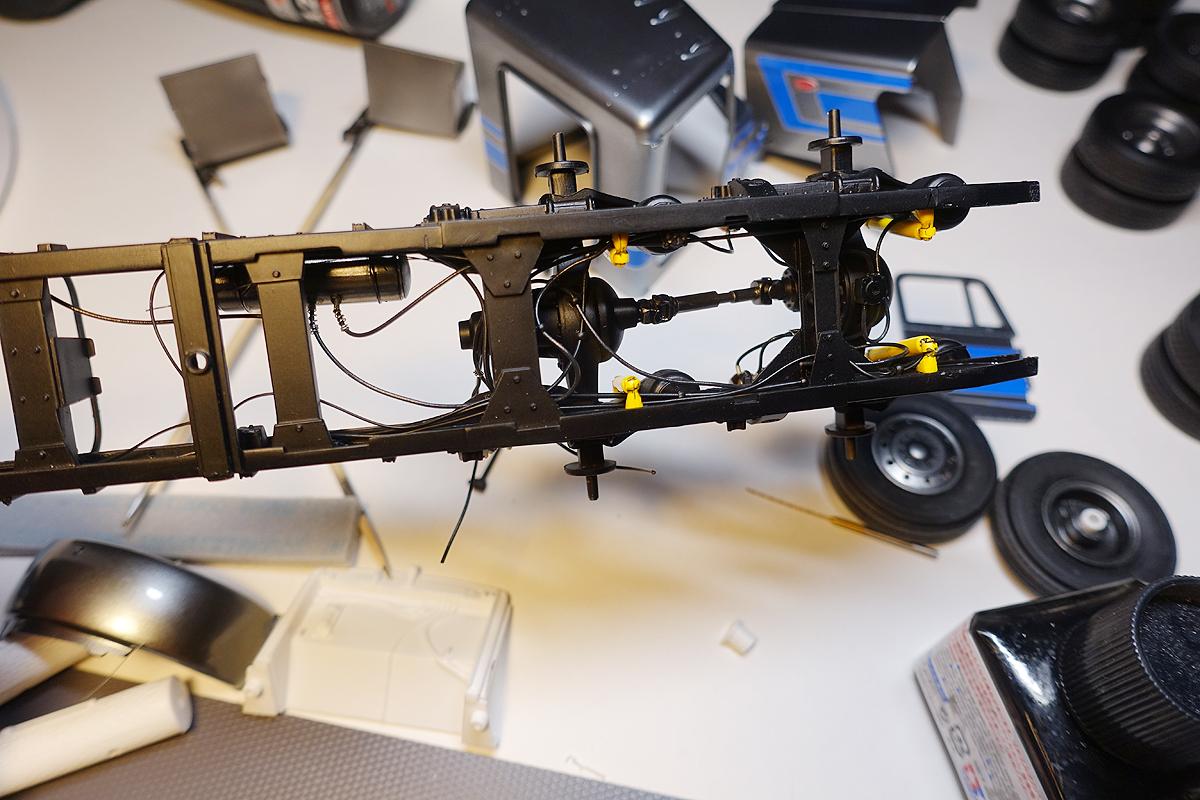
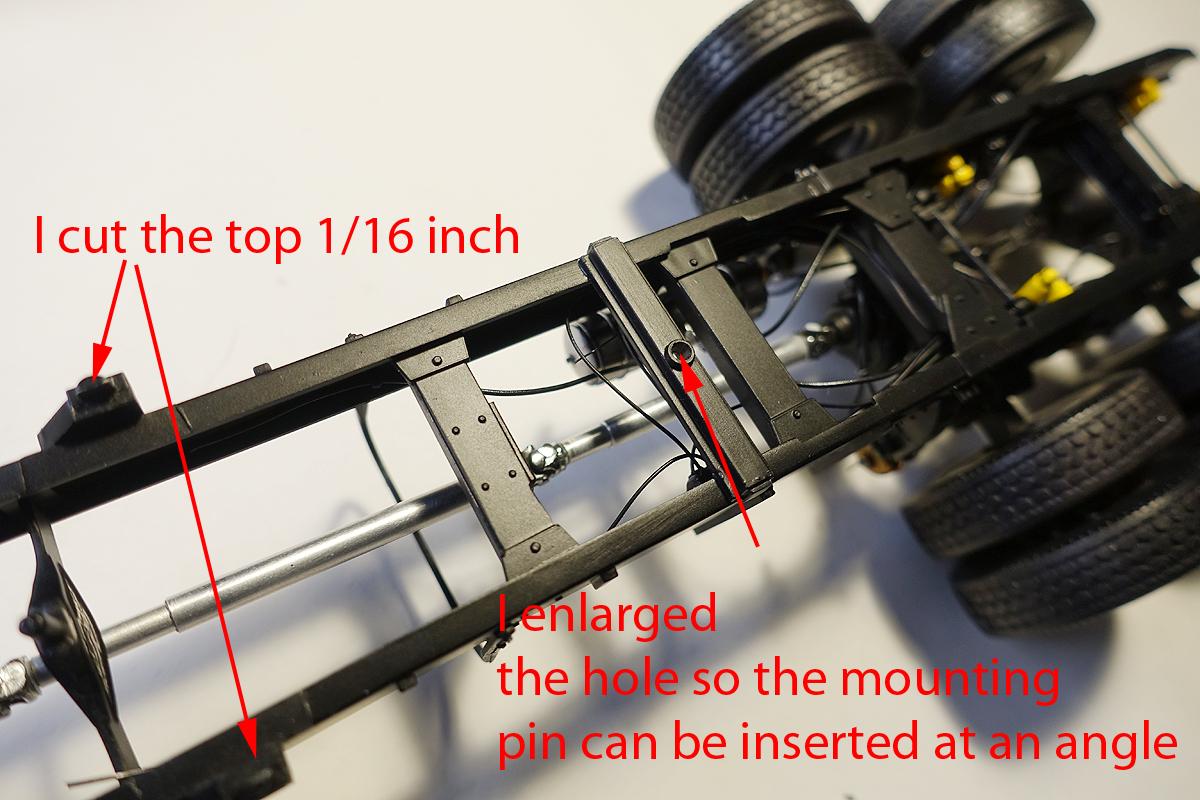
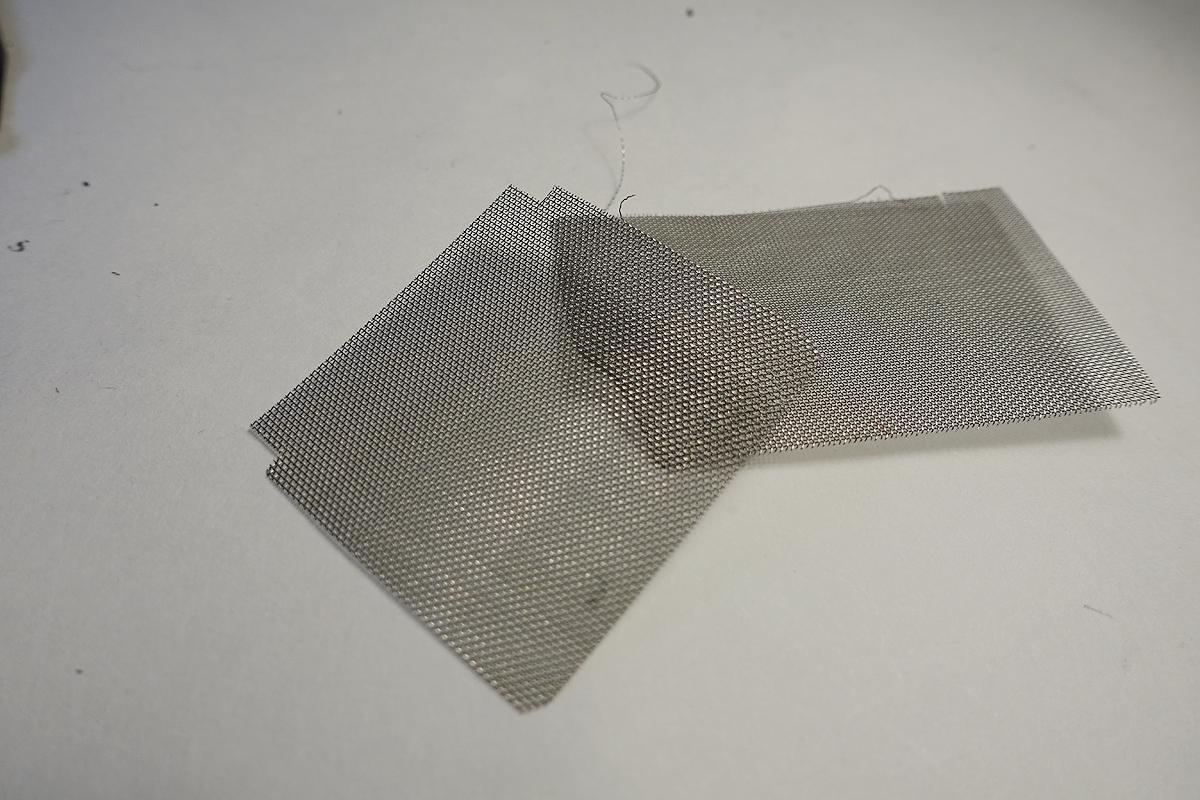
Getting closer, but still going! Doors fit nicely. No rubbing. The kit allows the doors to open and close, but I am hesitant to allow that. "Less moving parts = robust build = less problem" I want this sun visor to be shiny so the surface must be smooth. Unfortunately, the black primer revealed this sink mark that got pushed out from the other side. This type of issue will slow your work and take fun out of building. Another recess spin marking problem on headlights. I want to give some depth to the light housing, so I ended up removing the flat surface. A simple divider panel was made to split the headlight since there are two light bulbs (high and low beam). Again, utilizing parts from beads making, I simulate the headlight bulbs. Painted the inner light housing with silver and using Micro Kristal Klear, I attached the lens. The white residue (shown at the side of the lens) will dry clear! On certain situations, it becomes very beneficial to follow my wife on shopping trips. It was one of those days when I found this. This splatter guard (for frying pan) mesh can be used on grilles. I can probably build at least 10-20 grilles, no problem. And the mesh pattern is better than anything I have seen! Also no painting required. Peterbilt front is looking better now. Semi gloss black coat was applied to the chassis frame and I began attaching sub components that I made earlier. I see the differentials have joint line showing up, but I won't lose sleep over it. I did my best to connect air lines based on several diagrams. I struggled building previous two semi trucks on this, and this is no exception. For certain piping path, I had to hide the end of hoses because I really do not know where they would need to go from one side to the other. Maybe there is information already available and I just can't find it. Another test fitting session here. I don't want any unplanned surprises later. I solved the front track being too narrow, but I cheated. I extended the cap that mounts the front wheel to the hub. Time to mount wheels permanently. This truck will not have rotating wheels. I don't plan to play it around, so the wheels will be positioned and glued on! I noticed that my truck wasn't sitting straight. To be accurate, it is the cab not sitting in parallel. After spending some time figuring this out, I found out that it all started with my sleeper not being correctly assembled. If you recall (hope you do!) from the previous WIP, I mentioned that instructions were somewhat vague on how to assemble the sleeper and I didn't know how to mount the sleeper floor. Those guide tabs NEED to be under the floor. I assembled mine incorrectly. So if you are using this as build reference, please do not do what I did. There were 6 mounting points for the cab/sleeper and the incorrectly assembled sleeper floor altered mounting positions including the height of the last three mounting pins. Due to three mounting points under the sleeper being too tall, it broke the proper geometry of how the cab/sleeper should sit on the frame. This caused the cab to sit at an angle creating uneven gap at the front. To fix this issue, I had to shave off the middle mount points somewhat and the last mounting pin now has a bigger mounting hole. If this is too confusing, then don't be. If you assemble your sleeper floor correctly, you will not see this issue! Thanks for following!
-
You did an excellent job making this good! Looks flawless and high quality! ??? (clapping)
-
My contribution to the GSL Lynx Project the Bertone Mustang
cifenet replied to Len Woodruff's topic in Model Cars
Great finish, looks like it came out of a promo photoshoot!