Radretireddad
-
Posts
521 -
Joined
-
Last visited
Content Type
Profiles
Forums
Events
Gallery
Everything posted by Radretireddad
-
What did you see on the road today?
Radretireddad replied to Harry P.'s topic in General Automotive Talk (Trucks and Cars)
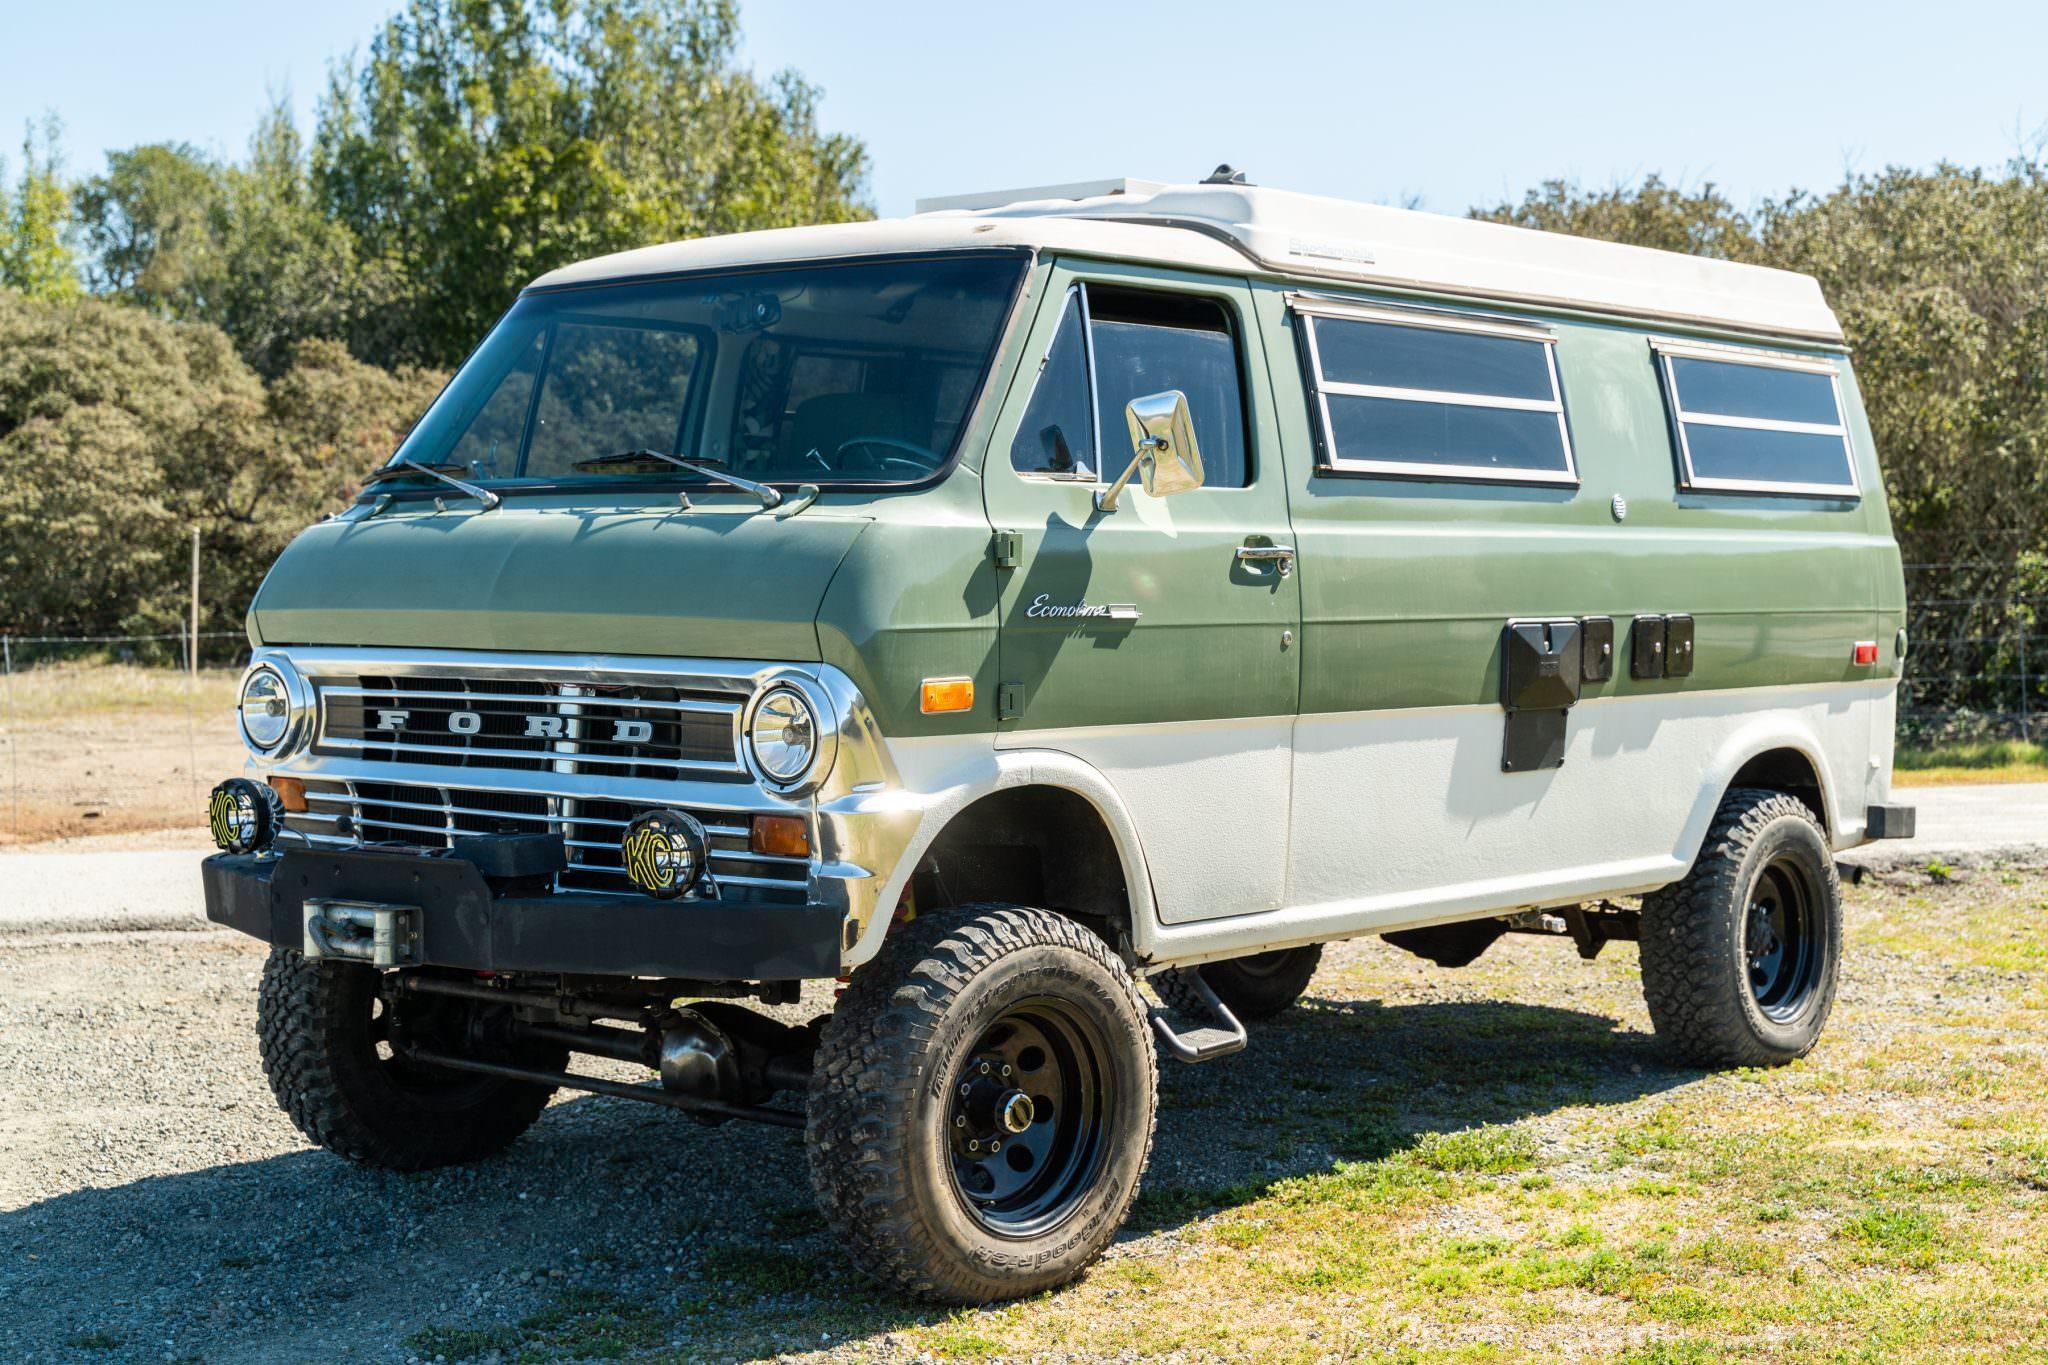
I took my father to see the new F1 movie starring Brad Pitt. It was a totally predictable cringe fest so don’t say you weren’t warned. The coolest thing in the whole movie was the 4x4 Econoline van Brad Pitt drove.
-
😀😃😄
-
All of the pre tooling change versions of the AMT kits in the modified stocker series would be great!
-
Very cool, very cool! Looks like our benefactors at Round2 are indeed listening closely. I need a Jeepster and the S10 extreme, although not a super high priority for me, now needs to take its place alongside the rest of the versions in the series sitting on my shelf. The lace side panels on the Riv almost look like snakeskin. Is the custom ‘57 Vette based on the good Mueller era stock fuelie version?
-
2025 Release of the Revell Chevrolet S-10 Lowrider
Radretireddad replied to Jonathan's topic in Truck Kit News & Reviews
I’ve got a complete, unstarted S10 waverider kit that I have no idea why I bought it or what to do with it. I must have been a little too into the ‘90’s sport truck trend at the time because now I think it’s pretty ridiculous looking. I’m suddenly thinking about maybe combining it with the Syclone parts in the current S10 reissue to make a wacky west coast style 11 second customized matching tow vehicle for the waverider jet ski that came in the Silverado kit set I have. -
When the project dies. Or does it?
Radretireddad replied to Jantrix's topic in Model Building Questions and Answers
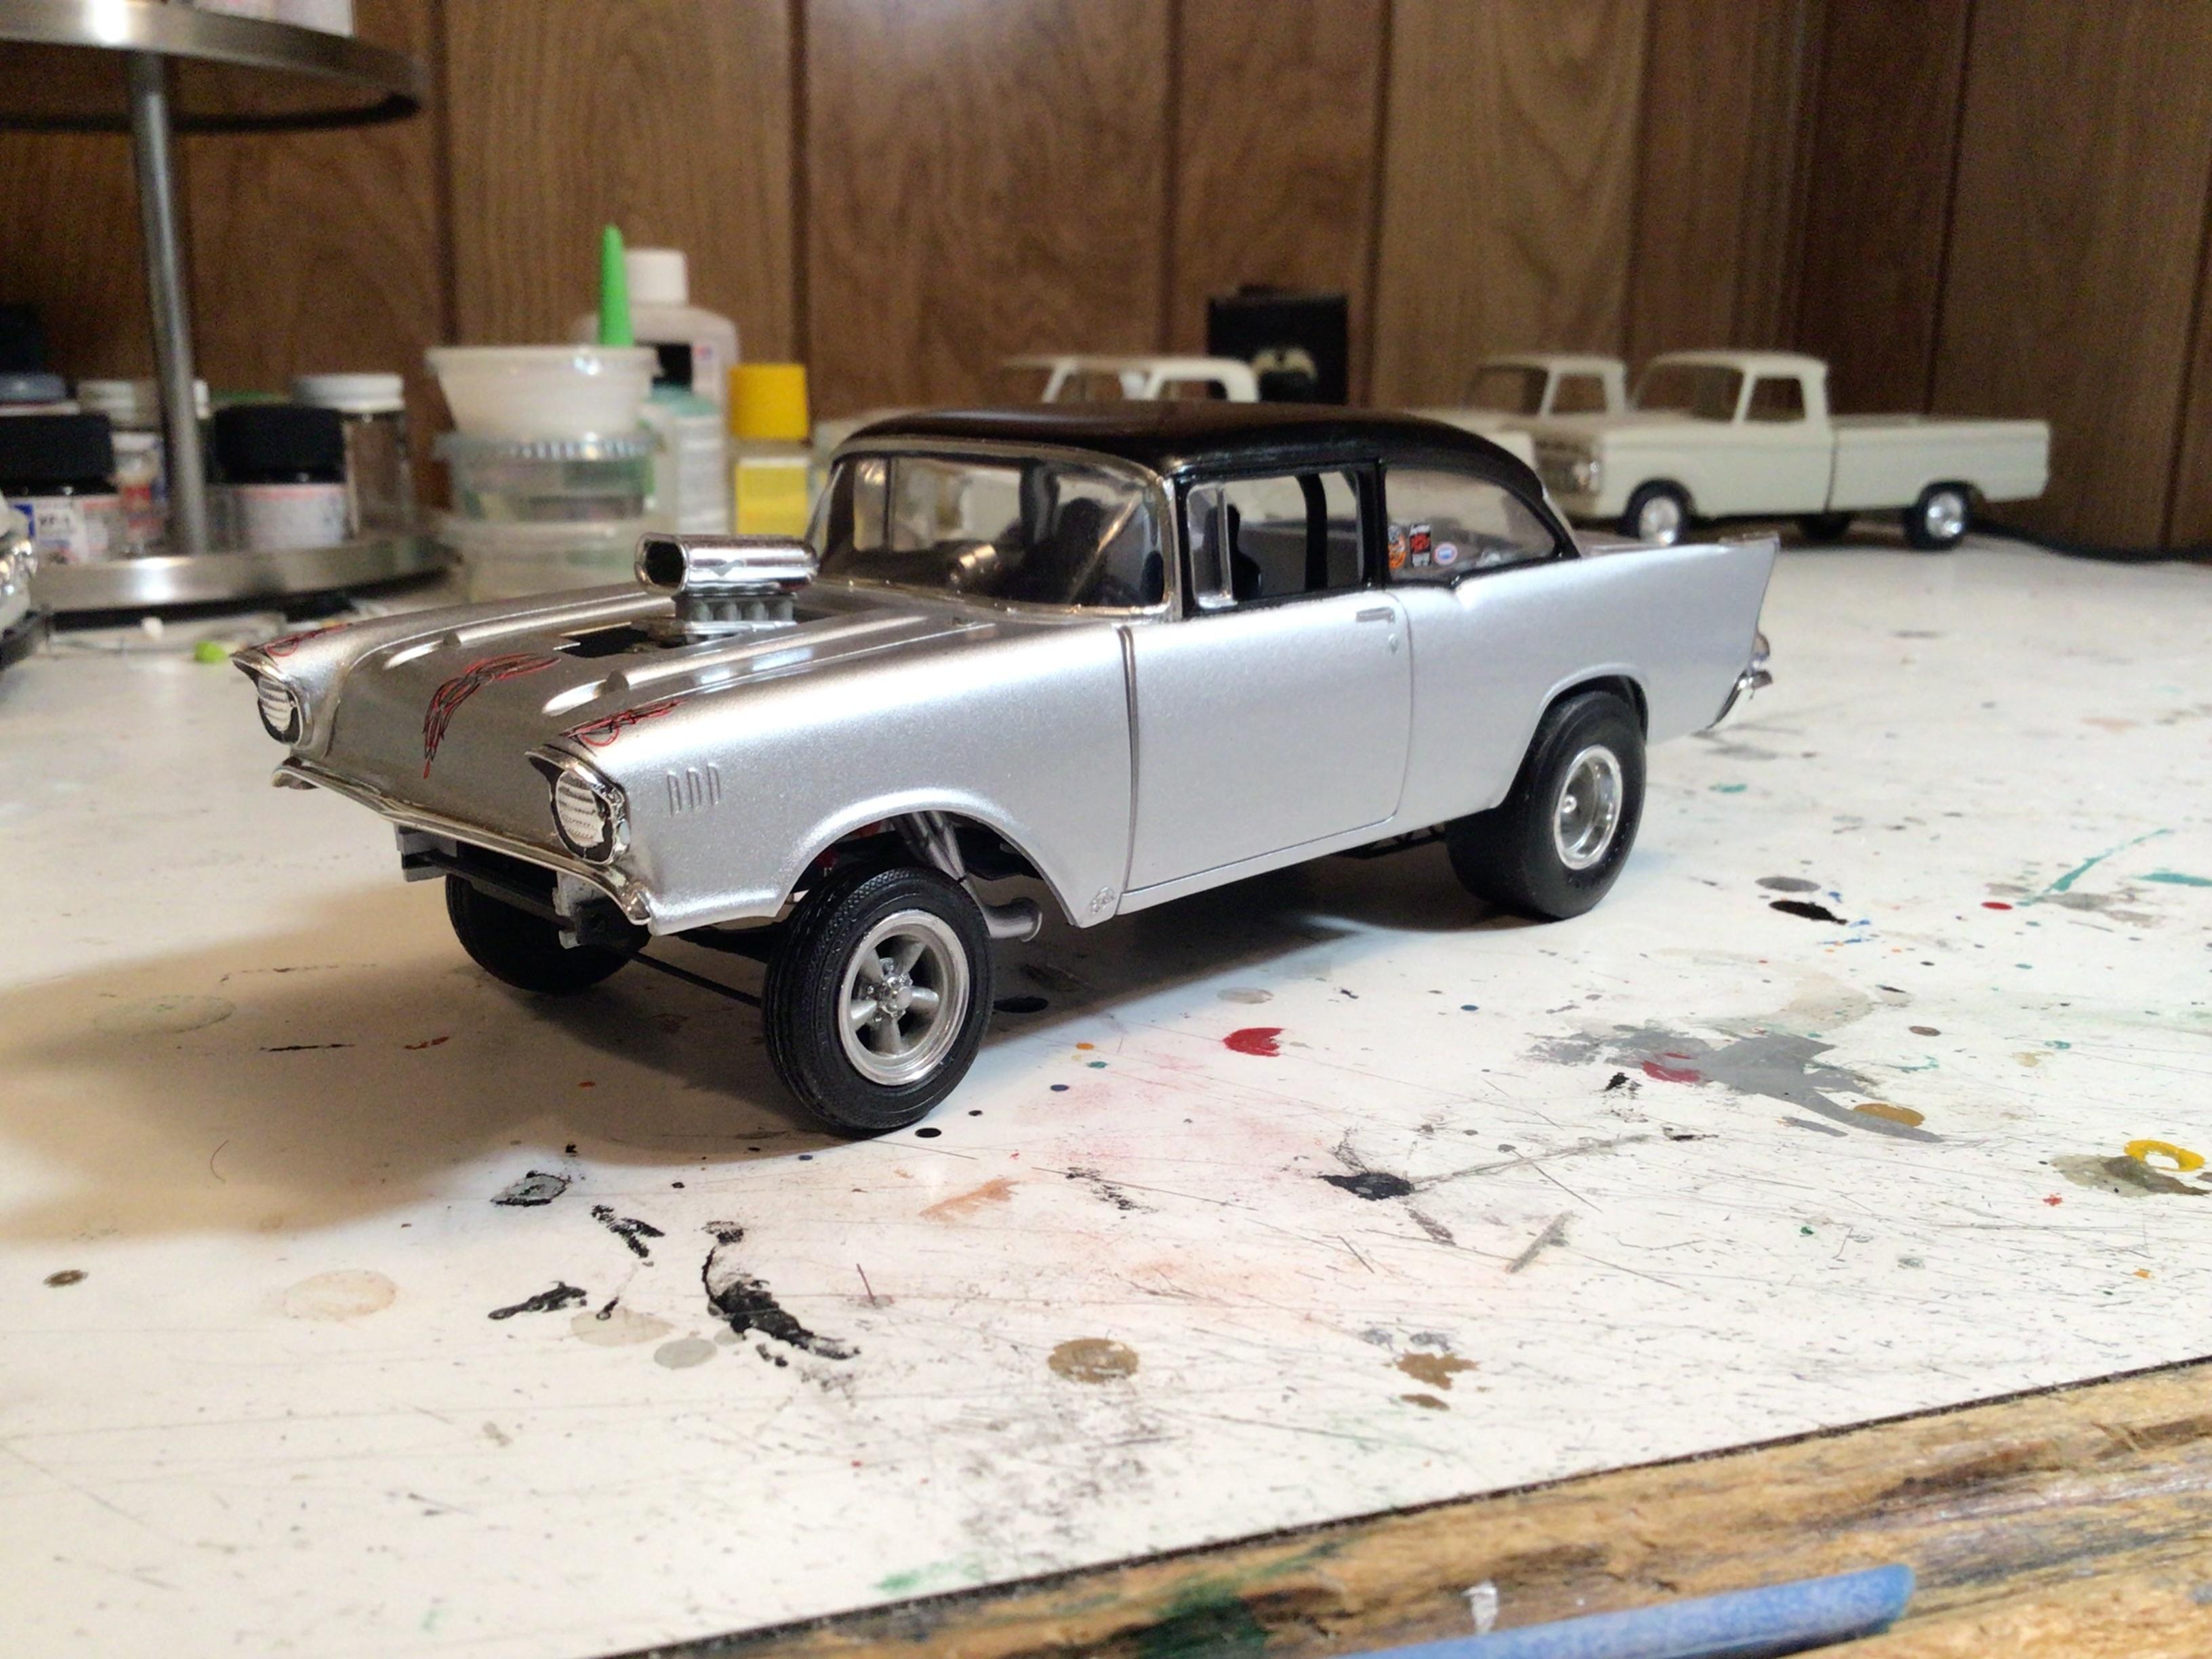
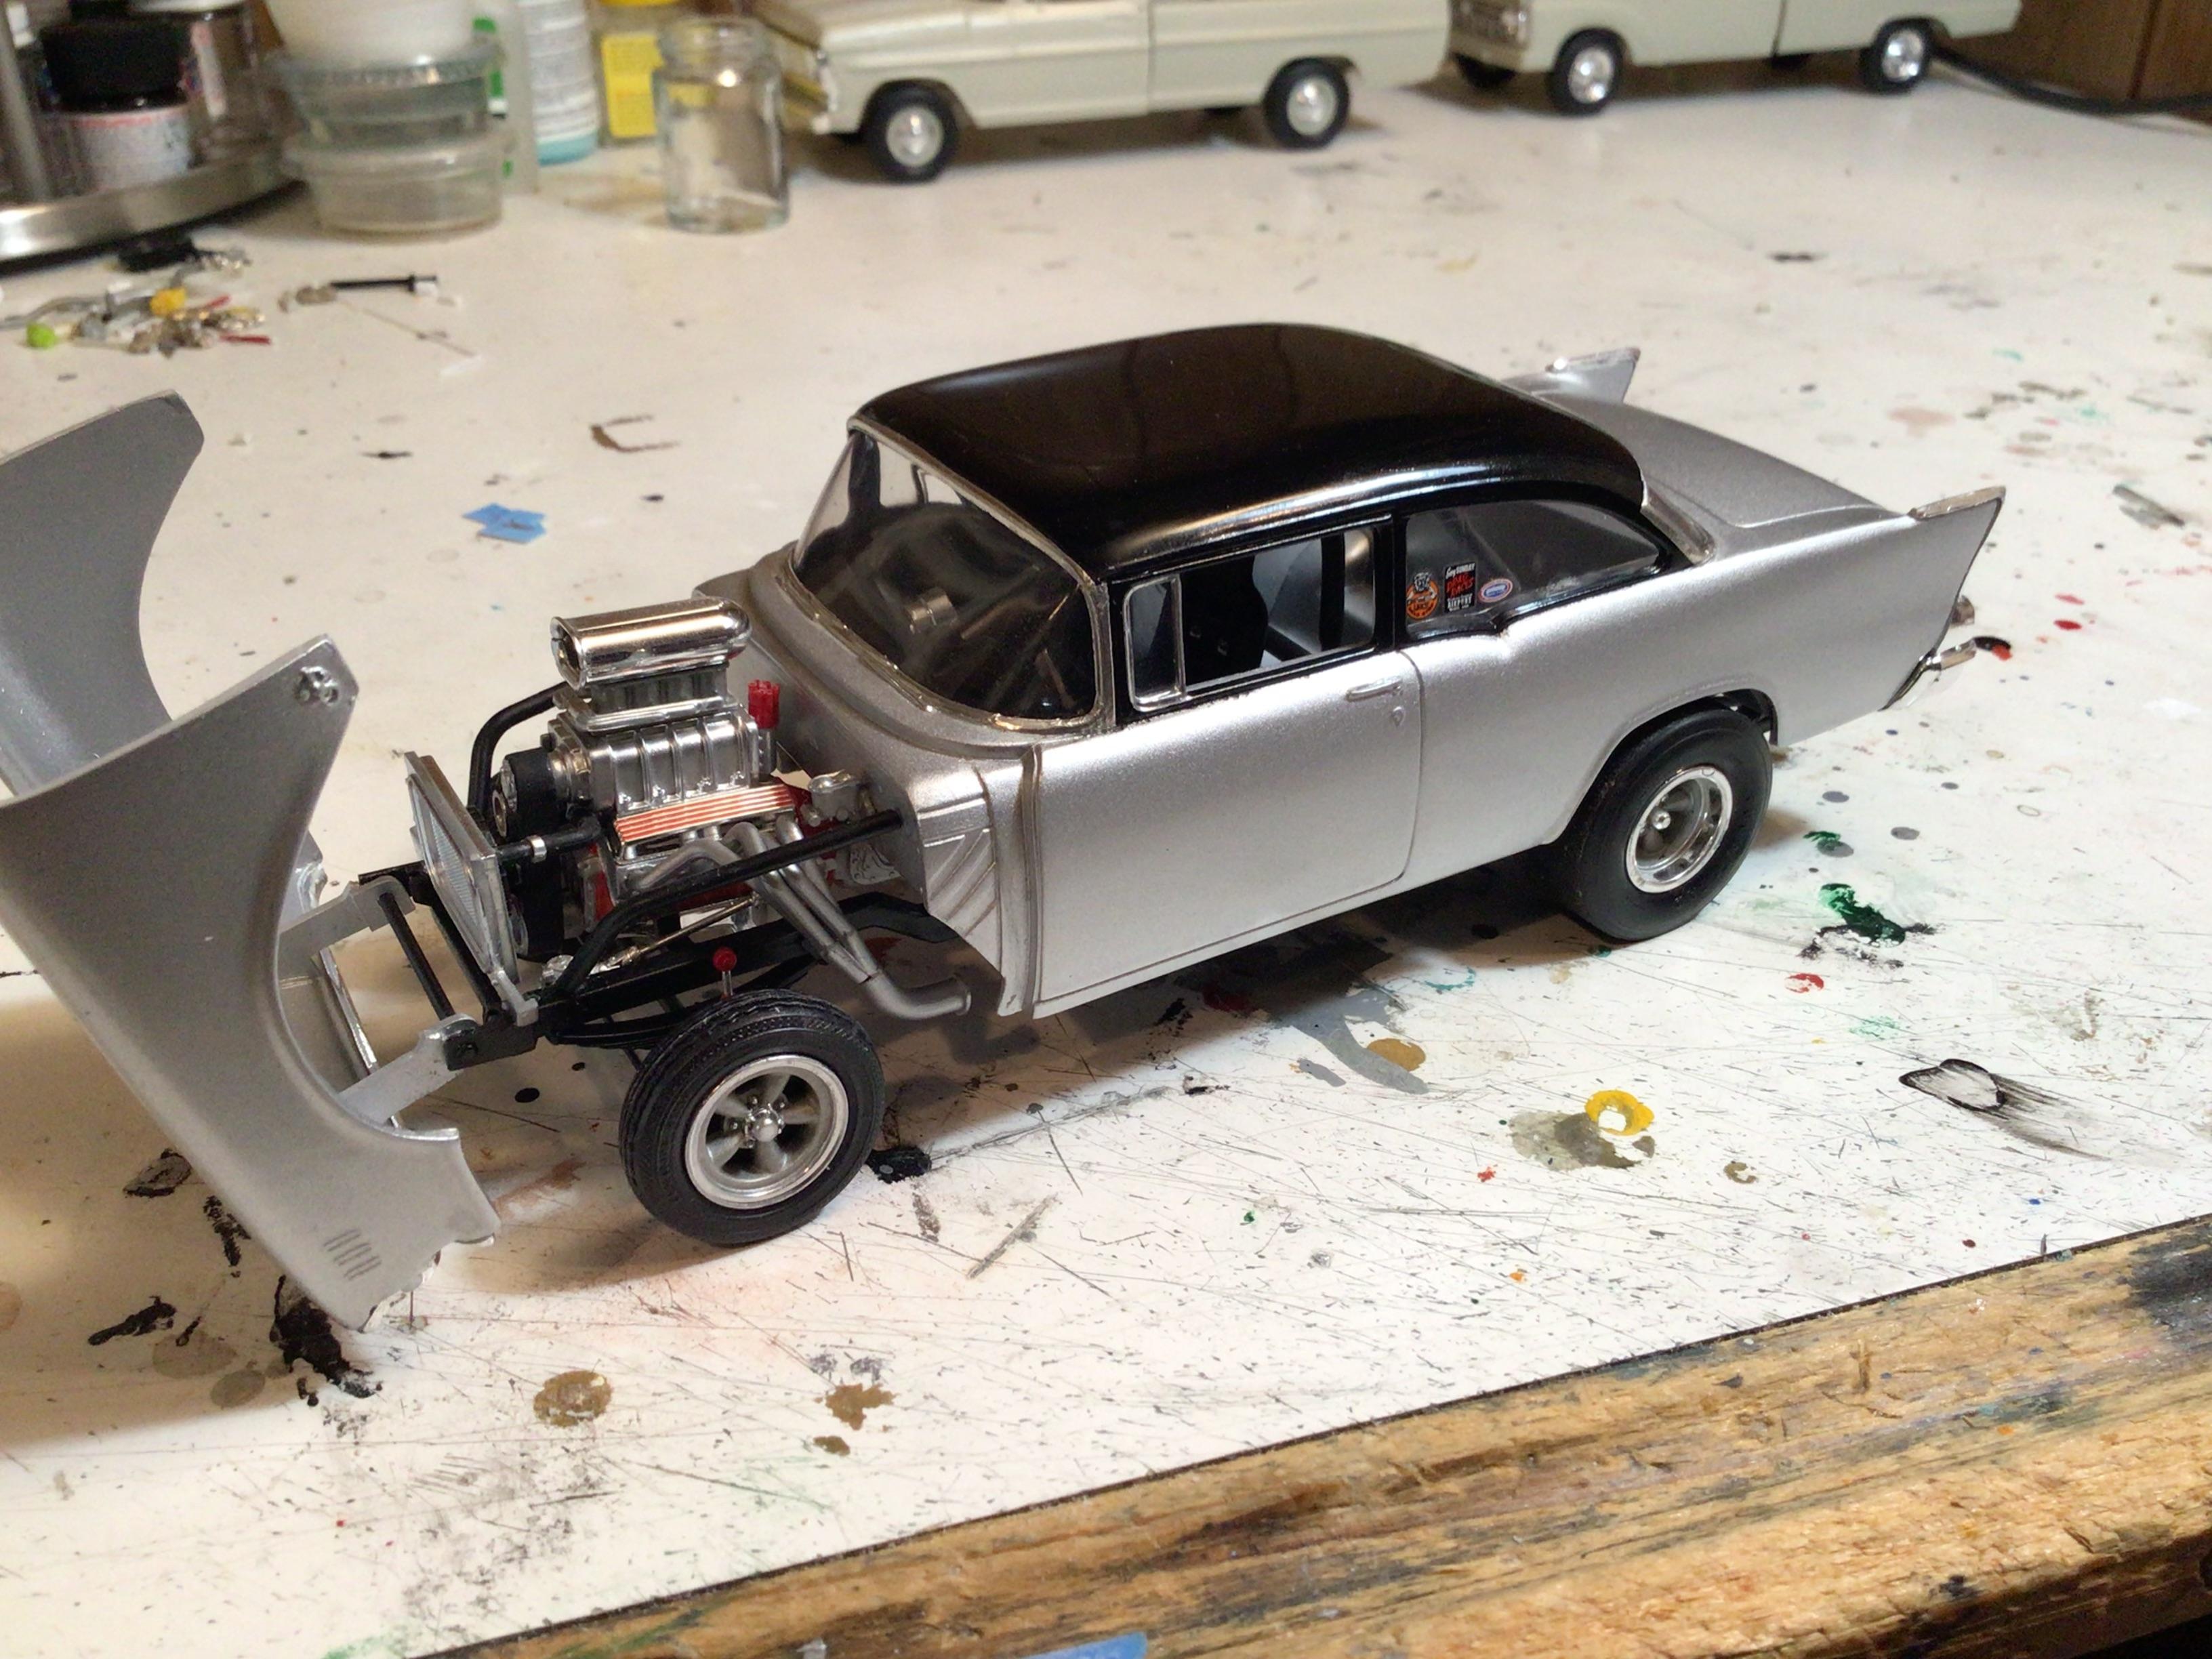
One of the very first builds I did when I returned to the hobby two years ago was this ‘57 gasser that I mentally conceived around the time the original Spirit of ‘57 kit was first released. I found exactly what I needed to complete the drivetrain and suspension in the Moebius ‘65 Nova kit so I bought it and jumped right in. It turned out to be way more involved than I imagined but I forced myself to complete it before starting another build. Even though it now stands as a reminder of what patience and determination can accomplish, I’m not likely to ever attempt anything this involved again. I do rotate most builds over time through various stages as my interests and tastes dictate but as of today I have only one previously started project that is teetering on the save/scrap threshold. Everything else I’ve started I fully intend to finish at some point in the future.
-
Best approach to painting these wheels?
Radretireddad replied to Monty's topic in Model Building Questions and Answers
I’d spray the entire wheel with testors chrome silver and then brush a light coat of Tamiya flat clear into the recesses. -
Where did you hear about this?
-
I completely agree. The engine in the Revell kits are better but are also too wide to properly depict a 289/302. They look more like a 351W. Your assessment of the Revell body is also spot on. It’s good but something is not quite right. I’ve already started a kit bash of the R2 ‘66 notchback and ‘67 GT and I’d prefer to do the same with the newer Round2 GT and Shelby fastbacks versions, but having to spend upwards of $60 over the cost of the base kits for two more parts kits is cost prohibitive for me at the moment.
-
Ok then. I wasn’t aware those versions existed so I stand corrected. Thanks for posting that.
-
All true, but if one specifically wants a ‘66 GT350 the only two options are the new Round2 kit or the Revell GT350H which would require different wheels and decals to duplicate the Round2 kit. Revell really needs to reissue that ‘65 kit with those wheels.
-
It features the chassis and engine from the original AMT 1966 notchback kit which is outdated and inaccurate. The Revell kits are better in this area but overall the kits outward appearance is still quite good. IIRC the Only 66 Shelby in the Revell series is a GT350H. You could make the case for preferring it to the Revell 1/24th scale series.
-
Moebius 1/25 1964 Mercury Comet K-code
Radretireddad replied to Justin Porter's topic in Car Kit News & Reviews
I caught these test shots at Pegasus hobbies in a recent YouTube vid. Looks really good! Sorry for the sketchy quality. Credit to Red Hill Rod & Kustom for the video. Here’s the link. There’s also shots of the B/FX ‘65 Comet and 1970 Ramp truck.
-
That’s awesome as well Steve. My dad has finished the Lego Taj Mahal kit and the Lego solar system kit and is currently working on the Lego riverboat kit which has 4000 pieces. Happy building!
-
I’m pretty discriminating in what I’ve been collecting and my modest stash currently has maybe 125 or so kits. Before I retired last year, I updated it with 15 or so new kits released during the years family obligations required me to set the hobby aside. Barring a miraculous release of a bunch of desirable newly tooled kits, I can count the number of upcoming kits I plan to buy on one hand. The only other kits I’d like to have are the ones needed to fill all the holes in my annuals collection and as you can imagine are highly collectible and very expensive so I’m not concerned about having too many of those. Will I be able to finish everything I have? Only if the Lord allows me an abundance of days enjoying the same good health I’m currently in. My dad is 93 and still enjoys building pretty complex Lego kit’s so I’ll take that as a favorable sign.
-
HPI Guy's '66 Shelby GT350 Video
Radretireddad replied to Tim W. SoCal's topic in Car Kit News & Reviews
I appreciate the upgrades Round2 has given these two kits over the original coupe which wasn’t bad either. It’s just that those upgrades still can’t compensate for such a woefully outdated and inaccurate chassis and engine. The cost of new kits has me rethinking the number of future kit bashes I’d like to do but for me these guys almost demand the better chassis and drivetrain from the Mueller era ‘67 to compliment their body and interior updates. Since there are better Revell versions of the Shelby (yes I’m aware it’s an GT350H) and the GT fastback, it’s even harder to justify the additional expense for AMT renditions. -
Just a few AMT kits coming this year !!
Radretireddad replied to Mr mopar's topic in Car Kit News & Reviews
Recalling recent posts from Sir Goldman, I can’t help thinking and hoping round2’s upcoming releases are building up to bigger things so I keep waiting for the other shoe to drop. This revelation has me thinking my limited summer hobby budget will be spent on what’s in my garage and not what’s at the LHS. -
Painting Script ?
Radretireddad replied to Jon Haigwood's topic in Model Building Questions and Answers
Prime the tailgate in whatever color you want the lettering to be and color coat over it with the body color. When it dries, lightly sand or scrape the top coat away on the raised script to reveal the color underneath. That’s what I did here.
-
Columbia Overdrive
Radretireddad replied to sidcharles's topic in Model Building Questions and Answers
I love the vintage look an old banjo rear end presents. Is it possible to set up an old banjo rear end to run reliably in daily use behind modest power levels and at modern freeway speeds? -
HPI Guy's '66 Shelby GT350 Video
Radretireddad replied to Tim W. SoCal's topic in Car Kit News & Reviews
True, but with Round 2, I’m thinking this is as good as it’s going to get. -
HPI Guy's '66 Shelby GT350 Video
Radretireddad replied to Tim W. SoCal's topic in Car Kit News & Reviews
So we’ve waited how many years to finally get the rest of the kit to match the wheels? -
What is your favorite sports car?
Radretireddad replied to WillyBilly's topic in General Automotive Talk (Trucks and Cars)
My father also restored and drove a ‘62 big Healy. I remember being with him the night he bought it off a used car lot in Houston in the mid sixties. Anytime he went out in it my brother and I always wanted to ride along. I remember asking my dad why everyone stopped and stared when we drove by. He sold it right after he bought the E-type and we both still regret not keeping it but we only had enough room for one toy at a time. -
I’m sensing that square body GM’s are definitely trending strongly. I would love to see more love and attention given to them by kit makers.
-
What is your favorite sports car?
Radretireddad replied to WillyBilly's topic in General Automotive Talk (Trucks and Cars)
Well, for me it has something to do with the fact that the one in my garage has been in my family since I was 8 years old (I’m 65 today) and was lovingly restored mostly by my father. I can confidently say that even though there may be a few other more desirable cars than my E-type, I would trade it for exactly none of them. I’d venture most others wouldn’t either. -
If you’re going to use the front axle that comes with the kit, you can drill out the center of the wheels and use a small machine screw on each side to eliminate the exposed metal axle. The stock center caps cover the screw heads.